1
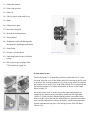
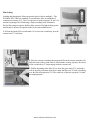
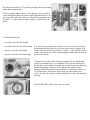
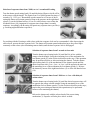
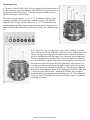
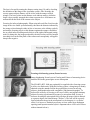
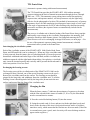
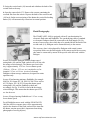
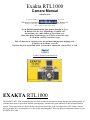
Exakta RTL1000
Camera Manual
posted 12-8-'02
This camera manual library is for reference and historical purposes, all rights reserved.
This page is copyright by
, M. Butkus, N.J.
This page may not be sold or distributed without the expressed permission of the producer
I have no connection with any camera company
If you find this manual useful, how about a donation of $3 to:
M. Butkus, 29 Lake Ave., High Bridge, NJ 08829-1071
and send me your e-mail address so I can thank you.
Most other places would charge you $7.50 for a electronic copy
or $18.00 for a hard to read Xerox copy.
This will allow me to continue to buy new manuals and pay their shipping costs.
It'll make you feel better, won't it?
If you use Pay Pal, use the link below. Use the above address for a check, M.O. or cash.
To main Chinon/Ricoh manual site
EXAKTA RTL1000
The EXAKTA RTL 1000, maintaining the use of the world-renowned quick-change bayonet and offering plenty of
valuable innovations to up-to-date miniature photography, continues the great traditions of this high-performance
camera. These innovations are based on the well-approved principle of the true single-lens reflex camera with its
always parallax-free correspondence of reflex image and photograph. These are the most important features of your
EXAKTA RTL 1000:
4.butkus.org
Simple arrangement of all operating controls. Interchangeable viewfinder systems: Finder Hood, Penta Prism, one
TTL Penta Prism for the automatic exposure timing with internal measurement, the lens being stopped down or fully
opened. Focal-plane shutter made of metal laminate and destined for the complete series of shutter speeds from 8
seconds to 1/1000 second, 1 second to 1/1000 second with built-in delayed-action release. B setting for any long
shutter speeds. Right-hand and left-hand release. Quick tensioning with a 30° preliminary elevation for series of
photographs. Instant return mirror. Synchronizing switch for electronic flash units and flashbulbs: electronic flash
units being synchronized with approximately 1/125 second, fast-burning flashbulbs with 1/30 second. Automatic film
loading system with free selection of film. Frame counter automatically returning to its initial position. Rewind
release catching in interchangeable lenses with original EXAKTA quick change bayonet and automatic diaphragm
mechanism with internal r4lease. On the left-hand release there can be employed any earlier EXAKTA lenses with
automatic diaphragm mechanism. Accessories for any field of application.
We are delighted that you have chosen an EXAKTA RTL 1000 Contents
and we wish you every success with your new camera. We
Page
Operating controls of the
EXAKTA RTL 1000
4
Preparations for use
6
Film loading
7
Operating the shutter
11
Operating the lens
15
Using the Finder Hood
22
Using the Penta Prism
24
Using the TTL Penta Prism
26
would like to advise you, however, to read this instruction
manual carefully before you start using your camera. In this
way you will obtain the greatest possible service from it, since
you will eliminate from the outset the possibility of operating it
incorrectly, and possibly damaging the mechanism. The
EXAKTA RTL 1000 is a high-quality precision instrument
which can naturally only be expected to answer all your
requirements when it is always hand led correctly.
Interchanging the viewfinder
systems
27
Exchanging the focusing screen
27
Changing the film
28
Flash photography
30
Care of the camera and its
accessories
32
Accessories
cover
www.orphancameras.com
Operating controls of the EXAKTA RTL 1000
1 = Tensioning lever of mechanism for low shutter speeds
2 = Shutter-speed setting knob for 2 seconds to 8 seconds
(mechanism for low shutter speeds)
3 = Release knob of preset timing
mechanism (relayed-action release)
6 = Eyelets for carrying strap or cord
7 = Frame counter
8 = Film-type reminder disc
9 = Rapid-wind lever
10 = Shutter-speed setting knob for second to 1 second
and B setting
4 = Release lock on the right-hand
release
11 = Finder hood
5 = Right-hand release
12 = Red aligning dot on the camera
(for lens changing)
13 = Red aligning dot on the lens
(for lens changing)
14 = Rewind crank with knob and fixture
for attaching the accessory shoe
15 = Film-sensitivity reminder ring
16 = Left-hand release (with connection
for cable release)
17 = Aperture-setting ring
18 = Depth-of-field scale
19 = Lens locking lever
20 = Flash nipple
21 = Distance-setting ring
22 = Lens
23 = Knob for stopping down the lens
24 = Knob for opening the finder hood
25 = (Swing-up) focusing magnifier
26 = Cover of finder hood
27 = Rewind arbor (with carrier)
28 = Cassette chamber
29 = Film channel
30 = Film gate
www.orphancameras.com
31 = Film-guide runners
32 = Film-wind sprocket
33 = Film rest
34 = Take-up spool (with catch bows)
35 = Mark
36 = Film-pressure plate
37 Camera back (hinged)
38 = Rewind declutching button
39 = Tripod thread
40 = Diaphragm switch (for disengaging
the automatic diaphragm mechanism)
41 = Penta Prism
42 = Eyepiece of Penta Prism
43 = Unlocking knobs for the viewfinder
system
44 = Driver pin for the coupling of the
TTL Penta Prism (page 26)
Preparations for use
The Finder Hood (11) is opened by pressing on the knob (24). To close
the hood, press the cover of the Finder Hood (26) backwards until it locks
in position. The focusing magnifier (25) can be swung either forward into
the position of rest in the cover of the Finder Hood (26) or backwards into
the working position. For further information on the use of the Finder
Hood see page 22.
Swing the release lock (4) to the stop on the right (marking dots ore
staggered): the shutter can be released by pressing on the right-hand
release (5). When you have finished taking pictures, swing the release
lock (4) to the stop on the left (the marking dots are opposite each other) :
now it will be impossible to release the shutter, which means protection
against unintentional exposures. (No locking in case of the left-hand
release (16))
Film loading
Loading and changing the film must not take place in direct sunlight! -- The
EXAKTA RTL 1000 uses standard 35 mm miniature film, in standardized,
commercial cassettes of 12, 20 or 36 exposures, to make negatives 24 mm x 36
mm the beginning of the film having a shape according to the illustration.
Perfect film transport requires faultless film cassettes. Daylight loading spools
should only be inserted in capsules made by the same manufacturers.
1. Pull out the knob of the rewind crank (14) as far as the second stop: now the
camera back (37) will open.
4.butkus.org
2. Place the cassette containing the unexposed film in the cassette chamber (28).
Push the knob of the rewind crank (14) backwards, twisting it gently: the carrier
of the rewind arbor (27) must engage with the cassette core.
3. Pull the beginning of the film (29) as far as the green mark (35), and push it
with its (lower) perforation from above under the film rest (33) and, accordingly,
over the film-wind sprocket (32). The catch bow of the take-up spool (34) must
not stand upwards!
www.orphancameras.com
4. Closing camera back (37) by pressing it lightly home, the locking
taking place automatically.
5. Now swing the rapid-wind lever (9) right up to its stop and let it
return. Release the shutter by means of the right-hand release (5) or
by means of the left-hand release (16). Repeat these operations until
the figure "1" in the automatic frame counter (7) will be below the
mark.
= black-and-white film
= reversible color film for daylight
= reversible color film for artificial light
= negative color film for daylight
= negative color film for artificial light
6. A special setting of the frame counter is not necessary since the latter,
springing automatically back as soon as the camera back is opened, will
begin to operate when the camera back is closed. -- Afterwards the frame
counter will indicate the number of photographs already taken on the film
placed in the camera.
7. When film is loaded, set the film-type reminder disc (8) and the filmsensitivity reminder ring (15) as reminders of the type and sensitivity of
the film that is in the camera. Turn the disc and the ring in either direction
until the appropriate references will be opposite the orange-colored
triangles. On the film-sensitivity reminder disc (15) the figures from 9 to
33 are DIN values, whereas the figures from 6 to 1600 denote ASA
values. The film-type symbols on the reminder disc (8) have the following
meaning:
The EXAKTA RTL 1000 is now ready for action!
Operating the shutter
1. The shutter is tensioned and the film wound on by operating the rapid-wind
lever (9). This lever should always be swung right up to its stop, and will then
spring back of its own accord. -- The tensioning of the shutter and the
transportation of the film are coupled (avoiding unintentional double exposures
and blank frames). It is impossible to release the shutter before it has been fully
tensioned and the film wound on. It is also impossible to release the shutter in
intermediate positions of the rapid-wind lever (9).
In order to enable users to work in quick succession e.. g. in case of series of
photographs) the rapid wind lever (9) can be employed with preliminary
elevation: intermediate position at approximately 30" after the position of rest.
2. The image in any of the viewfinder systems (Finder
Hood, Penta Prism, and TTL Penta Prism) will be visible
even after the shutter has been released (instant return
mirror). The red warning signal in the image in the
viewfinder system indicates that the camera is not yet
ready for action, and that the rapid-wind lever (9) must be
cocked before the shutter is ready for release (See
illustration: image seen through the Penta Prism).
3. Setting the shutter speeds.
You will safely succeed in taking photographs with shutter
speeds from 1/1000 second to 1/30 second (white figures
on the shutter-speed setting knob (10) "by hand", i.e.
without the use of a tripod. For any exposure times from
1/15 second to 1 second (orange-colored figures on the
shutter-speed setting knob (10) and for still longer
exposure times with the B setting, the camera should be
screwed on to a tripod and a cable release be employed.
Tripod thread (39) at the bottom of the EXAKTA RTL 1000, thread for the cable release in the left-hand release (16).
All setting operations can be effected before and after tensioning the shutter.
www.orphancameras.com
Selection of exposure times from '/1000, sec. to 1 second and B setting
Turn the shutter-speed setting knob (10) until the desired figure or the B will be
at the orange-colored triangle. The figures from 2 to 1000 represent fractions of
seconds (e. g. 1/125 sec.). Intermediate speeds cannot be set. In case of the B
setting the shutter will remain opened as long as the pressure on the right-hand
release (5), on the left-hand release (16) or on a cable release screwed into the
left-hand release (16) (important for exposure times longer than 8 seconds)
continues. Accordingly, the B setting will permit any exposure times you like (e.
g. for taking night and indoor exposures).
4.butkus.org
For working with the B setting a cable release with time-exposure lock can be recommended: After depressing the
cable release, operate the time exposure lock. The shutter will remain opened without having to keep ones finger
constantly on the release (also eliminating camera shake) until the time-exposure lock is disengaged.
Selection of exposure times from 2 seconds to 8 seconds
Turn the shutter-speed setting knob (10) until the B is in line with the
orange-colored triangle. Swing the tensioning lever of the mechanism for
low shutter speeds (1) in the clockwise direction to the stop. (This operation
may be performed before or after tensioning the shutter). Turn the shutterspeed setting knob (2) of the mechanism for low shutter speeds until the
desired exposure time (2 sec., 4 sec.. or 8 sec.) will be opposite the mark on
the tensioning lever of the mechanism for low shutter speeds (1). Release
the shutter by means of the right-hand release (5) or of the left-hand release
(16).
Selection of exposure times from 1/1000 sec. to 1 sec. with delayedaction release
Turn the shutter-speed setting knob (10) until the desired exposure time will
be opposite the orange-colored triangle Swing the tensioning lever of the
mechanism for low shutter speeds (1) in the clockwise direction to the stop (
tension the preset timing mechanism; this operation may be performed
before or after tensioning the shutter).
Release the shutter only with the release knob of the preset timing
mechanism (3). Exposure will take place after 8 seconds.
Operating the lens
1. The lenses of the EXAKTA RTL 1000 are equipped with internal release of
the fully-automatic pressure diaphragm. Select the desired aperture number by
turning the aperture-setting ring (17): the desired aperture number must be
opposite the orange-colored triangle.
The smaller aperture numbers, e. g. f 1.8. 2, 2.8, 4 indicate relatively large
diaphragm openings: these permit brief exposures, but give only shallow
depth of field. The larger aperture numbers, e. g. 16, 22, indicate relatively
small diaphragm openings requiring longer exposure times, but giving great
depth of field, Further information on the depth of field will be found on page
19.
2. For critical focusing according to the image in the viewfinder system the
lenses with internal release of the fully-automatic pressure diaphragm are fully
opened. Owing to an energy store incorporated in the camera the automatic
pressure diaphragm becomes the higher value "automatic spring diaphragm".
The lens is stopped down automatically as soon as the shutter is released. In
case of all the longer exposure times and of exposures taken by means of the
delayed-action release the lens is also fully opened only after exposure. For
focusing trials and in order to check the depth of field stop the lens down by
way of trial by means of the stop-down knob (23). The automatic diaphragm
mechanism is disengaged by means of the diaphragm switch (40) (white mark
= engaged, orange-colored mark = disengaged). Then the lens is stopped
down manually by operating the aperture-setting ring (17). This is important
for the use of the TTL Penta Prism and for close-ups by means of extensionincreasing accessories.
www.orphancameras.com
The lens is focused by turning the distance-setting ring (21) and by checking
the definition of the image in the viewfinder system. After focusing, the
correct camera-subject distance will be in line with the orange-colored
triangle. The lower values on the distance scale indicate meters, whilst the
larger values possibly arranged above them represent feet. All distance are
measured from the back of the camera to the subject.
Focusing for infra-red photography: When using infra-red film, first focus the
image in the view-finder system normally, then note the distance indicated by
the orange-colored triangle (either in feet or in meters or the infinity symbol),
and turn the focusing ring to set this distance against the orange-colored dot,
the so-called infra-red setting mark which is to the right of the normal setting
mark. By doing this, the image produced by the infra-red rays will be brought
into sharp focus in the film plane of the camera and consequently will appear
sharp in the negative.
Focusing with focusing system (Fresnel screen):
Image-brightening Fresnel screen Circular mark Pointer of measuring device
Annular field in the ground-glass screen Microprism
The EXAKTA RTL 1000 may optionally be supplied with a focusing system
in all its viewfinder units. With this focusing system, a sharp image is mainly
obtained using the annular field in the ground-glass screen (for moving
subjects, photographs taken with a magnifier, and photomicrographs). To
increase the accuracy of focusing or In case of slowly moving and stationary
subjects focusing is performed by means of a microprism field. In case of
incorrect focusing the microprism field will show an image which in blurred
to a greater degree (the blurred image "flickers"). The lens will be correctly
focused when the image in the microprism Is at its sharpest (i.e. no flicker
effect). It is however, absolutely necessary to focus with a large diaphragm
opening (small aperture number) (this is important above all in case of lenses
without internal release).
4.butkus.org
With apertures of 5.6 and smaller, the image in the
microprism field will appear relatively sharp, even with
the lens incorrectly focused. This, of course, will lead to
unsatisfactory results. For extreme close-ups of
magnifications greater than 1: 1 and for
photomicrogrophy, the microprism cannot be used. The
rest of the image in the viewfinder (Fresnel field) does
not serve for focusing the lens.
lens.
Reading off the depth of field: When the depth of field is
great, objects at widely varying distances from the
camera will form a sharp image. After focusing the
precise extent of this sharp zone will be indicated by the
depth-of-field scale (18) on the lens: on either side of the
orange-colored setting mark (triangle) you can read off
from the distance scale where the depth-of-field zone
begins and ends for any specific aperture setting. If the
relevant aperture number on one side of the central
distance-setting mark is in line with the infinity symbol
(oo) or -- beginning from the center -- even beyond it,
then the depth of field will extend right up to infinity.
On the right above one example:
Distance setting 3 meters, aperture f 8 depth of field
extends from something more than 2 meters to 5 meters.
www.orphancameras.com
Changing the lens (22) : Press the locking lever (19)
towards the lens. Then turn the lens to the left until the
orange-colored dots (12 and 13) ore in line. Lift the lens
out towards the front, -- To insert a lens, proceed in the
reverse sequence: line up the orange-colored dots, and turn
the lens to the right until it locks in place.
In the EXAKTA RTL 1000 there can be used special
purpose lenses with focal lengths ranging from the shortest
to the longest. All lenses for the earlier EXAKTA and
EXA models can be used. However, in order to be able to
operate their automatic diaphragm mechanism (external
release), you have to screw an adapter into the left-hand
release (16).
Click here for chart of lenses for Exakta RTL 1000
Using the Finder Hood
The image in the Finder Hood (11) of the EXAKTA RTL 1000 may be used
both for selecting or framing the subject, and also for focusing and checking
the depth of field, by provisionally stopping down the lens. Generally, a
large enough image for normal view finding purposes will be obtained when
using the image field; for critical focusing, however, we recommend the
additional use of the Swing-up Focusing Magnifier (25), The latter will
spring into its working position when the Finder Hood is opened, but can be
folded back out of the way when operated as described at page 6,
Normally, the EXAKTA RTL 1000 is held at chest or shoulder level when
using the Finder Hood. When the pivoted supplementary Focusing Magnifier
(25) is also used, the camera must be held close to the eye. When taking
vertical pictures with the Finder Hood it is possible to shoot at right angles.
This is particularly useful for working inconspicuously since the
photographer can remain in concealment.
The image in the Finder Hood (11) can also be observed
Users who normally wear spectacles should use their
from below when the camera is held above the head. This
distance glasses for focusing with the Finder Hood. For
will prove very useful when taking pictures over walls or
interchanging the Finder Hood, see page 27.
over the heads of crowds.
Using the Penta Prism
The Penta Prism (41) serves the same purpose as the Finder Hood, with
the exception, that the image in the viewfinder will invariably be
upright and laterally-correct no matter whether the camera is held
horizontally or vertically; this is particularly useful when taking
pictures of moving subjects, since the image in the viewfinder will
move in the same direction as the subject itself. With very rapidlymoving subjects the camera can thus be ,,panned" by swinging it gently
in the direction of motion of the subject, as for example, with racing
cars.
When employing the Penta Prism (41) the camera should always be
held at eye level. Viewing the image through the eyepiece (42) may be
effected with either eye. This is the most advantageous way to use the
EXAKTA RTL 1000 with Penta Prism: The camera should be focused
with the thumb and index finger of the left hand, the right index finger
being used for releasing the shutter.
Photographers who normally wear spectacles should use their distance glasses
for focusing with the Penta Prism. For fitting and removing the Penta Prism
see page 27.
An invaluable accessory for use with the Penta Prism is the flexible eyepiece
cup:
this is fitted on to the eyepiece (42) of the Penta Prism and shields it from
distracting stray light. It is also helpful for spectacle wearers since visioncorrection senses made by ones optician can be inserted into the revolving
mount, making it possible to focus without wearing glasses.
www.orphancameras.com
TTL Penta Prism
(Automatic exposure timing with internal measurement)
The TTL Penta Prism provides the EXAKTA RTL 1000 with an automatic
exposure timing on the basis of internal measurement through the lens (Through
The Lens = TTL). This automatic system, taking into account film sensitivity,
exposure time, and aperture number, will always measure only the light being
effective for the photograph to be taken, This method of measurement is of greatest
importance above all when employing special-purpose lenses (angle of view equal
to the angle of measurement) as well as when working with extension-increasing
accessories and filters (the exposure factors are automatically included in the
measurements).
The use as a viewfinder unit is identical to that of the Penta Prism: always upright
and laterally-correct image in the viewfinder. Photographers who normally wear
spectacles should use their distance glasses. For fitting and removing the TTL
Penta Prism as well as for exchanging its image field screens, see next page. -- For
the use of the automatic exposure timing (internal measurement) a detailed
instruction leaflet is joined to the Penta Prism.
Interchanging the viewfinder systems
4.butkus.org
Each of the viewfinder systems of the EXAKTA RTL 1000 (Finder Hood, Penta
Prism, and III Penta Prism) can be exchanged. -- When any of the viewfinder units
is being removed from the camera, the two unlocking knobs (43) must be pressed
downwards with thumb and index finger of the left hand, and the viewfinder unit
withdrawn upwards with the right hand without tilting. On replacing a viewfinder
unit, it must be inserted squarely and vertically and be pressed downwards until it
clicks into position. Never use force!
Exchanging the focusing screens
The focusing screen of the viewfinder units of the EXAKTA RTL 1000 can be
exchanged so that, if desired, one of the special focusing screens can be used. -Remove the viewfinder unit from the camera. The focusing screen should be
gripped by the long sides, and withdrawn frame the viewfinder unit. To refit the
focusing screen it should again be held by the long sides (do not touch the mat
surface) and pressed Into the frame of the viewfinder unit.
Changing the film
When the frame counter (7) indicates the maximum of exposures to be taken
with the film with which the camera is loaded (12, 20 or 36), the film should
now be rewound into its cassette.
1. Press the rewind declutching button (38) into the camera.
2. Swing the rewind crank (14) out, and turn it with the right hand evenly and
slowly in the direction of the arrow (clockwise direction) until it is felt that it
turns more easily, which means that the film has now been rewound. (If the film
is rewound at too great a speed, static electricity will cause discharge marks to
appear on the negatives.)
3. Swing the rewind crank (14) inwards and withdraw the knob of the
rewind crank to the stop.
4. Open the camera back (37). Remove the cassette containing the
rewound film from the camera. Depress the knob of the rewind crank
(14) back. On the next tensioning of the shutter the rewind declutching
button (38) will automatically return into its normal position.
Flash Photography
The EXAKTA RTL 1000 is equipped with an X synchronization for
electronic flash units and flashbulbs. The synchronizing cable of standard
or electronic flashguns should be connected to the flash nipple (20). By
means of an accessory shoe which has to be attached below the knob of the
rewind crank (14), flashguns can be fastened directly to the camera.
The accessory shoe is also adapted for flashguns with central contact
except that in this case the flash nipples of the camera and of the accessory
shoe must be connected by means of the special cable delivered with the
flashgun.
In case of electronic flashguns turn the shutter-speed
setting knob (10) until the flash symbol will be in line with
the orange-colored triangle. The shutter speed set in this
way is approximately 1/125 sec. Lower shutter speeds
(1/60 sec., 1/30 sec., 1/15 sec. etc.) can also be set, for
example 1/15 sec. or 1/8 sec. in case of electronic
flashguns without storage condensers, designed for mains
operation only.
In case of fast-burning miniature flashbulbs (for example
NARVA Xl, Osram AG 3 B. XM 1 B, XM 5 B as well as
AG 3 B Super, PF 1 B, PF 5 B) turn the shutter-speed
setting knob (10) until the flashbulb symbol and,
accordingly, the fig. 30 will be in line with the orangecolored triangle. This means that the shutter speed 1/30
sec. has been set.
In case of longer-burning flashbulbs set 1/15 sec. or any
lower shutter speed.
For all flashlight sources used with the EXAKTA RTL
1000 the effective exposure time will be approximately
equal to the duration of the flash, and not to the time that
the shutter remains open (this is important when taking
photographs of moving objects).
www.orphancameras.com
Care of the camera and lenses
Always keep the camera in its ever-ready case with the lens (or lens cap) and viewfinder unit in position; alternatively
it may be kept wrapped in a fluff-free cloth. All parts which are easily accessible from the outside should be kept
clean and dusted with a soft brush. This applies particularly to the film channel (29) with the film-guide runners (31)
and the film-wind sprocket (32), the cassette chamber (28), the film rest (33), the take-up spool (34) and also the
camera back (37) including the pressure plate (36). The reflex mirror should only be dusted when absolutely
necessary, using a clean soft brush without applying any pressure. Protect the camera against moisture, dust, windborne sand, etc. Never touch the glass surfaces of the lenses, the focusing screens or the eyepieces of the two Penta
Prisms or the mirror with the fingers. These glass surfaces should be cleaned when necessary only with a soft, flufffree linen cloth. It is highly inadvisable to attempt to interfere with the mechanism of the camera; repairs should be
undertaken only by authorized servicing agencies.
Accessories
Finder Hood
Repro Unit (with Large Bellows Attachment, with
Penta Prism
Lighting equipment, if required) and others
TTL Penta Prism for internal measurement
lighting equipment for Copying stand and Repro Unit
Eyepiece cup for Penta Prisms
Special-purpose lens 1 2.8/50 from Jena, in sunk
Ever-Ready Case
mount far Large Bellows Attachments
Counter-light Lens Hood with screw-in mount M 49 x
0.75
Lens Reversal Rings
Adapter Rings for using photomicrography lenses
Accessory shoe
Special Focusing Screens
Angular viewfinder for Penta Prisms
Lens Magnifier insert with Top Lens
Focusing telescope for Penta Prisms Bayonet rings and
tubes as well as Two-in-one ring for close-ups
Adapter rings with tappet 12.5 mm and 25 mm for lenses
with internal release (for close-ups)
Macro-Micro Photometer
Ring flash Units RB 1 and RB 2
Kolpofot
Miniature Bellows Attachment Auto couple Extension
Release for lenses with external release
Endoscope Attachment
Special ring with socket for cable release
Spectroscope Adapter Ring and Sleeve
Special adopter ring with double cable release
Adapter far Astrophotography
Multi-Purpose equipment for close-ups, reproductions and Microscope Attachment
photomicrography, etc., consisting of the following parts:
Universal tripod
Large Bellows Attachment
Focusing slide
Transparency Copying Attachment
Copying Stand for direct fastening of the camera
Should you want further information, we shall be pleased to send you any special leaflets. The illustrations in this
manual may differ in certain details from the actual appearance of the camera and its accessories.
www.orphancameras.com