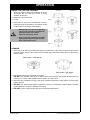
1
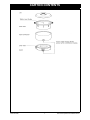
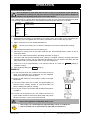
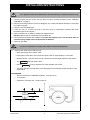
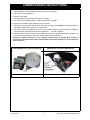
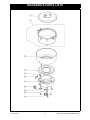
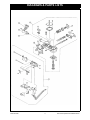
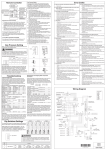
Operation / Installation Manual
GAS RICE COOKER
Model: RER-55AS
Natural Gas & ULPG
- Read these instructions before Operation or Installation.
- Installer must leave this manual with Consumer after installation.
- Consumer to retain this manual for future reference.
Manufactured for
INSTALLATIONS MUST COMPLY WITH:
- Manufacturers installation Instruction
- Current AS 5601 ‘Gas Installations’
- Local Regulations and Municipal Building Codes
- Installation, commissioning and servicing must be
performed by an authorised person.
by
AGA 7508
TABLE OF CONTENTS
WARNINGS ................................................................................................................1
CARTON CONTENTS ................................................................................................2
OPERATION ...............................................................................................................3
TO LIGHT ....................................................................................................................3
TO SHUT OFF ............................................................................................................3
COOKING INSTRUCTIONS .......................................................................................4
STEPS ........................................................................................................................4
CORRECT SET UP FOR COOKING ..........................................................................5
CLEANING ..................................................................................................................5
TROUBLE SHOOTING ...............................................................................................6
SPECIFICATIONS ......................................................................................................7
INSPECTION & SERVICE ..........................................................................................7
INSTALLERS INSTRUCTIONS ..................................................................................8
CLEARANCES ............................................................................................................8
COMMISSIONING INSTRUCTIONS ..........................................................................9
DIAGRAMS & PARTS LISTS ....................................................................................10
WARRANTY& CONTACTS ......................................................................................14
Rinnai Australia
i
Rice Cooker Operation & Installation Manual
WARNINGS
INSTALLATIONS MUST COMPLY WITH:
• Manufacturers installation Instruction
• Current AS 5601 ‘Gas Installations’
WARNING
• Local Regulations and Municipal Building Codes
• Installation, commissioning and servicing must be performed by an authorised
person.
•
•
•
•
•
•
•
•
•
•
•
•
•
•
NO USER SERVICABLE PARTS INSIDE.
NOT SUITABLE FOR USE ON UN-STABILISED WATER VESSELS OR BOATS.
DO NOT leave unit unattended whilst in operation.
DO NOT operate this unit before you have read and understood these instructions.
DO NOT spray aerosols in the vicinity of this appliance whilst it is in operation.
DO NOT operate with any other cooking pot other than the one supplied.
DO NOT operate with any other gas or at any other gas pressure than what is
marked on the data plate on the unit.
DO NOT operate if any part of the appliance or gas control system is damaged or if
you suspect it is damaged.
DO NOT operate if main burner ports are blocked or not visible.
DO NOT operate without heat shroud.
DO inspect the rice cooker for damage or blocked burner ports daily before use.
DO have a qualified service person inspect your appliance periodically.
DO clean the appliance daily.
DO operate in a well ventilated area.
FOR YOUR SAFETY – GENERAL
IF YOU SMELL GAS:
1.
2.
3.
4.
Shut off gas to the appliance, if possible.
Extinguish any open flame.
Remove rice pot.
If odour continues, immediately call your gas supplier.
STORAGE:
1.
2.
Rinnai Australia
DO NOT store or use petrol or other flammable vapours and liquids
in the vicinity of this or any other appliance.
DO NOT store gas cylinders that are not connected for use in the
vicinity of this appliance.
1
Rice Cooker Operation & Installation Manual
CARTON CONTENTS
Rinnai Australia
2
Rice Cooker Operation & Installation Manual
OPERATION
TO LIGHT
1. Be sure the manual valve is open and heat shroud and
pot are in correct position with the six pilot view holes
directly above controls. See page 5.
2. Push 1. IGNITION knob down until it clicks and hold down
for approximately 10 seconds.
3. Release
1. IGNITION
1. IGNITION
KNOB
2. COOKING
KNOB
knob, check that the pilot is lit by
looking through the six pilot view holes.
will return and
2
PILOT VIEW
HOLES
KEEP WARM
1. IGNITION
knob
3
knob will stay pushed down.
4. If the PILOT has failed to ignite, repeat steps 1-3. If the
pilot does not ignite after 5 attempts refer to the Trouble
Shooting guide on page 6.
IGNITION
KNOB
2. COOKING
KNOB
KEEP WARM
KNOB
5. For best results soak rice in water for approximately 30
minutes before cooking. Ensure to rinse and drain rice
before refilling for cooking.
6. To ignite main burner push 2. COOKING knob down.
Check main burner ignition by viewing through the
6 view holes.
5
1. IGNITION
KNOB
2. COOKING
KNOB
• If the Heat Shroud is not correctly installed the main burner will fail to ignite even
though the pilot is burning.
NOTE
• DO NOT lift the
• DO NOT push
lit.
KEEP WARM
2. COOKING
knob while cooking - the rice cooker may shut off.
knob first, the lever will not stay down unless the pilot is
• After cooking the 2. COOKING knob will automatically spring up shutting off the main
burner. The pilot light will still remain on.
6
TO SHUT OFF
7. Before removing pot after cooking turn the rice cooker
OFF by lifting the
KEEP WARM
1. IGNITION
KNOB
2. COOKING
KNOB
KEEP WARM
KNOB
knob.
8. Turn the gas supply valve to the rice cooker OFF if the
rice cooker is not to be used for extended period or is
undergoing maintenance.
• When igniting make sure not to put face near the viewing holes. If the gas should
flash personal injury may result.
WARNING
• If it is hard too see the pilot flame, relocate the position of the shroud so view holes
are directly over the controls (see page 5).
Rinnai Australia
3
Rice Cooker Operation & Installation Manual
OPERATION
COOKING INSTRUCTIONS
• Do not attempt to cook more than 10 litres of dry rice by measure. If this amount is
exceeded the cooking rice may over flow the rice pot which may create a dangerous
CAUTION situation and possibly block ports on the main burner.
The cooking method, cooking times and quantities of water and rice herein are intended as a guide
only and may require adjustment to suit individual preferences and different rice varieties.
Litre of
Water Level
Dry Rice
Guide (RHS)
10.0 =
9.0 =
7.2 =
5.4 =
4.5 =
5.5
5
4
3
2.5
STEPS
1. Measure desired quantity of uncooked dry rice using metric ‘litre’ scale in your measuring cup.
(Measuring cup not supplied with rice cooker). See above chart for water and rice ratio.
2. Wash / rinse the rice to suit individual preference.
The more you wash your rice before cooking the more loose it will be after cooking.
3. Place measured washed rice into the cooking pot.
4. Add water to correct level on the scale inside the pot. See example below, ensure all rice is
covered by water.
5. Turn on rice cooker as described in operating instruction on page 3.
6. The burner will shut off automatically when cooking is complete, however, the keep warm pilot
light will continue to burn until it is switched off manually, (you can switch it off either with the
keep warm knob or the manual ball valve on the side off the unit).
7. Allow rice to sit for approximately 10-15 minutes with lid on, leave on
complete cooking.
8. Shut off pilot by lifting the
KEEP WARM
KEEP WARM
setting to
knob up.
EXAMPLE:
1) To cook 5.4 litres of dry rice, measure out 5.4 litres of dry rice
using your measuring cup, (measuring cup not supplied).
Wash and rinse rice to remove starch.
5.4 litres
2) Fill the pot with water up to the number 3 mark on the right
hand scale.
3) For best results soak rice in water for approximately 30
minutes before cooking. Ensure to rinse and drain rice
before refilling with water for cooking.
3
4) Turn on rice cooker in accordance with operating instructions
on page 3.
5) Lid may now be placed on pot. Use caution as some rice
types contain excessive amounts of starch which may cause
the pot to boil over. If this occurs remove the lid.
NOTE
• Never leave appliance unattended while in use.
• 1 litre of dry rice could expand to approximately 3 litres of cooked rice.
• 1 litre of cooked rice is equivalent to 4 cups (AU) of cooked rice.
Rinnai Australia
4
Rice Cooker Operation & Installation Manual
OPERATION
CORRECT SET UP FOR COOKING
1. Align pilot holes in Heat Shroud directly over on/
off knobs. Be sure that the shroud is sitting
squarely in drip pan.
CORRECT
INCORRECT
2. Install the pot in the shroud.
3. Fit Lid.
4. After unit is lit carry out a visual burner check by
peering through viewing holes. The flames should
be blue with no excessive yellow tipping.
WARNING
• Misalignment as shown at right may
cause early shut off or prevent safe
operation of the rice cooker.
Personal injury may result.
• Do not look into viewing holes while
lighting main burner. If gas should
flash, injury may result.
CLEANING
1. When unit is off and has cooled down clean the heat sensor in the centre of the main burner and
the heat sensor spigot in the centre of the pot daily. Wipe with warm soapy water to remove any
foreign matter.
heat sensor - main burner
- pot spigot
heat sensor - pot spigot
2. Inspect the main burner and clean if required.
DO NOT use wooden tooth picks to clean burner ports as these may break off inside the port
blocking it. If unsure call a qualified service person to clean burner.
3. Wipe the rest of appliance using a soft cloth moistened with warm soapy water, dry thoroughly
before next use.
4. DO NOT use abrasive type paste or abrasive scourers on enamelled, stainless steel or powder
coated surfaces, marking or damage may result.
5. DO NOT put any of the components into an automatic dishwasher.
Rinnai Australia
5
Rice Cooker Operation & Installation Manual
TROUBLE SHOOTING
Fault
Cause
Remedy
Gas supply not turned on
Check if main gas is on by lighting another gas appliance.
Lighting procedure not followed
correctly
Follow correct lighting procedure. See page 3.
Damaged gas supply line
Pilot will not light
Faulty piezo ignition module
Valve or thermocouple assembly is
damaged
Main burner will not light pilot is lit
Main burner shuts off
before rice is completely
cooked
Pilot and main burner shut
off while cooking
Main burner does not shut
off automatically
Short flame on main burner
Heat shroud and pot not correctly in
place.
Check for correct alignment. See page 4.
Lighting procedure not followed
correctly
Follow correct lighting procedure. See page 3.
Valve or thermocouple assembly is
damaged
Contact authorised service representative. See page 14 for
contact details.
Too little water for rice volume
Cook with correct amount of water. See page 4.
Contamination on thermal sensing
surfaces
Clean thermal sensing surfaces. See page 5.
Rice pot, drip pan or heat shroud not
Correctly position components. See page 5.
positioned correctly
Thermostat is malfunctioning or dirty
Contact authorised service representative. See page 14 for
contact details.
Spillage on pilot unit
Clean pilot unit with soft brush and warm soapy water, dry
thoroughly.
Pilot injector is clogged
Contact authorised service representative. See page 14 for
contact details.
Gas supply pressure too low
Check gas line for proper size (refer to AS 5601).
Check that ball valves are fully open.
Check for supply fault with your local gas supplier.
Thermocouple is covered with
spillage or damaged
Contact authorised service representative. See page 14 for
contact details.
Thermostat is malfunctioning or dirty
Contact authorised service representative. See page 14 for
contact details.
Rice pot, drip pan or heat shroud not Correctly position components. See page 5.
positioned correctly
Valve or thermocouple assembly is
damaged
Contact authorised service representative. See page 14 for
contact details.
Gas supply pressure is too low
Check that gas supply valves are fully open.
Blockage of main orifice
Incorrect gas type
Yellow flame on main
burner.
Soot on base of pot
Contact authorised service representative. See page 14 for
contact details.
Contact authorised service representative. See page 14 for
contact details.
Blockage of primary air intake
Damaged main control valve
Burner ports blocked
Carefully remove blockage. DO NOT use wooden tooth
picks, they may break off and further block ports. Carefully
clean with metallic probe or soft brush.
Incorrect gas pressure
Contact authorised service representative. See page 14 for
contact details.
Flame on main burner lifting
Boiling over
Too much water/rice
Cook with correct ratios of water and rice, see page 4.
Excessive starch content in rice
Wash rice before cooking or cook without lid.
Rice pot has sat for long period with
rice or water left in it
Rice Pot discolours *
Clean rice pot regularly immediately after cooking.
Note: minor discolouration is
not harmful to your health Rice pot used for cooking foods other
than rice
White Aluminium Oxide *
formed in and on pot
Humming noise heard
when main burner is on
DO NOT wash pot or any other components in
an automatic dishwasher ALLOXIDE MUST BE REMOVED BEFORE USE
Rice pot washed in dishwasher
Food additives that react with
aluminium
CAUTION
Gas pressure set to high
Contact authorised service representative. See page 14 for
contact details.
Incorrect gas type used for unit
* Aluminium Oxide is the powdery white residue that is created when some food additives react with the aluminium
metal of the cooking pot. The aluminium oxide will affect the flavour and colour of the food.
Long term ingestion may be hazardous to your health.
DO NOT cook anything other than pure rice and pure water in the rice cooker.
For Spare parts availability and Servicing. See page 14 for contact details.
Rinnai Australia
6
Rice Cooker Operation & Installation Manual
SPECIFICATIONS
Gas Input Main burner
RER - 55AS(NG)
(Natural Gas)
RER - 55AS(ULPG)
(Universal LPG)
35 MJ/hr
35 MJ/hr
Main burner Injector Ø
2.80 mm
1.67 mm
Gas Input - Pilot
0.3 MJ/hr
0.4 MJ/hr
Pilot Injector Ø
0.25 mm
0.21 mm
Height: 455 mm
Width: 610 mm
Depth: 476 mm
Dimensions
Regulator
Internal
Gas Control Valve
Rinnai Japan - # DRR37-213-10 (ULPG)
Rinnai Japan - # DRR37-213-9 (NG)
Gas Control Knobs
ABS moulded plastic
Flame Failure Device (FFD)
Thermo-electric FFD
Thermal Control - Burner protection
Mechanical Thermal cut out
Inlet pressure
1.13 kPa
2.75 kPa
Burner pressure
0.85 kPa
2.65 kPa
Sides and Rear: minimum 150 mm
Top: minimum 600 mm
Clearances to Combustibles
Gas Connection
1/2” BSP Female
Weight - (Net)
16 kg
Base Material
Powder Coated Steel
Heat Shroud
Vitreous Enamel Coated Steel
Pot Material
Cast Aluminium
Lid Material
Stainless Steel
Cooked Rice Capacity
10 litres
Rinnai Australia Pty Ltd. Reserves the right to make modification and change specifications without notice.
INSPECTION AND SERVICE
Rinnai recommend that this appliance be inspected and serviced by an authorised person annually.
Rinnai Australia
7
Rice Cooker Operation & Installation Manual
INSTALLERS INSTRUCTIONS
• This appliance must be installed and commissioned by an authorised person only.
WARNING
1. Carefully unpack unit and confirm that you have the carton contents as listed on See “CARTON
CONTENTS” on page 2.
2. Remove all packing material. Check for damage if any components appear damage do not install
and contact supplier.
3. Choose a well ventilated area.
4. Locate the unit on a bench top that is free and clear of combustible materials and other
flammable vapours and liquids.
5. Observe clearances as shown in clearances diagram below.
DO NOT obstruct flow of combustion and ventilation air.
6. Connect the gas regulator and isolation valve. Note: Gas supply to be correctly sized. Refer to
commissioning chapter follow requirements of AS 5601.
7. Check for gas leaks.
• To test unit operation of safety FFD, (Flame Failure safety Device).
CAUTION
8.
Remove Pot, Heat shroud and Drip tray.
• Open gas supply valve isolator valve.
• Push ignition knob down until it clicks and push down for approximately 3-4 seconds.
• Release Ignition - pilot should remain lit. If it does not remain alight repeat the step above.
• The
KEEP WARM
• Pull the
knob will remain down.
KEEP WARM
knob up and listen for a faint metallic click sound.
• This Click sound is the FFD safety valve dropping out and signifies proper operation of the
safety valve.
CLEARANCES
• Sides and rear from combustible materials - minimum15 cm
• To overhead
• cupboard or extraction fan - minimum 60 cm
60 cm
Rinnai Australia
8
Rice Cooker Operation & Installation Manual
COMMISSIONING INSTRUCTIONS
1. Install appliance as per installation instructions on previous page.
2. Open gas valves to appliance.
3. Check for gas leaks.
4. Proceed to light as per lighting instructions on page 3.
5. Set ATPP as per settings listed on “SPECIFICATIONS” on page 7.
6. Explain the operation of the appliance to the end user.
7. Explain the content of this manual to the end user ensuring the ‘WARNINGS’, ‘OPERATION’ and
‘TROUBLE SHOOTING’ sections are understood.
8. If the gas supply to this appliance is from a gas cylinder, explain to the end user the installation
and positioning requirements of AS 5601 Appendix J - “LP Gas Cylinders”.
9. Hand this manual to the end user and remind the end user to complete the details on page 14 of
this manual and to keep this manual in a safe place for future reference.
• Installer to explain operation to the customer remind them to operate Rice Cooker in
accordance with these instructions and that these instructions be kept in a secure place for
future reference.
ATPP (Appliance Test Point Pressure)
Main Burner Pressure Adjustment
Remove spill tray to access from top of unit
To access remove cover on base of unit
Rinnai Australia
9
Rice Cooker Operation & Installation Manual
DIAGRAMS & PARTS LISTS
Rinnai Australia
10
Rice Cooker Operation & Installation Manual
DIAGRAMS & PARTS LISTS
Rinnai Australia
11
Rice Cooker Operation & Installation Manual
DIAGRAMS & PARTS LISTS
Rinnai Australia
12
Rice Cooker Operation & Installation Manual
DIAGRAMS & PARTS LISTS
Parts Lists
No.
1
2
3
4
5
6
7
8
9
10
11
12
13
14
15
16
17
18
19
20
22
23
24
25
26
27
28
29
30
32
33
34
35
36
37
Part Name
RA Part No.
Drawing No
Lid Assembly
RR84-32034
Rice Pot Assembly
RR77-1733
Heat Shroud
RR84-20413
Drip Pan
36550
Cock Mount Plate
BRR37-113
Connecting Inlet Cover
BRR37-345
Bottom Casing
RR82-2655
Control Panel
BRR37-105
Rubber Leg Assembly
49231
Pressure Adjustable Hole cover
BRR37-332
Under Cover
RR77-4590
Manual Valve
BRR37-244
Cock Joint
BRR37-401
Packing
C36E1-6
Combination Control Assembly (for ULPG)
Combination Control Assembly (for Natural Gas)
DRR37-213-10 (ULPG)
DRR37-213-9 (NG)
Lock Plate
ARR37-600
Operating Unit
BRR37-243
Burner
CRR37-338
Air Shutter Plate
BRR37-315
Air Shutter
BRR37-313
Damper Push Spring
RR77-4641
Main Injector (for ULPG) Ø 1.67 mm
Main Injector (for Natural Gas) Ø 2.8 mm
RMC-7253 (ULPG) Ø 1.67 mm
RMC-7253 (NG) Ø 2.8 mm
Burner Fitting Board
ARR37-104
Thermal Sensing Unit Assembly
BRR37-505
Thermal Sensing Unit Spring
46608
Magnet Case Guide
RR77-3582
Base Magnet Case
39346A
Thermal Sensing Stopper Pin Spring
ARR40-306
Drip Pan Fixing Plate
BRR37-103
Burner Plate
RR77-2588
Piezo Electronic ignition Device
BRR37-1
Pilot Fitting Board
BRR37-329
Constant Pilot Burner (for ULPG)
Constant Pilot Burner (for Natural Gas)
BRR37-326 (ULPG)
BRR37-326-2 (NG)
Thermocouple
RR82-41318-02
Thermocouple Fixing Pin
ARR32-623
Pilot Injector - Permanent (for ULPG) Ø 0.21 mm
Pilot Injector - Permanent (for Natural Gas) Ø 0.25mm
ARR37-331 (ULPG) Ø 0.21 mm
6541-96 (NG) Ø 0.25 mm
39
40
41
Constant Pilot Tube
BRR37-403-1
Pilot Holder Assembly
CP-50746
Pilot Orifice (Instant) (for ULPG) Ø 0.4 mm
Pilot Orifice (Instant) (for Natural Gas) Ø 0.65 mm
6541-96 (ULPG) Ø 0.4 mm
6541-96 (NG) Ø 0.65 mm
42
43
44
45
46
47
Ignition Pilot Tube
BRR37-403-2
Connecting Tube Push Metal
ARR37-333
Washer
CP-20805
O-Ring
C5G1-8
38
Electrode
CP-50188
Plug Holder
CP-50709
Rinnai Australia
13
Rice Cooker Operation & Installation Manual
WARRANTY
For warranty and after sales service contact G&K Distributors
Pty Ltd details below.
Please keep these instructions in a safe place for future reference
Please take a moment to complete the following information:
Your Retailer:
______________________________________________
Name:
______________________________________________
Address:
______________________________________________
Telephone No.
______________________________________________
Date of Purchase:
________ / ________ / _______________________
Servicing and Spare Parts by G.&K.
Contact details
Ph: * 1300 73 71 76
[email protected]
* cost of a local call higher for mobile or public phones
Rinnai Australia
14
Rice Cooker Operation & Installation Manual - Issue No. 1 19/5/09