1
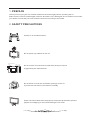
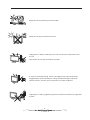
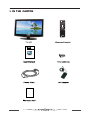
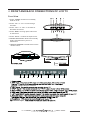
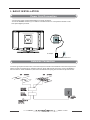
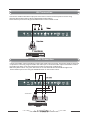
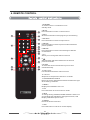
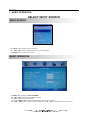
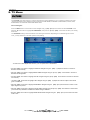
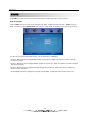
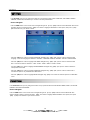
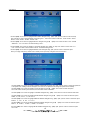
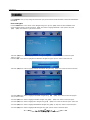
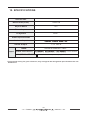
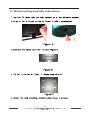
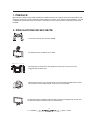
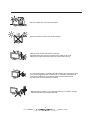
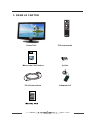
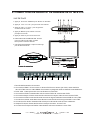
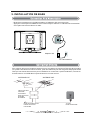
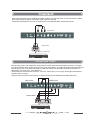
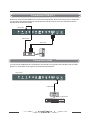
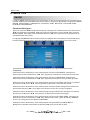
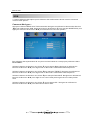
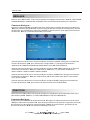
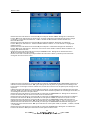
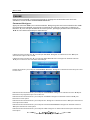
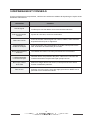
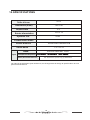
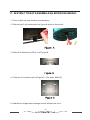
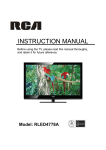
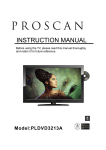
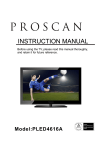
1
PREFACE
3
2
SAFETY
PRECAUTIONS
3
3
IN THE CARTON
5
4
FRONT AND
BACK
CONNECTIONS
OF LCD TV
6
5
BASIC
INSTALLATION
6
REMOTE CONTROL
7
Basic Operation
8
TV Operation
Power Cord Connection
Antennas Connection
AV Connection
YPbPr Connection
7
7
8
8
9
9
10
Select Input Source
11
Picture Menu
12
Sound Menu
13
Setting Menu
14
Function Menu
14
Channel Menu
16
TROUBLESHOOTING
AND ADVICE
17
10
SPECIFICATIONS
18
11
Wall mounting
Assembly
Instruction
19
9
1. PREFACE
Thank you for buying this TV ! Please read this manual throughly before operating the TV.
Make sure the TV was not damaged in transit. Should the TV is damaged, do not install it and contact
your dealer. Check that you have all the accessories according to the model.
2. SAFETY PRECAUTIONS
Put the TV on a stable surface.
Do not place any material on the TV.
Minimum distances
25mm
25mm
25mm
60mm
Do not use the TV with fixtures other than those provided or
suggested by the manufacturer.
Do not block or cover the ventilation openings on the TV.
If you have a wall mount, check that it is steady.
Power cord and cables must be properly routed and protected to prevent
people from stepping on them and causing the TV to fall.
3
Keep the TV dry and away from humidity.
Keep the TV away from heat sources .
Unplug the TV before cleaning it. Do not use solvent or liquid to clean
the TV.
Only clean the TV with a soft and dry cloth.
In case of troubleshooting, do not use spare parts other than those
suggested by the manufacturer. Using inadequate spare parts can
lead to electric shocks, short-circuits fire or other incidents.
Unplug the TV during lightening storms or when unused for long periods
of time.
4
3. IN THE CARTON
TV SET
MANUEL D'INSTRUCTION
Veu il le z li re a tt en ti ve me nt c e ma nu el e t le r et en ir p ou r fu tu r
ré fé re nc e av an t d' ut il is er l a Télé .
MODELE: LCD1933
LI MI TE D PR OD UC T WAR RA NT Y
Th is q ua li ty p ro du ct i s wa rr an te d to b e fr ee f ro m ma nu fa ct ur er 's d ef ec ts
in m at er ia l an d wo rk ma n- sh ip , pr ov id ed t ha t th e un it i s us ed u nd er t he
no rm al o pe ra ti ng c on di ti on s in te nd ed b y th e ma nu fa ct ur er.
Sh ou ld y ou h av e an y pr ob le m wi th t hi s pr od uc t, p le as e an d it i s hi gh ly
re co mm en de d to v is it o ur w eb si te a t ww w.c ur ti si nt .c om b ef or e yo u ta ke
an y ot he r st ep s as w e ha ve a dd it io na l co pi es o f in st ru ct io n ma nu al s,
op er at in g ma nu al s an d tr ou bl e sh oo ti ng t ip s on o ur w eb si te w hi ch g iv es
yo u th e an sw er o n mo st o f th e qu es ti on s yo u co ul d ha ve i n op er at in g th e
un it .
TE RM S OF WA RR AN TY
C. I. S er vi ce D ep t. w ar ra nt s th is p ro du ct t o be f re e fr om d ef ec ts i n
ma te ri al s an d wo rk ma ns hi p fo r 1 ye ar o n pa rt s an d 90 d ay s on l ab or. I f
yo u or ig in al ly p ur ch as ed y ou r pr od uc t mo re t ha n 90 d ay s ag o, a r ep ai r
fe e ma y ap pl y.
No th in g wi th in t hi s wa rr an ty s ha ll i mp ly t ha t C. I. w il l be r es po ns ib le o r
li ab le f or a ny d am ag e to a ny i te ms p la ce d in t hi s pr od uc t, w he th er d ue t o
an y de fe ct o f th e pr od uc t, o r it s us e, w he th er p ro pe r or i mp ro pe r.
EX CL US IO NS
Sa ve a s he re in p ro vi de d, C .I . Se rv ic e De pt . (C an ad a) o r C. I. S er vi ce
De pt . (U SA ), t he re a re n o ot he r wa rr an ti es , co nd it io ns , re pr es en ta ti on s
or g ua ra nt ee s, e xp re ss o r im pl ie d, m ad e or i nt en de d by C .I . or i ts
au th or iz ed d is tr ib ut or s an d al l ot he r wa rr an ti es , co nd it io ns ,
re pr es en ta ti on s or g ua ra nt ee s, i nc lu di ng a ny w ar ra nt ie s, c on di ti on s,
re pr es en ta ti on s or g ua ra nt ee s un de r an y Sa le o f Go od s Act o r li ke
le gi sl at io n or s ta tu e is h er eb y ex pr es sl y ex cl ud ed . Sa ve a s he re in
pr ov id ed , C. I. S er vi ce D ep t. ( Ca na da ) or C .I . Se rv ic e De pt . (U SA ), s ha ll
no t be r es po ns ib le f or a ny d am ag es t o pe rs on s or p ro pe rt y, inc lu di ng t he
un it i ts el f, h ow so ev er c au se d or a ny c on se qu en ti al d am ag es a ri si ng
fr om t he m al fu nc ti on o f th e un it a nd b y th e pu rc ha se o f th e un it , th e
pu rc ha se r do es h er eb y ag re e to i nd em ni fy a nd s av e ha rm le ss C .I . fr om
an y cl ai m fo r da ma ge s to p er so ns o r pr op er ty c au se d by t he u ni t.
Remote Control
4. FRONT AND BACK CONNECTIONS OF LCD TV
Front View
1.Press “POWER” button to turn standby
mode on or off.
2.Press “CH+” or “CH-” to scan through
channels.
3.Press “VOL+” or “VOL-” to increase or
decrease the volume.
4.Press “MENU” to bring up the main menu
on the screen.
5.Press “INPUT” to select the input source.
6.POWER INDICATOR: Show red in standby
mode, show blue when your TV is
switched on.
7. REMOTE SENSOR: Infrared sensor for the
remote control.
10
9
8
7
(HDMI cable not inclued)
Antenna Input.
6
5
4
3
2
1
5. BASIC INSTALL ATION
Power Cord Connection
- Connect the power cord and AC adaptor correctly as shown.
- Press the POWER switch of your LCD TV to switch the unit on. The power indicator on the
front panel lights up in blue.
AC Adaptor
POWER Cord
Antennas Connection
To ensure good picture and sound, TV antenna system needs to be installed. The antenna system as
shown can be sourced from TV equipment shops, which will provide service for correct installation
and connection. After installation, insert the 75-OHM antenna plug into the antenna jack as shown.
AV Connection
Connect the VIDEO and AUDIO output jack of the DVD or VCR to the AV IN jacks on the set using
the RCA cable (Yellow [video], White and RED [left & Right audio]).
Select the AV input source using the SOURCE button on the remote control.
YPbPr Connection
Connect the YPbPr output of the DVD or VCR to the YPbPr input on the set. The picture quality is improved
compared to connecting a regular VCR to the video input. Connect the Audio output of the DVD or VCR to
the Audio input jacks on the set using the RCA cable. (3.5mm plug-2 X RCA plug)
Match the jacks colours: Y is green, Pb is blue, Pr is red, Audio left is white and Audio right in red.
Select YPbPr input source using the SOURCE button on the remote control.
YPbPr Cable
Connect the RGB output of the PC to the VGA jack on the set. Connect the AUDIO output of the PC to the PC
AUDIO jack on the set. Select the PC input source using SOURCE button on the remote control.
VGA Cable
HDMI Connection
HDMI connection allows the user to transfer both audio and video control signals through one cable only.
These signals are transferred in digital.
6. REMOTE CONTROL
1.STANDBY
To switch on the Tv or make the TV into
standby mode.
1
2
2.MUTE
Press this button to mute or restore sound.
3
3.INFO
Show the information of the program you are watching.
4
4.SOURCE
Press this button to select an input source.
5
5.PMODE
Press this button to select a picture mode for different
picture qualities.
7
6
8
9
12
10
11
13
15
16
14
17
6.SMODE
Press this button to select sound setting for different
sound effects.
7.0-9
Allows you to change the channel of the TV.
8.
Switches back and forth between the current and
previous channels.
9.SLEEP
To select the amount of time before your TV turns
Off automatically.
10.VOL+/VOLIncreases/Decreases the Volume control.
11.CH+/CHSkips to the next/previous channel on TV mode.
12.UP/DOWN/LEFT/RIGHT
Moves the cursor upward/downward/to the left/to the right
when making a selection.
13.MENU
Displays the OSD Menu of the TV.
14.CC
Press the button to enter into the CC mode.
15.MTS
To change among STEREO, MONO and SAP. If there is no
second language available for the signal received, LCD
Display audio will output to mono.
16.ENTER
Enters the function selected.
17.Exit
Press this button to exit the on screen display.
10
OSD Manual
7. BASIC OPERATION
SELECT INPUT SOURCE
INPUT SOURCE
·Use INPUT button to display the input source list;
·Use 【▲】 /【▼】 button to select the input source you want to watch;
·Use ENTER button to enter the input source;
BASIC OPERATION
·Use MENU button to display the MAIN OSD MENU;
·Use 【▲】 /【▼】button to select the MENU you want;
·Use 【 ► 】 button to enter the sub menu;
You can use MENU or EXIT button to save and return back to the previous menu .
·Use 【▲】 /【▼】 button to select the option and then press 【◄】 /【 ► 】to adjust the value in the sub menu;
11
OSD Manual
8. TV Menu
PICTURE
The PICTURE menu offers options to enhance and refine the picture displayed on your TV based on ambient room light
and personal prefer-ences. Adjustment options include PICTURE MODE, CONTRAST, BRIGHTNESS, COLOR, TINT,
SHARPNESS, COLOR TEMP. and NOISE REDUCTION.
How to Navigate:
Press the MENU button on the remote control. Navigate using 【◄ 】 /【 ►】 arrow buttons to select PICTURE. Press
the down ▼ arrow button to highlight PICTURE MODE, then press the 【◄ 】 /【 ►】 arrow button to select your viewing
Preference.
The STANDARD setting is recommended for most viewing environments. Depending on the ambient light level in the
room, you may select one of the other options more pleasing.
To make more critical adjustments based on your own preferences in PERSONAL:
• Use down 【▼】 arrow button to highlight CONTRAST. Navigate using the 【◄ 】 /【 ►】arrow buttons to increase or
decrease contrast intensity.
• Use down 【▼】 arrow button to highlight BRIGHTNESS. Navigate using the 【◄ 】 /【 ►】 arrow buttons to increase or
decrease overall brightness.
• Use down 【▼】 arrow button to highlight COLOR. Navigate using the 【◄ 】 /【 ►】 arrow buttons to increase or decrease
color intensity.
• Use down 【▼】 arrow button to highlight TINT. Navigate using the 【◄ 】 /【 ►】arrow buttons to adjust colors toward
green or reddish tint.
• Use down 【▼】 arrow button to highlight SHARPNESS. Navigate using the 【◄ 】 /【 ►】arrow buttons to soften or view
crisper edges in the picture.
• Use down 【▼】 arrow button to highlight COLOR TEMP.. Navigate using the 【◄ 】 /【 ►】arrow buttons to select COOL
(more bluish tone), NORMAL or WARM. The default setting is NORMAL.
• Use down 【▼】 arrow button to highlight NOISE REDUCTION. Navigate using the 【◄ 】 /【 ►】 arrow buttons to select
it ON or OFF.
12
CATV
OSD Manual
SOUND
The SOUND menu offers options to make sound enhancements while listening through the built-in speakers
How to Navigate:
Press the MENU button on the remote control. Navigate using 【◄ 】 /【 ►】arrow buttons to select SOUND . Press the
【▼】 arrow button to highlight SOUND MODE, then press the 【◄ 】 /【 ►】 arrow button to select your sound preference.
To make more critical sound adjustments based on your own preferences in PERSONAL:
• Use down 【▼】 arrow button to highlight Bass. Navigate using the 【◄ 】 /【 ►】arrow buttons to increase or decrease
low frequency intensity.
• Use down 【▼】 arrow button to highlight TREBLE. Navigate using the 【◄ 】 /【 ►】arrow buttons to increase or decrease
high frequency intensity.
• Use down 【▼】 arrow button to highlight BALANCE. Navigate using the 【◄ 】 /【 ►】arrow buttons to adjust sound
towards the left or right speaker.
• Use down【▼】arrow button to highlight AVL. Navigate using the【◄ 】 /【 ►】arrow buttons to select it ON or OFF.
13
OSD Manual
SETTING
In the SETTING menu you may change the initial set up of preferences that include LANGUAGE, OSD TIMER, TRANSP-ARENCE, OVERSCAN, and RESET your TV back to its factory default status.
How to Navigate:
Press the MENU button on the remote control. Navigate using arrow 【◄ 】 /【 ►】buttons to select SETTING. Gain access
to display options by pressing the down 【▼】 arrow button to highlight LANGUAGE or other options, then press 【◄ 】 /
【 ► arrow buttons on your remote to select.
·Use down【▼】arrow button to highlight LANGUAGE. Navigate using 【◄】 /【 ► 】arrow button to select the OSD
language. There are 6 language for selection: ENGLISH > GERMAN> FRENCH> SPANISH> ITALIAN> PORTUGUESE.
·Use down【▼】arrow button to highlight OSD TIMER. Navigate using 【◄】 /【 ► 】arrow button to select the OSD
timer. There are 6 modes for selection: 5 SEC>10 SEC> 15SEC> 20SEC> 25 SEC> 30 SEC.
·Use down【▼】arrow button to highlight TRANSPARENCE. Navigate using 【◄】 /【 ► 】arrow button to select the
transparence of the OSD.
·Use down【▼】arrow button to highlight OVERSCAN. Navigate using 【◄】 /【 ► 】arrow button to select it ON or
OFF. But this option is only available in the HDMI source.
·Use down【▼】arrow button to highlight RESET. Navigate using【 ► 】arrow button to reset the options in the SETTING
menu.
FUNCTION
In the FUNCTION menu you may change the function set up of preferences that include SLEEP TIMER, ASPECT, CCAPTION
PARENT CTRL and BLUE SCREEN.
How to Navigate:
Press the MENU button on the remote control. Navigate using arrow 【◄ 】 /【 ►】buttons to select FUNCTION. Gain
access to display options by pressing the down 【▼】 arrow button to highlight SLEEP TIMER or other options, then press
【◄ 】 /【 ►】 arrow buttons on your remote to select.
14
OSD Manual
·Use down【▼】arrow button to highlight SLEEP TIMER. Navigate using 【◄】 /【 ► 】arrow button to select the sleep
timer, and the TV will turn off automatically in the setting time . There are 9 modes for selection: 15 Min>30 Min> 45 Min>
60 Min> 75 Min> 90 Min> 105 Min> 120 Min> OFF.
·Use down【▼】arrow button to highlight ASPECT. Navigate using 【◄】 /【 ► 】arrow button to select: FULL> ZOOM
> SUBTITLE > 4:3>14:9>AUTO. The default setting is FULL. .
·Use down【▼】arrow button to highlight C.CAPTION. Navigate using 【◄】 /【 ► 】arrow button to select: OFF> Cc1
> CC2 >CC3>CC4>TEXT1>TEXT2>TEXT3>TEXT4. The default setting is OFF.
·Use down【▼】arrow button to highlight PARENT CTRL. Navigate using 【 ► 】arrow button to select this option.
Enter your 4 digit code (factory default code is "0000") unless previously changed to enter the submenu.
·Use down【▼】arrow button to highlight CHANGE PASSWORD. Navigate using 【 ► 】arrow button to change the password
of the system lock. A dialog as above will appear, the enter the new password can change the password successfully.
·Use down【▼】arrow button to highlight V-CHIP. Navigate using 【◄】 /【 ► 】arrow button to select this option
ON or OFF. When set the system lock OFF, the locks below will be unavailable.
·Use down【▼】arrow button to highlight TV-RATING. Navigate using 【 ► 】arrow button to enter the submenu and select.
·Use down【▼】arrow button to highlight MOVIE-RATING. Navigate using 【◄】 /【 ► 】arrow button to select this option.
NONE、G、PG、PG-13 、R、NC-17 or X.
·Use down【▼】arrow button to highlight ENGLISH-RATING. Navigate using 【◄】 /【 ► 】arrow button to select this option
EMPTY、C、C8 +、G、PG、14 + or 18 +.
·Use down【▼】arrow button to highlight FRENCH-RATING. Navigate using 【◄】 /【 ► 】arrow button to select this option
EMPTY、G、8 ANS +、13 ANS +、16 ANS + or 18 ANS +.
·Use down【▼】arrow button to highlight BLUE SCREEN. Navigate using 【◄】 /【 ► 】arrow button to select this option
ON or OFF.
15
OSD Manual
CHANNEL
In the CHANNEL menu you may change the channel set up of preferences that include SOURCE, AUTO SCAN and MANUAL
PROGRAM .
How to Navigate:
Press the MENU button on the remote control. Navigate using arrow 【◄ 】 /【 ►】buttons to select CHANNEL. Gain
access to display options by pressing the down 【▼】 arrow button to highlight SOURCE or other options, then press
【◄ 】 /【 ►】 arrow buttons on your remote to select.
·Use down【▼】arrow button to highlight SOURCE. Navigate using 【◄】 /【 ► 】arrow button to select the option
CATV or AIR.
·Use down【▼】arrow button to highlight AUTO SEARCH. Navigate using 【 ► 】arrow button to start auto scan.
·Use down【▼】arrow button to highlight MANUAL PROGRAM. Navigate using 【 ► 】arrow button to enter the submenu.
·Use down【▼】arrow button to highlight PROGRAM. Navigate using 【◄】 /【 ► 】arrow button to select the program
that you want to watch.
·Use down【▼】arrow button to highlight SYSTEM. Navigate using 【◄】 /【 ► 】arrow button to select the option.
·Use down【▼】arrow button to highlight AFT. Navigate using 【◄】 /【 ► 】arrow button to select this option ON or OFF.
·Use down【▼】arrow button to highlight ADD/ERASE. Navigate using 【◄】 /【 ► 】arrow button to select this option.
·Use down【▼】arrow button to highlight FINE. Navigate using 【 ► 】arrow button to select this option.
16
9. TROUBLESHOOTING AND ADVICE
Should your unit develop a problem, please refer to the below troubleshooting table before
requesting assistance.
Troubleshooting
No signal
No colour shades
Control
Please check that all cables are correctly plugged in.
Adjust the contrast, colour and brightness
Stain show on the
screen
Maybe result from a lighting signal from car, motor, neon light and
other electrical devices or appliances.
Double or multiple
display image
Maybe the result of an electrical wave disturb from other TV,
Computer and Game machine or Radio
Snow on the screen
The cables of the antenna are not correctly plugged in.
The remote control
does not work
Please check the polarity of the batteries. Check that the receiver
of the remote control is not sheltered by something.
"Zip" noise on
coming from TV
No sound
Even if the display image is correct, the noise may come from an
unsteady fixation of the panel.
Make sure that you have not press the MUTE button o n t he remote
control.
17
10. SPECIFICATIONS
Screen Size
19 Inch
Resolution(Pixel)
1366 X 768
Aspect Ratio
16:9
Power Input
DC12V 4A
TV System
NTSC
Video Input Format
NTSC
Antenna Input
Audio Output
L / R 2X3 W
HDMI
Input
Standards TMDS Max. 1080P
(Video/S-Video/YPbPr/PC)
Audio (AV/S-Video/YPbPr/PC)
1366 X 768/60Hz
R/L 200mVrms (max3.0vp-p) 20K Ω RCA
This manual is only for your reference, any change to the design and specification will not
be advised.
18
11. Wall mounting assembly instruction
19
1
PREFACE
3
2
PRECAUTIONS
DE SECURITE
3
3
DANS LE CARTON
5
4
CONNECTIONS
DE DEVANT ET
DE DERRIERE DE
LA TELE LCD
6
5
INSTALLATION
DE BASE
Connection Fil d'Alimentation
Connection Antenne
Connection AV
Connection YPbPr
Connection VGA (PC)
7
Connection HDMI
9
7
8
8
9
6
TELECOMMANDE
Instructions de la Télécommande
10
7
OPERATION DE
BASE
Sélectionner Entrée Source
11
Menu Image
12
Menu Son
13
Menu Réglage
14
Menu Fonction
14
Menu Chaîne
16
8
OPERATION TELE
9
DEPANNAGE ET
CONSEILS
17
10
SPECIFICATIONS
18
11
INSTRUCTION
D'ASSEMBLAG
E MONTAGE
MURAL
19
1. PREFACE
Merci d'avoir acheté cette Télé! Veuillez lire attentivement ce manuel avant de manipuler la télé.
Assurez-vous que la Télé n'a pas été endommagé en transit. Si la Télé est endommagée, ne pas
l'installez et contactez votre fournisseur. Vérifiez que vous avez tous les accessoires selon le
modèle.
2. PRECAUTIONS DE SECURITE
Posez la Télé sur une surface stable.
Ne placez aucun matériel sur la Télé.
Minimum distances
25mm
25mm
25mm
60mm
N'utilisez pas la Télé avec des appareils autres que ceux fournis ou
suggérés par le fabricant.
Ne bloquez pas et ne couvrez pas les ouvertures de ventilation de la Télé.
Si vous avez un montage mural, vérifiez que c'est stable.
Fil d'alimentation et câbles doivent être routés et protégés pour éviter que
les gens marchent dessus et que la Télé tombe.
3
Garder la Télé sec et loin de l'humidité.
Garder la Télé loin des sources de chaleur.
Débranchez la Télé avant de le nettoyer.
N'utilisez pas de solvant ou liquide pour nettoyer la Télé.
Nettoyez la Télé seulement avec un chiffon doux et sec.
En cas d'anomalies, n'utilisez pas des pièces de rechange autres
que celles suggérées par le fabricant. L'utilisation de pièces de
rechange inadéquat peut aboutir à de choques électriques,
feu de court-circuit et autres incidents.
Débranchez la Télé s'il y a orage et éclair ou si la Télé n'est pas
utilisée pendant une longue période.
4
3. DANS LE CARTON
Poste Télé
Télécommande
MANUEL D'INSTRUCTION
Veu il le z li re a tt en ti ve me nt c e ma nu el e t le r et en ir p ou r fu tu r
ré fé re nc e av an t d' ut il is er l a Télé .
MODELE: LCD1933
Manuel de l'Utilisateur
2 piles
Fil d'alimentation
Adapteur AC
4. CONNECTIONS DE DEVANT ET DE DERRIERE DE LA TELE LCD
VUE DE FACE
1. Appuyer le bouton "POWER" pour allumer ou éteindre.
2. Appuyer "CH+" ou "CH-" pour parcourir les chaînes.
3. Appuyer "VOL+" ou "VOL-" pour augmenter
ou descendre le volume.
4. Appuyer "MENU" pour afficher le menu
principal sur l'écran.
5. Appuyer "INPUT" pour entrer la source.
6. INDICATEUR D'ALIMENTATION: lumière
rouge veut dire mode veille, lumière
bleu quand la Télé est allumée.
7. CAPTEUR A DISTANCE: capteur infrarouge
pour la télécommande.
10
9
8
7
6
5
4
3
2
1
1. Douille d'alimentation de courant.
2. Connection HDMI. / Si vous avez un lecteur DVD ou un lecteur jeu vidéo, cette douille le
relie à la Télé avec un câble HDMI fournissant un playback audio et vidéo à haute définition.
3. Prise VGA. / Cette prise relie votre ordinateur à votre Télé.
4. Connection YPbPr/ Cette douille relie la sortie YPbPr de votre lecteur DVD.
5. Connection Super-Vidéo/ Cette douille relie la sortie super vidéo de votre lecteur DVD.
6. Connection Vidéo/ Cette douille relie la sortie du signal vidéo du lecteur DVD de votre Télé.
7. Connection chaîne audio Gauche et Droite/ Cette douille relie le signal audio à votre Télé.
8. Connection PC Audio/ Cette douille relie la prise de sortie audio à votre ordinateur.
9. Casque Ecouteur/ Cette douille relie le casque écouteur à votre Télé.
10. Connection Fréquence Radio/ Cette douille relie votre antenne à votre Télé.
5. INSTALLATION DE BASE
Connection Fil d'Alimentation
- Branchez correctement le fil d'alimentation et l'adapteur AC comme montré.
- Appuyez l'interrupteur POWER de votre Télé LCD pour allumer. L'indicateur d'alimentation
sur le panneau avant s'allume en bleu.
Adapteur AC
Fil d'alimentation
Connection Antenne
Pour obtenir de bonnes images et de bons sons, le système de l'antenne Télé doit être installé.
Le système de l'antenne comme montré, peut être alimenté par des magasins d'équipement de
Télé qui fournissent des services pour installation et connection. Après installation, insérez la
fiche d'antenne 75-OHM dans la prise d'antenne comme montré.
ANTENNE VHF
ANTENNE VHF
AMPLIFICATEUR
ANTENNE
EXTERIEUR
AMPLIFICATEUR
ANTENNE
INTERIEUR
PRISE D'ALIMENTATION
D'AMPLIFICATEUR
D'ANTENNE
75 OHM
PRISE D'ANTENNE
Connection AV
Branchez la prise de sortie VIDEO et AUDIO du DVD ou VCR à la prise AV IN en utilisant le câble
RCA (Jaune [vidéo], Blanc et ROUGE [audio gauche & droit].
Sélectionnez Entrée Source AV en utilisant le bouton SOURCE de la Télécommande.
Télé arrière
Câble Vidéo
DVD ou VCR arrière
DVD ou VCR
Connection YPbPr
Branchez la prise sortie YPbPr de votre DVD ou VCR à la prise entrée YPbPr du poste. Comparé
à un branchement d'un VCR normal à la prise entrée de vidéo, la qualité d'image est bien améliorée.
Branchez la prise sortie Audio du DVD ou VCR à la douille entrée Audio du poste en utilisant un
câble RCA. (Fiche 3,5mm fiche 2X RCA)
Assortissez les couleurs des douilles : Y en vert, Pb en bleu, Pr en rouge, Audio gauche est blanc
et Audio droit en rouge.
Sélectionnez la source entrée YPbPr en utilisant le bouton SOURCE de la télécommande.
Câble Audio
Télé arrière
Câble YPbPr
DVD ou VCR arrière
DVD ou VCR
Connection VGA (PC)
Branchez la prise sortie RGB du PC à la fiche VGA du poste. Branchez la prise sortie AUDIO du
PC à la fiche PC AUDIO du poste. Sélectionnez l'entrée source du PC en utilisant le bouton
SOURCE de la télécommande.
Télé arrière
Câble Audio
Câble VGA
Connection HDMI
La connection HDMI permet à l'utilisateur de transférer les signaux de contrôle audio et vidéo
grâce à un seul câble. Ces signaux sont transférés en digital.
Télé arrière
Câble HDMI
DVD ou VCR arrière
DVD ou VCR
6. TELECOMMANDE
Instructions de la Télécommande
1. EN VEILLE
Pour allumer la Télé ou mettre la Télé en mode veille.
2. EJECT
Pour ouvrir ou fermer le chargeur du lecteur DVD.
2
1
3
3. INFO
Affiche les informations du programme que vous
regardez.
4. SOURCE
Appuyez ce bouton pour sélectionner une entrée source.
4
5
7
6
8
9
10
5. PMODE
Appuyez ce bouton pour sélectionner un mode d'image
pour différents qualités d'images.
6. SMODE
Appuyez ce bouton pour sélectionner le réglage de son
pour différents effets sonores.
12
7. 0-9
Vous permet de changer la chaîne de la Télé.
11
8.
Changer entre les chaînes précédent et actuel.
13
9. SLEEP
Pour configurer la durée de temps avant que la Télé
s'éteigne automatiquement.
15
16
14
17
10. VOL+/VOLAugmente/diminue le volume.
11. CH+/CHPour aller à la chaîne suivante/précédente en mode
Télé.
12. Haut/Bas/Gauche/Droite
Pour déplacer le curseur vers le haut/vers le bas/vers la
gauche/vers la droite quand vous faites un choix.
13. MENU
Affiche le Menu OSD de la Télé.
14. CC
Appuyez le bouton pour entrer en mode CC.
15.MTS
Pour changer entre STEREO, MONO et SAP. S'il n'y a
aucun langage valable pour le signal réceptionné,
l'audio de l'LCD Display changera en mono.
16. ENTER
Entre la fonction sélectionnée.
17. EXIT
Appuyez ce bouton pour quitter ce qui est affiché à l'écran.
10
Manuel OSD
7. OPERATION DE BASE
SELECTIONNER ENTREE SOURCE
ENTREE SOURCE
Utilisez le bouton INPUT pour afficher la liste entrée source ;
Utilisez les boutons ▲/▼ pour sélectionner l'entrée source que vous voulez voir ;
Utilisez le bouton ENTRER pour entrer entrée source ;
OPERATION DE BASE
Utilisez le bouton MENU pour afficher MENU PRINCIPAL OSD ;
Utilisez le bouton ▲/▼ pour sélectionner le MENU que vous voulez ;
Utilisez le bouton ► pour entrer le sous-menu ;
Vous pouvez utiliser le bouton MENU ou EXIT pour enregistrer ou retourner au menu précédent.
Utilisez le bouton ▲/▼ pour sélectionner l'option puis appuyez ◄/►pour régler la valeur dans le
sous-menu ;
11
Manuel OSD
8. Menu Télé
IMAGE
Le menu IMAGE offre des options pour améliorer et affiner l'image affiché à la Télé basé sur la
lumière ambiante et les préférences personnelles. Les options de réglage comprennent MODE
IMAGE, CONTRASTE, LUMINOSITE, COULEUR, TEINT, NETTETE, COULEUR TEMP.
Et REDUCTION DE BRUIT.
Comment Naviguer :
Appuyez le bouton MENU de la télécommande. Naviguer en utilisant les boutons de direction
◄/► pour sélectionner IMAGE. Appuyez le bouton de direction vers le bas ▼ pour marquer
MODE IMAGE, puis appuyez le bouton de direction ◄/► pour sélectionner la préférence de
visualisation de votre choix.
Le réglage STANDARD est recommandé pour la plupart des visualisations. Dépendant de la
lumière ambiante de la pièce, vous pouvez sélectionner un des options que vous voulez.
Pour effectuer des ajustements plus cruciaux basés sur votre propre préférence dans
PERSONAL :
Utilisez le bouton de direction vers le bas ▼ pour marquer CONTRASTE. Naviguez en
utilisant les boutons de direction ◄/► pour augmenter ou diminuer l'intensité de contraste.
Utilisez le bouton de direction vers le bas ▼ pour marquer LUMINOSITE. Naviguez en
utilisant les boutons de direction ◄/► pour augmenter ou diminuer la luminosité générale.
Utilisez le bouton de direction vers le bas ▼ pour marquer COULEUR. Naviguez en utilisant
les boutons de direction ◄/► pour augmenter ou diminuer l'intensité de couleur.
Utilisez le bouton de direction vers le bas ▼ pour marquer TEINT. Naviguez en utilisant les
boutons de direction ◄/► pour régler les couleurs vers le vert ou teint rougeâtre.
Utilisez le bouton de direction vers le bas ▼ pour marquer NETTETE. Naviguez en utilisant
les boutons de direction ◄/► pour adoucir ou afficher de meilleures images.
Utilisez le bouton de direction vers le bas ▼ pour marquer COULEUR TEMP . Naviguez en
utilisant les boutons de direction ◄/► pour sélectionner COOL ( plus de bleuté), NORMAL
ou VIF. La configuration par défaut est NORMAL.
Utilisez le bouton de direction vers le bas ▼ pour marquer REDUCTION DE BRUIT.
Naviguez en utilisant les boutons de direction◄/► pour choisir ON ou OFF.
12
Manuel OSD
SON
Le menu SON offre des options pour effectuer des améliorations de son tout en écoutant à
travers l'haut-parleur.
Comment Naviguer :
Appuyez le bouton MENU de la Télécommande. Naviguez en utilisant les boutons de direction
◄/► pour sélectionner SON. Appuyez le bouton de direction ▼ pour marquer MODE SON, puis
appuyez le bouton de direction ◄/► pour sélectionner votre son préféré.
Pour effectuer des ajustements de son plus cruciaux basés sur votre propre préférence dans
PERSONNEL:
Utilisez le bouton de direction vers le bas ▼ pour marquer Bass. Naviguez en utilisant les
boutons de direction ◄/► pour augmenter ou diminuer l'intensité de basse fréquence.
Utilisez le bouton de direction vers le bas ▼pour marquer TREBLE. Naviguez en utilisant les
boutons de direction ◄/► pour augmenter ou diminuer l'intensité de haute fréquence.
Utilisez le bouton de direction vers le bas ▼pour marquer BALANCE. Naviguez en utilisant les
boutons de direction ◄/► pour régler le son vers le haut parleur gauche ou le haut parleur
droit.
Utilisez le bouton de direction vers le bas ▼ pour marquer AVL. Naviguez en utilisant les
boutons de direction ◄/► pour sélectionner ON ou OFF.
13
Manuel OSD
REGLAGE
Dans le menu REGLAGE, vous pouvez changer les réglages initiaux tels LANGUE, OSD TIMER,
TRANSPARENCE, OVERSCAN, et RESET votre Télé au statut par défaut par le fabricant.
Comment Naviguer :
Appuyez le bouton MENU de la télécommande. Naviguez en utilisant les boutons de direction
◄/► pour sélectionner REGLAGE. Ayez accès pour afficher les options en appuyant le bouton
de direction vers le bas▼ pour marquer LANGUE ou autres options, puis appuyez les boutons
de direction ◄/► sur votre télécommande pour choisir.
Utilisez le bouton de direction vers le bas▼ pour marquer LANGUE. Naviguez en utilisant les
boutons de direction ◄/► pour sélectionner Langue OSD. Il y a 6 langues de sélection :
ANGLAIS>ALLEMAND >FRANÇAIS>ESPAGNOL>ITALIEN>PORTUGUAIS.
Utilisez le bouton de direction vers le bas▼ pour marquer OSD TIMER. Naviguez en utilisant
les boutons de direction ◄/► pour sélectionner OSD Timer. Il y a 6 modes de sélection :
5SEC>10SEC >15SEC>20SEC>25SEC>30SEC.
Utilisez le bouton de direction vers le bas▼ pour marquer OVERSCAN. Naviguez en utilisant
les boutons de direction ◄/► pour sélectionner ON ou OFF. Mais cette option n'est valable
qu'en Source HDMI.
Utilisez le bouton de direction vers le bas▼ pour marquer RESET. Naviguez en utilisant les
boutons de direction ◄/► pour refuser les options dans le menu REGLAGE.
FONCTION
Dans le menu FONCTION, vous pouvez changer la configuration de fonctions de votre choix
tels SLEEP TIMER, ASPECT, C.CAPTION PARENT CTRL et ECRAN BLEU.
Comment Naviguer :
Appuyez le bouton MENU de la télécommande. Naviguez en utilisant les boutons de direction
◄/► pour sélectionner FONCTION. Ayez accès pour afficher les options en appuyant le bouton
de direction vers le bas▼ pour marquer SLEEP TIMER ou autres options, puis appuyez les
boutons de direction ◄/► sur la télécommande pour choisir.
14
Manuel OSD
Utilisez le bouton de direction vers le bas▼ pour marquer SLEEP TIMER. Naviguez en utilisant le
bouton ◄/► pour sélectionner le sleep timer, et la télé s'éteindra automatiquement selon le temps
configuré. Il y a 9 modes de sélection : 15 Min >30 Min>45 Min>60 Min>75 Min>90 Min>105
Min>120 Min>OFF.
Utilisez le bouton de direction vers le bas▼ pour marquer ASPECT. Naviguez en utilisant le
bouton ◄/► pour sélectionner : PLEIN >ZOOM>SOUS-TITRE>4 :3>14 :9>AUTO. Le réglage par
défaut est FULL. .
Utilisez le bouton de direction vers le bas▼ pour marquer C.CAPTION. Naviguez en utilisant le
bouton ◄/► pour sélectionner : OFF>Cc1>CC2>CC3>CC4>TEXT1>TEXT2>TEXT3>TEXT4>. Le
réglage par défaut est OFF.
Utilisez le bouton de direction▼ pour marquer PARENT CTRL. Naviguez en utilisant le bouton
◄/► pour sélectionner cette option.
Entrez votre code à 4 chiffres (code par défaut de l'usine est « 0000 ») à moins que le code a été
changé en entrant au sous-menu.
Utilisez le bouton de direction vers le bas▼ pour marquer CHANGER LE MOT DE PASSE. Naviguez en
utilisant les boutons de direction ◄/► pour changer le mot de passe du système de verrouillage. Une
boîte comme sur l'image ci-dessus s'affichera, l'entrée d'un nouveau mot de passe peut changer le mot
de passe.
Utilisez le bouton de direction vers le bas▼ pour marquer V-CHIP. Naviguez en utilisant les boutons de
direction ◄/► pour sélectionner cette option ON ou OFF. Quand le système de verouillage est au OFF, le
verrouillage ci-dessous n'est plus valide.
Utilisez le bouton de direction vers le bas ▼ pour marquer CLASSEMENT-TV. Naviguez en utilisant le
bouton de direction ► pour entrer au sous-menu et sélectionner.
Utilisez le bouton de direction vers le bas ▼ pour marquer CLASSEMENT-FILM. Naviguez en utilisant
les boutons de direction ◄/► pour sélectionner cette option. NONE, G, PG, PG-13, R, NC-17 ou X.
Utilisez le bouton de direction vers le bas ▼ pour marquer CLASSEMENT-ANGLAIS. Naviguez en
utilisant les boutons de direction ◄/► pour sélectionner cette option VIDE, C, C8+, G, PG, 14+ ou 18+.
Utilisez le bouton de direction vers le bas ▼ pour marquer CLASSEMENT-FRANCAIS. Naviguez en
utilisant les boutons de direction ◄/► pour sélectionner cette option VIDE, G, 8 ANS+, 13 ANS+, 16 ANS
+, ou 18 ANS+.
Utilisez le bouton de direction vers le bas ▼ pour marquer ECRAN BLEU. Naviguez en utilisant les
boutons de direction ◄/► pour sélectionner cette option au ON ou OFF.
15
Manuel OSD
CHAINE
Dans le menu CHAINE, vous pouvez changer le réglage des chaînes de votre choix tels
SOURCE, AUTO SCAN et PROGRAMME MANUEL.
Comment Naviguer:
Appuyez le bouton MENU sur la télécommande. Naviguez grâce aux boutons de direction ◄/►
pour sélectionner CHAINE. Ayez accès pour afficher les options en appuyant le bouton de
direction ▼ pour marquer SOURCE ou autres options, puis appuyez les boutons de direction
◄/► de votre télécommande pour sélectionner.
Utilisez le bouton de direction ▼ pour marquer SOURCE. Naviguez en utilisant le bouton ◄/► pour
sélectionner l'option CATV ou AIR.
Utilisez le bouton de direction ▼ pour marquer RECHERCHE AUTO. Naviguez en utilisant le bouton
◄/► pour commencer une recherche automatique.
Utilisez le bouton ▼ pour marquer PROGRAMME MANUEL. Naviguez en utilisant le bouton ► pour entrer
le sous-menu.
Utilisez le bouton de direction ▼ pour marquer PROGRAMME. Naviguez en utilisant le bouton ◄/► pour
sélectionner le programme que vous voulez voir.
Utilisez le bouton de direction ▼ pour marquer SYSTEME. Naviguez en utilisant le bouton ◄/► pour
sélectionner cette option.
Utilisez le bouton de direction ▼ pour marquer AFT. Naviguez en utilisant le bouton ◄/► pour sélectionner
cette option ON ou OFF.
Utilisez le bouton de direction ▼ pour marquer AJOUTER/SUPPRIMER. Naviguez en utilisant le bouton
◄/► pour sélectionner cette option.
Utilisez le bouton de direction ▼ pour marquer FINE. Naviguez en utilisant le bouton ► pour sélectionner
cette option.
16
9.DEPANNAGE ET CONSEILS
Si votre unité encontre un problème, veuillez vous référer au tableau de dépannage ci-après avant
demande d'assistance.
Anomalies
Aucun signal
Pas de nuances de
couleur
Contrôle
Vérifiez que tous les câbles sont correctement branchés.
Ajuster le contraste, couleur et luminosité.
Tâche sur l'écran
Pourrait résulter d'éclairage d'une voiture, moteur, néon et autres
dispositifs électriques ou appareils.
Image affiché en
double ou multiple
Pourrait résulter d'une perturbation de sonde électrique d'autres
télé, ordinateur et machine de jeu ou radio.
Neige apparaissant
à l'écran
Les câbles de l'antenne ne sont pas branchés correctement.
La télécommande
ne fonctionne pas
Veuillez vérifier les polarités des piles. Vérifiez si le receveur de
la télécommande n'est pas caché par quelque chose.
Bruit "zip" venant
de la Télé
Même si l'image affiché est correct, le bruit pourrait venir d'une
fixation instable du panneau.
Pas de son
Assurez-vous que vous n'avez pas appuyé le bouton MUET sur le
panneau ou sur la télécommande.
17
10.SPECIFICATIONS
19 Inch
Taille d'écran
Résolution (Pixel)
1366 X 768
Aspect Ratio
16:9
DC12V 4A
Entrée alimentation
NTSC
Système Télé
NTSC
Format entrée Vidéo
Entrée Antenne
Prise d'antenne standard 75 Ω
Sortie Audio
L / R 2X3 W
HDMI
Input
Standards TMDS Max. 1080P
Entrée(Vidéo/S-Vidéo/YpbPr/PC)
Audio (AV/S-Video/YPbPr/PC)
1366 X 768/60Hz
R/L 200mVrms (max3.0vp-p) 20K Ω RCA
Ce manuel est seulement pour référence, tout changement au design et spécification ne sera
pas informé d'avance.
18
11. INSTRUCTION D'ASSEMBLAGE MONTAGE MURAL
1. Fixez la télé sur une surface non-abrasive.
2. Enlevez les 3 vis montrés sur la figure A avec un tournevis.
3. Enlever le stand de la Télé, voir Figure B.
4. Fixer les 4 vis comme sur la Figure C. (Vis spéc: M4X10)
5. Attachez le support de montage mural utilisant les 4 vis.
19