1
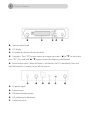
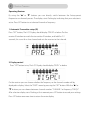
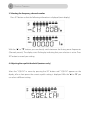
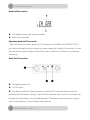
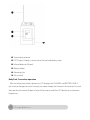
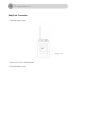
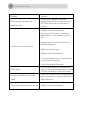
The New iLive series of AMC Wireless systems
Created for active musician and presenters who also manage their own sound, AMC
iLive improves your performance and simplifies your setup.
Innovations such as automatic transmitter setup make wireless system management
effortless. iLive wireless microphone system deliver the crystal clear sound quality that
pro audio engineers trust.
CONTENTS:
Receiver features
3
Handheld Transmitter
8
Body pack Transmitter
10
Changing Batteries
11
Operation
13
Troubleshooting
15
Specifications
16
Volume control knob
LCD display
IR window for data transfer to transmitter
Controllers: Press "SET" to enter menu, to navigate menu press “” or “”, to select item
press “SET”. Press and hold “” “” button to select the frequency and channel.
Power button switch: When the Power is switched on, the LCD should be lit, Press and
hold the button for 3 seconds, to turn off the receiver.
AC power supply
Antenna input
XLR balanced audio output
l/4" unbalanced audio output
Audio level switch
8-step level display showing incoming RF signal
8-step level display with “PEAK” warning showing incoming AF signal
When the FREQ light glows, displayed numbers show active frequency.
When the CHAN light glows, displayed numbers show active channel.
Squelch (MUTE) indicator: with the active mute, no signal is transmitted to outputs
Diversity display (shows if antenna I or antenna II is active).
Operating Menu
• Before turning on the receiver, firstly ensure that the transmitter is switched off, and then
adjust receiver volume to the min.
• Check for Audio and Radio frequency decibel meters. If values are high exchange the
channel to avoid the noise spot, it may also increase the static chirp value, enhancement
anti jamming ability.
• Lastly turn on the transmitter power source, the corresponding channels radio frequency
decibel meter lightens. Adjust receivers audio output level to suitable size, then speak to
the microphone, the receiver audio frequency decibel meter lightens in correspondence
to microphone volume level. If voice output is not hearable and the decibel meter is not
bright, overhaul transmitter and receiver.
Operating Receiver
By using the “” or “” buttons you can directly switch between the factory-preset
frequencies or channels presets. The display starts flashing by indicating that your selection is
active. Press SET button to set selected channel or frequency.
1. Automatic Transmitter setup (IR)
Press "SET" button, The LCD Display should display “PRG IR” as below. Put the
receiver IR window to match the transmitter IR window, and hold for 2-3
seconds, this scans for a clear channel and sets the receiver to that channel.
.
2. Display control
Press "SET" button twice, The LCD Display should display “DISPL” as below.
On the receiver you can choose whether the frequency or the channel number will by
displayed in display. Select the “DISPL” menu by pressing the “SET” button. With the “” or
“” buttons you can choose between: channel number: “CHANNEL” or frequency: “FREQU”
After selection display starts flashing, at this moment press SET button to record your settings.
Press SET button one more time to return the main display.
3. Selecting the frequency, channel number
Press SET button so that the following information is displayed (main display)
With the “” or “” buttons you can directly switch between the factory-preset frequencies
(Channels presets). The display starts flashing by indicating that your selection is active. Press
SET button to record your setting.
4. Adjusting the squelch threshold (receivers only)
Select the "SQELCH" in menu by pressing the SET button until "SQELCH" appears on the
display; after a short pause the current squelch setting is displayed. With the “”or “” you
can select a different setting.
The squelch can be switched of (0 dB) or adjusted in 5 db steps. Selecting a smaller value
reduces the squelch threshold, selecting a higher value increases the squelch threshold. New
setting starts flashing on the display. Set the squelch threshold to the lowest possible value
that suppressed hissing noise. If the squelch threshold is set too high, the transmission
distance will be reduced.
5. Locking and Unlocking Controls
Press SET button until you will see the LCD display as below
You can lock the “ ” buttons to prevent accidental programming during operating.
Activating the Lock-mode function
Select “LOCK” in menu by pressing the “SET” button. Current setting is indicated on the
display. Press “” button to activate the lock-mode function. “LOCK ON” starts flashing on the
display. Press “SET” button to return to the main menu.
Note:
If you press “” / “” buttons, “LOCK” appears on the display informing that the buttons are
now locked.
Deactivating lock-mode function
Select “LOCK” in menu by pressing “SET” button. “LOCK ON” appears on the display.
Press ““” / “” buttons to deactivate the lock-mode function (“LOCK OFF” begins to flash on
the display) Press “SET” button to return to the main display. Now all functions can be
operated normally.
Sound inlet basket
Display section
IR port receives infrared beam to synchronize frequencies
Power on/mute/off
Microphone body
Battery port: 2*1,5 AA Alkaline batteries
RF LOW and HIGH switch
LOCK switch
Hand-held transmitter
LCD display showing the channel number
Battery level indicator
Operating Hand-held Transmitter
After switching transmitter’s power on, LCD displays the CHANNEL and BATTERY LEVEL. If
you want to change the active channel, you need change the channel in the receiver first and
then, put the transmitter IR port in front of the receiver and Press SET button to synchronize
frequencies.
Body Pack Transmitter
Microphone Input Jack
On-Off switch
Low battery indicator: When the power is switched "ON", indicator blink one time, for
improving that the battery capacity is normal. When indicator shows no activity unit does not
have power, or the battery was not loaded properly. If the battery indicator lamp is shining, it
shows that the battery is low and needs to be replaced.
Transmitting antenna
LCD Display: Displays current active channel and battery status
Infrared detector (IR port)
Battery holder
Mounting clip
Gain control
Body Pack Transmitter operation
After switching transmitter’s power on, LCD displays the CHANNEL and BATTERY LEVEL. If
you want to change the active channel, you need change the channel in the receiver first and
then, put the transmitter IR port in front of the receiver and Press SET button to synchronize
frequencies.
Handheld Transmitter
1. Open the battery cover
2. Insert the 2*1,5V AA Alkaline battery
3. Close the battery cover
Body Pack Transmitter
1. Open the battery cover
Battery cover
2. Insert the 2*1,5V AA Alkaline battery
3. Close the battery cover
•
When selected frequency in the 25MHz band width allocation is without intermodulations, 4 transmitters may be used simultaneously, if more wireless microphones is
needed, other frequency hand type equipment has to be used.
• Distance between the receiver and the transmitter should not be too far, minimum distance
is 1 meter.
• If the receiver’s RF condition is not ideal, external high gain antenna, even the antenna
amplifier, may achieve very obvious gain effects.
• The receiver and the transmitter must use the same frequency.
• When using multiple receivers it is suggested to install the high gain antenna,
antenna amplifier and the receiver shunt.
• Both, transmitter and receiver should be in direct access and least obstacles
should be met in path between them.
• When the receiver is used with omni-directional antenna, the antenna should
be minimum 0.5m from the wall, and should be kept far away from any
other metal constructions.
• When the multiple transmitter’s are used together, they should be separated
by at least 20cm, in order to avoid disturbs.
• After finished using the transmitter, switch off the power source. Remove the
batteries when storing for long time.
• Handheld transmitter should be grasped in the middle of full length. Not too
close to the microphones head so microphone's electrical pickup effect
would not be affected. Not too close to base antenna position so emission
efficiency would not be cut, and service range would not be reduced.
• Changing active distance between the microphone and lips may cause
fluctuation in high frequency reproduction.
• Belt type transmitter uses 1/4 wave length whip antenna, this antenna
should not contact with the human body, also should be separated from
microphones cable which would reduce the overall efficiency.
• Adjusts between the microphone and mouth's distance, may fluctuate the
high bass.
• When storing switch of receiver’s power and remove batteries from
transmitters.
Problem
Receiver does not show any
operation signs
Solution
Make sure AC adapter is securely
plugged into electrical outlet and in to
DC input connector on rear panel of
receiver
Remove nearby sources which may
interfere with radio frequency
transmission (CD players, computers,
digital effects, in-ear monitor systems,
etc.)
Change receiver and transmitter to a
different frequency.
Distortion or unwanted noise
Reduce transmitter gain.
Replace transmitter batteries.
If using multiple systems, change one of
active systems frequency.
No RF signal
Adjust the squelch threshold.
Transmission frequency should be the
same as the receiving frequency, or make
sure the transmitter is not out of range.
signal
Check connector to the microphone and
make sure receiver's squelch threshold is
adjusted to low
Transmitter could not be turned on
Replace transmitter batteries
RF signal available but no audio
Specifications for system:
Carrier frequency range
:
:
795 MHz – 820 MHz; 606 MHz - 648 MHz
Modulation FM
Adjustable range
Channels
:100
:25MHz
:
Frequency stability:±0.005%
Dynamic range:100dB
Max. Deviation:±45KHz
Frequency response:80Hz-18KHz (±3dB)
S/N ratio :>105dB
T.H.D:≤0.5%
Working range: 100m (Note: actual range depends on
RF signal absorption, reflection, and interference)
Operating temperature range:-10 °C--+40°C
Receiver :
Receiver way:Two frequency conversion super-heterodynes
Intermediate frequency:110MHz, 10.7MHz
Antenna :BNC/50Ω
Sensitivity :12 dB µV (80dBS/N)
Sensitivity range :12-32 dB µV
Image rejection:≥75dB
Max. Audio output:+10 dB V
Transmitter:
Antenna:built-in spiral antenna for the handle microphone
1/4 Wave length spiral antenna for the body pack
Power output :High 30mW;low 3mW
Image rejection :-60dB
Battery :2*1.5 V AA Alkaline battery
Battery life:30mW for 10 hours, 3mW for 15 hours
Channel spacing 250KHz
AMC is a registered trademark of AMC Baltic www.amcpro.eu