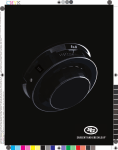
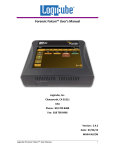
1
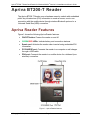
Apriva BT200-T
Smart Card Reader
for Window Mobile
Version 6.x
®
®
Installation and
User’s Guide
Apriva 6900 East Camelback Road Suite 700 | Scottsdale AZ 85251
Apriva BT200-T Smart Card Reader
for Windows Mobile Version 6.x
Installation and User’s Guide
®
®
®
Part number 700012-01
September 2010
Apriva 6900 East Camelback Road Suite 700 | Scottsdale AZ 85251
Apriva® BT200-T Smart Card Reader for Windows Mobile® Version 6.x Installation and User’s Guide
Notice
Terms and Conditions
This publication is proprietary of Apriva and is intended solely for use by
Apriva customers. This publication may not be reproduced or distributed for
any purpose without the written permission of Apriva.
The information Apriva furnished in this publication is believed to be accurate
and reliable. However, Apriva assumes no responsibility for its use, and
reserves the right to make changes to the publication at any time without
notice. This document applies to Apriva products and supporting software.
Trademarks
Apriva and Apriva logos are registered trademarks of Apriva. Apriva has
attempted throughout this publication to use trademarks correctly and
consistently with the wishes of the owners of such trademarks. Any error in
identifying any proprietary marks or notices is inadvertent and unintentional.
All product names and services mentioned in this publication are the
trademarks, service marks, registered marks, or registered service marks of
their respective owners.
FCC and IC Requirements
In accordance with Federal Communications Commission (FCC) and Industry
Canada (IC) requirements, the Apriva Smart Card Reader operation is subject
to the following to conditions:
•
This device may not cause interference.
•
This device must accept any interference, including interference that
causes undesired operation of the device.
Important Legal Information
THIS DOCUMENT CONTAINS IMPORTANT TERMS AND CONDITIONS
REGARDING THE ACCOMPANYING APRIVA PRODUCT.
YOUR USE OF THE PRODUCT SHALL IRREVOCABLY INDICATE YOUR
ACCEPTANCE OF THE ENCLOSED TERMS AND CONDITIONS.
© Copyright 2010 Apriva.
Page i
September 2010
Apriva® BT200-T Smart Card Reader for Windows Mobile® Version 6.x Installation and User’s Guide
IF YOU DO NOT AGREE TO THE ENCLOSED TERMS AND CONDITIONS,
PROMPTLY RETURN THE PRODUCT TO THE PLACE OF PURCHASE
FOR A FULL REFUND. ALL RETURNED PRODUCTS MUST BE IN NEW
CONDITION, IN THE ORIGINAL PACKAGING.
APRIVA provides the original purchaser (“Purchaser”) of the product with
the following non-transferable License and Limited Warranty:
License
The firmware (software embedded in and provided with the product) is
licensed to Purchaser, not sold. Purchaser is granted a non-transferable, nonexclusive license to use the firmware solely in connection with Purchaser’s
use of the Product. Purchaser understands and agrees that it is not
permitted to distribute the firmware in any form, or to use the firmware
except as it is embedded in the non-volatile memory component(s) of the
Product. Purchaser agrees that it shall not allow any third party to attempt to
reverse engineer, decompile, or disassemble the firmware for any reason.
Limited Warranty
Apriva warrants to Purchaser that the Product will be free from material
defects in workmanship and materials for a period of three (3) years from the
date the Product was first purchased (“Warranty Period”). During the Warranty
Period and upon proof of purchase of the Product by Purchaser, Apriva, at
its option, will either repair or replace the Product without charge for either
parts or labor. If the Product is repaired or replaced during the Warranty
Period, the Warranty Period will still expire three (3) years from the date of
original purchase of the Product.
This Limited Warranty does not apply to normal wear and tear, and does not
cover repair or replacement of any Product damaged by misuse, accident,
abuse, neglect, misapplication, physical damage to the Product, or defects
due to repairs or modifications made by anyone other than Apriva or Apriva’s
authorized service representative.
This Limited Warranty does not apply to any peripheral equipment or items
other than the Product itself, nor does it apply when the malfunction results
from the use of this Product in conjunction with accessories other than the
Windows Mobile or other approved ancillary or peripheral equipment. Finally,
Apriva will have no obligations hereunder where it is determined by Apriva that
there is no defect in the Product itself. To obtain warranty service, Purchaser
must return the Product to Apriva at the address below, transportation and
insurance pre-paid.
Apriva
6900 East Camelback Road Suite 700
Scottsdale, AZ 85251
© Copyright 2010 Apriva.
Page ii
September 2010
Apriva® BT200-T Smart Card Reader for Windows Mobile® Version 6.x Installation and User’s Guide
Contents
Introduction .........................................................................................................1
Definitions .............................................................................................................1
Hardware and Software Requirements .................................................................2
Hardware Required .........................................................................................2
Software and Firmware Required ...................................................................2
Apriva BT200-T Reader .......................................................................................3
Apriva Reader Features ........................................................................................3
Powering on the Reader........................................................................................4
Installing the Reader Driver on the Mobile Device ................................................4
Pairing the Devices .........................................................................................6
Using Tethered USB Mode ...................................................................................8
Using Tethered USB Mode .............................................................................8
Switching to Bluetooth Mode ..........................................................................8
Charging the Reader Battery.................................................................................9
Charging Indications .....................................................................................10
Installing the Reader USB Driver ..................................................................10
Setting the Reader Power Down Timers .............................................................11
Viewing Reader Details .......................................................................................12
Viewing Reader Versions ....................................................................................13
Viewing Reader Information..........................................................................13
Updating the Firmware..................................................................................13
Reader Troubleshooting Tips ..............................................................................14
Reader LED Startup Indications ...................................................................14
Charging a Completely Discharged Reader Battery .....................................14
Reader LED Descriptions .............................................................................15
Reader Error Messages ................................................................................16
Support ..............................................................................................................17
Apriva Technical Support ....................................................................................17
Technical Support Contact Information .........................................................17
Technical Support Links................................................................................17
Microsoft Product Support ...................................................................................17
© Copyright 2010 Apriva.
Page iii
September 2010
Apriva® BT200-T Smart Card Reader for Windows Mobile® Version 6.x Installation and User’s Guide
Figures
Figure 1 – Apriva Reader features ........................................................................3
Figure 2 – Apriva Reader driver and firmware files ...............................................5
Figure 3 – Reader Connection area ......................................................................6
Figure 4 – Battery Level area ................................................................................9
Figure 5 – Power Down Timers area ...................................................................11
Figure 6 – Details tab ..........................................................................................12
Figure 7 – Driver and reader version screen .......................................................13
Tables
Table 1 – Definitions..............................................................................................1
Table 2 – LED Charging indications ....................................................................10
Table 3 – Reader LED descriptions.....................................................................15
Table 4 – Reader error messages .......................................................................16
© Copyright 2010 Apriva.
Page iv
September 2010
Apriva® BT200-T Smart Card Reader for Windows Mobile® Version 6.x Installation and User’s Guide
Introduction
This guide provides instructions to install and operate the Apriva® BT200-T
Smart Card Reader on mobile devices that use the Windows Mobile® version
6.x operating system. (Windows Mobile version 6.5 is currently not supported.)
NOTICE
For wireless connections, mobile devices must support Bluetooth® stack
requirements. For more information, contact Apriva Technical Support. See
Apriva Technical Support on page 17.
Definitions
Table 1 shows product terms and definitions used in this guide.
Term
Definition
Apriva Smart Card
Reader
Apriva device for allowing an interface between a
mobile device and a smart card.
Windows Mobile
Microsoft® operating system for mobile devices.
ActiveSync®
Microsoft software used to transfer files from
computers that use the Windows XP operating
system to mobile devices that use the Windows
Mobile operating system.
Windows Mobile Device
Center
Microsoft software used to transfer files from
computers that use the Windows Vista® or Windows
7 operating systems to mobile devices that use the
Windows Mobile operating system.
Table 1 – Definitions
© Copyright 2010 Apriva.
Page 1
September 2010
Apriva® BT200-T Smart Card Reader for Windows Mobile® Version 6.x Installation and User’s Guide
Hardware and Software
Requirements
The following sections describe hardware and software requirements.
Hardware Required
The following hardware is required:
•
Apriva BT200-T Bluetooth Smart Card Reader
•
Mobile device
•
Smart card
•
USB cable with mini adapter
•
Computer with Windows platform operating system (Windows XP,
Windows Vista, or Windows 7) for transferring files to the mobile device
or charging the battery.
NOTE: You cannot charge the reader battery with computers that use
Windows Vista or Windows 7 operating systems. See Charging the
Reader Battery on page 9.
Software and Firmware Required
The following software and firmware are required:
•
AprivaReader<vxx_xx_xxxx-date>.bin, where “<xx_xx_xxxx>” is the
version number
•
AprivaSmartCardDriver.<xx.xx.xx>.cab, where “<xx.xx.xx>” is the version
number
•
Microsoft ActiveSync or Windows Mobile Device Center
•
Windows Mobile version 6.x (except version 6.5, which is currently not
supported)
© Copyright 2010 Apriva.
Page 2
September 2010
Apriva® BT200-T Smart Card Reader for Windows Mobile® Version 6.x Installation and User’s Guide
Apriva BT200-T Reader
The Apriva BT200-T Reader uses a hardware security module with embedded
public key infrastructure (PKI) information to create a secure, one-to-one
connection with the mobile device through wireless Bluetooth protocol or a
Universal Serial Bus (USB) connection.
Apriva Reader Features
Figure 1 shows the following Apriva Reader features:
•
ON/OFF button: Powers the reader on and off.
•
GREEN/RED LEDs: Indicate battery and connection statuses.
•
Smart card: Activates the reader when inserted using embedded PKI
information.
•
PC/CHARGE port: Connects the reader to a computer or wall charger
through a USB cable.
•
PDA port: Connects the reader to a mobile device for a tethered (nonwireless) connection.
Figure 1 – Apriva Reader features
© Copyright 2010 Apriva.
Page 3
September 2010
Apriva® BT200-T Smart Card Reader for Windows Mobile® Version 6.x Installation and User’s Guide
Powering on the Reader
When powered on, both LEDs illuminate while the reader performs a series of
startup tests. For LED startup descriptions, see Reader LED Startup
Indications on page 14.
To power the reader on or off:
Press the Power On/Off button on the top of the reader. If the reader will
not power on (the LEDs are not lit), try charging the battery as described
in Charging a Completely Discharged Reader Battery on page 14.
Installing the Reader Driver on the
Mobile Device
You must install the Apriva Reader driver on the mobile device before you can
pair the devices. See Pairing the Devices on page 6.
To upload the reader files to the mobile device:
1. If applicable, obtain the Apriva firmware and driver files from your system
administrator. For more information, contact Apriva Technical Support.
See Apriva Technical Support on page 17.
2. If you do not have one currently installed, download a data
synchronization program, such as Microsoft ActiveSync (for Windows
XP) or Windows Mobile Device Center (for Windows Vista or Windows
7). You can download the programs from the Microsoft website at:
http://www.microsoft.com/windowsmobile/en-us/downloads/default.mspx
3. Connect the mobile device to the computer with the USB cable. Use the
supplied adapter if necessary.
4. Power on the mobile device. The data synchronization program should
start, showing the user interface of the mobile device on the computer. If
the program does not start, make sure it is correctly installed and that the
USB cable is correctly connected.
5. Copy and paste the Apriva reader firmware and driver files from the
computer to the following directory of the mobile device: Start > File
Explorer > My Documents, as shown in Figure 2 on page 5. The Apriva
Reader file names are similar to the following:
• AprivaReader<vxx_xx_xxxx-date>.bin, where “<xx_xx_xxxx>” is the
version number.
• AprivaSmartCardDriver.<xx.xx.xx>.cab, where “<xx.xx.xx>” is the
version number.
© Copyright 2010 Apriva.
Page 4
September 2010
Apriva® BT200-T Smart Card Reader for Windows Mobile® Version 6.x Installation and User’s Guide
Figure 2 – Apriva Reader driver and firmware files
6. Select the AprivaSmartCardDriver file shown in the directory. Selecting
the file automatically installs it. After installation, the mobile device
restarts.
© Copyright 2010 Apriva.
Page 5
September 2010
Apriva® BT200-T Smart Card Reader for Windows Mobile® Version 6.x Installation and User’s Guide
Pairing the Devices
Pairing the reader (and smart card) to the mobile device creates a one-to-one
connection between the devices.
To pair with the reader to the mobile device:
1. Connect the USB cable to the PDA port on the reader, and then connect
the other end of the USB cable to the mobile device. Use the supplied
USB adapter if necessary.
2. Press the ON/OFF switch to power on the reader.
3. Insert the smart card in the reader.
4. From the mobile device applications menu, select the Apriva Reader
icon ( ). The Apriva Smart Card Reader screen appears. See Figure 3.
If you do not see the Apriva Reader icon, you might need to reinstall the
software. See Installing the Reader Driver on the Mobile Device on
page 4.
Figure 3 – Reader Connection area
5. Select Test Connection to make sure the devices are connected.
6. In the Reader Connection area, select USB. Do not select Enhanced
USB. This feature is reserved for future Apriva reader versions.
7. Select Pair. After pairing, the “Pairing Complete” message appears.
8. Select ok to close the message box.
9. In the Reader Connection area, select the Bluetooth connection
method to enable the (wireless) Bluetooth connection.
10. Disconnect the USB cable.
11. Select Test Connection to make sure the devices are connected
through Bluetooth.
© Copyright 2010 Apriva.
Page 6
September 2010
Apriva® BT200-T Smart Card Reader for Windows Mobile® Version 6.x Installation and User’s Guide
• If the test is successful, the reader is now paired for wireless
operation. When the reader is powered on and the smart card is
inserted, the reader is available for Bluetooth operation. When the
smart card is removed or when you power it off, radio frequency (RF)
emissions stop and the reader is disabled.
• If the test fails, try the following, and then retest the connection:
o Check the cables and make sure they are in the correct ports on
device. See Apriva Reader Features on page 3.
o Make sure that the reader battery is charged. See Charging the
Reader Battery on page 9.
Contact Apriva Support if the problem persists. See Apriva Technical
Support on page 17.
© Copyright 2010 Apriva.
Page 7
September 2010
Apriva® BT200-T Smart Card Reader for Windows Mobile® Version 6.x Installation and User’s Guide
Using Tethered USB Mode
You can disable Bluetooth (wireless) mode and use the reader in tethered
USB mode. Tethered USB mode prevents wireless RF emissions. This is
useful in situations where RF emissions are not allowed, such as airplanes or
Sensitive Compartmented Information Facilities (SCIFs).
NOTE: The devices must be paired before you can switch between USB and
Bluetooth modes. See Pairing the Devices on page 6.
Using Tethered USB Mode
If you are currently using the reader in Bluetooth mode, you can switch to USB
mode.
To enable USB mode:
1. Connect the USB cable to the PDA port on the reader, and then connect
the other end of the USB cable to the mobile device. Use the supplied
USB adapter if necessary.
2. Make sure the smart card is inserted in the reader, and then press the
ON/OFF switch to power on the reader.
3. From the mobile device applications menu, select the Apriva Reader
icon ( ). The Apriva Smart Card Reader screen appears.
4. In the Reader Connection area, select USB. DO NOT select Enhanced
USB.
5. Select Test Connection to verify that the USB connection is working.
Switching to Bluetooth Mode
If you are currently using the reader in USB mode, you can switch to Bluetooth
mode.
To enable Bluetooth mode:
1. Make sure the USB cable is connected to the reader.
2. Make sure the smart card is inserted in the reader, and then press the
ON/OFF switch to power on the reader.
3. From the mobile device applications menu, select the Apriva Reader
icon ( ). The Apriva Smart Card Reader screen appears.
4. In the Reader Connection area, select Bluetooth.
5. Remove the USB cable.
6. Select Test Connection to verify that the Bluetooth connection is
working.
© Copyright 2010 Apriva.
Page 8
September 2010
Apriva® BT200-T Smart Card Reader for Windows Mobile® Version 6.x Installation and User’s Guide
Charging the Reader Battery
The reader battery must be fully charged before use. It takes approximately
three hours to charge a completely discharged battery. The LEDs on the top of
the reader indicate the charge status. See Charging Indications on page 10.
NOTICE
If you are charging the battery with a computer that uses Windows XP, you
must first install the Apriva USB driver. Failure to do so could drain the
reader battery. See Installing the Reader USB Driver on page 10.
You cannot charge the reader battery with computers that use Windows
Vista or Windows 7 operating systems. If your computer has one of these
operating systems, you must use a wall charger to charge the battery.
To keep the reader functioning properly, make sure the battery level is
always at least 50%. If the reader battery is completely discharged (LEDs
do not illuminate when reader is powered on), charge the reader battery as
described in Charging a Completely Discharged Reader Battery on page 14.
To view the battery voltage:
1. From the mobile device applications menu, select the Apriva Reader
icon ( ). The Apriva Smart Card Reader screen appears.
2. Select the Power tab. The Battery Level area shows the charge
percentage and voltage. See Figure 4. A fully charged battery measures
between 4.1 and 4.2 volts.
Figure 4 – Battery Level area
© Copyright 2010 Apriva.
Page 9
September 2010
Apriva® BT200-T Smart Card Reader for Windows Mobile® Version 6.x Installation and User’s Guide
To charge the reader battery:
Connect the USB cable from the PC/CHARGE port on the reader to the
USB port on the computer or a standard wall charger. Allow the battery
to charge for 20 to 30 minutes. When charging, the GREEN LED is
continuously lit with occasional quick flashes.
Charging Indications
Table 2 shows reader LED charging indications. For general LED operation
descriptions, see Reader LED Descriptions on page 15.
Indication
Description
GREEN LED is continuously lit with
occasional quick flashes.
The reader is connected to a computer
and the battery is charging.
GREEN LED is not continuously lit but
blinks on every few seconds.
The reader has a sufficient charge.
RED LED is continuously lit.
The battery is low and needs to be
charged.
Table 2 – LED Charging indications
Installing the Reader USB Driver
If you are using a USB connection to charge the battery (not a wall charger),
and the battery does not seem to be charging, or if it takes more than one hour
to charge, you might need to install the Apriva USB driver.
To install the USB driver and recharge the reader:
1. Download the USB driver from the Apriva downloads website. For driver
download information, see Apriva Technical Support on page 17.
2. Connect the reader to the computer with the USB cable to start the driver
installation wizard.
3. Follow the wizard instructions to install the USB driver.
After installing the driver, connect the reader to the computer with the USB
cable to charge the reader.
© Copyright 2010 Apriva.
Page 10
September 2010
Apriva® BT200-T Smart Card Reader for Windows Mobile® Version 6.x Installation and User’s Guide
Setting the Reader Power Down
Timers
You can set the amount time that elapses before the reader powers down
when it is inactive. You can set the timers for when the reader has no smart
card inserted (No Card) or when the smart card is inserted (Card Present).
To change the Power Down Timer settings:
1. From the mobile device applications menu, select the Apriva Reader
icon ( ). The Apriva Smart Card Reader screen appears. See Figure 5.
Figure 5 – Power Down Timers area
2. Select the Power tab.
3. Use the up and down arrows to change the time. The time range is 3 to
30 minutes.
4. Select Apply to save the changes.
© Copyright 2010 Apriva.
Page 11
September 2010
Apriva® BT200-T Smart Card Reader for Windows Mobile® Version 6.x Installation and User’s Guide
Viewing Reader Details
The Details tab shows the following:
•
Reader Info: Shows reader copyright, version, and serial number.
•
Reader Diagnostics: Shows reader diagnostic results. If any of the
diagnostics results show “Fail,” contact Apriva Technical Support for
assistance. See Apriva Technical Support on page 17.
•
Reader Firmware Signature: Shows the reader firmware signatures.
To view reader information:
1. From the mobile device applications menu, select the Apriva Reader
icon ( ). The Apriva Smart Card Reader screen appears.
2. Select the Details tab. See Figure 6.
Figure 6 – Details tab
© Copyright 2010 Apriva.
Page 12
September 2010
Apriva® BT200-T Smart Card Reader for Windows Mobile® Version 6.x Installation and User’s Guide
Viewing Reader Versions
The Version tab shows the driver and reader version information.
Viewing Reader Information
To view reader information:
1. From the mobile device applications menu, select the Apriva Reader
icon ( ). The Apriva Smart Card Reader screen appears.
2. Select the Version tab to view version information. See Figure 7.
Figure 7 – Driver and reader version screen
Updating the Firmware
If the reader version is an earlier version that the version downloaded in
Installing the Reader Driver on the Mobile Device on page 4, update the
reader firmware.
NOTE: If you have downloaded a newer firmware version from the Apriva
Secure Download website, be sure it is the correct version for the device
before installing it on the reader.
To update the firmware:
1. From the mobile device applications menu, select the Apriva Reader
icon ( ). The Apriva Smart Card Reader screen appears.
2. Select Update. The firmware version screen appears.
3. If applicable, select the most recent firmware version from the list. If the
firmware installed on the reader is an earlier version than the one
selected, the firmware is updated.
© Copyright 2010 Apriva.
Page 13
September 2010
Apriva® BT200-T Smart Card Reader for Windows Mobile® Version 6.x Installation and User’s Guide
Reader Troubleshooting Tips
The following sections describe general reader troubleshooting tips.
Reader LED Startup Indications
When you power on the reader, the LEDs remain lit for a few seconds while
the reader performs an integrity check. During the integrity check, the reader
first determines if there is a USB connection and then adjusts the settings as
follows:
•
If a USB connection is found, the reader disables Bluetooth and uses the
USB connection.
•
If a USB connection is not found, the reader disables the USB option and
looks for a Bluetooth pairing.
•
If the reader is not paired with the mobile device, the reader powers off.
•
If the reader is paired with the mobile device, the reader determines if
Bluetooth is enabled.
•
If Bluetooth is not enabled, the reader powers off.
•
If Bluetooth is enabled, the LEDs blink every four seconds while awaiting
the Bluetooth connection.
Charging a Completely Discharged Reader
Battery
If the reader battery is completely discharged (the LEDs are not lit), the
microprocessor that operates the LEDs might not be not be working, which
may cause faulty LED indications. This is because the microprocessor
requires enough battery voltage to operate the LEDs. If you find that the LEDs
are not lit even when you are charging the battery, try the following procedure.
To charge a completely discharged battery:
1. Connect the USB cable from the PC/CHARGE port on the reader to the
USB port on the computer or a standard wall charger. Allow the battery
to charge for 20 to 30 minutes.
2. Disconnect the reader from the charger.
3. Power the reader on to make sure the LEDs illuminate.
4. Reconnect the reader to the charger.
• If the LEDs still do not illuminate, contact Apriva Technical Support.
See Apriva Technical Support on page 17.
• If the LEDs are lit, allow the battery to charge for about three hours,
and then disconnect the USB cable. The battery is charged.
© Copyright 2010 Apriva.
Page 14
September 2010
Apriva® BT200-T Smart Card Reader for Windows Mobile® Version 6.x Installation and User’s Guide
Reader LED Descriptions
Table 3 describes reader LED indications and their meanings.
Action
Reader powered
on using power
button
Battery test mode
(about four
seconds)
Reader ready
mode
Indication
Meaning
Solid GREEN and
Normal power on indication while reader
solid RED for about
completes self test.
two seconds
Solid GREEN
Battery over 75% charged, ready for
reader operations.
Rapid GREEN
blinking (two per
second)
Battery between 25% and 75% charged,
ready for reader operations.
Rapid RED blinking Battery less than 25% charged, you
(two per second)
should charge before use.
After four seconds
both LEDs turn off
Normal transition to reader ready mode.
GREEN blinking
(every four
seconds)
No USB or Bluetooth connection,
battery over 25% charged.
RED blinking
(every four
seconds)
No USB or Bluetooth connection,
battery less than 25% charged.
GREEN blinking
USB or Bluetooth connection, battery
(every one second) over 25% charged.
RED blinking
USB or Bluetooth connection, battery
(every one second) less than 25% charged.
Power down mode
GREEN and RED
solid for about two
seconds then both
turn off
Reader charging
Solid GREEN
blinking off every
mode
four seconds
(Reader is
connected to a
charger or a
computer through a
USB cable)
Power down indicates power switch
pressed, card removed, reader not
paired, no Bluetooth or USB connection,
or inactivity timer expired.
No USB or Bluetooth connection, reader
charging.
NOTE: If the reader is off when the
cable is inserted, the reader will power
on.
Table 3 – Reader LED descriptions
© Copyright 2010 Apriva.
Page 15
September 2010
Apriva® BT200-T Smart Card Reader for Windows Mobile® Version 6.x Installation and User’s Guide
Reader Error Messages
Table 4 provides information to help you troubleshoot reader errors and error
messages. For errors not defined here or for additional support, contact Apriva
Technical Support. See Apriva Technical Support on page 17.
Error Message
Possible Solution
The CardReader was not found.
Check the reader connection and
make sure the reader is powered on.
Pairing cannot be performed using a
Bluetooth connection.
The mobile device does not support
the Bluetooth stack required for reader
connection or USB pairing is not
complete.
Please make sure the reader is
attached and powered on before
pairing.
Make sure both ends of the USB cable
are connected and make that the LEDs
indicate that the reader is powered on.
See Reader LED Startup Indications
on page 14.
The reader update process requires a
USB connection.
Firmware updates require a tethered
(non-wireless) connection. Make sure
the mobile device is connected to a
computer through a USB connection.
There is no application associated with The mobile device is trying to connect
AprivaReader xxxx (where xxxx is the to an application that is not installed.
version number). Run the file first, and
then open the file from within the
application.
Apriva driver is busy, close all
applications first.
The Apriva Smart Card Reader screen
is currently open.
Table 4 – Reader error messages
© Copyright 2010 Apriva.
Page 16
September 2010
Apriva® BT200-T Smart Card Reader for Windows Mobile® Version 6.x Installation and User’s Guide
Support
The following sections provide support information.
Apriva Technical Support
The Apriva Technical Support Department is available 24 hour a day, 7 days a
week including holidays.
For prompt service, please have the following information available:
•
Name
•
Job title
•
Address
•
Phone number
•
Email address
•
Software version
•
Mobile device operating system version
•
Description of problem
Technical Support Contact Information
Toll-free customer support line (U.S. only): 866-277-9478
Countries outside the U.S.: 480-421-1303
Email: [email protected]
Technical Support Links
Technical Support: http://iss.apriva.com/support.aspx
Software downloads: https://iss-software.apriva.com
Microsoft Product Support
For questions regarding Microsoft products, refer to the Microsoft Corporation
website at www.microsoft.com.
© Copyright 2010 Apriva.
Page 17
September 2010
Apriva
6900 East Camelback Road Suite 700
Scottsdale, Arizona 85251 U.S.A.
www.apriva.com
© 2010 Apriva
All rights reserved.
Part number 700012-01