1
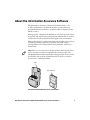
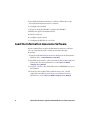
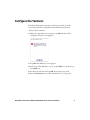
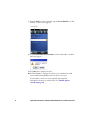
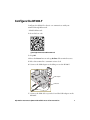
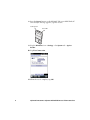
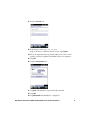
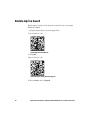
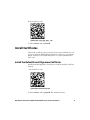
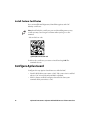
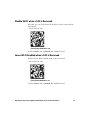
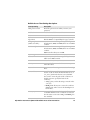
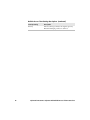
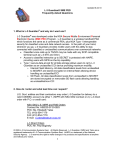
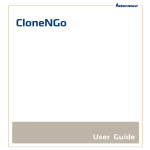
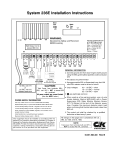
Information Assurance Software
with Reliable Access Client
Instructions
Contents
Contents
About the Information Assurance Software . . . . . . . . . . . . . . . . . . . . . . . . . . . . . . . . . . . . . . . . . 3
Load the Information Assurance Software. . . . . . . . . . . . . . . . . . . . . . . . . . . . . . . . . . . . . . . . . . . 4
Configure the Terminal. . . . . . . . . . . . . . . . . . . . . . . . . . . . . . . . . . . . . . . . . . . . . . . . . . . . . . . . . . . . 5
Configure the BT200-T . . . . . . . . . . . . . . . . . . . . . . . . . . . . . . . . . . . . . . . . . . . . . . . . . . . . . . . . . . . . 7
Enable Apriva Guard . . . . . . . . . . . . . . . . . . . . . . . . . . . . . . . . . . . . . . . . . . . . . . . . . . . . . . . . . . . . . 10
Install Certificates . . . . . . . . . . . . . . . . . . . . . . . . . . . . . . . . . . . . . . . . . . . . . . . . . . . . . . . . . . . . . . . 11
Install the Default E-mail Signature Certificate . . . . . . . . . . . . . . . . . . . . . . . . . . . . . 11
Install Custom Certificates . . . . . . . . . . . . . . . . . . . . . . . . . . . . . . . . . . . . . . . . . . . . . . . 12
Configure Apriva Guard . . . . . . . . . . . . . . . . . . . . . . . . . . . . . . . . . . . . . . . . . . . . . . . . . . . . . . . . . . 12
Disable Wi-Fi when a CAC is Removed . . . . . . . . . . . . . . . . . . . . . . . . . . . . . . . . . . . . . 13
Leave Wi-Fi Enabled when a CAC is Removed . . . . . . . . . . . . . . . . . . . . . . . . . . . . . . 13
Configure the Reliable Access Client . . . . . . . . . . . . . . . . . . . . . . . . . . . . . . . . . . . . . . . . . . . . . . . 14
ii
Information Assurance Software with Reliable Access Client Instructions
About the Information Assurance Software
The Information Assurance software (Cx7xInfoAssurance.cab)
includes both Intermec by Honeywell and 3rd party software to
provide Information Assurance capabilities that are required by the
AIT-IV contract.
When properly configured, the Reliable Access Client provides robust
encryption and authentication mechanisms. Administrators should
evaluate the need for a firewall for their application environment.
This product includes components from various open source projects
including the WPA_supplicant, OpenSSL, and WCEcompact.
Cx7xOpenSourceLicensing.txt file included with the .zip file you
downloaded.
Note: There are several versions of this software. These instructions
are for versions 2.0 and later only which also addresses the CVE20140-0160 TLS Heartbeat (Heartbleed bug) problem. Browse to the
\DoD folder and open the Cx7xInfoAssurance.txt file to view the
version that is currently installed.
AR10
Apriva BT200-T
The AR10 and Apriva BT200-T Smart Card Readers
Information Assurance Software with Reliable Access Client Instructions
3
To install the Information Assurance software, follow these steps:
1 Load the Information Assurance software.
2 Configure the terminal.
3 If you are using the BT200-T, configure the BT200-T.
4 Enable the Apriva GuardTM software.
5 Install certificates.
6 Configure Apriva Guard.
7 Configure the Reliable Access Client.
Load the Information Assurance Software
If your terminal does not have the Information Assurance software,
you can easily download the .cab file and install it through
ActiveSync.
1 Download the Information Assurance Software from the Intermec
AIT-IV website at www.intermec.com/AIT.
2 Establish an ActiveSync connection between the terminal and your
desktop PC. For more information, see the 70 Series Mobile
Computer User Manual.
3 Copy the .cab file to the \Flash Files Store\CABFILES directory on
the terminal.
4 Clean boot the terminal. The terminal extracts the .cab files
required for installation and reboots several times. For more
information, see the 70 Series Mobile Computer User Manual.
4
Information Assurance Software with Reliable Access Client Instructions
Configure the Terminal
To load the Information Assurance software you need to set the
correct date and time, and disable Assured Radio Deactivation.
1 Turn on the terminal.
2 When the Agreement screen appears, tap OK. The Zero Hero
Compliance Check screen appears.
3 Tap OK. The Windows screen appears.
4 At the top of the Windows screen, tap the Title bar, and then tap
the Clock icon.
5 Set the date and time and tap OK. Your settings are saved.
6 Press the Power button on the terminal twice to cycle power.
Information Assurance Software with Reliable Access Client Instructions
5
7 Tap the Title bar again, and then tap the Green Shield icon. The
Wireless Center screen appears.
Green Shield
8 Tap Assured Radio Deactivation to turn on the radios. An Alert
Message appears.
9 Tap OK. Your computer restarts.
10 For the BT200-T, configure it so that it can communicate with
your terminal through Bluetooth. See the next section.
For the AR10, connect it to the terminal and install the
Information Assurance software files. See “Enable Apriva
Guard” on page 10.
6
Information Assurance Software with Reliable Access Client Instructions
Configure the BT200-T
Configure the BT200-T so that it can communicate with your
terminal through Bluetooth.
1 Enable Bluetooth.
2 Scan this bar code:
//\DoD\AprivaSmartCardDriver.INT.cab
3 Tap OK.
4 Press the Power button and tap Reboot. The terminal restarts.
5 Place the terminal in a communications dock.
6 Connect the USB adapter to the PDA port on the BT200-T.
USB adapter
USB cable
7 Connect the USB cable to your dock and the USB adapter on the
BT200-T.
Information Assurance Software with Reliable Access Client Instructions
7
8 Press the Power button on the BT200-T. The green LED blinks. If
an ActiveSync message appears, tap X to close it.
Power button
Green LED
9 Tap the Windows icon > Settings > the System tab > Apriva
Reader.
10 Tap Test Connection.
11 When the test is complete, tap OK.
8
Information Assurance Software with Reliable Access Client Instructions
12 Tap the Version tab.
13 If the driver version is 03.30.26, go to
Step 15. If there is a different driver version, tap Update.
14 Select the AprivaReaderxxxx.bin file where xxxx is the version
number, and then tap Yes. The BT200-T drivers are updated.
15 Tap OK.
16 Tap the Connection tab.
17 Tap Pair. The BT200-T is paired with the terminal.
18 Tap OK.
19 Tap Bluetooth. The BT200-T is configured.
Information Assurance Software with Reliable Access Client Instructions
9
Enable Apriva Guard
Enable Apriva Guard to lock down the terminal if you are using the
BT200-T or AR10.
1 (Optional) Install your custom applications.
2 Scan this bar code:
//\DoD\AprivaGuard.INT.cab
3 Tap OK.
4 Scan this bar code:
//\DoD\IntermecFunk_AprivaConfig.cab
5 Select Device and tap Install.
10
Information Assurance Software with Reliable Access Client Instructions
6 Scan this bar code:
//\DoD\start_stop_supp_apps_.cab
7 Select Device and tap Install.
Install Certificates
Choose the certificates you need to load onto your terminal. You can
choose to load the default E-mail Signature certificate, or customize
which certificates are loaded when you access your terminal with a
CAC card.
Install the Default E-mail Signature Certificate
Install the E-mail Signature Certificate to load the default certificate
settings.
1 Scan this bar code:
//\DoD\AG.Cert.Email.Sign.cab
2 Select Device and tap Install. The terminal restarts.
Information Assurance Software with Reliable Access Client Instructions
11
Install Custom Certificates
You can install E-mail Signature, E-mail Encryption, and CAC
Identity certificates.
Note: Install only the certificates you need. Installing unnecessary
certificates may cause longer load times when you log in to the
terminal.
1 Scan this bar code:
//\DoD\AG.Cert.Custom.cab
2 Select the certificates you want to install and tap OK. The
terminal reboots.
Configure Apriva Guard
Configure the way Apriva Guard interacts with the RAC.
12
•
Disable Wi-Fi when you remove a CAC. The connection is enabled
when a CAC is inserted and your PIN is validated.
•
Wi-Fi is always enabled, but Apriva Guard locks down your
terminal when you remove a CAC.
Information Assurance Software with Reliable Access Client Instructions
Disable Wi-Fi when a CAC is Removed
If needed, you can easily disable Wi-Fi when a CAC is removed from
the terminal.
1 Scan this bar code:
//\DoD\CacDisableNetOnce.cab
2 Select Device and tap Install. The terminal restarts.
Leave Wi-Fi Enabled when a CAC is Removed
If allowed, leave Wi-Fi enabled when a CAC is removed.
1 Scan this bar code:
//\DoD\CacEnableNetOnce.cab
2 Select Device and tap Install. The terminal restarts.
Information Assurance Software with Reliable Access Client Instructions
13
Configure the Reliable Access Client
Configure the Reliable Access Client to connect to your wireless
network, and to enable FIPS 140-02 (DoD standard) settings.
1 Scan this bar code:
//\DoD\RACdefaults.cab
2 Select Device and tap Install. The .cab file is installed and the
terminal restarts.
3 Tap the Windows icon > Settings > System > Intermec Settings.
4 Tap Communications > 802.11 > Reliable Access Client >
Default.
5 In SSID, type the SSID name of your network.
6 Configure any other settings that you need. For more information,
see the next table.
Note: Modifying any settings other than the SSID may cause the
Reliable Access Client not to operate in FIPS mode.
7 Tap OK when you are finished.
14
Information Assurance Software with Reliable Access Client Instructions
Reliable Access Client Settings Descriptions
Security Setting
Description
Hide password text
Hides the password text when you enter your
password.
Enabled
Enables the Reliable Access Client.
SSID
Your network name.
Authentication
Algorithm
Select from Open, LEAP for Cisco CCX systems, or
Shared WEP for compatibility for legacy systems.
Group Cipher
(multicast traffic)
Use CCMP for FIPS compatibility. Other options
include None, WEP, and TKIP, which are not FIPS
certified.
Pariwise Cipher
Use CCMP for FIPS compatibility. Other options
include None, WEP, and TKIP, which are not FIPS
certified.
WPA networks always use CCMP.
Key Management
Select from WPA-EAP, WPA-PSK, or None.
Protocol
Use WPA2 (RSN) for FIPS compatibility, or WPA,
which is not FIPS certified.
EAP
Select from TLS, PEAP, or TTLS.
Identity
Enter quick://CACCard or the username you
want associated.
Password
Anonymous. This setting is not active when using
TLS.
CA Certificate
Leave blank for no validation, cert_store://CA to
use the certificate from the Intermediate store, or
cert_store://ROOT for the Root store/Default.
You can also enter the path of the certificate on
the file system or specify the hash of the
certificate:
• cert:// gives you the substring to match in the
cert store.
• hash://xxxx allows you to enter the certificate
thumb print, where xxxx is the thumbprint in
hex format.
Privacy Key
Enter quick://CACCard to dynamically use the
credentials from the CAC card when it is inserted
into the smart card reader. cert:// and hash:// are
also available.
Information Assurance Software with Reliable Access Client Instructions
15
Reliable Access Client Settings Descriptions (continued)
16
Security Setting
Description
Priority
Indicates which profile has the highest priority.
Enter 0 if multiple profiles are defined.
Information Assurance Software with Reliable Access Client Instructions
by Honeywell
6001 36th Avenue West
Everett, Washington 98203
U.S.A.
tel 425.348.2600
fax 425.355.9551
www.intermec.com
© 2014 Intermec by Honeywell
All rights reserved.
Information Assurance Software with Reliable Access Client Instructions
*943-418-002*
P/N 943-418-002