1
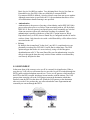
1. ABSTRACT:
The rapid proliferation of data networks and the expansion of their bandwidth as well as
the deployment of solutions to solve the last-mile access problem have ushered in many
possible applications for this new-found connectivity. One of the most attractive as well
as useful of these applications has been the sending of voice signals over Internet
Protocol data networks. Another big thrust in the effort towards better connectivity has
been in the direction of achieving wireless access to data networks. Although wireless
broadband over long distances ( through cellular networks implementing the Wireless
Access Protocol for example ) still remains an expensive proposition, it is possible to
have untethered access to large data pipes over short distances over simple network
topologies. The Lucent Wavelan is a PCMCIA device that implements Ethernet over
wireless (IEEE 802.11). Due to the availability of this technology and the vigorous
efforts to develop software implementing Voice over IP (whose results are available as
open source on the internet ), we were able to propose a marriage of these two killer apps.
2. OBJECTIVES:
The product that we set out to develop was a 2.4GHz cordless Voice over IP Internet
telephone. This was a project whose goal was to combine interesting and emerging
technologies in networking in order to fashion a product that was very easy for the user to
identify with because of its simplicity and usefulness. However the well-known fact that
simplicity for the user translates into complexity for the designer holds quite true in our
case. Although actual development work was minimal, the effort involved in the
successful integration of disparate components (especially the hardware which was
limited by the embedded nature of this application ) was considerable. This project
needed a lot of components in order to make it work and at the end of our work, there
will still be a lot of room for improvement especially in the quality of sound, network
connection, and specialization of software and hardware. Ideally the hardware, software,
network connection, and user interface of our product (which is really a clever
combination of the best off-the shelf components we could find) can be emulated and
then improved upon by more specialized design in order to yield a more-integrated,
cheaper to manufacture product.
In its finished form our product uses a PCM5896 Single Board Computer from Emac-inc
running Linux kernel 2.2.14 on a AMD K6 CPU. It employs the freely available
Openh323 software for voice communication over Internet Protocol running over both
wired (IEEE 802.3) and wireless (IEEE 802.11) ethernets. The Open Sound System
(OSS) sound driver that is part of the Linux 2.2.12 kernel and the Soundblaster16
compatible full-duplex Ensoniq ES1371 formed the hardware and software platform for
sound on our system. Network connectivity was provided by Intel eepro100 (for wired
Ethernet for testing purposes) and the Lucent IEEE Wavelan Silver PCMCIA cards (for
wireless use) As it will become evident later in our report the selection of these many
components had various subtle and sometimes even unexpected effects on each other
during the course of our development.
1
3 TECHNOLOGY
The wireless VoIP phone is an interesting product in that it combines various
technologies. This includes IEEE802.11(Wavelan), OPENH323, and Voice over IP.
3.1 IEEE802.11:
The Wavelan IEEE Silver implements the IEEE802.11 standard of wireless networking.
This standard specifies a Physical Layer and a Media Access Control (MAC) layer.
3.1.1 Physical Layer
At the physical (PHY) layer, IEEE 802.11 defines three physical characteristics for
wireless local area networks: diffused infrared, direct sequence spread spectrum (DSSS),
and frequency hopping spread spectrum (FHSS). The latter two operate in 2.4GHz R-F
frequency band also known as ISM band. Wavelan uses the Digital Spread Spectrum
modulation technique. Spread Spectrum technique spreads the power of a signal over its
frequency bandwidth increasing its signal to noise ratio while sacrificing bandwidth.
Direct Spread Spectrum makes use of a chipping code in order to send a stream of bits for
every bit of data that is sent. This increases the tolerance of the signal to noise. This can
enable data rates as high as 11Mbps which is supported by the Lucent Wavelan card.
3.1.2 Media Access Control
The 802.11 MAC layer, supported by an underlying PHY layer, is concerned primarily
with rules for accessing the wireless medium. Two network architectures are defined: the
Infrastructure Network and the Ad Hoc Network. An Infrastructure Network is a network
architecture for providing communication between wireless clients and wired network
resources. The transition of data from the wireless to the wired medium is via an Access
Point. The coverage area is defined by an Access Point (AP) and its associated wireless
clients, and together all the devices form a Basic Service Set.
An Ad Hoc network is an architecture that is used to support mutual communication
among wireless clients. Typically created spontaneously, an ad hoc network does not
support access to wired networks, and does not need an AP to be part of the network.
The primary services provided by the MAC layer are as follows:
2
•
Data transfer
Wireless clients use a Collision Sense Multiple Access with Collision Avoidance
(CSMA/CA) algorithm as the media access scheme.
•
Association
This service enables the establishment of wireless links between wireless clients
and APs in Infrastructure Networks.
•
Reassociation
This takes place in addition to association when a wireless client moves from one
Basic Service Set (BSS) to another. Two adjoining Basic Service Sets form an
Extended Service Set (ESS) if they are defined by a common ESSID.
If a common ESSID is defined, a wireless client to roam from one area to another.
Although reassociation is specified in 802.11, the mechanism that allows AP-toAP coordination to handle roaming is not specified.
•
Authentication
Authentication is the process of proving a client identity, and in IEEE 802.11this
process takes place prior to a wireless client associating with an AP. By default,
IEEE 802.11 devices operate in an Open System, where essentially any wireless
client can associate with an AP without the checking of credentials. True
authentication is possible with the use of the 802.11 option known as Wired
Equivalent Privacy or WEP, where a Shared Key is configured into the AP and its
wireless clients. Only those devices with a valid Shared Key will be allowed to be
associated to the AP.
•
Privacy
By default, data is transferred "in the clear"; any 802.11-compliant device can
potentially eavesdrop like-PHY 802.11 traffic that is within range. The WEP
option encrypts data before it is sent wirelessly, using a 40-bit encryption
algorithm known as RC4. The same Shared Key used in authentication is used to
encrypt or decrypt the data; thus only wireless clients with the exact Shared Key
can correctly decipher the data.
.
3.2 VOICE OVER IP
In the truest form of the concept, voice over IP is a network level application. When a
user places a VoIP call over an internet Service provider, his call is switched through the
PSTN (public switched telephone network) to a Voice over IP gateway which interfaces
the PSTN to the ISP’s network which may in turn interface with the internet. The VoIP
gateway then routes the call to the VoIP gateway nearest the destination which then
interfaces onto the PSTN on the other side. When the VoIP gateway at the destination
side receives the Voice packets they are collected and after some Segmentation and
reassembly are sent on through the PSTN.
3
In our demonstration of our product in the lab, no interface to the PSTN takes place.
Instead the communication is strictly between two IP nodes sending packetized voice to
and from each other (full duplex) over a wireless medium using an AdHoc networking
architecture with a CSMA/CD Medium Access Control scheme. Ad Hoc networking
involves different nodes in the network communicating without an intermediary. For
purposes of demonstrating the product we have had both wavelan cards communicating
on the same channel (3). It remains to be seen whether forcing the cards to use different
channels will degrade or improve the network performance.
3.3 OPENH323
Openh323 is an open source software implementation of the International
Telecommunication Union’s H.323 protocol which includes packet-based multimedia
communication, call control protocol, security, and media control protocol. The standard
also provides for codecs to digitize traditionally analog data such as audio and speech.
The freely downloadable simph323 is one application that implements these protocols.
The documentation relating to this protocol can be accessed at
http://www.itu.int/itudoc/itu-t/rec/h/ .
The H.323 provides foundation for audio, video, and data over IP based network. The
potential applications are:
1.
2.
3.
4.
5.
Internet Telephony & Video Telephony
Desktop videoconferencing
Collaborative computing
Business conference calling
Distance learning
6. Interactive Shopping
4. EQUIPMENT:
The right choice of equipment for our product was critical for the success of our
application. Since our product involves the interworking of hardware, software, network
interface, and user interface, a misinformed or badly informed choice of any one of these
would severely affect and hamper the performance of the other parts and consequently
that of the whole. As we found out later, despite our best efforts, we were unable to
predict some of the variables.
4.1 HARDWARE
The main considerations for the hardware platform were:
(i)
ability to run Linux and x86 compatible.
(ii)
on-board full duplex sound support (Mic in, speaker out)
(iii) PCMCIA support for Wavelan cards
4
(iv)
(v)
Small size (for mobile application)
Low power consumption ( in case of migration to a DC power supply in order
to make it truly mobile )
(vi)
Ethernet interface for wire-line testing of software’s suitability for Embedded
application
(vii) Compact Storage Media ( e.g. Disk on Chip )
(viii) Enough Memory to run application.
(ix)
Appropriate interfaces for user input and output ( keyboard, monitor, RS-232
serial interface )
We looked at several candidates in order to fulfill these considerations. Two of them
were head and shoulders above the rest of the competition. They were the SBC EM-350
from Akumeka Technology and the PCM 5896 from EMAC inc. The following table
shows how well they met our requirements
Features
Support for Linux OS
PCMCIA support incl. Drivers
Sound support incl. Drivers
optimum Keyboard-LCD
Keyboard-LCD Drivers
Power Consumption
duplex sound
storage media support
availability
software support
SBC EM-350
PCM 5896
Yes
Yes
yes (w/ kernel)
Yes
Yes
5V and 12V
SounBlaster comp.
IDE, DiskOnChip
Yes
not known
Yes
Yes
Yes
yes, RAD
Yes
5V and 12V
SoundBlaster comp.
IDE, DiskonChip
Yes
Yes
Although both of them were very close in terms of feature availability, the PCM-5896
finally won out over our previous choice, the SBC EM-350 because they seemed to be
able to offer a more complete system which promised to make our job of system
integration a whole lot easier. They were more complete in that they offered to provide an
already installed linux kernel complete with drivers to support PCMCIA, full duplex
Sound, Ethernet, and Disk on Chip. They were also able to provide us with an integrated
LCD-keypad interface in order to provide easy input/output to the system. This also
simplified our job of searching for a suitable user interface as we knew that we were
working with something that compatible with our system. They were also very available
and prompt in answering all our questions regarding the system both by phone and email.
We guessed that they would continue to be reliable during the course of the execution of
our design, integration and testing and we turned out to be correct.
5
The following is the hardware profile of our system of choice:
PCM 5896
• AMD K6-2-333 MHz
• 32 MB RAM
• IDE, FDD ports
• Ensoniq ES1373 sound interface
• Reltek 100Base-Tx Fast Ethernet controller
• PCI and PC/104 expansion slots
• +5V and +12V power supplies
The PCM 5896 also needs a soft jumper switch in order to finish the connection in the
ATX power supply. Other accessories used were VGA connector, keyboard connector,
audi connectors, and Ethernet connectors.
PCM-3115 PCMCIA PC/104 Module
• Two PCMCIA slots
• +5V power
• busy and battery status LED
4.2 SOFTWARE:
4.2.1 APPLICATION SOFTWARE
Since our product was an integration of different pre-developed components, we chose to
go with already built software.
At first we chose the command line Voice over IP software developed by students in
Spring 2000 ECE4005. This was an attractive choice because the software had been
developed for Linux and had been tested and demonstrated extensively. Better still David
Jeffery, one of the authors of this software was our Lab TA and would therefore be
knowledgeable about it. He had also worked with Lucent wavelan wireless networking
for Linux and would therefore prove to be a valuable source of information and expertise.
We also looked at Voxilla at this time but were put off by its report that it was in a
constant state of development and the unreliability of the documentation due to this state
of flux.
So things looked good for our choice of indigenously developed command line Voice
over IP software. Later into the game this rosy outlook proved ill founded. This was
because although the software had been tested on Linux Desktops, there were no
assurances about their portability on to an embedded platform.
6
This became apparent to us when we found about the software’s reliance on the
Advanced Linux Sound Architecture (ALSA). The ALSA libraries, drivers and utilities
were supposed to be compiled and installed on the machine running the software. This
was however not possible with the PCM-5896 as it was not equipped for compilation and
development. An example of this limitation was unavailability of the make utility. We
tried to circumvent this by transferring the already compiled object files under
/lib/modules/misc under Linux but we were unsuccessful in getting the ALSA drivers to
load with the modprobe utility. This was because they were not compatible with the
configuration of the kernel on the Single Board Computer. We discovered this after a
couple of frantic calls to our vendor who informed us that their product would actually be
incompatible with ALSA at a very low level due to the configuration of the pre-installed
2.2.14 kernel at compile time. The lack of configuration utilities on our Single Board
Computer ( typical of Linux installation on embedded applications of this type ) left us
even less room to maneuver in. Due to this turn of events, we were forced with two
choices: change the command line Voice over IP code in order to eliminate its reliance on
ALSA and use the Open Sound System (OSS) instead or choose another application that
did not rely on ALSA. We felt that figuring out the workings of the VoIP software would
involve a steep learning curve and would therefore be unsuitable to our limited time
frame. This left us searching frantically for another application that implemented Voice
over IP with some promise of working on an embedded platform. We were unsuccessful
in finding any that was distributed as a binary, something that we were looking for due to
the lack of compilation utilities on our Single Board Computer. We came across two
programs: SIMPH323 and Ohphone, both of which were source downloadable from
http://www.openh323.org/. We were quite skeptical about getting either of these to work
on our embedded system as they relied on the PWLB library package whose source was
also freely available on the same website. This package would have to be compiled on the
desktop and then the library structure would have to be recreated on our Single Board
Computer. This meant that we would have to run the risk of those libraries being
incompatible with our newer 2.2.14 kernel on our embedded system. We decided to go
with the first application we downloaded, SIMPH323, which had very excellent
directions for compilation and installation as did the PWLIB library. After experimenting
with transferring the relevant libraries to another Desktop, we were able to get
SIMPH323 to work over wired Ethernet. This gave us some encouragement to try the
same approach on our Single Board Computer. When testing with the PCM-5896 also
proved successful, we decided to adopt SIMPH323 as our embedded software application
of choice.
4.2.2 DRIVERS
4.2.2.1 SOUND DRIVERS
As mentioned before, the ALSA sound drivers were found to be necessary for our initial
choice of Voice over IP software. However, when it became evident that it would not be
7
possible to use them in our embedded environment, we decided to go with the OSS (
Open Sound System ) sound drivers that came with our pre-loaded kernel. When we
tested the OPENH323 software, we found that it did not have any problem working with
these drivers. So it became the default choice since it did not involve any new
compilation or installation, an important consideration given the lack of a development
environment on our Hardware .
4.2.2.2 PCMCIA/WAVELAN Drivers
These came pre-installed on our Single Board Computer. Although we had some hiccups
configuring the drivers with the options we wanted, we were able to do so with some help
from our lab TA. We installed the 3.1.22 PCMCIA package on our desktops for testing
purposes. Lucent Technologies also provided a driver with their Wavelan PCMCIA card
(module name: wavelan2_cs). We did not use it for the simple reason that it was not preinstalled on our SBC. A more important reason was that the open source linux driver
whose module was named wvlan_cs provided much better signal strength in Ad-Hoc
mode ( wireless networking between peer machines equipped with Lucent IEEE Wavelan
cards without an intermediary base station ) which was the case for our network. This
was especially important to our voice application since it could affect the quality of
sound. Besides the open source nature of the wvlan_cs made it possible for us to solve
any problems relating to the wireless nature of our software. For example we were not
able to ping the neighboring host equipped with the other wavelan card at first because
we had to specify Ad-Hoc mode when loading the driver. However we did not know the
correct variable name to specify. A look at the code for the wavelan driver yielded this
variable name to be PORT_TYPE and the correct value to be set to 3. This enabled us to
get the correct behavior from our card.
4.2.3 CONFIGURATION UTILITIES
4.2.3.1 AUMIX
This is a utility to manipulate the mixer controls for the sound card. It can be found under
/usr/bin. This played an important part in our project because we were unable to
configure the soundcard to record from mic. The command:
aumix –m R
allowed us to remedy this condition.
For more detailed documentation please do:
man aumix
8
in any standard Linux distribution.
This utility was present in the Linux distribution installed on our desktop. However that
was not the case on the PCM-5896. So we had to ftp the executables to the SBC ( the
only way to transfer files to it), add some necessary libraries and use it in the command
line mode.
Just typing:
aumix
tried to open the curses version of the program which could not display from our Single
Board’s terminal.
In this case we had to specify all the options on the command line itself.
Our choice of this mixer utility was obvious. It was available as a standard component of
the distribution and it was not kernel specific. More importantly it was extremely portable
onto our single board computer and with the addition of a few libraries worked perfectly
in the command mode.
4.2.3.2 IWCONFIG
This was a utility written by Jean Tourrilhes to manipulate the wireless extensions of the
PCMCIA Wavelan card. It could be used to set different parameters such as ESSID
(NETWORK_NAME), CHANNEL, ENCRYPTION etc. as part of the wireless_tools
package. We were able to use the version 19 of this package on our desktop running the
2.2.12 kernel. The package actually contained the pre-compiled executable. However our
Single Board Computer was running kernel version 2.2.14. The wireless_tools
corresponding to this kernel was version 20 (wireless_tools.20.tar.gz). We were not
successful in getting this to compile and so was not able to ftp the executable onto the
Board. So I was forced to circumvent the use of this utility by calling modprobe in order
to load up the wavelan module with the appropriate extensions.
In this case it was:
modprobe wvlan_cs NETWORK_NAME=MyNet CHANNEL=3 PORT_TYPE=3
4.3 NETWORK INTERFACE
There were two methods we used to get to the network. One was wired Ethernet using a
PCI Ethernet card EEPRO100. The other method was using the Lucent Wavelan IEEE
silver PCMCIA card. We did not have any alternatives as these were the only hardware
we had
9
4.4 POWER SUPPLY
The hardware of our choice, the PCM-5896 uses an ATX power supply. Our demo is to
be carried out using an A/C ATX power supply which plugs into the wall.
In order to consider this a truly mobile application we need to have a DC to DC ATX
power supply with a battery power source Most DC to DC power supplies require 12V or
24V DC power input. 12V power input is more desirable since it is easy to locate DC
power sources such as video/camcorder batteries as well as laptop batteries at that
voltage. On the other hand their availability was lower and none of the companies that
advertised carrying them had them in stock. 24V input DC to DC power supplies were
more widely available. However I was only able to locate one 24V DC power source
which was a laptop battery.
Supplier and
model number
DC Input
Voltage
Silicon Rax Sliger
pws-300atx/+24
Quantum Power
Labs
BSI COMPUTER
PS-916V ATX
24
Power
Price
Max Current on
5V output
300W
Min Current on
5V
output
2A
$110.00
30A
12
250 W
2A
$149.00
25A
12
100 W
2A
$137.00
20A
The PCM 5896 draws about 2.3A of current from the 5V output. It will draw about 75W.
Battery to power DC-DC ATX at 24V:
Zenith Turbosport 386E 24V 2.2AH NiMH PL B-511 $141.80
We were unable to incorporate the DC-DC power supply into our hardware solution
because we were running into roadblocks quite late in the game and the possibility of us
achieving full functionality was called into question. But the DC-DC power supply can
be integrated quite easily into the prototype without changing any of the properties of the
Hardware or the Software.
http://www.proxim.com/wireless/standards/80211wp.shtml
4.5 USER INTERFACE
We chose the Remote Access Device which was an interface for a Serial LCD and a 16-key keypad.
The people at EMAC also provided us with the Serial LCD and Keypad as they had misquoted what
actually came with the RAD unit. This was supposed to be compact and mobile replacing the clunky
keyboard and monitor. This communicates with the Single Board Computer using the RS-232 serial port.
10
A fair bit of serial programming is involved in sending input to the Single Board Computer.
Unfortunately, we were not able to get this to work with our Single Board Computer due to a shortage of
time and a lack of technical experience with serial programming. This was the only unmet objective in our
product.
5. TESTING
In order to ensure that our product worked, we needed to subject it to extensive testing.
There were different waves of testing that were necessary in order to iron out bugs and
compatibility issues. Due to the wireless, VoIP, sound, nature of our application we had
to ensure that bugs/difficulties in installation etc. due to the wireless, VoIP, or sound
were caught one by one. For a detailed explanation of how the software was tested please
refer to the HOWTO provided as an appendix.
5.1 ALSA TESTING WITH CLVOIP (Over Desktop)
This was the first bit of testing that was done earlier in the semester. It helped establish
the ground rule that the CLVoIP software was still functional. It involved compiling and
installing the ALSA libraries, drivers, and utilities packages on our linux desktop in order
to prep them for use after the clvoip software was installed.
Wired Ethernet IEEE (802.3)
One of the utilities of the ALSA package, amixer, was used to manipulate the mixer
controls.
11
The clvoip was then compiled and installed under a directory in root. The testprog utility
that accompanied the command line Voice over IP program was run to test that ALSA
was set up correctly. We repeated the procedure for another desktop, also equipped with
an ES1371 sound interface. Then we continued to initiate a VoIP call using clvoip over
ethernet. This was successful.
We then installed the PCMCIA Wavelan cards on both the desktops using a PCIPCMCIA Slot and ran the above test again over IEEE 802.11 wavelan.
IEEE 802.11
5.2 The Single Board Computer
When we received the board, we tried to power it up. Since we did not have an ATX
power supply on hand, we tried to use one of the power supplies in the chassis of the
computers in the Linux lab. With TA David Jeffery’s help we were able to power up the
board once. However, when we tried to bring it up again, the board did not power up.
After numerous unsuccessful attempts, we decided to send the board back. On the
board’s arrival at Emac-inc we got a message back saying that the on-board BIOS was
configured wrong. After a few days we got a message saying that the Board had actually
been burnt out on our end.
The folks at Emac-inc graciously consented to replace our Single Board Computer.
5.2.1 Testing VoIP over Ethernet on the Single Board Computer
When it finally arrived, we decided to continue the installation of the VoIP software on
the embedded platform. As we started transferring the VoIP package to our embedded
system, we discovered that it did not come equipped with build and compilation utilities.
So we decided to transfer the compiled ALSA modules to the Single Board Computer
and hope that they worked. We were quickly jolted back to reality when we were
informed by the vendors at Emac-inc that the pre-loaded kernel had a configuration
incompatibility and would therefore not be able to function with ALSA. This was a
potentially crippling blow to our efforts since our VoIP software depended on the ALSA
library for its back-end functionality.
IEEE 802.3 (Ethernet)
12
VoIP over IEEE 802.3 on the PCM-5896
As we were contemplating what to do next, we came across several programs
implementing IP telephony that offered free open source code. Although we couldn’t
compile on our embedded machine, we felt quite confident of being able to generate
object code on our desktop and then transfer the same to the PCM-5896. Being able to do
this was crucial as our machine does not have any development utilities.
Transfer
OPENH323
libraries and
Dir.structures
Transfer
PWLIB
libraries and
Dir.structures
Transfer
OPENH323
libraries and
Dir.structures
Transfer
PWLIB
libraries and
Dir.structures
5.2.2 Getting it to work on the PCM-5896 OVER Wavelan
We decide to try to compile and install one of these, Simph323, an application based on
the OPENH323 standard on our desktop. In order to allow this to work, we also had to
compile and install the PWLIB package. Our intention was to transfer the compiled
executable and application and any needed libraries to the PCM-5896 after creating all
the needed directory structures. We decided to test to see if this approach would work by
first transferring the executable and the libraries onto another desktop. After doing this
we were able to get the Simph323 application to start running after setting some
environment variables. However we were not able to get any sound to record on the
microphone. We had to use the aumix utility in order to set the mic to record instead of
play. This was because were using the free Open Sound Support driver that came with the
kernel. Manipulating the settings on this driver was different from the ALSA driver.
After that we were able to communicate using the Simph323 application. After this it was
time to try the same approach on the Single Board computer.
We carefully recreated all our directory structures on the Board and then transferred all
the files over. This included the library files compiled out of the previously mentioned
PWLIB package as well as standard C++ libraries. When all of this was done and some
environment variables (OPENH323LIBDIR, PWLIBDIR, and LD_LIBRARY_PATH)
were set the program started to run without any error messages. After this, we were able
to talk to the SBC through Ethernet. Wavelan, however, was an entirely different
proposition. At the beginning we were unable to get the interface to come up. After trying
13
unsuccessfully to use the iwconfig utility we found a way to configure the wavelan card
correctly. Please refer to the HOWTO to find out how. After this we were able to
successfully send Voice packets over IP using a wireless network.
This was the timeline we followed for our testing:
Date
Week 4
Week 6
Test and veriy VoIP code
Difficulty
Very Hard
Very Hard
Very Hard
Very Hard
Easy
Easy
Easy
Week 7
Test VoIP over Ethernet
Easy
Week 8
Test over IEEE 802.11
Hard
Week 9
Test w/ SBC over Ethernet
Easy
Week 10
Test w/ SBC over 802.11
Medium
Week 5
Intended Schedule
Selection of SBC
Selection of Interface
Study VoIP Code
Install Script
Hard
Week 11
Test w/ SBC over 802.11
Hard
Very Hard
Week 12
Test w/ SBC over 802.11
Week 13
Completion
Week 14
‘’
Easy
Easy
Week 15
14
Very Hard
Actual Schedule
Selection of Hardware
Selection of Interface
Selection of Hardware
Selection of Interface
Study VoIP code
Install Script
Selection of Hardware and
I/O
Test VoIP over 802.3 using
ALSA
Successfully tested
Indentified external power
sources for demo
Updated install scripts for
802.11
Installed IEEE 802.11 card
on desktop
Got the board but had trouble
powering up
Tested VoIP over 802.11
Successfully tested
Problems powering up the
board
Further rigorous testing of
the board
The board was sent back for
check
Setup the project/company
webpage
Ready to get DC-DC power
suppy
The board came back, no
problems powering up
Can boot up and run, found
no dev. Software
Problems with ALSA on the
board
Medium
Easy
Hard
Hard
Switch to OPENH323,
configuration and setup
Ran Ethernet voice tests
between 2 computers
Duplicated tests over the
board
Found problem with the mic
Problems with configuration
of WaveLAN on the board
Fixed problems on WaveLan
and Sound
6 Marketing
6.1 Production and Prototyping
The following table illustrates the estimated cost of development of the project. Our
product the Linux wireless VoIP phone is an example of an integrated system. What we
have done is tested the concept with freely available hardware and software. The
hardware we used was a single board computer capable of lot more than just being a mere
"phone." Therefore it is reasonable to make the assumption that if a small scale embedded
developer were to develop this product it would cost them the same.
Task
Hardware
Software
Product Planning
Integration and Test
Maintenance and Support
15
Man-hrs
N/A
N/A
50
150+
15
Cost
$1300.00
$0.00
$1500.00
$4500.00+
450.00
$7750.00+
If this product were put into a manufacturing cycle the projected cost would be a lot more
than what it cost us. In terms of a ball-park figure the development cost for hardware that
just did that is somewhere close to $100,000.00. The end product would also be a lot
smaller considering the shrink in form-factor brought on by the production cycle. The
production cycle will also replace hardware components such as the PCMCIA cards,
which sell for $120.00 by a much cheaper media since the consumer is not going to be
interested in buying a phone that cost over $200.00. This would bring on added
configuration costs however, it would be a lot cheaper than the conceptual prototype that
we have out together. An estimate of the price of the final product should be close to
$100.00.
6.2 Recurring costs and Maintenance
The product sold would require no maintenance on the part of the user. However a good
business model for the embedded systems developer would be to keep integrating new
features into the product, concentrating more on software advances rather than hardware.
This would enable release of new versions of the product with exciting new features.
However the build up a faithful customer base that would continue to buy this line of
products the initial product has to as free of bugs and glitches as possible.
6.3 Other products and the technology in general
Internet telephony has been the buzzword in the networking market for the last five years
or so with big giants like Nortel and Cisco jumping on the bandwagon. Coupled with this
has been the explosion in the wireless arena. Put together, we are looking at a new
revolution.
6.3.1 Nortel Networks
Eventually, mobile phones will patch automatically into the campus network as
employees carrying them approach the building, reconfiguring themselves as PBX
extensions. But for the foreseeable future, the two environments will remain quite
separate, with wireless voice on the campus having a more direct day-to-day impact on
telecom managers. Vendors such as Nortel Networks are currently in customer trials with
products that carry voice-over-IP (VoIP) traffic across wireless LANs (WLANs) based
on the 802.11 Ethernet standard.
The Nortel Networks solution uses wireless NetVision Phone and Data Phone network
appliances from Symbol Technologies, which connect over a non-licensed 2.4GHz radio
band to an integrated telephony gateway (ITG) card that is installed in a Meridian 1
switch. This single ITG card interfaces to both the WLAN and PSTN infrastructures, and
extends new and legacy PBX features to the wireless handsets. These handsets are also IP
16
data nodes, so they provide both on-campus mobility and a voice/data convergence
platform for next-generation applications.
Wireless interfaces are still more expensive than their cabled counterparts, but prices
continue to drop. LAN cards are now in the $250 range, and the access points, which
support up to 250 users, are $1,200 to $1,300. Wireless LANs can also be used as pointto-point or point-to-multipoint bridges between buildings, providing a cost-effective
alternative to T1 lines. They have a range of up to two miles if there is a clear line of
sight between the locations. Inside buildings, where transmissions may have to go
through walls, the range is about 300 feet.
Contrary to many perceptions, wireless LANs are quite secure. Wireless LANs are
actually more secure than the typical wired LAN. They use spread spectrum and hop
around the different frequencies every tenth of a second, and they break the payloads
down into sub-bits. They also have more built-in authentication.
6.3.2 BreezeCom and Cisco
They provide a complete wireless local loop (WLL) solution based on voice over IP
technology (VOIP). The BreezePHONE conforms to H.323, the ITU standard for realtime voice and multimedia application over IP (Internet protocol). This standard is
supported by the major hardware and software vendors providing voice over
Internet/Intranet products.
The BreezePHONE uses frequency-hopping, spread spectrum radio technology and
operates in the license-free 2.4 GHz ISM (industrial, scientific and medical) band. The
DSP (Digital Signal Processor) design of the BreezePHONE allows it to operate with the
highest reliability with data speeds of up to 3 Mbps with single cell coverage up to 5 km
radius.
The solution is comprised of the BreezePHONE Remote Unit (BRU), BreezePHONE
Access Point (BAP) and a gateway connection to the Public Switched Telephone
Network (PSTN) using Cisco 2600/3600/AS5300 platforms with the Cisco Voice/Fax
network module, and Cisco IOS.
17
6.4 Our Business Model
It is very evident that this technology is catching on like wildfire. Large companies such
as Ericsson and Airtouch (now Verizon Wireless) are joining in. We intend to refine our
product such that it’s a market leader accompanied with a killer applications package.
This would strain giants like Cisco and Nortel to pay us some heed. Eventually, we
intend to be bought over by one of the networking conglomerates.
6.5 Credits
We feel that it is important to mention people who have played a major role in seeing this
project through. We owe gratitude to Dr. Owen for bearing with us through the project.
We realize that we were definitely not the most structured people. He was instrumental in
guiding us through the initial phase of selecting our hardware and took great pains
himself in researching some for us.
We are extremely fortunate to have been served by the people at EMAC who on more
occasions than one went beyond their sphere to help us out. The sales group at EMAC
agreed to ship us a new board when they discovered that we had possibly shorted it out.
The tech-support group was extremely helpful in troubleshooting our problems. On one
occasion, their engineers spent eight hours working on one of our problems.
The list would be incomplete if we forget to include David Jeffery, our TA. He has been
an invaluable resource to us even though we ended up not using his ALSA based VoIP
application due to the difficulties mentioned in our report. He has helped us a great deal
with the sound system and the setup for the wireless LAN.
7 CONCLUSION AND REFLECTION
During the course of achieving our goal of VoIP over Wavelan on an embedded system,
we were able to come away with some valuable, albeit painful, lessons. We were so
thrilled with our choice of hardware platform with its pre-installed Linux operating
system and device drivers, a vendor who was willing to bend over backwards to
accommodate us, and a software application whose author was just a shout for help away
that we took a lot for granted.
7.1 The ALSA issue:
When we learnt that EMAC would load the drivers for the sound card on our system we
felt that a lot of our work was already done for us due to a wise choice in hardware
platform. Little did we realize that we were too premature in congratulating ourselves.
18
The dependence of David’s software on ALSA was a revelation to us as was the
unavailability of a development environment on the PCM-5896. We had wrongly
assumed that all Linux distributions ( or distros as they are affectionately called ) had the
make and compilation utility. When this view was found to be incomplete and incorrect,
we were left facing a crisis.
7.2 Hardware problems.
The PCM-5896 uses an ATX power supply. A lack of familiarity of this type of hardware
led us to damage our initial board because we were not aware of the fact that there was
always a 5V source present in this type of power supply even when the contact was
broken using a soft switch connected to a jumper. This most probably led us to our
damaging the board without even knowing it because we were supposed to have cut off
the power from the wall supply while working on it. As we found out belatedly, this
ignorance was fatal to our application as it set us back at least a week in having to return
the hardware to the vendor. The vendor was kind enough to send us another board with
an identical configuration. If it hadn’t for EMAC’s willingness to replace the hardware, it
would have been impossible for us to achieve what we have achieved today. However,
this may have been a little bit of a blessing in disguise as it encouraged us to be extra
careful during the latter and most crucial part of our project.
7.3 Lack of familiarity with the Software and substitutes
The software application that we were to use, ClVoip, was developed at GeorgiaTech by
students of an earlier batch of this same. This included David Jeffery, our Lab Teaching
Assistant. Because of the presence of this obvious support, we were hesitant to examine
other software that could have suited our application and our hardware platform better.
We were afraid of the unknown and that fear ended up hurting us temporarily.
Fortunately, we were able to rebound with a better choice in software.
7.4 Our behavior in times of crisis
Although we were beset by so many problems from so many angles, we did not
relinquish our goal. Instead we chose to think and act on our feet. When the solution
based on ALSA did not work, we chose another one. This also had the potential to fail as
it was distributed as source. Given the lack of a compile environment on our Board, it
was a challenge to get it working. We came up with a way to build the executables and
the needed libraries on our development system and then transfer them and their
directory structures in their entirety to the PCM-5896. Although this approach had failed
for the ALSA libraries, we chose to look at the new situation on its own merits. We knew
that the new software had limited tie-ins with the kernel and would be less inclined to be
affected by the difference in the Linux distributions in the development (compiled) and
the application environment. We also took a guess that the new software (Simph323) did
not depend on ALSA as such a dependence was not mentioned anywhere in the
documentation. We also encountered other obstacles such as the failure to record sound
and the wavelan interface not coming up. We refused to be discouraged. Instead we chose
to expand our limited knowledge of these technologies by trying different approaches to
19
solve our problems. Eventually after expending a lot of time and energy, we were able to
solve them and achieve our goal. The knowledge gained from our experiments and trials
are there for you to peruse in the HOWTO in the appendix.
8. SOURCES
Our principal sources were all from the web.
www.akumeka.com
www.embedded-wares.com
www.emacinc.com
www.alsa-project.com
www.linux-embedded.com
www.opensound..com
www.opeh323.org
www.fasta.fh-dortmund.de/users/andy/wvlan
www.hpl.hp.com/personal/Jean_Tourrilhes/Wavelan-IEEE.html
20
APPENDIX A
Wireless VoIP Linux – Software Installation HOWTO
This document describes software installations over Linux. The purpose of this document
is to familiarize the reader with all the intricacies in the installation of the software over
the development system as well as the single board computer. The list includes all the
software used during the course of the project regardless of the fact whether it was
included in the final product. The intent is to bring any future users up to speed more
quickly rather than searching endlessly on newsgroups and mailing lists.
Table of Contents
1. Introduction
1.1 Acknowledgements
1.2 Feedback
2. PCMCIA Installation
2.1 Files
2.2 Wireless Extensions and Support
2.2.1 iwconfig
2.2.2 iwspy
2.2.3 iwpriv
2.3 Installation
3. ALSA and clvoip Installation
3.1 Files
3.2 ALSA and clvoip setup on development system
21
4. OPENH323 Installation
4.1 Files
4.2 OPENH323 setup on development system
4.3 OPENH323 setup on SBC
4.4 Adding environment variables
4.5 Mixer Program
1.Introduction
This is the Wireless VoIP Linux – Software Installation HOWTO. It is intended as a
reference covering everything you need to know to install and configure the software
mentioned under Linux.
The scope is limited to the aspects that were encountered while working on the project.
Please refer to other HOWTO documents for general information on each component,
hardware or software.
1.1 Acknowledgements
Much of this information came from documents such as these (other HOWTOs). This is
just a compilation of issues that pertain to our project.
1.2 Feedback
I rely on you, the reader, to make this HOWTO useful. If you have any suggestions,
corrections, or comments, please send them to me, [email protected], and I will
try to incorporate them in the text revision.
If you can find me, I am also willing to answer general questions pertaining to the
project, as best as I can. Before doing so, please read all of the information in this
HOWTO, and send me detailed information about the problem. Please do not ask me
about generating similar results in operating systems other than Linux.
22
2. PCMCIA Installation
This section gives a very cursory overview of the installation of PCMCIA package over
Linux. If you know that you are going to be using PCMCIA hardware, it is best to
configure that in your kernel when you are installing Linux initially. In our case, we had
done so and had put the PCMCIA package included in the RedHat 6.1 kernel v2.2.12 on
our system.
For the SBC, the PCMCIA drivers came pre-installed from EMAC.
2.1 Files
The PCMCIA package on our system needed to be upgraded to a newer version because
the newer version had support for the Lucent WaveLAN cards that we were using. The
latest version is the pcmcia-cs-3.1.22 and it has support for most wireless LAN cards. In
addition it has much needed wireless extensions that can be used to configure the device.
2.2 Wireless Extensions and support
Along with the PCMCIA package, you also need the wireless extensions. The usage of
the extensions is such:
Wireless_tools.19 : are used with Kernel version before 2.2.14
Wireless_tools.20 : are used with Kernel version 2.2.14 and later
There are three main tools in the package.
2.2.1 iwconfig
This tool is designed to configure all the wireless specific parameters of the driver and
the hardware. This is a clone of ifconfig used for standard device configuration.
2.2.2 iwspy
This tool allows the user to set a list of network addresses in the driver. The driver will
gather quality information for each of those addresses (updated each time it receives a
packet from that address). The tool allows the user to display the information associated
with each address in the list.
2.2.3 iwpriv
23
This tools is an experimental support utility for device specific extensions. Some drivers
might define some extra parameters or functionality, iwpriv is used to manipulate those.
2.3 Installation
Below are the steps you need to follow to install the PCMCIA package and the wireless
extension tools.
•
•
•
•
If you already have an older version of the PCMCIA package (this is located
in /usr/src) go into that package and type “make clean” at the prompt. After
this you can delete the package directory.
Unpack (tar xvf) the new PCMCIA package (pcmcia-cs-3.1.?.tar.gz) in
/usr/src.
Run “make config” from the prompt in the new pcmcia-cs-3.1.? directory.
Run “make all”, and then “make install”. You are done!
3. ALSA and clvoip Installation
The ALSA package can be obtained from their site at www.alsa-project.org. We were
using ALSA because our VoIP application was based on the ALSA API.
3.1 Files
The ALSA package comes with the drivers, libraries and the utilities needed to interface
with the drivers. The three tarballs are:
•
•
•
alsa-driver-0.5.?.tar.gz
alsa-lib-0.5.?.tar.gz
alsa-utils-0.5.?.tar.gz
3.2 ALSA setup on development system
The setup on the development system is very straightforward. The following steps
explain what to do.
•
24
Unpack (tar xvf) alsa-driver-0.5.?.tar.gz, alsa-lib-0.5.?.tar.gz, alsa-utils-0.5.?.gz
in /usr/src.
•
•
•
•
•
•
•
•
•
From each of the directories created (alsa-driver-0.5.?, alsa-lib-0.5.?, alsa-utils0.5.?) first run “./configure” at the prompt, followed by “make” and “make
install”.
Edit the /etc/conf.modules (or modules.conf) file to include the following line:
”alias sound-slot-0 snd-card-ens1371”
Change your directory to alsa-driver-0.5.? and run the following commands
o “./snddevices”
o “modprobe snd-card-ens1371”
These commands have to be run everytime you restart your computer therefore it
is best to put them in your .cshrc file.
Change directory to alsa-utils-0.5.?/amixer and type the following commands in
at the prompt
o “./amixer set ‘Input Gain’ 75% on
o “./amixer set ‘Master’ 75% on
o “./amixer set ‘PCM’ 75% on
These commands configure the settings in the mixer program (amixer) that
comes with ALSA. To explore other options just type “./amier –help”
So as to make it easier to run the next time, after you have used amixer to set the
parameters, as root run “/usr/src/alsa-utils-0.5.?/alsactl/alsactl store”
To store the present sound mixer configuration in /etc/asound.conf, you may run
the following command manually after booting or insert it in your boot scripts
(.cshrc)
o “/usr/src/alsa-utils-0.5.?/alsactl/alsactl restore”
To store clvoip unpack clvoip.tar.gz in the directory of your choice and run
“make” from within the clvoip directory that gets created.
4. OPENH323 Installation
The openh323 package and the accompanying libraries can be obtained from
www.openh323.org. We chose to use OPENH323 finally because we could not get
ALSA to work with the SBC successfully.
4.1 Files
The OPENH323 package comes with a pwlib package which is a C++ library package
used by OPEN323. The two tarballs are:
• pwlib_min_?.??.tar.gz
• openh323_1.x.x.tar.gz
4.2 OPENH323 setup on development system
25
The setup for the development system includes installing the two packages. The
following steps explain the installation process:
• Unpack pwlib_min_x.xx.tar.gz somewhere, preferably in your home directory.
• Change directories such that you are in the pwlib directory that you just created
and run “make both”
• Next, extract the contents of the openh323_x.x.tar.gz file somewhere, preferably
at the same level as the pwlib directory (home directory).
• To build the H323 bootstrap you need to go into the new openh323 directory that
you created. From within that directory run “make opt”
• The result of all this will be an executable called simph323. This executable is
placed in $(OPENH323DIR)/samples/obj_linux_x86_r/. This executable is
platform dependent so if you run on anything other than linux the naming
convention of the directory structure would reflect that.
4.3 OPENH323 setup on the SBC
Since the SBC does not have development tools (gcc, make, etc.) the only way to put
openh323 is to export the code from somewhere where it has already been built. In our
case we exported the code from our development system. However you do not need to
transfer everything over. The needed directory structure is illustrated:
|\openh323
|
|
|
| ------\lib
|
|
|
|
|
|\obj_linux_x86_r
|
|
|
|\samples
|
|
|
|
|
|----\simple
|
|
|
|
|
|
|
|\obj_linux_x86_r
|
|
|
|----\pwlib
|
|
|
|------\lib
|
|
|
|
|
|\obj_linux_x86_r
|
|
|
|
|
|
26
Once you have created the above directory structure in your target system (SBC), please
follow the next set of instructions very carefully as they explain exactly which files are
transferred.
• Transfer the contents of \root\pwlib\lib\obj_linux_x86_r\ to your target system in
the same location
• Transfer the file libpt_linux_x86_r.so.1.1.18 from \root\pwlib\lib\ to the same
directory on the target system.
• Once you do that we will create some links that were present in the
\root\pwlib\lib\ directory. Using the “ln” command create the following links:
o “ln –s \root\pwlib\lib\libpt_linux_x86_r.so.1.1.18 libpt_linux_x86_r.so”
o “ln –s \root\pwlib\lib\libpt_linux_x86_r.so.1.1.18 libpt_linux_x86_r.so.1”
o “ln –s \root\pwlib\lib\libpt_linux_x86_r.so.1.1.18
libpt_linux_x86_r.so.1.1”
• Transfer the contents of \root\openh323\lib\obj_linux_x86_r\ to your target
system in the same location
• Transfer the file libh323_linux_x86_r.so.1.1.0 from \root\openh323\lib\ to your
target system in the same location
• Once you do that we will create some links that were present in the
\root\openh323\lib\ directory. Using the “ln” command create the following links:
o “ln –s \root\openh323\lib\libh323_linux_x86_r.so.1.1.0
libh323_linux_x86_r.so”
o “ln –s \root\openh323\lib\libh323_linux_x86_r.so.1.1.0
libh323_linux_x86_r.so.1”
o “ln –s \root\openh323\lib\libh323_linux_x86_r.so.1.1.0
libh323_linux_x86_r.so.1.1”
• After this you need to move the executable simph323 from
\root\openh323\samples\simples\obj_linux_x86_r\ to your target system in the
same location.
• Please remember to maintain the same permissions on the file when you move
files from development to target system.
• You need another C library that you need to transfer from the development
system to the target system. The library is in /usr/lib/ and is called “libstdc++-2libc6.1-1-2.9.0.so”. You need to put this file in the same location (/usr/lib/) on the
target system. After that create the following link:
o “ln –s /usr/lib/libstdc++-2-libc6.1-1-2.9.0.so libstdc++-libc6.1-1.so.2”
4.4 Adding environment variables
Add the following lines in your boot scripts (.cshrc) for the development system and
(.bashrc) for the target system.
PWLIB=$HOME/pwlib
export PWLIBDIR
OPENH323DIR=$HOME/openh323
27
export OPENH323DIR
LD_LIBRARY_PATH=$PWLIBDIR/lib:$OPENH323DIR/lib
export LD_LIBRARY_PATH
Now you are all done!
4.5 Mixer Program
The OPENH323 software also comes with a mixer program called aumix. The program
can be run as a tab controlled GUI or through the command shell. The mixer lets you set
levels for volume, mic in, speakers, etc. In the PCM-5896, the application must be run on
the command line. For details on how to specify options on the command line, please
refer to the man pages on any standard Linux distribution.
5. CONFIGURING THE WAVELAN INTERFACE
Bringing up the wvlan0 interface is less than straightforward on the PCM-5896. The
lack of configuration utilities does not make this any easier. The wvlan_cs driver gets
auto-loaded at boot time albeit with the incorrect parameters. This is what you need to
do to be able to ping the other hosts on the network:
ifconfig eth0 192.168.1.132 //make sure that the Ethernet interface is
already configured
ifconfig wvlan0 down
//Unbusy wvlan0 interface
rmmod wvlan_cs
// Unload driver for PCMCIA wavelan
modprobe wvlan_cs Network_Name = “ Same network name as
other\ Wavelan card” port_type=3 channel=3
// bring up driver with correct options (port_type=3 sets it in Ad-Hoc mode
You should now be able to see the driver come up listing all the available channels.
ifconfig wvlan0 192.168.1.132 //configure wavelan interface with the
correct IP address
ifconfig eth0 down
we don’t need it
// Take down Ethernet card interface because
Now we can ping the other host.
If you don’t want to do this every time you can include the commands in the .bashrc
file under your home directory.
28
APPENDIX B
Frequently Asked Questions
The following FAQ was generated as a result of correspondence with tech-support at
EMAC and numerous other people on linux mailing lists. The FAQ details with subject
mater ranging from sound specific ALSA issues to hardware issues related to the SBC,
PCM - 5896.
Q. What are the standard boot-up procedures for the single board computer PCM 5896?
A. Here is the boot-up procedure for PCM 5896:
1) Make sure the 120 volts is not applied to the ATX supply while the connector is
plugged into the board, and while connecting any peripherals. As possible board damage
can occur (as there is a 5v output that is always on in the supply).
2) After the ATX power supply is connected to the board and the supply is plugged into
the wall, the jumper for the ATX power on switch needs to be triggered. This is done
with a momentary switch (if a hard jumper is used the board may not power up).
3) Also make sure the board is resting on a non-conducting surface. (i.e. paper, or plastic)
29
4) If you are still having problems try disconnecting items from the board (such as
keyboard, mouse, monitor, hard drives, CD-ROM drives, floppy drives, or serial
peripheral devices) sometimes they can prevent the board from booting.
Q. How do I get my single board computer to play or record sound?
A. On the base SiB, no audio devices exist. In order to create them, you must press "W"
on startup when prompted, so that the root filesystem is mounted read/write. Then, go to
a command prompt as root and issue the following commands, one per line:
mknod /dev/mixer c 14 0
mknod /dev/sequencer c 14 1
mknod /dev/midi c 14 2
mknod /dev/dsp c 14 3
mknod /dev/audio c 14 4
mknod /dev/sndstat c 14 6
sync
shutdown -r now
The SiB should reboot, and you should then see the sound device files in
/dev (/dev/mixer, /dev/sequencer, etc).
Q. Would adding just these basic modules and nothing else make the SiB work with
ALSA?
A. No, in addition, you must compile the ALSA sound kernel modules against a 2.2.14
kernel (present on the SiB). Compile **just** the kernel modules, and move them to the
appropriate place on the SiB, which is /lib/modules/2.2.14/??. In addition, from my
ALSA needs some additional devices, which you will need to create via the mknod
command.
Q. I have a single board computer which I am using for a VoIP application. However my
problem is that the application is written to be compatible with the ALSA package and I
cannot compile the ALSA package on the SBC because of storage limitations and lack of
a development environment. I need to know if I can export only the required modules and
binaries from the already compiled package on a PC and make it work
A. Off course you can. The alsa-drivers are just kernel-modules. So the way to go is:
compile the right kernel; compile the Alsa-modules; copy kernel and specific modules to
the board and test.
Please be aware of the fact that you need not only the specific sound card module, but
also a couple of generic modules. You might want to dry-run it on a regular PC, just to
see what gets loaded when you load an Alsa sound card module.
30
Q. What are the basic ALSA modules that should definitely be present to make things
work?
A. Here is a list of ALSA modules present on a machine:
soundcore (this may not have come with ALSA, it might be the one already on the
board)
snd
snd-seq-device
snd-mixer
snd-ac97-codec (I don't know if you actually need this...)
snd-emux-mem
snd-raw-midi
snd-timer
snd-pcm
snd-emu10k1 (This is specific to my sound card, it has an emu10k1 chipset)
snd-card-emu10k1 (Ditto. You should probably replace these two with stuff
for the es1373)
snd-mixer-oss (only needed for OSS compatibility)
snd-pcm-plugin
snd-pcm-oss (OSS compatibility layer)
snd-seq
snd-seq-midi-event
snd-seq-oss (OSS compatibility)
My guess is that anywhere you see "emu10k1" above, you should replace it with
"es1373" or something which is specific to your sound hardware. If there's nothing
specific for the es1373, then the es1371 drivers should also work (at least, the OSS
drivers for the 1371 work for the 1373, so they must be very similar chips.)
Q. Should the files /dev/?? have something in them. The reason I asked that is because I
found the files but there was no configuration info in the files?
A. No. These are special files which correspond to physical hardware.
Q. I want to boot up the board using the IDE drive from my development environment.
However, I want to know whether I will need any software, drivers, etc to make this
work?
A. You should be able to plug in the IDE drive and boot from it without modification. If
the board attempts to boot from the DiskOnChip with the IDE drive plugged in, you may
need to remove the DiskOnCHip from the system. Otherwise, there should be no issues
at all with booting from the hard drive.
31
Q. Do I need any specific drivers off the DiskOnChip to be place on the IDE drive?
A. There are no drivers on the DiskOnChip which cannot be duplicated on the hard drive
by kernel compilation. So long as you compiled the kernel on the IDE drive with the
appropriate drivers for the SBC, you should be fine.
Q. Should I get these drivers off of the DiskOnChip and put them on my IDE driver just
in case?
A. "Drivers" are kernel modules, and are therefore kernel-specific, compiled at the same
time as the kernel. Unless your IDE drive uses the same kernel we use, the drivers off the
DiskOnChip will be useless. Whatever distribution you installed onto the IDE drive
should have provided drivers to match the kernel it installed on the drive. If you really,
really want to try the drivers from the DiskOnChip, then boot from the DoC and FTP the
modules to another machine.
The only drivers you'll need are rtl8139.o (for the ethernet) and soundcore.o (for the
sound). The OSS sound drivers will work if you also load sound.o and es1371.o, but
these two should not be loaded if you're using ALSA. To use ALSA, you'll just need to
use the modules (and libraries) that you've already compiled there on the IDE drive.
Everything else on that board is standard PC-compatible stuff and does not require any
special drivers to operate.
Q. We want to use the RAD as a mini terminal. How can we do that?
A. The RAD is just a serial device. You should have received a manual along with the
RAD, describing the operation and protocol of the device (I think it comes set to packet
mode by default). You just need to open a serial port and send/receive data...you can use
minicom (though you can't send control characters that way), or write a C program, or
even write a BASH script that uses echo and cat to write and read the serial port device.
Q. Doesn't the board already have device drivers for the RAD. I mean if I connect the
RAD to the serial port can I not send commands to the CPU?
A. No, the RAD just sends characters to the host PC's serial port when a RAD key is
pressed. What you do with the data is entirely up to you.
Q. Is there a small distribution of Linux (< 20 MB) that can support and run ALSA
without any problems?
32
A. If you'd like to build some minimal mp3 player or so, you should simply build the
distribution yourself. That's not difficult at all and you safe a lot of memory by picking
individual files you *really* need instead of installing complete packages (with all their
documentation, compatibility links, additional but unused features). I think you can have
ALSA, some player, a shell and maybe even a useable editor in <10MB.
Another option is to use one of those router distros.
Q. Is it possible to remove the linux distribution from the disk on chip and put something
else there?
A. Yes. DOS tools for the DiskOnChip are available from M-Systems website (www.msys.com). You'll need to boot from a DOS HDD or floppy, then use the M-Systems tools
to re-format the DiskOnChip as a DOS drive. When you reboot, the DoC will appear as a
regular DOS hard drive and can be used as such. Drivers for other operating systems are
also available from M-System's website. Re-formatting and installation methods vary by
operating system, but usually involve booting from another medium (floppy or HDD)
containing the new operating system, then formatting the DoC and copying over the OS's
files.
Q. How do you enable sound module support in the kernel?
A. Do the following:
# cd /usr/src/linux
# make xconfig
The "Linux Kernel Configuration" window comes up and you should select the "Sound."
Then, if you're going to compile your own alsa loadable modules, I believe all you need
to select from the "Sound" window is the first item: "Sound card support" and you only
need "m" for module support. Everything else in "Sound" can be set to "n".
Then "Save and Exit", then do:
# make dep clean bzImage modules modules_install
Then follow the other usual kernel compile instructions: ie copy the bzImage to /boot,
edit /etc/lilo.conf, and run lilo.
Q. Can I stream an MP3 on the board to test the sound? How do I do that? How about
full-duplex, can I test for that on the board?
A. You can install mpg123 on the system and FTP a .mp3 file to the board, then play the
.mp3 using mpg123.
33
Apparently to use "full duplex" with the OSS sound drivers, the program needs to open
two different sound device files, one for reading and one for writing. The OSS
documentation also states that not all OSS drivers support full duplex in this manner, but
some do. I have been unable to find a list of which do and which do not. The OSS
documentation suggests writing a test program. I will let you know if I come across
anything more.
Q. I have installed the openh323 and the pwlib software on the computers however I am
not able to get the mic to record sound and play through the speakers on the other side.
A. If you're running the voice apps (ohphone, simpleh323) under linux, then run aumix to
make sure that the Rec. button is selected for Mic not anything else.
Q. The board is set up such that Ensoniq ES1371 device only plays back. How can I get it
to record?
A. I doubt the hardware or driver are the problem. First, make sure you've got a mic
plugged into the right jack...if in doubt, try them all. You might be able to test the
recording capability with the command line
"cat /dev/dsp > /tmp/test.au".
Stop this with control-C before the file gets too big! To see what you got, just type
"cat /tmp/test.au > /dev/dsp"
You may want to make sure audio playback is working before you do this.
Q. I have to enter my environment variables each time I boot up my computer. I tried to
save it in the bash script .bashrc but they don't get loaded up.
A. The .bashrc script only gets excecuted when BASH is run as a NON-login shell. So if
you were to type "bash" at a bash prompt, a new BASH would start and .bashrc would be
run. ".profile" is probably the file you want, it gets executed when BASH is a login shell.
34
APPENDIX C
Serial Programming Code for RAD
#include
#include
#include
#include
#include
<sys/types.h>
<sys/stat.h>
<fcntl.h>
<termios.h>
<stdio.h>
/* baudrate settings are defined in
<asm/termbits.h>, which is
included by <termios.h> */
#define BAUDRATE B38400
/* change this definition for the
correct port */
#define MODEMDEVICE "/dev/ttyS1"
#define _POSIX_SOURCE 1 /* POSIX
compliant source */
#define FALSE 0
#define TRUE 1
volatile int STOP=FALSE;
main()
{
int fd,c, res;
struct termios oldtio,newtio;
char buf[255];
/*
Open modem device for reading and
writing and not as controlling tty
because we don't want to get killed if
linenoise sends CTRL-C.
*/
fd = open(MODEMDEVICE, O_RDWR |
O_NOCTTY );
if (fd <0) {perror(MODEMDEVICE); exit(1); }
tcgetattr(fd,&oldtio); /* save current
serial port settings */
35
bzero(&newtio, sizeof(newtio)); /*
clear struct for new port settings */
/*
BAUDRATE: Set bps rate. You could also
use cfsetispeed and cfsetospeed.
CRTSCTS : output hardware flow control
(only used if the cable has
all necessary lines. See
sect. 7 of Serial-HOWTO)
CS8
: 8n1 (8bit,no parity,1
stopbit)
CLOCAL : local connection, no modem
contol
CREAD
: enable receiving characters
*/
newtio.c_cflag = BAUDRATE | CRTSCTS |
CS8 | CLOCAL | CREAD;
/*
IGNPAR : ignore bytes with parity
errors
ICRNL
: map CR to NL (otherwise a CR
input on the other computer
will not terminate input)
otherwise make device raw (no other
input processing)
*/
newtio.c_iflag = IGNPAR | ICRNL;
/*
Raw output.
*/
newtio.c_oflag = 0;
/*
ICANON : enable canonical input
disable all echo functionality, and
don't send signals to calling program
*/
newtio.c_lflag = ICANON;
/*
initialize all control characters
default values can be found in
/usr/include/termios.h, and are given
36
in the comments, but we don't
them here
*/
newtio.c_cc[VINTR]
= 0;
c */
newtio.c_cc[VQUIT]
= 0;
\ */
newtio.c_cc[VERASE]
= 0;
*/
newtio.c_cc[VKILL]
= 0;
newtio.c_cc[VEOF]
= 4;
d */
newtio.c_cc[VTIME]
= 0;
inter-character timer unused */
newtio.c_cc[VMIN]
= 1;
blocking read until 1 character
*/
newtio.c_cc[VSWTC]
= 0;
*/
newtio.c_cc[VSTART]
= 0;
q */
newtio.c_cc[VSTOP]
= 0;
s */
newtio.c_cc[VSUSP]
= 0;
z */
newtio.c_cc[VEOL]
= 0;
*/
newtio.c_cc[VREPRINT] = 0;
r */
newtio.c_cc[VDISCARD] = 0;
u */
newtio.c_cc[VWERASE] = 0;
w */
newtio.c_cc[VLNEXT]
= 0;
v */
newtio.c_cc[VEOL2]
= 0;
*/
need
/* Ctrl/* Ctrl/* del
/* @ */
/* Ctrl/*
/*
arrives
/* '\0'
/* Ctrl/* Ctrl/* Ctrl/* '\0'
/* Ctrl/* Ctrl/* Ctrl/* Ctrl/* '\0'
/*
now clean the modem line and activate
the settings for the port
*/
tcflush(fd, TCIFLUSH);
tcsetattr(fd,TCSANOW,&newtio);
/*
37
terminal settings done, now handle
input
In this example, inputting a 'z' at
the beginning of a line will
exit the program.
*/
while (STOP==FALSE) {
/* loop until
we have a terminating condition */
/* read blocks program execution until
a line terminating character is
input, even if more than 255 chars
are input. If the number
of characters read is smaller than
the number of chars available,
subsequent reads will return the
remaining chars. res will be set
to the actual number of characters
actually read */
res = read(fd,buf,255);
buf[res]=0;
/* set end
of string, so we can printf */
printf(":%s:%d\n", buf, res);
if (buf[0]=='z') STOP=TRUE;
}
/* restore the old port settings */
tcsetattr(fd,TCSANOW,&oldtio);
}
38
APPENDIX D
PRESENTATION SLIDES
39