1
RoboCom
User manual and documentation
IRALab
University of Milano – Bicocca
D.I.S.CO.
Table of contents
Table of contents ............................................................................................................................................................ 2 Chapter 1 – Introduction ............................................................................................................................................... 4 Robot packages ......................................................................................................................................................... 4 Chapter 2 – Specifications ............................................................................................................................................. 5 Main components ...................................................................................................................................................... 5 Physical characteristics ............................................................................................................................................. 5 Measures............................................................................................................................................................... 5 Materials ............................................................................................................................................................... 6 Special profiles ................................................................................................................................................ 6 Other materials ................................................................................................................................................ 6 Planes............................................................................................................................................................... 6 Batteries .................................................................................................................................................................... 7 Charging ............................................................................................................................................................... 7 Electrical schema ...................................................................................................................................................... 8 Electronics................................................................................................................................................................. 9 DC-DC 24V to 18V board.................................................................................................................................... 9 DC-DC 24V to 5V board.................................................................................................................................... 10 IRABoard v1.1 ................................................................................................................................................... 10 Evolution ....................................................................................................................................................... 10 Specifications ................................................................................................................................................ 11 Motors ..................................................................................................................................................................... 13 Maxon codes ...................................................................................................................................................... 13 Combination technical data ................................................................................................................................ 13 Planetary Gearhead............................................................................................................................................. 13 Motor .................................................................................................................................................................. 13 Tacho .................................................................................................................................................................. 14 Transmission ........................................................................................................................................................... 14 Wheels..................................................................................................................................................................... 16 MacMini .................................................................................................................................................................. 17 Hardware ............................................................................................................................................................ 17 Software ............................................................................................................................................................. 17 Vision system (optional) ......................................................................................................................................... 18 Camera ............................................................................................................................................................... 18 Mirror ................................................................................................................................................................. 18 Tuning plane ....................................................................................................................................................... 18 Chapter 3 – Start using RoboCom ............................................................................................................................... 19 Mounting the battery pack....................................................................................................................................... 19 Inserting battery pack, electronic case and MacMini .............................................................................................. 19 Connect all the plugs and switch on the robot......................................................................................................... 20 The electronic case connectors ........................................................................................................................... 20 The MacMini connectors.................................................................................................................................... 20 The main power connector ................................................................................................................................. 20 Verify serial connection, encoders and motors ....................................................................................................... 20 Start testing your command software ...................................................................................................................... 21 Chapter 4 – IRABoard documentation......................................................................................................................... 22 Design Choices ....................................................................................................................................................... 22 Microprocessor Clock and Oscillator Frequency ............................................................................................... 22 Pulse Width Modulation ..................................................................................................................................... 22 Encoders ............................................................................................................................................................. 23 Serial Line Interface ........................................................................................................................................... 24 Control .................................................................................................................................................................... 24 PID Control ........................................................................................................................................................ 24 Timing issues .......................................................................................................................................................... 26 Concurrency issues.................................................................................................................................................. 26 Eeprom .................................................................................................................................................................... 27 Source Code Description......................................................................................................................................... 27 The language ...................................................................................................................................................... 27 The environment................................................................................................................................................. 27 The compiler ...................................................................................................................................................... 27 The code ............................................................................................................................................................. 27 definitions.h ................................................................................................................................................... 28 ROBOT MAIN.c ........................................................................................................................................... 28 rs232.c ........................................................................................................................................................... 29 controller.c ..................................................................................................................................................... 30 eeprom.c ........................................................................................................................................................ 30 Chapter 5 - How to use IRABoard ............................................................................................................................... 31 Test program in C/C++ Language........................................................................................................................... 31 Commands .............................................................................................................................................................. 33 Enable Motors .................................................................................................................................................... 33 Disable Motors ................................................................................................................................................... 34 Change Set point Value ...................................................................................................................................... 34 Configuring parameters ...................................................................................................................................... 35 Using internal EEPROM .................................................................................................................................... 36 Return distance or speed..................................................................................................................................... 37 Debug information ............................................................................................................................................. 38 Auto tuning parameters ...................................................................................................................................... 39 Chapter 1 – Introduction
The RoboCom is a multi purpose robot, designed for carrying modest weights (max 50 kg) in
indoor and outdoor spaces. The presence on the robot of a powerful PC allows both easy
communications with other computers (e.g. wireless, Bluetooth, etc.) and easy interface to sensor
devices.
The high wheels allows the robot to drive without problems also on grass and rough grounds. The
motors are kept high with respect to the wheels in order to protect them against accidental hits with
objects. The skeleton is completely in aluminum to reduce the robot’s weight and designed for high
resistance to solicitations.
The batteries are easily chargeable, no need to extract them from the robot or to charge separately,
thanks to the unique plug of the battery pack. The electronic case is designed for quick plug-in and
plug-out, without any risk of mistakes with plugs.
The MacMini’s I/O ports are fully accessible and the computer’s case itself is easily extricable from
the robot.
A set of security power switches and LEDs grants an easy emergency stop and diagnosis of the
robot’s status.
Robot packages
The main units of RoboCom are:
• The robot’s skeleton
• The battery pack
• The electronic case
• The Mac Mini
• The radio remote emergency stop
Optional components are:
• Omni directional camera with support
• Additional battery packages
• Battery charger
FOTO
Chapter 2 – Specifications
Main components
DISEGNO AUTOCAD CON SPIEGAZIONE
Physical characteristics
Measures
Global
Width:
Depth:
Height:
mm 600
mm 540
mm 790
Case
Width:
Depth:
Height:
mm 510
mm 350
mm 270
Main plane
Width:
Depth:
Height:
mm 510
mm 350
mm 370 from ground
Battery pack
Width:
Depth:
Height
mm 300
mm 120
mm:90
Electronic case
Width:
mm 320
Depth:
mm 100
Height:
mm 120
Mac Mini
Width:
Depth:
Height:
mm 165
mm 165
mm 50
Vision system
Width:
Depth:
Height:
mm 120
mm 120
mm 420
Materials
Special profiles
Item profiles (www.item.info):
Product code
Length (mm)
Quantity
370.03
370.03
370.03
370.03
370.03
370.86
370.86
419.01
510,00
514,00
156,00
199,00
284,00
268,00
284,00
260,00
2
2
2
2
1
1
1
1
Description
Profile 5 20x20, natural
Profile 5 20x20, natural
Profile 5 20x20, natural
Profile 5 20x20, natural
Profile 5 20x20, natural
Profile 5 80x20, natural
Profile 5 80x20, natural
Profile 6 30x30, natural
Other materials
Rectangular aluminum profile (wheel legs):
Width:
80mm
Depth:
40mm
Height:
Thickness: 4mm
Planes
Steel sheets:
Thickness: 0.5mm
Width
Height
Description
Batteries
The battery pack includes four FGH 20902 High rate 12V 9Ah batteries.
Battery pack DC output: 24V 18Ah
Charging
Recharge the battery pack is very easy as shown by the following steps:
1. Ensure that the robot and the MacMini are turned off
2. Unplug the robot power plug from the battery pack power plug
3. Plug the charger’s plug in the battery pack power plug
4. Plug the charger to the power grid
5. The charger’s LEDs indicates the charging status
6. When the green LED lights the battery pack is fully charged
7. Unplug the charger from the power grid
8. Unplug the charger’s plug from the battery pack power plug
9. Ensure that the robot’s power switches are turned off
10. Plug the robot power plug in the battery pack power plug
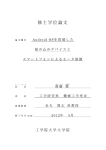
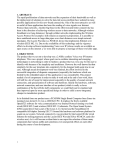
Electrical schema
The following electrical schema shows the power supply wires in the robot. We can see that the
ground wire coming from the batteries goes to the ground stabilizer. This stabilizer is a piece of
copper from which departs the ground wires for all electrical components.
On the +24V line we find a fuse and the main power switch, which is highly recommended to be
turned off if the robot is not in use.
Inside the electronic case there are 3 electronic components:
• The 24V to 18V switching step down power converter board, which powers the MacMini
• The 24V to 5V switching step down power converter board, which powers the IRABoard
• The IRABoard v1.1
(for details see the electronic section).
MOTOR 0
MOTOR 1
MAIN
POW ER SWITCH
Battery pack
+24V
GND
MacMini
FUSE
Electronic case
24V -> 18V
24V -> 5V
IRABoard v1.1
LOGIC SW ITCH
REMOTE ST OP
Ground stabilizer
Electronics
The electronic case contains the all the electrical and electronic components of the RoboCom.
There are 3 components.
DC-DC 24V to 18V board
We implemented the evaluation board of the ST L4970A 10A step-down switching regulator.
This board carries two big capacitors (3300 uF) which grants clean output even in case of
perturbations on the power line.
The ST L4970A component is a step-down switching regulator; with an appropriate RC oscillator
in the circuit this component outputs 18V DC with a maximum of 10 amperes. It is provided in a
15-lead multiwatt plastic power package, which requires an adequate cooling system.
We use this board to power the MacMini. A little trick is needed when powering the MacMini
without his own power adaptor, because there is a 3rd wire, called iSense, which allows the boot.
Without this wire the MacMini will not boot.
The following is the schematic of the board as provided by ST.
DC-DC 24V to 5V board
We implemented the evaluation board of the ST L4973 3.5A step-down switching regulator.
This board is significantly smaller than the previous one, the component is provided in a 18-pin
PowerDIP package and needs only a few components.
The ST L4973 component is a step-down switching regulator; with an appropriate RC oscillator in
the circuit this component outputs 5V DC with a maximum of 3.5 amperes.
We use this board to power the IRABoard v1.1 for the logic sub circuit. See also the ‘Future work’
section.
The following is the schematic of the board as provided by ST.
IRABoard v1.1
Evolution
The IRABoard v1.1 is the empowered version of the IRABoard v1.0, while the IRABoard v2.0 is
currently under development. This family of powerful boards have grown from the experiences
achieved by the IRALab in the last years. This experiences drove us to very important
improvements, which will be discussed in the following.
During the development of the v1.0 we encountered heavy problems due to the electrical noise
driven by the H bridges. In order to solve that critical situation (the noise disturbs reset the
microcontroller) we decided to physically divide the two sub circuits (i.e. the logic and the power
one) over the same board.
The resulting v1.0 worked well under some conditions, but it revealed to be unreliable in normal
robot activity conditions. The biggest problems was the RS-232 communication between the board
and the PC (invalid characters or sequences), which commonly causes the PIC’s firmware crash.
For the v1.1 we redesigned a big part of the circuit, optimizing the space and shorting the
communication wires. The result is a robust board which we tested for more than 5 hours of
continuative work.
Specifications
The main components of the logic part of the board are:
The PIC18F452 Microchip’s microcontroller. This component is the operating core of the entire
board. It communicates via RS-232 with the MacMini, interfaces with the HCTL in order to retrieve
the encoder count and generates the PWM signal for both the H-bridges. For more information
about the firmware see the dedicated section.
Follows a list of the main features of this microcontroller:
• Linear program memory addressing to 32 Kbytes
• Linear data memory addressing to 1.5 Kbytes
• Up to 10 MIPs operation:
• DC - 40 MHz osc./clock input
• 4 MHz - 10 MHz osc./clock input with PLL active
• 16-bit wide instructions, 8-bit wide data path
• Priority levels for interrupts
• 8 x 8 Single Cycle Hardware Multiplier
• Two Capture/Compare/PWM (CCP) modules. PWM output: PWM resolution is 1- to 10-bit
• Addressable USART module: Supports RS-485 and RS-232
• Single supply 5V In-Circuit Serial Programming™ (ICSP™) via two pins
• In-Circuit Debug (ICD) via two pins
The HCTL-2032 Agilent’s Quadrature Decoder/Counter Interface. This component receives the
signals from the two encoders, decode them and count the ticks of the motor’s rotation. The counter
are two 32bit signed registers (one for each motor) which are accessible to the PIC via an 8-bit
tristate interface. The microcontroller periodically reads this value and resets the counter.
Follows a list of the main features of this microcontroller:
• Up to 33MHz clock operation
• Programmable count modes (1x, 2x, 4x)
• High noise immunity
• Schmitt trigger inputs and digital noise filter
• 32-bit binary up/down counter
• 8-bit tristate interface
• 8, 16, 24 or 32-bit operating mode
• TTL/CMOS compatible I/O
• 32 pin PDIP
The MAX232 component for the voltage conversion of the RS-232 signal.
The LMD18200 H-bridges by National Semiconductors. The LMD18200 is a 3A H-Bridge
designed for motion control applications. The device is built using a multi-technology process
which combines bipolar and CMOS control circuitry with DMOS power devices on the same
monolithic structure. Ideal for driving DC and stepper motors; the LMD18200 accommodates peak
output currents up to 6A.
This components are the power supplier for the motors, according to the PWM, direction and break
signals coming from the microcontroller.
An ICD2 interface is also built on the
board to allow easy microcontroller
reprogramming.
This is the schematic of
the IRABoard v1.1:
Motors
The motors are a Maxon product. The specifications are the following:
Maxon codes
Gear
Motor
Encoder
203123
148867
110513
Combination technical data
No load speed at gear output
Max. cont. torque at gear output
Interm. perm. torque at gear output
Length
min-1
Nm
Nm
mm
103
9.1
23
161.9
Planetary Gearhead
Gear order no. 203123
Description
Planetary Gearhead GP 42 C Ø42 mm 15 Nm, ball bearing, ceramic
Reduction
Number of stages
Max. cont. torque
int. permissible Torque
Max. efficiency
Average backlash, unloaded
Mass inertia
Gearhead length
Weight
Max. motor shaft diameter
Nm
Nm
%
deg
gcm2
mm
g
mm
74:1
3
15
23
72
1.0
15
69.9
460
10.0
Motor
Motor order no. 148867
Description
RE 40 Ø 40 mm, Graphite brushes, 150 Watt
Power rating
Nominal voltage
W
Volt
150
24.0
No load speed
Stall torque
Speed/torque gradient
No load current
Starting current
Terminal resistance
Max. permissible speed
Max. continuous current
Max. continuous torque
Max. power output at nominal voltage
Max. efficiency
Torque constant
Speed constant
Mechanical time constant
Rotor inertia
Terminal inductance
Thermal resistance housing-ambient
Thermal resistance rotor-housing
Thermal time constant winding
Length
Weight
min-1
Nm
min-1 mNm-1
mA
A
Ohm
min-1
mA
mNm
W
%
mNm A-1
min-1 V-1
ms
gcm2
mH
KW-1
KW-1
s
mm
g
7580
2.28
3.33
137
76
0.317
12000
5770
170
438
91
30.2
317
5
138
0.082
4.7
1.9
41.6
71.0
480
Tacho
Tacho / resolver order no. 110513
Description
Digital-Encoder HEDS 5540 Ø 10 mm 500 counts per turn, 3 channels
Axle diameter
Counts per turn
Number of channels
Max. operating freq.
Diameter
Length
mm
kHz
mm
mm
4
500
3
100
10
21.0
Transmission
The transmission for each motor/wheel consists of two pulleys and a belt. We chose the belt based
transmission with the aim of minimize the maintenance operations. Indeed, the belts don’t need any
maintenance at all, while the chains need lubrication and cleaning.
The two motors are not placed at the same height in order to reduce robot’s width. With this trick
we gain in width 6 cm.
The upper pulley is fixed on the motor’s shaft, the torque transmission granted by a
XXXXXXXX(linguetta). The toothed belt transmits the motion to the lower pulley which is fixed
on the wheel’s shaft. This shaft is steel-made so as to resist to any possible solicitation and is hold
by two ball bearings.
The following scheme shows the transmission system.
Wheels
The robot has two drive pneumatic spoked wheels in front (moved by the motors), and a pivoting
wheel on the rear. The front wheels are fixed on the steel shaft which receives motion by the belt.
Technical data:
Front
Producer
Product number
Wheel diameter
Hub diameter
Wheel thickness
Wheel weight
3Emme Italy (www.3emme.com)
260DALPN17 (black tire)
mm
260
mm
17
mm
80
Kg
1.48
Rear
Producer
Product number
Wheel diameter
Pivoting plane height
GS Euromarket (http://shop.gseuromarket.com)
SCP200F
mm
200
mm
239
FOTO
MacMini
Hardware
1.83GHz Intel Core Duo processor
Apple Remote with Front Row
2GB RAM
Intel GMA 950 graphics processor
DVI connector, VGA adapter
Slot-loading optical drive
80GB hard drive
Built-in gigabit Ethernet
Analog and digital audio
Expansion via USB and FireWire
Software
By default a Ubuntu Linux distribution is installed, but end user may choose alternative operating
systems.
For robot control we provide the complete documentation of the command set, which can be used
via COM ports communication.
Vision system (optional)
The MRT 06 is a omnidirectional vision system, composed by a firewire camera, a bi-conical
omnidirectional mirror and a tuning plane for camera centering.
Camera
The camera is fixed on the tuning plane on the floor of the video system and is directed upwards.
Interface
Camera Type
Sensor Type
Resolution
Optics
Lens filters/coating
Video Modes
Frame Rates
Gain
Shutter
Gamma
White Balance
Color Saturation
Backlight
Compensation
Sharpness
Special Features
Power Supply
Dimensions (WxHxD)
Housing & Weight
IEEE-1394a (FireWire) 400 Mbps, 2 ports (6 pins)
IIDC-1394 Digital Camera, V1.04 Specification compliant
Sony™ Wfine* ¼” color CDD with progressive scan (ICX-098BQ)
VGA 640 x 480
Bright (F 2.0) lens, with with 4.3 mm focal length.
Antireflective coating and infrared cut filter
YUV (4:1:1, 4:2:2, 4:4:4), RGB-24bit, Monochrome-8bit
30, 15, 7.5 and 3.75 frames per second
Automatic or Manual Control 0-30 dB
Automatic or Manual Control 1/3400s-1/31s
ON / OFF (visual use / image processing use)
Automatic or Manual Control
Adjustable
6 modes + OFF
Adjustable
Software sleep mode, Color bar generator
8 to 30 VDC, by 1394 bus or external jack input Consumption 1W max, 0.9 W
typical,
0.4 W sleep mode
62 x 62 x 35 mm
Silver gray plastic polymer, 60 gr
Mirror
The mirror is a bi-conical omnidirectional mirror and is fixed in front of the camera (i.e. on the top
of the vision system). The image retrieved by the camera of this mirror is the conical projection of
the surrounding world. This image should be straighten via software.
Tuning plane
The camera lies on a tunable plane with 2 degrees of freedom. The tuning should be performed with
a screwdriver from the outside of the vision system. This operation is fundamental for centering the
camera’s optical axis with the mirror’s one.
Chapter 3 – Start using RoboCom
Mounting the battery pack
The battery pack consists of four batteries and their container.
Place the batteries in the container in numerical order like shown in the figure and fix them with the
belt. Plug the power wires in the battery plates like indicated by the labels on the wires.
+
B a tte r y I II
‐
+
B at te r y I
‐
+
Ba tt e ry I V
‐
+
Ba tt e ry II
‐
Inserting battery pack, electronic case and MacMini
Now that the battery pack is assembled put them in the robot the way indicated by the arrows on the
battery container; now push them in the direction of the motors until the pack reaches the motor
plane border. The battery pack is in position.
The electronic case must be placed beside the battery pack. Put the case in the remaining space
beside the battery pack and push them to the end.
Finally remains the MacMini. Put them in the appropriate space on the rear of RoboCom, the I/O
ports on the right side of the robot. Fix them with the belts.
Connect all the plugs and switch on the robot
There are some plugs you may need to connect disconnect while working with RoboCom.
The electronic case connectors
There is the main connector, a big plug you’ll see in the area of the case. It includes the power wires
coming from the batteries/switches and going to the MacMini and the remote emergency stop.
The motors wires come from the motors and terminate in two green easy-on plugs. Plug this male
connectors to the correspondent female on the IRABoard, as indicated by the labels.
The encoder wires come from the encoders and terminate in two black little plugs. Plug this male
connectors to the correspondent female on the IRABoard, as indicated by the labels.
The RS232 serial connector coming from the MacMini is the last connector you must plug. On the
IRABoard it must be plugged on the bottom of the front side of the board.
The MacMini connectors
On the MacMini you need to connect at least the power connector coming from the electronic case
and the USB plug of the USB/USART converter, also coming from the electronic case.
Other devices may be plugged like the omnidirectional camera, sonar or laser devices and similar.
The main power connector
LAST, remember, LAST, you need to connect the main power connector to the battery pack’s one
you settled up before. Be very careful to plug this connector the correct way, otherwise you may
irremediably damage the robot.
At this point you may switch the power switches on and begin the test phase.
Verify serial connection, encoders and motors
If you completed all the previous steps then now you can switch on the MacMini. When logged run
minicom in a command window and try to send some commands to the robot.
On each command you send two events must happen:
• The communication led on the board (the yellow one) will change his status (blink)
• A response to your command should appear on minicom.
Try to execute the command ‘C2’; on minicom it should appear the string ‘OK’.
Let’s test the encoders. Type the command ‘D3’; minicom will start to write the motion controller
status. Two values are important for us, ‘E0’ and ‘E1’: the encoder reads.
Rotate the robot’s wheels clockwise and counterclockwise: the ‘E0’ and ‘E1’ values should change.
Verify that the ‘E0’ value changes when you rotate the wheel corresponding to the Motor 0 (each
motor is labeled with his number); furthermore verify that the value is positive when you rotate the
wheel clockwise and negative when you rotate the wheel counterclockwise.
Do the same for the Motor 1.
If something goes wrong verify you plugged the connectors the right way.
Let’s now verify the motors.
LIFT THE ROBOT, SO THE WHEELS DON’T THOUCH THE GROUND AND ARE FREE
FOR ROTATING.
Type the command ‘T2’.
WARNING: be very careful while using this command, because it sets both the motors rotation
speed at maximum (clockwise) for several seconds.
When the wheels stop, look at the minicom window, you should read the following:
TICK_MOTOR_0 = 1349
TICK_MOTOR_1 = 1352
(the values may change in a little range)
If one of the two values is 0, there is a mistake with the motor wires. Verify that you plugged the
right motor in the right female connector on the IRABoard.
If all behaves like you expect the robot is well settled.
Start testing your command software
Now all is ready for start using the robot. See the next chapter for the documentation of the
IRABoard firmware and communication, then write your code and enjoy the RoboCom.
Chapter 4 – IRABoard documentation
The whole content of this chapter is taken from the AIRBoard user manual, with only some
modifications to match the hardware differences.
Design Choices
In this section we will explain in detail the design choices in the design of the IRABoard control
unit software and hardware along with their rationale.
Microprocessor Clock and Oscillator Frequency
Since the oscillator frequency is correlated with the clock frequency according to the following
formula:
Fclock = ¼ Fosc
we have chosen the maximum oscillator frequency allowed, which is 40 MHz on the PIC18F452.
Notice that, in order to obtain this frequency, a particular oscillator configuration must be used:
10 MHz crystal and HS/PLL oscillator mode2
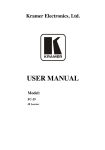
Pulse Width Modulation
Pulse Width Modulation (PWM) is a common and simple way for interfacing digital and analog
devices. Since in IRABoard the control logic is programmed with a digital microcontroller and the
DC motor is driven by an analog power circuit, we use PWM to connect them.
A PWM signal is a periodic signal made up of pulses
with a variable width. Period and duty cycle –that is the
width of the pulses in time units– are the characteristic
parameters of such a signal (see figure beside).
Period is fixed during the operation of the system and
the main considerations that must be addressed
regarding its choice are:
•
•
Audible frequency band: the PWM frequency must be outside the audible frequency band,
otherwise a disturbing noise would be heard.
Compatibility with analog circuits: the PWM frequency must be chosen so that analog circuits
(that will receive that signal as input) would be able to process it.
The PWM period can be specified writing an integer value into the PIC PR2 register that can be
calculated using the following formula:
PWM period = [PR2 + 1] · 4 · Tosc · (TMR2Prescalevalue)
where Tosc is ¼ 10−7 at 40Mhz. In our case, the PWM frequency chosen is 20KHz. To obtain this
value, we put:
PR2 = 7C16 = 12410
and a TMR2 prescale value of ¼.
The duty cycle is the information that a PWM signal carries and it generally varies over time. It is
the output of the control logic for the power circuit that will drive the motor to the desired rotation
speed.
The PIC18F452 has a maximum PWM duty cycle resolution of 10 bits and its value can be
calculated using the following formula5:
PWMdutycycle = (CCPR1L : CCP1CON < 5 : 4 >)·Tosc·(TMR2prescalevalue)
where CCPR1L:CCP1CON<5:4> are the registers containing the desired PWM duty cycle value
(CCPR1L stores the eight MS bits, the fourth and fifth bits of CCP1CON stores the two LS bits). It
is important to notice that the PWM duty cycle has to be in the following range:
PWMdutycycle ∈ [0, PWMperiod]
as is quite obvious from the definition of PWM duty cycle. If the PWM duty cycle equals the PWM
period or exceeds it, we obtain a constant signal that is always in the “high” state (electrically
speaking, a constant signal of +5V).
Having chosen a PWM period of 500 · Tosc · TMR2prescalevalue we have a 9-bit PWM duty cycle
resolution since values that we can write to CCPR1L:CCP1CON<5:4> registers must be in the
range [0, 500].
As stated above, the PWM duty cycle express the desired motor rotation speed computed by the
control logic. Since, for a generic DC motor, we can have two direction of rotation, we have two
information (direction and rotation speed) that need to be communicated to the analog circuit. This
is performed by a signal that carries only this information, the direction bit.
In addition our H-bridges accept the brake information (implemented inverted: low = brake), which
signals to the bridge to stop the motors. The H-bridges, when the brake bit is low short-circuit the
two motor wires together; this action forces the current induced by the inertial motor rotation to reenter in the motor, strongly braking the rotation.
Encoders
The encoder measures the motor rotation speed, providing a feedback to the control logic. We used
optoelectronic encoders, produced by HP. As can be read from Maxon catalogue, they work
according to the following principle: a LED light is sent through a finely screened code wheel that
is rigidly mounted onto the motor shaft. The receiver (photo transistor) changes light / dark signals
into corresponding electrical impulses that are amplified and processed in the electronics.
These encoders provide three signals: two of them (Channel A and B) are 90° phase shifted square
signals that can be counted for exact motor shaft positioning or rotation speed determination;
furthermore, rotation direction can be derived by comparing each other. The third signal provides
zero crossing and could be used as a reference point for precise angle determination. In our setup,
Channel A and B are processed by the HCTL2032, which we already discussed.
Serial Line Interface
The IRABoard can be interfaced to any device through a common RS232 serial line connection.
This interfacing method has been chosen for several reasons:
• The PIC18F452 has a built-in USART circuit that allows easy serial communication from
the software point of view
• RS232 interface is commonly available in almost every personal computer
• Only few electronic components are needed to build the circuit responsible for TTL-RS232
signal level conversion
Among the drawbacks of serial lines the most important one is the limited data transfer rate that
they can achieve. This is not an issue in our case due to the limited computational resources
available that prevent us from setting too high baud rates. Regarding serial line settings, in our setup
we have chosen to operate in a full-duplex asynchronous fashion: data can flow in each direction as
soon as it is produced, without clock synchronization issues. Each character sent over the line is
represented by 8 bits, with one start bit and one stop bit. Baud rate used is 115200 bps.
In IRABoard, serial line data management is interrupt-driven: when a character is received into the
RCREG register an interrupt will be raised and the corresponding interrupt service routine (ISR)
will be executed. Notice that this is an high-priority ISR, meaning that it cannot be interrupted by
any other ISR. Received characters are copied into a buffer to store the whole command string.
When the terminator character ’\r’ is received, the buffer content is transferred into a second buffer,
where the complete command string can be parsed.
Control
PID Control
The process that IRABoard will control is a DC brush motor. From control point of view, this
system can be modeled as a second order system, where input variable is the voltage applied to the
motor armature and output variable is the rotation speed. From the physical model of the motor we
can derive the following transfer function applying Laplace Transform:
where:
•
•
•
•
•
K is the electromotive force constant
J is the moment of intertia of the motor
L is the electric inductance
R is the electric resistance
b is the damping ratio
We have chosen a closed-loop control system.
This control architecture ensure both high disturbance rejection in noisy environments and low
residual error with respect to open-loop control systems. This can be done thanks to the feedback
provided by the encoders. The control algorithm implemented is a digital PID.
This kind of controller is common in industry, and suits well in control systems where process can
be modeled as a second order transfer function. It is written in an incremental form, so that the
control law is:
where u(k) is the control output at instant k, e(k) is the error at instant k, y(k) is the process output
at instant k.
Notice that this formulation differs from the standard continuous-time PID controller: here the
derivative action is applied on the process output, not on the set point. This approach guarantees
smoother control action behavior in case of a set point step variation.
From the software point of view, the control algorithm is contained into a subroutine that is called
with a fixed sampling time period and its main tasks are:
• Reading encoders data stored into timers
• Computing control output
• Applying the control output
Regarding the first sub-task, it is needed in order to compute current motor rotation speed, which
compared to the set point value yields the control error.
Although this would seem a natural and simple way to design the control routine, it is not efficient:
two ratios between two big integers should be computed at each control cycle, and this is a timeconsuming operation for a microcontroller with limited resources.
We adopted the following strategy: instead of comparing the computed speed with the set point, the
set point is transformed in a way that can be directly compared with ticks. This transformations
require two ratios too, but they are computed every time the set point is changed, not at each control
cycle.
The second sub-task, computation of control action, is done according to the above depicted control
law. In order to do this, we need to maintain state variables to store past errors, control action and
process output. It is worth to notice that attention must be paid in order to avoid the “integral
windup” problem that affects PID controllers. This problem may cause very large response times of
the controlled system, due to the presence of an integrator which, in case of control output
saturation, may diverge. A solution for this problem is the following: the discrete integrator (part of
the PID algorithm) is “stopped” when the control output saturate, preventing the integrator from
reaching too large values. In other words, the sum that realize the discrete integrator is not
performed when control action saturate.
Third sub-task involves the control action application. A saturation must be introduced here, since
PWM duty cycle values must stay in a given set.
Timing issues
In IRABoard, in order to perform control action every sampling time, a timer generated interrupt is
used. Our PIC is equipped with three hardware timers registers, of which only the third (Timer2) is
used. It performs the counter within the PWM circuit as a time-base generator, and must be set to
operate at the PWM frequency.
Fortunately, it is also possible to use this timer as an interrupt generator with a programmable
postscaler. This means that an ISR will be called every fixed amount of time that must be a multiple
of the PWM period.
In our case, the chosen sampling time was Ts = 100Hz. To have the control routine called 100 times
per second, we set TMR2 postscaler equal to 10 and a software trick has been introduced so that the
control routine is called every 20 TMR2 interrupts.
Concurrency issues
In order to make the whole system correct with respect to concurrent behavior, the ISR with the
control routine runs at low priority. This means that the control routine can be interrupted (only) by
the RS232 ISR, which has high priority. This may cause delays, but they are of little amount since
RS232 ISR has short-time execution. This gives us two advantages:
• No serial received character will be overwritten, since RS232 ISR will be executed as soon
as the character arrives on the receiving buffer.
• The RS232 ISR is executed as an atomic operation, which is needed to preserve correct
program state, since multiple memory location are accessed/modified by it.
Furthermore, since the control routine is executed into an ISR, it can interrupt program body
execution (command string parsing for example) guaranteeing to be executed at a given frequency.
Eeprom
As you can see in Datasheet errata about pic18Fxx2 family, when reading the stored data, the
contents of the EEDATA register may be corrupted if the RD bit (EECON1<0>) is set immediately
following a write to the address byte (EEADR). A NOP instruction between the registers writing
should solve the problem.
Source Code Description
The language
The code has been written in C language. It is not an ANSI C, but it is a Microchip1 version, very
similar to the ANSI C, including some libraries (such as string.h) rewritten for working on small
devices, with a little amount of memory and low computer power. The most important thing while
programming this device is clock cycles saving: it is better to have longer code than compact code,
but slower to execute. However we must remember that PIC has a little amount of memory and the
code cannot be too long. This is the trade off we have considered programming the PIC.
The environment
The entire code has been written with MPLAB IDE environment v6.30 by Microchip. The code can
be modified with any text editor, but we advise to use this suite because the PIC18 specific compiler
can be easily integrated with this environment. MPLAB IDE allows also to compile the source code
to obtain the hexadecimal file that must be written on the PIC. MPLAB IDE can write the
hexadecimal file on the PIC, but also different program can do it.
The compiler
The code has been compiled with MPLAB C18 compiler v.2.20 by Microchip. This compiler has
been designed to be integrated with MPLAB IDE suite. This is the specific compiler for PIC18
family. If we change PIC family (i.e. PIC17 family) we must change the compiler because the
libraries of each compiler has been written for one specific PIC family.
The code
The program has been divided in various modules, each of them performing a particular function.
Every module has been organized with the ANSI C typical structure: an header file (.h extension)
that contains the functions and local variable declarations and a code file (.c extension) that contains
the functions source code. There is also an header file that contains all global variable declarations
and all definition strings (the classic “#DEFINE” preprocessor directives).
definitions.h
This header file is the most important, because it contains all constant strings and global variable
definitions. The constant strings (#define preprocessor directive) are very important because we can
indicate each PIC pin with a mnemonic string. In this way, if we change pin layout, we have to
change only the #define string, without changing the mnemonic string in the code. The #define
directive is also useful for other characteristics: we can define mnemonic strings with a particular
value or define boolean variables and all Eeprom mnemonic strings.
Global variables are useful because they keep their value even when the subroutine has finished,
and these values are available to each module. We have chosen to use many global variables to keep
the variable value for different elaboration steps and in each module. We can find in definitions.h
all global communication buffer, encoders and controller variables.
ROBOT MAIN.c
This is the main file. It contains all global variables declarations, the interrupt service routines and
the command interpreter. When we turn on the IRABoard, the sequence of operation is:
1. Initialize all pic feature (rs232, timer and PWM)
2. Load from internal EEPROM all controller constants
3. Start an infinite loop: this is a polling loop which can be interrupted by serial bus and control
interrupt service routines. When IRABoard receives a terminal character (carriage return)
from communication buffer, it calls the interpreter routine to parse the command and then
execute it (if valid).
We can see this sequence in the diagram on the next page.
The subroutines contained in this module are:
• control_isr: this is the control interrupt service routine. It is called each sampling period.
• rs232_isr: this is the serial bus interrupt service routine. It is called at each character arrival
from the serial bus.
• executeCommand: this is the subroutine that execute the command received from the upper
layer. It is called when the serial bus isr receive the end string character (carriage return).
• Setup: this is the initial PIC setup routine. It sets all pic features we need.
• restoreData: this is the subroutine that load all pic parameters from pic internal EEPROM. It
is called after Setup subroutines.
• main: the main subroutine.
rs232.c
This file contains all rs232 serial bus subroutines. This module is not the original Microchip’s,
because the original had some bugs (specially in the putsUSART and putrsUSART subroutines), so
we rewrote it. The new version is so smaller than the original and contains only the subroutines
necessary for our application. The subroutines contained in this module are:
• putsUSART: this is the subroutine that writes a string on the serial bus. The string has to be
placed in the PIC RAM memory: this means that the string must not be within the double
•
•
•
•
quote (i.e. constant string). Example of use is putsUSART(variable); where variable is a
string variable.
putrsUSART: this is the subroutine that writes a string on the serial bus. This string has to be
placed in the PIC ROM memory: this means that the string is a constant string, write within
the double quote. Example of use is putrsUSART("Welcome in IRABoard");.
ReadUSART: this is the subroutine that read a single character from the serial bus. Example
of use is character = ReadUsart();.
WriteUSART: this is the subroutine that write a single character into the serial bus. Example
of use is WriteUSART(’\r’);.
read_rs232: this is the subroutine called by serial bus interrupt service routine. When a
character arrives, this subroutine retrieve it from rs232 input register and copy it in the
command buffer. When a terminal character (carriage return) is received, the command
buffer is passed to the proper subroutine for command parsing and execution.
controller.c
This file contains the controller subroutine. It contains only one subroutine, but it is the most
important in IRABoard, since it is the engine controller algorithm. Actually the engine control is a
digital P.I.D, but it is possible to write in IRABoard any type of control (e.g. fuzzy controller). If we
want to change control algorithm, we have to modify this file. The only subroutine contained in this
module is:
• engine control: this is the subroutine that contains the engine control algorithm.
eeprom.c
This file contains all EEPROM subroutines. This module is not the original Microchip, because it
does not exist. We have written this module with datasheet information. The address necessary for
store or load data is 8 bits data: the only reason for this choice is that EEPROM maximum size is
256 bytes and with 8 bits we can cover all memory space.
The subroutines contained in this module are:
• readByteFromIE: it reads a single byte data (8 bits) from the EEPROM memory. Example of
use is data = readByteFromIE(address); where address is the memory location of the data
we want.
• writeByteToIE: it writes a single byte data (8 bits) it the EEPROM memory. Example of use
is writeByteToIE(address, data); where address is the memory location we want store the
value and data is the value to save.
• loadEEPromValue: it reads a floating point value from the EEPROM memory. The floating
value is stored in scientific notation (mantissa and exponent), so we can store a big range of
number with few memory locations. Example of use is value = loadEEPromValue(address);
where address is the memory location of the value we want.
• storeEEPromValue: it writes a floating point value in the EEPROM memory. Example of
use is storeEEPromValue(address, value); where address is the memory location we want
store the value and value is the value we want to save.
Chapter 5 - How to use IRABoard
The use of IRABoard is very simple. First of all, we have to configure the serial bus with the proper
values, otherwise the communication will not be possible. For testing the communication we can
use a terminal emulation program (HyperTerminal on Windows or Minicom on Linux) or a test
program written in C/C++ language.
The values to use are:
•
•
•
•
bus speed: 115.200 bps
hardware flow control: disabled
bit parity: no parity
eventual modem initializations: disabled
Test program in C/C++ Language
We can use IRABoard with a test program written in C (or C++) language. To use a test program
we have to include the header file “sstream.h”, and then we must create a function to initialize the
serial communication.
We can do that in the constructor method if we are programming with C++. An example of
initialization code (constructor method) could be the follow:
SerialCommunicationAIRBoard::SerialCommunicationAIRBoard()
{
mBaudRate = B115200;
mModemDevice = strdup("/dev/ttyS0");
mHardwareFlowControl = false;
InitCommunication();
StartMotors();
}
The functions InitCommunication and StartMotors start respectively the serial communication and
the motors. The InitCommunication function initializes the serial port with the correct configuration
bits. An example of initialization communication could be the follow:
void SerialCommunication::InitCommunication(void)
{
// Open modem device for reading and writing and not as
// controlling tty because we don’t want to get killed
// if linenoise sends CTRL-C.
if ((fd = open(mModemDevice, O_RDWR | O_NOCTTY )) <0)
{
perror(mModemDevice);
exit(-1);
}
// save current serial port settings
tcgetattr(fd,&oldtio);
// clear struct for new port settings
bzero(&newtio, sizeof(newtio));
// BAUDRATE: Set bps rate. You could also use cfsetispeed
// and cfsetospeed.
// CRTSCTS : output hardware flow control (only used if the
// cable has all necessary lines. See sect. 7 of
// Serial-HOWTO)
// CS8 : 8n1 (8bit,no parity,1 stopbit)
// CLOCAL : local connection, no modem contol
// CREAD : enable receiving characters
if (mHardwareFlowControl)
{
newtio.c_cflag = mBaudRate|CRTSCTS|CS8|CLOCAL|CREAD;
}
else
{
newtio.c_cflag = mBaudRate|CS8|CLOCAL|CREAD;
}
// IGNPAR : ignore bytes with parity errors
// ICRNL : map CR to NL (otherwise a CR input on the other
// computer will not terminate input)
// otherwise make device raw (no other input processing)
newtio.c_iflag = IGNPAR | ICRNL;
// Raw output.
newtio.c_oflag = 0;
// ICANON : enable canonical input
// disable all echo functionality, and don’t send signals to
// calling program
newtio.c_lflag = ICANON;
// initialize all control characters
// default values can be found in /usr/include/termios.h,
// and are given in the comments, but we don’t need them here
newtio.c_cc[VINTR] = 0; // Ctrl-c
newtio.c_cc[VQUIT] = 0; // Ctrl-\
newtio.c_cc[VERASE] = 0; //del
newtio.c_cc[VKILL] = 0; // @
newtio.c_cc[VEOF] = 4; // Ctrl-d
newtio.c_cc[VTIME] = 0; // inter-character timer unused
newtio.c_cc[VMIN] = 0; //blocking read until 1 character arrives
newtio.c_cc[VSWTC] = 0; // ’\0’
newtio.c_cc[VSTART] = 0; // Ctrl-q
newtio.c_cc[VSTOP] = 0; // Ctrl-s
newtio.c_cc[VSUSP] = 0; //Ctrl-z
newtio.c_cc[VEOL] = 0; // ’\0’
newtio.c_cc[VREPRINT] = 0; // Ctrl-r
newtio.c_cc[VDISCARD] = 0; // Ctrl-u
newtio.c_cc[VWERASE] = 0; // Ctrl-w
newtio.c_cc[VLNEXT] = 0; // Ctrl-v
newtio.c_cc[VEOL2] = 0; // ’\0’
// now clean the modem line and activate the settings for
// the port
tcflush(fd, TCIFLUSH);
tcsetattr(fd,TCSANOW,&newtio);
// terminal settings done, now handle input
}
Variables newtio and oldtio are defined as private struct termios. The structure Termios describes a
general terminal interface for controlling asynchronous communications port. In order to use this
structure, we must include “termios.h” header file. To see the other functions descriptions, use
Linux man pages.
Commands
In this section, we describe the commands available to use the IRABoard. The basic syntax of a
command is
<COMMAND><DEVICE>[<VALUE1>][<VALUE2>]
Where
• <COMMAND>: is the specific command we want to execute;
• <DEVICE>: is the device we want to command. Possible values are:
− 0 for the motor0
− 1 for the motor1
− 2 for both motor0 and motor1.
• <VALUEx>: is the command parameter (if exists). This value can be a motor set point, or a
value we want to store into PIC EEPROM. The <VALUEx> is optional because it is not
used by all commands; it will be specified in the appropriate section.
The command is finished when we send the terminator character, that is a carriage return. If we are
using a terminal emulation program (such as minicom or HyperTerminal), we must press the enter
key. If we are using a program test, we must insert the character ‘\r’ at the end of the command
string. In this manual we indicate the variables between “<” and “>” and optional variables between
“[” and “]”.
Enable Motors
This command enable the motor specified in the <DEVICE> value; its syntax is:
a<DEVICE>
<DEVICE> is the device we want to enable.
When a motor is enabled, it will start the control action to react with the current set point (it could
have been previously set). Before enabling a motor, it is better to set the correct set point (the
default set point values are zero, so that the robot will not move even if we enable motors without
giving set point values).
Possible examples:
a2 //start both motors
a0 //start only motor 0
Disable Motors
This command disable the motor specified in the <DEVICE> value: its syntax is:
b<DEVICE>
<DEVICE> is the motor we want to disable.
When a motor has been disabled, every change in set point value will not produce any result, until
next habilitation. The motors will be automatically disabled after a number of cycles with nocommand set in the Eeprom.
Possible examples:
b2 //disable both motors
b1 //disable only motor 1
Change Set point Value
This command allow to change set point values for the motors; its syntax is:
m<DEVICE>+<VALUE0>[+<VALUE1>]
<DEVICE> is the motor for which we want to change set point.
According to the devices, we can have different values. When <DEVICE> is equal to 0 or 1, the
new set point value is <VALUE0> and <VALUE1> is not used; when <DEVICE> is equal to 2, we
must use both <VALUE0> and <VALUE1>: Some examples are (for simplicity, we will consider
the motors always active):
m1+010+010
ERROR 7
m1+010
OK
m2-020
ERROR 7
//set motor1
//error: bad command
//set motor1
//operation ok
//set both motors
//error: bad command
The command sequence above shows a typical use of this command. As we can see, the first
command produces an error, because we have chosen to change set point value only to motor1 but
we have specified two values. The second command is correct since we have specified only one
value to motor1. The third command produces an error since we have chosen to change both set
point values, but we have passed only one value.
m2+000+000
OK
//set both motors
//operation ok
m0+050
OK
m1+050
OK
m2+099+099
OK
//set only motor0
//operation ok
//set only motor1
//operation ok
//set both motors
//operation ok
This command sequence shows the use of all cases, without errors.
The first command stops both the motors (they are still enabled).
The second command change set point value only to motor0.
The third command change set point value only to motor1: now both engines have the same set
point value.
The fourth command change set point value to both the motors.
When the motor is controlled in speed, the new set point value is expressed in MAX speed
percentage and it can be both positive and negative. The MAX speed value is, in absolute value,
100 and the MIN value is 0 (value greater than +100 or less than -100 takes the controller to
saturation zone). If we want to move the robot to its MAX speed, we must set the set point value to
+100 (or -100 if we want to change the direction). If we want to stop the robot (without disabling
motors), we have to set the set points value to 0.
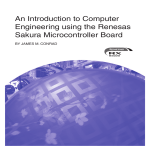
The sign represents the direction of motor rotation. Usually
with positive set point values, the motor rotation is clockwise
and with negative set point values the motor rotation is
counter-clockwise. Warning! If the wheels are opposed (such
as with bidirectional robots) and we want to move the robot
on a straight direction, we must set one set point positive and
the other negative. This is necessary because if we set both
set points with the same sign, the wheels will rotate both
clockwise, and robot will turn around itself.
We have chosen to represent the speed as max-value percentage (when the motor is controlled in
speed), and not with absolute values (such as in cm/sec), because we are always sure that +100
represent the MAX speed even if we change motors or wheels while absolute speed value may
change.
Configuring parameters
This command configure the control parameters of motor specified in the <DEVICE> value and
other parameters; its syntax is:
c<DEVICE>
<DEVICE> is the device we want to configure.
This command is useful if we want a quick configuration of all parameters. The parameters
configured are the constant of the PID controller (kp=0.5, ki=0.1, kd=0.3) and maxtick value
(maxtick=240) according with device choice, and others parameters needed for correct working of
PIC (with suggested values, see below in ”Using internal EEPROM” section).
Possible examples:
c2
c0
//configure both motors
//configure only motor 0
Using internal EEPROM
This command allow to use PIC internal EEPROM to save robot and control parameters. The
syntax is slightly different from other commands since we have to specify the operation we want to
perform and not the device. The syntax is:
e<OPERATION><VARIABLE>[=<VALUE>]
There are only two possible values for <OPERATION>:
r
w
read a value from EEPROM
write a value to EEPROM
We have to specify also the variable we want to save or restore. Each variable is contained in
<VARIABLE> and it is represented by a mnemonic string. Strings representing variables are:
•
•
•
•
•
•
•
•
•
•
•
kd0: motor 0 control derivative constant. It is a positive floating point value.
ki0: motor 0 control integrative constant. It is a positive floating point value.
kp0: motor 0 control proportional constant. It is a positive floating point value.
kd1: motor 1 control derivative constant. It is a positive floating point value.
ki1: motor 1 control integrative constant. It is a positive floating point value.
kp1: motor 1 control proportional constant. It is a positive floating point value.
ct: controller sampling period multiplier. It is a positive integer value. It is expressed in
milliseconds. The advice value is 10.
nc: It is the number of no-command cycles after that the program disable the engine. The
advice value is 5000.
maxtc0: MAX tick for motor 0. It is a positive integer value (between 1 and 250, it depend
on battery condition, advice value is 240). This value can be computed using the auto-tuning
command
maxtc1: MAX tick for motor 1. It is a positive integer value (between 1 and 250, it depend
on battery condition, advice value is 240). This value can be computed using the auto-tuning
command
ticsp0: ticks to space for motor 0. It represents the covered space (in millimeters) by one
tick. To calculate this value, we have to follow two steps. First of all, we have to reset
encoder counters using command r2e and then move the robot by hand (with motors
disabled), by one meter straight. Then we have to use the command r2e again to read the
ticks number. We have to move the robot very slowly to have an exact measure. We have to
repeat this step many times to have a reliable ticks number. The second step is calculate the
“ticks to space value”. We have to use the formula:
where TICKS PER METER is the ticks number we have just retrieved. It is a positive
floating point value.
• ticsp1: ticks to space for motor 1. It represents the covered space (in millimeters) by one
tick. To calculate this value, we have to follow the steps shown above. It is a positive
floating point value.
If we want to write a variable into the EEPROM, we must also specify the value to store adding
“=<VALUE>” in the command syntax. The value representation is the same of normal computers:
if the value is a floating point, we must use a “dot” to separate integer and decimal part, while if the
value is an integer, we must write an integer number.
Now we will show some example of use.
erkd0=1
ERROR 7
ewki1
ERROR 7
erki2
ERROR 7
er
ERROR 7
//error: bad command
//error: bad command
//error: bad command
//error: bad command
The command sequence above shows some example of typical error. The first command is wrong
because we want to perform a read, but we also specify a value. The second command is wrong
because we want to perform a write, but we do not specify any value. The third command is wrong
because we specify a not existent mnemonic string. The fourth command is wrong because we do
not specify any parameter.
ewkd0=1.5
OK
erkd0
kd0=1.5
OK
//write in the internal Eeprom the value for kd0
//operation ok
//read from the internal Eeprom the value for kd0
//the value for kd0 is printed
//operation ok
This command sequence shows two correct commands. The first command write the value 1.5 in
the EEPROM space associated to the mnemonic string “kd0”. The second command retrieve from
EEPROM memory the value of variable “kd0” and write it on the serial bus.
Return distance or speed
This command allows to read the current speed value and the covered distance since last read
command; its syntax is:
r<DEVICE>[<TYPE>]
<DEVICE> is the device we want to query for distance or speed
<TYPE> is the data type we want to check. The possible values are:
− s
we want to read the speed. It is expressed in ticks/second
− e
we want to read the space. It is expressed in ticks.
<TYPE> is optional since we may want both current speed and covered space for both devices. In
this case, we must write only the command “r2”, without any other parameters, and the AIRboard
will return speed and space for both devices. If we do not want both, <TYPE> is required. Now we
will show some example of this command.
r2
//print both distance and speed for both the motors
453 345 //the covered space for motor0 and motor1
23 67 //the current speed for motor0 and motor1
OK
//operation ok
This example shows the use of command r2 : it returns both speed and covered distance for both the
motors. Here we have not specified the <TYPE>, so IRABoard has returned all data.
r2e
453 345
OK
r2s
23 67
OK
//print covered space for both the motors
//the covered space for motor0 and motor1
//operation ok
//print current speed for both the motors
//the current speed for motor0 and motor1
//operation ok
This command sequence has the same effect of the previous, but here we have used two commands
instead of one. As we can see the results are the same.
r0e
453
OK
r0s
23
OK
//print covered space only for motor 0
//the covered space for motor 0
//operation
//print speed only for motor 0
//the current speed for motor 0
//operation ok
In this example, the commands print the covered space and the current speed only for motor 0.
Debug information
This command allows to change debug level and the information returned by IRABoard. This
feature is useful to get values and messages during IRABoard tests. Its syntax is:
d<DEBUG VALUE>
<DEBUG VALUE> is the value of the debug level. The values are:
• 0 it does not return any message. It is the default value.
• 1 it returns only the command results (OK if the command execution has successfully
terminated, ERROR code if the command execution has failed).
• 2 it returns advanced debug messages such as intermediate elaboration results. It shows
EEPROM operation result and enable/disable operation on kicker and motors.
• 3 it returns ALL messages, even the controller results (set point, PWM and tick) step by
step.
Warning! This causes slowing down in the execution
because of writing on the serial bus. We recommend to use
this feature with a monitor and terminal emulation program
(such as HyperTerminal under Windows or minicom under
Linux).
We have said above that when a command execution fails, an error message is printed with a
special code. They are:
• ERROR 1: bad device. This error is shown when we indicate in the command a device not
valid.
• ERROR 2: bad data. This error is shown when we indicate in the command a not valid data
(i.e. numbers in wrong format).
• ERROR 7: bad command. This error is shown when we indicate a wrong command (i.e.
EEPROM write request without associated value)
• ERROR 99: unknown command. This error is shown when we indicate a command that
does not exist
Auto tuning parameters
This command allows to get/set automatically some important robot parameters, such as MAX
encoder ticks; its syntax is:
t<DEVICE>
<DEVICE> is the device we want to set parameters automatically.
This feature is very important because if we change the motors or encoders, we can retrieve these
parameters automatically. The most important parameter retrieved is MAX encoder ticks (i.e.
actually NUM encoder ticks at the MAX speed) for both the motors. When these parameters have
been calculated, they are automatically written in the EEPROM (the mnemonic strings are maxtc0
or maxtc1).
Warning! This command set the motor to its MAX speed.
Before start auto tuning, if you are testing traction motor, you
should raise the robot, so it can’t start without control at its
MAX speed. If you are testing rotation motor, pay attention
no one finds near the robot. The test lasts about 5 second.