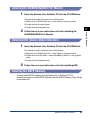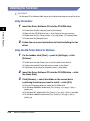
1
Series
Setup Guide
Please read this guide before operating this equipment.
After you finish reading this guide, store it in a safe place for future reference.
ENG
LASER CLASS 700 Series
Setup Guide
Manuals for the Machine
The manuals for this machine are divided as follows. Please refer to them for detailed information.
The manuals supplied with optional equipment are included in the list below. Depending on the
system configuration and product purchased, some manuals may not be needed.
Guides with this symbol are printed manuals.
• Basic Operations
• Troubleshooting
• Sending Instructions
• Fax Instructions
• Setting Up the Network Connection and
Installing the CD-ROM Software
• Remote User Interface Instructions
• Network Connectivity and Setup Instructions
• PCL Printer Instructions
• PCL Printer Driver Installation and
Instructions
• Fax Driver and Cover Sheet Editor Installation
and Instructions
The machine illustration on the cover may differ slightly from your machine.
CD-ROM
Guides with this symbol are PDF manuals included on the
accompanying CD-ROM.
Reference Guide
Sending Guide
Facsimile Guide
Setup Guide
CD-ROM
(This Document)
Remote UI Guide
CD-ROM
Network Guide
CD-ROM
PCL Printer Guide
CD-ROM
PCL Driver Guide
CD-ROM
Fax Driver Guide
with Cover Sheet Editor
CD-ROM
How This Manual Is Organized
Chapter 1
Connecting the Machine to a Network
Chapter 2
Installing Software
Please read this chapter
Considerable effort has been made to ensure that this manual is free of inaccuracies and omissions. However, as we are constantly improving our
products, if you need an exact specification, please contact Canon.
Contents
Preface . . . . . . . . . . . . . . . . . . . . . . . . . . . . . . . . . . . . . . . . . . . . . . . . . . . . . . . . . .vi
How to Use This Manual . . . . . . . . . . . . . . . . . . . . . . . . . . . . . . . . . . . . . . . . . . . vi
Symbols Used in This Manual . . . . . . . . . . . . . . . . . . . . . . . . . . . . . . . . . . . . . . vi
Illustrations Used in This Manual . . . . . . . . . . . . . . . . . . . . . . . . . . . . . . . . . . . vii
Abbreviations Used in This Manual . . . . . . . . . . . . . . . . . . . . . . . . . . . . . . . . . vii
Legal Notices . . . . . . . . . . . . . . . . . . . . . . . . . . . . . . . . . . . . . . . . . . . . . . . . . . . .viii
FCC (Federal Communications Commission) . . . . . . . . . . . . . . . . . . . . . . . . . viii
Laser Safety . . . . . . . . . . . . . . . . . . . . . . . . . . . . . . . . . . . . . . . . . . . . . . . . . . . viii
International Energy Star Program. . . . . . . . . . . . . . . . . . . . . . . . . . . . . . . . . . . ix
Trademarks. . . . . . . . . . . . . . . . . . . . . . . . . . . . . . . . . . . . . . . . . . . . . . . . . . . . . ix
Copyright . . . . . . . . . . . . . . . . . . . . . . . . . . . . . . . . . . . . . . . . . . . . . . . . . . . . . . ix
Disclaimers. . . . . . . . . . . . . . . . . . . . . . . . . . . . . . . . . . . . . . . . . . . . . . . . . . . . . x
Legal Limitations on the Usage of Your Product and the Use of Images . . . . . . x
Chapter 1
Connecting the Machine to a Network
Setting Up the Network Connection. . . . . . . . . . . . . . . . . . . . . . . . . . . . . . . . . 1-2
Settings Flowchart . . . . . . . . . . . . . . . . . . . . . . . . . . . . . . . . . . . . . . . . . . . . . 1-2
Making Connections . . . . . . . . . . . . . . . . . . . . . . . . . . . . . . . . . . . . . . . . . . . . .
Connecting to a Network . . . . . . . . . . . . . . . . . . . . . . . . . . . . . . . . . . . . . . . .
Connecting to a 100Base-TX Network . . . . . . . . . . . . . . . . . . . . . . . . . . .
Connecting to a 10Base-T Network . . . . . . . . . . . . . . . . . . . . . . . . . . . . .
Chapter 2
1-3
1-3
1-4
1-5
Installing Software
About the User’s CD-ROM Software . . . . . . . . . . . . . . . . . . . . . . . . . . . . . . . .
CD-ROM Contents . . . . . . . . . . . . . . . . . . . . . . . . . . . . . . . . . . . . . . . . . . . . .
Driver Software . . . . . . . . . . . . . . . . . . . . . . . . . . . . . . . . . . . . . . . . . . . . .
Network User Software . . . . . . . . . . . . . . . . . . . . . . . . . . . . . . . . . . . . . . .
System Requirements . . . . . . . . . . . . . . . . . . . . . . . . . . . . . . . . . . . . . . . . . .
2-2
2-2
2-2
2-3
2-4
Installing the Software. . . . . . . . . . . . . . . . . . . . . . . . . . . . . . . . . . . . . . . . . . . . 2-5
For Windows. . . . . . . . . . . . . . . . . . . . . . . . . . . . . . . . . . . . . . . . . . . . . . . . . . 2-5
When the Machine Is Connected to a Network . . . . . . . . . . . . . . . . . . . . . . . 2-5
Software Installation Instructions . . . . . . . . . . . . . . . . . . . . . . . . . . . . . . . . . .
Installing the PCL Printer Driver . . . . . . . . . . . . . . . . . . . . . . . . . . . . . . . . . . .
Using the Installer. . . . . . . . . . . . . . . . . . . . . . . . . . . . . . . . . . . . . . . . . . .
Using the Add Printer Wizard for Windows . . . . . . . . . . . . . . . . . . . . . . .
Installing Canon Font Manager . . . . . . . . . . . . . . . . . . . . . . . . . . . . . . . . . . .
Installing the NetSpot . . . . . . . . . . . . . . . . . . . . . . . . . . . . . . . . . . . . . . . . . . .
iv
2-6
2-6
2-6
2-6
2-8
2-8
Installing the LPR Port Utility . . . . . . . . . . . . . . . . . . . . . . . . . . . . . . . . . . . . . .2-8
Installing the NetBIOS/NetBEUI Port Monitor . . . . . . . . . . . . . . . . . . . . . . . . .2-9
Installing DSE (Device Status Extension) . . . . . . . . . . . . . . . . . . . . . . . . . . . .2-9
Installing the NDPS Gateway. . . . . . . . . . . . . . . . . . . . . . . . . . . . . . . . . . . . . .2-9
Installing the Fax Driver . . . . . . . . . . . . . . . . . . . . . . . . . . . . . . . . . . . . . . . . .2-10
Using the Installer . . . . . . . . . . . . . . . . . . . . . . . . . . . . . . . . . . . . . . . . . .2-10
Using the Add Printer Wizard for Windows . . . . . . . . . . . . . . . . . . . . . . .2-10
v
Preface
Thank you for purchasing the Canon LASER CLASS 700 Series. Please read this manual
thoroughly before operating the machine in order to familiarize yourself with its capabilities,
and to make the most of its many functions. After reading this manual, store it in a safe place
for future reference.
How to Use This Manual
Symbols Used in This Manual
The following symbols are used in this manual to explain procedures, restrictions,
handling precautions, and instructions that should be observed for safety.
I
WARNING
Indicates a warning concerning operations that may lead to death or
injury to persons if not performed correctly. In order to use the
machine safely, always pay attention to these warnings.
CAUTION
Indicates a caution concerning operations that may lead to injury to
persons, or damage to property if not performed correctly. In order to
use the machine safely, always pay attention to these cautions.
IMPORTANT
NOTE
vi
Indicates operational requirements and restrictions. Be sure to read
these items carefully in order to operate the machine correctly, and to
avoid damage to the machine.
Indicates a clarification of an operation, or contains additional
explanations for a procedure. Reading these notes is highly
recommended.
Illustrations Used in This Manual
Unless otherwise mentioned, illustrations used in this manual are those taken when
no optional equipment is attached to the LASER CLASS 710.
The model LASER CLASS 710 is used for illustration purposes in this manual.
When there is any difference between the three models (710, 720i, or 730i), it is
clearly indicated in the text, e.g., “LASER CLASS 720i only.”
Abbreviations Used in This Manual
In this manual, product names and model names are abbreviated as follows:
Microsoft® Windows® 95 operating system:
Microsoft® Windows® 98 operating system:
Microsoft® Windows® Millennium Edition operating system:
Microsoft® Windows NT® operating system:
Microsoft® Windows® 2000 operating system:
Microsoft® Windows® XP operating system:
Microsoft® Windows® operating System:
Novell NetWare®:
Windows 95
Windows 98
Windows Me
Windows NT
Windows 2000
Windows XP
Windows
NetWare
vii
Legal Notices
FCC (Federal Communications Commission)
This equipment has been tested and found to comply with the limits for a Class B
digital device, pursuant to part 15 of the FCC Rules. These limits are designed to
provide reasonable protection against harmful interference in a residential
installation. This equipment generates, uses, and can radiate radio frequency
energy and, if not installed and used in accordance with the instructions, may
cause harmful interference to radio communications. However, there is no
guarantee that interference will not occur in a particular installation. If this
equipment does cause harmful interference to radio or television reception, which
can be determined by turning the equipment off and on, the user is encouraged to
try to correct the interference by one or more of the following measures:
• Reorient
or relocate the receiving antenna.
• Increase the separation between the equipment and receiver.
• Connect the equipment into an outlet on a circuit different from that to which the
receiver is connected.
• Consult your local authorized Canon dealer or an experienced radio/TV technician
for help.
Do not make any changes or modifications to the equipment unless otherwise
specified in the manual. If such changes or modifications should be made, you
could be required to stop operation of the equipment.
Laser Safety
This product complies with 21 CFR Chapter 1 Subchapter J as a Class Ι laser
product under the U.S. Department of Health and Human Services (DHHS)
Radiation Performance Standard according to the Radiation Control for Health and
Safety Act of 1968. Class Ι levels of laser radiation are not considered to be
hazardous.
Since radiation emitted inside the product is completely confined within protective
housings and external covers, the laser beam cannot escape from the machine
during any phase of user operation. Do not remove protective housings or external
covers, except as directed by the equipment's Reference Guide.
viii
International Energy Star Program
As an ENERGY STAR® Partner, Canon USA, Inc. has determined
that this product meets the ENERGY STAR® Program for energy
efficiency.
The International ENERGY STAR® Office Equipment Program is
an international program that promotes energy saving through the
use of computers and other office equipment. The program backs
the development and dissemination of products with functions
that effectively reduce energy consumption. It is an open system
in which business proprietors can participate voluntarily. The
targeted products are office equipment, such as computers,
displays, printers, facsimiles, and copiers. The standards and
logos are uniform among participating nations.
Trademarks
Adobe and Acrobat Reader are trademarks of Adobe Systems Incorporated.
Canon, the Canon Logo, LASER CLASS, and NetSpot are trademarks of Canon Inc.
Microsoft, Windows, and Windows NT are registered trademarks of Microsoft Corporation in
the United States and in other countries. Wingdings is a trademark of Microsoft Corporation.
NetWare and Novell are registered trademarks of Novell Inc.
Novell Distributed Print Service and NDPS are trademarks of Novell Inc.
PCL, PCL 5e, and PCL 6 are trademarks of Hewlett-Packard Company.
UNIX is a registered trademark exclusively licensed from X/Open Company, Ltd. in the
United States and in other countries.
Other product and company names herein may be the trademarks of their respective
owners.
Copyright
Copyright 2002 by Canon Inc. All rights reserved.
No part of this publication may be reproduced or transmitted in any form or by any means,
electronic or mechanical, including photocopying and recording, or by any information
storage or retrieval system without the prior written permission of Canon Inc.
ix
Disclaimers
The information in this document is subject to change without notice.
CANON INC. MAKES NO WARRANTY OF ANY KIND WITH REGARD TO THIS MATERIAL,
EITHER EXPRESS OR IMPLIED, EXCEPT AS PROVIDED HEREIN, INCLUDING
WITHOUT LIMITATION, THEREOF, WARRANTIES AS TO MARKETABILITY,
MERCHANTABILITY, FITNESS FOR A PARTICULAR PURPOSE OF USE OR AGAINST
INFRINGEMENT OF ANY PATENT. CANON INC. SHALL NOT BE LIABLE FOR ANY
DIRECT, INCIDENTAL, OR CONSEQUENTIAL DAMAGES OF ANY NATURE, OR LOSSES
OR EXPENSES RESULTING FROM THE USE OF THIS MATERIAL.
Legal Limitations on the Usage of Your Product and the
Use of Images
Using your product to scan, print, or otherwise reproduce certain documents, and
the use of such images as scanned, printed, or otherwise reproduced by your
product, may be prohibited by law and may result in criminal and/or civil liability. A
non-exhaustive list of these documents is set forth below. This list is intended to be
a guide only. If you are uncertain about the legality of using your product to scan,
print, or otherwise reproduce any particular document, and/or of the use of the
images scanned, printed or otherwise reproduced, you should consult in advance
with your legal advisor for guidance.
• Paper Money
• Travelers Checks
• Money Orders
• Food Stamps
• Certificates of Deposit
• Passports
• Postage Stamps
(canceled or uncanceled)
• Immigration Papers
• Identifying Badges or Insignias
• Internal Revenue Stamps
(canceled or uncanceled)
• Selective Service or Draft Papers
• Bonds or Other Certificates of
Indebtedness
• Checks or Drafts Issued by
Governmental Agencies
• Stock Certificates
• Motor Vehicle Licenses and Certificates • Copyrighted Works/Works of Art
of Title
without Permission of Copyright Owner
x
Connecting the Machine to a
Network
1
CHAPTER
This chapter describes how to connect the machine to a computer or network so that you
can print from the machine.
Setting Up the Network Connection . . . . . . . . . . . . . . . . . . . . . . . . . . . . . . . . . . . . . . . . . 1-2
Settings Flowchart . . . . . . . . . . . . . . . . . . . . . . . . . . . . . . . . . . . . . . . . . . . . . . . . . . . . . . . . . . . .1-2
Making Connections . . . . . . . . . . . . . . . . . . . . . . . . . . . . . . . . . . . . . . . . . . . . . . . . . . . . . 1-3
Connecting to a Network . . . . . . . . . . . . . . . . . . . . . . . . . . . . . . . . . . . . . . . . . . . . . . . . . . . . . . .1-3
1-1
Setting Up the Network Connection
This section describes how to connect the machine to a personal computer or
network, and describes the types of connectors and cables you should use.
Connecting the Machine to a Network
1
Settings Flowchart
Network Connection
Connect the necessary cables required for your
environment. (See pages 1-3 through 1-5.)
Using the
interface cable
Connecting to
a network
Environment Settings
Enter the date and time, and the System Manager
settings for system management operations. (See
Chapter 1, "Before You Start Using This Machine,"
in the Facsimile Guide, and Chapter 4, "Restricting
the Use of the Machine," in the Reference Guide.)
Network Settings
Enter the necessary network and server settings.
(See Chapter 2, "Using a TCP/IP Network
(Windows/UNIX)," in the Network Guide.)
Printer Driver Installation
Install the printer driver on personal computers.
Install any utility software that may be necessary
for your network environment. (See Chapter 2,
"Getting Started," in the PCL Driver Guide.)
1-2
Setting Up the Network Connection
Making Connections
Connect the machine to a computer or network using an interface cable which
supports bidirectional communication or a 100Base-TX or 10Base-T Ethernet
cable.
WARNING
To avoid electrical shock, disconnect the power cord from the power outlet,
before connecting an interface cable or network cable. (See Chapter 1, “Before
You Start Using This Machine,” in the Reference Guide.)
NOTE
This machine is not supplied with an interface cable or a network cable. Please purchase
the correct cable that is compatible with your computer or network.
Connecting to a Network
This machine has a built-in print server that is compatible with a TCP/IP network,
and allows you to use the machine as a network printer for UNIX and Windows. The
print server is supplied with a 100Base-TX/10Base-T port, which allows you to
connect it to a LAN (Local Area Network).
The connection examples in this section show you how to connect this machine to a
network, depending on the type of LAN.
IMPORTANT
In order to connect the machine to your network, you need a LAN cable and hub.
NOTE
• The print server of this machine is compatible with a NetWare network. For details,
contact your local authorized Canon dealer.
• The print server of this machine automatically detects the 100Base-TX or 10Base-T
interface connection.
• After connecting the network cable, perform the following procedures. For details on each
procedure, refer to the corresponding manual.
- Installing the printer driver. (See Chapter 2, “Getting Started,” in the PCL Driver Guide.)
- Date/time and system management settings. (See Chapter 1, “Before You Start Using
This Machine,” in the Facsimile Guide, and Chapter 4, “Restricting the Use of the
Machine,” in the Reference Guide.)
- Print server and network settings. (See Chapter 2, “Using a TCP/IP Network
(Windows/UNIX),” in the Network Guide.)
Making Connections
1-3
Connecting the Machine to a Network
1
Connecting to a 100Base-TX Network
Connect the 10Base-T/100Base-TX cable to the hub port using a Category 5 rated
twisted-pair LAN cable for use on a 100Base-TX network. Then, connect the
10Base-T/100Base-TX cable to the optional network card at the back of the LASER
CLASS 700 Series machine. If your computer is not compatible with a 100Base-TX
network, you would also need a 100Base-TX network board.
1
Connecting the Machine to a Network
Computer with a
100Base-TX Port
Computer without a
100Base-TX Port
100Base-TX
LAN Board
100Base-TX
Cable
100Base-TX Hub
10Base-T/100Base-TX
Port
NOTE
The hub, LAN cable, and network board that is connected to the LAN, should be
compatible with a 100Base-TX network. For details, contact your local authorized Canon
dealer.
1-4
Making Connections
Connecting to a 10Base-T Network
Connect the 10Base-T/100Base-TX cable to the hub port using a Category 3 or
higher rated twisted-pair LAN cable for use on a 10Base-T network. Then, connect
the 10Base-T/100Base-TX cable to the optional network card at the back of the
LASER CLASS 700 Series machine. If your computer is not compatible with a
10Base-T network, you would also need a 10Base-T network board.
1
Computer without a
10Base-T Port
Connecting the Machine to a Network
Computer with a
10Base-T Port
10Base-T
LAN Board
10Base-T Cable
10Base-T Hub
10Base-T/100Base-TX
Port
NOTE
The hub, LAN cable, and network board that is connected to the LAN, should be
compatible with a 10Base-T network. For details, contact your local authorized Canon
dealer.
Making Connections
1-5
Connecting the Machine to a Network
1
1-6
Making Connections
Installing Software
2
CHAPTER
This chapter describes how to install the software on the User Software CD-ROM supplied
with your machine.
About the User’s CD-ROM Software . . . . . . . . . . . . . . . . . . . . . . . . . . . . . . . . . . . . . . . . 2-2
CD-ROM Contents . . . . . . . . . . . . . . . . . . . . . . . . . . . . . . . . . . . . . . . . . . . . . . . . . . . . . . . . . . . .2-2
System Requirements . . . . . . . . . . . . . . . . . . . . . . . . . . . . . . . . . . . . . . . . . . . . . . . . . . . . . . . . .2-4
Installing the Software . . . . . . . . . . . . . . . . . . . . . . . . . . . . . . . . . . . . . . . . . . . . . . . . . . . 2-5
For Windows. . . . . . . . . . . . . . . . . . . . . . . . . . . . . . . . . . . . . . . . . . . . . . . . . . . . . . . . . . . . . . . . .2-5
When the Machine Is Connected to a Network . . . . . . . . . . . . . . . . . . . . . . . . . . . . . . . . . . . . . .2-5
Software Installation Instructions . . . . . . . . . . . . . . . . . . . . . . . . . . . . . . . . . . . . . . . . . . . 2-6
Installing the PCL Printer Driver . . . . . . . . . . . . . . . . . . . . . . . . . . . . . . . . . . . . . . . . . . . . . . . . . .2-6
Installing Canon Font Manager . . . . . . . . . . . . . . . . . . . . . . . . . . . . . . . . . . . . . . . . . . . . . . . . . .2-8
Installing the NetSpot . . . . . . . . . . . . . . . . . . . . . . . . . . . . . . . . . . . . . . . . . . . . . . . . . . . . . . . . . .2-8
Installing the LPR Port Utility . . . . . . . . . . . . . . . . . . . . . . . . . . . . . . . . . . . . . . . . . . . . . . . . . . . .2-8
Installing the NetBIOS/NetBEUI Port Monitor . . . . . . . . . . . . . . . . . . . . . . . . . . . . . . . . . . . . . . . .2-9
Installing DSE (Device Status Extension) . . . . . . . . . . . . . . . . . . . . . . . . . . . . . . . . . . . . . . . . . . .2-9
Installing the NDPS Gateway . . . . . . . . . . . . . . . . . . . . . . . . . . . . . . . . . . . . . . . . . . . . . . . . . . . .2-9
Installing the Fax Driver . . . . . . . . . . . . . . . . . . . . . . . . . . . . . . . . . . . . . . . . . . . . . . . . . . . . . . .2-10
2-1
About the User’s CD-ROM Software
This section provides a list of what is on the CD-ROM, and discusses which
software you should install.
CD-ROM Contents
Installing Software
2
The CD-ROM contains the following software and documentation:
Driver Software
■ Acrobat Reader
Install this software to view online manuals.
■ PCL Printer Guide
This PDF manual contains the PCL printer instructions.
■ PCL Driver Guide
This PDF manual contains the PCL printer driver installation and instructions.
■ Fax Driver Guide with Cover Sheet Editor
This PDF manual contains the fax driver and cover sheet editor installation and
instructions.
■ PCL Printer Driver
This is essential software when you print from Windows based applications. Be sure to
install this software.
■ Fax Driver
Install this software in order to use the facsimile function.
■ Font Manager 2000
Install this software to manage the 96 screen fonts which are included on the CD-ROM.
■ Bar Code and OCR TTF
Install these fonts in order to display them correctly.
2-2
About the User’s CD-ROM Software
NOTE
• For the detailed installation procedures, refer to the PDF manuals and readme.txt files in
each program folder on the CD-ROM.
• The PDF manuals may differ depending on which LASER CLASS 700 Series machine
you have. Refer to the PDF manuals specifically for your machine.
• To access the CD-ROM menu, insert the Driver Software CD into your CD-ROM drive ➞
double-click the [LC700.EXE].
Network User Software
Install this software to view online manuals.
■ Network Guide (with the optional Canon Network Kit III)
This PDF manual contains detailed information on connecting the optional network card
to your network.
■ Remote UI Guide
This PDF manual contains detailed information on controlling the machine via a web
browser.
■ Setup Guide
This PDF manual (the contents are the same as this manual) contains detailed
information on connecting your machine to a network and setting up the network
environment.
■ NetSpot
NetSpot is software that enables you to display the status of any machine that is
connected to a computer or network on your computer screen. This software is
applicable for Windows, macintosh, and UNIX computers.
■ LPR Port Utility
The LPR Port Utility for Windows 95/98/Me is software that enables you to print from
Windows 95/98/Me computers to printers on a TCP/IP network.
■ NetBIOS/NetBEUI Port Monitor Utility
The NetBIOS/NetBEUI Port Monitor Utility for Windows 95/98/Me is software that
enables you to print from Windows 95/98/Me computers to printers on a NetBIOS/
NetBEUI network.
■ DSE (Device Status Extension)
DSE is software that enables you to browse for information that is on shared printers,
and enables you to manage print jobs via a web browser.
About the User’s CD-ROM Software
2-3
Installing Software
2
■ Acrobat Reader
■ Canon NDPS Gateway
The Canon NDPS Gateway software configures Canon printers to operate in the Novell
NetWare NDPS (Novell Distributed Print Services) architecture.
NOTE
• For the detailed installation procedures, refer to the PDF manuals and readme.txt files in
each program folder on the CD-ROM.
• The PDF manuals may differ depending on which LASER CLASS 700 Series machine
you have. Refer to the PDF manuals specifically for your machine.
System Requirements
Installing Software
2
The CD-ROM is designed for use with Windows 95/98/Me, Windows NT or
Windows 2000/XP computers.
2-4
About the User’s CD-ROM Software
Installing the Software
Before printing, you need to install the printer drivers and utility software. When you
install the software, take care to install the correct version of the software that is
compatible with the operating system of your computer.
For Windows
To print from a Windows 95/98/Me/2000/XP or Windows NT computer, install the
printer driver and utility software from the supplied CD-ROM.
The following software is included on the supplied CD-ROM.
■ PCL Printer Driver
This is essential software if you want to print from Windows based applications. Be sure to
install this software.
■ NetSpot
This printer utility software enables you to display the status of a printer that is connected
to a computer or network on your computer screen. If you set up the printer and network
board, you can operate the printer from the connected computer in the same way as you
would operate the printer from the operation panel. Install this software if necessary.
When the Machine Is Connected to a Network
Install the supplied “NetSpot” network administration software.
NOTE
• When this machine is connected to a network, you need to set up the network’s operating
system (NetWare, UNIX, etc.), and the optional network board. For these settings, see
Chapter 1, “Before You Start,” in the Network Guide.
• When this machine is connected to a network, print the “PRINT EN CONFIG” list from
the TEST MENU to check the MAC address of the network board. Then, set up the
network OS (NetWare, UNIX, etc.), and the network board. For details, see Chapter 3,
“Summary of the Printer Menus,” in the PCL Printer Guide.
Installing the Software
2-5
2
Installing Software
IMPORTANT
For details on the printer drivers and the installation of the software, see the PCL Driver
Guide.
Software Installation Instructions
This section describes how to install the printer driver, fax driver, and other software
included on the accompanying CD-ROM.
NOTE
• For details on installing the printer driver, see Chapter 2, “Getting Started,” in the PCL
Driver Guide.
• For details on installing the fax driver, see Chapter 2, “Getting Started,” in the Fax Driver
Guide.
Installing Software
2
Installing the PCL Printer Driver
IMPORTANT
For Windows NT or Windows 2000, log on to as Administrator when you install the driver.
Using the Installer
1
Insert the Driver Software CD into the CD-ROM drive.
❑
❑
❑
❑
2
Double-click the [My Computer] icon on the Desktop.
Right click the CD-ROM drive icon ➞ click [Open] on the pop-up menu.
Double-click the [Drivers] ➞ [us_eng] ➞ [prnsetup].
Double-click the [Setup.exe] icon.
Follow the on screen instructions to finish installing the
printer driver.
Using the Add Printer Wizard for Windows
1
On the taskbar, click [Start] ➞ point to [Settings] ➞ click
[Printers].
❑ Double-click the [Add Printer] icon to start the Add Printer Wizard.
❑ Confirm that the Add Printer Wizard has started ➞ click [Next].
❑ Click either [Local printer] or [Network printer] ➞ click [Next].
2-6
Software Installation Instructions
2
Insert the Driver Software CD into the CD-ROM drive ➞ click
[Have Disk].
3
Click [Browse] ➞ select the folder on the correct drive
containing the driver you want to install ➞ click [OK].
● If you want to install the PCL5e Driver
❑ From the Drives drop-down list, select the CD-ROM drive.
❑ For Windows 95/98/Me, double-click [Drivers] ➞ [us_eng] ➞ [printer] ➞
2
[pcl5e] ➞ [win9x_me].
Installing Software
❑ For Windows NT, double-click [Drivers] ➞ [us_eng] ➞ [printer] ➞ [pcl5e] ➞
[winnt40].
❑ For Windows 2000/XP, double-click [Drivers] ➞ [us_eng] ➞ [printer] ➞
[pcl5e] ➞ [win2k_xp].
● If you want to install the PCL6 Driver
❑ From the Drives drop-down list, select the CD-ROM drive.
❑ For Windows 95/98/Me, double-click [Drivers] ➞ [us_eng] ➞ [printer] ➞
[pcl6] ➞ [win9x_me].
❑ For Windows NT, double-click [Drivers] ➞ [us_eng] ➞ [printer] ➞ [pcl6] ➞
[winnt40].
❑ For Windows 2000/XP, double-click [Drivers] ➞ [us_eng] ➞ [printer] ➞ [pcl6]
➞ [win2k_xp].
4
5
6
If the [Install From Disk] dialog box appears, make sure that
the path you selected in step 3 is showing in the [Copy
manufacturer’s files from] drop-down list ➞ click [OK].
Select your printer model from the list ➞ click [Next].
Follow the instructions on the screen to continue ➞ click
[Finish] to start copying the files.
Software Installation Instructions
2-7
Installing Canon Font Manager
1
Insert the Driver Software CD into the CD-ROM drive.
❑
❑
❑
❑
2
Installing Software
2
Double-click the [My Computer] icon on the Desktop.
Double-click the [Canonfm] folder ➞ [English] folder.
Right click the CD-ROM drive icon ➞ click [Open] on the pop-up menu.
Double-click the [Setup.exe] icon.
Follow the on screen instructions to finish installing Canon
Font Manager.
Installing the NetSpot
You can install NetSpot from the Network User Software CD. For instructions on
how to install NetSpot, see the NetSpot Quick Start Guide on the same CD.
v
Installing the LPR Port Utility
1
Insert the Network User Software CD into the CD-ROM drive.
❑
❑
❑
❑
2
2-8
Double-click the [My Computer] icon on the Desktop.
Right click the CD-ROM drive icon ➞ click [Open] on the pop-up menu.
Double-click the [Lprport] folder.
Double-click the [Setup.exe] icon
Follow the on screen instructions to finish installing the LPR
port utility.
Software Installation Instructions
Installing the NetBIOS/NetBEUI Port Monitor
Insert the Network User Software CD into the CD-ROM drive.
❑
❑
❑
❑
2
Double-click the [My Computer] icon on the Desktop.
Right click the CD-ROM drive icon ➞ click [Open] on the pop-up menu.
Double-click the [Portmon] folder.
Double-click the [Setup.exe] icon
2
Follow the on screen instructions to finish installing the
NetBIOS/NetBEUI Port Monitor.
Installing DSE (Device Status Extension)
1
Insert the Network User Software CD into the CD-ROM drive.
n
❑ Double-click the [My Computer] icon on the Desktop.
❑ Right click the CD-ROM drive icon ➞ click [Open] on the pop-up menu.
❑ Double-click the [DSE] folder ➞ select [Win2000] or [WinXP] ➞ click [english]
folder.
❑ Double-click the [Setup.exe] icon.
2
Follow the on screen instructions to finish installing DSE.
Installing the NDPS Gateway
You can install NDPS Gateway from the Network User Software CD. For
instructions on how to install NDPS Gateway, see the NDPS Gateway User’s Guide
on the same CD.
Software Installation Instructions
2-9
Installing Software
1
Installing the Fax Driver
IMPORTANT
For Windows NT or Windows 2000, log on to as Administrator when you install the driver.
Using the Installer
1
2
Insert the Driver Software CD into the CD-ROM drive.
Installing Software
❑
❑
❑
❑
2
Double-click the [My Computer] icon on the Desktop.
Right click the CD-ROM drive icon ➞ click [Open] on the pop-up menu.
Double-click the [Fax_Drivers] folder ➞ [us_eng] folder ➞ [Faxsetup] folder.
Double-click the [Setup.exe] icon.
Follow the on screen instructions to finish installing the fax
driver.
Using the Add Printer Wizard for Windows
1
On the taskbar, click [Start] ➞ point to [Settings] ➞ click
[Printers].
❑ Double-click the [Add Printer] icon to start the Add Printer Wizard.
❑ Confirm that the Add Printer Wizard has started ➞ click [Next].
❑ Click either [Local printer] or [Network printer] ➞ click [Next].
2
Insert the Driver Software CD into the CD-ROM drive ➞ click
the [Have Disk].
3
Click [Browse] ➞ select the folder on the correct drive
containing the driver you want to install ➞ click [OK].
❑ From the Drives drop-down list, select the CD-ROM drive.
❑ For Windows 95/98/Me, double-click [Fax_Drivers] ➞ [us_eng] ➞ [fax] ➞
[win9x_me].
❑ For Windows NT, double-click [Fax_Drivers] ➞ [us_eng] ➞ [fax] ➞ [winnt40].
❑ For Windows 2000/XP, double-click [Fax_Drivers] ➞ [us_eng] ➞ [fax] ➞
[win2k_xp].
2-10
Software Installation Instructions
5
6
If the [Install from Disk] dialog box appears, make sure that
the path you selected in step 3 is showing in the [Copy
manufacturer’s files from] drop-down list ➞ click [OK].
Select your fax model from [Printers] ➞ click [Next].
Follow the instructions on the screen to continue ➞ click
[Finish] to start copying the files.
2
Installing Software
4
Software Installation Instructions
2-11
Installing Software
2
2-12
Software Installation Instructions
CANON INC.
30-2, Shimomaruko 3-chome, Ohta-ku, Tokyo 146-8501, Japan
CANON U.S.A., INC.
One Canon Plaza, Lake Success, NY 11042, U.S.A.
CANON CANADA INC.
6390 Dixie Road Mississauga, Ontario L5T 1P7, Canada
CANON EUROPA N.V.
Bovenkerkerweg 59-61 P.O. Box 2262, 1180 EG Amstelveen, The Netherlands
CANON FRANCE S.A.
17, quai du President Paul Doumer 92414 Courbevoie Cedex, France
CANON (U.K.) LTD.
Woodhatch, Reigate, Surrey, RH2 8BF, United Kingdom
CANON DEUTSCHLAND GmbH
Europark Fichtenhain A10, 47807 Krefeld, Germany
CANON ITALIA S.p.A.
Palazzo L Strada 6 20089 Milanofiori Rozzano (MI) Italy
CANON LATIN AMERICA, INC.
703 Waterford Way, Suite 400, Miami, Florida 33126, U.S.A.
CANON AUSTRALIA PTY. LTD
1 Thomas Holt Drive, North Ryde, Sydney, N.S.W. 2113, Australia
CANON SINGAPORE PTE. LTD.
79 Anson Road #09-01/06, Singapore 079906
CANON HONGKONG CO., LTD
9/F, The Hong Kong Club Building, 3A Chater Road, Central, Hong Kong
HT1-2203-000-V.1.0
C CANON INC. 2002
120V