1
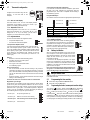
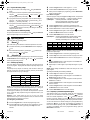
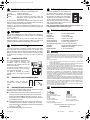
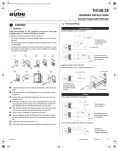
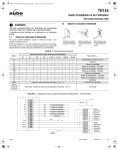
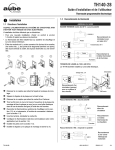
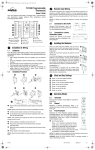
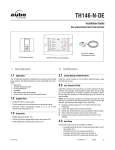
400-141-000-B ENG.fm Page 1 Friday, February 1, 2008 2:19 PM
TH141-HC-28
User Guide
n
Installation
1.
1.1
Remove the old thermostat
n Cut the power source to your heating or air conditioning system.
o Remove the cover of the old thermostat.
CAUTION: If, upon removing the wall plate, you see that it is mounted on
a junction box (similar to the junction box located behind an electrical
switch or outlet), this may indicate that it is a 120-V / 240-V system. For
more security, consult a qualified electrician to check the installation.
1.2
Install the new thermostat
For a new installation, choose a location about 1.5 meters (5 feet) above
the floor, with good air circulation. The thermostat must be installed on an
inside wall.
Avoid locations where there are:
•
air drafts (top of a staircase, air outlet,...)
•
dead air spots (behind a door,...)
•
direct sunlight
•
concealed chimneys or stove pipes.
1.3
Install and connect the thermostat
n Loosen the captive screw holding the faceplate to the mounting
plate.
o
p
Pull the lower part to separate the faceplate from the mounting plate.
Fix the mounting plate onto the wall using the supplied screws.
1.5
Connect the labelled wires to the thermostat
n Connect the system wires to the thermostat terminals according to
one of the wiring diagrams in section 1.6.
o
p
1.6
Make sure to return the remaining wire length into the wall.
If you own a CT240 telephone controller, refer to section 6.1 for
connection.
Wiring diagrams
The TH141 thermostat is compatible with most heating and air
conditioning systems. Multi-level heating and air conditioning systems,
Millivolt control heating systems, heat pumps and baseboard heating
units are not compatible with this thermostat. Baseboard units can be
connected using a 24-V relay.
1.6.1 2-wire heating system
n
o
Connect the heating relay to terminal W.
Connect the 24-V transformer to terminal
Rh.
In this case, the order of connection is
unimportant.
1.6.2 3-wire heating system with fan control
n
o
p
q
Connect the heating relay to terminal W.
Connect the fan relay to terminal G.
Connect the 24-V transformer to terminal
Rh.
Connect a wire between terminals Rh and
Rc.
1.6.3 3-wire air conditioning system with fan control
n
1.4
Identify the wires
n If the wall plate of your old thermostat has more than two wires
coming out of the wall, you will need to label the wires. Start by
identifying the letters close to each screw or terminal on which a wire
is connected. These terminals may be located on either side of the
plate.
o
p
Disconnect and identify each wire*.
You may need to tape the wires to the wall to keep them from falling
back into it. If the wall opening is bigger than necessary, fill it with
insulating wool in order to prevent the infiltration of warm or cold air
behind the thermostat.
* If your installation is recent, the colour of the wires should match the
identification on the mounting plate.
(Rh) Red
Heating power source
(W) White
Heating relay
(Rc) Blue
Air conditioning power supply
(Y) Yellow
Air conditioning relay
(G) Green
Fan relay
o
p
Connect the fan relay to terminal G.
Connect the 24-V transformer to terminal
Rc.
1.6.4 4-wire heating and air conditioning system
n
o
p
q
r
Connect the heating relay to terminal W.
Connect the air-conditioning relay to
terminal Y.
Connect the fan relay to terminal G.
Connect the 24-V transformer to terminal
Rh.
Connect a wire between terminals Rh and Rc.
1.6.5 5-wire heating and air-conditioning system
n
o
p
q
r
TH141-HC-28
Connect the air conditioning relay to
terminal Y.
Connect the heating relay to terminal W.
Connect the air-conditioning relay to
terminal Y.
Connect the fan relay to terminal G.
Connect the 24-V heating transformer to
terminal Rh.
Connect the 24-V air conditioning transformer to terminal Rc.
400-141-000-B
2008-02-01
1/4
400-141-000-B ENG.fm Page 2 Friday, February 1, 2008 2:19 PM
1.7
Thermostat configuration
Configure the thermostat using the DIP
switches
on the back side of the
faceplate.
2.Conventional mode with anticipation
If you want the conventional mode with anticipation, push switch
#5 down. This mode maintains the temperature within the
programmed span. This mode is compatible with all heating or
air-conditioning systems.
Programmable Span
Use switches #1 and #2 to select the appropriate temperature span.
1.7.1 24 hr. or 12 hr. Display
The TH141 offers a 12 hr. or 24 hr. mode display. Default
configuration of the display is in the 24 hr. mode. If you
prefer a 12 hr. display, push switch #3 up.
1.7.2 Temperature in °C or °F
Variations
Default configuration of the TH141 is in °C. If you wish to
change the temperature to °F, push switch #4 up. If you
change from °F to °C (or vice versa), you will need to
reprogram your comfort and economy settings.
1.7.3 Regulation Modes
0.3 °C/0.5 °F
0.5 °C/0.9 °F
0.4 °C/0.7 °F
0.6 °C/1.1 °F
Hot-Water Heating
Heating and Air-conditioning
0.3 °C/ 0.5 °F
For specific applications only
For specific applications only
0.4 °C/ 0.7 °F
Gas or electric wall furnace
Radiant or convection electric heating *
0.5 °C/ 0.9 °F
Fuel or gas floor furnace
Central heating or air-conditioning unit
0.6 °C/ 1.1 °F
Commercial unit
Commercial unit
* 240 volt heating with relay (baseboard, convector, radiant ceiling, etc.)
You have a choice between two regulation modes:
1.7.4 Heating Fan Control
•
•
This function determines whether the heating system
fan is operated by the thermostat or by the plenum's
temperature of the heating unit. In general, the fan is
operated by the heating unit. However, if the fan does
not turn on and the thermostat requires heating for
more than one minute, push switch #6 up.
Proportional adaptive mode
Conventional mode with anticipation
1. Proportional adaptive mode
If you want the proportional adaptive mode, push switch #5 up.
This mode analyses previous cycles to define the next duty
cycle. This operating mode guarantees optimal regulation based
on the capacity of your system. To avoid cycles that are too short
for the heating or air-conditioning units, minimum On and Off
duration is limited to 10% of the period (1.5 minutes for a 15
minute cycle).
Ideal for:
•
Radiant or convection electrical heating system
•
Circulator control in a hot water system
•
Electrical hot air furnace
•
Hot air, gas or fuel conventional furnace
•
Air-conditioning system
Not recommended for:
•
Gas or fuel furnace or boiler with wall chimney, if they include a
combustion gas purging cycle exceeding 30 seconds. To verify this
point, check the duration of the delay between the heating command
sent by the thermostat and the moment when the burner actually
goes on.
•
Multi-zone systems, where several thermostats command a single
heating or air-conditioning unit.
In the last two cases, the conventional mode is recommended.
Regulation Cycle Length
Set the length of the regulation cycles using switches #1 and #2. When
cycles are very short, the temperature variation in the room is very low
and the comfort level very high. However, very short cycles can generate
premature wear of your system. It is therefore important to adjust the
cycles to your type of installation. In general, the bigger your heating or
air-conditioning unit, the longer the cycles should be.
1.8
o
I
For specific applications only
• 10-minute cycle:
Radiant or convection electric heating
• 15-minute cycle: Central heating and air-conditioning unit
• 20-minute cycle:
TH141-HC-28
Entry of basic data
2.
You may program the thermostat while holding it in your hands or when it
is mounted on the wall.
2.1
Programming the time and day
n Set the time using the Hour and Minute buttons.
o Set the day using the Day button.
2.2
Programming the comfort, economy and vacation settings
The Comfort
, Economy
and Vacation
settings respectively
represent the temperatures that you wish to have during the day
night
• 5-minute cycle:
Battery installation
When you first install the batteries in the TH141, the unit
runs a sequence of tests and a complete reset to zero,
which last approximately 5 seconds. The screen should
display the time and the day, as well as the current
temperature as follows:
It is normal for the displayed temperature to be higher
than the room temperature if your are holding the TH141
in your hands, It will return to normal about one hour after
installation on the wall. Mount the thermostat on the wall
plate and screw it in place.
Even if the thermostat indicates that the batteries are
still good, it is recommended to replace them once a
year, at the beginning of the cold season.
, at
or while you are away at work , or while you are away for an
extended period . Since your thermostat controls both heating and airconditioning, and since the economy settings are the opposite in both
cases (reduction for heating temperature, increase for air-conditioning),
you must program the settings for heating and then for air-conditioning.
Commercial unit
400-141-000-B
2008-02-01
2/4
400-141-000-B ENG.fm Page 3 Friday, February 1, 2008 2:19 PM
2.2.1 Program the heating settings
n
o
Set your thermostat to the heating mode
button.
To program the Comfort temperature, select the desired degree
buttons and press the
using the
displayed (approximately 3 seconds).
p
button until the
icon is
button until the
buttons and press on the
button until the
icon
using the
is displayed (approximately 3 seconds). This setting is used by the
telephone remote control.
2.2.2 Program the air-conditioning settings
p
using the Heat/Cool
Operating modes
Press the Hour and Minute buttons to program the time.
When you have completed your programming, press the Manual/Auto
button to exit this function.
b) To Erase a Program
c) Example 1:
icon is
To program the Vacation temperature, select the desired degree
Set your thermostat to the air-conditioning mode
button and repeat steps 2 to 5 of section 2.2.1.
Press the Program button to select program 1, 2, 3 or 4.
Select the program using the Program and Day buttons, and press the
Clear button. The time zone displays --:-- when the program is inactive.
To program the Economy temperature, select the desired degree
buttons and press the
using the
displayed (approximately 3 seconds).
q
p
q
r
using the Heat/Cool
3.
n
o
p
q
r
Comfort period from 7:00 AM to 10:30 PM
Economy period from 10:30 PM to 7:00 AM
Identical schedule for all days of the week
Press the Program button to access the programming mode.
Press the Day button for 3 seconds to select every day of the week.
Press the Hour button to enter 7:00 AM, Program 1
.
Press the Program button again to select Program 2 , and press
the Hour and Minute buttons to enter 10:30 PM.
Press the Manual/Auto button to exit this function.
d) Example 2:
Comfort period: Monday to Friday from 6:15 AM
to 8:15 AM and from 5:00 PM to 10:00 PM
Saturday and Sunday from 7:30 AM to 11:00 PM
The TH141 offers two operating modes.
3.1
Manual ( )
Schedule/Day Monday
This mode allows you to maintain a constant temperature in the house.
n
To activate this mode, press the Manual/Auto button to display the
icon.
o
Set the desired temperature by pressing the
briefly pressing the
3.2
,
or
buttons or by
button.
Automatic ( )
This mode executes your own programming. To activate this mode, press
the Manual/Auto button to display the
that the program setting is active.
icon. The
or
Time
1
Wake-up time
2
Leaving time
3
Return time
4
Bed time
NOTE: For temperature increases (Program 1 and 3), allow at least 15
minutes per °C. If you have lowered the temperature by 3 °C during the
night and you wake up at 7 AM, change the setting at 6:15 AM.
For savings to be obtained, you must lower the temperature for a period
of 2 to 3 times the delay required to bring the temperature back to your
comfort level.
Example: If your system takes one hour to go from your saving
temperature level to your comfort temperature level, it is useless to lower
the temperature for a period of 2 to 3 hours.
a) To Program your Schedule
n
o
Press the Program button to access the programming mode.
Press the Day button to select the day to be programmed. You can
select all days of the week by pressing on the Day button for 3
seconds.
TH141-HC-28
Friday
Saturday
Sunday
6:15 AM
6:15 AM
6:15 AM
6:15 AM
7:30 AM
7:30 AM
PROG. 2
8:15 AM
8:15 AM
8:15 AM
8:15 AM
8:15 AM
----
----
PROG. 3
5:00 PM
5:00 PM
5:00 PM
5:00 PM
5:00 PM
----
----
PROG. 4
10:00 PM
10:00 PM
10:00 PM
10:00 PM
10:00 PM
11:00 PM 11:00 PM
NOTE: It is faster to program the same schedule for every day and then
modify the exception days.
n
o
p
Press the Program button to access the programming mode.
Press the Day button for 3 seconds to select every day of the week.
Press the Hour and Minute buttons to enter 6:15 AM (Program 1
).
q
The TH141 allows 4 setting changes for each day of the week. There are
no pre-set programs. The programs are tailored to perfectly adapt to your
life style.
The principle is very simple. For each day, enter the time at which you
wake up (P1), the time you leave for work (P2), the time you arrive back
home (P3) and the time you go to bed (P4).
Mode
Wednesday Thursday
6:15 AM
icon indicates
3.2.1 Schedule programming
Program
Tuesday
PROG. 1
r
Press the Program button to select Program 2 and the Hour and
Minute buttons to enter 8:15 AM.
Repeat step 4 to enter Program 3 (5:00 PM) and Program 4 (10:00
PM).
NOTE: When making modifications, make sure that you are in the
right program.
To modify the Saturday and Sunday schedules:
n
o
p
q
r
s
Press the Day button until SA or SU is displayed.
Press the Program button to select Program 1 and the Hour and
Minute buttons to enter 7:30 AM.
Press the Program button to select Program 2 and then press the
Clear button to erase it.
Press the Program button to select Program 3 and then the Clear
button to erase it.
Press the Program button to select Program 4 and then the Hour
and Minute buttons to enter 11:00 PM.
Press the Manual/Auto button to exit this function.
3.2.2 Temporary or permanent temperature bypass
This operation allows you to temporarily modify the room temperature
while you are in the automatic mode. Simply press the
buttons to
select the desired temperature, or the
or
button to select the
Comfort or Economy settings you have programmed.This temperature
will be maintained until the beginning of the next programmed schedule.
You can also switch to the Vacation setting for a prolonged absence by
pressing the
button. In that case, the derogation is permanent. To
return to the normal operating mode, press the Manual/Auto button. If
you wish to immediately return to the programmed settings, press the
Manual/Auto button twice.
400-141-000-B
2008-02-01
3/4
400-141-000-B ENG.fm Page 4 Friday, February 1, 2008 2:19 PM
q
Select the heating, air conditioning, or mixed mode
4.
Use the Heat/Cool button to select one of the following modes:
Heating:
Air-conditioning:
Mixed:
Controls the heating unit.
Controls the air-conditioning unit.
The TH141 analyzes the temperature pattern and
automatically alternates between heating mode and
air-conditioning mode.
To avoid needless switching, the automatic mode change will take at
least 2 minutes if it is required by a manual setting change and at least 15
minutes if it is due to a quick temperature change.
Furthermore, to protect your heating and air-conditioning system, it is
impossible to shut down and restart the system within a period equal to
10% of the cycle.
r
Fan control
5.
Use the Fan On/Auto button to force continuous air circulation (
appears) or to synchronize the fan with the heating or air-conditioning
demand ( disappears).
Please note that if you set the TH141 in Vacation mode using the
telephone controller or a house automation system, the continuous air
circulation will be automatically deactivated during your absence.
s
Telephone controller ( )
6.
The TH141 incorporates a telephone controller interface which allows
you to switch from the normal operating mode to the Vacation setting
( ), and vice versa, using the telephone keypad (stationary or portable).
You can, for example, heat your country house from your office on Friday,
or your house from the airport or from your car on your way back from
vacation.
6.1
Connection to the CT240
The TH141 is designed to connect directly to
the CT240 telephone controller. This
combination allows the activation and
deactivation of the Vacation mode from the
CT240 or the telephone.
Connect the CT240’s terminals A and C to
the TH141's terminals X and C respectively.
You must respect the polarity.
For details on operating the telephone
controller, refer to the CT240’s Instruction
Manual.
6.2
Connection to a house automation system
The Vacation setting can also be
activated from a house automation
system.
6.3
Operating the telephone interface
You can activate the Vacation setting using the Vacation button of the
telephone controller or using the telephone itself.
n
To activate the Vacation setting, press the Vacation button of the
CT240. The Vacation setting will be displayed on the thermostat
during 5 seconds and the
icon will flash on the screen. You no
longer have access to the TH141 keypad if this function is activated
by the telephone controller.
o
To deactivate the function and return to the previous mode, press
the Vacation button of the telephone controller again. The red light
will go off and the
icon will disappear from the thermostat within a
maximum of 5 seconds.
To modify the Vacation setting, refer to section 2.2.
TH141-HC-28
t
Battery replacement
7.
The TH141 will display an icon indicating that
the batteries must be replaced. This icon will
flash for 60 days. After this delay, the thermostat
will shut down your heating unit. During battery
replacement, the data is kept for of 15 seconds.
The time and the programs will not be lost.
After this delay, the TH141 runs a sequence of
tests and a complete reset to zero as for the
initial installation of the batteries.
Even if the thermostat indicates that the batteries are good, it is
recommended to replace them once a year.
u
Technical specifications
Power supply:
Connection:
Maximum load:
Auxiliary input:
Number of programs:
Heating setting range:
Air-conditioning setting range:
Anticipation:
Regulation:
Regulation periods:
;
8.
2 AA size alkaline batteries
2, 3, 4 or 5 wires
1.5 A/30 VAC per output
12 VDC ± 10%, 2.3 mA
4 programs/day, 28 programs total
5 °C to 30 °C (40 °F to 85 °F)
16 °C to 40 °C (60 °F to 105 °F)
electronic anticipation independent of the load
proportional or conventional
5, 10, 15 or 20 minutes
Warranty
9.
AUBE warrants this product, excluding battery, to be free from defects in the workmanship or materials, under normal use and service, for a period of three (3) years from the
date of purchase by the consumer. If at any time during the warranty period the product is
determined to be defective or malfunctions, AUBE shall repair or replace it (at AUBE's
option).
If the product is defective,
(i)
return it, with a bill of sale or other dated proof of purchase, to the place from
which you purchased it, or
(ii)
contact AUBE. AUBE will make the determination whether the product should be
returned, or whether a replacement product can be sent to you.
This warranty does not cover removal or reinstallation costs. This warranty shall not
apply if it is shown by AUBE that the defect or malfunction was caused by damage which
occurred while the product was in the possession of a consumer.
AUBE's sole responsibility shall be to repair or replace the product within the terms stated
above. AUBE SHALL NOT BE LIABLE FOR ANY LOSS OR DAMAGE OF ANY KIND,
INCLUDING ANY INCIDENTAL OR CONSEQUENTIAL DAMAGES RESULTING,
DIRECTLY OR INDIRECTLY, FROM ANY BREACH OF ANY WARRANTY, EXPRESS
OR IMPLIED, OR ANY OTHER FAILURE OF THIS PRODUCT. Some provinces, states
or regions do not allow the exclusion or limitation of incidental or consequential damages,
so this limitation may not apply to you.
THIS WARRANTY IS THE ONLY EXPRESS WARRANTY AUBE MAKES ON THIS
PRODUCT. THE DURATION OF ANY IMPLIED WARRANTIES, INCLUDING THE WARRANTIES OF MERCHANTABILITY AND FITNESS FOR A PARTICULAR PURPOSE, IS
HEREBY LIMITED TO THE THREE-YEAR DURATION OF THIS WARRANTY. Some
provinces, states or regions do not allow limitations on how long an implied warranty
lasts, so the above limitation may not apply to you.
This warranty gives you specific legal rights, and you may have other rights which vary
from one province, state or region to another.
Technical Assistance
705 Montrichard Avenue
Saint-Jean-sur-Richelieu, Quebec
J2X 5K8
Canada
Tel.: (450) 358-4600
Toll-free: 1-800-831-AUBE
Fax: (450) 358-4650
Email: [email protected]
10.
Service Centre
10 rue Ampère
95500 Gonesse, France
Tel.: 33 (0) 1 34 07 99 00
Fax: 33 (0) 1 34 07 99 19
Email: [email protected]
For more information on our products, go to
www.aubetech.com
400-141-000-B
2008-02-01
4/4