1
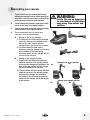
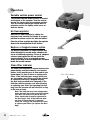
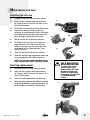
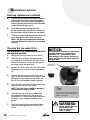
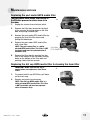
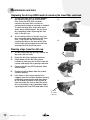
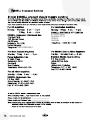
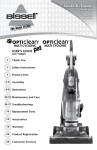
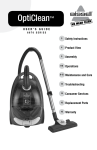
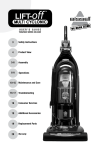
OptiClean™
USER’S GUIDE
60A4 SERIES 220-240v
3
Safety Instructions
4
Product View
5
Assembly
6-8
Operations
9-12
Maintenance and Care
13
Troubleshooting
14
Consumer Services
15
Replacement Parts
16
Warranty
Thanks for buying a BISSELL OptiClean™ Cyclonic Bagless Canister Vacuum
We’re glad you purchased a BISSELL OptiClean cyclonic bagless canister
vacuum. Everything we know about floor care went into the design and
construction of this complete, high-tech home cleaning system.
Your BISSELL canister vacuum is well made, and we back it with a limited
two year warranty. We also stand behind it with a knowledgeable,
dedicated Consumer Services department, so, should you ever have a
problem, you’ll receive fast, considerate assistance.
My great-grandfather invented the floor sweeper in 1876. Today, BISSELL is
a global leader in the design, manufacture, and service of high quality
homecare products like your BISSELL canister vacuum .
Thanks again, from all of us at BISSELL.
Mark J. Bissell
President and Chief Executive Officer
22
www.bissell.com
IMPORTANT SAFETY INSTRUCTIONS
When using an electrical appliance,
basic precautions should be observed,
including the following:
■ Remove plug from electrical outlet before cleaning or
Read all instructions
before using your
Canister VACUUM.
by the manufacturer or its service agent in order to
avoid a hazard.
■ Do not pick up toxic material (chlorine bleach,
ammonia, drain cleaner, petrol, etc.).
■ Do not use for any purpose other than described in
this User’s Guide.
■ Use only manufacturer’s recommended attachments.
■ Do not use with any opening blocked; keep free of
dust, lint, hair, and anything that may reduce air flow.
■ Keep appliance on a level surface.
■ Turn off all controls before unplugging.
■ Be extra careful when cleaning stairs.
■ This appliance is provided with double
insulation. Use only identical replacement parts.
■ Do not use without the dirt cup or a dust bag and
filters in place.
■ Pay close attention when working
around children.
WARNING:
To reduce
the risk of fire, electric shock,
or injury:
■ Use indoors only.
■ For dry pick up only.
■ Do not leave machine when it is plugged in.
■ Do not use with damaged cord or plug.
■ If appliance is not working as it should, has been
dropped, damaged, left outdoors, or dropped into
water, return it to a service agent.
■ Do not handle unit with wet hands.
■ Do not pull or carry by cord, use cord as a handle,
close door on cord, pull cord around sharp corners
or edges, run appliance over cord, or expose cord to
heated surfaces.
■ Do not unplug by pulling on cord. unplug by
grasping plug.
■ Do not run appliance over cord.
■ Do not handle plug or appliance with wet hands.
■ Do not expose hair, loose clothing, fingers or body
parts to openings or moving parts.
■ Do not pick up hot or burning objects such as
cigarettes, matches, or hot ashes.
■ Do not pick up flammable or combustible materials
(lighter fluid, petrol, kerosene, etc.) or use in the
presence of explosive liquids or vapour.
■ Do not use appliance in an enclosed space filled with
vapours given off by oil base paint, paint
thinner, some moth proofing substances, flammable
dust, or other explosive or toxic vapours.
■ Not intended for use by persons (including
children) with reduced sensory or mental capabilities,
or lack of experience and knowledge, unless they
have been given supervision or instruction concerning
use of the appliance by a person responsible for
their safety
■ Young children should be supervised to ensure that they
do not play with the appliance.
www.bissell.com
maintaining the appliance.
■ If the supply cord is damaged, it must be replaced
SAVE THESE
INSTRUCTIONS.
This model is for HOUSEHOLD use only.
IMPORTANT
FOR OPERATION ON A 220-240 VOLT A.C. 50/60 Hz
POWER SUPPLY ONLY.
If your appliance is fitted with a nonrewireable BS
1363 plug it must not be used unless a 13 amp (ASTA
approved to BS 1362) fuse is fitted in the carrier
contained in the plug. (Spares may be obtained from
your BISSELL supplier). If for any reason the plug is cut
off, it must be disposed of, as it is an electric shock
hazard should it be inserted into a mains socket.
3
Product view
Handle
Air Flow Regulator
Flex Hose
Carry
Handle
Swivel Hose
Telescoping Extension Wand
Easy Empty
Dirt Cup
Clean Filter
Indicator
Power
Button
Brush Switch
Automatic
Cord Rewind
Button
Post-Motor HEPA
Media Filter
Variable Suction
Power Control
Multi-Surface
Floor Nozzle
Upholstery Tool
4
Crevice Tool
www.bissell.com
Dusting Brush
Attachment
CAUTION:
Do not plug in your
vacuum until you
are familiar with all
instructions and
operating procedures.
Assembling your vacuum
1.
Connect swivel hose by squeezing both locking
buttons and inserting it into the suction opening on
the canister. Once the swivel hose is inserted in the
suction opening, release the locking buttons.
2.
Connect telescoping extension wand to the handle
end of the flex hose. Twist slightly to tighten.
3.
Connect floor nozzle to the end of the telescoping
extension wand. Twist slightly to tighten.
Warning:
Plastic film can be dangerous.
To avoid danger of suffocation,
keep away from babies and
children.
4.Once assembled, you can store your
vacuum in one of two positions:
A. Storing in the in-use position:
1.To store with the floor nozzle attached,
insert the storage clip (located on the
back of the floor nozzle) into the
storage slot on the rear of the vacuum.
2.To store without the floor nozzle
attached, insert the storage clip (located
on the bottom of the telescoping
extension wand) into the storage slot on
the rear of the vacuum.
B.
Storing in the upright position:
1.To store with the floor nozzle attached,
stand the vacuum in the upright position
and insert the storage clip (located on the
back of the floor nozzle) into the storage
slot on the bottom of the vacuum.
3.
A1.
2.To store without the floor nozzle attached,
stand the vacuum in the upright position
and insert the storage clip (located on
the bottom of the telescoping extension
wand) into the storage slot on the bottom
of the vacuum.
B1.
www.bissell.com
2.
1.
Storing in the in-use position
A2.
Storing in the upright position
B2.
5
Operations
Power cord
The power cord is located at the rear of the
vacuum. Gently pull out the power cord,
watching for the yellow line. Stop pulling the
power cord once the yellow line is visible.
There is also a red line, which indicates the
end of the usable cord. Do not pull the power
cord out beyond the red line.
Automatic cord rewind
Automatic
Cord Rewind
Button
Your vacuum is equipped with an automatic
cord rewind. When cleaning is finished, press
the power button OFF and grasp the plug to
disconnect from the electrical outlet. Hold the
plug and press the automatic cord rewind
button to rewind the cord automatically.
CAUTION:
Be careful to avoid
Power button
Turn the power on or off by pressing lightly
downward on the power button ( ).
caution:
Before using your vacuum,
make sure that either the
dirt cup or a dust bag and
all filters are in place. Do
not operate your vacuum
without the dirt cup or dust
bag and filters.
6
www.bissell.com
injury as cord retracts
very quickly.
Power Button
Operations
Special tools
Tip:
Your BISSELL OptiClean is not only a
powerful carpet and rug vacuum cleaner, it’s
Before cleaning under
also a versatile bare floor vacuum cleaner and
low furniture, check
area first for objects
above floor vacuum cleaner when you select
that might harm the
one of the special tools.
unit or block the hose.
Floor nozzle:
Use to vacuum carpets, rugs and bare floors.
1.
Swivel head turns to get into tight spaces
and fits under cabinets.
1.
2.
To vacuum carpets and rugs, push the brush
switch to the carpet position
. This
will pull the brushes up into the floor nozzle.
To vacuum bare floors, push the brush
switch to the bare floor position
.
This will extend the brushes down from the
floor nozzle.
Brush Up
Brush Down
2.
Upholstery tool:
Use the upholstery tool to clean curtains,
draperies, cushions and fabrics.
Dusting brush attachment:
Attach the dusting brush attachment to the
upholstery tool to dust furniture, blinds, books,
lamps, shelves and baseboards.
Crevice tool:
Use the crevice tool in tight, narrow spaces.
Tip:
Use the air flow regulator to
reduce air flow as needed
when using the tools.
Tip:
Hair, string and small objects
can block the hose and tools.
Check them occasionally for
obstructions.
www.bissell.com
7
Operations
Variable suction power control
The variable suction power control is located
on the back of the vacuum. Turn the control
toward the larger dots for maximum suction.
Turn the control toward the smaller dots to
minimize suction for lightly soiled areas or
delicate fabrics.
Air flow regulator
Open the air flow regulator by sliding the
regulator back towards the handle to an open
position to reduce suction for delicate fabrics.
Close the air flow regulator by sliding the regulator
down to the closed position for full suction.
Bagless or bagged vacuum option
The BISSELL OptiClean is a unique vacuum that
offers the option to vacuum using a bagless dirt
cup or a traditional paper bag. To use as a bagless
vacuum, simply place the dirt cup inside the
vacuum cleaner. To use as a bagged vacuum,
attach a dust bag to the dust bag holder and place
inside the vacuum cleaner.
Clean filter indicator
The clean filter indicator is located between the
power button and the automatic cord rewind
button. It will monitor your air flow and let you
know when it is time to clean or replace your
filters. If the indicator turns orange while you
are vacuuming, your filters need to be cleaned
or replaced (if using as a bagged vacuum,
the dust bag may need to be replaced). If the
indicator remains orange, even after cleaning
or replacing your filters (or replacing the dust
bag), turn the vacuum off and check for a clog
in the hose or tools.
Note: The indicator may turn orange when
using the tools due to the restricted airflow.
This does not necessarily mean that the
filters need to be cleaned or replaced (or
the dust bag is full). If the indicator does
not turn off once the tool is removed,
check for a clog in the hose/tools or clean
or replace your filters (or replace the dust
bag).
8
www.bissell.com
Clean Filter Indicator
Maintenance and care
Emptying the dirt cup
1.
Unplug the vacuum from electrical outlet.
2.
Open the dirt cup/dust bag compartment
by lifting up on the latch on the door on the
front of the vacuum.
3.
Lift the dirt cup assembly out from the vacuum.
4.
Remove the top cover from the dirt cup
assembly by unfastening the latch, raising the
front edge and removing the top cover off of
the rear hinges. Set the top cover aside.
5.
Empty the dirt into a garbage container.
6.
To reattach the top cover on the dirt cup,
align the slots on the top cover with the
hinges on the dirt cup and rotate the front
cover down to the closed position. Then
fasten the latch.
7.
Place the dirt cup back into the vacuum.
8.
Close dirt cup/dust bag compartment door and
press down gently until it locks into place.
2.
4b.
4a.
6.
NOTE: The dust bag compartment door will not
close without the dirt cup or a dust bag in place.
WARNING:
Dust bag replacement
1.
Unplug the vacuum from electrical outlet.
2.
Open the dirt cup/dust bag compartment
by lifting up on the latch on the door on the
front of the vacuum.
3.
Lift out the dust bag holder and dust bag.
4.
Release the dust bag from the holder by pressing
the dust bag holder clip and pulling the dust bag
out of the holder. Discard the used dust bag.
To reduce the risk of
electric shock, turn
power switch OFF and
disconnect plug from
electrical outlet before
performing maintenance
or troubleshooting
checks.
3.
4.
www.bissell.com
9
Maintenance and care
Dust bag replacement continued
5.
Slide the new dust bag into the holder by inserting
the dust bag into the tabs located at the bottom
of the holder. Then press the dust bag holder clip,
insert the dust bag and release the dust bag holder
clip to hold the dust bag in place.
6.
Place holder and new dust bag back into
the dirt cup/dust bag compartment, making sure
the entire bag is tucked in below the seal gasket.
7.
Close dirt cup/dust bag compartment door and
press down gently until it locks into place.
NOTE: The dust bag compartment door will
not close without the dirt cup or a dust bag
in place.
Cleaning the pre-motor filter
The pre-motor filter protects the motor from
dirt and dust particles.
1.
Unplug the vacuum from electrical outlet.
2.
Open the dirt cup/dust bag compartment
by lifting up on the latch on the door at the
front of the vacuum. Lift out the dirt cup or
dust bag holder and dust bag.
3.
Remove the filter frame from the filter holder
by grasping the lip of the frame and pulling
up.
4.
Remove the filter from the filter frame and
clean by hand washing in warm water. A mild
detergent can be used if desired. Allow the
filter to air dry thoroughly before replacing.
5.
Place the filter back into the filter frame and
replace back into the filter holder.
NOTE: The filter frame should be placed so
the protective frame is visible.
10
6.
Place the dirt cup or dust bag holder and
dust bag back into the dirt cup/dust bag
compartment. If using a dust bag, make sure
the entire bag is tucked in below the seal
gasket.
7.
Close dirt cup/dust bag compartment door
and press down gently until it locks into
place.
www.bissell.com
NOTICE:
This product is intended for household
use only and not for commercial or
industrial use. Vacuuming of dust
from products like plaster, concrete or
ashes will damage the motor and void
the warranty.
Washable PreMotor Filter
3.
Tip:
For maximum cleaning performance,
check the filters often and clean or
replace if necessary.
WARNING:
Do not operate cleaner
with damp or wet
filters or without all
filters in place.
Maintenance and care
Replacing the post-motor HEPA media filter
The post-motor HEPA media filter assists in
the filtration process to return clean air to
the room.
1.
Unplug the vacuum from electrical outlet.
2.
Remove the filter door (located on the back
of the vacuum) by pulling down on the filter
door and pulling it toward you.
3.
Remove the post-motor HEPA media filter by
grasping the lip of the filter frame and
pulling out toward you.
4.
Replace the post-motor HEPA media filter
with a new filter.
NOTE: The post-motor filter is a white,
pleated HEPA media filter. This filter is NOT
washable and must be replaced when it
becomes dirty.
5.
2.
3.
Post-Motor
HEPA Media Filter
Replace the filter door by inserting the two
tabs at the bottom of the filter door, pushing
down on the bottom of the filter door and
pushing it back into the vacuum.
Replacing the dirt cup HEPA media filter & cleaning the foam filter
IMPORTANT: Make sure the dirt cup is
empty before you replace or clean these
filters.
1.
To remove the dirt cup HEPA filter, pull down
on the front snap.
2.
Remove and replace as necessary.
1.
NOTE: The dirt cup HEPA media filter is a
white, pleated HEPA media filter. This filter
is NOT washable and must be replaced
when it becomes dirty.
www.bissell.com
11
Maintenance and care
Replacing the dirt cup HEPA media & cleaning the foam filter continued
3.
The dirt cup foam filter is located between
the bottom of the dirt cup and the HEPA
filter. Once the HEPA filter has been
removed, the foam filter can then be
removed and cleaned or replaced as needed.
To clean the foam filter, wash with warm
water and a mild detergent. Be sure to air
dry completely before replacing this filter
back in the dirt cup.
4.
To re-install the filters in the dirt cup, turn
dirt cup upside down and replace the foam
filter. Then replace the HEPA filter by
inserting the tabs on the back of the filter
into the slots on the bottom of the dirt cup
and snap the filter back into place.
3.
4.
Clearing clogs from the dirt cup
1.
To clear clogs from the dirt cup, remove the
top cover and set aside.
2.
3.
Empty the dirt into a garbage container.
Reach down into the dirt cup cyclone
chamber to clear any dirt or debris from the
cyclone and empty into a garbage container.
Remove the dirt cup HEPA and foam filters
and set aside.
4.
5.
6.
3.
Remove any dirt or debris from the cyclone
chamber opening.
If the holes in the cyclone appear to be
clogged, place the cyclone chamber opening
underneath running water and allow water
to run through the holes in the cyclone to
clear any clogs. Be sure to allow the entire
dirt cup assembly to dry completely before
replacing the dirt cup HEPA and foam filters.
5.
Cyclone
Chamber
Opening
12
www.bissell.com
Troubleshooting
Vacuum cleaner won’t run
WARNING:
To reduce the risk of electric shock,
turn power OFF and disconnect
plug from electrical outlet before
performing maintenance or
troubleshooting.
Possible causes
Remedies
1. Vacuum cleaner is not plugged in
1. Check electrical plug
2. Power button is not pressed down
2. Press power button down
Vacuum cleaner won’t pick up or low suction
Possible causes
Remedies
1. Tools, flex hose and/or telescoping extension wand are blocked
1. Remove each part and check for blockages
2. Filters are dirty
2. Check and clean or replace all filters
3. Dirt cup is full
3. Empty dirt cup
4. Dust bag is full
4. Replace with new dust bag
5. Swivel hose not securely attached to suction opening 5. Make sure swivel hose is locked into
suction opening
Vacuum cleaner won’t pick up or low suction
Possible causes
Remedies
6. Crack or hole in flex hose
6. Check hose and replace if needed
7. Air flow regulator or variable suction power
control is set to open or minimum setting
7. Change to closed or maximum setting
Visible dust escaping from vacuum
Possible causes
Remedies
1. Dirt cup is full
1. Empty dirt cup
2. Dust bag is full
2. Replace with new dust bag
3. Filters missing or installed incorrectly
3. Check all filters for correct installation
4. Filters are dirty
4. Check and clean or replace all filters
5. Flex hose is blocked
5. Remove hose and check for
blockages
6. Swivel hose not securely attached to suction opening
6. Make sure swivel hose is locked into
suction opening
7. Crack or hole in flex hose
7. Check hose and replace if needed
Other maintenance or service not included in the manual should be performed by an
authorized service representative.
Thank you for selecting a BISSELL product.
Please do not return this product to the store.
www.bissell.com
13
42 Rocco Drive
Scoresby 3179
Victoria
Australia
0844-888-6644
Replacement parts - BISSELL OptiClean
Item
1
2
3
4
5
6
7
8
9
10
11
12
Part No.
203-7289
203-7259
203-7258
203-7263
203-7260
203-7261
203-7267
203-7257
203-7256
203-7265
203-7266
203-7264
Part Name
Dirt Cup Assembly
Dirt Cup HEPA Media Filter
Dirt Cup Foam Filter
Dust Bag (3pk)
Pre-Motor Filter
Post-Motor HEPA Media Filter
Floor Nozzle
Flexible Hose with Handle
Telescoping Extension Wand
Upholstery Brush
Dusting Brush Attachment
Crevice Tool
1
2
3
4
5
6
7
8
9
10
11
12
www.bissell.com
15
42 Rocco Drive
Scoresby 3179
Victoria
Australia
0844-888-6644