1
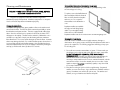
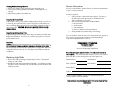
VIKING
USE AND CARE MANUAL
Viking Range Corporation
111 Front Street
Greenwood, Mississippi 38930 USA
For more product information
call 1-888-VIKING1 (845-4641)
or visit the Viking Web site
vikingrange.com
F20039C
(M1005VR)
Designer Series
Built-in Hoods
Congratulations. . .
Your purchase of this product attests to the importance you place upon the
quality and performance of the major appliances you use. With minimal care,
as outlined in this guide, this product is designed to provide you with years of
dependable service. Please take the few minutes necessary to learn the
proper and efficient use and care of this quality product.
We appreciate your choosing a Viking Range Corporation product, and hope
that you will again select our products for your other major appliance needs.
- READ AND SAVE THESE INSTRUCTIONS Table of Contents
Important Safety Instructions . . . . . . . . . . . . . . . . . . . . . . . . . . .2
Before Using Your Hood . . . . . . . . . . . . . . . . . . . . . . . . . . . . . .3
Operation of Your Hood . . . . . . . . . . . . . . . . . . . . . . . . . . . . . .4
Cleaning and Maintenance . . . . . . . . . . . . . . . . . . . . . . . . . . . .6
Replacing Light Bulbs . . . . . . . . . . . . . . . . . . . . . . . . . . . . . . . .8
Service Information . . . . . . . . . . . . . . . . . . . . . . . . . . . . . . . . . .9
Warranty . . . . . . . . . . . . . . . . . . . . . . . . . . . . . . . . . . . . . . . . . . .11
Important Safety Instructions
WARNING - TO REDUCE THE RISK OF FIRE, ELECTRIC SHOCK, OR
INJURY TO PERSONS, OBSERVE THE FOLLOWING:
1. Use this unit only in the manner intended by the manufacturer. If you have
any questions, contact the manufacturer.
2. Before servicing or cleaning unit, switch power off at service panel and
lock service panel to prevent power from being switched on accidentally.
When the service disconnecting means cannot be locked, securely fasten
a prominent warning device, such as a tag, to the service panel.
WARNING - TO REDUCE THE RISK OF A RANGETOP GREASE FIRE:
1. Never leave surface units unattended at high settings. Boilovers cause
smoking and greasy spillovers that may ignite. Heat oils slowly on low or
medium settings.
2. Always turn hood ON when cooking at high heat or when cooking
flaming foods.
3. Clean ventilating fans frequently. Grease should not be allowed to
accumulate on fan or filter.
4. Use proper pan size. Always use cookware appropriate for the size of the
cooking surface.
WARNING - TO REDUCE THE RISK OF INJURY TO PERSONS IN THE
EVENT OF A RANGETOP GREASE FIRE, OBSERVE THE FOLLOWING:
(based on “Kitchen Fire Safety Tips” published by NFPA)
1. SMOTHER FLAMES with a close-fitted lid, cookie sheet, or metal tray,
then turn off the burner. BE CAREFUL TO PREVENT BURNS. If the
flames do not go out immediately, EVACUATE AND CALL THE FIRE
DEPARTMENT.
2. NEVER PICK UP A FLAMING PAN. You may be burned.
3. DO NOT USE WATER, including wet dish cloths or towels - a violent
steam explosion will result.
4. Use an extinguisher ONLY if:
•You know you have a Class ABC extinguisher, and you already know
how to operate it.
•The fire is small and contained in the area where it started.
•The fire department is being called.
•You can fight the fire with your back to an exit.
IMPORTANT SERVICE INSTRUCTIONS
-CAUTIONFOR GENERAL VENTILATING USE ONLY. DO NOT USE TO EXHAUST
HAZARDOUS OR EXPLOSIVE MATERIALS AND VAPORS
Before Using Your Hood
Although the hood is cleaned upon completion of the manufacturing
process, you will probably need to clean your hood again after installation.
Wipe the surface of the hood with a good household cleaner applied with a
soft cloth, or stainless steel polish, depending upon the finish of your hood.
This will leave a protective finish on the hood.
2
3
Operation of Your Hood
Operation of Your Hood
Always turn your hood on before you begin cooking to establish an air flow
in the kitchen. Likewise, let the blower run for a few minutes to clear the air
after you turn your cooking appliance off. This will help keep the air in the
kitchen cleaner.
(DCH Models only)
Light Control (1)
Digital Display (3)
Lights
Fan Control (2)
Always turn your hood on before you begin cooking to establish an air flow
in the kitchen. Let the blower run for a few minutes to clear the air after you
turn your cooking appliance off. This will help keep the air in the kitchen
cleaner.
Fan
Timer
Push ON/OFF
S
Set Button (7)
Scroll Down Button (6)
Push ON/OFF
Delay Feature
Button (4)
Scroll Up Button (5)
(1)
(2)
(3)
(4)
(5)
(6)
(7)
Light Control - Push once to turn light on. Push again to turn lights
off. Rotate clockwise to increase light intensity and counterclockwise
to decrease light intensity. Light setting will stay the same when
turned on or off.
Fan Control - Push once to turn blower on. Push again to turn blower
off. Rotate clockwise to increase blower speed and counterclockwise
to decrease blower speed.
Digital Display - Remains blank while timer/delay functions are not in
use. Displays desired set time which is set by either the set button or
delay function button. Upon reaching 00:00, the buzzer will sound
and will continue to beep every 10 seconds up to 5 minutes.
Delay Function - Pushing this button once will automatically set the
digital display to 10 minutes. Pushing again will go to 20 minutes and
so forth up to 30 minutes. The blower will activate and the timer will
start counting down until 00:00 is reached. At this time the display will
go blank and blower will cut off.
Scroll Up - Changes timer display upward to 12 hours.
Scroll Down - Changes timer display downward to 00:00.
Set - Pushing once will activate display (00:00) and allow time to be
entered using the scroll up or scroll down buttons. The blower cannot
be activated using the set button. Only the timer will be activated.
Upon reaching 00:00, the buzzer will sound and will continue to beep
every 10 seconds up to 5 minutes.
4
Each hood has one blower motor which is operated using two (2) controls.
Use the on/off control switch to start and stop the blower. When turned on,
the blower will operate at the previous setting of the speed control. Turn the
speed control knob counterclockwise to decrease the blower speed and
clockwise to increase the speed. The type of cooking you are doing will
dictate the speed of the blower you will want to use.
Located to the left of the fan switches is the halogen light switch. This
controls the 50 watt halogen lights located in the front of the hood. The
halogen lights also have a switch which can be rotated in order to dim or
brighten the lights. Turn the dimmer control knob clockwise to brighten the
lights and counterclockwise to dim.
Heat Sensor Thermostat
Your hood is equipped with a heat sensor thermostat. The thermostat will
turn on or speed up the blower if it senses excessive heat above the cooking
surface. When the sensor activates, the letters “HOT” will appear on the
display. If the blower is OFF - it turns the blower ON to HIGH speed. If the
blower is ON at a lower speed setting - it turns the blower up to HIGH
speed. When the temperature level drops to normal, the blower will return
to its original setting and the display will be cleared.. CAUTION: If the
power to the hood is not disconnected during cleaning, the heat sensor
thermostat can cause the blower to turn ON.
5
Cleaning and Maintenance
CAUTION
UNPLUG POWER CORDS FROM CONTROL PANEL BEFORE
CLEANING OR SERVICING HOOD.
Any piece of equipment works better and lasts longer when
maintained properly and kept clean. Ventilation equipment is no exception.
Your hood must be kept clean and maintained properly.
Cleaning the Mesh Filters
As air passes through the filter, grease particles collect on the stainless steel
screen inside the filter. The filters should be examined periodically to assure
that all surfaces and parts are clean. This unit is equipped with a filter clean
alarm. Once the unit has been in operation for 48 hours, the letters “FILT”
will appear on the display. The filters can be washed in a dishwasher or in a
sink with hot, soapy water. Simple periodic cleaning will insure maximum
filter effectiveness. Do not use caustic detergent to clean the filters. A caustic
cleaner may damage the finish. Do not take the filters apart to clean them. It
is not necessary and will void the filter warranty. Once the filters have been
cleaned and placed back in the hood, the display is canceled by holding the
scroll up (+) and the scroll down (-) buttons for 5 seconds.
Mesh Filter
6
Charcoal Filter Maintenance (Recirculating Hoods Only)
Replace the charcoal filters every 6 months to 1 year depending on the
amount and type of cooking.
To replace, remove the baffle/charcoal
filter assembly and slide the charcoal
filter out of the channel and replace
with new one. Do not put the
charcoal filters in the dishwasher or
oven.
Replacement filters are available
through your local Viking Range
dealer or you can call the Viking
Online Store at 1-877-834-8222.
Replacement filters can also be ordered online at www.vikingrange.com
Cleaning the Hood Canopy
Finishes in enamel or stainless steel are highly resistant to damage or
discoloration due to grease, steam, and heat provided that reasonable care is
given to the equipment. The following suggestions will help you keep your
hood looking new.
1. Do not allow an excessive accumulation of grease. For best results, you
should wipe your hood clean with a cloth dipped in warm, soapy water.
DO NOT USE ABRASIVE CLEANSERS, STEEL WOOL PADS, or
ABRASIVE CLOTHS. DO NOT use cleaners that contain chlorides, the
chlorides in the cleaner could damage the stainless steel finish. If
necessary to scrape stainless steel to remove encrusted materials, soak the
area with hot towels to loosen the material, then use a wooden or nylon
spatula or scraper. Do not use a metal knife, spatula, or any other metal
tool to scrape stainless steel.
2. Every three months give your hood a thorough cleaning. On painted
surfaces, use a new coat of wax. A good wax cleaner, available at either a
grocery or hardware store will do both jobs at once. On stainless steel
surfaces, use a good stainless steel cleaner and polish.
7
Cleaning Ductless Venting Chamber
1. Remove the middle vent by gently raising up and pulling out.
2. Use the same cleaning directions as stated in “Cleaning the Hood
Canopy”.
3. After cleaning, replace the middle vent.
Renewing the Enamel Finish
If discoloration occurs, you should thoroughly polish the finish on your hood
to renew its gloss and luster and to remove any grease residue which may
have a yellowing effect. Use any good enamel polish, refrigerator polish, or
automotive polish. CAUTION: Do not use a porcelain cleaner or rough
abrasive cleaner.
Renewing the Stainless Steel Finish
Regular cleaning is the best way to assure that your stainless steel finish stays
bright and unscratched. Use lemon oil or stainless steel polish to coat and
protect stainless steel.
Brass Parts
Caution: All brass special ordered parts are coated with an epoxy coating.
Do not use brass cleaners or abrasive cleansers on the brass option parts. All
brass body parts should be wiped regularly with hot soapy water. When hot
soapy water will not do the job, use every day household cleaners that are
not abrasive.
Replacing Light Bulbs
1. Remove the bulb by rotating counterclockwise 1/4 turn. The bulb will
spring out of the socket.
2. Replace the bulb with a 50 watt GU-10 light bulb. To install the new bulb,
line up the studs on the back, push in and rotating 1/4 turn clockwise until
it falls into position.
Service Information
If your hood should fail to operate check to see if the the circuit breaker
is open, or if a fuse is blown?
If service is required:
1. Call your dealer or authorized service agency. The name of
the authorized service agency can be obtained from the
dealer or distributor in your area.
2. Have the following information readily available:
a. Model number
b. Serial number
c. Date purchased
d. Name of dealer from whom purchased
3. Clearly describe the problem that you are having.
If you are unable to obtain the name of an authorized service agency, or
if you continue to have service problems, contact Viking Range
Corporation at (888) 845-4641 or write to:
VIKING RANGE CORPORATION
PREFERRED SERVICE
111 Front Street
Greenwood, Mississippi 38930 USA
Record the information indicated below. You will need it if service is
ever required. The model and serial number for your hood is located
behind the filter on the left side panel in the lower right corner.
Model Number
Serial Number
Date of Purchase
Date Installed
Dealer’s Name
Address
If service requires installation of parts, use only authorized parts to
ensure protection under the warranty.
THIS MANUAL SHOULD REMAIN WITH THE HOOD FOR FUTURE
REFERENCE
8
9
DESIGNER SERIES
BUILT-IN HOODS/VENTILATORS WARRANTY
Notes . . . .
ONE YEAR FULL WARRANTY
Built-in hoods/ventilators and all of their component parts, except as detailed below*, are warranted to be free from
defective materials or workmanship in normal household use for a period of twelve (12) months from the date of
purchase. NOTE: Viking Range ventilator kits are designed specifically for use with Viking Range hoods. Use of any nonViking Range ventilator kits VOIDS the hood warranty. Viking Range Corporation, warrantor, agrees to repair or replace,
at its option, any part which fails or is found to be defective during the warranty period.
*Glass (including light bulbs), painted, and decorative items are warranted to be free from defective materials or
workmanship for a period of ninety (90) days from the date of original retail purchase. ANY DEFECTS MUST BE
REPORTED TO THE SELLING DEALER WITHIN NINETY (90) DAYS FROM DATE OF ORIGINAL RETAIL PURCHASE.
Viking Range Corporation uses the most up-to-date processes and best materials available to produce all color finishes.
However, slight color variation may be noticed because of the inherent differences in painted parts and porcelain parts as
well as differences in kitchen lighting, product locations, and other factors.
FIVE YEAR LIMITED WARRANTY
Any hood blower motor which fails due to defective materials or workmanship in normal household use during the
second year through the fifth year from the date of original retail purchase will be repaired or replaced, free of charge for
the part itself, with the owner paying all other costs, including labor.
This warranty extends to the original purchaser of the product warranted hereunder and to each transferee owner of the
product during the term of warranty.
This warranty shall apply to products purchased and located in the United States and Canada. Products must be
purchased in the country where service is requested. Warranty labor shall be performed by an authorized Viking Range
Corporation service agency or representative. Warranty shall not apply to damage resulting from abuse, accident, natural
disaster, loss of electrical power to the product by anyone other than an authorized Viking Range Corporation service
agency or representative. This warranty does not apply to commercial usage. Warrantor is not responsible for
consequential or incidental damage whether arising out of breach of warranty, breach of contract, or otherwise. Some
jurisdictions do not allow the exclusion or limitation of incidental or consequential damages, so the above limitation or
exclusion may not apply to you.
Owner shall be responsible for proper installation, providing normal care and maintenance, providing proof of purchase
upon request, and making the appliance reasonably accessible for service. If the product or one of its component parts
contains a defect or malfunction during the warranty period, after a reasonable number of attempts by the warrantor to
remedy the defects or malfunctions, the owner is entitled to either a refund or replacement of the product or its
component part or parts. Replacement of a component part includes its free installation. Warrantor’s liability on any claim
of any kind, with respect to the goods or services covered hereunder, shall in no case exceed the price of the goods or
service or part thereof which gives rise to the claim.
WARRANTY SERVICE: Under the terms of this warranty, service must be performed by a factory authorized Viking
Range Corporation service agent or representative. Service will be provided during normal business hours, and labor
performed at overtime or premium rates shall not be covered by this warranty. To obtain warranty service, contact the
dealer from whom the product was purchased, an authorized Viking Range Corporation service agency, or Viking Range
Corporation. Provide model and service number and date of original purchase. For the name of your nearest authorized
Viking Range Corporation service agency, call the dealer from whom the product was purchased or Viking Range
Corporation. IMPORTANT: Retain proof of original purchase to establish warranty period.
The return of the Owner Registration Card is not a condition of warranty coverage. You, however, should return the
Owner Registration Card so that Viking Range Corporation can contact you should any question of safety arise which
could affect you.
Any implied warranties of merchantability and fitness applicable to the above described hood or ventilator motors are
limited in duration to the period of coverage of the applicable express written limited warranties set forth above. Some
jurisdictions do not allow limitations on how long an implied warranty lasts, so the above limitation may not apply to you.
This warranty gives you specific legal rights, and you may also have other rights which may vary from jurisdiction to
jurisdiction.
VIKING RANGE CORPORATION
111 Front Street•Greenwood, Mississippi 38930 USA • (662) 455-1200
10
11