1
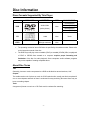
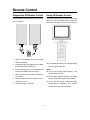
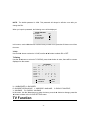
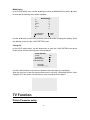
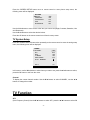
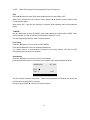
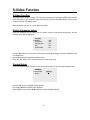
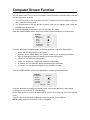
PROGRAM RATING
TV-PG
LTD1510
15" LCD/DVD COMBO
Table of Contents
Table of Contents -------------------------------------------------------------------------- 2
Safety Instructions ------------------------------------------------------------------------ 3
Features ----------------------------------------------------------------------------------------- 4
Disc Information ---------------------------------------------------------------------------- 5
Front View -------------------------------------------------------------------------------------- 6
Rear and Right View-------------------------------------------------------------------------7
Remote Control ----------------------------------------------------------------------------8
Preparation Of Remote Control -------------------------------------------------------------10
Using Of Remote Control ---------------------------------------------------------------------10
Connecting Other Equipment-------------------------------------------------------- 11
Connecting to Another Audio/Video Source------------------------------------------------11
Connecting to TV Signal Input --------------------------------------------------------------- 12
Connecting to a Personal Computer --------------------------------------------------------- 12
Connecting to Power Adapter ---------------------------------------------------------------------- 13
Connecting to Headphones--------- -------------------------------------------------------------- 13
TV Function ---------------------------------------------------------------------------------------- 14
AUX Function ------------------------------------------------------------------------------------- 19
S-VIDEO Function------------------------------------------------------------------------------ 20
Computer Screen Function -------------------------------------------------------------- 21
Disc Playback- ----------------------------------------------------------------------------------- 22
DVD Playback ----------------------------------------------------------------------------------------- 22
CD Playback -------------------------------------------------------------------------------------------23
JPEG Playback -------------------------------------------------------------------------------------- 23
Playback Functions ------------------------------------------------------------------------- 25
System Setup ----------------------------------------------------------------------------------- 28
Placement of the Unit -------------------------------------------------------------------- 32
Troubleshooting -------------------------------------------------------------------------------33
Specifications -----------------------------------------------------------------------------------34
Warranty ------------------------------------------------------------------------------------------- 35
- -2
Important Safety Instructions
The lightning flash with arrowhead symbol, within an equilateral triangle, is
intended to alert the user to the presence of un-insulated “dangerous voltage”
within the product’s enclosure that may be of sufficient magnitude to constitute a
risk of electric shock.
The exclamation point within an equilateral triangle is intended to alert the user
to the presence of important operating and maintenance (servicing) instructions
in the literature accompanying the appliance.
IMPORTANT FOR LASER PRODUCTS
CLASS 1 LASER PRODUCT
DANGER: visible laser radiation when open.
Avoid direct exposure to beam.
CAUTION:
These servicing instructions are for use by qualified service personnel only. To reduce the risk
of electric shock, do not perform any servicing other than that contained in the operating
instructions unless you are qualified to do so. Refer to service manual for servicing
instructions.
POWER SUPPLY:
Connect the supplied adapter to the side of the DVD player in the slot marked “DC 12V IN”.
Plug the two-prong end of the power cord to an AC100-240V outlet. If you have difficulty
inserting the plug, turn it over and reinsert it, if the unit will not be used for a long time,
disconnect the plug from the outlet.
NOTE:
Before plugging the power cord into an AC outlet, make sure that all the connections have
been made.
- -3
Safety Instructions
NOTES:
1.
2.
3.
4.
5.
6.
7.
8.
9.
10.
11.
12.
13.
14.
15.
Read these instructions.
Keep these instructions.
Heed all warnings.
Follow all instructions.
Do not use near water.
Clean only with dry cloth.
Do not block any ventilation openings. Maintain well ventilated conditions around the
product. Do not put product on bed, sofa or anything that blocks ventilation. Install
in accordance with the manufacturer’s instructions.
Do not install near any heat sources such as radiators, heat registers, stoves, or
other apparatus (including amplifiers) that produce heat.
Do not defeat the safety purpose of the polarized or grounding-type plug. A polarized
plug has two blades with one wider than the other. If the provided plug does not fit
into your outlet, consult an electrician for replacement of the obsolete outlet.
Protect the power cord from being walked on or pinched particularly at plugs,
convenience receptacles, and the point where they exit from the apparatus.
Only use attachments/accessories specified by the manufacturer.
Use only with the cart, stand, tripod, bracket, or table specified by
the manufacturer, or sold with the apparatus. When a cart is used,
use caution when moving the cart/apparatus combination to avoid
injury from tip-over.
Unplug the unit during lightning storms or when it will not be used for long periods of
time.
Refer all servicing to qualified service personnel. Servicing is required when the
apparatus has been damaged in any way, such as power-supply cord or plug is
damaged, liquid has been spilled or objects have fallen into the apparatus, the
apparatus has been exposed to rain or moisture, does not operate normally, or has
been dropped.
Apparatus shall not be exposed to dripping or splashing and no objects filled with
liquids, such as vases, shall be placed on the apparatus.
Copyright Protection
This product incorporates copyright protection technology that is protected by U.S. patents and
other intellectual property rights. Use of this copyright protection technology must be authorized
by Macrovision, and is intended for home and other limited viewing uses only unless otherwise
authorized by Macrovision. Reverse engineering or disassembly is prohibited.
-4-
Features
This product has incorporated a DVD player,
BBE
LCD display, TV receiver and computer
By correcting the phase delay and distortion
monitor.
naturally generated by audio systems, BBE
ensures that the sound that reaches your ears
is as natural as the original recording.
Television Features
By
enhancing the mid-range sound frequencies,
High Resolution
Adopts a MPEG2 decoding format to achieve
more than 500 lines of resolution.
BBE increases the presence and clarity of
dialog and music tracks.
are
Superior sound
Built-in Dolby Digital decoder outputs high
quality sound effects.
clearer,
vocals
High frequencies
are
crisper,
and
low-frequency bass is tight and well-defined.
DVD Features
Screen
Support the picture size of a normal screen
Compatibility
(4:3) and wide screen (16:9).
DVD, CD, CD-R, CD-RW, JPEG
Special Functions
Zoom Function
Support multi angle, multi language and multi
You can zoom in/out the picture to enhance
subtitle playback.
your enjoyment.
AV and VGA Input
All Playback Functions
External Audio/Video input and VGA input can
Fast forward and reverse, repeat playback.
be connected to AV source and PC (Personal
Search By Time
Computer).
Ability to search disc contents via time code.
Coaxial Digital Audio Output
Last Memory Playback
Can be connected to most amplifiers with
Continue to play from where you stopped
coaxial digital audio jack for Digital Audio
previously while still in POWER ON status.
Sound.
LCD (Liquid Crystal Display)
Designed with a colour TFT liquid crystal
display for maximum clearly.
-4-
Disc Information
Discs Formats Supported By This Player
DISC LOGO
CONTENTS
SIZE
MAXIMUM TIME
133min(SS-SL)
DVD
Audio+Video
(active picture)
12cm
242min(SS-DL)
266min(DS-SL)
484min(DS-DL)
Audio
CD
JPEG
•
Still high resolution
12cm
74min
12cm
The operating method of some DVD discs is specified by the software maker. Please refer
to the instruction manual of the disc.
•
The DVD Player will play most recordable (CD-R) or erasable (CD-RW) CDs, but playback
of CD-R or CD-RW discs created on a computer requires proper formatting and
finalization of the disc for audio playback. Some computers and/or software programs
may not be capable of creating compatible discs.
About Disc Terms
Title
Generally, pictures or music compressed on a DVD are divided into several sections, “title”.
Chapter
The smaller section unit of picture or music in a DVD under the title, usually one title is comprised of
one or more chapters and each of them is numbered for easy searching. But some discs may not
have a recording chapter.
Track
A segment of picture or music on a CD. Each track is numbered for searching.
-5-
Front View
Front View
1. LCD screen
Presents high resolution
pictures.
2. POWER button
Press to enter or exit the
STANDBY mode.
3. EJECT button
Press to eject the disc
while in the DVD mode.
4. Play/Pause button
Press to start or pause
playback under DVD mode.
5. Stop button
Press to stop playback,
then press the PLAY button
to resume normal playback
under DVD mode.
Press the STOP button twice repeatedly to stop completely.
6. Previous Skip button
Press to skip to the previous chapter/track for some discs under DVD mode.
7. Next Skip button
Press to skip to the next chapter/track for some discs under DVD mode.
8. Speakers
Two speakers produce stereo sound.
9. SOURCE button
Press to shift modes among DVD, TV, AUX, S-Video and PC. The player is designed with the
function of power stop memory function. The player will resume from the same mode, before the
power was stopped.
10. VOL-/+ button
Press to decrease/ increase the volume, the same function as ◄/► direction button when in screen
setup menu.
11. Power On indicator
Green light when operating. Red light in STANDBY mode. Yellow light when there is no input signal.
12. Remote Sensor
Receives the remote control signal for operation.
13. CH Λ / V button
Press to select channels backward/forward, while in TV mode, the same function as ▼/▲ direction
button when in screen setup menu.
14. MENU button
The same function as the SCREEN SETUP button on the remote control.
-6-
Rear and Right View
Rear View
Right View
1. DC 12V power supply Jack
Connecting to the power adapter.
2. Coaxial digital audio out jack
Connecting for coaxial digital audio output.
3. S-Video input jack
Connecting for S-Video signal input.
4. VIDEO input jack
Connecting for VIDEO input.
5. L-AUDIO input jack
Connecting for audio input.
6. R-AUDIO input jack
Connecting for audio input.
7. PC AUDIO INPUT jack
Connecting to the PC audio output.
8. Headphone jack
For headphone connection. When headphones
are connected to the unit, the internal speakers
will cease operation.
9. Computer VGA in jack
Connection to the personal computer.
10. Antenna in jack
Connected to external antenna to receive the
TV program in TV mode.
1. Disc Tray slot
Insert disc into the slot.
-7-
Remote Control
Remote Control Drawing
5. MENU button
Press to access the disc menu during DVD
playback.
6. +10 button
Select track number greater than 9, in DVD
mode.
7. GOTO button
Press to access or exit from the search menu
under DVD mode.
8. SCREEN SETUP button
Press to access to LCD functional setup menu.
9. direction buttons
Press to select menu items or settings.
Under TV mode, use the, buttons to
advance to the next channel or to go back to
the preceding channel.
10. OK button
Press to confirm the selection.
Press to exit from the SCREEN SETUP menu.
11. PIC MODE button
1. POWER button
Press to change the current picture mode from
Press to enter or exit STANDBY mode.
Manual, Standard, Mild or Fresh.
2. SUBTITLE button
12. Play When a DVD is playing, press to select a
Press to play the disc under DVD mode.
subtitle language, if the DVD disc contains
13. Stop
Press to stop playback, then press the PLAY
button to resume normal playback under DVD
mode.
Press the STOP button twice repeatedly to
stop completely.
Under TV mode, press to return to the channel
last viewed.
14. DVD OSD button
Press to display the current playback status of
DVD discs.
multiple subtitles.
3. BBE button
Press to shift between BBE 1, BBE 2, and BBE
OFF.
BBE is available for activating high quality
sound effects.
4. TITLE button
While a DVD is playing, press this button to
enter into the Title menu if available.
-8-
Remote Control
15. CLEAR button
Press to clear incorrect input under DVD
programming status.
16. REPEAT button
Press to repeat a chapter, track, title, or all
content under DVD mode.
17. A-B Repeat
Press to mark a segment to repeat between A
and B.
18. Previous Skip
Press once to go to the beginning of the
current chapter/track, press twice repeatedly to
skip to the previous chapter/track for some
discs under DVD mode.
19. Next Skip
Press to skip to the next chapter/track for some
discs under DVD mode.
20. EJECT button
Press to eject the disc under DVD mode.
21. AUDIO button
Press to access various audio languages, if the
DVD disc contains multiple audio languages.
22. 0-9 number buttons
Select numbers by pressing these buttons.
23. -/-Under TV mode, press to choose the channel.
For example: If you want to select channel 123,
you can press the button three times
repeatedly until OSD display ---, and then input
number buttons 1, 2, 3.
24. DVD SETUP button
Press to access the DVD setup menu under
DVD mode.
25. SOURCE button
Press to shift modes among DVD, TV, AUX,
S-Video and PC. The unit can memorize the
last mode when you restart the player.
26. MUTE button
Press to turn on/off the speaker output.
-9-
27. SCAN button
Under TV mode, press the button to scan
channels.
28. VOLUME+/-
Press to increase or decrease the speaker
volume level.
29. PAUSE button
Press to pause the playback.
Press the PLAY button to resume normal
playback.
Under TV mode, press to select the sleep time.
Press once, “SLEEP 0” will be displayed on the
screen, press again, “SLEEP 120” will be
displayed, repeatedly press the button, the
number will decrease accordingly per 15 every
time. The maximum time is 120. After finishing
the setting, press the button again to display
the remained time on the screen. When the
sleep time comes to the end, the unit will enter
standby mode automatically.
30. PROGRAM button
Allows the player to play the contents in a
programmed sequence under DVD mode.
31. ZOOM button
When a DVD is playing, press this button to
activate zoom function.
32. ANGLE button
Press to access various camera angles, if the
DVD disc contains multiple camera angles.
33. SLOW button
Press to activate slow forward under DVD
mode.
34. Press to search forward under DVD mode.
35. Press to search backward under DVD mode.
NOTE:
While in DVD mode, if the LCD set up menu
is in use, the DVD operation buttons on the
remote control are not available.
Remote Control
Preparation Of Remote Control
Using Of Remote Control
Insert the battery while observing the correct (+)
Point the remote control unit from no more than
and (-) polarities.
about 7m from the remote control sensor and
within about 60 degrees of the front of the unit.
1. Refer to the drawing; take off the empty
battery receptacle.
2. A separating film was applied to the battery
The operating distance may vary depending
to the brightness around.
for shipment. Remove this film.
3. Insert the battery into the receptacle and
Notes:
Do not point bright lights directly at the
insert the receptacle into the remote.
4. Under normal use the battery will last for
remote control sensor.
Do not place objects between the remote
six months.
5. Take out battery when the remote is not in
control unit and the remote control sensor.
Do not use this remote control unit while
use for a long time.
simultaneously
6. The battery type is CR2025.
operating
the
control unit of any other equipment.
- 10 -
remote
Connecting Other Equipment
•
Do not connect the power cord until all other connections have been made.
•
Each time you start the unit, it will begin from the last playback function that was used.
Connecting to Another Audio/Video Source
•
Use the supplied audio/video cable to connect the unit and the external AV signal input
source.
•
•
For Digital sound, connect a Digital Coax cable to the jack marked "COAXIAL OUT" to the
"COAXIAL IN" jack on a digital amplifier. (not supplied)
Connect the S-Video input jack of the unit to the S-Video output jack of the external signal
source, if the external signal source has the S-Video output jack. (not supplied)
Press the SOURCE button to shift to the S-Video or AUX modes depending on the input signal,
which will let you enjoy external signal source.
NOTE: If the amplifier has Dolby Digital decoding function, set the digital audio output format in the
Set Up menu to "SPDIF/RAW".
- 11 -
Connecting Other Equipment
Connecting to TV Signal Input
Plug the TV signal cable to the jack marked with ANT INPUT on the rear panel of the unit.
connecting, press the SOURCE button to shift to TV mode.
After
Connecting to a Personal Computer
The unit can be used as a display screen, when connecting to a personal computer. Connect the
unit and the computer via the VGA jack. Use an audio cable to connect the Audio input jack on the
rear panel of the unit to the audio output of the computer.
NOTE:
Press the SOURCE button to shift PC mode and set the PC’S resolution to 1024×768@60Hz.
- 12 -
Connecting Other Equipment
Connecting to Power Adapter
Power is supplied through the provided appropriative power adapter, one end of which is connected
to the DC 12V IN jack on the rear panel, another to wall outlet with AC100-240V.
Connecting to Headphone
Plug the headphones to the jack on the rear panel of the unit. When headphones are
connected to the unit, the internal speakers will mute.
TV Function
- 13 -
Basic Operation
Connect the antenna to the antenna jack on the unit rear panel.
After connection, plug in the power supply. If the player is in standby mode, press the POWER
button to turn on the power.
Press the SOURCE button to select the TV mode.
Press the ▼/▲ (direction buttons) on the remote control, or use the number buttons directly, to
select the channel that you wish to view.
It is recommended to perform the following General Set Up steps during the first time in operation:
General Setup
Press the SCREEN SETUP button three times repeatedly on the remote control to access the TV
setup menu.
GENERAL
►LANGUAGE
ENGLISH
RESET
CAPTION
OFF
V-CHIP SETTING
In this menu, use the▼/▲ buttons to select items you want to set. Press the ►/◄ buttons to enter
the submenu. Press OK to exit from the menu.
Language
Press the ►/◄ buttons to select the menu language.
Reset
Select RESET and press the►/◄ buttons to resume the default status.
Caption
This setting is used to set captions on or off for the hearing impaired.
Press the ▼/▲ button to select the CAPTION, use the ►/◄ button to select among
CC1,CC2,CC3,CC4,T1,T2,T3,T4 and OFF.
V-Chip Setting
The V-Chip setting is a parental control rating function. Depending on the program, you can edit
violence, language and explicit content.
Use the ▼/▲ buttons to select the V-CHIP SETTING, press the ► button to enter, “PIN _ _ _ _” will
be displayed on the lower portion of the screen, use the number buttons to enter your PIN.
(continued next page…)
TV Function
GENERAL
►LANGUAGE
ENGLISH
- 14 RESET
CAPTION
CC1
V-CHIP SETTING
PIN: _ _ _ _
NOTE: The default password is 3308. This password will always be effective even after you
change the PIN.
When you input the password, the following menu will be displayed:
V-CHIP SETTING
►V-CHIP
TV RATING
MPAA RATING
CHANGE PIN
ON
In this menu, use the▼/▲ buttons to select items you want to set, press the OK button to exit from
the menu.
V-Chip
Use the ▼/▲ button to select the V-CHIP, use the ►/◄ button to select ON or OFF.
TV Rating
Use the ▼/▲ button to select the TV RATING, press the ► button to enter, there will be a menu
displayed on the screen:
TV-Y
TV-Y7
TV-G
TV-PG
TV-14
TV-MA
L/U
U
U
U
U
L
L
TV RATING
FV D L S
U
- U U
U
U L U
L U
: PREVIOUS
: CHANGE
V
U
U
U
: NEXT
: EXIT
U = UNBLOCKED, L =BLOCKED,
D- SUGGESTIVE DIALOGUE, L- INDECENT LANGUAGE, S- EXPLICIT CONTENT,
V- VIOLENCE, FV- FANTASY VIOLENCE
In the menu, use the ▼or▲ button to select the items, press the ► button to change, press the
◄ button to return to the V-CHIP SETTING menu.
TV Function
- 15 -
MPAA Rating
In the V-CHIP setting menu, use the ▼/▲ button to select the MPAA RATING, press the ► button
to enter and the following menu will be displayed:
G
PG
PG13
R
NC17
X
MPAA RATING
U
U
U
U
U
U
: PREVIOUS
: CHANGE
: NEXT
: EXIT
Use the ▼/▲ button to select items, and then press the ► button to change the settings, press
the ◄ button to return to the V-CHIP SETTING menu.
Change Pin
In the V-CHIP setting menu, use the ▼or▲ button to select the V-CHIP SETTING press the ►
button to enter and the following menu will be displayed:
V-CHIP SETTING
V-CHIP
TV RATING
MPAA RATING
►CHANGE PIN
ON
NEW PIN: _ _ _ _
CONFIRM: _ _ _ _
Use the number buttons to input the new password and input again for confirmation.
When the rating level of the input signal matches with the set rating, “PROGRAM RATING” will be
displayed on the blue screen. Until the rating is reset, the program can be played.
TV Function
Picture Parameter setup
- 16 -
Press the SCREEN SETUP button once on remote control to enter picture setup menu, the
following menu will be displayed:
PICTURE
►BRIGHT
CONTRAST
SATURATION
HUE
SHARPNESS
050
050
070
050
000
Use the ▼/▲ buttons to move cursor to the item you want to set (Bright, Contrast, Saturation, Hue
and Sharpness).
Use the ►/◄ buttons to select the desired values.
Press the OK button on the remote control to exit from the setup menu.
TV System Setup
Press the SCREEN SETUP button twice repeatedly on the remote control to enter the tuning setup
menu, the following menu will be displayed:
TUNING
►CHANNEL
AFC
SKIP
TV MODE
FINE TUNING
AUTO MEMORY
VHF-L
002
OFF
OFF
AIR
◄◄◄
7%
In this menu, use the▼/▲ buttons to select items you want to set, press the ►/◄ buttons to select,
press the OK button to exit from the menu.
Channel
To display the current channel number. Use the▼/▲ buttons to select CHANNEL, use the ►/◄
buttons to change the number.
TV Function
AFC
(Auto Frequency Control) Use the▼/▲ buttons to select AFC, press the ►/◄ buttons to select ON
- 17 -
or OFF. When ON, the player will automatically fine tune the frequency.
Skip
Use the▼/▲ buttons to select SKIP, press the ►/◄ buttons to select ON or OFF.
When ON, it will skip the current channel, when using the ▼/▲ buttons to select channel under
normal playback status.
When select OFF, it will play the channels in sequence when selecting under normal playback
status.
TV MODE
Use the ▼/▲ button to select TV MODE, press the ►/◄ buttons to select AIR or CABLE. There
are 68 channels (2 to 69) for AIR and 124 channels for CABLE (2 to 125).
The unit supports HRC and IRC cable TV signal systems.
Fine Tuning
Press the ▼/▲ button to move cursor to FINE TUNING.
Press the ►/◄ buttons to fine tune forward and backward.
For a better effect it is recommended to activate the fine tuning function, AFC will turn OFF
automatically after the function is complete.
Auto Memory
Press the ▼/▲ button to move the cursor to “Auto Memory”.
Press the ► direction button to enter auto memory mode, and screen will display as below:
SEARCHING
CH:002
EXIT:
VHF-L
22%
The auto memory will take a few minutes. When the tuning operation is complete, the unit will exit
and memorize the programs by sequence.
During tuning, press the ◄ button to exit the auto memory.
- 18 -
AUX Function
AUX Function
The player has some other AUX functions. You can enjoy programs from external input sources by
pressing the SOURCE button on the remote control. Change to AUX mode after connecting to an
AV signal such as a VCR, camcorder, game system, etc.
After connection, you can go on with following setups:
Picture Parameter setup
Press the SCREEN SETUP button once on remote control to enter picture setup menu, and the
following menu will be displayed:
PICTURE
►BRIGHT
CONTRAST
SATURATION
HUE
SHARPNESS
050
050
070
050
000
Use the ▼/▲ button to move cursor to the item you want to set (Bright, Contrast, Saturation, Hue
and Sharpness).
Use the ►/◄ button to select the desired values.
Press the “OK” button on the remote control to exit the setup menu.
General Setup
Press the SCREEN SETUP button on the remote control twice to enter the general setup menu.
GENERAL
►LANGUAGE
ENGLISH
RESET
CAPTION
OFF
V-CHIP SETTING
NTSC-358
60Hz
Use the ▼/▲ button to highlight Language item.
Use the ►/◄ button to select menu language.
Select RESET and press the ►/◄ buttons to resume the default status.
Select CAPTION and V-CHIP SETTING, refer to the operations on the TV mode to set the items.
- 19 -
S-Video Function
S-Video Function
The player has S-VIDEO functions. You can enjoy programs from external S-VIDEO input sources.
After connecting to the external S-Video input source, press the SOURCE button on the remote
control to change to S-VIDEO mode.
After connection, you can go on with following setups:
Picture Parameter setup
Press the SCREEN SETUP button once on remote control to enter picture setup menu, and the
following menu will be displayed:
PICTURE
►BRIGHT
CONTRAST
SATURATION
HUE
SHARPNESS
050
050
070
050
004
Use the ▼/▲ button to move cursor to the item you want to set (Bright, Contrast, Saturation, Hue
and Sharpness).
Use the ►/◄ button to select the desired values.
Press the “OK” button on the remote control to exit the setup menu.
General Setup
Press the SCREEN SETUP button on the remote control twice to enter the general setup menu.
GENERAL
►LANGUAGE
RESET
ENGLISH
Use the ▼/▲ button to highlight Language item.
Use the ►/◄ button to select menu language.
Select RESET and press the ►/◄ buttons to resume the default status.
- 20 -
Computer Screen Function
You can use the unit’s TFT LCD as your computer’s monitor. Access the computer setup menu and
take the steps shown as below:
1. Turn OFF the power of the unit and the computer. Connect the unit to the computer VGA jack
with a VGA cable (not included).
2. Turn ON the power of this unit and the computer. If the unit is in standby mode, press the
POWER button to switch ON.
3. Press the SOURCE on the remote control to select the “PC” mode;
Press the SCREEN SETUP button once on the remote control to access the PC’s setup menu:
PICTURE
►BRIGHT
CONTRAST
AUTO
PHASE
CLOCK
H.POSITION
V.POSITION
055
050
000
100
050
027
Press the ▼/▲ button to highlight Bright, press the ►/◄ button to adjust the desired value.
• Bright: You can adjust the picture brightness.
• Contrast: You can adjust display zone contrast suitable to your environment condition.
• Auto: To automatically adjust the display zone and the picture quality.
• Phase: You can adjust the picture quality.
• Clock: You can enlarge or reduce the display zone horizontally.
• H. Position: You can adjust the display zone left and right horizontally.
• V. Position: You can adjust the display zone up and down vertically.
Press the SCREEN SETUP button twice repeatedly to access to general setup menu.
GENERAL
►LANGUAGE
RESET
COLOR R
COLOR G
COLOR B
ENGLISH
050
050
050
1024×768
60Hz
Press the ▼/▲ button to highlight the selecting items, press the ►/◄ button to select setting.
Language: You can select the PC menu language.
Reset: Select this item; press the ► button and all functions in the setup will return to the original
mode.
Color R, Color G, Color B: used to adjust the colour level of Red, Green and Blue.
NOTE: please set the PC’s resolution to 1024×768@60Hz.
- 21 -
Disc Playback
Preparation:After all connections have been made, turn ON the unit and select the relevant video
input.
Disc Loading Steps:
1. Press the POWER button on the front panel of the unit. The player will search for a disc
and play it automatically.
2. Handle the disc with the printed side facing outward vertically from the disc tray. (Referring
to the below picture.)
3. Put the disc slightly into the disc tray
4. The disc will be taken automatically into the tray.
"Loading" will be highlighted on the
screen and playback will begin.
Warning: Do not play poor quality discs that may damage the player’s lens.
DVD Playback
Menu
Most discs have menu selections. Press the MENU button on the remote, and then use the arrow
keys to highlight an item you would like to select. Press the OK button to select and save.
Title & Chapter
Normally there are several titles in a DVD disc, and several chapters (sections) in a title. You can
select any title or chapter quickly by entering the relevant number.
Region Code
DVD players and discs are coded by region. These regional codes must match the played discs. If
the codes don’t match, the disc cannot be played. This player’s default code is region 1.
- 22 -
Disc Playback
Language (Audio)
There can be up to 8 audio languages on a DVD disc. When you play a multi-language DVD disc
you can use the AUDIO button on the remote control to select a language.
Subtitle
The DVD player can support multiple kinds of subtitles. When you play a multi-subtitle disc you can
use the SUBTITLE button to select different subtitles.
Various Camera Angles
The movies on some DVDs have been recorded from various camera positions. This lets you enjoy
the same scene from different perspectives. In this case you’ll usually find a marking on the DVD
sleeve.
When playing a DVD containing various camera angles the camera symbol appears on the screen.
Press the ANGLE button repeatedly until the desired perspective is shown. The picture will be
adjusted in 1~2 seconds.
CD Playback
The player will play all tracks on a CD disc by default. You can use the and (PREV/NEXT skip)
buttons, or number buttons to select a track.
JPEG Playback
JPEG is a common picture format that requires small amounts of storage per image and has low
loss in resolution. Hundreds of pictures can be stored on a disc in this format. In order to view JPEG
photo albums, you can ask your film development company to make a ”PICTURE CD” when they
develop your film.
For JPEG disc, it will display root menu on the screen; for PICTURE CD disc, it may display the
picture directly.
Press the STOP button to return to the preview menu, in the preview menu, you can use the
◄►▲▼direction buttons to select picture, press the OK button to start playback.
Normal Playback
Load a JPEG disc in. press the ◄►direction buttons or OK button to enter the root menu, use the
▲▼direction buttons to select submenu and press the OK button to enter, then use the ▲▼
direction button to select the contents.
◆
some discs may contain contents other than picture.
- 23 -
Disc Playback
Picture Rotation
This can be used only when the picture is normally displayed. Once another picture is selected,
rotation will be cancelled automatically.
There are four kinds of rotational modes. You can use the direction buttons to select them.
Picture Zoom
The ZOOM button is used to turn on/off the zoom function and the move function.
When this function is turned on, use the buttons to control zoom proportion and the TV screen
will display the relevant proportion.
When this function is turned off, the picture will resume normal size. Press the MENU button to return
to menu page.
•
Some JPEG discs may support playback, but not rotation or zooming of the images.
- 24 -
Playback Functions
Stop
selecting the Title or Chapter, use number
Press this button once to stop playback and
buttons to input desired title or chapter.
then press PLAY button to resume it. Press
NOTE:
the button twice to stop playback completely.
Some DVD discs do not support the Search
function.
Pause
Press the PAUSE button to pause playback.
Press the PLAY button to resume playback.
Repeat
Use the REPEAT button to repeat a chapter
(section), a title, a track or a disc, and also to
cancel repeat.
Use the A-B button on the remote control to
repeat a section A to B. The player can repeat
any section A-B. Press once to set the starting
point A, the second time to set the ending point
B, and the third time to cancel repeat.
Fast Playback
Press the fast FWD/REV SCAN button on
the remote control to activate fast forward or
rewind playback.
Slow Playback
Press the SLOW button to activate slow
forward playback.
NOTE:
There is no slow playback for CD discs.
Zoom
Use the ZOOM button on the remote control to
achieve several zoom effects.
Press the ZOOM button once to achieve the
following zoom sequence.
×2
×3
X4
X1/2
X1/3
normal playback
◆
Some discs do not support the repeat
function.
Search By Time
During DVD disc playback, press the GOTO
button on the remote control once, there will be
a menu displayed on the screen. You can set
or select items for your preference. Use the
/ direction buttons to select items, press
the OK button to enter and use the /
direction buttons to select the desired item.
Press the direction button to return. When
- 25 -
NOTE:
There is no zoom function for CD discs.
X1/4
Playback Functions
Programming Chapters / Tracks
CD: Insert the CD and press the PROGRAM
You can store up to 20 chapters of a DVD (or
button. The screen shows:
20
tracks
of
a
CD)
in
an
individually
programmed order. Please proceed accordingly:
DVD:
Insert
the
DVD
and
press
the
PROGRAM button. The screen shows:
Now input the desired track number. Again
please use the +10 button for two-digit inputs.
Repeat this procedure until all desired audio
tracks are stored. Then use the direction button
Now type in the desired title number followed
by the chapter number. Again please use the
+10 button for two-digit inputs. Repeat this
procedure until all desired chapters are stored.
Then use the direction buttons to highlight
“START” and press OK. Now you see the
programmed chapters playing in the previously
stored order. To delete the program press the
STOP button. Or you call up the PROGRAM
function again, then choose “STOP” and press
OK. Choose “EXIT” to leave the function.
- 26 -
to highlight “START” and press the OK. Now
you hear the programmed tracks playing in the
previously stored order. To delete the program
please press the STOP button. Or you call up
the PROGRAM function again, then choose
“STOP” and press OK. Choose “EXIT” to leave
the function.
Playback Functions
Switching On and Off, Stand-by
Connect the main cord to a wall outlet with a
Playback will start automatically and most
voltage corresponding to the specifications on
discs will display a menu. You can control this
the rear panel of the unit.
menu with the direction buttons.
Select the desired option and press the OK
Press the POWER button on the front panel to
button to activate. To determine what content a
switch on the unit. You can operate all
disc contains, please check the disc sleeve or
functions, using the remote control and some
packaging.
functions from the unit itself.
To interrupt playback press the STOP once.
Press
the
SOURCE
button
to
shift
to
The screen shows “Press Play Key To
Continue”. The player memorizes the location
DVD-Mode.
where playback was stopped.
Press the
To set the unit into standby mode press the
PLAY button to resume playback.
POWER button on the remote control. In
discs support "resume play."
Not all
standby mode the unit is supplied with main
voltage but not active. In this condition you can
switch on the unit using the POWER button on
If this symbol appears on the screen while
the remote control.
pressing a button the unit can’t carry out the
Correctly put the disc into the disc tray.
desired function, because it’s not supported by
either the DVD inserted or the current
operating mode.
- 27 -
System Setup
DVD Setup Menu
General Setup Page
Please read this section to select the important
The General Setup is shown as follows:
settings for corresponding the DVD, TV and
other additional audio equipment.
1. Remove the disc from the DVD drive
and press the ‘DVDSETUP’ button on
the remote control, the settings menu
will appear. It includes General Setup,
Speaker Setup, Dolby Digital Setup,
Video Setup, and Preference.
2. Press (direction buttons) on
- - General Setup Page - TV Display
LB Normal/PS
Angle Mark
Off Normal/LB
OSD Lang
ENG Wide
SPDIF Output
Captions
Off
Screen Saver
On
Last Memory
Off
Set TV Display Mode
the remote control to select a category.
3. All the items in the category will appear
TV Display
remote control to select the correct
The program’s screen format (e.g. Normal TV/Wide
screen) is fixed by the DVD. Please note that this
format might not necessarily match your TV’s
screen format.
Normal/PS (PAN SCAN): Choose this mode when
your TV set has 4:3 screen format. The picture will
fill the screen but the right and left portion will be cut.
Normal/LB (LETTER BOX): Choose this mode when
your TV set has 4:3 screen format. The picture will
appear in its entire width but framed by black bars at
the top and the bottom.
Wide (16:9): Choose this mode when using a 16: 9
wide screen TV set.
category.
NOTE:
on the TV screen. Press the OK button
to confirm your selection.
Navigation
1. When you enter a category all the
items under this category will appear,
and the items placed in the middle (or
highlighted) will be the current set up.
2. Press (right direction button) on the
3. Press the direction button to select
This feature is not accessible in this model.
your preference. The item you select
Angle Mark
will be highlighted.
4. Press the OK button to confirm.
If this function is available, a camera symbol
5. Press (left direction button) to exit
will appear on the screen when various angles
are available on the DVD. Choose “Off” and no
the category.
camera symbol will appear.
- 28 -
System Setup
OSD Lang
Please select preferred language for the OSD
menus.
SPDIF Output
This item is used to set the format of digital
audio. ‘SPDIF Off’ turns off the digital audio;
‘SPDIF/RAW’ outputs the original. For example,
if the disc being played is Dolby Digital, then
the digital audio output is also Dolby Digital.
Select ‘SPDIF/PCM’ when you connect with a
2 channel digital stereo amplifier.
Captions
You can choose captions ON or OFF on screen
during playback.
Downmix
Selecting “Lt/Rt” in the ‘Downmix’ will alter the
audio output into a mixed Dolby output. By
selecting ‘Stereo’ in the ‘Downmix’ menu the
player will output a common stereo signal.
Dolby Digital Setup
- - Dolby Digital Setup - Dual Mono
Dynamic
Stereo
L-Mono
R-Mono
Mix-Mono
Dual Mono (1 + 1) Setup
Screen Saver
When you enable this function a moving DVD
Dual Mono
symbol will appear on the screen, when the
This function is used to set audio output:
unit is stopped or showing a still picture for
Stereo, L-MONO, R-MONO and MIX-MONO.
over a minute. This feature will protect your
screen from damage.
Dynamic
The Dynamic Range Compression minimizes
Last Memory
This item is used to set the function of last
memory ON or OFF.
the difference between loud and soft audio
levels. Setting this option to FULL maximizes
the affect while setting to OFF leaves the audio
Speaker Setup Page
unchanged.
Press the direction button to select your
preference. The item you select will be
Video Setup Page
highlighted.
- - Video
- - Speaker
Setup
Downmix
Page - -
Sharpness
Brightness
Contrast
Lt/Rt
Stereo
Sharpness
Set Downmix Mode
- 29 -
Setup
Page - -
MID
00
00
High
Medium
Low
System Setup
Sharpness
This menu allows the settings for the
sharpness of the picture: high, medium or low.
Brightness
If you activate this function you can set the
brightness of the picture using the /
buttons. Press the OK to return to the setup.
Contrast
If you activate this function you can set the
contrast of the picture using the / buttons.
Press the OK to return to the setup.
Preference Page
- - Preference
Audio
Subtitle
Disc Menu
Parental
Password
Default
Page - -
Eng
Off
Eng
English
French
German
Spanish
Preferred Audio Language
Audio
Please select your preferred language to
playback DVD movies in general. Sure this
selection is subject to the audio material on the
particular disc. You can also change the
language during playback by pressing the
AUDIO button.
Subtitle
Please select your preferred language to
generally show subtitles on the screen. Again
this is subject to the information available on
the particular disc. You can also change the
subtitle language during playback by pressing
- 30 -
the SUBTITLE button.
Disc Menu
Here you can choose the language in which
the DVD menu stored on the disc will be shown
on the screen
NOTE: this feature may not be available with
all discs.
Parental
DVD discs are equipped with the Parental Lock
function and rated according to their contents.
The contents and locking level may vary from
disc to disc. If the disc allows, you can edit out
violent scenes and replace them or lock out
playback of the disc altogether. To set the
parental level on the sub-menu press (direction buttons) on the remote control and
press the OK button. An interactive menu will
appear. The initial password is 3308.
Password
Here you can change the password you need
to adapt the parental control level.
Having activated CHANGE please type in the
old password. Now type in the new one and
repeat it for safety confirmation. You close this
procedure by pressing OK. From now on the
new password has to be entered for changing
the parental control level.
WARNING: Keep the password in a safe place,
as you will need to access the Parental Lock
function.
Default
Choose Default and confirm reset it if you want
to recall the factory settings.
Caution: All your settings done so far will be
deleted.
System Setup
Screen Setup Menu
After connecting the unit, there are other preferences you can set.
Turn the POWER ON and press the SOURCE button on the remote or front panel and select DVD
mode.
Picture Parameter Setup
Press the SCREEN SETUP on the remote and the screen will display the following:
PICTURE
►BRIGHT
CONTRAST
AUTO
PHASE
CLOCK
H.POSITION
V.POSITION
055
050
000
100
050
027
Press the ▼/▲ button to highlight Bright, press the ►/◄ button to adjust the desired value.
• Bright: You can adjust the picture brightness.
• Contrast: You can adjust display zone contrast suitable to your environment condition.
• Auto: To automatically adjust the display zone and the picture quality
• Phase: You can adjust the picture quality.
• Clock: You can enlarge or reduce the display zone horizontally.
• H. Position: You can adjust the display zone left and right horizontally.
• V. Position: You can adjust the display zone up and down vertically.
General setup
Press the SCREEN SETUP button twice repeatedly to access to general setup menu.
GENERAL
►LANGUAGE
RESET
ENGLISH
Press the ▼/▲ button to highlight the selecting items, press the ►/◄ button for setting.
• Language: You can select the menu language.
• Reset: press the ► button, then all functional setup in SCREEN SETUP menu will return to
the original mode.
- 31 -
Placement of the Unit
When first using the player, please take following steps to place it:
1. Turn over the player with its chassis up, put it on
a soft and smooth surface.
Pos A
2. With one hand hold the player, the other hand tilt
the set stand downwards about its axis. The unit
will revolve about 90 degree (position C) at
which point you will hear a click. Set the stand
vertically with the LCD screen.
Pos B
3. Turn up the player, put it standing on the table,
then you can go on with operations for your
preference. When adjusting the screen for
viewing, please revolve the screen about the
axis, make sure the axis stands vertically.
Pos C
4. If you want to return to initial position (A), you
should pull the tab sideways first, and then tilt the
set stand upwards until the set stand is
horizontally with the LCD screen.
Pos D
- 32 -
Troubleshooting
SYMPTOM
CHECK ITEM
The player cannot play.
Make sure disc is loaded in.
Make sure disc is correctly loaded.
Make sure disc is not dirty or warped.
Make sure the DVD disc region code is 1.
Make sure water condensation has not occurred.
If it occurs, take out disc and leave the player on for at least
one hour.
There is no sound.
Make sure system connection is correct.
Make sure the power of speakers is turned on.
Make sure the sound setup of DVD disc is correct.
Make sure disc is not dirty or warped.
Clean or replace the disc.
There is no picture or picture is
unstable.
Make sure unit is turned on and is in correct video mode.
Make sure system connection is correct. If it is not, access
the setup menu and select the correct system.
Cannot continue to play and play
a section repeatedly.
Make sure is not in A-B repeat status.
Press A-B button to cancel it.
Make sure disc is not dirty or damaged.
Clean the disc or skip the section.
The remote control does not work.
Make sure there are no obstructions between the remote
control and the player.
Make sure the remote control is pointing at the player.
Make sure battery is inserted or the polarity is correct.
Make sure battery is not weak.
Replace the weak battery.
Other Notes:
Static or other external interfere may cause the player to behave abnormally. In this occurs, unplug
the power-supply cord from the outlet and plug it in again to reset the player. If the problems persist,
then please disconnect the power and consult a qualified technician.
- 33 -
Specifications
TFT-LCD Screen Size
15 Inches
Laser Wavelength
Wavelength: 780/650nm
Digital Audio Out
Out Level: 0.5Vp-p,
Load: 75Ω
AC100V~ 240V, 50/60Hz
Power
DC +12V
Power Consumption
<48W
Dimension
422 mm x374 mm×102mm
Weight
About 6.5 kgs
DESIGN AND SPECIFICATIONS ARE SUBJECT TO CHANGE WITHOUT NOTICE
Manufactured under license from Dolby Laboratories.
“Dolby” and the double-D symbol are trademarks of Dolby Laboratories.
Confidential unpublished works. © 1992 -1997 Dolby Laboratories.
All rights reserved.
- 34 -
CITIZEN WARRANTY
Consumer Electronics Products
Thank you for choosing Citizen!
Citizen Electronics gives the following express warranty to the original consumer purchaser or gift recipient for this
Citizen brand product, when shipped in its original container and sold or distributed in Canada by Citizen Electronics
or by an Authorized Citizen Dealer:
Citizen Electronics warrants that this product is free, under normal use and maintenance, from any defects in material
and workmanship. If any such defects should be found in this product within the applicable warranty period, Citizen
Electronics shall, at its option, repair or replace the product as specified herein. Replacement parts furnished in
connection with this warranty shall be warranted for a period equal to the unexpired portion of the original equipment
warranty.
This warranty shall not apply to:
a. Any defects caused or repairs required as a result of abusive operation, negligence, accident, improper
installation or inappropriate use as outlined in the owner’s manual.
b. Any Citizen product tampered with, modified, adjusted or repaired by any party other than Citizen
Electronics or Citizen’s Authorized Service Centres.
c. Damage caused or repairs required as a result of the use with items not specified or approved by Citizen
Electronics, including but not limited to head cleaning tapes and chemical cleaning agents.
d. Any replacement of accessories, glassware, consumable or peripheral items required through normal use
of the product including but not limited to earphones, remote controls, AC adapters, batteries, temperature
probe, stylus, trays, filters, cables and paper.
e. Any cosmetic damage to the surface or exterior that has been defaced or caused by normal wear and tear.
f.
Any damage caused by external or environmental conditions, including but not limited to transmission
line/power line voltage or liquid spillage.
g. Any product received without appropriate model, serial number and CSA/cUL markings.
h. Any products used for rental or commercial purposes.
i.
Any installation, setup and/or programming charges.
Should this Citizen product fail to operate during the warranty period, warranty service may be obtained upon
delivery of the Citizen product together with proof of purchase and a copy of this LIMITED WARRANTY statement to
an Authorized Citizen Service Centre. In-home warranty service may be provided at Citizen Electronics’ discretion on
any Citizen television with the screen size of 27” or larger. This warranty constitutes the entire express warranty
granted by Citizen Electronics and no other dealer, service centre or their agent or employee is authorized to extend,
enlarge or transfer this warranty on behalf of Citizen Electronics. To the extent the law permits, Citizen Electronics
disclaims any and all liability for direct or indirect damages or losses or for any incidental, special or consequential
damages or loss of profits resulting from a defect in material or workmanship relating to the product, including
damages for the loss of time or use of this Citizen product or the loss of information. The purchaser will be
responsible for any removal, reinstallation, transportation and insurance costs incurred. Correction of defects, in the
manner and period of time described herein, constitute complete fulfillment of all obligations and responsibilities of
Citizen Electronics to the purchaser with respect to the product and shall constitute full satisfaction of all claims,
whether based on contract, negligence, strict liability or otherwise.
WARRANTY PERIODS: Parts & Labour (exceptions noted)
•
Audio Products: 1 Year (Remote Control, if applicable – 90 Days)
•
DVD Products: 1 Year (Remote Control – 90 Days)
•
LCD & Plasma Display TV: 1 Year (Remote Control – 90 Days)
•
Microwave Ovens: 1 Year
•
Television Products: 1 Year (Remote Control – 90 Days)
•
VCR Products: 1 Year (Remote Control – 90 Days, Video Heads – 6 Months)
To obtain the name and address of the nearest Authorized Citizen Service Centre or Dealer, please contact:
Citizen Electronics, 455 Gordon Baker Road, Toronto, Ontario M2H 4H2 or visit our web
www.citizen-electronics.com
site:
For more information on this Warranty or Service Locations, please call (416) 499-5611 or toll free 1-800-663-5954,
Monday to Friday 9:00am – 5:00pm Eastern Standard Time.
- 35 -