1
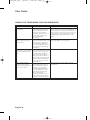
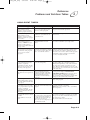
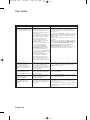
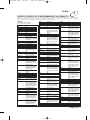
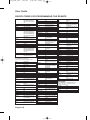
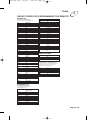
4100_Ch4_eng
6/15/05
4
8:36 AM
Page 1
Reference
PROBLEMS AND SOLUTIONS TABLES
Please use these tables if you encounter problems operating the system. Look in this
section for a description of the problem before calling Bell ExpressVu Customer Service
Call Centre. Many problems arise from basic misunderstandings of how the system
works, especially when one is just becoming familiar with it. These tables address many
problems, usually with a simple solution for each one. To solve a particular problem:
1. Review the section in this Guide that relates to the problem.
2. If you cannot find a solution, then find the section in the following tables that
relates to the problem. Look down the What Is Happening column until you find
the problem
3. For better understanding, read the information in the Possible Reason column.
4. Try each of the suggested solutions in the What to Do column.
5. If this does not help, call Bell ExpressVu Customer Service Call Centre at
1-888-SKY-DISH, or see the home page at http://www.bell.ca/satellite on the World
Wide Web. Note: Before calling Bell ExpressVu Customer Service Call Centre with
a problem, have ready the date of purchase and either your customer account number,
the receiver conditional access number, or the receiver model number. Display the
Important System Information menu to find these numbers (see Ordering Your
Bell ExpressVu Programming on page 3-1). Also, write down the contents of any
error messages that the receiver displays on the television screen.
Page 4-1
4100_Ch4_eng
6/15/05
8:36 AM
Page 2
User Guide
ERROR MESSAGES IN THE MENUS
What is Happening
The receiver displays an
“ERROR” message on the
TV screen.
ERROR message text: “The
number of password entry
retries has been exceeded.
Please try again later.”
Possible Reasons Why
ERROR message text: “The
front panel buttons are
locked.”
ERROR message text:
The receiver is not receiving a
“Unable to acquire signal.” or strong enough signal to maintain
“Unable to acquire program an uninterrupted, clean picture.
guide information.”
ERROR message text:
“Please insert your Smart
Card.”
ERROR message text:
“Smart Card not
inserted correctly.”
ERROR message text: “The
Smart Card currently inserted
is not valid for use with this
receiver.”
ATTENTION: Your Smart
Card does not currently have
authorization to view or
purchase this program. Please
wait or channel up or down.
ERROR: “Your receiver has
not yet been authorized.”
Smart card is missing or not
inserted correctly.
ATTENTION: “Acquiring
satellite signal.”
The receiver may have just been
plugged in. If so, it is acquiring
the satellite signal. The satellite
dish may have moved so that it is
no longer picking up the satellite
signal. The coaxial cables may
have loosened or have moisture
inside. There may be an
interruption of the satellite signal.
Page 4-2
What to Do
In most cases, the ERROR message explains the
error. Sometimes, the ERROR message prompts
you to do something. However, usually all you
need to do is select the OK option on the
ERROR message to clear the message from the
TV screen.
You may try to enter the password Wait until several minutes have passed,
and try again.
three times. If you do not enter
the correct password any of those
times, then you must wait several
minutes until you may try again.
You must use the remote control to unlock the
You or someone else locked the
receiver front panel buttons.
receiver front panel buttons.
When the receiver finds a
problem, it displays an ERROR
message on the TV screen.
Smart card is inserted upside
down or backwards.
The receiver will work only with
the Smart Card that came with it.
Check the condition of all the coaxial cables and
cable connections in the system. Check the
condition of the dish mounting and aiming. If
needed, contact your installer to re-aim the dish.
If the system is OK, then there may be a
weather-related problem with transmission of the
satellite signal.
Check that the Smart Card is fully inserted into
the receiver front panel slot.
Check that the Smart Card is inserted right side
up, with the picture on top and the arrow facing
in the correct direction.
Insert the Smart Card that came with the system.
There is a problem with the
Program Guide information
transmitted to the receiver via
the satellite signal.
You cannot watch the selected program, even
though it is displayed in the Program Guide.
Try a different program or channel.
The receiver has not yet been
electronically linked with
the Smart Card, via the satellite
signal.
If you have authorized your system, wait a few
minutes to see if the message is removed. If you
have not authorized your system, call Bell
ExpressVu Customer Service Call Centre for
assistance.
Wait a few minutes to see if the message is
removed. Check that the Signal Strength bar in
the Point Dish and Signal Strength menu is
green and displays the word “Locked.” If not,
contact your installer to re-aim the satellite dish.
4100_Ch4_eng
6/15/05
8:36 AM
Page 3
Reference
Problems and Solutions Tables
4
USING THE REMOTE CONTROL
What is Happening
You cannot find the remote
control.
Possible Reasons Why
N/A
The remote control may be
missing batteries, the batteries
may be incorrectly placed in the
remote, or the batteries may be
weak or dead.
The batteries may be weak or
When you press the remote
dead. The receiver power cord
control POWER button to
may not be plugged into a power
turn the receiver ON, the
receiver front panel POWER outlet, or there may be a problem
with the power.
light does not light up.
When you press a button on
the remote control, the
receiver does not do what
you expect.
You use infrared (IR) remote
control extenders (called
“pyramids”).
Other electronic devices
exhibit ultra-high frequency
(UHF) interference.
The extenders use UHF signals
to transmit signals from one room
of the building to another.
These signals may be causing
the interference.
You use infrared (IR) remote
control extenders (called
“pyramids”). The IR remote
control extenders do not seem
to work.
The IR sensor on the extender that
receives the remote control
signals may not be facing the
remote control.
The IR cable on the extender that
sends the signal to the receiver
may not be right in front of the IR
sensor on the receiver front panel.
What to Do
Use the receiver front panel Control Buttons to
control the receiver until you find the remote. If
the remote control is permanently lost or too
damaged to use, call Bell ExpressVu Customer
Service Call Centre to order a replacement.
If the batteries are missing or dead, insert fresh
AAA-size batteries. If the remote has fresh
batteries, check whether they are placed
according to the label diagram. If not, remove
them and place correctly.
Try other remote control buttons to see if the
receiver is responding. Replace the remote
batteries with fresh ones.
Check that the receiver power cord is not
damaged and that the plug is inserted correctly
into the outlet.
Temporarily stop using the extenders, to see
whether this eliminates the interference. If the
extenders are the source of the interference, you
will have to avoid using them whenever you do
not want interference with other devices that use
UHF. This is because UHF signals have a long
range and go through walls and other solid
objects.
Make sure that the extender that receives the
signal from the remote control is facing the right
way, so that the IR sensor can receive the remote
control signals.
Make sure that the IR cable on the extender that
sends the signal to the receiver is right in front
of the IR sensor on the receiver front panel, so
that the receiver IR sensor can receive the
signals.
If doing the above does not solve the problem,
contact the manufacturer of the extenders for
assistance.
Page 4-3
4100_Ch4_eng
6/15/05
8:36 AM
Page 4
User Guide
HEARING PROGRAM SOUND
What is Happening
Possible Reasons Why
The receiver front panel
Power light is on and there is
a good picture on the TV set,
but you do not hear any
sound.
You may have muted the sound,
or set the volume so low that
you cannot hear it. The audio
connections may not be properly
connected.
You hear a foreign language
with a program.
You may have programmed the
receiver to select an alternate
audio language.
What to Do
Check the volume level on the TV or audio
equipment. Turn off the mute or turn up the
volume, as required.
Check the audio connectors and cables from the
receiver to the TV or the sound system you are
using.
Check the TV speakers or the sound system you
are using.
Use the System Setup menu to open the
Alternate Audio menu, where you can select the
language you prefer.
WATCHING A PROGRAM
What is Happening
The receiver front panel
Power light is on, but the TV
image:
is black (no picture),
is frozen,
has breakups,
has “snow,” or
shows small squares of
various colours.
Page 4-4
Possible Reasons Why
The TV set may not be working
properly.
If the TV and the receiver are
working properly, there may be
interference with the satellite
signal. The TV may be wired
to the wrong input.
What to Do
Make sure that the TV set is plugged into an
electrical outlet. Make sure the outlet has
electrical power. Make sure that the TV is
turned on. If the receiver is connected to the TV
using only the RF or VHF connections, make
sure that the TV is tuned to channel 3 or 4
(whichever works best in your area) and that the
modulator output is set to the same channel as
the TV.
Make sure that the TV brightness and contrast
are adjusted correctly.
Make sure that the TV is connected properly to
the receiver.
Check that the system has been installed
correctly. Make sure that all required coaxial
cables are in place, and check that all cable
connectors are firmly connected.
Make sure that the satellite dish is aimed at the
satellite. Check the strength of the signal using
the Point Dish and Signal Strength menu.
Consult your installer to re-aim the dish, if
necessary, to obtain the maximum possible
signal strength.
Note the local weather conditions. Heavy rain,
snow, or cloud cover may be interfering with
transmission of the satellite signal. Remove any
snow or other debris which may have collected
on the satellite dish. Set the TV to SVIDEO or
VIDEO input.
4100_Ch4_eng
6/15/05
8:36 AM
Page 5
Reference
Problems and Solutions Tables
The receiver front panel
Power light is on, and there is
a picture on the TV screen,
but the picture:
has sparkles or is grainy,
has a herringbone pattern,
lacks colour or vertical
hold, or wobbles, or
looks “washed out”
or fuzzy.
The TV set may not be working
properly.
If the receiver is connected to the
TV using only the RF or VHF
connections, there may be a
strong local broadcast on the
same channel, or a channel
adjacent to the one to which the
TV is tuned.
There may be interference from
other nearby electrical devices
(such as cellular telephones,
computers, microwave ovens,
radios, stereos, or TVs).
The satellite dish may have
moved, so that it no longer picks
up the satellite signal.
A “black box” fills almost all You may have activated the Close
of the TV screen.
Caption feature on the TV, and
put that feature into Text mode.
The TV screen is all blue.
You may have connected the
receiver to an incorrect input
connection on the TV for the
signal output from the receiver.
4
Make sure that the TV brightness and contrast
are adjusted correctly, and that the TV is
working properly.
Make sure that the TV is connected properly to
the receiver.
Check other nearby electrical devices as
possible sources of interference. Check that all
required coaxial cables are in place. Check
for moisture or water leaking in all connections.
Dry them out if needed, then seal them with
coaxial cable sealant. Check the dish-toreceiver cable run length; if it is over 30m,
call your dealer or professional installer. Make
sure that the satellite dish is aimed at the
satellite. Check the strength of the signal using
the Point Dish and Signal Strength menu. If
necessary, contact your installer to re-aim the
dish to obtain the maximum possible signal
strength.Check the dish mount, tightening the
bolts if needed.
Using the TV remote control and/or menus
displayed by the TV (not the receiver remote
control or the menus displayed by the receiver),
deactivate the Close Caption feature.
Check your TV owner’s manual for the correct
TV input connection to use for the signal output
from the receiver.
USING THE MENUS
What is Happening
You were using a menu, and
it suddenly closed, taking you
back to the program you
were watching.
Possible Reasons Why
What to Do
Start over again.
The menus have a time-out
feature that closes any menu after
several minutes of no activity.
This will discard any changes you
have made, but otherwise does no
harm to the receiver.
USING THE PROGRAM GUIDE OR THE BROWSE BANNER
What is Happening
Possible Reasons Why
What to Do
Try displaying the Program Guide again later.
You try to display future
The Program Guide and Browse
By that time, it may show programs for the time
programs in the Program
Banner can display programs
Guide or Browse Banner,
scheduled for an extended, but not and date you want.
but find you cannot.
unlimited time beyond the
present.
You try to display past
The Program Guide and Browse Contact the program providers for information
on past programs.
programs (programs that have Banner can display only
ended) in the Program
programs that have not yet ended.
Guide or Browse Banner,
These features cannot display a
but find you cannot.
time earlier than the present.
You can change the active Favourites List while
When you are using the
You have activated a Favourites
using the Program Guide, by pressing the
Program Guide or Browse List other than the list named
remote control GUIDE button. You can choose
Banner, some channels are
ALL CHAN.
another custom Favourites List or the ALL
missing.
CHAN list, which includes all the channels.
Page 4-5
4100_Ch4_eng
6/15/05
8:36 AM
Page 6
User Guide
CHANGING CHANNELS
What is Happening
Possible Reasons Why
You enter a desired channel
number. The channel
changes, but the new channel
is not exactly the channel you
entered.
You are scanning up or down
through the channels, and
the receiver is skipping
channels that you know you
have purchased.
You may have made a mistake
entering the channel number, or
the channel number you entered
may be invalid.
If so, the channel displayed is the
closest possible to the channel
you entered.
If you were watching a program
and entered the number for a
channel that you have not
purchased, the receiver will
change to the unpurchased
program and allow a purchase or
display a message.
If a Favourites List other than
ALL CHAN is active, the
receiver will skip channels not on
the active list.
What to Do
Carefully retry entering the channel number you
want.
Press the remote control RECALL button to
return to the previous channel number. Select
ALL CHAN as the active Favourites List.
USING FAVOURITES LISTS
What is Happening
You try to change the ALL
CHAN list. The receiver
displays an ERROR message.
You try to make an empty
Favourites List active. The
receiver highlights the
Modify List option.
You try to add a channel to a
Favourites List. The receiver
displays an ERROR message.
Page 4-6
Possible Reasons Why
What to Do
The receiver will not allow you to Choose another list to change.
change the ALL CHAN list.
The receiver will not allow you to Choose another list to use, or add at least one
channel to the empty list.
activate an empty list.
The list is full (that is, it has the
maximum number of channels
allowed in it).
You must delete a channel from the list to make
room for each new channel.
4100_Ch4_eng
6/15/05
8:36 AM
Page 7
Reference
Problems and Solutions Tables
4
SETTING AND USING SECURITY LOCKS
What to Do
What is Happening
Possible Reasons Why
You set a lock (for example, a
lock on programs by ratings),
but the lock does not take
effect.
You forgot your password, so
that you are unable to unlock
the receiver.
You have not locked the receiver.
You must lock the receiver for any lock to take
effect.
You may not have written down
the password, to keep it in a safe
place.
Call Bell ExpressVu Customer Service Call
Centre. You must provide the following
information:(1) your name; (2) your address; 3)
your telephone number; (4) the receiver serial
identification number; and (5) your Bell
ExpressVu Customer Service Call Centre
Personal Identification Number (PIN), if you use
one.
ORDERING A PAY PER VIEW PROGRAM
What is Happening
Possible Reasons Why
Someone orders a pay per
view program without your
permission.
You may have been away from
the receiver, and someone else
used it.
You are not able to order a
pay per view program.
The receiver may not be
connected to an active telephone
line.
The Smart Card credit limit may
have been exceeded.
You find that you are not able
to cancel a pay per view
program.
Your setup includes more
than one receiver. You order a
pay per view program, but it
does not appear via all of the
receivers.
You ordered a pay per view
program, and then decided not to
watch it.
You ordered a pay per view
program, and want it to be
available via all the receivers in
your setup.
What to Do
Lock the receiver to prevent unauthorized pay
per view purchases. Note: You do not have to set
any locks to lock pay per view purchases.
Locking the receiver automatically locks pay per
view purchases. Remember that you are
responsible for all pay per view purchases,
whether or not you authorize such purchases. If
you lock the receiver, then anyone who wants to
order a pay per view program must enter the
password.
The receiver must be connected at all times to an
active telephone connection. If you install two or
more receivers, each receiver must be connected
at all times to an active telephone connection.
Call Bell ExpressVu Customer Service Call
Centre.
You cannot cancel an order for a pay per view
program, whether it was just ordered or ordered
previously.
If you use more than one receiver, you must
order a pay per view program for each receiver.
Page 4-7
4100_Ch4_eng
6/15/05
8:36 AM
Page 8
User Guide
USING THE TELEPHONE FOR VOICE/DATA/FAX
What is Happening
During a telephone call, you
hear “clicks.”
Possible Reasons Why
The receiver may have tried to
call Bell ExpressVu Customer
Service Call Centre in order to
send pay per view purchase
information. When the receiver
found that the telephone was
busy, it automatically
disconnected.
You pick up the telephone to The receiver was calling Bell
make a call, but you do not
ExpressVu Customer Service Call
hear a dial tone.
Centre in order to send pay per
view information. When the
receiver found that the telephone
was picked up, it automatically
disconnected.
Your computer or FAX
The receiver was calling Bell
machine tries to send a FAX ExpressVu Customer Service Call
or modem transmission, but Centre in order to send pay per
fails.
view information. When the
receiver found that a call was
being made on the telephone, it
automatically disconnected. The
FAX or modem found that there
was no dial tone, and canceled
the transmission.
Your computer or FAX
The receiver may have tried to
machine was receiving a
call Bell ExpressVu Customer
FAX or modem transmission, Service Call Centre in order to
but an error occurred.
send pay per view purchase
information during the FAX or
mode call. When the receiver
found that the telephone was
busy, it automatically
disconnected. This generated
“clicks” that caused an error in
the FAX or modem transmission.
Page 4-8
What to Do
You do not have to do anything.
The receiver must be connected at all times to an
active telephone connection. If you install two or
more receivers, each receiver must be connected
at all times to an active telephone connection.
Call Bell ExpressVu Customer Service Call
Centre.
Press the telephone receiver button to hang up.
Release the button to get a dial tone.
Resend the FAX or modem transmission.
Have the sender resend the FAX or modem
transmission.
4100_Ch4_eng
6/15/05
8:36 AM
Page 9
Reference
Problems and Solutions Tables
4
USING EVENT TIMERS
What is Happening
Possible Reasons Why
What to Do
You try to set up an event
timer and the receiver
displays a message noting
that the program is locked.
You must enter the password
before you can create an event
timer for a locked program.
To be able to set up an event timer for the
program, first enter the password.
You try to set up an event
timer and the receiver
displays a message noting
that the program is a pay per
view event.
You must order a pay per view
event before you can create an
event timer for it.
To be able to set up an event timer for the event,
first order it.
You already have set up the
You try to set up an event
maximum number of event
timer, but the receiver
timers.
displays an Error message
giving you the option to
delete an event timer that was
set up earlier.
To be able to set up a new event timer, delete
one of the event timers you set up earlier.
You may have set up a Reminder
Event Timer but what you should
have set up is an Auto-Tune Event
Timer, or a VCR Event Timer.
Remember that a Reminder Event Timer just
reminds you that the program is about to start.
An Auto-Tune Event Timer reminds you and
tunes the receiver to the channel of the program.
A VCR Event Timer reminds you, tunes the
receiver, and starts the VCR.
You set up an event timer for You may have set up a timer with
a program that is repeated
an incorrect frequency.
(such as a regularly
scheduled program), but the
timer does not operate for a
showing of the program.
Remember that a Once event timer operates just
one time. A Mon-Fri. event timer operates
Monday through Friday on the same channel at
the same time. A Daily event timer does the
same, Monday through Sunday. A Weekly event
timer operates once a week on the same channel
at the same time.
You set up an event timer, but The program time may have
the timer does not operate at changed so that the event timer
all.
overlapped another event timer.
The program time may have
changed by more than twentyfour hours.
If the receiver is ON and finds and event timer
overlap, it will display the Event Timer
Scheduling Conflict menu. You must edit or
delete one of the overlapping event timers.
No event timer will operate if the program time
changes by more than twenty-four hours.
You set up a Once event
timer, but the timer operates
at a time different from what
you expect.
The program time changed.
A Once event timer always operates at the actual
time of the program.
You stop the operation of an
event timer for one showing
of a program that is repeated
(such as a regularly
scheduled program), but the
timer operates for the next
showing.
To stop all operations of a repeated event timer,
Stopping the event timer applies
only to the current showing of the you must delete the event timer.
Note: The receiver deletes a Once event timer
program.
when it operates.
You are testing a VCR code
to see if the receiver controls
a VCR.
The VCR does not do the
test.
The VCR may not be turned ON,
there may not be a tape inserted,
the tape may not be rewound, or
the write-protect tab on the tape
may have been removed.
The code you are testing may not
be valid for the VCR.
You set up an event timer, but
the receiver does not tune to
the channel of the program,
or does not record the
program.
Make sure the VCR is turned ON, with a blank
tape inserted on which you want to record, that
the tape is rewound, and that the write-protect
tab on the tape is intact.
Try another VCR code from the table.
Page 4-9
4100_Ch4_eng
6/15/05
8:36 AM
Page 10
User Guide
What is Happening
Possible Reasons Why
You set up a VCR Event
You may not have turned the
Timer, but the VCR does not VCR ON, inserted a tape, or
record the program you want. rewound the tape. Or, the writeprotect tab on the tape may have
been removed.
If you use the receiver back panel
RF of VHF connections in the
wiring setup, you may not have
set the receiver channel 3/4
setting and both the VCR
modulator output and viewing
channel to either 3 or 4.
There may be obstacles between
the receiver and the VCR.
If you set up the VCR Event
Timer using the Create an
Event Timer menu, you may
have selected an Auto-Tune, or
Reminder, instead of a VCR timer.
If you did select a VCR timer, you
may have selected an
inappropriate timer frequency.
If you set up the VCR Event
Timer using the quick record
feature, the timer was one-time
only, and may have missed
another showing of the program.
What to Do
Make sure the VCR is ON, with a tape inserted
on which you want to record, that the tape is
rewound, and that the write-protect tab on the
tape is intact.
If you use the RF of VHF connections, you must
set the receiver channel 3/4 setting and both the
VCR modulator output and viewing channel to
either 3 or 4.
Remove any obstacles between the receiver and
the VCR.
When you set up a VCR Event Timer, make sure
to select the VCR option in the Timer Type list
on the Create an Event Timer menu. Also,
make sure to select the proper option in the
Timer Frequency list on this menu.
Remember that you can set up a Once (one-time
only) timer using the quick record feature.
You edit an automatic event
timer. The timer does not
start or does not end
according to the program for
which you set the timer.
Editing an automatic event timer If you want an automatic event timer to start and
stop according to a specific program, avoid
converts it to a manual event
editing that event timer.
timer. Such a timer starts and
stops at the times you specify, not
the start and stop times of any
specific program.
You try to set up a manual
event timer. The receiver
displays an Error message.
You may have tried to set a
manual event timer with invalid
start or stop times.
The receiver does not display The receiver may not be able to
display a program name for a
the program name for a
manual event timer.
manual event timer.
You set an event timer. The
event timer misses the
beginning or the end of a
program.
Page 4-10
The program may have started a
little earlier than scheduled, or it
may have run over its scheduled
ending time.
Review the rules on start and stop times for
manual event timers.
Use the Program Guide or a printed schedule
to find the program name.
Use the Start 1 min. early option to start any
event timer one minute early, except for a pay
per view event.
Use a manual event timer to start any event timer
at the times you set yourself, except for a pay
per view event.
4100_Ch4_eng
6/15/05
8:36 AM
Page 11
Codes
4
DEVICE CODES FOR PROGRAMMING THE REMOTE
These tables contain the manufacturer codes for programming the remote to control your TV, VCR, DVD player, or audio amplifier. Every
attempt has been made to include all codes. If your device brand is not listed or if the codes do not work, the remote may not control your
device. In some cases codes may operate some but not all buttons shown in this guide.
TV Codes
Programming in AUX mode:
Press 0 before entering the TV code.
A Mark
Action
Admiral
Aiko
Aiwa
Akai
A-Mark
Amtron
Anam National
AOC
Apex
Archer
Audiovox
Bell & Howell
Broksonic
Capehart
Citizen
Classic
Colortyme
Contec/Cony
Craig
Crown
Curtis Mathes
Daewoo
Daytron
Dimensia
DISH Network
Dixi
Dumont
Echostar
Electrohome
Emerson
Envision
Fisher
Fujitsu
Funai
GE
Goldstar
Gradiente
670
662
514, 521, 605, 668, 669, 675
727
751
570, 573, 659, 660
620
657
509, 541, 620, 651,
657, 661, 663, 698
505, 506, 519, 520, 573, 620,
627, 652, 653, 654, 659, 664,
665, 670, 672
743, 744, 745
620
620, 657, 662, 672
590, 669, 675
752, 659, 661, 748
519, 627
506, 516, 523, 524, 525, 526,
590, 652, 654, 657, 658, 680,
727
659
573, 627, 652, 654, 660, 667,
668, 671, 674, 679, 681
541, 655, 657, 661, 662, 726
536, 541, 657, 661, 662, 666,
667, 694
526, 536, 657, 666, 670
506, 516, 526, 573, 590, 641,
645, 650, 652, 654, 658, 659,
660, 664, 665, 667, 668, 670,
674, 680, 703, 708
505, 524, 526, 529, 530, 531,
573, 652, 653, 654, 658, 659,
663, 664, 665, 670, 672, 674,
684, 698, 719, 727
526, 627, 652, 654, 658, 665,
670, 672
645, 650
742
566, 620
501, 627, 652
722
526, 573, 651, 652, 654, 656,
659, 660, 665, 670, 709, 728
526, 534, 535, 536, 537, 538,
539, 541, 573, 590, 627, 636,
642, 648, 652, 654, 655, 657,
658, 659, 660, 661, 662, 665,
666, 667, 669, 670, 677, 679,
682, 692, 696, 699, 720
506, 573, 652, 654, 660, 664
542, 590, 683
534, 682, 694
534, 541, 657, 661, 662, 677,
682, 694
508, 509, 543, 544, 630, 645,
646, 650, 651, 652, 654, 659,
661, 663, 665, 667, 668, 670,
673, 676, 681, 690, 691, 698,
701, 715, 716, 725, 728, 742
505, 523, 526, 545, 546, 566,
573, 652, 653, 654, 655, 656,
658, 659, 660, 664, 665, 670,
671, 678, 693, 730, 747
660, 671
Granada
Grundig
Hallmark
Harman Kardon
Hinari
Hitachi
Infinity
JBL
JC Penney
Jensen
JVC
Kawasho
Kenwood
Kloss Novabeam
Konka
KTV
Lloyds
Loewe
Logik
Luxman
LXI
Magnasonic
Magnavox
Majestic
Marantz
Megatron
Memorex
MGA
Mitsubishi
Montgomery Ward
Motorola
MTC
Multitech
NAD
National
NEC
Nikkai
Nikko
Onwa
627, 670, 671
670, 673
627, 652, 654, 659
561, 659
534
523, 526, 548, 549, 553, 554,
555, 585, 597, 626, 636, 638,
643, 648, 652, 654, 655, 665,
668, 669, 670, 672, 673, 702,
718, 726
666, 671
566, 671
505, 506, 516, 525, 526, 543,
546, 631, 645, 646, 650, 652,
653, 654, 658, 659, 664, 667,
668, 670, 673, 676, 678, 680,
690, 691, 701, 725, 726, 728,
730
556, 573, 652, 654, 660
508, 557, 559, 642, 649, 655,
667, 673, 676, 726, 735, 736,
737
548, 561, 573, 652, 654, 664
506, 573, 652, 654, 656, 659,
660, 664, 679, 681
657, 663, 698, 723, 724
753
526, 539, 541, 573, 657, 658,
661, 662, 664, 665, 670, 696,
627, 679
566
675
523, 652, 654,
563, 566, 590, 595, 667, 631,
635, 645, 646, 650, 654, 659,
668, 678, 683, 691, 701, 725
573, 659, 660, 669, 672, 677
506, 520, 525, 536, 566, 567,
568, 573, 610, 652, 654, 656,
659, 660, 664, 665, 666, 669,
671, 673, 674, 677, 723, 724,
729
675
506, 566, 573, 652, 654, 660,
664, 665, 671, 678, 681
627, 654
590, 627, 653, 654, 659, 675
678, 720
504, 505, 506, 542, 571, 573,
627, 652, 653, 654, 656, 660,
728
504, 505, 542, 570, 571, 572,
573, 597, 623, 627, 652, 653,
654, 656, 659, 660, 664, 665,
670, 671, 705, 728
675
521, 605, 651
505, 506, 516, 523, 573, 627,
652, 653, 654, 659, 664, 667,
672, 680
657
502, 617, 627, 631, 635, 637,
654
509
505, 506, 507, 517, 523, 573,
627, 651, 652, 653, 654, 660,
664, 665, 679, 681, 731, 732
612
654, 672, 727
541, 657, 661
Optimus
Optonica
Orion
Osaki
Panasonic
637
521, 605, 607
694
612
508, 509, 510, 512, 566, 644,
651, 662, 663, 668, 672, 673,
676, 685, 689, 698, 700, 716,
234, 247
Philco
505, 506, 525, 536, 568, 573,
610, 651, 652, 653, 654, 655,
656, 659, 660, 664, 665, 666,
669, 671, 672, 674, 677, 723,
724, 729
Philips
525, 566, 651, 652, 655, 656,
671, 690, 723, 724, 729
Pioneer
502, 548, 576, 636, 637, 648,
652, 654, 663, 665, 681, 708
Portland
505, 526, 573, 652, 654, 658,
659, 664, 665, 670, 727
Price Club
680
Prism
676
Proscan
645, 646, 650, 668, 691, 725,
742
Proton
513, 519, 526, 536, 585, 627,
652, 654, 655, 659, 660, 665,
666, 668, 670, 678
Quasar
508, 509, 651, 663, 673, 676,
698, 700, 747
Radio Shack/Realistic 526, 541, 590, 607, 612, 645,
650, 652, 654, 655, 657, 658,
661, 662, 663, 668, 670, 683,
698, 730
RCA
503, 505, 548, 586, 630, 633,
634, 636, 641, 645, 646, 648,
650, 651, 652, 653, 654, 656,
661, 663, 665, 667, 668, 670,
681, 691, 698, 701, 708, 715,
716, 725, 742, 749
Realistic
590, 645
Runco
501
Sampo
506, 519, 652, 654, 658, 663,
664, 665, 698, 730, 746
Samsung
505, 506, 516, 523, 526, 566,
573, 612, 627, 647, 652, 653,
654, 655, 656, 658, 659, 664,
665, 667, 669, 670, 679, 680,
704, 717, 730, 738
Sansui
754
Sanyo
542, 590, 652, 683
SBR
566
Schneider
566
Scott
526, 534, 537, 541, 600, 652,
654, 655, 657, 661, 662, 665,
670, 677, 682, 696, 701
Sears
523, 534, 542, 563, 590, 595,
601, 604, 617, 627, 631, 635,
645, 646, 650, 652, 654, 656,
659, 661, 668, 670, 682, 683,
688, 691, 703, 725, 726
Sharp
521, 526, 585, 605, 607, 628,
629, 652, 654, 655, 658, 669,
670, 674, 679, 739, 740, 741
Signature
675
Solavox
612
Sony
500, 578, 640, 670, 690
Soundesign
525, 536, 541, 627, 652, 654,
657, 659, 661, 665, 666, 682
Starlite
657
Supra
523
Sylvania
506, 525, 536, 566, 568, 569,
Page 4-11
4100_Ch4_eng
6/15/05
8:36 AM
Page 12
User Guide
DEVICE CODES FOR PROGRAMMING THE REMOTE
573, 600, 610, 652, 654, 656,
659, 660, 664, 665, 666, 671,
672, 674, 677, 723, 724, 729,
733
Symphonic
632, 657, 662, 677, 692, 694
Tandy
521, 605
Tatung
509, 651, 663, 698,
Technics
508, 673, 676
Techwood
523, 573, 652, 654, 660, 676
Teknika
504, 505, 512, 516, 523, 524,
525, 526, 534, 536, 541, 573,
644, 652, 653, 654, 655, 657,
658, 661, 662, 664, 665, 666,
670, 672, 675, 680, 681, 682,
685, 726, 727
Telefunken
679
Toshiba
516, 590, 617, 631, 635, 667,
678, 680, 683, 688, 750
Totevision
526, 658, 668
Ultra
672
Universal
543, 690
Vector Research
506
Video Concepts
570, 661
Wards
536, 573, 607, 645, 650, 652,
653, 654, 656, 659, 664, 665,
666, 667, 668, 669, 674, 675,
677, 678, 682, 690, 715, 723,
724, 729
White Westinghouse 659, 664, 670, 672, 674
Yamaha
505, 506, 573, 652, 653, 654,
656, 664, 666, 672, 679,
VCR Codes
Programming in AUX mode:
Press 1 before entering the VCR code.
Aiwa
Akai
Alba
Amstrad
ASA
Audiovox
Bell & Howell
Broksonic
Bush
Calix
Canon
Capehart
CCE
Citizen
Colortyme
Craig
Curtis Mathes
Daewoo
Daytron
Denon
Dimensia
Dumont
Electrohome
Emerson
Finlandia
Finlux
Fisher
588, 622, 623
513, 514, 515, 516, 517, 518,
520, 568, 682
546
588
556
676
581
559, 748
589
676
554, 678, 679
546
681
534, 591, 592, 594, 675, 676,
677, 684
592,
591, 658, 675, 676, 681, 685,
687, 688
554, 592, 594, 605, 607, 675,
677, 678, 679, 683, 684
506, 534, 546, 547, 559, 588,
684
546
686
607
549
512, 676, 687
505, 506, 508, 509, 511, 512,
534, 559, 568, 588, 590, 618,
676, 678, 684, 687
549
549, 556, 588
548, 549, 581, 584, 588, 608,
610, 684, 688
Page 4-12
Fuji
Funai
Garrard
GE
Go Video
Goldstar
Goodmans
Gradiente
Granada
Grundig
Harman Kardon
Harwood
Hinari
Hitachi
ITT
JC Penney
Jensen
JVC
Kenwood
KLH
Kodak
Lloyds
Logik
Luxor
LXI
Magnasonic
Magnavox
Marantz
Matsushita
Memorex
MGA
Minolta
Mitsubishi
Motorola
MTC
Multitech
NAD
NEC
Nikko
Noblex
Olympus
Optimus
Optonica
Orion
Panasonic
Pentax
Pentex Research
Perdio
Philco
Philips
Pioneer
Portland
Proscan
Proton
Quasar
Radio Shack
678
588
588
550, 551, 552, 554, 572, 591,
605, 607, 675, 678, 679
557, 558, 620, 685
592, 594, 676, 687, 747
585, 589
588, 687
549, 581
556
568, 592
681
589
536, 538, 539, 540, 588, 595,
597, 680, 682, 686
518
554, 581, 591, 592, 594, 595,
600, 674, 675, 676, 678, 679,
680, 681, 685, 686, 687
595, 680, 682
561, 562, 563, 581, 592, 594,
600, 674, 682, 686
562, 581, 592, 594, 600, 674,
677, 682, 683
681
676, 678
683, 688
589, 681, 685
518
676
685, 687
527, 533, 554, 556, 678, 679,
684, 685
554, 556, 581, 585, 592, 594,
600, 602, 674, 677, 678, 683
678
507, 533, 549, 554, 566, 581,
585, 588, 608, 675, 676, 678,
686, 687, 688
512, 567, 568
595, 680, 686
512, 562, 567, 568, 570, 571,
595, 680, 687
678
544, 588, 675, 685
579, 588, 675, 677, 681
573
562, 581, 592, 594, 600, 602,
674, 677, 682, 683
676
675
678
676, 687
585
506, 684, 687
523, 554, 598, 614, 628, 633,
678, 679, 684, 685, 688, 747
592, 595, 677, 680, 683, 686
594
588
554, 678, 679, 686
554, 556, 585, 678, 684
562, 573, 574, 575, 576, 600,
674, 680
546, 677
605, 607
685
554, 678, 679, 747
512, 607, 608, 610, 687
Radio Shack/Realistic 581, 584, 588, 608, 675, 676,
678, 679
Radix
676
RCA
518, 525, 527, 528, 591, 595,
605, 607, 615, 631, 649, 675,
678, 680, 686
Realistic
534, 549, 554, 581, 584, 585,
588, 608, 675, 678, 679, 687,
688
Ricoh
502
Runco
533
Saisho
506
Salora
567, 581
Samsung
515, 517, 534, 579, 591, 675
Sansui
544, 562, 600, 674, 682, 685
Sanyo
549, 581, 582, 583, 608, 675,
688
SBR
556
Schneider
589
Scott
508, 534, 559, 590, 684, 687
Sears
548, 549, 581, 584, 595, 608,
610, 676, 678, 680, 683, 684,
686, 687, 688
Sentra
546
Sharp
512, 585, 607, 625
Shintom
589, 595, 681, 685
Singer
678, 681, 685
Sony
500, 501, 502, 504
STS
678
Sylvania
554, 556, 567, 588, 678, 679
Symphonic
588, 594, 683, 688
Tandy
581, 588
Tashiko
588, 676
Tatung
594, 682
Teac
588, 594, 682
Technics
554, 633, 678
Teknika
554, 588, 676, 678, 687
Toshiba
534, 535, 567, 584, 590, 680,
684, 688
Totevision
591, 675, 676, 687
Unitech
675
Vector Research
534, 592, 600, 674, 677, 683
Video Concepts
534, 568, 592, 600, 674, 677,
683
Wards
534, 588, 595, 608, 675, 676,
678, 680, 681, 684, 687, 688
XR-1000
588, 678, 681
Yamaha
581, 592, 594, 600, 674, 682,
683
Zenith
500, 501, 533, 747
TV/VCR Combo
Programming for combination devices:
Program the remote control in TV mode
and then in VCR mode.
Broksonic
Goldstar
Panasonic
Quasar
Zenith
748
747
747
747
747
4100_Ch4_eng
6/15/05
8:36 AM
Page 13
Codes
4
DEVICE CODES FOR PROGRAMMING THE REMOTE
DVD Player Codes
Programming in AUX mode:
Press 1 before entering the DVD code.
Aiwa
Alpine
Apex
Broksonic
Clarion
Classic
Daewoo
Denon
Emerson
Fisher
Funai
GE
Go Video
GPX
Hitachi
JVC
Konka
Koss
Magnavox
Memorex
Mintek
Mitsubishi
NAD
Norcent
Onkyo
Oritron 7
Panasonic
Philips
Pioneer
Proscan
Qwestar
RCA
Sampo
Samsung
Sansui
Sanyo
Sharp
Sherwood
Sony
Sylvania
Teac
Technics
Techwood
Toshiba
Yamaha
Zenith
634, 694, 751
653
654, 655, 743, 744
656, 752
696
695
657
697, 698, 699, 700
658, 701
659
658
702, 703
692, 693
704
632, 635, 660, 705, 706, 707
636, 689, 708, 711
637, 638, 753
745
626, 661
709
710
629
701
762
713
23
639, 662, 663, 714, 715, 716,
717, 734
640, 641
665, 718, 719
720
721, 723
627, 650, 666, 690, 742, 749
724
651, 652, 667, 668, 691, 740,
741
725, 754
643, 726
669, 727, 746
728
617, 644, 645, 670, 671, 729,
730, 731
658
732
733
664
616, 646, 647, 672, 735, 736,
750
737, 738, 739
648, 673
JVC
Kenwood
Luxman
Magnavox
Marantz
NAD
Nakamichi
NEC
Onkyo
Optimus
Panasonic
Pioneer
Proton
Quasar
Radio Shack
RCA
Sansui
Sanyo
Sharp
Sherwood
Sony
Teac
Technics
Toshiba
Yamaha
637, 683, 703, 725
649, 676, 691, 726, 728, 745
752
654, 705, 740
651, 740, 742, 743
739
671, 748, 750
716, 739
642, 660, 662, 678
648, 664, 734, 744, 749
643, 644, 652, 742, 746
658, 667, 668, 679, 702, 734
654, 705
652, 742, 746
744
635, 638, 704, 727
753
741
712, 713, 714, 715, 749
646, 670, 736, 738, 744
639, 645, 650, 687, 728, 729,
730
684, 737
643, 644, 652, 742, 746
710
663, 730, 731, 732, 733, 745,
747
DVD/VCR Combo TV/DVD
Go Video
JVC
RCA
Samsung
692, 693
689
690
667, 691
Combo Codes
Programming for combination devices:
Program the remote control in TV mode and
then in VCR (or AUX - press 1 before
entering the DVD code) mode.
Aiwa
Broksonic
Konka
Panasonic
RCA
Sansui
Toshiba
751
752
753
734
749
754
750
Tuner/Amplifier Codes
Programming in AUX mode:
Press 2 before entering the
tuner/amplifier code.
Aiwa
Carver
Citizen
Curtis Mathes
Denon
Fisher
GE
Goldstar
Harmon Kardon
Hitachi
JBL
636, 641, 656, 687, 718, 720,
724, 725, 726, 775
653
709
734
647, 674
653, 741
711
677, 690
640, 672, 751
717, 754
640
Page 4-13
4100_Ch4_eng
6/15/05
8:36 AM
Page 14
User Guide
Notes
Page 4-14