1
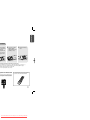
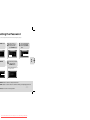
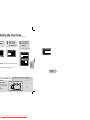
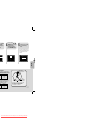
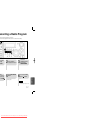
3 DVD MINI
COMPONENT SYSTEM
DVD/VCD/CD/MP3-CD/CD-R/RW
PLAYBACK
MAX-DS990
Instruction Manual
SLEEP
OPEN/CLOSE
DIMMER
DISC SKIP
ZOOM
REPEAT
REMAIN
TUNER
TAPE
SLOW
SUB TITLE
AUX
BAND
TUNING
VOLUME
INFO
MENU
MU
TE
URN
RET
ENTER
TEST TONE
SOUND EDIT
P.SCAN
TIMER/CLOCK
CANCEL
TIMER ON/OFF EZ/VIEW
AH59-01379B
COMPACT
DIGITAL AUDIO
DIGEST
LOGO SLIDE MODE
NTSC/PAL
COMPACT
DIGITAL VIDEO
Downloaded From Disc-Player.com Samsung Manuals
CONNECTIONS
OPERATION
power supply in your house complies with the identification sticker located on the back of your player. Install your
on a suitable base (furniture), with enough space around it for ventilation (3~4inches). Make sure the ventilation slots
o not stack anything on top of the player. Do not place the player on amplifiers or other equipment which may become
the player, ensure the disc tray is empty. This player is designed for continuous use. Switching off the DVD player to
does not disconnect the electrical supply. In order to disconnect the player completely from the power supply,
ug from the wall outlet, especially when left unused for a long period of time.
PREPARATION
PREPARATION
Precautions
SETUP
to lightning could damage the unit.
Do not expose the unit to direct sunlight or other heat
sources.
This could lead to overheating and malfunction of the unit.
RADIO OPERATION
ms, disconnect AC main plug from the
TAPE DECK
Phones
yer during the winter, wait approximately 2 hours
hed room temperature before using.
The battery used with this product contain chemicals that
are harmful to the environment.
Do not dispose of batteries in the general household trash.
2
Downloaded From Disc-Player.com Samsung Manuals
MISCELLANEOUS
m moisture(i.e. vases) , and excess
equipment creating strong magnetic or electric
. Disconnect the power cable from the AC supply if
ns. Your player is not intended for industrial use.
for personal use only.
cur if your player or disc have been stored in cold
PREPARATION
Contents
N
.........................................................................................................................................................................................1
.........................................................................................................................................................................................2
.........................................................................................................................................................................................3
.........................................................................................................................................................................................5
NS
eakers ..............................................................................................................................................................................9
V ........................................................................................................................................................................................11
ve Scan) Function ............................................................................................................................................................12
al Components .................................................................................................................................................................13
,AM and SW(option) Antennas........................................................................................................................................14
.........................................................................................................................................................................................15
.........................................................................................................................................................................................16
gating pages ...................................................................................................................................................................18
.........................................................................................................................................................................................19
ormation ...........................................................................................................................................................................21
k .......................................................................................................................................................................................22
ongs.................................................................................................................................................................................23
.........................................................................................................................................................................................24
.........................................................................................................................................................................................25
ack ....................................................................................................................................................................................27
.........................................................................................................................................................................................28
btitle Language................................................................................................................................................................29
a Scene/Song...................................................................................................................................................................30
k .......................................................................................................................................................................................31
.........................................................................................................................................................................................33
nu......................................................................................................................................................................................34
ge.....................................................................................................................................................................................35
type..................................................................................................................................................................................37
ontrols (Rating Level) .......................................................................................................................................................39
ord.....................................................................................................................................................................................40
per ....................................................................................................................................................................................41
de .....................................................................................................................................................................................43
.........................................................................................................................................................................................44
r Mode ............................................................................................................................................................................45
ne ...................................................................................................................................................................................46
me ...................................................................................................................................................................................47
Quality ..............................................................................................................................................................................49
Dynamic Range Compression) .........................................................................................................................................51
Mode ..............................................................................................................................................................................53
Effect ..............................................................................................................................................................................54
ATION
.........................................................................................................................................................................................55
.........................................................................................................................................................................................56
ette ..................................................................................................................................................................................57
OUS
act Disc ............................................................................................................................................................................60
Program ..........................................................................................................................................................................62
.........................................................................................................................................................................................63
er.......................................................................................................................................................................................64
MODE Function .............................................................................................................................................................65
on / Mute Function...........................................................................................................................................................66
DIMMER Function/ECO Function ....................................................................................................................................67
EL Function/SUB WOOFER LEVEL Function ..................................................................................................................68
hones/Microphone(option) ...............................................................................................................................................69
ng and Storing Discs .......................................................................................................................................................70
Service ..............................................................................................................................................................................71
.........................................................................................................................................................................................73
ogy....................................................................................................................................................................................74
.........................................................................................................................................................................................75
4
Downloaded From Disc-Player.com Samsung Manuals
PREPARATION
anel—
1. SW Antenna Connector (Option)
2.
3.
4.
5.
6.
1
2
3
4
AM Antenna Connectors
FM Antenna Connector
LINE OUT
Sub woofer Control Jack
5.1 Channel Speaker Output
Terminals
7. Voltage Selector (Option)
8. Component Video Output Connectors
Connect a TV with component vide input jacks to
these jacks.
9. Video Output Connector
5
6
7
10 9
Connect the TV's video input jacks (VIDEO IN) to
the VIDEO OUT connector.
10. S-Video Output Connector
If the TV is equipped with an S-Video input
connector (S-VIDEO IN), connect it to the
player's S-Video output jack.
11.
AUX-In
8
essories
OPEN/CL
OSE
DISC
SLEEP
SKIP
DIMMER
ZOOM
REPEAT
SLOW
REMAIN
TUNER
BAND
TAPE
SUB
TITLE
AUX
VOLUME
TUNING
MENU
MUTE
INFO
TEST
TIMER/CLO
TONE
SOUND
CK
TIMER
RETURN
ENTER
EDIT
ON/OFF
AH59-01379B
EZ/VIEW
NTSC/PAL
CANCEL
P.SCAN
DIGEST
LOGO
SLIDE
MODE
Remote Control
Video Cable
Audio Cable
AM Antenna
FM Antenna
User's Manual
6
Downloaded From Disc-Player.com Samsung Manuals
PREPARATION
ote Batteries
ove the battery
r on the back of
emote by
sing down and
g the cover in
irection of the
w.
2
Insert two 1.5V AAA
batteries, paying
attention to the correct
polarities (+ and –).
3
Replace the battery
cover.
ollow these precautions to avoid leaking or cracking cells:
Place batteries in the remote control so they match the polarity:(+) to (+)and (–)to (–).
Use the correct type of batteries.Batteries that look similar may differ in voltage.
Always replace both batteries at the same time.
Do not expose batteries to heat or flame.
Operation of the Remote Control
ntrol can be used up to approximately 23
n a straight line. It can also be operated at
gle of up to 30° from the remote control
To open the remote control cover, push the
top of the cover, then slide downward.
8
Downloaded From Disc-Player.com Samsung Manuals
CONNECTIONS
Speaker (R)
Front Speaker (L)
L
R
Subwoofer
r
SW
Violet
Green
Gray
Blue
White
Red
RS
Rear Speaker (R)
LS
Rear Speaker (L)
he Main Unit
e connecting jacks to
the DVD player.
he colors of the speaker terminals
olors of the connecting jacks.
10
Downloaded From Disc-Player.com Samsung Manuals
P.SCAN (Progressive Scan) Function
like regular Interlace Scan, in which two fields of picture information alternate to create the
tire picture (odd scan lines, then even scan lines), Progressive Scan uses one field of
ormation (all lines displayed in one pass) to create a clear and detailed picture without
ible scan lines.
d P.SCAN button on the remote controller for over 5 seconds in
is Progressive (or Non-Interlaced) Scanning?
an (1 FRAME = 2 FIELDS)
Progressive Scan (FULL FRAME)
deo, a frame consists of two
and even), where each field
horizontal line in the frame.
nating lines is displayed first, and
displayed to fill in the alternating
ield to form a single frame.
d every 1/30th of a second, contains
thus a total of 60 fields are
th of a second.
ing method is intended for capturing
The progressive scanning method scans one full frame of
video consecutively down the screen, line by line.
An entire image is drawn at one time, as opposed to the
interlaced scanning process by which a video image is
drawn in a series of passes.
The progressive scanning method is desirable for dealing
with moving objects.
nction works only on TVs equipped with component video inputs (Y, Pr, Pb) that support
ssive Video. (It does not work on TVs with conventional component inputs, i.e., non-progressive
Vs.)
ding on the brand and model of your TV, this function may not work.
the Video Format
main unit and then press NTSC/PAL on the Remote Control or REC/PAUSE on the Main Unit.
e video format is set to "PAL".
e button is pressed, the video format switches between "NTSC" and "PAL".
has a different video format standard.
ayback, the video format of the disc must be the same as the video format of your TV.
12
Downloaded From Disc-Player.com Samsung Manuals
CONNECTIONS
ding the button for over 5 seconds will select "Progressive Scan" and "Interlace
y.
Connecting the FM, AM(MW) and SW(option) Antennas
If AM reception is poor, connect an
outdoor AM antenna(not supplied).
CONNECTIONS
AM Loop Antenna
(supplied)
pplied)
Snap the tabs on the loop into the
slots of the base to assemble the
AM loop antenna.
Spread the SW aerial out and attach the
ends to a wall, in the position providing the
best reception.
If reception is poor (e.g. distance from
transmitter too great, walls blocking the
radio waves, etc.), install an outdoor aerial.
nnection
antenna supplied to the FM 75Ω
al as a temporary measure.
antenna wire around until you
here reception is good, then
l or other rigid surface.
connect an outdoor antenna.
75Ω coaxial cable (with a standard
connect the supplied FM antenna.
AM (MW) antenna connection
1. Connect the AM loop antenna supplied
to the AM and
terminals.
2. If reception is poor, connect an outdoor
single vinyl-covered wire to the AM
terminal. (Keep the AM loop antenna
connected).
The cooling fan dissipates the heat generated inside the unit so that the unit can be operated
normally. The cooling fan is activated automatically to supply cool air to the unit.
Please observe the following cautions for your safety.
• Make sure the unit is well-ventilated. If the unit has poor ventilation, the temperature inside the unit
could rise and may damage it.
• Do not obstruct the cooling fan or ventilation holes. (If the cooling fan or ventilation holes are
covered with a newspaper or cloth, heat may build up inside the unit and fire may result.)
L
R
+
-
14
+
+
R
L
+
-
Downloaded From Disc-Player.com Samsung Manuals
Disc Playback
Selecting a CD in the Disc changer
The CD function is automatically selected when Disc Skip is pushed.
To select a specific disc, press the corresponding DISC (1, 2, 3) button on the front panel or
DISC SKIP on the remote control, until the required disc indicator flashes.
Result: All the discs will be played in turn, starting with the one selected.
• If you use the DISC (1, 2, 3) function when listening to the radio or to a tape, the
DVD
DVDAUDIO
VCD
CD
OPERATION
system switches automatically to the CD mode.
• If the disc selected is not loaded, the next disc is played automatically.
• Playback starts automatically.
MP3
JPEG
DivX
• Playback starts automatically.
• If the TV is on, a list of MP3s on
the CD will appear on the TV
screen.
Note
• Depending on the content of the disc, the initial screen may appear different.
• Depending on the recording mode, some MP3-CDs cannot be played.
• Table of contents of a MP3-CD varies depending on the MP3 track format recorded
on the disc.
To stop playback,
press STOP during playback.
• If pressed once, “PRESS PLAY” is displayed and the
porarily pause playback,
LAY/PAUSE during playback.
e playback, press PLAY/PAUSE
ain.
•
stop position will be stored in memory. If PLAY/PAUSE
(
) button or ENTER button is pressed, playback
resumes from the stop position. (This function works
only with DVDs.)
If pressed twice, “STOP” is displayed, and if
PLAY/PAUSE (
) button is pressed, playback
starts from the beginning.
16
Downloaded From Disc-Player.com Samsung Manuals
Bonus Group / Navigating Pages
Bonus Group
DVDAUDIO
Some DVD-Audio discs have an extra ‘bonus’ group that requires a 4-digit key
number to access. See the disc packaging for details and the-key number.
When you play a DVD-Audio disc that has a
bonus group, the key number input screen
appears automatically.
OPERATION
KEY NUMBER :
Note
• If you eject the disc, switch the power off, or unplug the player, you will need to re-enter
the key number.
Navigating Pages
During playback, press the
remote control.
DVDAUDIO
button on the
• You can select the desired image from a DVD-Audio disc containing still images.
• With some discs, you may not be able to select images depending on how the
disc was manufactured.
18
Downloaded From Disc-Player.com Samsung Manuals
nute Skip function
yback, press the
,
button.
en about 5 minutes after whenever you press
en about 5 minutes earlier whenever you press
button.
button.
tle Display
SUBTITLE button.
eature Table
ntain the audio and video data; these must be stored on CD in the ISO 9660 format.
SPEC
DivX3.11
Up to the latest VERSION
WMV
WMV V1/V2/V3/V7
MP3
CBR : 80kbps~384kbps
AC3
CBR : 128kbps~384kbps
WMA
CBR : 56kbps~128kbps
MPEGs containing DivX can be divided into Video and Audio.
• Video compatibility : All versions of DivX later than 3.11 (including
the latest 5.1) are supported. In addition, XviD is supported.
For WMV, V1, V2, V3, and V7 formats are possible.
The initial resolution is 720X480 and may support up to 720X576 .
• Audio compatibility : MP3s encoded at bitrates from 80kbps to
384kbps, AC3s from 128kbps to 384kbps, and WMAs from 56kbps
to 128kbps are supported.
• In addition, for subtitles, this unit will support Text format (SMI).
aying the DivX disk, you can play the file with extension of AVI only.
he available DivX audio formats, DTS Audio is not supported.
is not supported for WMV files.
rning a subtitle file to a CD-ROM with your PC, be sure to burn it as an SMI file.
does not playing when its sampling frequency is lower than 32KHz.
the discs recorded in DivX or XviD depending on the way of recording could be
ack not correctly or couldn’t be played back at all.
upport: MPEG1 LAYER3 (BITRATE : 128KBPS~320KBPS , SAMPLING FREQ.:
K/48KHz) .
20
Downloaded From Disc-Player.com Samsung Manuals
OPERATION
press the button, your selection will toggle between “SUBTITLE ON” and “SUBTITLE OFF”.
only one subtitle file, it will be played automatically.
languages are supported.
Fast/Slow Playback
Fast Playback
Press and hold
DVD
VCD
CD
MP3
.
• Each time the button is held down during playback,
the playback speed changes as follows:
OPERATION
Slow Playback
Press SLOW button.
• Each time the button is pressed during playback,
the playback speed changes as follows:
DVD
VCD
DivX
Note
• Reverse slow playback does not work with VCDs and DivX.
• During fast playback of a CD or MP3-CD, sound is heard only at
2x speed, and not at 4x, 8x, and 32x speeds.
• No sound is heard during slow playback and step motion
playback.
22
Downloaded From Disc-Player.com Samsung Manuals
Angle Function
This function allows you to view the same scene in different angles.
DVD
2
Press Cursor
button to move to
ANGLE display.
Press INFO button.
3
Press Cursor , buttons or numeric buttons
to select the desired angle.
OPERATION
1
• Each time the button is pressed, the angle changes as follows:
Note
• The Angle function works only with discs on which multiple angles
have been recorded.
24
Downloaded From Disc-Player.com Samsung Manuals
DVD
VCD
CD
To Select a Repeat Playback Mode
in the Disc Information Screen
1
Press INFO button
twice .
2
Press Cursor button
to move to REPEAT
PLAYBACK display.
•For a VCD or CD,Press INFO
button once.
4
Press ENTER
button.
DVD
VCD
CD
Note
• For MP3 and JPEG discs, you cannot select Repeat Play
from the information display screen.
• For VCD Version 2.0 discs, you can select Repeat Play in
PBC off mode.
26
Downloaded From Disc-Player.com Samsung Manuals
OPERATION
3
Press Cursor
button to select the
desired Repeat
Playback mode.
Zoom Function
This function allows you to enlarge a particular area of the displayed image.
m (Screen Enlarge) Function
ZOOM
2
Press Cursor , ,
, buttons to
move to the area
you want to enlarge.
DVD
3
VCD
Press ENTER
button.
• Each time the button is pressed, the
zoom level changes as follows:
ect Ratio
OPERATION
POSITION
DVD
EZ VIEW button.
button is pressed, the zoom function will switch between On
is played in Wide screen format, black bars at the top and
TV screen can be removed by pressing the EZ VIEW button.
EZ VIEW OFF
on will not work if the DVD is recorded with multi-camera angle format.
s may not disappear because some DVD discs have a built-in horizontal to vertical ratio.
28
Downloaded From Disc-Player.com Samsung Manuals
Moving Directly to a Scene/Song
CD
Moving to a Title/Track
FO button.
1/1
Chapter
, buttons
uttons to select
hapter and
NTER button.
0:00:01
03/05
001/002
0:00:01
1/1
Moving to a Specific Time
5
1/1
3
01/05
025/040
1:17:30
001/040
0:00:01
1/1
Moving to a Specific Time
Press Cursor ,
buttons to move to
time display.
01/05
Press Cursor ,
buttons to move to
Chapter display.
6
Press the numeric
buttons to select the
desired time and then
press ENTER button.
01/05
1/1
028/040
1:30:00
1/1
Note
numeric
• You can press
will be played.
G disc cannot be moved
ormation screen.
n MP3 or JEPG disc, you
to move a folder.
r, press (Stop) and
.
•
on the remote
control to move directly to the desired
title, chapter, or track.
Depending on the disc, you may not
be able to move to the selected title or
time.
30
Downloaded From Disc-Player.com Samsung Manuals
OPERATION
0:00:37
2
Moving to a Chapter
Press Cursor , buttons
or numeric buttons to select
the desired title/track and then
press ENTER button.
igest Function
u can view 9 JPEG images on the TV screen.
ss DIGEST
on during
yback.
2
s will be shown in
s.
Press Cursor , , , buttons
to select the desired image and
then press ENTER button.
• The selected image is played for 5 seconds before moving to
the next image.
OPERATION
the previous or next image with 9 windows, press
.
otate/Flip Function
Cursor
,
,
,
buttons during playback.
button: Flip Vertically
button: Rotate 90°
Counterclockwise
button: Rotate 90° Clockwise
Original Image
button: Flip Horizontally
32
Downloaded From Disc-Player.com Samsung Manuals
Using the Title Menu
For DVDs containing multiple titles, you can view the title of each movie.
Depending on the disc, this function may either not work at all or may work differently.
p mode Press
U button.
2
Press Cursor ,
button to move to
‘Title Menu’.
3
Press ENTER button.
• The title menu appears.
OPERATION
MENU button to exit the setup screen.
34
Downloaded From Disc-Player.com Samsung Manuals
anguage Code List
r the appropriate code number for the initial settings “Disc Audio”, “Disc Subtitle”
or “Disc Menu” (See page 33).
uage
Code
Language
Code
Language
Code
Language
ar
1181
Frisian
1334
Latvian, Lettish
1506
Slovenian
azian
1183
Irish
1345
Malagasy
1507
Samoan
aans
1186
Scots Gaelic
1347
Maori
1508
Shona
aric
1194
Galician
1349
Macedonian
1509
Somali
bic
1196
Guarani
1350
Malayalam
1511
Albanian
mese
1203
Gujarati
1352
Mongolian
1512
Serbian
ara
1209
Hausa
1353
Moldavian
1513
Siswati
aijani
1217
Hindi
1356
Marathi
1514
Sesotho
1226
Croatian
1515
Sundanese
ussian
1229
Hungarian
1358
Maltese
1516
Swedish
arian
hkir
1233
Armenian
1363
1357
Burmese
Malay
1517
Swahili
ari
1235
Interlingua
1365
Nauru
1521
Tamil
ama
1239
Interlingue
1369
Nepali
1525
Tegulu
Tajik
1245
Inupiak
1376
Dutch
1527
1248
Indonesian
1379
Norwegian
1528
Thai
ton
1253
Icelandic
1393
Occitan
1529
Tigrinya
1403
alan
(Afan) Oromo
1531
ican
1257
Hebrew
1408
Oriya
1532
Tagalog
ech
1261
1254
Japanese
Italian
1417
Punjabi
1534
Setswana
Turkmen
lsh
1269
Yiddish
1428
Polish
1535
Tonga
ish
1283
Javanese
1435
Pashto, Pushto
1538
Turkish
man
1287
Georgian
1436
Portuguese
1539
Tsonga
tani
1297
Kazakh
1463
Quechua
1540
Tatar
ek
1298
Greenlandic
1481
Rhaeto-Romance
1543
Twi
lish
1299
Cambodian
1482
Kirundi
1557
Ukrainian
ranto
1300
Kannada
1483
Romanian
1564
Urdu
nish
1301
Korean
1489
Russian
1572
Uzbek
nian
1305
Kashmiri
1491
Kinyarwanda
1581
Vietnamese
Volapuk
que
1307
Kurdish
1495
Sanskrit
1587
sian
1311
Kirghiz
1498
Sindhi
1613
Wolof
nish
1313
Latin
1501
Sangro
1632
Xhosa
ji
1326
Lingala
1502
Serbo-Croatian
1665
Yoruba
oese
1327
Laothian
1503
Singhalese
1684
Chinese
nch
1332
Lithuanian
1505
Slovak
1697
Zulu
36
Downloaded From Disc-Player.com Samsung Manuals
SETUP
Bangla
tan
g the TV Aspect Ratio (Screen Size)
l to vertical screen size ratio of conventional TVs is 4:3, while that of wide screen and high
is 16:9. This ratio is called the aspect ratio. When playing DVDs recorded in different
ou should adjust the aspect ratio to fit your TV or monitor.
✱ For a standard TV, select either "4:3LB" or "4:3PS" option according to
personal preference. Select "16:9" if you have a wide screen TV.
: Select this to view a 16:9 picture in the full-screen
mode on your wide screen TV.
E
• You can enjoy the wide screen aspect.
: Select this to play a 16:9 picture in the letter box
mode on a conventional TV.
B
box)
S
Scan)
SETUP
• Black bars will appear at the top and bottom of the screen.
: Select this to play a 16:9 picture in the pan & scan
mode on a conventional TV.
• You can see the central portion of the screen only (with the
sides of the 16:9 picture cut off).
a DVD is in the 4:3 ratio, you cannot view it in wide screen.
ince DVD discs are recorded in various image formats, they will look different depending on
e software, the type of TV, and the TV aspect ratio setting.
38
Downloaded From Disc-Player.com Samsung Manuals
Setting the Password
ou can set the password for the Parental (rating level) setting.
2
Press Cursor
button to move to
‘Setup’ and then
press ENTER button.
ENTER
n.
5
Enter the password
and then press
ENTER button.
3
Press Cursor button to
move to ‘PASSWORD’
and then press ENTER
button.
SETUP
MENU button.
• Enter the old password, a new
password, and confirm new password.
• The setting is complete.
TURN button to return to the previous level.
NCEL button to cancel the error numeric when you inputting password.
NU button to exit the setup screen.
40
Downloaded From Disc-Player.com Samsung Manuals
ange the Wallpaper
2
Press Cursor
button to move to
‘Setup’ and then
press ENTER button.
to select
ed ‘USER’,
press
5
Press MENU
button to exit the
setup screen.
3
Press Cursor
button to move to
‘LOGO’ and then
press ENTER button.
SETUP
MENU
N button to return to the previous level.
button to exit the setup screen.
42
Downloaded From Disc-Player.com Samsung Manuals
V SYNC Setup
eo may look slower than the audio if it is connected with digital TV.
his case, adjust the delay time of audio to optimal status to fit the video.
ss the MENU button.
pears.
en appears.
Press Cursor , buttons
to move to ‘Audio’ and then
press ENTER button.
• 'Audio' menu appears.
4
Press Cursor
, buttons
to select the Delay Time of
AV-SYNC and then press the
ENTER button.
• You can set the audio delay time between 0 ms
and 300 ms. Set it to the optimal status.
RETURN button to return to the previous level.
MENU button to exit the setup screen.
44
Downloaded From Disc-Player.com Samsung Manuals
SETUP
Cursor ,
buttons
ve to ‘AV-SYNC’ and
ress ENTER button.
2
Setting the Test Tone
ess the Test Tone to check the speaker connections and to adjust the speaker levels.
p mode,
MENU
.
2
Press Cursor
button to move to
‘Audio’ and then
press ENTER button.
3
Press Cursor button
to move to ‘TEST
TONE’ and then press
ENTER button.
• The test tone will be sent to L ➝ C ➝
R ➝ RS ➝ LS ➝ SW in that order.
If the ENTER button is pressed again
at this time, the test tone will stop.
SETUP
RN button to return to the previous level.
U button to exit the setup screen.
Continues to
next page
ng using the TEST TONE button
NE button.
L: Front Speaker (L)
R: Front Speaker (R)
C: Center Speaker
LS: Rear Speaker (L)
SW: Subwoofer
RS: Rear Speaker (R)
Multi-Channel Pro Logic Mode
duced as follows:
or CD, this will work
heck that each speaker is
and that there is no problem.
ne,
E button.
Start
46
Downloaded From Disc-Player.com Samsung Manuals
or button
DELAY
hen press
ton.
4
Press Cursor , ,
, buttons to move
to the desired
speaker and then
press ENTER button.
5
Press Cursor ,
to set the Delay
time.
• You can set the delay time for C
between 00 and 05mSEC and for
LS and RS between 00 and
15mSEC.
SETUP
SPEAKER
is equal to or longer than the
figure, set the mode as 0ms.
the setting according to the table.
d Dc
Delay Time
0 ms
1 ms
2 ms
3 ms
4 ms
5 ms
SPEAKERS
is equal to the distance of Ds
mode as 0ms. Otherwise,
according to the table.
nd Ds
Ideal CENTER
SPEAKER placement
Delay Time
0 ms
3 ms
6 ms
9 ms
12 ms
15 ms
Ideal
SPEAKER
placement
It is desirable to place all speakers within this circle.
Df: The distance from FRONT SPEAKER
Dc: The distance from CENTER SPEAKER
Ds: The distance from SPEAKER
48
Downloaded From Disc-Player.com Samsung Manuals
manually adjusting with the SOUND EDIT button
Speaker Balance
SOUND
button and
ress Cursor
.
DS RT
ST
TUNED
Adjusting Center Speaker Level
Press SOUND
EDIT button and
then press Cursor
, .
Press SOUND
EDIT button and
then press Cursor
, .
2
TITLE
CHAP PRGM RDS RT
ST
kHz
MHz
r Speaker Level
ST
TUNED
TUNED
3
TITLE
CHAP PRGM RDS RT
ST
TUNED
kHz
MHz
kHz
MHz
Adjusting Subwoofer Speaker Level
5
TITLE
SETUP
SOUND
utton and
ess Cursor
DS
Adjusting Rear Speaker Balance
Press SOUND
EDIT button and
then press Cursor
, .
CHAP PRGM RDS RT
kHz
MHz
ST
TUNED
kHz
nt/Rear Speaker Balance
ct between 00 and –06 and OFF.
ecreases as you move closer to –6.
ter/Rear/Subwoofer Speaker Level
evel can be adjusted in steps from +6dB to –6dB.
ets louder as you move closer to +6dB and quieter as you get closer to -6dB.
50
Downloaded From Disc-Player.com Samsung Manuals
DRC” is selected,
ess ENTER.
4
Press Cursor ,
adjust the ‘DRC’.
to
• The
Cursor
button is pressed, the greater the
effect, and the Cursor
button is pressed, the
smaller the effect.
SETUP
TURN button to return to the previous level.
NU button to exit the setup screen.
52
Downloaded From Disc-Player.com Samsung Manuals
Dolby Pro Logic II Effect
his function works only in Dolby Pro Logic MUSIC mode.
s
PL II MODE
n to select ‘MUSIC’
e.
2
Press
PL II EFFECT button
and then press Cursor ,
buttons to select the mode.
• You can select either 0 or 1.
TITLE PBC CHAP PRGM RDS RT
TITLE PBC CHAP PRGM RDS RT
TA
ST
TA
ST
CMX
TUNED
TUNED
kHz
MHz
MPEG
kHz
MHz
PL II EFFECT button
hen press Cursor ,
ns to select the mode.
ST
TUNED
kHz
MHz
DSP TITLE PBC CHAP PRGM RDS RT
TA
CMX
MPEG
ST
TUNED
kHz
MHz
hen playing a DVD disc encoded with two or more channels, multi-channel mode will be
elected automatically and
(Dolby Pro Logic II) button does not work.
: This mode extends the front stereo image to include the surround speakers for
an exciting "wraparound" effect with side wall imaging.
DTH: Sound is output to the center speaker only. The front left and right speakers
produce phantom sound.
: Incrementally adjusts the sound field (DSP) from the front or rear.
54
Downloaded From Disc-Player.com Samsung Manuals
SETUP
TA
Press
PL II EFFECT button
and then press Cursor ,
buttons to select the mode.
• You can select between 0 and 6.
ct between 0 and 7.
TITLE PBC CHAP PRGM RDS RT
4
Presetting Stations
You can store up to:
15 FM stations
5 MW stations
5 SW1 stations
5 SW2 stations
or
15 FM stations
15AM stations
FM 89.1 in the memory
AND)
d select
nd.
2
3
Press
to
select "89.10".
• Refer to Step 2 on page 41
on is pressed,
between
1,2)".
Press the TUNER
MEMORY button.
• “PROGRAM” flashes in the
to automatically or manually
tune in to a station.
display.
PROGRAM
kHz
kHz
MHz
kHz
MHz
MHz
5
ween 1 and
• Press the TUNER MEMORY button before
to
6
Press the TUNER
MEMORY button.
To preset another
station, repeat
steps 2 to 5.
‘PROGRAM’ disappears from the display.
• ‘PROGRAM’ disappears from the display
and the station is stored in memory.
Note
kHz
kHz
MHz
RADIO OPERATION
set
MHz
• When listening AM/SW ,
(Dolby Pro Logic II)
button does not work.
n to a preset station, press
ontrol to select a channel.
on the
56
Downloaded From Disc-Player.com Samsung Manuals
cting the Cassette Playback Mode
component system has three cassette playback modes which
ou to listen to both sides of a cassette automatically. .
RSE MODE until the appropriate
splayed.
de of the selected cassette and then stops.
de of the cassette.
ther side of the cassette and then stops.
des of the cassette indefinitely until you
Counter
assette in one of the cassette
s displayed to enable you to
ounter value at the start of
t playback at the
rack to which you wish to
TAPE DECK
ord a cassette for which you wish to take
alues at the beginning of each track, reset
ng COUNTER RESET .
has a separate counter.
58
Downloaded From Disc-Player.com Samsung Manuals
ecording a Compact Disc
an record a compact disc on a cassette in two different ways:
ed recording
s you to synchronize the start of the recording with the start of the disc or track of your choice
system
sing
/ON.
2
Insert a blank
cassette in Tape 2.
• Press the PUSH/EJECT button (
•
)
to open the cassette door, insert a
cassette, and then close the cassette
door.
Insert the cassette with the safety
tabs.
5
n(
,
)
desired song.
• When stopped, press the button to
start the recording from the first
piece of music.
CD SYNCHRO
button during the playback of CD to
start the recording from the first part
of the music being played.
• Press and hold
Load a compact
disc.
• Press the OPEN/CLOSE button (
)
to open the CD door.
• Insert a CD and press the
OPEN/CLOSE button (
the CD door.
6
) to close
To stop recording,
press button.
Note
•You can use CD/SYNCHRO button
only in CD Playback Mode.
•In Recoding,DPL II doesn’t work.
60
Downloaded From Disc-Player.com Samsung Manuals
TAPE DECK
Press CD SYNCHRO
button.
DVD/CD
on.
3
ecording a Radio Program
can record a radio program of your choice.
do not need to adjust the volume, as it has no effect on the recording.
e system
ssing
Y/ON.
3
Select the
TUNER function
by pressing
TUNER/BAND.
5
Press(REC/PAUSE)
button.
6
To stop recording,
press button.
• REC is displayed in red and
recording starts.
Note
• In Recoding,DPL II doesn’t work.
62
Downloaded From Disc-Player.com Samsung Manuals
MISCELLANEOUS
radio
t you wish
y pressing
N or UP/
2
Insert a blank
cassette in Deck 2.
Canceling the Timer
After having set the timer, it will start automatically as shown by the TIMER indication on the display.
If you no longer wish to use the timer, you must cancel it.
To cancel the timer, press TIMER ON/OFF
once.
•
To resume the timer, press TIMER ON/OFF
again.
PL II
EFFECT
•
TEST TONE
SOUND EDIT
is no longer displayed.
is displayed again.
Note
• You can cancel the timer while the power is on or while the player is in standby.
P.SCAN
MISCELLANEOUS
64
Downloaded From Disc-Player.com Samsung Manuals
leep Timer Function / Mute Function
Sleep Timer Function
You can set the time that the DVD player will shut itself off.
DIMMER
Press SLEEP button.
SLOW
SUB TITLE
• Each time the button is pressed, the selection changes as follows:
AUX
90 MIN ➝ 60 MIN ➝ 45 MIN ➝ 30 MIN ➝ 15 MIN ➝ OFF.
kHz
MHz
NING
PL II
EFFECT
To confirm the sleep timer setting, press SLEEP button.
O
RN
TU
RE
L
•The remaining time before the DVD player will shut itself off is displayed.
•Pressing the button again changes the sleep time from what you have set
earlier.
To cancel the sleep timer, press SLEEP button until
OFF appears on the display.
TEST TONE
SOUND EDIT
P.SCAN
DIGEST
SLIDE MODE
Mute Function
This is useful when answering a doorbell or telephone call.
Press MUTE button.
MISCELLANEOUS
• ‘MUTE ’ appears in the display.
• To turn off mute, press the button again.
kHz
MHz
66
Downloaded From Disc-Player.com Samsung Manuals
MAXX BASS LEVEL Function/SUB WOOFER
LEVEL Function
X BASS Level Function
utilizes the principle of the missing fundamental ,which creates the sensation of
es by generating a carefully calculated series of harmonics designed to simulate
experience caused by the missing fundamental pitch. These harmonics extend the
ncy response up to two-third or 11/2 octaves below the physical speaker cutoff
hout perceived distortion or increased power consumption.MAXX BASS function
ones providing thudding sound effects.
MAXX BASS button on
nt panel to select:
2
You can select the level of low
tones you desire.
M-BASS 2 ➞ M-BASS 3 ➞ M-BASS 4 ➞
Woofer Level Function
sub woofer level with the SUB WOOFER OUT SYSTEM CONTROL Jack.
2
Turn the SUB WOOFER
LEVEL knob to adjust the sub
woofer volume.
68
Downloaded From Disc-Player.com Samsung Manuals
MISCELLANEOUS
POWER ON/OFF
switch on the
r.
Cautions on Handling and Storing Discs
mall scratches on the disc may reduce sound and picture quality or cause breaks in
ayback. Be especially careful not to scratch discs when handling them.
g discs
Do not touch the playback side of the disc. Hold
the disc by the edges so that fingerprints will not
get on the surface.
Do not stick paper or tape on the disc.
g and Storing Discs
When you get fingerprints or dirt on the disc, clean it
with a mild detergent diluted in water and wipe with a
soft cloth.
• When cleaning, wipe gently from the inside to the outside of the disc.
Note
• Condensation may form if warm air comes into contact with cold parts
inside the player. When condensation forms inside the player, the player
may not operate correctly. If this occurs, remove the disc and let the
player stand for 1 or 2 hours with the power on.
ions When Using Audio Cassettes
the tape in the cassette is sufficiently taut.
erasing a cassette that you wish to keep, remove the safety tab on the upper edge of the
o record a cassette, where the tab has been broken, simply cover the opening with adhesive
have finished playing a cassette, always put it back in its case.
cassettes in a clean place, out of direct sunlight, where they will not be exposed to high
es.
120-minute cassettes as they place unnecessary strain on the tape mechanism.
MISCELLANEOUS
70
Downloaded From Disc-Player.com Samsung Manuals
ptom
e and
ot work.
Check/Remedy
• Audio language and subtitles will not work for DVDs not containing
them. And depending on the disc, they may work differently.
not appear even
ction is selected.
• Are you using a disc that does not contain menus?
annot be
• You can play 16:9 DVDs in 16:9 WIDE mode, 4:3 LETTER BOX
mode, or 4:3 PAN SCAN mode, but 4:3 DVDs can be seen in 4:3
ratio only. Refer to the DVD disc jacket and then select the
appropriate function.
not start
• The TAPE function has not been selected.
• The cassette has not been inserted correctly.
• The cassette player has not been closed.
• The tape is either slack or broken.
ff
t erased correctly
wow and flutter
• The audio heads are dirty.
• The rollers or drive capstans are dirty.
• The tape is worn.
adio
• Is the antenna connected properly?
• If the antenna's input signal is weak, install an external FM
antenna in an area with good reception.
s not working.
ower goes out or
heard.)
yer is not
mally.
for longer than 5 seconds.
Using the RESET function will erase all stored settings.
Do not use this unless necessary.
• While the player is in “NO DISC” mode, hold the main unit's TUNING
MODE/ button for longer than 5 seconds. “INITIAL” appears on the
display and all settings will return to the default values.
• Press the POWER button.
Using the RESET function will erase all stored settings.
Do not use this unless necessary.
72
Downloaded From Disc-Player.com Samsung Manuals
MISCELLANEOUS
for rating
forgotten.
• Turn off the power and hold the P.Sound button on the main unit
Notes on Terminology
Recorded onto some DVD discs are scenes which have been simultaneously shot
from a number of different angles (the same scene is shot from the front, from the
left , from the right , etc.).
With such discs, the Angle button can be used to change the angle of view for
specific scenes.
These numbers are recorded on DVD discs. A Title is subdivided into many
sections, each of which is numbered, and specific parts of the video can be
searched quickly using these numbers.
R
R
A high-density optical disc on which high-quality pictures and sound have been
recorded by means of digital signals. Incorporating a new video compression
technology (MPEG-2) and high-density recording technology, a DVD disc
comprises two 0.6 mm thick discs bonded together.
An acronym for Pulse Code Modulation - another name for digital audio.
This is recorded on a video CD (version 2.0). Selected scenes or information can
be chosen from the menu displayed on the TV monitor.
K
)
BER
Both the DVD player and DVD discs are encoded with a region number.
If the region number on the DVD disc does not correspond to the region number
of the DVD player, the player cannot play the disc.
S
Translated appearing at the bottom of the screen. A DVD disc can contain up to
32 subtitle languages.
BER
These numbers are recorded on DVD discs. When a disc contains two or more
movies, these movies are numbered as Title 1, Title 2, etc.
BER
These numbers are assigned to the tracks which are recorded on video and
audio CDs. They enable specific tracks to be located quickly.
D
Contains recordings of pictures and sound whose quality is roughly comparable
to that of video tape.
This player also supports video CDs with playback control (version 2.0).
74
Downloaded From Disc-Player.com Samsung Manuals
MISCELLANEOUS
5.1 (or 6) Channel Digital Surround sound reproduced from DVDs and LDs
recorded as a digital signals (with
disc marking). With better sound quality,
dynamic range, and directionality than traditional Dolby surround technology, you
can enjoy dynamic, realistic sound.
Memo
MISCELLANEOUS
76
Downloaded From Disc-Player.com Samsung Manuals