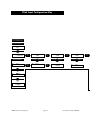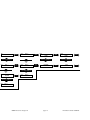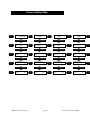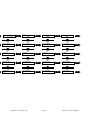
1
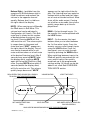
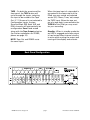
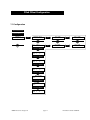
User's Guide and Warranty Information
PRe6
™
Multi-Channel Analog
Pre-Amplifier
Bel Canto Design, LTD.
212 Third Avenue North
Minneapolis, MN 55401
Phone: (612) 317.4550
Fax: (612) 359.9358
www.belcantodesign.com
[email protected]
©2002 Bel Canto Design, LTD
Thank you for purchasing the Bel Canto Design PRe6. As the proud owner of a
PRe6 you can expect high quality performance for years to come. The PRe6 presented in the following pages is designed to maintain very high value, setting the
benchmark for design, quality and sonic accuracy while maintaining our heritage
of musicality and realism.
PRe6
™
Multi-Channel Analog
Control Pre-Amplifier
© 2002 bel canto design, Ltd.
page 2
PRe6 User’s Guide rev082102
Unpacking your new PRe6
PRe6 box contents include the following:
1 (one) - PRe6 Analog Preamplifier
1 (one) - PRe6 User’s Guide
1 (one) - Power cord [6.6’ - 2 meters long]
1 (one) - Remote Control
1 (one) – Warranty Sheet
Carefully unpack each piece and
check for shipping damage. If there is
any damage, or if anything is missing, please contact your dealer, distributor or Bel Canto Design.
IMPORTANT: Save all packing materials as the packing
is specially designed to protect the unit during transportation or
shipping. If the packaging becomes
lost or damaged, please contact your
dealer, distributor or Bel Canto
before attempting to transport your
unit.
Power Connection
This preamplifier, like any electrical
component, can be dangerous and
cause injury unless correct handling
procedures are observed and used.
Before powering this preamplifier it
is necessary to read and follow proper setup and procedures.
The power supply on the PRe6 is preset for the proper national voltage.
The power cable should have the
correct plug for your local power system. If you believe this to not be true,
please contact your dealer immediately.
Warning!
Complete and mail the Owner’s
Registration Sheet immediately in
order to activate your warranty.
Do not connect power to
this preamplifier yet!
© 2002 bel canto design, Ltd.
page 3
PRe6 User’s Guide rev082102
Placement and Initial Setup
Single Ended RCA and Balanced XLR
connectors are available. XLR jacks
allow balanced hookup using the
standard North American pin configuration:
Because the PRe6 runs so cool it can
be placed in many system locations
without compromise. We do not recommend placing weights or other
objects directly on the PRe6. This
may mar or scratch the chassis finish. Do not use harsh chemicals
when cleaning the outside of your
PRe6.
Pin 1 Ground
Pin 2 Input +
Pin 3 Input -
IMPORTANT: Make all connections before powering your unit.
Design Features
The Bel Canto PRe6 represents a new
direction in audiophile grade control
preamplifiers. Its unique and powerful dual zone and multi-channel
options coupled with unequalled 2channel audio performance define a
new genre of control preamplifier:
• Independent display/control and analog transformers and power supplies
for optimum power isolation for sensitive analog circuitry
• Multi-stage power supply regulation
for high isolation from power line
effects
• Precision resistors and film capacitors in signal path
• RS232 port for integration with a
system controller and for easy software updates
• Dual triggers for powering main 2channel and surround amplifiers
• Independent Tape/Zone2 routing
with buffered outputs
• Red/Green LED rear panel indicators to aid in system setup and
cabling
• All analog, low noise, low distortion
architecture for controlling 2 to 8
channel sources: 2-5.1/7.1 inputs, up
to 12 2-channel inputs including 1balanced input
• Fully balanced XLR outputs for driving up to 500 feet of interconnect
• Programmable options for inputs:
function (5.1/7.1, stereo, disable),
name, main level, zone 2 level and
soft mute level
• 4-layer PC board design for optimum signal routing, grounding and
power supply routing
• Latest generation of active audio
buffers, level controls and output
drivers provide superb measured
and subjective audio quality
© 2002 bel canto design, Ltd.
page 4
PRe6 User’s Guide rev082102
Conditioning
The PRe6’s sonic performance will
start to stabilize after approximately
40 hours of continuous power up.
Front Panel and Remote Control
Balance Left - (available from the
remote only) Shifts balance left in
0.5dB increments and reduces the
volume in the opposite channel
equally. Balance increment is visible
on the left side of the display.
Volume Up - Increases the output
gain in 0.5 dB increments from 0 to
100, 100 being maximum gain. Unity
gain is 84.0.
Volume Down - decreases the output
gain in 0.5 dB decrements.
HARD MUTES OUTPUT, DISABLES DISPLAY
AND CONTROLS
VOLUME AND BALANCE CONTROLS AND
NAVIGATION FOR SETUP MENUS
INPUT SELECTION
SHUTS OFF DISPLAY
PRESS 6 TIMES TO
ACCESS SETUP MENUS
CYCLES THROUGH INPUTS
CYCLES THROUGH ZONE 2
AND TAPE OUTPUTS
© 2002 bel canto design, Ltd.
page 5
PRe6 User’s Guide rev082102
Balance Right - (available from the
remote only) Shifts balance right in
0.5dB increments and reduces the
volume in the opposite channel
equally. Balance level is visible on
the right side of the display.
appears on the right side of the display. The listening level can again be
lowered while muted and then taken
out of mute at the desired level. Mute
shuts off the audio output. Coming
out of either mute mode, the volume
quickly ramps back up to the displayed level.
MUTE - When coming out of Standby
the PRe6 starts in Soft Mute. This
volume level can be adjusted in
Configuration (of) Inputs. (This Soft
mute level is shown as the number
of decibels below the current listening level.) Pressing MUTE will first
soft mute the unit. The volume quickly ramps down to the preset soft
mute level and “SOFT” appears on
the right side of the display. The volume can be lowered while in soft
mute and then taken out of soft mute
at the desired listening level. After 3
seconds from pressing MUTE (after
the display dims), pressing MUTE
again will bring the PRe6 out of Soft
mute. Pressing MUTE twice within 3
seconds (before the display dims)
will fully mute the unit. The volume
quickly ramps down and “MUTE”
PRESS ENTER 4 TIMES OR HOLD FOR 2 SECONDS
TO ACCESS INPUT CONFIGURATION MODE
SOFT AND FULL MUTE FUNCTIONS
MAIN – Cycles through inputs. On
the remote, this is accomplished with
the LOOP button
INPUT – On the remote, the input
buttons allow you to select between
the 1st five active inputs. From the
remote, you can cycle through inputs
using the LOOP button. From the
front panel, you can cycle through
inputs by pressing the MAIN button.
When switching between inputs, the
PRe6 will quickly ramp down the volume, switch inputs, then quickly
ramp back up to the programmed
volume setting. All inputs can be disabled if not used. See CONFIGURATION INPUTS section.
VOLUME CONTROL*
INPUT SELECTION*
SELECT TAPE INPUT*
HARD MUTES OUTPUT, DISABLES DISPLAY AND CONTROLS
*ALSO USED FOR NAVIGATION WHEN IN INPUT CONFIGURATION MODE
© 2002 bel canto design, Ltd.
page 6
PRe6 User’s Guide rev082102
When the tape input of a tape deck is
connected to the tape output of the
PRe6, you may record any selected
source (CD, Phono, Tuner, etc) except
the TAPE input. When the tape output of a tape deck is connected to the
TAPE IN of the PRe6 you may monitor your recording.
TAPE – On both the remote and the
front panel, the TAPE button will
cycle through the inputs, selecting
the input to be routed to the Tape
Out. If 7.1 Surround is not selected in
Configuration Inputs, the two
Surround Back (SB) (both XLR and
RCA) channels will automatically be
configured as Zone 2 and routed
along with the Tape Output selection
(for further explanation on ZONE2,
please see page 10).
Standby - When in standby mode the
red LED is engaged and audio output
is hard muted. Most internal circuitry
is active while muting the output and
turning off the display and controls.
NOTE: Tape Out and ZONE2 route
the same input.
Back Panel Configuration
© 2002 bel canto design, Ltd.
page 7
PRe6 User’s Guide rev082102
PRe6 Setup and Options
arrow buttons: CONFIGURATION (of)
INPUTS, CONFIGURATION (of) OFFSETS, SAVE CONFIG? and ERASE
CONFIG?.
Factory Configuration:
The PRe6 has the following factory
input settings:
Input 1: 5.1 Surround
Input 4, 5 and 6: Stereo
Input 7: 5.1 Surround
Input 10: Stereo
Input 11: Stereo
TAPE: Stereo
CONFIGURATION (of) INPUTS:
Using the down arrow button, CONFIGURATION (of) INPUTS menu
allows you to customize your PRe6 in
the following ways: Define Input
(5.1, 7.1, Stereo, Disable), Name
Input, Set MAIN Volume, Set
SoftMute Vol(ume), Set Zone2
Volume. Press ENTER to edit a given
setting, adjust setting using the UP
and DOWN arrow buttons and press
ENTER again to exit edit mode.
Modifying Factory Configuration:
Press the ENTER button on the
remote eight times or press and hold
the ENTER button on the front panel
for two seconds to engage
Configuration Mode.
CONFIGURATION (of) OFFSETS:
Configuration Mode allows you to
customize individual inputs/channels.
Navigation is accomplished with the
UP and DOWN and down arrow button to select menu options, and the
RIGHT and LEFT arrow buttons to
select the input you wish to change
(See pages 10-14). If you are called
away for more than 30 seconds while
in Input Configuration mode, the unit
will exit Input Configuration mode.
Your changes will remain in memory
(but won’t take affect) until either the
unit is shut off (deleting the changes)
or you reenter Input Configuration
mode and finish your adjustments,
then SAVE (see below).
The CONFIGURATION OFFSETS
menu allows for adjustment of the
Surround Sound speaker levels. The
RIGHT and LEFT arrow buttons allow
you to select either Surround Input.
As you press the down arrow button,
selection options are: Center, LFESub, Left Surround, Right Surround.
If 7.1 Surround is enabled, Sur Left
Back and Sur Right Back will also be
available. Surround levels can be
adjusted +10 to –20 dB in relation to
the front main speakers. Press
ENTER to edit a given setting, adjust
setting using the UP and DOWN
arrow buttons and press ENTER
again to exit edit mode.
Top Level Menu
The Top Level menu screen has four
options selectable using the right/left
© 2002 bel canto design, Ltd.
page 8
PRe6 User’s Guide rev082102
SAVE CONFIG ?
and will be skipped when cycling
through inputs, as they now are
defined as being part of Input 1. On
the back panel of the unit, these
numbered inputs are also labeled
according to their Surround Speaker:
Input 1 - F for Front left and right.
Input 2 - C for center and LFE for subwoofer. Input 3 - S for surrounds and
Input 4 - SB for Surround Back. You
will notice that inputs 6-9 follow a
similar format. Green LEDs on the
back panel show which inputs are
selected to aid in cable connection.
After you have edited your settings,
you must SAVE your settings by
using the UP or DOWN arrow keys in
the SAVE CONFIG? screen. Or you
can press ENTER at the Configuration
Input screen, which will bring you to
the SAVE CONFIG? screen, then use
the UP/DOWN arrow buttons to select
SAVE YES/NO and then press ENTER.
ERASE CONFIG ?
This will reset your PRe6 to the factory settings, use the UP/DOWN arrow
buttons to select ERASE YES/NO and
then press ENTER.
Disable:
When cycling through inputs from
both the front panel and remote,
selecting DISABLE deactivates an
input and removes it from the menu.
CONFIGURATION (of) INPUTS
Define Inputs:
Edit Input Name:
The input definition screen allows
you to set up and assign all available
inputs. Using the RIGHT and LEFT
arrow keys allows you to cycle
through all available inputs.
Input selections can be labeled with
up to 8 characters consisting of
upper and lower case letters, a space
and numbers 0-9. Press ENTER to
edit Input Name. A cursor will
appear. Use the RIGHT and LEFT
arrow buttons to move cursor. Use
the UP and DOWN arrow buttons to
select the letters and numbers of
your choice. Press ENTER again to
exit Edit mode.
Available inputs will depend on
Surround Sound modes chosen.
Inputs 1 and 7 can be configured for
multi-channel use, either 5.1 or 7.1,
in addition to Stereo or Disabled.
Surround Sound modes make use of
adjacent inputs on the back panel as
necessary.
Set MAIN Volume:
Each individual input can be adjusted
in .5 dB steps to match levels from
various source components when
selected (factory default is 65). Use
For instance: If you set Input 1 to 7.1
Surround, Input 1 now controls
Inputs 1, 2, 3 and 4. When you define
Input as a Surround format, inputs 2,
3 (and 4 if you chose 7.1 surround)
will no longer be available separately
© 2002 bel canto design, Ltd.
page 9
PRe6 User’s Guide rev082102
Zone 2 Function
the RIGHT and LEFT arrow keys to
select the desired input and then
press ENTER to adjust level. Use the
UP and DOWN arrow keys to adjust
volume level accordingly and press
ENTER again to exit.
When a 7.1 input is not enabled in
Configuration Inputs, the SB
(Surround Back) outputs (both RCA
and XLR) are used as an additional
volume controlled output for use in a
second zone. If you have an external
volume control for your second zone,
adjust Zone 2 volume level to 84.0
(unity gain) for proper output to Zone
2. Input selection for Zone 2 is
accomplished using the TAPE button
found on both the remote and front
panel. The red LEDs on the back
panel will indicate which source is
selected for TAPE/Zone 2 for output
(XLR and RCA). As you continue to
press the TAPE button, the display
will cycle through the various inputs
that will be routed to the TAPE/Zone
2 output.
Set Soft Mute Offset:
The volume level for Soft Mute is
preset to - 20 dB below the current
volume level. Press ENTER to adjust
the desired input. Use the UP and
DOWN arrow keys to adjust setting
preferences and press ENTER again
to exit.
Set Zone 2 volume:
Located at the bottom most
Configuration Input screen, you will
the find Zone 2 volume settings.
ZONE 2 has been preset to 65.0.
Press ENTER to edit volume level
using the UP and DOWN arrow keys.
Press ENTER again to exit Zone 2
volume level edit mode.
Specifications
Bandwidth Into >600 Ohms: DC-200KHz
Volume setting for unity gain • 84.0
Signal to Noise Ratio @ 2 Volt RMS • >100 dB A weighted, 20Hz-20kHz
Distortion @ 2 Volt RMS/ 1kHz <0.005%
Input overload: 10 V RMS
Output Impedance: 10 Ohms
Input Impedance: 20K Ohms
Gain: 16dB
Maximum Output Level: 10 V RMS
Idle power draw • 21 Watts
Power Requirements • 110-120 VAC 50-60 Hz or 220-240 VAC 50-60 Hz
Dimensions • 17.5” W x 14.5” D x 4.5” H (445 mm x 368 mm x 114 mm)
Weight: 24lbs. (13 kg)
© 2002 bel canto design, Ltd.
page 10
PRe6 User’s Guide rev082102
PRe6 Offset Configuration
7.1 Configuration
Press Enter Button for 2 Seconds
or Remote Enter Button 8 Times
Press Enter To Edit Any Screen
Configuration
Inputs
Press
LEFT/RIGHT
Button
Press
LEFT/RIGHT
Button
Configuration Offset?
Press UP/DOWN Button
Press UP/DOWN Button
IN 1:
Press UP/DOWN Button
Press
LEFT/RIGHT
Button
Input 1
5.1 SURROUND
Press
LEFT/RIGHT
Button
Save Config?
No
Save Config?
Yes
Erase Config ?
No
Press UP/DOWN Button
Press
LEFT/RIGHT
Button
Erase Config
Yes
?
Press UP/DOWN Button
Input:
Center
1:
0.0
Press UP/DOWN Button
Input:
Subwoofer
1:
0.0
Press UP/DOWN Button
Left Surround
1:
0.0
Input:
Press UP/DOWN Button
Right Surround
1:
0.0
Input:
Press UP/DOWN Button
Sur Back Left
1:
0.0
Input:
Press UP/DOWN Button
Sur Back Right
1:
0.0
Input:
© 2002 bel canto design, Ltd.
page 11
PRe6 User’s Guide rev082102
PRe6 Input Configuration Map
Press Enter Button for 2 Seconds
or Remote Enter Button 8 Times
Press Enter To Edit Any Screen
Configuration
Inputs
Press UP/DOWN Button
IN 1:
Input 1
5.1 SURROUND
Press
LEFT/RIGHT
Button
PRESS ENTER TO
CHANGE CONFIGURATION
IN 1:
Input 1
STEREO
IN 4:
Input 4
STEREO
Press
LEFT/RIGHT
Button
Press UP/DOWN Button
Press
LEFT/RIGHT
Button
IN 4:
Input 4
DISABLED
IN 5:
Input 5
STEREO
Press UP/DOWN Button
Press
LEFT/RIGHT
Button
IN 5:
Input 5
DISABLED
Press
LEFT/RIGHT
Button
IN 6:
Input 6
STEREO
Press UP/DOWN Button
IN 6:
Input 6
DISABLED
Press UP/DOWN Button
IN 1:
Input 1
DISABLED
5.1
SURROUND
Press UP/DOWN Button
IN 1:
Input 1
7.1 CHANNEL
© 2002 bel canto design, Ltd.
page 12
PRe6 User’s Guide rev082102
Press
LEFT/RIGHT
Button
IN 7
Press
LEFT/RIGHT
Button
Input 7
5.1 Surround
IN 10:
Input 10
STEREO
Press
LEFT/RIGHT
Button
Press UP/DOWN Button
Input 7
STEREO
Press
LEFT/RIGHT
Button
Press UP/DOWN Button
IN 7:
Input 7
1
DISABLED
5.1
SURROUND
IN 10:
Input 10
STEREO
BALANCED
STEREO
Press
LEFT/RIGHT
Button
Press UP/DOWN Button
Press UP/DOWN Button
IN 7:
IN 11:
Press
LEFT/RIGHT
Button
BALANCED
DISABLED
TAPE:
TAPE
STEREO
Press
LEFT/RIGHT
Button
Press UP/DOWN Button
Press
LEFT/RIGHT
Button
TAPE
DISABLED
Press
LEFT/RIGHT
Button
Press UP/DOWN Button
Press
LEFT/RIGHT
Button
IN 10:
Input 10
DISABLED
Press UP/DOWN Button
IN 7:
Input 7
7.1 CHANNEL
© 2002 bel canto design, Ltd.
page 13
PRe6 User’s Guide rev082102
Factory Settings Map
Press
LEFT/RIGHT
Button
IN 1:
Input 1
5.1 SURROUND
Press
LEFT/RIGHT
Button
Press UP/DOWN Button
Press
LEFT/RIGHT
Button
Press UP/DOWN Button
Press
LEFT/RIGHT
Button
Set Volume
Input 1
65.0
SOFT MUTE OFFSET
Input 1
-20.0
Press
LEFT/RIGHT
Button
SET ZONE2 Volume
Input 1
65.0
© 2002 bel canto design, Ltd.
Set Volume
Input 4
65.0
Press
LEFT/RIGHT
Button
SOFT MUTE OFFSET
Input 4
-20.0
Press
LEFT/RIGHT
Button
SET ZONE2 Volume
Input 4
65.0
page 14
Press
LEFT/RIGHT
Button
Edit Input Name
IN 5:
Input 5
Set Volume
Input 5
65.0
Press
LEFT/RIGHT
Button
SOFT MUTE OFFSET
Input 5
-20.0
SET ZONE2 Volume
Input 5
65.0
Press
LEFT/RIGHT
Button
Input 6
STEREO
Press
LEFT/RIGHT
Button
Edit Input Name
IN 6:
Input 6
Press UP/DOWN Button
Press
LEFT/RIGHT
Button
Set Volume
Input 6
65.0
Press
LEFT/RIGHT
Button
Press UP/DOWN Button
Press
LEFT/RIGHT
Button
Press UP/DOWN Button
Press
LEFT/RIGHT
Button
IN 6:
Press UP/DOWN Button
Press UP/DOWN Button
Press UP/DOWN Button
Press
LEFT/RIGHT
Button
Press
LEFT/RIGHT
Button
Input 5
STEREO
Press UP/DOWN Button
Press UP/DOWN Button
Press UP/DOWN Button
Press
LEFT/RIGHT
Button
Press
LEFT/RIGHT
Button
Edit Input Name
IN 4: Input 4
IN 5:
Press UP/DOWN Button
Press UP/DOWN Button
Press UP/DOWN Button
Press
LEFT/RIGHT
Button
Press
LEFT/RIGHT
Button
Input 4
STEREO
Press UP/DOWN Button
Press
LEFT/RIGHT
Button
Edit Input Name
IN 1:
Input 1
IN 4:
SOFT MUTE OFFSET
Input 6
-20.0
Press
LEFT/RIGHT
Button
Press UP/DOWN Button
Press
LEFT/RIGHT
Button
SET ZONE2 Volume
Input 6
PRe6 User’s Guide rev082102
65.0
Press
LEFT/RIGHT
Button
IN 7
INPUT 7
5.1 Surround
Press
LEFT/RIGHT
Button
Press UP/DOWN Button
Press UP/DOWN Button
Set Volume
Input 7
65.0
Press
LEFT/RIGHT
Button
65.0
Set Volume
Input 10
65.0
Press
LEFT/RIGHT
Button
SOFT MUTE OFFSET
Input 10
-20.0
Press
LEFT/RIGHT
Button
SET ZONE2 Volume
Input 10
© 2002 bel canto design, Ltd.
65.0
Press
LEFT/RIGHT
Button
Edit Input Name
IN 11:
Balanced
Set Volume
Balanced
65.0
Press
LEFT/RIGHT
Button
SOFT MUTE OFFSET
Balanced
-20.0
SET ZONE2 Volume
Balanced
page 15
65.0
Press
LEFT/RIGHT
Button
Edit Input Name
Tape:
Tape
Press UP/DOWN Button
Press
LEFT/RIGHT
Button
Set Volume
Tape
65.0
Press
LEFT/RIGHT
Button
Press UP/DOWN Button
Press
LEFT/RIGHT
Button
Press UP/DOWN Button
Press
LEFT/RIGHT
Button
Press
LEFT/RIGHT
Button
TAPE
STEREO
Press UP/DOWN Button
Press UP/DOWN Button
Press UP/DOWN Button
Press
LEFT/RIGHT
Button
Press
LEFT/RIGHT
Button
BALANCED
STEREO
Press UP/DOWN Button
Press UP/DOWN Button
Press UP/DOWN Button
SET ZONE2 Volume
Input 7
Press
LEFT/RIGHT
Button
Edit Input Name
IN 10 :
INPUT 10
IN 11:
Press UP/DOWN Button
Press UP/DOWN Button
Press UP/DOWN Button
SOFT MUTE OFFSET
Input 7
-20.0
Press
LEFT/RIGHT
Button
INPUT 10
Stereo
Press UP/DOWN Button
Press
LEFT/RIGHT
Button
Edit Input Name
IN 7 :
Input 7
IN 10:
SOFT MUTE OFFSET
Tape
-20.0
Press
LEFT/RIGHT
Button
Press UP/DOWN Button
Press
LEFT/RIGHT
Button
SET ZONE2 Volume
Tape
65.0
Press
LEFT/RIGHT
Button
PRe6 User’s Guide rev082102
Bel Canto Design, LTD.
212 Third Avenue North
Minneapolis, MN 55401
Phone: (612) 317.4550
Fax: (612) 359.9358
www.belcantodesign.com
[email protected]
©2002 Bel Canto Design, LTD
PRe6™ is a trademark of Bel Canto Design, LTD