1
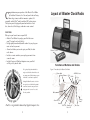
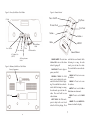
User’s Guide for
iBlasterTM Clock Radio
Model No.
187, 187BK
C
ongratulations on your purchase of the iBlaster Clock Radio
by Excalibur Electronics, Inc. You and your friends will enjoy
hours of great music with this innovative product. It's
compatible with all iPod® models and other MP3 audio systems.
This system provides high quality sound and includes a clock,
date, alarm clock, iPod charger, radio and a remote control.
FEATURES:
Wake up to your favorite tunes on your iPod!
• iBlaster Clock Radio lets you play your iPod videos on
your TV (using the included cables).
• Its high quality sound and adjustable volume lets you play your
music as loud as you want.
• Alarm clock allows you to wake up to your iPod, the radio
or the buzzer.
• Includes a remote control so you can play your music from
across the room.
• Included 5 universal iPod dock adaptors ensure your iPod
will fit perfectly into the dock.
The legendary King Arthur brandished a
magic sword, Excalibur, from which we take
Layout of iBlaster Clock Radio
REMOTE CONTROL
Functions of Buttons and Knobs
Figure 1: Front-side of the iBlaster Clock Radio
Volume Knob
Snooze/Dimmer
our company name. With this unique weapon
in his hand, he could not be vanquished.
iPod
Radio
Although Excalibur Electronics can’t claim
AM/FM/Selector
Sleep
Clock
the magical secrets of Merlin, King Arthur’s
court wizard, sometimes our patented technology may make it seem as if we could.
We make you think.
iPod ® is a registered trademark of Apple Computer, Inc.
2
Dock
Alarm On/Off
Alarm Set
Wake-To Alarm Reset/
Power Off
3
Time Zone
Setting
Knob
Figure 2: Rear of the iBlaster Clock Radio
Figure 4: Remote Control
Power On/Off
S-Video
Play/Pause
Previous Track
Next Track
Volume -
Line-Out Jack
Line-In Jack
AC Adapter Jack
(DC IN)
Video
AM Loop Antenna
Socket
Figure 3: Bottom of the iBlaster Clock Radio
Battery Compartment
Right Mono
Audio
Volume +
Radio
AM/FM
Left Mono Audio
Snooze/Dimmer
POWER ON/OFF: Press to turn
it ON or OFF or to reset the alarm
when it’s going off.
and hold to scan forward while
listening to a song. In radio
mode, press to tune the radio.
Press and hold to scan radio stations.
PLAY/PAUSE: Press to play or
pause your iPod.
VOLUME +: Press to increase
the volume.
TRACK:
In iPod
mode, press to skip to the previous track when the iPod is playing. Press and hold to scan backwards while listening to a song.
In radio mode, press to tune the
radio. Press and hold to scan
radio stations.
PREVIOUS
DST Switch
VOLUME -: Press to decrease
the volume.
AM/FM:
FM
RADIO:
mode.
NEXT TRACK: In iPod mode,
press to skip to the next track
when the iPod is playing. Press
4
Press to select AM or
stations in radio mode.
Press to select
RADIO
SNOOZE: Press to SNOOZE the
alarm or to dim the display.
5
Figure 5: Clock Display
BATTERY LOW
INDICATOR
RADIO FREQUENCY/TIME ZONE INDICATOR
TIME/ALARM
DISPLAY
PM INDICATOR
When installing batteries, be
sure to not mix old and new batteries or mix alkaline, standard
(carbon-zinc) or rechargeable
batteries.
Your remote control requires
one CR2032 3-volt lithium battery (included). To replace the
battery, press the tab on the base
of the remote to the left to
release the battery compartment,
as shown in Figure 6. Pull it out
like you would open a drawer.
Insert the CR-2032 3-volt battery, making sure to match the
polarity (+ and -) with the diagram inside the battery compartment. Push it back, until it locks
securely.
Figure 6:
Remote Control Battery
DAYLIGHT
SAVINGS TIME
ALARM ARMED
WAKE TO
INDICATOR:
IPOD, RADIO,
BUZZER
SLEEP
INDICATOR
IPOD
AM/FM
INDICATOR
INDICATOR
Powering your iBlaster Clock Radio
You power your iBlaster
Clock Radio by using an AC
adaptor (included). To use the
AC adaptor, connect the AC
adaptor to the DC jack located
on the back of the unit. Plug the
AC adaptor into an electrical
outlet.
Your iBlaster Clock Radio
requires two AA batteries
(included) for the clock backup
power. To install batteries, carefully turn it over so that the
iBlaster Clock Radio is upside
down on a soft surface, such as a
towel or magazine. You'll find
the battery compartment on the
unit's base.
Press the side tab and lift to
release the lid of the battery
compartment. Install two AA
batteries, making sure to match
the polarity (+ and -) with the
diagram inside the battery compartment. Replace the lid by
pressing on the side tabs and
returning it to its original position. Release the side tabs once
the lid is secure.
6
How to Use Your iBlaster Clock Radio
Setting Up the iBlaster
Clock Radio
Your iBlaster Clock Radio is
preset to Eastern Standard Time.
To change this setting, use the following instructions.
for approximately two seconds
until the Time Zone Indicator at
the top right corner of the display
shows the current time zone. Turn
the Setting Knob to select the time
zone.
To change the time zone, press
and hold the Time Zone Button
ALS: Alaska
HAI: Hawaii
ATL: Atlantic
EAS: Eastern
CEN: Central
MTN: Mountain
PAC: Pacific
Press the TIME ZONE Button
again to exit this mode. You
Depending
on
whether
Daylight Savings Time (DST) is
in effect, set the DST Switch
located at the bottom of the unit to
+1 or -1 to activate this feature.
Activating the +1 switch will set
the time forward by one hour.
7
should hear two beeps indicating
the TIME ZONE has been set.
play. Be sure to set your alarm
correctly to the AM or PM time. A
PM icon will be shown on the right
of the time display. There is no AM
icon. Now, when the alarm volume flashes at the right top corner
of the display turn the SETTING
knob to set the ALARM volume.
When finished, press ALARM SET
button again. You should hear two
beeps indicating that the ALARM is
set.
Setting the Time and Date
To set the time, press and hold
the CLOCK button for two seconds
until the display flashes. Turn the
SETTING knob (located on the
right side of the unit) until the correct time is shown on the display.
Press the CLOCK button again to
confirm the time. You should hear
one beep indicating that the
CLOCK time is set.
Press the WAKE TO button to
select your iPod, the radio or the
buzzer. A corresponding icon will
show on the top of the display.
Press the ALARM SET button to
confirm your settings. You should
hear two beeps indicating the
alarm is set.
The year at the top right corner
of the display will flash. Turn the
SETTING knob to change it or press
the CLOCK button again to confirm
the year. You should hear one
beep indicating that the year is set.
The date at the top right corner
will flash. Turn the SETTING knob
to change it or press the CLOCK
button again to confirm the date.
You should hear two beeps indicating that the date is set.
Setting the Alarm
To set the alarm, press and hold
the ALARM SET button for two seconds until the display flashes.
Turn the SETTING knob until the
desired alarm is shown on the dis-
Alarm Functions
8
The iBlaster Clock Radio features a “SURE ALARM” function. If the power failure occurs or
the AC cord is accidentally disconnected, your alarm will not be
affected (if you have your backup batteries installed). However,
if back-up power is used in the
event of a power failure, the
iBlaster Clock Radio will default
to the buzzer setting.
This unit also features a
“GENTLE WAKING” function.
This means that when the alarm is
going off, it will gradually
increase in volume.
after it goes off, it will continue to
go off for approximately one hour
and then it will turn itself off. This
cycle will repeat every 24 hours
unless the settings are altered.
First, set the alarm time as
described in the “Setting the
Alarm” section of this manual.
If you choose to wake to an
iPod but there is no iPod installed,
your iBlaster Clock Radio will
default to the buzzer.
NOTE: To wake to your iPod,
your iPod must be properly
docked and off or the alarm will
not work.
If you are waking up to an iPod,
make sure your iPod has an hour’s
worth of songs. If not, set your
iPod to REPEAT mode.
You can change the sound you
want to wake to by pressing the
WAKE TO button.
Sleep Mode
To enter SLEEP mode, press the
button on the iBlaster
Clock Radio. The unit will turn
off after the selected time. SLEEP
mode also features a “GENTLE
SLEEP” function, which will
gradually decrease the volume if
you are listening to your iPod or
the radio.
Press the ALARM ON/OFF button
to arm or disarm the alarm.
SLEEP
When the alarm is going off,
press the POWER OFF/ALARM
/RESET button on the iBlaster
Clock Radio or the POWER
ON/OFF button on the remote control to turn the alarm off. The
alarm will go off again the next
day at the same time.
You can adjust the sleep time
from 120, 90, 60, 30 or 15 minutes by pressing the SLEEP button
again. Pressing the SLEEP button
during the SLEEP mode will reset
the SLEEP time to 15 minutes.
To stop the alarm from going
off the next day, press the ALARM
ON/OFF button to turn the alarm
function off. The ALARM icon and
the WAKE icon will disappear from
the display.
If the
ALARM
is not turned off
9
Once the display changes back
to the current time, press the
SLEEP button to view the amount
remain at that level until you
change the settings.
of SLEEP time remaining. Pressing
it again will change the SLEEP
time to 15 minutes.
If you’d like to stop listening to
your iPod or radio during sleep
ALARM
mode,
press
the
RESET/POWER OFF button on the
iBlaster Clock Radio or the
POWER ON/OFF button on the
remote control.
The iBlaster Clock Radio has
an independent VOLUME setting
for SLEEP mode so you can adjust
the sleeping volume without
affecting the alarm volume. While
in SLEEP mode, turn the VOLUME
knob on the iBlaster Clock Radio
or the VOL + or VOL - on the
remote control to adjust the SLEEP
volume. The SLEEP volume will
Carefully insert your iPod
into the dock (See Figure 8).
turn the
wise.
To remove your iPod from the
iBlaster Clock Radio, carefully
remove your iPod, then remove
the dock adapter by pulling gently upwards.
THIN iPOD
THICK iPOD
NANO
iPod Mini
iPod 3 Gen (10-15 GB)
iPod 3 Gen (20 GB)
iPod 4 Gen (20 GB)
iPod Photo (20 GB)
iPod Video (30 GB)
iPod 3 Gen (30 GB)
iPod 3 Gen (40 GB)
iPod 4 Gen (40 GB)
iPod Photo (40 GB)
iPod Photo (60 GB)
iPod Video (60 GB)
iPod Nano (1 GB)
iPod Nano (2 GB)
iPod Nano (4 GB)
Installing your iPod
Your iBlaster Clock Radio
comes with five removable dock
adapters to ensure your iPod fits
properly in the docking station.
To insert a dock adapter, first
use the table to select the correct
size for your iPod. Due to the
release of newer iPod models,
new dock adapters are subject to
availability.
10
Gently insert the iPod dock
adapter insert into the docking
station.
knob clock-
To change tracks, press the
|<< or >>| button on the remote
control or the iPod.
To turn it
OFF,
press the
button on the iBlaster Clock Radio
or the POWER ON/OFF button on
the remote. Your iPod will continue to charge while docked in
the iBlaster Clock Radio.
ALARM RESET/POWER OFF
Charging your iPod
Your iPod will charge when it
is docked in the iBlaster Clock
Radio.
Figure 7: iPod Dock Adapter Compatibility Chart
MINI
VOLUME
PLEASE NOTE:
iPod Shuffles and other nondocking iPod models will not
charge.
Figure 8: Installing your iPod
Listening to your iPod
After you've installed your
iPod, press the PLAY button on
the remote control or the iPod.
To PAUSE, press the same button.
The VOLUME knob is located on the left side of the unit. To
increase the VOLUME, turn the
VOLUME knob counter-clockwise. To decrease the VOLUME,
11
Listening to a non-docking
iPod or other portable
audio devices
If you are using an iPod without a docking port, MP3 player
or other portable audio device,
you can still play it through the
iBlaster Clock Radio via the
LINE-IN jack.
Before using the
LINE-IN
jack,
make sure an iPod is not docked
in the iBlaster Clock Radio.
placed up to 12 inches away
from the unit for best reception.
You can also rotate the AM
antenna loop to improve reception.
Plug one end of the audio
patch cord (included) into the
headphone or LINE-OUT jack on
your device and the other end of
the patch cord into the iBlaster
Clock Radio LINE-IN jack, located on the back of the unit.
To listen to the radio, first
press the RADIO button on the
iBlaster Clock Radio or on the
remote control. The radio frequency will appear on the top
right corner of the display.
Press the iPod button on the
iBlaster Clock Radio (or
PLAY /PAUSE button on the
remote). The AUX icon will
appear, indicating AUX playing
mode.
Press the AM/FM button on the
iBlaster Clock Radio or on the
remote control to select AM or
FM radio stations.
Turn on and play your device.
Turn the SETTINGS knob on
the iBlaster Clock Radio or the
>> or << button on the remote
control to find your desired station.
Use the VOLUME knob on the
left side of the unit to adjust the
volume.
To turn OFF the unit, press the
button (or the POWER ON/OFF button on the remote). Be sure to
turn off your device as well.
You can connect your iBlaster
Clock Radio to your television
by using the OUTPUT terminals
on the back of the unit. Before
connecting, be sure to set your
iPod video to television. The
OUTPUT terminals output the
video and audio signals shown
on the television.
If your television has an
terminal, connect
your iBlaster Clock Radio to it.
If not, connect it to the video
terminal, as shown in Figure 9.
S-VIDEO INPUT
Figure 9: Connecting your iBlaster Clock Radio to external equipment
Turn the VOLUME knob on the
iBlaster Clock Radio or the
VOL+ or VOL- buttons on the
remote control to adjust the VOLUME.
ALARM RESET/POWER OFF
To turn the radio OFF, press
the ALARM RESET/POWER OFF
button on the iBlaster Clock
Radio or the POWER ON/OFF button on the remote control.
Listening to Radio
To listen to the radio, first
fully extend the FM antenna wire
to improve reception.
NOTE: Do not strip, alter or
attach to other antennas. The
AM antenna loop should be
Connecting your iBlaster
Clock Radio to external
equipment
You can connect the iBlaster
Clock Radio to another linelevel device, such as an amplifier or recording device through
the LINE-OUT jack located at the
back of the unit. The VOLUME
setting on the iBlaster Clock
Radio does not affect the line
level. Adjust the VOLUME
through the device you connect
to.
12
13
Special Care and Handling
• Avoid rough handling such as bumping or dropping.
• Avoid moisture and extreme temperatures. For best results, use
between the temperatures of 39º F and 100º F (4º C and 38º C).
• Clean using only a slightly damp cloth. Do not use cleaners with
chemical agents.
This device complies with Part 15 of the FCC Rules. Operation is subject to the following
two conditions: (1) this device may not cause harmful interference, and (2) this device must
accept any interference received, including interference that may cause undesired operation.
NOTE: This equipment has been tested and found to comply with the limits for a Class B digital
device, pursuant to Part 15 of the FCC Rules. These limits are designed to provide reasonable l
interference in a residential installation. This equipment generates, uses and can radiate radio
frequency energy and, if not installed and used in accordance with the instructions, may cause
harmful interference to radio communications. However, there is no guarantee that interference
will not occur in a particular installation. If this equipment does cause harmful interference to
radio or television reception, which can be determined by turning the equipment off and on,
the user is encouraged to try to correct the interference by one or more
of the following measures:
•
Reorient or relocate the receiving antenna.
•
Connect the equipment into an outlet on a circuit different from that to which the
receiver is connected.
•
•
Increase the separation between the equipment and receiver.
Consult the dealer or an experienced radio/TV technician for help.
Excalibur Electronics reserves the right to make technical changes
without notice in the interest of progress.
14
LIMITED
90-DAY
EXCALIBUR ELECTRONICS, INC.,
warrants to the original consumer that
its products are free from any electrical
or mechanical defects for a period of 90
DAYS from the date of purchase. If any
such defect is discovered within the
warranty period, EXCALIBUR ELECTRONICS, INC., will repair or replace
the unit free of charge upon receipt of
the unit, shipped postage prepaid and
insured to the factory address shown at
right.
The warranty covers normal consumer
use and does not cover damage that
occurs in shipment or failure that results
from alterations, accident, misuse,
abuse, neglect, wear and tear, inadequate maintenance, commercial use, or
unreasonable use of the unit. Removal
of the top panel voids all warranties.
This warranty does not cover cost of
repairs made or attempted outside of the
factory.
Any applicable implied warranties,
including warranties of merchantability
and fitness, are hereby limited to 90
DAYS from the date of purchase.
Consequential or incidental
damages resulting from a
breach of any applicable
express or implied warranties are hereby excluded. Some states do not
allow limitations on the
duration of implied
warranties and do not
allow exclusion of
WARRANTY
incidental or consequential damages, so
the above limitations and exclusions in
these instances may not apply. The only
authorized service center in the United
States is:
Excalibur Electronics, Inc.
13755 SW 119th Ave
Miami, Florida 33186 U.S.A.
Phone: 305.477.8080
Fax: 305.477.9516
www.ExcaliburElectronics.com
Ship the unit carefully packed, preferably in the original carton, and send it
prepaid, and adequately insured. Include
a letter, detailing the complaint and
including your daytime telephone number, inside the shipping carton. If your
warranty has expired and you want an
estimated fee for service, write to the
above address, specifying the model and
the problem.
PLEASE DO NOT SEND
YOUR UNIT WITHOUT
RECEIVING
AN ESTIMATE
FOR SERVICING.
WE CANNOT
STORE YOUR UNIT!
15
EXCALIBUR ELECTRONICS, INC.
13755 SW 119TH AVENUE,
MIAMI, FLORIDA 33186 U.S.A.
Phone: 305.477.8080
Fax: 305.477.9516
Play games live at:
www.ExcaliburElectronics.com
187BK (MA) iBlasterClockRadio 091206 V10