1
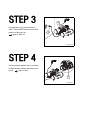
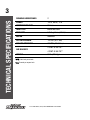
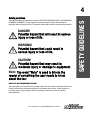
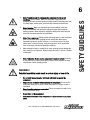
INSTRUCTION MANUAL
058-9308-0
If any parts are
missing or damaged,
or if you have any
questions, please call
1-800-689-9928.
Quick Start Guide
Read and understand this instruction manual
thoroughly before using the product. It contains
important information for your safety as well as
operating and maintenance advice.
Keep this instruction manual for future use. Should
this product be passed on to a third party, then this
instruction manual must be included.
5 U.S. GALLONS (18.9 L)
·
150 PSI (MAX) AIR COMPRESSOR 058-9308-0
QUICK START GUIDE
STEP 1
1
Place the compressor (1) on a flat, even,
2
concrete floor surface or separate concrete
100125
75
5
foundation. Locate the compressor near a
125
15 200
18
225
0
250
150
175
10
100
75 5
150
175
10
25 0
50
15
200
0
225
20 250
50
0
25
0
grounded electrical outlet (2).
page 13, steps 1-2
MC-589308-03
STEP 2
Make sure the drain valves at the bottom of
the tanks are closed. Connect the air hose (1)
to the air line outlet (2) and the air
3
2
125 150
175
10
200
15
1
100
75 5
18 225
50
25 0
250
0
150
125
175
10
100
75 5
15
200
225
20 250
50
0
25
tool (3).
page 16, steps 1-2
0
MC-589308-09
5 U.S. GALLONS (18.9 L) AIR COMPRESSOR 058-9308-0
STEP 3
2
outlet. Turn the ON/OFF switch (2) to the AUTO
position. Let the motor run.
0
0
Plug the power cord (1) into the electrical
125 150
175
10
200
15
100
75 5
18 225
50
25 0
250
0
125
1
150
175
10
100
75 5
15
200
0
225
20 250
50
0
25
0
page 16, steps 3-4
MC-589308-12
MC-589308-12
STEP 4
125 150
175
10
200
15
100
75 5
Turn the pressure regulator knob (1) clockwise
25 0
250
0
to adjust the hose pressure with respect to the
150
175
10
100
75 5
air tool.
18 225
50
125
15
200
0
225
20 250
50
0
25
0
page 16, step 5
125 150
175
10
200
15
100
75 5
18 225
50
25 0
250
0
125
150
175
10
100
75 5
15
200
0
225
20 250
50
0
25
0
1
MC-589308-11
QUICK START GUIDE
TECHNICAL SPECIFICATIONS
3
SAFETY GUIDELINES
4–9
KEY PARTS DIAGRAM
10
IMPORTANT INFORMATION
11–12
ASSEMBLY INSTRUCTIONS
13
OPERATING INSTRUCTIONS
14–17
MAINTENANCE
18–20
TROUBLESHOOTING
21–22
EXPLODED VIEW
23
PARTS LIST
24
WARRANTY
25–26
5 U.S. GALLONS (18.9 L) AIR COMPRESSOR 058-9308-0
TABLE OF CONTENTS
2
TECHNICAL SPECIFICATIONS
3
RUNNING HORSEPOWER
2
POWER
120 V, 60 Hz, 12 A
COMPRESSOR TYPE
Oil-less
TANK TYPE
Black twin tank
TANK SIZE
5 U.S. gallons (18.9 L)
MOTOR
Induction
CUT-IN PRESSURE
120 PSI (8.27 bar)
CUT-OFF PRESSURE
150 PSI (10.34 bar)
5 CFM* @ 40 PSI**
AIR DELIVERY
4 CFM* @ 90 PSI**
52 lb (23.6 kg)
WEIGHT
*CFM: Cubic feet per minute
**PSI: Pounds per square inch
5 U.S. GALLONS (18.9 L) AIR COMPRESSOR 058-9308-0
4
This manual contains information that relates to PROTECTING PERSONAL SAFETY and PREVENTING
EQUIPMENT PROBLEMS. It is very important to read this manual carefully and understand it
thoroughly before using the product. The symbols listed below are used to indicate this information.
DANGER!
Potential hazard that will result in serious
injury or loss of life.
WARNING!
Potential hazard that could result in
serious injury or loss of life.
CAUTION!
Potential hazard that may result in
moderate injury or damage to equipment.
Note: The word “Note” is used to inform the
reader of something the user needs to know
about the tool.
SAFETY RECOMMENDATIONS
These precautions are intended for the personal safety of the user and others working with the user.
Failure to follow these instructions may result in a permanent loss of vision, serious personal, or
even fatal, injury, property damage, and/or tool damage. Please take the time to read and
understand them.
5 U.S. GALLONS (18.9 L) AIR COMPRESSOR 058-9308-0
SAFETY GUIDELINES
Safety guidelines
SAFETY GUIDELINES
5
DANGER!
Potential hazard that will result in serious injury or loss of life.
•
Keep bystanders, children and visitors away from the work area while
operating the compressor. Do not allow children to handle the compressor.
Distractions can affect the control of the compressor.
•
Never point any nozzle or sprayer toward yourself, other people or animals.
Fast moving air may spread dust and debris which are harmful. Always
release air slowly when draining tank or depressurizing the compressor
system.
•
Always shut OFF the compressor, remove the power plug from the electrical
outlet, and release all pressure from the air system, before attempting to
install, service, relocate, or perform any maintenance on the compressor.
•
Never use plastic PVC pipe with the compressor. Failure to comply will result
in serious personal injury or death.
•
Do not operate the compressor if the power cord or plug is damaged. Have
the cord or plug serviced at a qualified service centre.
•
Follow all local electrical and safety codes.
Risk of burns: To prevent burns or other injuries, do not touch the
compressor while operating. Once stopped, allow it to cool before touching.
The compressor parts may be hot even if it is stopped.
•
Motor, electrical equipment and control can produce an
electrical spark that will ignite a flammable gas or
vapour. Never use the compressor in a combustible
environment or in the presence of combustible materials,
such as flammable chemicals, adhesives, gasoline or
solvents, as the internal combustion produces hot exhaust
gases that may ignite flammable materials. Failure to
observe this warning can cause explosion and serious
personal injury or death.
5 U.S. GALLONS (18.9 L) AIR COMPRESSOR 058-9308-0
Oxygen
Hydrogen
Explosive
Combustible
MC-OM-02
•
Risk of electric shock: Do not expose the compressor to rain or wet
conditions. Store it indoors. Make sure the power supply outlet and
grounding wire are grounded properly. Keep the power cord away from heat,
oil, sharp edges, moving parts, chemical spills, solvents and wet floors.
•
Risk of bursting: Make sure the safety relief valve installed in the tank
complies with ASME code and has a setting not higher than maximum
working pressure. Never attempt to adjust the safety relief valve. Keep the
valve free from paint and other accumulations.
•
Risk of fire or explosion: Always operate the compressor in a well-ventilated
area. Do not smoke while spraying paint or insecticides. Never spray
flammable liquids near ignition sources or in a confined area or the area
where spark or flame is present. Keep the compressor as far as possible
from the spraying area and all flammable materials.
•
Never attempt to repair or modify the air tank, as doing so may damage the
tank, resulting in an explosion. Always replace the tank if it is worn, cracked,
or damaged.
•
Risk of inhalation: Do not use the compressor to spray chemicals, as doing
so may affect your lungs by inhaling toxic fumes. Use a respirator in dusty
environment or when spraying paints.
WARNING!
Potential hazard that could result in serious injury or loss of life.
•
Do not allow inexperienced or untrained individuals to operate the
compressor.
•
Stay alert and use caution when operating the compressor. Do not use the
compressor when you are tired or under the influence of drugs, alcohol or
medication.
•
Never leave the compressor unattended. Failure to comply will result in fire
or serious personal injury.
•
Do not stand on the compressor.
•
Make sure all fasteners of the compressor are tightened securely in proper
place.
5 U.S. GALLONS (18.9 L) AIR COMPRESSOR 058-9308-0
SAFETY GUIDELINES
6
7
SAFETY GUIDELINES
CAUTION!
Potential hazard that may result in moderate injury or damage to
equipment.
•
Do not wear watches, rings, bracelets or loose clothing when using the
compressor. Keep your hair, clothing and gloves away from moving parts.
•
Use the compressor only for its intended purpose. Do not alter or modify the
compressor from its original design or function.
•
Always operate the compressor in a stable, secure position to prevent
accidental movement.
•
Do not misuse the power cord. Never use the cord to carry the compressor.
Always use grip handle to move it. Remove the power plug from the power
supply outlet after use.
•
Drain out the moisture from the air tank on a regular basis to prevent
corrosion of the tank. Inspect the tank periodically.
•
Make sure the compressor vibrates normally during operation. If not, stop
the compressor and immediately find the cause of the vibration.
•
Keep the compressor and the work area clean and well lit. A cluttered or
dirty workplace may lead to an accident. Floors should be kept clear.
•
Protect the air hose and electric cord from damage and puncture. Inspect
them weekly for weak or worn spots, and replace them if necessary.
•
Use safety glasses and ear protection.
Wear safety glasses with side shields when operating the
tool and verify that others in the work area are also wearing
safety glasses. Safety glasses must conform to American
National Standards Institute (ANSI Z87.1) requirements and
must provide protection from flying particles from the front
and the sides.
The compressor is loud, and the sound can cause hearing
damage. Always wear ear protection to help prevent hearing
damage and loss. Failure to comply may result in moderate
injury.
5 U.S. GALLONS (18.9 L) AIR COMPRESSOR 058-9308-0
MC-OM-01
8
•
The air tool is not a toy. Careless and improper use of the air tool may result in a serious
accident.
•
Never leave or store the tool with the air hose attached to avoid accidental starting of the tool
and serious personal injury.
•
Protect the air hose from damage or puncture. Keep the air hose away from sharp objects,
chemical spills, oil, solvents and wet floors.
•
Make sure the air hose is free of obstructions or snags. Entangled or snarled hoses can cause
loss of balance or footing, and may become damaged.
•
Inspect the power cord of the air tool and air hose before each use. Ensure that all
connections are proper. Do not use the damaged hose. Have a qualified electrician repair or
replace the damaged part.
•
Stay alert and use proper sense when operating the tool. Do not use the tool when you are
tired or under the influence of drugs, alcohol or medication.
•
Do not overreach. Keep proper footing and balance at all times to enable better control of the
tool in unexpected situations.
•
For personal safety, use an extension cord marked as “W-A” or “W” while operating the tool
outdoors.
•
Maintain the tool with care.
•
Make sure the tool is serviced only by a qualified technician.
•
Store idle tools out of reach of children and other untrained people.
•
Always wear eye protection when using the air tool. If required, use a dust mask, non-skid
safety footwear, a hard hat or hearing protection.
5 U.S. GALLONS (18.9 L) AIR COMPRESSOR 058-9308-0
SAFETY GUIDELINES
SAFETY INSTRUCTIONS FOR USING THE AIR TOOL
9
SAFETY GUIDELINES
ELECTRICAL SAFETY
Grounding instructions: In the event of a
malfunction or breakdown, grounding provides
the path of least resistance for electrical
2
current in order to reduce the risk of electric
shock. This tool is equipped with an electric
cord that has a grounding wire and a
grounding plug (1). The plug must be plugged
1
into a matching power supply outlet (2) that is
properly installed and grounded in accordance
MC-589308-01
with all local codes and ordinances, or a
grounded wall socket, for optimum
performance. The grounding plug has two
flat-blade terminals and a grounding pin.
If the grounding plug does not fit into the outlet, do not try to modify it. Have a qualified electrician
repair the proper outlet.
If the compressor's electrical cord requires repair or replacement, have this done by an authorized,
qualified service technician.
Guidelines for using extension cords
Note: Do not use the extension cord unless it is necessary. It is better to use a longer air hose that
reaches the work area where air is needed.
•
Use only a three-wired extension cord that has a three-prong grounding plug that fits into a
three-slot receptacle.
•
Ensure the extension cord is properly wired and in good electrical condition. Always replace a
damaged extension cord immediately or have it repaired by a qualified technician.
•
Protect the extension cords from sharp objects, excess heat and damp or wet areas.
•
Using extension cords with inadequately sized wires will cause a serious drop in voltage,
resulting in loss of power and tool damage. The smaller the gauge number, the heavier the
extension cord. If in doubt, select the next heavier gauge.
Note: Recycle unwanted materials rather than disposing of them as waste. When the tool is no
longer of use, sort the tool and its components in specific categories and take to the local recycling
center or dispose of them in an environmentally safe way.
5 U.S. GALLONS (18.9 L) AIR COMPRESSOR 058-9308-0
13
12
1
2
11
3
10
125 150
175
10
200
15
100
75 5
18 225
50
25 0
250
0
125
150
175
10
100
75 5
15
200
0
225
20 250
50
0
25
0
9
7
8
4
5
6
MC-589308-02
No.
Description
No.
Description
1
Motor
8
Power cord
2
Air filter
9
Check valve
3
Air tank
10
Air line outlet
4
Drain valve
11
Safety relief valve
5
Outlet pressure gauge
12
ON/OFF switch
6
Pressure regulator knob
13
Grip handle
7
Tank pressure gauge
5 U.S. GALLONS (18.9 L) AIR COMPRESSOR 058-9308-0
KEY PARTS DIAGRAM
10
11
IMPORTANT INFORMATION
General use
This Mastercraft Maximum® 5 U.S. Gallons (18.9 L) Air Compressor is designed to provide compressed
air to power air tools. This compressor is provided with an ON/OFF switch, an air tank and a motor with
automatic reset thermal overload protector.
Air compressor components
Air filter
The filter is attached to the compressor cylinder head for removing impurities from the air intake of
the compressor.
Air tanks
These air tanks are cylindrical components that are used to store the compressed air.
Check valve
This valve is an one-way valve that is connected between the air tank and pressure transfer tube to
prevent backflow of compressed air from the air tank to the compressor pump.
Drain valves
These valves are located at the bottom of the air tanks to drain moisture from the tank.
Pressure regulator knob
The knob can be adjusted to regulate the pressure at the air line outlet of the compressor. Turn the
knob clockwise to increase pressure and counter-clockwise to decrease pressure.
ON/OFF switch
This switch is operated manually to turn ON or OFF the compressor. When switch is in the AUTO
position, the compressor shuts down or starts up automatically based on air pressure level in the air
tank. Always set this switch to OFF position when the compressor is not being used and before
unplugging the compressor.
Pump
The pump is used to compress the air and discharge the compressed air into the air tank through a
reciprocating piston.
5 U.S. GALLONS (18.9 L) AIR COMPRESSOR 058-9308-0
12
This valve automatically gets activated if the compressor does not shut down automatically due to
high pressure in the air tank. To operate manually, pull the relief valve ring to relieve air pressure in
the tank.
Tank pressure gauge
The gauge indicates the pressure level of stored air in the air tank. It cannot be adjusted manually.
Thermal overload protector
This protector will automatically turn OFF the compressor if the temperature of the electric motor
exceeds a predetermined limit. If the thermal overload protector is activated, the motor must be
allowed to cool down before starting.
Outlet pressure gauge
The gauge is used to measure the regulated pressure at the air line outlet.
Effects of moisture in compressed air
Moisture in compressed air will form droplets when passing through the pump. When humidity is high
or when a compressor is in continuous use for an extended period of time, this moisture gets collected
in the air tank. If the compressor is connected to air tools for spraying applications, this water will flow
from the tank through the hose and outside the gun as droplets mixed with the spray material.
In paint spray application, water spots will be formed on painting surface due to condensation. In
sandblasting application, sand clumps will form and clog the gun, thereby causing the gun to be
ineffective.
Note: To reduce the moisture in compressed air, place a filter near the gun.
5 U.S. GALLONS (18.9 L) AIR COMPRESSOR 058-9308-0
IMPORTANT INFORMATION
Safety relief valve
13
ASSEMBLY INSTRUCTIONS
Before assembly
•
Unpack the carton and take out the air compressor. Make sure all parts are present. Inspect
the unit for damage.
•
If any part is missing or damaged, do not attempt to assemble the product. Contact customer
service for replacement parts.
•
Complete a damage claim for replacement parts immediately as there is time limitation.
•
Check the compressor’s serial label to ensure that the correct model was received, and that it
has the required pressure rating (120/150 PSI) for its intended use.
Assembly of the compressor
CAUTION!
Potential hazard that may result in moderate injury or damage to
equipment.
•
1.
To avoid damaging the motor, do not use the compressor in areas
containing dust particles.
Place the compressor (1) on a flat, even,
concrete floor surface or separate
concrete foundation in a clean,
well-ventilated area (fig A).
Note: Make sure the compressor is placed on a
flat surface to ensure proper drainage of the
moisture in the tank.
2.
fig A
1
150175
100125
75
5
10
25 0
15 200
18
225
0
250
50
125
150
175
10
100
75 5
15
200
0
225
20 250
50
0
25
0
Locate the compressor near a grounded
electrical outlet (2) (fig A).
Note: During cold weather, store the
compressor in a heated place when not in use.
This will reduce motor starting problems and
freezing of water condensation.
5 U.S. GALLONS (18.9 L) AIR COMPRESSOR 058-9308-0
2
MC-589308-03
14
WARNING!
Potential hazard that could result in serious injury or loss of life.
1.
•
Do not touch the compressor while operating, as the motor will be very hot.
Allow the compressor to cool before handling or servicing it to avoid skin
burns or other injuries.
•
Do not move or attempt to service the compressor when the air tank is
under pressure.
•
Never use air hose or power cord to pull or move the compressor. If
required, use the handle to move it.
•
Never direct air stream toward yourself or other people standing nearby.
Make sure the ON/OFF switch (1) is in
the OFF position (fig B).
fig B
1
125 150
175
10
200
15
100
75 5
18 225
50
25 0
250
0
125
150
175
10
100
75 5
15
200
225
20 250
50
0
25
0
MC-589308-04
2.
Open the drain valves (1) by turning
them counter-clockwise to permit air to
escape and prevent air pressure
build-up in the air tank during the
break-in period (fig C).
fig C
125 150
175
10
200
15
100
75 5
18 225
50
25 0
250
0
125
150
175
10
100
75 5
15
200
0
225
20 250
50
0
25
0
1
MC-589308-05
5 U.S. GALLONS (18.9 L) AIR COMPRESSOR 058-9308-0
OPERATING INSTRUCTIONS
Break-in procedure
15
Potential hazard that may result in moderate injury or damage to
equipment.
•
3.
Wear safety glasses when opening the drain valves, as the air and moisture
released from the tank can propel debris that may cause eye injury.
Turn the pressure regulator knob (1)
counter-clockwise to reduce the
pressure at the air line outlet (fig D).
fig D
125 150
175
10
200
15
100
75 5
18 225
50
25 0
250
0
125
150
175
10
100
75 5
15
200
0
225
20 250
50
0
25
0
125 150
175
10
200
15
100
75 5
18 225
50
25 0
250
0
150
125
175
10
100
15
75 5
200
1
0
225
20 250
50
0
25
0
MC-589308-06
4.
Plug the power cord (1) into the
electrical outlet (2) (fig E).
fig E
1
125 150
175
10
200
15
100
75 5
18 225
50
25 0
250
0
125
150
175
10
100
75 5
15
200
0
225
20 250
50
0
25
0
2
MC-589308-07
5.
Set the ON/OFF switch (1) to the AUTO
position (fig F).
fig F
1
0
OPERATING INSTRUCTIONS
CAUTION!
125 150
175
10
200
15
100
75 5
18 225
50
25 0
250
0
125
150
175
10
100
75 5
15
200
0
225
20 250
50
0
25
0
MC-589308-08
6.
Allow the motor to run for 30 minutes at
zero PSI under no load conditions.
7.
After 30 minutes, move the ON/OFF
switch to the OFF position and close the
drain valves. The compressor is now
ready for use.
5 U.S. GALLONS (18.9 L) AIR COMPRESSOR 058-9308-0
16
WARNING!
Potential hazard that could result in serious injury or loss of life.
•
Check the manufacturer's maximum pressure rating for air tools and
accessories. The outlet pressure must never exceed the maximum pressure
rating of the air tool.
•
Do not use any storage cover to cover the compressor during operation.
•
Never leave the compressor unattended. Failure to comply will result in fire
or serious personal injury.
1.
Make sure the drain valves are closed.
2.
Connect an air hose (1) to the air line
outlet (2). Then connect the air hose to
an air tool (3) (fig G).
fig G
3
2
1
125 150
175
10
200
15
100
75 5
18 225
50
25 0
250
0
125
150
175
10
100
15
75 5
200
225
20 250
50
0
25
0
MC-589308-09
3.
4.
Turn ON the power supply to the
compressor. Set the ON/OFF switch (1)
to the AUTO position (fig H).
fig H
1
Let the motor run.
125 150
175
10
200
15
100
75 5
18 225
50
25 0
250
0
125
150
175
10
100
75 5
15
200
0
225
20 250
50
0
25
0
MC-589308-10
5.
Adjust the air hose pressure gradually
with respect to the operating pressure of
the air tool by turning the pressure
regulator knob (1) clockwise (fig I).
fig I
125 150
175
10
200
15
100
75 5
18 225
50
25 0
250
0
125
150
175
10
100
75 5
15
200
0
225
20 250
50
0
25
0
125 150
175
10
200
15
100
75 5
18 225
50
25 0
250
0
125
150
175
10
100
75 5
15
200
0
225
20 250
50
0
25
0
1
MC-589308-11
5 U.S. GALLONS (18.9 L) AIR COMPRESSOR 058-9308-0
OPERATING INSTRUCTIONS
Start-up procedure
17
OPERATING INSTRUCTIONS
Shut down procedure
1.
Turn the ON/OFF switch (1) to the OFF
position. Turn OFF the power supply and
unplug the power cord (2) from the
electrical outlet (fig J).
fig J
1
125 150
175
10
200
15
100
75 5
18 225
50
25 0
250
0
125
150
175
10
100
75 5
15
200
0
225
20 250
50
0
25
0
2
MC-589308-12
2.
Reduce the pressure in the tank through
the air hose. Pulling the safety valve
ring (1) will also reduce the pressure in
the tank (fig K).
fig K
1
125
100
75 5
150
10
175
15
200
18 225
50
25 0
250
0
150
125
10
100
175
200
15
225
75 5
0
20 250
50
0
25
0
MC-589308-12
3.
Open the drain valves and release all
moisture in the tank.
CAUTION!
Potential hazard that may result in moderate injury or damage to
equipment.
•
Wear safety glasses when opening the drain valves, as the air and moisture
released from the tank can propel debris that may cause eye injury.
5 U.S. GALLONS (18.9 L) AIR COMPRESSOR 058-9308-0
18
General maintenance
WARNING!
Potential hazard that could result in serious injury or loss of life.
•
Always shut OFF the compressor, remove the power plug from the
electrical outlet, and release all pressure from the air system, before
attempting to install, service, relocate, or perform any maintenance in the
compressor.
•
Do not use a damaged tool. If abnormal noise or vibration occurs, rectify
the problem before use.
•
Have the compressor repaired by an authorized service person.
MAXIMUM SERVICE INTERVAL
DESCRIPTION
COMPONENTS
To drain moisture
Air tanks
X
To check proper operation
Safety relief valve
X
To clean
Air filter
Test for leaks
All connections
Daily
Weekly
Monthly
X
X
Draining the air tank
Note: Drain the air tanks after each use, especially during cold weather to reduce freezing of water
condensation and to prevent corrosion of the tank.
1.
Turn OFF the power supply to the pump. Release air pressure in air tanks by pulling the safety
valve ring.
2.
Turn the drain valves counter-clockwise and tilt the air tanks to drain water and moisture
completely.
3.
Tighten the drain valves.
5 U.S. GALLONS (18.9 L) AIR COMPRESSOR 058-9308-0
MAINTENANCE
Regular and periodic maintenance of the compressor ensures trouble-free operation.
19
MAINTENANCE
Checking the safety relief valve
1.
Turn ON the power supply to the compressor and allow the motor to run until cut-off pressure
is reached.
2.
Pull the relief valve ring to check whether it is operating properly and to clear possible
obstructions of the valve.
3.
Replace the safety relief valve if it does not release pressure when pulling the ring.
CAUTION!
Potential hazard that may result in moderate injury or damage to
equipment.
•
Wear safety glasses when opening the drain valves and pulling the safety
valve ring, as the air and moisture released from the tank can propel debris
that may cause eye injury.
•
Do not direct the fast moving air from the tank toward your face.
•
If the safety relief valve does not work properly, over-pressurization may
occur, thereby causing air tank rupture or explosion.
Replacing the air filter
After continuous use of the compressor, the air
filter may get clogged. This will reduce the air
intake capacity of the compressor. Therefore it
is necessary to replace the air filter.
1.
Turn OFF the power supply to the
compressor.
2.
Remove the old air filter (1) from the
motor head (fig L).
3.
Install new air filter.
fig L
1
125 150
175
10
200
15
100
75 5
18 225
50
25 0
250
0
125
150
175
10
100
75 5
15
200
0
225
20 250
50
0
25
0
MC-589308-14
CAUTION!
Potential hazard that may result in moderate injury or damage to
equipment.
•
Make sure the filter is free from dirt or paint. Direct exposure of the filter to
dirty conditions or painting areas will void warranty. Replace it immediately.
5 U.S. GALLONS (18.9 L) AIR COMPRESSOR 058-9308-0
20
Check that all connections are tight. Small leaks in the tank, hoses, connections or transfer tubes
will substantially reduce the compressor performance. Spray a small amount of soapy water around
the area of suspected leaks. If bubbles appear, repair, replace or reseal the faulty component. Do not
overtighten any connections.
Storage
Before storing the compressor for a prolonged period, follow the steps below correctly.
•
Disconnect the power cord and coil it up on the handle.
•
Clean all dust and debris from the compressor using an air blow gun.
•
Pull the safety valve ring to release all pressure from the tank.
•
Drain all moisture from the air tank.
•
Clean the air filter. Replace it if necessary.
•
Cover the compressor to protect it from moisture and dust.
5 U.S. GALLONS (18.9 L) AIR COMPRESSOR 058-9308-0
MAINTENANCE
Testing for leaks
21
TROUBLESHOOTING
Troubleshooting
WARNING!
Potential hazard that could result in serious injury or loss of life.
•
•
PROBLEM
Air pressure is low or
compressor does not
stop.
Always shut OFF the compressor, remove the power plug from the electrical
outlet, and release all pressure from the air system, before attempting to
install, service, relocate or perform any maintenance in the compressor.
Allow the compressor to cool after extended use to avoid skin burns.
POSSIBLE CAUSES
SOLUTIONS
1. Drain valves are opened.
1. Close the drain valves.
2. Leakage in fittings.
2. Check fittings with soapy water. Tighten or
reseal leaking fittings. Do not overtighten.
3. Air filter is restricted.
3. Clean or replace air filter.
4. Prolonged use of excessive
amount of air.
4. Decrease the amount of air being used.
5. Compressor capacity is low.
5. Check the air requirement of the air tool.
If it is higher than the CFM and pressure
supplied by the compressor, use a compressor
of higher capacity. Most tools are rated at 25%
of actual CFM while running continuously.
6. Check and replace the air hose if required.
6. Air hose is worn or damaged.
7. Leakage in air tank.
7. Replace the air tank immediately. Do not
attempt to repair it.
8. Replace the valve.
8. Leakage in safety relief valve.
The pressure regulator
The regulator knob is dirty or
knob does not regulate
damaged.
the pressure.
1. The ON/OFF switch does not shut
OFF the motor when the air
compressor reaches the cut-out
pressure and the safety valve
The motor runs
activates.
continuously when the
2. The compressor’s capacity is not
ON/OFF switch is in
high enough.
the ON position.
Replace the regulator knob.
1. Set the ON/OFF switch to the OFF position. If
the motor does not shut OFF, unplug the air
compressor. If the ON/OFF switch is defective,
replace it.
2. Check air requirements of the accessory that is
being used. If it is higher than the CFM and the
pressure supplied by the compressor, use a
compressor of higher capacity. Most
accessories are rated at 25% of actual CFM
while running continuously.
5 U.S. GALLONS (18.9 L) AIR COMPRESSOR 058-9308-0
PROBLEM
The motor will not run
or start.
The compressor
overheats.
POSSIBLE CAUSES
SOLUTIONS
1. The power cord is not plugged in.
1. Plug the power cord into a grounded outlet.
2. The ON/OFF switch is in the OFF
position.
2. Set the ON/OFF switch to the ON position.
3. The motor’s thermal overload
protector has tripped.
3. Turn the air compressor OFF, unplug the power
cord and wait until the motor has cooled down.
Plug in the power cord and wait for at least
five minutes to make sure the thermal overload
protector has recovered.
4. A fuse has blown or a circuit
breaker has been tripped.
4. Replace the fuse or reset the circuit breaker.
Check for low voltage conditions. Disconnect
any other electrical appliances from the circuit
or operate the compressor on a dedicated
circuit.
5. The safety relief valve is stuck.
5. Clean or replace the safety relief valve.
6. Electrical connections are loose.
6. Have the compressor serviced by a qualified
technician.
7. The motor capacitor or safety valve
is defective.
7. Have the compressor serviced by a qualified
technician.
1. Ventilation is inadequate.
1. Relocate the compressor to an area with cool,
dry and well-circulated air.
2. Cooling surfaces are dirty.
2. Clean all cooling surfaces on the pump and the
motor thoroughly.
Note: If there is any damage to compressor components, please contact 1-800-689-9928 for
assistance.
8
71613 00 6 9 0
5 U.S. GALLONS (18.9 L) AIR COMPRESSOR 058-9308-0
7
TROUBLESHOOTING
22
EXPLODED VIEW
23
3
1
4
5
2
6
8
32
9
31
7
30
10
29
11
13
12
14
28
15
27
26
16
25
24
17
23
22
21
20
19
18
MC-589308-14
5 U.S. GALLONS (18.9 L) AIR COMPRESSOR 058-9308-0
No.
Description
Qty
No.
Description
Qty
1
Control panel
1
17
Air tank
1
2
Tank pressure gauge
1
18
Rubber foot
4
3
Bolt, M4 x 10
2
19
Drain valve
2
4
Quick connector
1
20
Hexagon nuts with flange, M6 x 20
4
5
Pressure regulator knob
1
21
Anchor nut
1
6
Outlet pressure gauge
1
22
Check valve
1
7
Tube
1
23
Power cord
1
8
Back shroud
1
24
ON/OFF switch
1
9
Air filter
1
25
Safety relief valve
1
10
Self tapping screw
4
26
Cushion pad
4
11
Pump/motor assembly
1
27
Hexagon nuts with flange
4
12
Hexagon socket cap screws,
M5 x 12
4
28
Cross recessed pan head screws,
M5 x 10
2
13
Hexagon socket cap screws,
M8 x 25
4
29
Flat washer
4
14
Lock washer
2
30
Front shroud
1
15
Grip handle
1
31
Switch retainer
1
16
Pressure transfer tube
1
32
ON/OFF switch assembly
1
If any parts are missing or damaged, or if you have any questions, please call 1-800-689-9928.
5 U.S. GALLONS (18.9 L) AIR COMPRESSOR 058-9308-0
PARTS LIST
24
25
WARRANTY
3-Year Limited Warranty
This Mastercraft Maximum product is guaranteed for a
period of 3 years from the date of original retail purchase
against defects in workmanship and materials.
Subject to the conditions and limitations described below,
this product, if returned to us with proof of purchase within
the stated warranty period and if covered under this
warranty, will be repaired or replaced (with the same model,
or one of equal value or specification), at our option. We will
bear the cost of any repair or replacement and any costs of
labour relating thereto.
These warranties are subject to the following conditions and limitations:
a.
a bill of sale verifying the purchase and purchase date must be provided;
b.
this warranty will not apply to any product or part thereof which is worn or broken or which
has become inoperative due to abuse, misuse, accidental damage, neglect or lack of proper
installation, operation or maintenance (as outlined in the applicable owner’s manual or
operating instructions) or which is being used for industrial, professional, commercial or rental
purposes;
c.
this warranty will not apply to normal wear and tear or to expendable parts or accessories that
may be supplied with the product that are expected to become inoperative or unusable after a
seasonable period of use;
d.
this warranty will not apply to routine maintenance and consumable items such as, but not
limited to, fuel, lubricants, vacuum bags, blades, belts, sandpaper, bits, fluids, tune-ups or
adjustments;
e.
this warranty will not apply where damage is caused by repairs made or attempted by others
(i.e. persons not authorized by the manufacturer);
f.
this warranty will not apply to any product that was sold to the original purchaser as a
reconditioned or refurbished product (unless otherwise specified in writing);
g.
this warranty will not apply to any product or part thereof if any part from another
manufacturer is installed therein or any repairs or alterations have been made or attempted by
unauthorized persons;
5 U.S. GALLONS (18.9 L) AIR COMPRESSOR 058-9308-0
h.
this warranty will not apply to normal deterioration of the exterior finish, such as, but not
limited to, scratches, dents, paint chips, or to any corrosion or discolouring by heat, abrasive
and chemical cleaners; and
i.
this warranty will not apply to component parts sold by and identified as the product of
another company, which shall be covered under the product manufacturer’s warranty, if any.
Additional limitations
This warranty applies only to the original purchaser and may not be transferred. Neither the retailer
nor the manufacturer shall be liable for any other expense, loss or damage, including, without
limitation, any indirect, incidental, consequential or exemplary damages arising in connection with
the sale, use or inability to use this product.
Notice to consumer
This warranty gives you specific legal rights, and you may have other rights, which may vary from
province to province. The provisions contained in this warranty are not intended to limit, modify, take
away from, disclaim or exclude any statutory warranties set forth in any applicable provincial or
federal legislation.
5 U.S. GALLONS (18.9 L) AIR COMPRESSOR 058-9308-0
WARRANTY
26