1
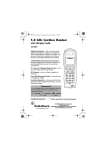
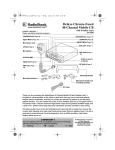
SQUELCH — Rotate to reduce background noise (CB sensitivity).
TRC521 CB Radio
21-1711
RF GAIN — Rotate to improve signal
reception in strong signal areas.
OFF/VOLUME — Rotate towards VOLUME (clockwise) to
turn on your CB, and then adjust to desired listening level.
Rotate towards OFF (counterclockwise) to turn off your CB.
CB/WX — Slide to CB to use and listen to citizen’s band radio.
Slide to WX to listen to local and national weather broadcasts.
DUAL WATCH/ALERT TONE OFF —
Press to activate dual watch while in
CB mode, or to silence weather alert
tones. See Page 11 in your owner’s
manual.
Connect the supplied microphone here.
CHANNEL — Rotate to tune to a
channel.
Quick Start Guide
for installing, setting up and using your new product
Step One
Attach Microphone Holder
You can attach the microphone holder
horizontally or vertically to either side of the CB
as shown.
Vertical
Horizontal
Microphone
Holder
UP/DN — Press or hold down to scroll
up or down through channels.
Mounting Bracket
Step Three
Mount the CB
Find a convenient location in your vehicle to mount your CB. If you are
uncomfortable mounting the CB yourself, consult with your vehicle service
center or automotive dealer for assistance. o
To attach the microphone holder somewhere
else, follow these steps.
1. Use the microphone holder as a template
to mark the positions for the mounting
screws at the desired mounting location.
2. Drill a hole at the marked position. Do not
drill into anything behind the mounting
surface.
3. Attach the microphone holder to the
mounting surface using the supplied
(small) machine screws and lockwashers.
Step Two
Connect the Microphone
Microphone
Jack
1. Align the holes
inside the
microphone’s plug
with the pins in
the microphone
jack and insert the
plug.
2. Turn the plug’s
locking nut
clockwise to
secure it.
Select a mounting location where:
•
you can easily reach the CB.
•
wires and cables are clear of the vehicle’s pedals or other moving
parts.
•
the CB is not directly in front of heating vents.
•
all wires and cables can reach their connection points.
Microphone
Mounting hardware supplied for the
microphone holder and your CB.
1. Use the mounting bracket as a template to mark the positions for the
screws on the mounting surface.
2. At the marked positions, drill a hole slightly smaller than the mounting
screws. Do not drill into objects behind the mounting surface.
3. Secure the mounting bracket to the mounting surface with the
supplied screws and lockwashers.
Screws and Lockwashers
Mounting Bracket
Mounting
Knobs
PTT — Push to talk. Hold down and talk into the
microphone while transmitting.
Step Four
Connect an Antenna
There are many different types of CB antennas for mobile
CBs. Each type has its own benefits, so choose the one that
best meets your needs. Your local RadioShack sells a wide
variety of antennas. When choosing an antenna, keep in mind
that for the best performance you should mount the antenna:
•
•
•
Rubber
Washers
Microphone Holder
as high as possible in the vehicle.
as far as possible from sources of electrical noise.
vertically.
1. Follow the antenna’s mounting instructions.
2. Route the antenna cable to the CB radio and connect it to
the ANT. jack.
Black/red
POWER
wires
ANT. Jack
Antenna Cable
Step Five
Locking
Microphone Plug
Nut
3. Slide the microphone onto the holder.
4. To disconnect the microphone, unscrew the
locking nut and pull the microphone plug
toward you. Do not pull the microphone
cable.
4. Attach the CB to the mounting bracket with the supplied rubber
washers and mounting knobs.
o
WARNING
o
Mount the CB securely to avoid damage to the CB or vehicle, and to
avoid injury to anyone in the vehicle during sudden starts or stops.
Connect to Vehicle Battery Power
1. Connect the CB’s red POWER wire to a terminal in your vehicle’s fuse box that has power only when the ignition is in the
ACC (accessory) or ON position.
2. Connect the CB’s black POWER wire to a metal part of the vehicle’s frame (chassis ground). Do not connect the black wire
to a non-metallic (plastic) part, or to any part insulated from the vehicle’s chassis by a non-metallic part.
Step Six
Step Seven
Common 10-Codes
Accessories
Receiving and Transmitting
Listening to the Weather Band
We recommend you try receiving transmissions
before you transmit.
The National Oceanic and Atmospheric Administration (NOAA) broadcasts
local forecast and regional weather information on one or more of seven
channels in the US. Your CB is preprogrammed with all seven frequencies.
Citizen’s Band users have adopted the following
codes for standard questions and answers.
Depending on how and where you plan to use your CB radio, the
following accessories can be used with your CB radio for enhanced
fuctionality and power. Visit your local RadioShack store to browse
for a variety of CB accessories.
Receiving
1. Rotate OFF/VOLUME towards OFF until it
clicks to turn off the CB.
Channel
8. To tune to a channel, rotate CHANNEL on
the radio, or press UP or DN on the
microphone. To quickly scroll through
channels in either direction, hold down UP or
DN until you reach the desired channel.
9. Adjust VOLUME to a comfortable listening
level.
10. To turn off the CB, rotate OFF/VOLUME
counterclockwise to OFF until it clicks.
Transmitting
1. To transmit, hold down PTT on the
microphone. Hold the microphone about 2–3
inches from your mouth and speak in a
normal tone of voice. TX lights to indicate
transmission.
2. When you finish transmitting, release PTT.
TX turns off.
3. To turn off the CB, turn OFF/VOLUME
counterclockwise to OFF until it clicks.
Receiving poorly.
10-2
Receiving well.
WX2
162.425
10-3
Stop transmitting.
WX3
162.450
10-4
OK, message received.
WX4
162.475
10-5
Relay message.
WX5
162.500
10-6
Busy, please stand by.
WX6
162.525
WX7
162.550
10-7
Out of service.
10-8
In service
10-9
Repeat message.
10-10
Transmission completed,
standing by.
Usage Tips
10-11
Talking too rapidly.
•
Only rotate SQUELCH until the hissing stops. If you continue to
rotate it clockwise, you will be unable to receive any signals.
10-12
Visitors present.
10-13
Advise Weather/Road conditions.
You may want to purchase an SWR (Standard Wave Ratio) meter
to measure your range and signal strength. This will enable you
to adjust your antenna for maximum range, and determine the
best position for RF GAIN. See your SWR meter owner’s manual
for instruction on how to use it.
10-17
Urgent business.
10-18
Anything for us?
10-19
Nothing for you. Return to base.
10-20
My location is____.
•
You cannot transmit when CB/WX is set to WX.
10-21
Call by telephone.
•
Because of atmospheric conditions, you may receive signals that
do not contain information relevant to the emergency level. This
is normal.
10-22
Report in person to____.
10-23
Please stand by.
10-25
Can you contact____.
4. Rotate RF GAIN fully clockwise.
7. Rotate RF GAIN clockwise to optimize
reception (incoming signal strength). Or,
rotate it counterclockwise to decrease signal
strength.
10-1
162.400
3. Rotate SQUELCH fully counterclockwise.
6. To decrease CB sensitivity so you do not
hear weak, distant signals, slowly rotate
SQUELCH clockwise until the hissing stops.
To increase sensitivity and to receive very
weak signals, rotate SQUELCH
counterclockwise.
Frequency
WX1
2. Slide CB/WX to CB.
5. Rotate OFF/VOLUME clockwise to turn on
the CB. The display lights and the channel
number appears. An alert sounds if a
weather alert signal is detected.
Frequency (MHz)
Code
To listen to a weather broadcast, slide CB/WX to WX. Rotate CHANNEL
to select a frequency.
•
CB Antenna
SWR Meter
8-ohm External Speaker
12V DC Power Supply
Base Station Antenna
Coaxial Antenna Cable and Connectors
Antenna Connectors
2-Amp Glass Fuse (for fuse replacement)
Limited 90-Day Warranty
•
The radio sounds an alert regardless of the channel setting.
10-26
Disregard last information.
•
The CB will not sound an alert while you are transmitting.
10-27
I am moving to channel____.
•
If you are in a rural or fringe area, your radio might be triggered
by an alert broadcast in one area, but not be triggered if you
travel to another area (even close by).
10-28
Identify your station.
10-32
I will give you a radio check.
10-33
Emergency traffic.
This product is warranted by RadioShack against manufacturing defects in material and workmanship under
normal use for ninety (90) days from the date of purchase from RadioShack company-owned stores and
authorized RadioShack franchisees and dealers. EXCEPT AS PROVIDED HEREIN, RadioShack MAKES NO
EXPRESS WARRANTIES AND ANY IMPLIED WARRANTIES, INCLUDING THOSE OF MERCHANTABILITY
AND FITNESS FOR A PARTICULAR PURPOSE, ARE LIMITED IN DURATION TO THE DURATION OF THE
WRITTEN LIMITED WARRANTIES CONTAINED HEREIN. EXCEPT AS PROVIDED HEREIN, RadioShack
SHALL HAVE NO LIABILITY OR RESPONSIBILITY TO CUSTOMER OR ANY OTHER PERSON OR ENTITY
WITH RESPECT TO ANY LIABILITY, LOSS OR DAMAGE CAUSED DIRECTLY OR INDIRECTLY BY USE
OR PERFORMANCE OF THE PRODUCT OR ARISING OUT OF ANY BREACH OF THIS WARRANTY,
INCLUDING, BUT NOT LIMITED TO, ANY DAMAGES RESULTING FROM INCONVENIENCE, LOSS OF
TIME, DATA, PROPERTY, REVENUE, OR PROFIT OR ANY INDIRECT, SPECIAL, INCIDENTAL, OR
CONSEQUENTIAL DAMAGES, EVEN IF RadioShack HAS BEEN ADVISED OF THE POSSIBILITY OF
SUCH DAMAGES.
10-36
Correct time is____.
Some states do not allow limitations on how long an implied warranty lasts or the exclusion or limitation of
incidental or consequential damages, so the above limitations or exclusions may not apply to you.
10-37
Wrecker needed at____.
10-38
Ambulance needed at______
10-41
Please turn to channel_____.
10-42
Traffic accident at_____.
10-43
Traffic tie-up at____.
10-50
Break channel.
10-62
Unable to copy; use telephone.
10-70
Fire at_____.
•
Most 12-volt DC power supplies plug into a standard AC outlet to
produce DC power. Before connecting your CB to a 12-volt DC
power supply, read and follow the instructions included with the
power supply.
In the event of a product defect during the warranty period, take the product and the RadioShack sales receipt
as proof of purchase date to any RadioShack store. RadioShack will, at its option, unless otherwise provided
by law: (a) correct the defect by product repair without charge for parts and labor; (b) replace the product with
one of the same or similar design; or (c) refund the purchase price. All replaced parts and products, and
products on which a refund is made, become the property of RadioShack. New or reconditioned parts and
products may be used in the performance of warranty service. Repaired or replaced parts and products are
warranted for the remainder of the original warranty period. You will be charged for repair or replacement of the
product made after the expiration of the warranty period.
This warranty does not cover: (a) damage or failure caused by or attributable to acts of God, abuse, accident,
misuse, improper or abnormal usage, failure to follow instructions, improper installation or maintenance,
alteration, lightning or other incidence of excess voltage or current; (b) any repairs other than those provided
by a RadioShack Authorized Service Facility; (c) consumables such as fuses or batteries; (d) cosmetic
damage; (e) transportation, shipping or insurance costs; or (f) costs of product removal, installation, set-up
service adjustment or reinstallation.
This warranty gives you specific legal rights, and you may also have other rights which vary from state to state
RadioShack Customer Relations, 200 Taylor Street, 6th Floor, Fort Worth, TX 76102
12/99
©2004. RadioShack Corporation.
All Rights Reserved.
RadioShack and RadioShack.com are trademarks
used by RadioShack Corporation.
21-1711
Printed in China
01A04
UTZZ69368ZZ