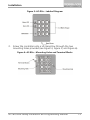
1
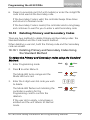
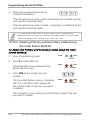
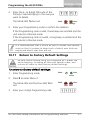
2013 July AC-B/C/D3x Family Standalone Access Control Units Installation and Programming Manual AC-B3x AC-C3x AC-D3x Copyright © 2013 by Rosslare. All rights reserved. This manual and the information contained herein are proprietary to REL, RSP Inc. and/or their related companies and/or subsidiaries’ (hereafter:”ROSSLARE”). Only ROSSLARE and its customers have the right to use the information. No part of this manual may be re-produced or transmitted in any form or by any means, electronic or mechanical, for any purpose, without the express written permission of ROSSLARE. ROSSLARE owns patents and patent applications, trademarks, copyrights, or other intellectual property rights covering the subject matter in this manual. TEXTS, IMAGES, AND ILLUSTRATIONS INCLUDING THEIR ARRANGEMENT IN THIS DOCUMENT ARE SUBJECT TO THE PROTECTION OF COPYRIGHT LAWS AND OTHER LEGAL RIGHTS WORLDWIDE. THEIR USE, REPRODUCTION, AND TRANSMITTAL TO THIRD PARTIES WITHOUT EXPRESS WRITTEN PERMISSION MAY RESULT IN LEGAL PROCEEDINGS. The furnishing of this manual to any party does not give that party or any third party any license to these patents, trademarks, copyrights or other intellectual property rights, except as expressly provided in any written agreement of ROSSLARE. ROSSLARE reserves the right to revise and change this document at any time, without being obliged to announce such revisions or changes beforehand or after the fact. Table of Contents Table of Contents 1. Introduction ................................................................ 8 1.1 Reader/Controller Types........................................................... 8 1.2 Key Features ........................................................................... 8 1.3 Equipment .............................................................................. 9 1.4 Additional Equipment.............................................................. 9 2. Technical Specifications ............................................ 10 3. Installation ................................................................ 12 3.1 Mounting ............................................................................. 12 3.2 Wiring .................................................................................. 14 4. Normal, Secure, and Master Users............................ 18 5. Modes of Operation .................................................. 19 6. Changing the Modes of Operation ........................... 20 6.1 Changing from Normal to Secure Mode ................................. 20 6.2 Changing from Secure to Normal Mode ................................. 20 6.3 Changing from Normal to Bypass Mode ................................. 21 6.4 Changing from Bypass Mode to Normal Mode ....................... 21 7. REX Button ................................................................ 22 8. Case and Back Tampers ............................................. 23 9. BL-D40 External Sounder .......................................... 24 10. Programming the AC-B/C/D3x ................................... 25 10.1 Entering Programming Mode ................................................. 26 10.2 Exiting Programming Mode ................................................... 26 10.3 Changing Open Code 1......................................................... 27 AC-B/C/D3x Family Installation and Programming Manual iii Table of Contents 10.4 Changing Open Code 2......................................................... 28 10.5 Changing the Programming Code .......................................... 28 10.6 Changing the Normal/Secure Code ........................................ 29 10.7 Changing the Normal/Bypass Code and Door Chime Settings .. 30 10.8 Setting Fail Safe/Secure Operation, Tamper Siren Time, and Lock Strike Release Time................................................................ 31 10.9 Enrolling Primary and Secondary Codes .................................. 31 10.9.1 Primary Codes...............................................................................31 10.9.2 Secondary Codes ..........................................................................32 10.9.3 Enrolling Primary and Secondary Codes ........................................32 10.9.4 Enrolling Primary and Secondary Codes Using the Standard Method .....................................................................................................33 10.9.5 Enrolling Secondary Codes Using the Code Search Method..........34 10.10 Deleting Primary and Secondary Codes................................... 35 10.10.1 Deleting Primary and Secondary Codes Using the Standard Method .....................................................................................................35 10.10.2 Deleting Primary and Secondary Codes Using the Code Search Method ........................................................................................36 10.11 Return to Factory Default Settings .......................................... 37 10.12 Replacing a Lost Programming Code ...................................... 38 10.13 Replacing a Lost Normal/Secure Code .................................... 38 iv AC-B/C/D3x Family Installation and Programming Manual List of Figures List of Figures Figure 1: AC-B3x – Labeled Diagram ...............................................................12 Figure 2: AC-C3x – Labeled Diagram ...............................................................12 Figure 3: AC-D3x – Labeled Diagram ...............................................................13 Figure 4: AC-B3x – Mounting Holes and Terminal Blocks ................................13 Figure 5: AC-C3x – Mounting Holes and Terminal Blocks ................................14 Figure 6: AC-D3x – Mounting Holes and Terminal Blocks ................................14 Figure 7: AC-B3x – Wiring the Lock Strike Relay and REX ................................15 Figure 8: AC-B3x – Wiring the BL-D40 External Sounder .................................15 Figure 9: AC-C3x – Wiring the Lock Strike Relay and REX................................16 Figure 10: AC-C3x – Wiring the BL-D40 External Sounder ...............................16 Figure 11: AC-D3x – Wiring the Lock Strike Relay and REX..............................17 Figure 12: AC-D3x – Wiring the BL-D40 External Sounder ...............................17 AC-B/C/D3x Family Installation and Programming Manual v List of Tables List of Tables Table 1: Programming Menu ...........................................................................25 vi AC-B/C/D3x Family Installation and Programming Manual Notice and Disclaimer Notice and Disclaimer This manual’s sole purpose is to assist installers and/or users in the safe and efficient installation and usage of the system and/or product, and/or software described herein. BEFORE ATTEMPTING TO INSTALL AND/OR USE THE SYSTEM, THE INSTALLER AND THE USER MUST READ THIS MANUAL AND BECOME FAMILIAR WITH ALL SAFETY REQUIREMENTS AND OPERATING PROCEDURES. The system must not be used for purposes other than those for which it was designed. The use of the software associated with the system and/or product, if applicable, is subject to the terms of the license provided as part of the purchase documents. ROSSLARE ENTERPRISES LIMITED and/or its related companies and/or subsidiaries’ (hereafter:"ROSSLARE") exclusive warranty and liability is limited to the warranty and liability statement provided in an appendix at the end of this document. This manual describes the maximum configuration of the system with the maximum number of functions, including future options. Therefore, not all functions described in this manual may be available in the specific system and/or product configuration you purchased. Incorrect operation or installation, or failure of the user to effectively maintain the system, relieves the manufacturer (and seller) from all or any responsibility for consequent noncompliance, damage, or injury. The text, images and graphics contained in the manual are for the purpose of illustration and reference only. In no event shall manufacturer be liable for any special, direct, indirect, incidental, consequential, exemplary or punitive damages (including, without limitation, any and all damages from business interruption, loss of profits or revenue, cost of capital or loss of use of any property or capital or injury). All graphics in this manual are for reference only, some deviation between the image(s) and the actual product may occur. All wiring diagrams are intended for reference only, the photograph or graphic of the PCB(s) are intended for clearer illustration and understanding of the product and may differ from the actual PCB(s). AC-B/C/D3x Family Installation and Programming Manual vii Introduction 1. Introduction The AC-B/C/D3x is a family of indoor standalone controllers. The units accept up to 500 users and allow entry via a personal identification number (PIN) and/or by presenting a proximity card. 1.1 Reader/Controller Types The six types of units described in this manual are: Keypad Type PIN Proximity 1.2 AC-B31 3X4 Standard AC-B32 3X4 Standard AC-C31 2X6 Mullion AC-C32 2X6 Mullion AC-D31 3X4 Standard AC-D32 3X4 Standard Key Features The following are some of the AC-B/C/D3x key features: Built-in proximity card reader (125 KHz ASK Modulation) (AC-x32 models) Built-in keypad for PIN code entry Internal buzzer Comes with security screw and security screw tool Two status/programming interface LEDs Three user levels (Normal User, Secure User, Master User) Three modes of operation (Normal Mode, Bypass Mode, Secure Mode) "Code Search" feature simplifies maintaining user codes Input for REX button Lock Strike Electronic Relay with built-in suppressor protection. 8 AC-B/C/D3x Family Installation and Programming Manual Introduction Comes with mounting template for easier installation Built-in case tamper and back tamper Bell, chime, siren, and strobe features available with BL-D40 Bell, Chime, Siren, Battery Backup, Tamper Output (Open Collector 20 mA) features available with PS-x41 (Output Power 1.2 A) and PS-x42 (Output Power 1.8 A) Programmable Siren Time Programmable Lock Strike Release Time Comes with Suppression Diode (1N4004) 1.3 Equipment The following equipment is provided in every AC-B/C/D3x package: AC- B/C/D3x controller Installation kit Installation and operating instructions 1.4 Additional Equipment The following additional equipment is required: Electric Lock Strike Mechanism – Fail Safe (Power to Lock) or Fail Secure (Power to Open) Power supply with backup battery – 12 to 16 VDC (from a regulated power supply) Request to Exit (REX) button – Normally Open Type; switch is closed when pressed. BL-D40 External Sounder (optional) – Provides siren, bell, and chime functions to the controller Other Rosslare accessories can be found at Rosslare's Website: http://www.rosslaresecurity.com AC-B/C/D3x Family Installation and Programming Manual 9 Technical Specifications 2. Technical Specifications Electrical Characteristics Operating Voltage Range 12–16 VDC From a regulated power supply Input Current (excluding attached devices) AC-x31 models: • Standby: 20 mA • Max: 60 mA AC-x32 models: • Standby: 40 mA • Max: 90 mA Relay Outputs • Lock Strike Relay – Electronic, 3.5 A with built in suppressor protection • Auxiliary Relay – Form C, 1A (AC-x32 models) • REX – N.O., Dry Contact Inputs • Auxiliary Input (In/Monitor) • Monitor Mode – N.C., Dry Contact • Input Mode – N.O., Dry Contact LEDs Two tri-colored LEDs Built-In Proximity Reader (AC-x32 models) • Read Range: 90 mm (3.5 in.)* • Modulation: ASK at 125kHz • Compatible cards: All 26-Bit EM cards Environmental Characteristics Operating Temperature -31°C to 63°C (-25°F to 145°F ) Operating Humidity 0 to 95% (non-condensing) 10 AC-B/C/D3x Family Installation and Programming Manual Technical Specifications Mechanical Characteristics Dimensions (Length x Width x Depth) AC-B3x: 92 x 92 x 24 mm (3.62 x 3.62 x 0.94 in.) AC-C3x: 130 x 42 x 18 mm (5.12 x 1.65 x 0.7 in.) AC-D3x: 122 x 75 x 4 mm (4.8 x 2.95 x 0.94 in.) Weight AC-B3x: 130 g (4.59 oz) AC-C3x: 70 g (2.47 oz) AC-D3x: 130 g (4.59 oz) * Measured using Rosslare proximity card (AT-11/12) or equivalent. Range also depends on electrical environment and proximity to metal. AC-B/C/D3x Family Installation and Programming Manual 11 Installation 3. Installation 3.1 Mounting Before starting, select the location to mount the controller. This location should be at shoulder height and on the same side as the door handle. The AC-B/C/D3x is designed to be easily mounted onto a US Gang Box. To mount the controller: 1. Remove the bezel screw from the bottom of the unit (see Figure 1, Figure 2, and Figure 3). Figure 1: AC-B3x – Labeled Diagram Figure 2: AC-C3x – Labeled Diagram 12 AC-B/C/D3x Family Installation and Programming Manual Installation Figure 3: AC-D3x – Labeled Diagram 2. Screw the controller onto a US Gang Box through the two mounting holes provided (see Figure 4, Figure 5, and Figure 6). Figure 4: AC-B3x – Mounting Holes and Terminal Blocks AC-B/C/D3x Family Installation and Programming Manual 13 Installation Figure 5: AC-C3x – Mounting Holes and Terminal Blocks Figure 6: AC-D3x – Mounting Holes and Terminal Blocks 3. Wire the controller as shown in Section 3.2. 4. Replace the controller’s bezel and replace the factory default screw with the security screw that is provided in the installation kit. A security screw tool is also provided in the installation kit. 3.2 Wiring Typical wiring diagrams for the various units are shown in the following subsections. For other wiring diagram examples, refer to the support section of the Rosslare website: http://www.rosslaresecurity.com/. 14 AC-B/C/D3x Family Installation and Programming Manual Installation 3.2.1 AC-B3x Figure 7: AC-B3x – Wiring the Lock Strike Relay and REX Figure 8: AC-B3x – Wiring the BL-D40 External Sounder AC-B/C/D3x Family Installation and Programming Manual 15 Installation 3.2.2 AC-C3x Figure 9: AC-C3x – Wiring the Lock Strike Relay and REX Figure 10: AC-C3x – Wiring the BL-D40 External Sounder 16 AC-B/C/D3x Family Installation and Programming Manual Installation 3.2.3 AC-D3x Figure 11: AC-D3x – Wiring the Lock Strike Relay and REX Figure 12: AC-D3x – Wiring the BL-D40 External Sounder AC-B/C/D3x Family Installation and Programming Manual 17 Normal, Secure, and Master Users 4. Normal, Secure, and Master Users The controller accepts up to 500 users and provides entry via the use of proximity cards and/or PIN codes. Each user is provided with two code memory slots: Memory Slot 1 (Primary Code) and Memory Slot 2 (Secondary Code). For the AC-x32 models, the two memory slots can be programmed for proximity cards, PIN codes, or a combination of both proximity cards and PIN codes. The way that the two memory slots are programmed determines a user's access level and also determines the way that the unit grants access in its three modes of operation. There are three user levels: Normal User – A Normal User only has a Primary Code and is only granted access when the unit is in Normal or Bypass mode. Secure User – A Secure User must have a Primary and Secondary Code programmed; the two codes cannot be the same. The Secure User can gain access when the unit is in any of its three modes of operation. In Normal mode, the Secure User must use a Primary Code to gain entry. In Secure Mode, the Secure User must present both a Primary and Secondary Code to gain entry. Master User – A Master User must have both Primary and Secondary Codes programmed with the same PIN code. The Master User can gain access during any mode of operation by entering the PIN code. (The Master User is convenient, but is less secure than a Secure User.) 18 AC-B/C/D3x Family Installation and Programming Manual Modes of Operation 5. Modes of Operation The controllers have three modes of operation: Mode Normal mode – Mode LED is green. Door Green Normal Mode is the default mode. In Normal mode, the door is locked until a Primary Code is presented to the controller. Special codes such as “Open Code 1” and “Open Code 2” are active in Normal mode (see Sections 10.3 and 10.4). Mode Bypass mode – Mode LED is orange. Door Orange In Bypass mode, access to the premises is dependent on whether the controller's Lock Strike Relay is programmed for Fail Safe Operation or for Fail Secure Operation. When the Lock Strike Relay is programmed for Fail Secure Operation, the door is locked until the door bell button is pressed. When the Lock Strike Relay is programmed for Fail Safe Operation, the door is constantly unlocked. Mode Secure mode – Mode LED is red. Door Red Only Secure and Master Users can access the premises during the Secure Mode. A Secure User must enter a Primary and a Secondary Code to gain entry. After entering the Primary Code, the Door LED flashes green for 10 seconds, during which time the Secondary Code must be entered. A Master User only needs to enter a PIN code once to gain entry. AC-B/C/D3x Family Installation and Programming Manual 19 Changing the Modes of Operation 6. Changing the Modes of Operation 6.1 Changing from Normal to Secure Mode The default factory setting for the Normal/Secure Code is 3838. To change from Normal to Secure mode: 1. Enter the 4-digit Normal/Secure code. The Mode LED flashes red. Mode Door Red 2. Press # to confirm the mode change. The Mode LED turns red. 6.2 Mode Door Red Changing from Secure to Normal Mode The default factory setting for the Normal/Secure Code is 3838. To change from Secure to Normal mode: 1. Enter the 4-digit Normal/Secure code. The Mode LED flashes green. Mode Door Green 2. Press # to confirm the mode change. The Mode LED turns green. 20 Mode Door Green AC-B/C/D3x Family Installation and Programming Manual Changing the Modes of Operation 6.3 Changing from Normal to Bypass Mode See Section 10.6 to create/modify the Normal/Bypass Code. To change from Normal to By pass mode: 1. Enter the 4-digit Normal/Bypass Code. The Mode LED flashes orange. Mode Door Orange 2. Press # to confirm the mode change. The Mode LED turns orange. 6.4 Mode Door Orange Changing from Bypass Mode to Normal Mode See Section 10.6 to create/modify the Normal/Bypass Code. To change from By pass to Normal mode: 1. Enter the 4-digit Normal/Bypass code. The Mode LED flashes green. Mode Door Green 2. Press # to confirm the mode change. The Mode LED turns orange. Mode Door Green AC-B/C/D3x Family Installation and Programming Manual 21 REX Button 7. REX Button The REX button is used to open the door without the use of a PIN code, and must be located inside the premises to be secured. It is usually located in a convenient location, such as inside the door or at a receptionist's desk. The function of the REX button depends on whether the Lock Strike Relay is programmed for Fail Safe Operation or for Fail Secure Operation. The door chime in the BL-D40 does not sound when the REX button is used to open the door. Fail Secure Operation: From the moment the REX button is pressed, the door remains unlocked until the Lock Strike Release Time passes. After this time, the door is locked even if the REX Button is not released. Fail Safe Operation: From the moment the REX Button is pressed, the door remains unlocked until the REX Button is released and the Lock Strike Release Time passes. In this case, the Lock Strike Relay only begins its countdown once the REX Button is released. 22 AC-B/C/D3x Family Installation and Programming Manual Case and Back Tampers 8. Case and Back Tampers If the case of the controller is opened or the controller is removed from the wall, a tamper event is triggered and a coded tamper signal is sent to a BL-D40, PS-x41 Series Power Supply, or PS-x42 Series Power Supply, or to another compatible device. If the BL-D40 External Sounder, PS-x41 Series Power Supply, or PS-x42 Series Power Supply receives a Tamper Event Signal, it activates a siren, and if available, a strobe light. The siren time can be easily programmed in the unit from 0 to 9 minutes. You can clear a tamper event by entering a valid User or Open code to open the Lock Strike Output in the current mode of operation. For example, while in Secure mode, you cannot use the Open code to clear the tamper event, because the Open code does not work in Secure mode. However, you can apply a Master code or Secure code to clear the tamper event in Secure mode. AC-B/C/D3x Family Installation and Programming Manual 23 BL-D40 External Sounder 9. BL-D40 External Sounder The BL-D40 External Sounder is compatible with the AC-x31, AC-x32, AC-x41, and AC-x42 series of standalone controllers. (For a more upto-date list of compatible products, check the Rosslare website at www.rosslaresecurity.com.) It is designed to operate indoors and is installed within the premises to be secured. The sounder can be powered by a 16 VAC or a 12 to 24 VDC power supply. The BL-D40 is capable of emitting four different types of alerts, both audible and visual: Bell, Door Chime, Siren, and Strobe Light. The bell always sounds when the controller's doorbell button is pressed. The door chime can be programmed to sound whenever the controller unlocks the door (the door chime does not sound when the REX button is used to open the door). The siren can be programmed to sound when the case of the controller is opened or when the controller is removed from the wall. The controller can also program the length of the siren in the BL-D40. The controller communicates with the BL-D40 using a coded proprietary Rosslare communications protocol. This provides a more secure link between the controller and the BL-D40. If the BLD40 receives any unrecognized codes on its communication line, or communication between the controller and the BL-D40 are severed, the strobe flashes repeatedly until the communication problem is resolved. 24 AC-B/C/D3x Family Installation and Programming Manual Programming the AC-B/C/D3x 10. Programming the AC-B/C/D3x Programming the controller is done using the unit's keypad driven Programming Menu System. During the manufacturing process, certain codes and settings are preprogrammed. These settings are called the default factory settings. Table 1 shows the names of all the unit’s menus. It also shows all the default factory codes and settings. Table 1: Programming Menu Menu Number Menu Description Factory Settings 1 Change Open Code 1 2580 2 Change Open Code 2 0852 3 Change Program Code 1234 4 Change Normal/Secure Code 3838 5 Change Normal/Bypass Code N/A 6 Change Door Release Time 0004 7 Enroll PIN code, proximity cards (AC-x32 models), or both 8 Delete PIN code or proximity cards (AC-x32 models) 0 Return to default factory setting A complete description and instructions for each of the above menu items is detailed in the following subsections. AC-B/C/D3x Family Installation and Programming Manual 25 Programming the AC-B/C/D3x 10.1 Entering Programming Mode To reach the Programming Menu System, first place the unit in Programming mode. To enter Programming mode: 1. Press # for two seconds. The Mode LED turns off and the Door LED turns red. Door Mode Red 2. Enter your 4-digit Programming code. If the Programming code is valid, the door LED turns green and the unit enters Programming mode. Door Mode Green The controller must be in Normal mode to enter the Programming mode. The factory default Programming code is 1234. If a Programming code is not entered within five seconds, the unit returns to Normal mode. 10.2 Exiting Programming Mode To ex it Programming mode: 1. Press # for two seconds. Three beeps are emitted. The Door LED turns off. The Mode LED turns green, indicating that the unit has returned to Normal Mode. 26 Mode Door Green AC-B/C/D3x Family Installation and Programming Manual Programming the AC-B/C/D3x Wrong entries may reset the controller back to Normal mode. While in Programming mode, if no key is pressed for one minute, the unit exits Programming mode and returns to Normal mode. In certain Programming modes, a quick press on # may also return the system to Normal mode. 10.3 Changing Open Code 1 Open Code 1 is mainly used as a method to quickly test the Lock Strike Relay during installation. The default factory setting for Open Code 1 is 2580. When the first user is added to the controller, the default Open Code 1 is automatically deleted, and is ready for a new Open Code 1 to be re-entered. To change the Open Code 1: 1. Enter Programming mode. Mode Door Green 2. Press 1 to enter Menu 1. The Mode LED turns red. Mode Door Red Green 3. Enter the new 4-digit code that you want to set as Open Code 1. The system returns to Normal mode: The Door LED turns off. The Mode LED turns green. Mode Door Green Open Code 1 does not function in Secure mode. Wrong entries return the controller to Normal mode. Code 0000 erases and deactivates Open Code 1. AC-B/C/D3x Family Installation and Programming Manual 27 Programming the AC-B/C/D3x 10.4 Changing Open Code 2 Open Code 2 is mainly used as a method to quickly test the Lock Strike Relay during installation. The default factory setting for Open Code 2 is 0852. When the first user is added to the controller, the default Open Code 2 is automatically deleted, and is ready for a new Open Code 2 to be re-entered. To change the Open Code 2: 1. Enter Programming mode. Mode Door Green 2. Press 2 to enter Menu 2. The Mode LED turns orange. Mode Door Orange Green 3. Enter the new 4-digit code that you want to set as Open Code 2. The system returns to Normal mode: Three beeps are emitted. The Door LED turns off. The Mode LED turns green. Mode Door Green Open Code 2 does not function in Secure mode. Wrong entries return the controller to Normal mode. Code 0000 erases and deactivates the Open code. 10.5 Changing the Programming Code To change the Programming code: 1. Enter Programming mode. Mode Door Green 2. Press 3 to enter Menu 3. The Mode LED turns green. 28 Mode Door Green Green AC-B/C/D3x Family Installation and Programming Manual Programming the AC-B/C/D3x 3. Enter the new 4-digit code that you want to set as the Programming code. The system returns to Normal mode: Three beeps are emitted. The Door LED turns off. The Mode LED turns green. Mode Door Green The Programming code cannot be erased; code 0000 is invalid and does not erase the Programming code. 10.6 Changing the Normal/Secure Code To change the Normal/ Secure code: 1. Enter Programming mode. Mode Door Green 2. Press 4 to enter Menu 4. The Mode LED flashes red. Mode Door Red Green 3. Enter the new 4-digit code that you want to set as the Normal/Secure code. The system returns to Normal mode: Three beeps are emitted. The Door LED turns off. The Mode LED turns green. Mode Door Green When the Auxiliary Mode is 1, 2, 3, or 4, the Auxiliary Input takes priority over the Normal/Secure Code. AC-B/C/D3x Family Installation and Programming Manual 29 Programming the AC-B/C/D3x 10.7 Changing the Normal/Bypass Code and Door Chime Settings The Normal/Bypass code is also used to turn the door chime off and on. To change the Normal/By pass code and Door Chime Settings: 1. Enter Programming mode. Mode Door Green 2. Press 5 to enter Menu 5. The Mode LED flashes orange. Door Mode Orange Green 3. There are four different ways to program the Normal/Bypass code and door chime: Disable both Bypass Code and the door chime. Enter the code 0000. Disable Bypass Code and enable the door chime. Enter the code 0001. Enable Bypass Code and disable the door chime. Enter any code ending with 0. Enable Bypass Code and enable the door chime. Enter a code not ending with 0. The system returns to Normal mode: Three beeps are emitted. The Door LED turns off. The Mode LED turns green. Mode Door Green The door is only generated when the Lock Strike Relay is activated due to a valid code entry. 30 AC-B/C/D3x Family Installation and Programming Manual Programming the AC-B/C/D3x 10.8 Setting Fail Safe/Secure Operation, Tamper Siren Time, and Lock Strike Release Time 1. Enter Programming mode. Mode Door Green Press 6 to enter Menu 6. The Mode LED flashes green. 2. Mode Door Green Green Construct the 4-digit code using the following instructions: First Digit For Fail Secure Operation, the first digit should be 0. For Fail Safe Operation the first digit should be 1. Second Digit Siren time in minutes (1-9, 0-disabled) Third and Fourth Digits Enter the number of seconds (from 1 to 99) that you want the Lock Strike to be released. For example, 0512 means a Fail Secure Operation consisting of a 5-minute siren and a 12-second Lock Strike release time. The system returns to Normal mode. You hear three beeps. Mode Door Green The Door LED turns off and the Mode LED turns green 10.9 Enrolling Primary and Secondary Codes 10.9.1 Primary Codes Primary Codes can only be enrolled to an empty user slot, meaning a slot where there is no existing Primary code. Primary Codes must be unique, meaning that one user's Primary AC-B/C/D3x Family Installation and Programming Manual 31 Programming the AC-B/C/D3x Code cannot be the same as another user's Primary code. Primary codes cannot be the same as any system codes, such as the Normal/Secure code or Open code. Users who hold a Primary code can gain entry only during Normal mode. 10.9.2 Secondary Codes Secondary codes can only be enrolled to a user slot that already has a Primary Code enrolled, but no Secondary code. Secondary Codes do not have to be unique, meaning that multiple users can all hold the same Secondary code. Secondary codes cannot be the same as any system codes, such as the Normal/Secure code or Open code. Users who hold Secondary codes can gain entry in any mode of operation. 10.9.3 Enrolling Primary and Secondary Codes There are two methods to enroll Primary and Secondary codes: Standard Method Mainly used when the user slot number for the user that you want to program is known. You can program both Primary and Secondary codes using the Standard method (see Section 10.9.4). Code Search Method Mainly used when enrolling a user's Secondary code and the User slot code is unknown. The Code Search method only works if a user’s Primary code is already enrolled but the Secondary code is not (see Section 10.9.5). 32 AC-B/C/D3x Family Installation and Programming Manual Programming the AC-B/C/D3x 10.9.4 Enrolling Primary and Secondary Codes Using the Standard Method To enroll primary and secondary codes using the Standard method: 1. Enter Programming mode. 2. Mode Door Green Press 7 to enter Menu 7. The Mode LED turns orange. Mode Door Orange 3. Perform one of the following: a. Enter a 3-digit User Slot number between 001 and 500 to indicate the user to whom you want to enroll a Primary or Secondary code. For example, the User Slot 003 represents User #3. If the selected slot has no Primary Code, the Mode LED flashes green, indicating that the controller is ready to accept a Primary Code. Mode If the selected slot already has a Primary Code but no Secondary code, the Mode LED flashes red, indicating that the controller is ready to accept a Secondary Code. Mode Door Green Green Door Red Green If the selected slot already has a Primary and Secondary Code, you hear a long beep and the controller returns to Normal mode. b. Present a proximity card (AC-x32 models) or enter the 4-digit PIN that you want to assign as the Primary or Secondary Code for this slot number. AC-B/C/D3x Family Installation and Programming Manual 33 Programming the AC-B/C/D3x If the proximity card presented or PIN entered is valid, the Mode LED stops flashing and the controller is ready for you to enter the next 3-digit slot number (refer to Step a) that you want to assign a code to. 4. Do one of the following: a. Press # to move to the next slot number. b. If you do not wish to continue enrolling codes, press # twice and the controller returns to Normal mode. 10.9.5 Enrolling Secondary Codes Using the Code Search Method The Code Search feature enables you to quickly enroll a Secondary Code to a user who already has a Primary Code. To enroll secondary codes using the Code Search method: 1. Enter Programming mode. Mode Door Green 2. Press 7 to enter Menu 7. The Mode LED turns orange. Mode Door Orange 3. Enter the 3-digit User Slot number 000. The Door LED flashes orange. Mode Door Orange The controller is now waiting for the Primary Code of the user to whom you want to add a Secondary Code. 4. Present a proximity card (AC-x32 models) or enter the 4-digit PIN code of the Primary code belonging to the user for whom you want to add a Secondary code. 5. The Mode LED flashes red. Mode Door Red Orange If the Primary code entered is not valid, a long beep is emitted and the unit continues to wait for a valid Primary code. 34 AC-B/C/D3x Family Installation and Programming Manual Programming the AC-B/C/D3x 6. Present a proximity card (AC-x32 models) or enter the 4-digit PIN code to be used as the Secondary code. If the Secondary Code is valid, the controller beeps three times and returns to Normal mode. If the Secondary Code is invalid, the controller emits a long beep, and continues to wait for you to enter a valid Secondary code. 10.10 Deleting Primary and Secondary Codes 29B There are two methods to delete Primary and Secondary codes: the Standard Method and the Code Search method. When deleting a user slot, both the Primary code and the Secondary code are erased. 10.10.1 Deleting Primary and Secondary Codes Using the Standard Method 41B To delete the Primary and Secondary codes using the Standard Method: 1. Enter Programming mode. Mode Door Green 2. Press 8 to enter Menu 8. The Mode LED turns orange and the Mode LED turns red. Mode Door Red Orange Red Orange 3. Enter the 3-digit user slot code you wish to delete. The Mode LED flashes red indicating the controller is waiting for the Programming code to confirm the deletion. Mode Door If the user slot is empty, a long beep is emitted and the unit returns to Normal mode. AC-B/C/D3x Family Installation and Programming Manual 35 Programming the AC-B/C/D3x 4. Enter your programming code to confirm the deletion. If the Programming code is valid, three beeps are emitted and the unit returns to Normal mode. If the Programming code is invalid, a long beep is emitted and the unit returns to Normal mode. It is recommended that a record be kept of added and deleted users so that it is easier to keep track of which user slots are empty and which user slots are not. 10.10.2 Deleting Primary and Secondary Codes Using the Code Search Method To delete the Primary and Secondary codes using the Code Search Method: 1. Enter Programming mode. Mode Door Green 2. Press 8 to enter Menu 8. The Mode LED turns orange and the Mode LED turns red. Mode Door Red Orange Red Orange 3. Enter 000 as the 3-digit user slot number. The Door LED flashes orange, indicating that the controller is now waiting for the Primary code of the user you want to delete. Mode Door The controller is now waiting for the Primary Code of the user you want to delete. 36 AC-B/C/D3x Family Installation and Programming Manual Programming the AC-B/C/D3x 4. Enter the 4- to 8-digit PIN code of the Primary Code belonging to the user you want to delete. The Mode LED flashes red. Mode Door Red Orange 5. Enter your Programming code to confirm the deletion. If the Programming code is valid, three beeps are emitted and the unit returns to Normal mode. If the Programming code is invalid, a long beep is emitted and the unit returns to Normal mode. It is recommended that a record be kept of added and deleted users so that it is easier to keep track of which user slots are empty and which user slots are not. 10.11 Return to Factory Default Settings Be very careful before using this command as it erases the entire memory, including all User and Special codes, and returns all codes to their factory default settings. To return to factory default settings: 1. Enter Programming mode. Mode Door Green 2. Press 0 to enter Menu 0. The Mode LED and the Door LED flash red. Mode Door Red Red 3. Enter your 4-digit Programming code. AC-B/C/D3x Family Installation and Programming Manual 37 Programming the AC-B/C/D3x If the Programming Code is valid, all memory is erased, three beeps are emitted, and the controller returns to Normal mode. If the Programming code is invalid, a long beep is emitted, and the controller returns to Normal mode without erasing the memory of the controller. 10.12 Replacing a Lost Programming Code To be able to replace a lost programming code, the controller must be in Normal mode. Before proceeding, verify that the Mode LED is green. 1. Remove power from the unit. 2. Press the REX button. 3. Apply power to the unit while pressing the REX button. 4. Release the REX button. 5. You have 15 seconds to program a new Programming code into the unit using the initial default code 1234 before the controller reverts to the existing code. 10.13 Replacing a Lost Normal/Secure Code To be able to replace lost Normal/Secure code, the controller must be in Secure mode. Before proceeding, verify that the Mode LED is red. 1. Remove power from the unit. 2. Press the REX button. 3. Apply power to the unit while pressing the REX button. 4. Release the REX button. 5. You have 15 seconds to program a new Normal/Secure code into the unit using the initial default code 3838 before the controller reverts to the existing code. 38 AC-B/C/D3x Family Installation and Programming Manual Limited Warranty Limited Warranty ROSSLARE‘S TWO-YEAR LIMITED WARRANTY is applicable worldwide. This warranty supersedes any other warranty. ROSSLARE'S TWO-YEAR LIMITED WARRANTY is subject to the following conditions: WARRANTY Warranty of ROSSLARE'S products extends to the original purchaser (Customer) of the ROSSLARE product and is not transferable. PRODUCTS COVERED BY THIS WARRANTY AND DURATION ROSSLARE warrants the AC-B/C/D3x Family of Standalone Access Control Units to be free from defects in materials and assembly in the course of normal use and service. The warranty period commences with the date of shipment to the original purchaser and extends for a period of 2 years (24 months). WARRANTY REMEDY COVERAGE In the event of a breach of warranty, ROSSLARE will credit Customer with the price of the Product paid by Customer, provided that the warranty claim is delivered to ROSSLARE by the Customer during the warranty period in accordance with the terms of this warranty. Unless otherwise requested by a ROSSLARE representative, return of the failed product(s) is not immediately required. If ROSSLARE has not contacted the Customer within a sixty (60) day holding period following the delivery of the warranty claim, Customer will not be required to return the failed product(s). All returned Product(s), as may be requested at ROSSLARE’S sole discretion, shall become the property of ROSSLARE. To exercise the warranty, the user must contact ROSSLARE Enterprises Ltd. to obtain an RMA number after which, the product must be returned to the Manufacturer freight prepaid and insured. In the event ROSSLARE chooses to perform a product evaluation within the sixty (60) day holding period and no defect is found, a AC-B/C/D3x Family Installation and Programming Manual 39 Limited Warranty minimum US$ 50.00 or equivalent charge will be applied to each Product for labor required in the evaluation. ROSSLARE will repair or replace, at its discretion, any product that under normal conditions of use and service proves to be defective in material or workmanship. No charge will be applied for labor or parts with respect to defects covered by this warranty, provided that the work is done by ROSSLARE or a ROSSLARE authorized service center. EXCLUSIONS AND LIMITATIONS ROSSLARE shall not be responsible or liable for any damage or loss resulting from the operation or performance of any Product or any systems in which a Product is incorporated. This warranty shall not extend to any ancillary equipment not furnished by ROSSLARE, which is attached to or used in conjunction with a Product, nor to any Product that is used with any ancillary equipment, which is not furnished by ROSSLARE. This warranty does not cover expenses incurred in the transportation, freight cost to the repair center, removal or reinstallation of the product, whether or not proven defective. Specifically excluded from this warranty are any failures resulting from Customer's improper testing, operation, installation, or damage resulting from use of the Product in other than its normal and customary manner, or any maintenance, modification, alteration, or adjustment or any type of abuse, neglect, accident, misuse, improper operation, normal wear, defects or damage due to lightning or other electrical discharge. This warranty does not cover repair or replacement where normal use has exhausted the life of a part or instrument, or any modification or abuse of, or tampering with, the Product if Product disassembled or repaired in such a manner as to adversely affect performance or prevent adequate inspection and testing to verify any warranty claim. ROSSLARE does not warrant the installation, maintenance, or service of the Product. Service life of the product is dependent upon the care it receives and the conditions under which it has to operate. In no event shall ROSSLARE be liable for incidental or consequential damages. 40 AC-B/C/D3x Family Installation and Programming Manual Limited Warranty LIMITED WARRANTY TERMS This warranty sets forth the full extent of ROSSLARE’S warranty. The terms of this warranty may not be varied by any person, whether or not purporting to represent or act on behalf of ROSSLARE. This limited warranty is provided in lieu of all other warranties. All other warranties expressed or implied, including without limitation, implied warranties of merchantability and fitness for a particular purpose, are specifically excluded. In no event shall ROSSLARE be liable for damages in excess of the purchase price of the product, or for any other incidental, consequential or special damages, including but not limited to loss of use, loss of time, commercial loss, inconvenience, and loss of profits, arising out of the installation, use, or inability to use such product, to the fullest extent that any such loss or damage may be disclaimed by law. This warranty shall become null and void in the event of a violation of the provisions of this limited warranty. AC-B/C/D3x Family Installation and Programming Manual 41 AC-B/C/D3x Family Asia Pacific, Middle East, Africa Rosslare Enterprises Ltd. Kowloon Bay, Hong Kong Tel: +852 2795-5630 Fax: +852 2795-1508 [email protected] United States and Canada Rosslare Security Products, Inc. Southlake, TX, USA Toll Free: +1-866-632-1101 Local: +1-817-305-0006 Fax: +1-817-305-0069 [email protected] Latin America Rosslare Latin America Buenos Aires, Argentina [email protected] China Rosslare Electronics (Shenzhen) Ltd. Shenzhen, China Tel: +86 755 8610 6842 Fax: +86 755 8610 6101 [email protected] India Rosslare Electronics India Pvt Ltd. Tel/Fax: +91 20 40147830 Mobile: +91 9975768824 [email protected] Europe www.rosslaresecurity.com 0706-0960514+00 Rosslare Israel Ltd. Rosh HaAyin, Israel Tel: +972 3 938-6838 Fax: +972 3 938-6830 [email protected]