1
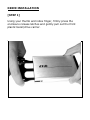
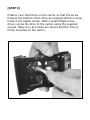
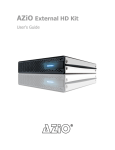
AZiO™ External HD Kit Quick Start Guide Model # ENC211SU31 OVERVIEW Thank you for purchasing the AZiO USB 2.0 Mobile HD kit, one of the most stylish and practical data storage solutions available. This AZiO HD Kit can convert your internal serial ATA 2.5” hard disk drive into an external hi-speed mobile storage device. Use it to store your collection of documents, photos, media files, and/or backup all your important data. This external drive kit is very easy to install, is hot-swappable, and is backed by AZiO Corporation’s 1-year Limited Warranty. This Quick Start Guide is designed to get you up and running in the least amount of time possible. A comprehensive user’s manual can be found at our website at www.aziocorp.com if you need additional details or trouble-shooting tips. Thank you again and we sincerely hope you enjoy using your new AZiO External HD Kit. PACKAGE CONTENTS When you unpack your external drive kit, be sure you have removed all the accessories and information papers. The items shown below are included with your drive kit: 1. 2. 3. 4. 5. 6. 7. External HD Enclosure Windows 98 Driver CD Carrying Case Installation Screw Pack USB 2.0 Cable (Mini-B to A) eSATA Cable Power adapter FEATURES Supports all 2.5” SATA Hard Disk Drives Dual Interface: eSATA & USB 2.0 Transfer rates up to 3Gbps with eSATA Transfer rates up to 480Mbps with USB 2.0 Hot-Swappable: Plug and plays without rebooting Aluminum design to keep your drive running cool Bus-powered (via USB 2.0) and compact sized, perfect for the mobile professional Featuring Smart Pull-Out Tray for easy installation POWERING UP THE DEVICE There are two ways to power this AZiO device, via USB or power adapter. Here are the options: When connected via USB: If connected to a nonpowered HUB then power supply is required, otherwise this device can draw power via the USB port. When connected via eSATA: You may power this device by connecting the USB cable simultaneously to draw power or use the power adapter. When both interfaces are connected, the drive will be accessed as an eSATA device. Note: The included USB cable may have came with two connector heads. Under normal operations, just connecting one of the connectors will be sufficient. However, some hard drives may require additional power to function properly - in which case you will need to plug in both connectors or use the included power adapter. DRIVE INSTALLATION [STEP 1] Using your thumb and index finger, firmly press the enclosure release latches and gently pull out the front plastic bezel/drive carrier. [STEP 2] The Drive Kit PCB contains the interface connector for you’re your hard drive. Orient your 2.5” hard drive so that the drives connectors are aligned with the interface connector. Install the hard drive by firmly pushing the drive until it is securely connected to the PCB. Do not touch the PCB as it contains sensitive electronics that can be easily damaged. [STEP 3] Position your hard drive on the carrier so that the screw holes at the bottom of the drive are aligned with the screw holes in the plastic carrier. With a small Philips screw driver, screw the drive to the carrier using the supplied screws. Make sure all screws are secure and the drive is firmly mounted on the carrier. [STEP 4] Close the drive kit by carefully sliding the drive carrier back into the Drive Enclosure, making sure the release latches securely locks the carrier in place. Your external drive is now ready for use. SOFTWARE INSTALLATION USB 2.0 Driver Installation 1. 2. 3. 4. 5. For Windows XP, Windows 2000, Windows ME, MAC OS 9.x and MAC OS 10.x or higher, no drivers are required. For Windows 98SE, insert the software CD and click follow the instructions below. After the drive has been properly connected and powered on, the Add New Hardware Wizard should appear with the message: “Found New Hardware USB 2.0 Storage Adapter.” Click Next. You will then see the message: “What do you want windows to do?” with two options. Select “Search for the best driver for your device (Recommended).” Click Next. In the next window that appears, check the box labeled CD-ROM drive. Click Next. You will then see the message: “Windows is now ready to install the best driver for this device…” Click Next. Once the installation is complete, you will see the message “Windows has finished installing the software…” Click Finish and then eject the CD. You should now see a new icon (a gray box with a green arrow) next to the time display on your system tray. eSATA Driver Installation No drivers are required for all supported operating systems. Windows XP and 2000 Hard Drive Installation If the external hard drive does not mount after you have plugged-in and turned on your external drive, you will need to partition and format the drive by doing the following: 1. 2. 3. 4. RIGHT-CLICK on “MY COMPUTER”, click on “Manage”. Click on “DISK MANAGEMENT”. A list of all the drives in your system will be displayed. If ‘Write Signature and Upgrade Disk Wizard’ auto starts, you can use this wizard to initialize the hard disk and create partition and format the drive. Otherwise, locate the respective drive listed in the lower right side of the window. Right click on the drive, make a new partition and format the drive. Windows 98SE and ME Hard Drive Installation If the external hard drive does not mount after you have plugged-in and turned on your drive kit, you would need to partition and format the drive by doing the following: 1. 2. 3. 4. 5. 6. 7. 8. RIGHT-CLICK on “MY COMPUTER”, then click on “PROPERTIES”. Click on “DEVICE MANGER”. Click on “DISK DRIVES”. DOUBLE-CLICK on the drive that corresponds to the external hard drive. Click on “SETTINGS” tab. Check the REMOVABLE box. Click “OK” then restart the computer. After restarting, DOUBLE CLICK on “MY COMPUTER”, the external hard drive will now appear. DOUBLE CLICK the drive to format the drive. SERVICE & WARRANTY Service If you need assistance with the product, please check the comprehensive user’s manual included in the software CD or visit our website at www.aziocorp.com for frequently asked questions and troubleshooting tips. Otherwise, you may contact our dedicated customer care team. There are several ways to contact us: By Phone: (909) 468-1198 By Email: [email protected] On LiveChat: www.aziocorp.com Warranty Limited 1 Year Warranty AZiO Corporation warrants this product against defect in material or workmanship for 1 year from the date of purchase. If this product proves to be defective, contact AZiO Corporation’s customer care for repair or replacement of your unit. Return requests can not be process without the proof of original date of purchase. This warranty applies only to the original purchase of the product and is not transferable. This warranty does not cover any incompatibilities due to the user’s computer, hardware, software or related system configuration in which the product interfaces. The warranty does not cover any damage caused by negligence, abuse, or non-authorized modifications. To the maximum extent permitted by applicable law, in no event shall AZiO Corporation, its affiliates, or its dealers be liable for any special, incidental, indirect or consequential damages whatsoever regardless of cause or form of action. FCC Information FCC Compliance Statement This equipment has been tested and found to comply with the limits for a Class B Digital Device, pursuant to Part 15 of the FCC Rules. These limits are designed to provide reasonable protection against harmful interference in a residential installation. This equipment generates, uses and can radiate radio frequency energy and if not installed and used in accordance with the instruction manual may cause harmful interference to radio communication. However, there is no guarantee that interference will not occur in a particular installation. If this equipment does cause harmful interference to radio or television reception, which can be determined by turning the equipment off and on, the user is encouraged to try to correct the interference by one or more of the following measures: Reorient or relocate the receiving antenna. Increase the separation between the equipment and receiver. Connect the equipment into an outlet on a circuit different from that to which the receiver is connected. Consult the dealer or an experienced radio TV technician for help.