1
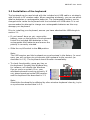
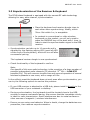
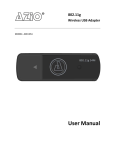
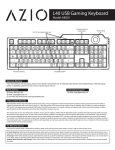
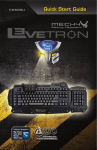
The Right Connection TM The Right Connection TM KB351RT Wireless Trackball Keyboard Quick Installation Guide KB351RT User Guide Copyright Statement is the registered trademark of AZiO Corporation. All the products and product names mentioned herein are the trademarks or registered trademarks of their respective holders. Copyright of the whole product as integration, including its accessories and software, belongs to AZiO Corporation. Without the permission of AZiO Corporation, any individual or party is not allowed to copy, plagiarize, imitate or translate into other languages. All the photos and product specifications mentioned in this manual are for reference only. Actual throughput and operating distances will vary due to software & hardware setup and environmental factors beyond our control. As upgrade of software and hardware progresses, there may be changes to specifications. AZiO is not responsible for informing of these changes in advance. If you would like to know more about our product information, please visit our website at www.aziocorp.com. 1 KB351RT User Guide Table of Contents 1 Introduction…………………........................………………………………… 3 1.1 Welcome……………………….......…….....……….……………………… 3 1.2 Product Features.……………………………….…………………………. 3 1.3 Package Contents………....…………...……………….………………… 3 1.4 Before You Begin…...........……….………..………….………………… 3 2 Installation…………………………..……………………………………….…..… 4 2.1 Installation of the USB Receiver.….....……….……………………… 4 2.2 Installation of the Keyboard...……………………………….………… 5 2.3 Synchronization of the Radio Channel…………………….………… 6 3 How to use the Keyboard….………………………………………………..……7 3.1 Meaning of the Status LEDs…….………………………..……………… 7 3.2 Special Operations……...………………….…….………………………… 7 3.3 Power Sources……………………………….…….………………………… 8 4 Troubleshooting………….…...……........................………………………… 9 4.1 Things to Consider..……………………………...………...……………… 9 4.2 FCC Statement………………………….……..…..………………………… 10 4.3 Warranty & Support……………………….…….………………………… 11 2 KB351RT User Guide Introduction 1.1 Welcome Thank you for purchasing the AZiO KB351RT Wireless USB Trackball Keyboard. The KB351RT trackball keyboard connects you with your PC by Wireless RF technology via the mini USB receiver dongle. The keyboard features make it ideal as a handheld controller for your Media Center or Home Theater PC. 1.2 Product Features Slim, elegant, super-mini design perfect for handheld HTPC or Media Center PC input device Built-in 16mm diameter easy-to-use trackball pointing device with left-had mouse buttons 7 Embedded MCE keys - Back Track, Next Track, Play/Pause, Stop, Vol +, Vol -, Mute 3 Internet hotkeys - HOME, EMAIL, BACK 2.4 GHz wireless RF technology Effective range up to 30ft (10m) Scissors keycap architecture makes typing silent, responsive, and comfortable. Glossy Piano Black Construction 1.3 Package Contents Wireless Trackball Keyboard Mini USB receiver 2 AAA Battery User guide One mini-USB cable (for optional direct interface) Contact your local authorized reseller or the store purchased from for any items damaged and/or missing. 1.4 Before You Begin Be sure your computer meets the following requirements: A laptop computer/desktop PC with an available USB 2.0 /1.1 slot Windows 98SE / ME / 2000 / XP / Vista / Win 7 Installation of the keyboard under the mentioned above operating systems requires no separate driver. 3 KB351RT User Guide Installation In order to install your keyboard, please follow these steps: 2.1 Installation of the USB receiver • Connect the included USB receiver (mini-dongle) to a free USB port on your computer. Note: Please ensure that the USB receiver has a minimal distance of 20 cm to metallic dividing walls, other computer cases, monitors, speakers and switching power supplies in order to maximize range. • Up-to-date operating systems mentioned above all have Plug & Play support and will recognize your keyboard automatically and will load the required drivers. During this phase of installation your operating system will inform you via pop-up message from the task-bar the current status of installation. Please wait until installation is successful. The USB receiver is now ready. Note: Older operating systems will not always automatically recognize USB devices, if you attach your USB receiver and an error of this effect occurs, please try the following to solve the problem: • Update your operating system to the latest version, by launching ‘Windows Update’ or by downloading the latest service pack from Microsoft’s website. • In some cases, your operating may need to reboot after installation of hardware or software. Try rebooting your computer. • Check whether your motherboard BIOS has support enabled for USB keyboards. Some motherboard manufacturers offer BIOS up-dates for download over the internet. • Ensure your system’s USB connection is not disabled or missing its driver. Do this by checking your system’s device manager. • If all else fails, check to see if this keyboard works in another computer. If it does not, please contact AZIO support. 4 KB351RT User Guide 2.2 Installation of the keyboard The keyboard can be used wired with the included mini USB cable or wirelessly with the built-in RF wireless radio. When operating wirelessly, you can use either alkaline batteries or rechargeable batteries. The rechargeable battery can be charged while inside the keyboard with the included mini USB cable. It is not recommended to attempt to charge non-rechargeable batteries as this may damage your keyboard. Prior to installing your keyboard, ensure you have attached the USB dongle in section 2.1. • If you haven’t done so yet, remove the battery cover on the bottom of the keyboard. Install the included AAA batteries or two rechargeable AAA batteries and ensure the polarity is correctly oriented. • Slide the on/off switch to the ON position. Note: The USB receiver and the keyboard are synchronised in the factory. In most caes, you will not have to synchronise the keyboard to the receiver (as described in 2.3). The keyboard should function immediately. • To check functionality, press any key on the keyboard. Pressing the Windows key, for instance, will display the Windows Pop-up menu on screen. If so, your wireless keyboard is working correctly. If not, please synchronise the USB receiver and the keyboard like described in 2.3. Note: Should the functionality be affected by other wireless keyboard close-by, try to re-synchronise as described in 2.3. 5 KB351RT User Guide 2.3 Ssynchronization of the Receiver & Keyboard The RF Wireless Keyboard is equipped with the newest RF radio technology allowing for easy, auto-channel, synchronisation. • Place the keyboard and receiver dongle close to each other when synchronizing. Ideally, within 30cm. But within 1m, is acceptable. • In contrast to conventional or older wireless keyboards on the market, you will only need to press the PAIRING key on the back side 1 time, in order to start the synchronisation signal to the USB receiver. • Synchronisation can take up to 10 seconds and is signalled by the flashing pairing LED (most left LED on the front of the keyboard), which will turn off after a successful pairing. The keyboard receiver dongle is now synchronised. • Check functionality of the keyboard to confirm. Note: One benefit of this new radio technology is the provision of a large number of possible independent radio channels (16 channels *216 Bit = 1.048.576 possible IDs). This will ensure a trouble-free and secured operation of several wireless keyboards in one room, with a range of 10m. In the unlikely event the keyboard does not work even after synchronization, you can try the following options to resolve this problem: • If your USB receiver is attached to a USB hub, please install it directly to the USB connector of your notebook or desktop. • During synchronisation, the keyboard should be located close to the USB receiver to ensure a successful paring. Also ensure that the immediate vicinity is ideal for radio transmission. Avoid interferences due to metal surfaces or other sources of magnetic / wireless interferences. • Ensure you are using new batteries. When in doubt, change the batteries as a precaution, then resume resynchronisation. 6 KB351RT User Guide How to use the keyboard After a successful installation, you are now free to move around the room to a location up to approx. 10 m from the PC. Range can be affected by dividing metallic surfaces, monitors, loudspeakers, switching power supplies, but also by low batteries. Keep track of the status LEDs on front side of the keyboard. This will inform you about a low battery situation. 3.1 Meaning of status LEDs • Pairing/Transmitting-LED Pairing: Led flashes once per second. It indicates that the keyboard and the USB receiver are in Pairing-Mod. It goes out after successful synchronization. Transmitting: LED flashes on every key stroke. It indicates key actuation and/or trackball operation that input information has been sent out successfully by radio transmission from the keyboard. • Battery Low-LED LED is on. It indicates that the remaining battery charge is low. The LED will stay on until a new battery is inserted or until the battery is used up completely. • Charging-LED LED flashes when charging and remains on when fully charged. Please make sure to use re-chargeable battery for charging. They keyboard can use also non -chargeable batteries. But do not attempt to charge them. 3.2 Special operation modes of the keyboard • Sleep-Mode After 10 minutes of no input from your keyboard or trackball, the keyboard automatically goes into Sleep-Mode (idle state) to save battery. • Wake up-Mode To wake the keyboard from Sleep-Mode press any key on your keypad (not including trackball) 7 KB351RT User Guide 4. Power sources This keyboard can be powered by the following three power sources. Primary battery (non-chargeable battery): 2 x AAA batteries are needed for operation. 3.0V to 2.0V only. Re-chargeable battery: 2 x AAA NI-MH batteries. 2.4V to 2.0V. When battery LED is on, you can connect a USB cable to charge the battery. USB bus power: Via mini-USB connector. Once a USB cable is plugged into the mini-USB connector and the other end is connected to a PC, the keyboard can be operated by USB power. In the meantime, if a pair of re-chargeable batteries are installed, the batteries can be charged. In the charging mode, the right most LED starts to flash and then remains on when it’s at full charge. The complete charging period is about 3-4 hours for an empty battery. Please note: do not attempt to charge non-rechargeable batteries. 8 KB351RT User Guide Troubleshooting Things to Consider In the unlikely event the keyboard does not work, even after synchronization, you can try the following options to resolve this problem: • If your USB receiver is attached to a USB hub, please install it directly to the USB connector of your notebook or desktop. • During synchronisation, the keyboard should be located close to the USB receiver to ensure a successful paring. Also ensure that the immediate vicinity is ideal for radio transmission. Avoid interferences due to metal surfaces or other sources of magnetic / wireless interferences. • Ensure you are using new batteries. When in doubt, change the batteries as a precaution, then resume resynchronisation. Older operating systems will not always automatically recognize USB devices, if you attach your USB receiver and an error of this effect occurs, please try the following to solve the problem: • Update your operating system to the latest version, by launching ‘Windows Update or downloading the latest service pack from the Microsoft website. • In some cases, your operating may need to reboot after installation of new hardware & software. Please reboot your computer. • Check whether your motherboard BIOS has support for USB keyboards. Some motherboard manufacturers offer BIOS up-dates for download over the Internet. • Ensure in your system settings that your USB connection is not disabled or missing from your system’s device manager. 9 KB351RT User Guide FCC Statement CAUTION: This device complies with Part 15 of the FCC Rules. Operation is subject to the following two conditions: (1) this device may not cause harmful interference, and (2) this device must accept any interference received, including interference that may cause undesired operation. The user’s manual or instruction manual for an intentional or unintentional radiator shall caution the user that changes or modifications not expressly approved by the party responsible for compliance could void the user’s authority to operate the equipment. Note: This equipment has been tested and found to comply with the limits for a Class B digital device, pursuant to part 15 of the FCC Rules. These limits are designed to provide reasonable protection against harmful interference in a residential installation. This equipment generates, uses, and can radiate radio frequency energy and, if not installed and used in accordance with the instructions, may cause harmful interference to radio communications. However, there is no guarantee that interference will not occur in a particular installation. If this equipment does cause harmful interference to radio or television reception, which can be determined by turning the equipment off and on, the user is encouraged to try to correct the interference by one or more of the following measures: —Reorient or relocate the receiving antenna. —Increase the separation between the equipment and receiver. —Connect the equipment into an outlet on a circuit different from that to which the receiver is connected. —Consult the dealer or an experienced radio/TV technician for help. Service & Warranty Service If you need assistance with the product, please visit our website at www.aziocorp.com for frequently asked questions and troubleshooting tips. Otherwise, please contact our dedicated customer care team. There are several ways to reach us: By Phone: (866) 468‐1198 By eMail: [email protected] On Live Help: http://www.aziocorp.com/support/helpdesk.htm 10 KB351RT User Guide Warranty AZIO Lifetime Warranty AZiO Corporation warrants only to the original purchaser of this product from an AZiO-authorized reseller or distributor that this product will be free from defects in material and workmanship under normal use and service for the life of the product. AZiO reserves the right, before having any obligation under this warranty, to inspect the damaged AZiO product, and all costs of shipping the AZiO product to AZiO for inspection shall be borne solely by the purchaser. In order to keep this warranty in effect, the product must have been handled appropriately and must not have been misused in any way. This warranty does not cover any damage due to accident, misuse, abuse or negligence. Please retain the dated sales receipt as evidence of the original purchaser & date of purchase. You will need it for any warranty service. In order to claim under this warranty, Purchaser must make claim to AZiO within 60 days of occurrence, and must present acceptable proof of original ownership (such as original receipt) for the product. AZiO, at its option, shall repair or replace the defective unit covered by this warranty. This warranty is non-transferable and does not apply to any purchaser who bought the product from a reseller or distributor not authorized by AZiO, including but not limited to purchases from internet auction sites. This warranty does not affect any other legal rights you may have by operation of law. Contact AZiO at [email protected] or at one of the technical support numbers listed below for warranty service procedures. DISCLAIMER OF WARRANTY EXCEPT FOR THE WARRANTY PROVIDED HEREIN, TO THE EXTENT PERMITTED BY LAW, AZiO DISCLAIMS ALL WARRANTIES, EXPRESS OR IMPLIED, INCLUDING ALL WARRANTIES OF MERCHANTABILITY AND/OR FITNESS FOR A PARTICULAR PURPOSE. TO THE EXTENT THAT ANY IMPLIED WARRANTIES MAY NONETHELESS EXIST BY OPERATION OF LAW, ANY SUCH WARRANTIES ARE LIMITED TO THE DURATION OF THIS WARRANTY. SOME STATES/PROVINCES DO NOT ALLOW LIMITATIONS ON HOW LONG AN IMPLIED WARRANTY LASTS, SO THE ABOVE LIMITATIONS MAY NOT APPLY TO YOU. LIMITATION OF LIABILITY REPAIR OR REPLACEMENT OF THIS PRODUCT, AS PROVIDED HEREIN, IS YOUR EXCLUSIVE REMEDY. AZIO SHALL NOT BE LIABLE FOR ANY SPECIAL, INCIDENTAL OR CONSEQUENTIAL DAMAGES, INCLUDING, BUT NOT LIMITED TO, LOST REVENUES, LOST PROFITS, LOSS OF USE OF SOFTWARE, LOSS OR RECOVERY OF DATA, RENTAL OF REPLACEMENT EQUIPMENT, DOWNTIME, DAMAGE TO PROPERTY, AND THIRD-PARTY CLAIMS, ARISING OUT OF ANY THEORY OF RECOVERY, INCLUDING WARRANTY, CONTRACT, STATUTORY OR TORT. NOTWITHSTANDING THE TERM OF ANY LIFE TIME WARRANTY OR ANY WARRANTY IMPLIED BY LAW, OR IN THE EVENT THAT ANY LIFE TIME WARRANTY FAILS OF ITS ESSENTIAL PURPOSE, IN NO EVENT WILL AZIO'S ENTIRE LIABILITY EXCEED THE PURCHASE PRICE OF THIS PRODUCT. SOME STATES/PROVINCES DO NOT ALLOW THE EXCLUSION OR LIMITATION OF INCIDENTAL OR CONSEQUENTIAL DAMAGES, SO THE ABOVE LIMITATION OR EXCLUSION MAYNOT APPLY TO YOU. THIS WARRANTY GIVES YOU SPECIFIC LEGAL RIGHTS AND YOU MAY ALSO HAVE OTHER RIGHTS THAT VARY FROM STATE TO STATE AND PROVINCE TO PROVINCE. 11