1
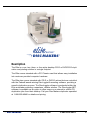
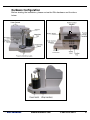
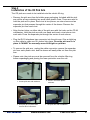
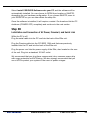
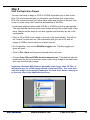
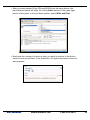
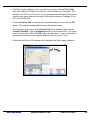
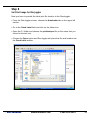
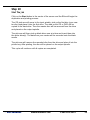
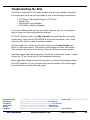
T
Version 1.1
01/23/03
Elite™
CD-R/DVD-R Publishing
and Printing System
Instruction Guide
Elite1
Elite2
Elite3
T
www.discmakers.com
Elite4
1-888-800-4041
Welcome
Congratulations on the purchase of your Disc Makers Elite™ duplication system. This sturdy unit has been professionally designed and manufactured
under strict quality guidelines to provide you with years of dependable and
trouble-free operation. This instruction guide is designed to allow the user
immediate operation of the Elite system. For advanced operation instructions,
please refer to the DiscJuggler manual.
Technical support
Disc Makers backs your duplicator purchase with free lifetime technical support. Tech support hours are from 9:00 a.m. to 6:00 p.m. EST Monday through
Friday at 1-888-800-4041. Or you can email our tech support team at
[email protected]. For FAQs, downloadable manuals, product
updates, and warranty registration, go to www.discmakers.com/support.
Warranty
Disc Makers warrants to the original purchaser that the duplication equipment
you have purchased is free from defects in materials and workmanship for a
period of one year (three years on robotics). This warranty is applicable when
the warranty registration has been completed and returned to Disc Makers
within a reasonable period of time following the purchase. This warranty is not
transferable.
Warranty does not apply to malfunctions caused by misuse, negligence, accident, or alteration. Disc Makers is not responsible for or liable for consequential
damages related to the use or misuse of this equipment. Disc Makers’ liability
under this warranty extends solely to the obligation to repair or replace a covered product. Disc Makers’ liability under this warranty shall not exceed the
cost of the covered product.
Warranty Repair
Any item that needs to be returned for a warranty repair must be returned
in original packaging. You must call Disc Makers for a return authorization
number (RMA) before returning any product. In the event that the original packaging has been discarded, you can purchase replacement packaging from Disc
Makers. The sender will be responsible for any damage incurred if product is
not returned in original or replacement packaging. To obtain replacement
packaging, call Disc Makers technical support at 1-888-800-4041 with the
model of your duplicator.
Piracy
The copying of audio, video, or software without the permission of the copyright
holder is illegal. Disc Makers accepts no responsibility for the copyright use or
misuse of this equipment. It is the sole responsibility of the user to ensure that
the legal rights of the copyright owners are respected.
T
www.discmakers.com
1-888-800-4041
2
Need blank media or supplies?
Disc Makers offers a range of top-quality blank CD-Rs and DVD-Rs at unbeatable prices, including our own Disc Makers Premium brand. We also have an
extensive line of packaging and mailing supplies, as well as inkjet cartridges
and other peripherals for your duplication and printing system. For the latest
products and lowest prices, shop securely online at www.discmarket.com, or
call 1-888-800-4041.
Custom printing on blank CD-Rs and
DVD-Rs -- in just 5 days!
Disc Makers gives you the same high-quality silk screen
technology on your blank media that we use on our
professionally replicated discs. Call 1-888-800-4041, or go
to www.discmakers.com/CDR105 for details and pricing.
Have a CD or DVD project that’s
too big for duplication?
With our state-of-the-art replication and printing facilities, no order is too small
or too large. Our turnkey packages make shopping for the right CD-ROM or
DVD package a snap. We offer hard-to-find packaging options in small or large
quantities, or we’ll create a custom package to fit your needs. And fast turn
times are our specialty. Many of our complete CD-ROM packages are ready in
just 7 working days! No one does it faster. Call your Disc Makers product specialist at 1-800-CD-ROM-NOW, or go to www.discmakers.com/rom for complete information and package pricing.
T
www.discmakers.com
1-888-800-4041
3
Table of Contents
Warranty . . . . . . . . . . . . . . . . . . . . . . . . . . . . . . . . . . . . . . . . . . . . . . . . . . . .2
Description . . . . . . . . . . . . . . . . . . . . . . . . . . . . . . . . . . . . . . . . . . . . . . . . . .5
Hardware Configuration . . . . . . . . . . . . . . . . . . . . . . . . . . . . . . . . . . . . . . . .6
Unpacking the Hardware . . . . . . . . . . . . . . . . . . . . . . . . . . . . . . . . . . . . . . . .7
Installation of the Pick Arm . . . . . . . . . . . . . . . . . . . . . . . . . . . . . . . . . . . . . .8
Installing Firewire PCI card into PC . . . . . . . . . . . . . . . . . . . . . . . . . . . . . . .9
Installation and Connection of AC Power, Firewire, and Serial Link . . . . . .10
Installation of the Autograph On-disc Printer . . . . . . . . . . . . . . . . . . . . . . . .11
Turn the System On and Boot Up . . . . . . . . . . . . . . . . . . . . . . . . . . . . . . . .12
Start the Duplication Process . . . . . . . . . . . . . . . . . . . . . . . . . . . . . . . . . . .13
Set On-disc Print Image (Label) . . . . . . . . . . . . . . . . . . . . . . . . . . . . . . . . .15
Set Printer Image for DiscJuggler . . . . . . . . . . . . . . . . . . . . . . . . . . . . . . . .17
Cycle Only Option . . . . . . . . . . . . . . . . . . . . . . . . . . . . . . . . . . . . . . . . . . . .18
Start the Job . . . . . . . . . . . . . . . . . . . . . . . . . . . . . . . . . . . . . . . . . . . . . . . .19
Troubleshooting . . . . . . . . . . . . . . . . . . . . . . . . . . . . . . . . . . . . . . . . . . . . . .20
T
www.discmakers.com
1-888-800-4041
4
elite
T
series™
Description
The Elite is a one, two, three, or four-writer desktop CD-R or DVD/CD-R duplication and printing solution in a single footprint.
The Elite comes standard with a PCI Firewire card that allows easy installation
into customer provided computer hardware.
The Elite also comes standard with CD-R or DVD-R writers that are controlled
with the Padus® award-winning DiscJuggler® recording software, providing a
smooth duplication process. The DiscJuggler software is preloaded within the
Elite autoloader providing a seamless, reliable solution. The DiscJuggler.NET
software is available as an option to allow users on a network to submit CD
duplication jobs from their desktop. Call your Disc Makers duplicator specialist
at 1-888-800-4046 for details and pricing.
T
www.discmakers.com
1-888-800-4041
5
Hardware Configuration
Before starting the installation, please review the Elite hardware and functions
below:
Firewire
Connection
T
www.discmakers.com
1-888-800-4041
6
Step 1
Unpacking the Hardware
Your system was shipped in two boxes. The larger box contains the Elite unit,
Firewire PCI card, and cables. The smaller box contains your Autograph ondisc inkjet printer.
Select a suitable location for your Elite. It should be level, clean, and free from
excessive vibration. Carefully open the largest box and remove the following:
• CD pick arm
• Firewire PCI card box
• Printer control cable
• AC power cord
• Software and manual
Set the components on a table that will hold the Elite unit and your PC. Next,
by lifting straight upward, carefully remove the foam container and foam protection over the Elite unit. You will see the Elite in a plastic bag. The Elite has
lifting handles on either side. Locate the lifting handles (see page 6) and
remove the Elite from the box. Take the Elite out of the bag and place all shipping components back into the shipping carton.
Important: Please save the original box and packaging in the event the unit
requires future servicing or you need to move the unit from one location to
another. This will help to reduce the possibility of damage occurring in transit.
Any item that needs to be returned for a warranty repair must be returned
in the original package. (See page 2.)
Next remove the printer from its shipping carton and place all the components
on the table. Account for all the components and proceed to installation of the
CD pick arm.
Large box opened with parts
located in top section.
T
Remove foam sections to access
the Elite unit.
www.discmakers.com
Locate the lifting handles (see
page 6) on the Elite unit and
lift out.
1-888-800-4041
7
Step 2
Installation of the CD Pick Arm
The CD pick arm needs to be installed onto the robotic lift ring.
• Remove the pick arm from its bubble wrap packaging. Included with the pick
arm will be a bag containing two small black plastic rivets. These are used to
hold the pick arm in place. Each rivet is two pieces, an outer sleeve and an
expander pin that presses through the center of the sleeve. Remove the
expander pin from each rivet.
• Align the two holes on either side of the pick arm with the holes on the CD lift
mechanism. Hold the pick arm with one hand and insert a rivet sleeve into
each side. Press the expander pin through the center of each sleeve.
• Plug the RJ12 telephone type connector into the pick arm. Give a slight tug
on this cable to make sure it’s locked into place. Once the pick arm is in
place it CANNOT be manually moved left/right or up/down.
• To remove the pick arm, unplug the cable connector, remove the expander
pin from each plastic rivet, and the sleeve will easily slide out from the pick
arm.
• Please note: the pick arm must be removed from the robotics lifter ring
before repackaging and placing the foam protection over the unit.
1. Locate pick arm and retainers.
3. Hold pick arm in place and
connect RJ12 connector.
T
2. Press in the black plastic
retainers.
4. The pick arm after installation.
www.discmakers.com
1-888-800-4041
8
Step 3A
Installing Firewire® PCI card into customer supplied PC
The Elite unit must be connected to a PC with the following minimum requirements:
Elite1 and
Elite2
Elite3 and
Elite4
CD Version
DVD Version
• 800 MHz Celeron® or equivalent
• 128MB RAM
• 7200 RPM 20 GB hard drive
• Free External Com Port (for RS232 to
autoloader)
• Free PCI Slot (for Firewire to Writers)
• Free Parallel Connection (for CD printer)
• Windows® XP
• 800 MHz Celeron® or equivalent
• 512 MB RAM
• 7200 RPM 20 GB hard drive
• Free External Com Port (for RS232 to
autoloader)
• Free PCI Slot (for Firewire to Writers)
• Free Parallel Connection (for CD printer)
• Windows® XP
• 1 GHz Celeron® or equivalent
• 1 GB RAM
• 7200 RPM 40 GB hard drive
• Free External Com Port (for RS232 to
autoloader)
• Free PCI Slot (for Firewire to Writers)
• Free Parallel Connection (for CD printer)
• Windows® XP
• 1 GHz Celeron® or equivalent
• 512 MB RAM
• 7200 RPM 40 GB hard drive
• Free External Com Port (for RS232 to
autoloader)
• Free PCI Slot (for Firewire to Writers)
• Free Parallel Connection (for CD printer)
• Windows® XP
These PC requirements are very important because the fast speed of the Elite
writers requires sufficient memory and FAST hard drives.
Locate the FireWire® PCI IEEE 1394 Host Adapter Box, open and follow the
instructions included for installation into your PC.
Locate and install the CD printer drivers and labeling software included with the
Elite system. Follow the instructions on their enclosed documentation.
Locate the Elite Setup and Installation CD-ROM and insert the disc into your
PC ROM drive. It will automatically open to a setup screen. Note: If your
CD-ROM drive is not set to autoplay, open the CD-ROM and click on
Index.htm.
Important: The Elite Setup and Installation CD-ROM sleeve will be sealed
with a sticker indicating your Unit Serial Number and Software
Registration Key. Open the CD-ROM sleeve carefully so that you will be
able to read these numbers later. You will be required to enter these numbers when installation of the software begins.
T
www.discmakers.com
1-888-800-4041
9
Select Install CDR/DVDR Software onto your PC and the software will be
automatically installed. You can choose to OPEN from location or SAVETO,
depending on your hardware configuration. If you choose SAVETO, save to
your DESKTOP so you can later delete the setup file.
Once the software is installed, it will require a restart. Go ahead and let the PC
shutdown (POWER OFF) completely and continue to the next section.
Step 3B
Installation and Connection of AC Power, Firewire®, and Serial Link
While the PC is off:
Plug the serial cable into the PC and into the back of the Elite unit.
Plug the Firewire cable into the PCI IEEE 1394 card that was previously
installed into the PC and into the back of the Elite unit.
Plug the power cord into the power supply of the Elite, also located on the rear
of the unit. Plug into a standard 115VAC outlet.
We recommend that you plug these components into a common power strip
with surge protectoin and AC filtering. We also strongly recommend that you
use a UPS to protect your system in the event of power outages.
T
www.discmakers.com
1-888-800-4041
10
Step 4
Installation of the Autograph On-disc Printer
Review the Autograph printer manual included with your printer. Install the inkjet
print cartridge (that was shipped with the printer) according to the
instructions in the printer manual before mounting your printer on the Elite duplicator. Note: You can order additional inkjet cartridges online at
www.discmarket.com, or call your product specialist at 1-888-800-4041.
The Elite is preset for the Autograph printer series
Place the Autograph into the print holding tray located at the top of the Elite unit
above the drive(s). Holding the printer with hands on the left and right sides,
insert the front of the printer in an angle first, then lower the back section gently
down into place. The printer should sit securely in into the print holder tray and
should be completely level.
Plug in the parallel printer cable (provided with the Elite) into the parallel
connetion on your PC.
Plug in the printer mini din control cable (this is similar to a keyboard cable and
has connectors on both ends) into matching connectors in the rear of the printer
and the rear of the Elite.
Place the AC power adapter that was provided with the printer next to the rear
of the printer and plug into a standard 115VAC outlet.
When you plug in the printer, power is applied. The printer will perform a basic
internal test and wait for additional commands from the operator of the software.
Install printer by allowing front section to rest in
place, then lower the rear section into the tray.
Connect the printer control cable
and parallel cable to the printer.
Connect the printer control cable
to the Elite.
T
www.discmakers.com
1-888-800-4041
11
Step 5
Turn the System On and Boot Up.
With all the cables in place and power connected, turn on the power button on
the right of the Elite then power on the PC.
Elite/DiscJuggler
This icon starts the duplication software and embedded autoloader.
Discus LE
This icon starts the Discus labeling software for the
on-disc printer. You will have to make a label with
this software and then print to a file. This *.prn file
will be utilized in the DiscJuggler software to print on
the label of the disc. By default, XP places the *.prn
into C:\ProgramFiles\Discus.
T
www.discmakers.com
1-888-800-4041
12
Step 6
Start the Duplication Process
You are now ready to begin a CD-R or DVD-R duplication job or task on the
Elite. The next steps will take you through a typical setup and usage of the
Elite. We recommend that you follow these steps and produce a test job, then
move on to the many other functions and features of the Elite.
• Load blank inkjet printable media (CD-Rs or DVD-Rs) onto the input spindle.
The input spindle has three silver rods located around the outside edge of the
discs. Make sure the discs do not stick together and that they lay flat in the
input spindle.
• Place a CD or DVD to be copied on the top of the input spindle. This will be
the “master” for this test run. We recommend that you use a CD with an
image of 30MB or less to allow for a faster test run.
• On the desktop, click on the Elite/DiscJuggler icon. The DiscJuggler program will open.
• Click on File / New and the panel pictured below will open.
• Choose Copy CDs and DVDs from the same burner. This task will take the
master disc on the top of the input stack, load a temp image to the hard drive,
and copy from the temp image.
Important: Because DVD files are generally much larger than CD files, it
will take longer for a DVD image to load to the hard drive. You must wait
until the image has completed loading to the hard drive before moving on
to the next step in the duplication process.
T
www.discmakers.com
1-888-800-4041
13
• After you have selected Copy CDs and DVDs from the same burner, the
panel pictured below will open. Go to the Action section in the upper right
portion of the panel. In the pull down section, select Write and Print.
• Next enter the number of copies or discs you want to produce in the Action
section in the second field. In the illustration, 25 copies have been chosen for
test purposes.
T
www.discmakers.com
1-888-800-4041
14
Step 7
Set On-disc Print Image (Label) for Media
The next step is to prepare a print image that can be used by the DiscJuggler
software to print text or graphics on your CD-Rs or DVD-Rs. To do this, you will
use the Discus labeling software provided with your Elite.
• Minimize the DiscJuggler screen and on the desktop, click on the Discus
icon. The labeling software will open.
• Double click on the label type (CD Label).
• You will see a window similar to the illustration below. Click on the Text tab.
Click the New button (below the Canvas tab) and type “Test Label.” Click the
OK button. The text will appear in the center of the label.
• When you move the arrow over the text box, it will change to a hand. Left
click and drag the text box to the top of the CD.
• You can change the font or enlarge the text with the options on the left side of
the window.
T
www.discmakers.com
1-888-800-4041
15
• The DiscJuggler software uses *.prn files for printing. Choose File / Print
from the menu bar. Examine the Printer name window for your printer. The
default is the CD Color Printer IV. If you purchased the Autograph Pro printer,
use the drop down carrot at the right of the printer window to change to the
CD Color Printer Pro.
• Click the Print to File box (below the properties button), then click the OK
button. The pop up window should match the screen below.
• You will see a pop up box titled Print to File with a window inside named
Output File Name. Type c:\printtest.prn. Be sure to include the *.prn at the
end of the file name. Click the OK button and the label in *.prn format will be
generated and saved in the highest directory level of your C drive.
• Minimize the Discus LE software and maximize the DiscJuggler software.
T
www.discmakers.com
1-888-800-4041
16
Step 8
Set Print Image for DiscJuggler
Now you have to provide the label print file location to the DiscJuggler.
• From the DiscJuggler screen, choose the Autoloader tab on the upper left
section.
• Go to the Good Label field and click on the folder icon.
• Open the C:\ folder and choose the printtest.prn file (or the name that you
chose for the test run).
• Choose the Open option and DiscJuggler will place this file and location into
the Good Label section.
T
www.discmakers.com
1-888-800-4041
17
Step 9
Cycle Only Option
As an option, you can elect to "cycle only" and the software will not record onto
the media. Printing will still occur, but the disc will not be recorded on. Check
the Cycle Only box in the Autoloader section at the top left to skip recording.
T
www.discmakers.com
1-888-800-4041
18
Step 10
Start The Job
Click on the Start button in the center of the screen and the Elite will begin the
duplication and printing process.
The CD pick arm will move to the input spindle, pick up the first disc (your master disc) and place it into the first drive. The data on the CD or DVD will be
copied to the hard drive. Then the master disc will be removed from the drive
and placed on the output spindle.
The pick arm will then pick up blank discs one at a time and insert them into
the writer drive(s). The data from your master will be recorded onto the blank
media.
The pick arm will remove the recorded disc from the drive and place it into the
printer tray. After printing, the disc will be placed on the output spindle.
This cycle will continue until all copies are completed.
T
www.discmakers.com
1-888-800-4041
19
Troubleshooting the Elite
The Elite is comprised of four basic systems that all work together. Generally,
any issues that come up can be isolated to one of the following components:
•
•
•
•
PC System / Windows® Program / PCI Card
Loader Unit
DiscJuggler Copy Software
CD Printer / Labeling Software
If you have difficulty with any one of the four systems, you can run separate
tests on each to verify and correct the problem.
On the PC System, click on the My Computer icon and view the connected
components. Verify that the CD-R/DVD-R drives are accessible. If not, there
may be a PCI Card or cable connection problem.
On the Loader Unit, if there is a problem, click on the Loader Debug icon.
Enter a V and press return. The loader should display its name and version.
This indicates the loader is functioning. Close the Debug terminal program.
Run DiscJuggler and view the explorer. Are all the components shown – loader,
drives, etc.? If not, check the PC and hardware connection.
DiscJuggler has a Help section that can assist in solving most problems within
the CD-R software. Or you can refer to the printed version of the DiscJuggler
manual that was included with this guide.
PHILADELPHIA AREA
NEW YORK CITY
LOS ANGELES
SILICON VALLEY
SEATTLE
CARIBBEAN
Plant & Main Office • 7905 N. Route 130, Pennsauken, NJ 08110-1402 • 1-888-800-4041 • Outside USA: 856-663-9030
11 West 17th Street, New York, NY 10011-5504 • 1-800-446-3470
3445 Cahuenga Blvd. W., Los Angeles, CA 90068-1329 • 1-800-731-8009
42650 Christy Street, Fremont, CA 94538-3135 • 1-800-869-0715
730 Andover Park West, Tukwila, WA 98188-3322 • 1-800-553-8906
Avenida Blvd., Arturo Cadilla EB18, Levittown, Toa Baja, PR 00949-2701 • 1-800-804-9588
T
www.discmakers.com
1-888-800-4041
20