1
FOREWORD
It is illegal to duplicate copyrighted discs for any reason other than personal use, unless you
happen to be the copyright owner. The Elite recording unit is intended for use only to those
identities that are the owners of the copyright or are properly licensed to use the copyright.
Copyright, Trademark and Service Mark Acknowledgement
Manual Revision 0
04 Rev 2
Discmakers and the Discmakers logo © Discmakers
Elite is a trademark of Discmakers
Microsoft, Windows, XP and .NET are registered Trademarks of Microsoft Corp.
Intel and Celeron are registered Trademarks of Intel Corporation
Plextor is a registered trademark of Plextor Corporation
Pioneer is a registered trademark of Pioneer Electronics
Sanyo is a registered trademark of Sanyo Corporation
Padus and Discjuggler are registered trademarks of Padus Inc
Primera is a registered trademark of Primera Technology, Inc
Signature IV is a trade name of Primera Technology, Inc
Discus is a trademark of Magic Mouse Productions, Inc
FlexWriter is a trademark of Amtren Corporation
All other trademarks and registered trademarks are the property of its respective owners.
This manual and its contents © 2001 2002 2003 Amtren Corporation
The Elite is manufactured under license of Patent 6,141,298 and other Patents Pending
Elite Setup Guide
Table of Contents
Welcome and Introduction
3
Hardware Overview
4
Minimum Hardware and Software Requirements
5
Unpacking the Hardware (Step 1)
6
Installation of CD Pick Arm (Step 2)
7
Installation and Connection of PCI Card into
Customer PC (Step 3)
8
Installation of CD Printer (Step 4)
9
Installation of Ink Cartridges (Step 5)
10
Connection of FireWire, Serial and AC Power
(Step 6)
11-12
Network Connection (Step 7)
13
Installation of Startup CDR (Step 8)
14-15
Installation of Recording Software (Step 9)
16-17
Installation of Autoloader Command Console (Step 10)
18-20
Installation of Autograph VI Drivers (11)
21
Installation of Labeling Software (Step 12)
22
Disabling Auto-Insert Notification for your
CD ROM Drives (Step 13)
23
Selecting CD Recorder Drives & Printing Port (Step14)
24
Loading Media & Using DiscJuggler (Step 15)
25-27
Design Print Image for Media (Step 16)
28-32
Set Print Image for DiscJuggler (Step 17)
33
Cycle Only Option (Step 18)
34
Start the Job (Step 19)
35
Using Drive Assigner
36
Troubleshooting Guide
37
2
Elite Setup Guide
Welcome
Thank you for purchasing the Elite CDR/DVDR publisher. This system has been designed and
is manufactured under strict quality guidelines. This product will provide years of dependable
and trouble free operation.
Description
125/200 Piece Input
CDR or DVDR Drives
2 Year Warranty on Robotics
The Elite is a multi writer desktop CD-R or DVD/CD-R copying and printing solution in a
single footprint. As the most versatile duplication system on the market today, the Elite offers
you endless possibilities to automate your CD-R or DVD/CD-R duplication and printing
needs.
The fast and advanced Center-Pick autoloading mechanism will provide ease of use and
will provide years of trouble-free operation.
The Elite is provided with all the hardware and software that allows easy installation with
customer provided computer hardware. Please be sure to review the minimum computer
requirements. Failure to observe these requirements could affect the performance of your
Elite and quality of your recorded product.
The Elite comes standard with CDR or DVDR/CDR combo writers which are controlled by
smooth duplication process with trouble-free operation. The DiscJuggler® software is firmly
embedded within the Elite's system providing a seamless and reliable solution to the user
Discus© labeling software is included to enhance your product. The Discus© label making
software is a simple and easy to use program that will enable you to create professional
quality CD/DVD labels.
3
Elite Setup Guide
Hardware Overview
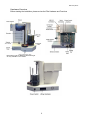
Before starting the installation, please review the Elite Hardware and Functions
Note that the front CD ROM and Hard Drive light
are only available on Pro models.
4
Elite Setup Guide
Customer Minimum Hardware and Software Requirements
Desktop systems change rapidly and the Elite was designed for use with PC systems that are
relatively new models. It is recommended that you operate your new Elite with the best
possible hardware. This will ensure you a recording and printing system that will operate
smoothly and efficiently.
The following are minimum requirements for the PC to which the Elite is to be connected.
These are very important. Due to the high speed of the Writers, sufficient memory and FAST
hard drives are required.
Minimum PC Requirements:
1 - 2 Drive Elite
1.0 GHZ Celeron® Processor or equivalent.
3 - 4 Drive Elite
1.7 GHZ Celeron® Processor or equivalent.
256 MB RAM.
512 MB RAM.
7200 RPM 20 GB hard drive with 50% free
space for CDR unit.
7200 RPM 20 GB hard drive with 50% free
space for CDR unit.
7200 RPM 40 GB hard drive with 70% free
space for DVDR unit
7200 RPM 40 GB hard drive with 70% free
space for DVDR unit
Free External Com Port (for RS232 to Elite)
Free External Com Port (for RS232 to Elite)
Free PCI Slot (for FireWire® card)
Free PCI Slot (for FireWire® card)
Free Parallel Connection (for CD printer)
Free Parallel Connection (for CD printer)
Software Requirements:
Windows 2000 or Windows XP
5
Elite Setup Guide
This brief setup guide is provided to get the Elite operational out of the box. Once you get the
system operational, complete online help can be accessed from the DiscJuggler HELP
Section.
Step 1
Unpacking the Hardware:
Your system was shipped in 1 box and contains the Elite unit, Firewire PCI Card and cables. If
you purchased the CD Printer, it was shipped in a separate box.
Carefully open the box and remove the top protective cardboard sheet. You will then be able
to remove the following:
CD Pick Arm
FireWire PCI Card Box
Printer Control Cable
Printer USB Cable
DB9 Serial Loader to PC Cable
AC Power Cord
Software and Manual
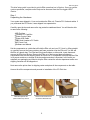
Set the components on a table that will hold the Elite unit and your PC. Next, by lifting straight
up, carefully remove the foam container and foam protection over the Elite unit. You will see
the Elite in a plastic bag. The Elite has lifting hand holders on either side, locate these and
remove the Elite from the box. Remove the Elite out of the bag and place all shipping
components back into the shipping carton for future use. It is important to always ship the Elite
in its proper container so storage of the box and accessories is important. In the event you
misplace your packaging and need to ship the Elite contact the service department and a new
shipping container will be shipped out.
Next remove the printer from its shipping carton and place all the components on the table.
Account for all the components and proceed to installation of the CD Pick Arm.
Main Box Opened and
parts located in top section
Remove foam sections and
Access the Elite Main Unit
6
Locate Lifting handles on
the Elite Unit and lift out
Elite Setup Guide
Step 2
Installation of CD Pick Arm
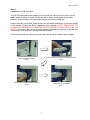
The CD Pick Arm needs to be installed onto the rotate arm. Remove the pick arm from the
bubble wrap packaging. Included with the arm will be a bag containing two black plastic
retainers. These retainers are used to hold the pick arm onto the rotate arm.
Hold the pick arm in one hand. Place the arm onto the slotted resting tray on the upper section
of the column. Plug in the RJ12 (telephone) type connector (NOTE: MAKE SURE THE
CONNECTOR RETAINER HAS SNAPPED INTO PLACE BY PULLING GENTLY ON THE
CABLE). Then secure the arm into place by pressing a retainer into each side of the pick arm.
These steps can be reviewed in the pictures shown below.
The pick arm should freely float or pivot from the point where the retainers were installed.
Locate Pick Arm & Retainers
Step 1
Hold Pick Arm in Place & Connect RJ12 Connector
Step 2
Install / Press in the Black Plastic Retainers
Step 3
The Pick Arm after Installation
Step 4
7
Elite Setup Guide
Step 3
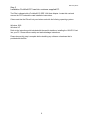
Installation FireWire® PCI card into customer supplied PC.
The Elite is shipped with a FireWire® PCI IEEE 1394 Host Adapter. Locate this card and
remove the PCI Card and the card installation instructions.
Please note that the Elite will only work when used with the following operating systems:
Windows 2000
Windows XP
Refer to the instruction guide included with the card for details on installing the 1394 PCI Card
into your PC. Please observe safety and static discharge instructions.
Please be sure this step is complete before installing any software or hardware that is
provided with the Elite.
8
Elite Setup Guide
Step 4
Installation of the CD Printer
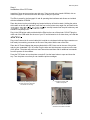
Install the Printer and connections per this step. Then proceed to the install CDROM, click on
Install Autograph VI Drivers and follow the steps as they are provided.
The Elite is preset for the Autograph VI and all operating label software and drivers are included
with the installation CDROM.
Place the printer into the print holding tray located at the top of the drive stack. Holding the printer
with hands on the left and right side, insert the front on the printer at an angle first, and then let the
be securely inserted into the print holder tray and
should be completely level.
Plug in the USB printer cable provided with the Elite into the rear of the printer. DO NOT plug the
other end of the USB cable into the rear of your PC until directed to do so later when you install the
Plug in the Printer mini din control cable (this is similar to a keyboard cable and has connectors on
both ends) into matching connectors in the rear of the printer and the rear of the Elite.
Place the AC Power Adapter that was provided with the CD Printer next to the rear of the printer
and plug into a standard 115V AC outlet. Plug the other end into the power connector on the rear
of the printer. The printer will perform a basic internal test and then wait for additional commands
from the operator or the software.
Press the TOP button to turn the printer on and off. Use the lower button to open and close the
tray. Turn the printer on so that you can install the printer cartridges.
Connect the Printer USB
Cable to the printer
Install Printer by allowing front section
to rest in place, then lower the
rear section into the tray.
Connect the Printer DIN Control
Cable from the Printer to the Elite
9
Elite Setup Guide
Step 5
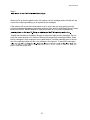
When you lift up the front plastic cover of the printer, the ink cartridge holder will slide into the
center of the opening enabling you to replace the ink cartridges.
If the pickarm will not allow the front plastic cover to open, then you may gently push the
pickarm downward by applying downward pressure at the base of the pickarm where it wraps
around the column. NEVER attempt to rotate the pickarm or try to push it downward by
Unpack the included ink cartridges. Be sure to remove the tape from the cartridges. Do not
touch the metal contacts or ink nozzles. Release the latches on the cartridge holders. Place
the ink cartridges in their respective color-coded holders. The black cartridge goes in the left
slot of the cartridge holder and the color cartridge in the right slot. To secure the cartridges,
place. Close the printer door.
10
Elite Setup Guide
Step 6
Installation and Connection of AC Power, FireWire® and Serial Link
Plug the FireWire® and Serial Cable into each of their identified connections located on the
rear of the Elite unit. These connections are identical to the common connections of standard
computers. If you have multiple recorders, then short FireWire® cables are used to link each
Arrange your PC hardware on the same table as the Elite unit. Connect the other ends of the
FireWire® and Serial Cables to their respective connections on your PC. Plug the power cord
into the power supply of the Elite, also located on the rear side. Plug into a standard 115VAC
outlet.
It is recommended to plug these components into a common plug strip with AC filtering, as is
common with most high-end computers. Also if the unit is to be located in an area where the
utility or power company experiences frequent outages, utilizing a UPS is strongly
recommended.
Rear View of FireWire® Connections
Loader Serial Connection
Drive FireWire® Connection
Printer Control Connection
AC Power Connection
11
Elite Setup Guide
Please review your entire unit and be sure that you have the following:
Four cables connected to the Elite Unit
2. Printer control cable running from the rear of the Elite to your CD printer.
the CD recorder on the rear of the Elite. Note that if you have multiple recorders,
4. AC power cable from the power supply on the rear of the Elite to a standard wall outlet.
Three cables connected to the printer
1. Printer control cable from your Elite unit
2. USB printer cable that will plug into your PC
3. Power cable from a standard wall outlet.
Two cables connected to your PC
1. FireWire® cable running a recorder of the Elite unit.
2. USB printer cable that is NOT yet plugged into your PC from the CD printer.
3. Serial cable running to the serial port on the rear of the Elite.
12
Elite Setup Guide
Step 7
Network Connection
You may connect the Elite to your existing computer network. It may be necessary to change
Connecting the Elite to your network will allow you to access shared folders and drives on
other computers in the network. The DiscJuggler.Net software allows other users on your
network to submit CD duplication jobs to the Elite from their desktop. If your network includes
access to the Internet, then you can easily download software updates as they become
available.
13
Elite Setup Guide
Step 8
Installation of Startup CDR
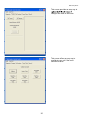
automatically open to a setup screen. Note: If your CDROM drive is not set to autoplay, open
the CDROM and click on click_here.htm.
Once the Installation CDR is deployed, you will have several options displayed on the screen.
Each of these options are briefly outlined on the following pages.
Install 1-2 Drive CDR/DVDR Software or Install 3-4 Drive CDR/DVDR Software
Installs the following three programs:
DiscJuggler Pro 4.1 Local Batch Mode Duplication from any source.
autoloading-printing process.
ImageJuggler 4.1 Local FAST Duplicate and Print Mode with
asynchronously operation of the drives and the printer. This mode is best
used for medium to high volume production tasks. The production output
will be significantly higher than the batch mode. To use the ImageJuggler
program, you must first create an image of your CD using DiscJuggler
Pro. The ImageJuggler should only be used by the experienced
operators.
Network Console Icon. This allows login and setup of the Network Server
Operating Platform. This package is set to login automatically upon
opening the package. The console ICON will appear in the lower right
desktop area when it is deployed. This package should be operational at
all times to service requests from the clients on your network. This service
of the client work will not impact the local jobs from either DiscJuggler Pro
or ImageJuggler.
Install AutoLoader Command Console Program
The ACC (Autoloader Control Console) provides a graphical interface
allowing you to troubleshoot, update, and adjust your Elite unit. This is a
useful utility for setup and maintenance of the Elite. You may have to
install the .NET Framework, also located on this CD, before installing this
software.
14
Elite Setup Guide
Install Autograph VI Drivers
This link will display detailed, step by step directions for the setup of your Autograph VI
drivers.
View Hardware Setup PDF Document
This is an electronic PDF version of this installation manual.
View Autograph VI Setup PDF Document
This is an electronic PDF manual for the Autograph VI.
Register Your Elite
If your PC is currently connected to the Internet, click on this option to register your Elite
online. You are encouraged to register your Elite to allow you to be notified of software
updates.
Check for Software Updates/Upgrades
If your PC is currently connected to the Internet, click on this option and you will be directed to
the software support download site. You can compare the version you are installing or are
download the installation PDF and review before upgrading your software.
Install .NET Framework
This is a copy of the Microsoft® .NET installer. If your PC does not already have the .NET
framework, the ACC installation will fail and you will need to install this program.
Install Client CDR/DVDR Software on Network PC's
You may carry this CD to the other computers on your network and use this option to
install the client version of DiscJuggler. This software is used to submit jobs to the
DiscJuggler server that runs the Elite directly. If you have DiscJuggler.NET, multiple
clients can submit multiple jobs. If you have DiscJuggler Professional, then only one client
can submit a single job at a time.
15
Elite Setup Guide
Step 9
Installation of Recording Software
(CD Step 1)
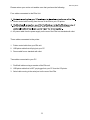
The first option is to install the recording software. Select either the 1-2 CDR/DVDR Software
or the 3-4 CDR/DVDR Software depending on the number of recorders your unit has. You will
hardware configuration. If you choose SAVETO, then save to your DESKTOP so you can later
delete the setup file. The software installation will begin automatically.
Note: Keep the Registration Key [DJ4A-0000-0000-0000-00] on the back of the Sleeve handy;
you will need to enter this number when installation of the software begins. Play close
attention to the Key and be sure to enter exactly as it is written on the label.
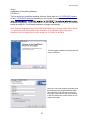
The DiscJuggler installation will begin with this
screen. Click Next.
Enter your name and company information and
the Registration Key [DJ4A-0000-0000-000000] on the back of the CD Sleeve and on the
front page of this manual. Play close attention
to the Key and be sure to enter exactly as it is
written on the label.
16
Elite Setup Guide
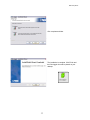
Click complete and Next
The installation is complete. Click Finish and
the DiscJuggler Icon will be placed on your
desktop.
17
Elite Setup Guide
Step 10
Installation of Autoloader Command Console
(CD Step 2)
Next you can install the ACC (Autoloader Command Console) program. This is a utility
program used to align and support the Elite unit.
Double click on the install Autoloader Command Console Program and choose Open from
location. The ACC will install, please follow the instructions.
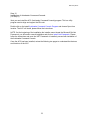
NOTE: If at the beginning of the installation the installer cannot locate the Microsoft Dot.Net
Framework, you will need to cancel installation and click on Install .Net Framework. Please
follow the instructions and once the .NET Framework is installed, proceed with installation of
the Autoloader Command Console.
Once the ACC has been installed, review the following two pages to understand the features
and functions of the ACC.
18
Elite Setup Guide
The ACC allow you to troubleshoot and
update your Elite unit. If any electrical or
mechanical issues occur, run the
Diagnostics. The ACC Diagnostic routine will
test all functions of the Elite and provider
graphical feedback.
The Comm Port setting enables you to
chose between using COM1 and COM2
when communicating with the Elite. This
cable into.
! CAUTION !
This screen allows you to adjust the position
of the Picker Arm when placing CDs in the
recorder and printer. DO NOT change these
settings unless instructed to do so by a
qualified technician.
19
Elite Setup Guide
This screen provides an easy way to
changes are made in the future.
This screen offers an easy way to
recalibrate your unit if the need
should ever arise.
20
Elite Setup Guide
Step 11
Install Autograph VI Drivers
(CD Step 3)
By clicking on the Install Autograph VI Drivers link on the Installation and Support CDROM,
you will open a second page with instructions detailing the installation and setup of your
Autograph VI. Please follow these directions exactly. Failure to do so could result in inferior
printing results.
21
Elite Setup Guide
Step 12
Installation of Labeling Software
Locate the Discus CD Labeling Software CDR and insert into your CDROM drive on the PC
XXX-XXX-XXX. This key will be needed to complete the Discus installation.
The menu below will be displayed. Choose install to hard disk. If your CDROM drive is not set
to autoplay, open the CDROM and click on Launcher.exe. NOTE: Be sure that your PC can
handle the 500MB and not affect the minimum requirements of the Elite hardware.
When the Discus Labeling Software begins to install, it will first load Apple QuickTime onto
your PC. Following the instructions on the installation. When the screen asks to register the
QuickTime, simply click on Proceed without entering anything.
Once the Discus installation is complete, a DiscusLE icon will be placed on your desktop.
Click on the Discus LE icon and verify that the Discus installed correctly. The following screen
will appear. Type in your Discus key and click the OK button. Close Discus and remove the
CDROM.
Type in your Discus Key.
22
Elite Setup Guide
Step 13
Disabling Auto-Insert Notification for your CD ROM Drives
If your computer automatically tries to play a music CD, or launch a program when a data CD
is inserted into your CD ROM drive, then you w
feature. You MUST
a master CD to be copied, your computer will try to automatically play or run whatever is on
that CD.
One easy way to disable Auto-Run in Windows XP and 2000 is as follows:
You will see a screen
similar to the one at the
left. Click on
HKEY_LOCAL_MACHINE, then
SYSTEM, then Current Control Set,
and then Services.
Scroll down until you find a folder called
side of the screen, you will see an
name and a new window will open,
allowing you to change the value from a
Below is a picture of this. Click OK and
close the Registry Editor.
Reboot your computer.
23
Elite Setup Guide
Step 14
Using Drive Assigner to select Recording Drives & Printing Port
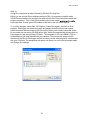
Before you can use the Elite to duplicate and print CDs, it is necessary to specify which
CD/DVD burners and printer port are to be used with the Elite. Ensure that all the cables are
properly connected. Turn on the Elite by pressing the power switch
front right side. A small green LED located on the front of the unit should light up.
To run Drive Assigner, select Start, All Programs, Padus DiscJuggler, and click on Drive
Assigner. DiscJuggler will review the system and display the devices that it has located.
Select the writers that are located in the Elite unit by clicking on the boxes beside the drives.
Do not select any non-writing CD ROM drives. Also, select the appropriate printing port for
DiscJuggler to use when printing CD labels. The Autograph VI will use USB001. Click on
Update and then OK when finished with your selection. This process will assign only the
recorders of the Elite to DiscJuggler and will set which port the software uses to communicate
with your CD printer. The assignment will remain set unless you run the Drive Assigner again
and change your settings.
24
Elite Setup Guide
Step 15
Loading Blank Media & Using DiscJuggler
Ensure that all the cables are properly connected. If you have not already done so, turn on
the Elite by pressing the power switch
front right side. A small green
LED located on the front of the unit should light up. If not, check to see that the power supply
located at the rear of the unit is turned on and that it is properly connected to a standard
working 115V power outlet. You are now ready to start creating and duplicating CD/DVDs.
The next steps will take you through a typical setup and usage of the Elite. It is recommended
to follow these steps and produce a test job, then move on to the many other functions and
features of the Elite.
Load blank Ink Jet media, data side down, onto the input spindle. The input spindle has three
silver rods located around the outside edge of the media. Please be sure the media does not
stick together and that the media lays flat in the input spindle. You may use the included gray
plastic alignment rod to help ensure that the CDs are properly aligned.
Place a CD-R to be copied on top of the blank media in the input spindle. This will be
faster.
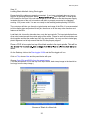
On the Desktop, click on the DiscJuggler ICON and the DiscJuggler will run.
Click on File, choose New and the panel below will open.
Choose Copy CDs and DVDs from the same burner
(This task will take the CD on the top of the Input Stack; load a temp image to the hard drive
and copy from the temp image.)
Screen of Start of a New Job
25
Elite Setup Guide
After you have selected Copy CDs and DVDs from the same burner, the panel below will
open. Choose ACTION from the upper right section. On the PULL DOWN select Write and
Print if you have a CD/DVD printer. Otherwise, select Write.
Under the Source and Destination tab, ensure that the Elite unit is selected, and NOT a
recorder on your PC. Next enter the number of Copies or disks you want to produce, we have
chosen 25 as shown below:
26
Elite Setup Guide
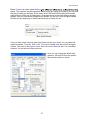
Below Copies is an option called Method
speed. The maximum possible speed will depend upon the model of recorder in your unit and
the type of media you are using. Since nearly all the CDR and DVDR media on the market
today will burn at 24X and 2X respectively, we suggest those as the initial default recording
speeds. Once you successfully complete your first job, you can try to burn at higher speeds.
Results will vary depending on which brand and type of media you use.
Burn Speed Selector
Once you have found a burning speed that works well with your media, you can make that
speed the default. To do this, click on the Tools menu located at the top of the DiscJuggler
window. Then click on the Options menu. Next, click on the Defaults tab if it is not already
selected. You will see the following window.
Here, you can change the default write
speed for CDs and DVDs to the speeds
that work best with your media.
27
Elite Setup Guide
STEP 16
DESIGN PRINT IMAGE (LABEL) FOR MEDIA
Note: You must be using an Autograph VI CD Printer in the following steps. If
you are using another printer refer to documentation that includes your printer.
Next you have to prepare a print image that can be used by the DiscJuggler software to print
text or graphics on top of the media. To do this you will have to use the Discus labeling
software provide with the Elite. Minimize the DiscJuggler software and on the Desktop, click
on the Discus CD Labeling ICON. The Discus software will open.
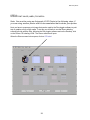
When the Discus screen below opens, click on CD Label.
28
Elite Setup Guide
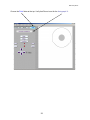
Choose the Print folder at the top. Verify that Discus is set for the Autograph VI.
29
Elite Setup Guide
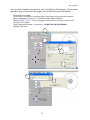
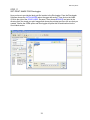
Choose the Text (1) folder at the top. Click on an ABC (2) button and the Centered (3)
button. Then click on the New (4) button. Type in the text as shown in the figure below.
1
4
2
3
30
Elite Setup Guide
Once you have completed your test label, save it by clicking on File and save. Choose a path
that will be easy to access from DiscJuggler, such as My Documents or the Desktop.
Click on the Print folder.
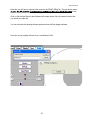
Click on the Print button. A Printer Display similar to the one shown in the figure below will be displayed.
Make sure that the Autograph VI is selected under Printer Selection.
Choose PRINT TO FILE. In order for Discjuggler to use the label file, it is necessary to create a print file.
Click on PRINT button.
Type in the print file name: (i.e. printtest.prn) YOU MUST ADD THE .PRN EXTENSION.
Click the OK button.
1
2
3
4
5
6
7
31
Elite Setup Guide
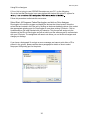
Note that you will have to choose a file name for the PRINT (PRN) file. This can be the same
. In the
example below we have created printtest.prn
Click on OK and the Discus Label Software will create the prn file in the same location that
you saved your label file.
You can minimize the labeling software and maximize the DiscJuggler software.
Note this may be slightly different if you use Windows 2000.
32
Elite Setup Guide
STEP 17
SET PRINT IMAGE FOR DiscJuggler
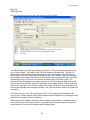
Now you have to provide the label print file location to the DiscJuggler. From the DiscJuggler
Software choose the AUTOLOADER tab on the upper left section. Then click on the folder
ICON to the right of the GOOD LABEL file panel. Then choose BROWSE and point to the
directory that you stored your print images and choose the printtest.prn file or the one that you
created. Choose the OPEN option and DiscJuggler will place this file and location into the
Good Label section.
33
Elite Setup Guide
Step 18
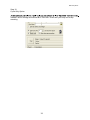
Cycle Only Option
Instead it will run through all functions BUT RECORD. Check the Cycle Only box to skip
recording.
34
Elite Setup Guide
Step 19
Start The Job
Now you are ready for the unit to start a job. Click on the START button.
The Elite should move to the input spindle, pick up the 1st CD (your master) and place it into
one of the recorders. The image on the CD will be copied to the hard drive. Then the CD
Master will be removed from the Drive and place on the output spindle. Then the Elite will
place a blank CD from the input spindle into each of your CD recorders. Next, the image will
be recorded onto the media. After that, the Elite will pick up the recorded disk from one of the
recorders and carry it to the top of the column and wait for the CD Printer to open. The
recorded CD will be placed into the printer tray and the CD will be printed. After printing, the
Elite will pick up the CD from the printer and place it on the output spindle. This will repeat for
each of your recorders. Once all your recorders are empty, the Elite will take more blank CDs
from the input spindle and reload the recorders. This cycle will continue until the 25 copies are
completed.
If the unit is trying to use a CD recorder on your PC, or if you get an error message when
trying to print, please read the Using Drive Assigner section located on the next page of this
guide for some steps to correct the problem.
Please observe the operation and verify that everything works smoothly. If anything does not
work, back track and review your steps. If you cannot find the problem please call customer
service and one of our technical support staff will gladly assist.
35
Elite Setup Guide
Using Drive Assigner
If Your Unit is trying to use CD/DVD Recorders on your PC, try the following:
Due to the fact that DiscJuggler is an open platform that looks at the entire PC system for
Follow this procedure to eliminate this occurrence:
Select Start, All Programs, Padus DiscJuggler, and click on Drive Assigner.
DiscJuggler will review the system and display the devices that it has located. Select the
writers that are located in the Elite unit by clicking on the boxes beside the drives. Also, select
the appropriate printing port for DiscJuggler to use when printing CD labels. Click on
Update and then OK when finished with your selection. This process will assign only the
recorders of the Elite to DiscJuggler and will set which port the software uses to communicate
with your CD printer. The assignment will remain set unless you run the Drive Assigner and
change your settings.
If you have a Autograph VI and get an error message and cannot print after a CD is
placed in the printer, please read the above paragraph for details on how to select
the proper USB printing port for the printer.
36
Elite Setup Guide
Troubleshooting the Elite
The Elite systems is comprised of 4 basic systems that all work together similar to a PC,
Scanner and Printer configuration.
Generally any items that come up can be isolated to one of the following components:
1) PC System / Windows® Program / PCI Card
2) Loader Unit
3) DiscJuggler Copy Software
4) CD Printer / Labeling Software
If you have difficulty with any one of the four systems, you can run separate tests on each to
verify and correct the problem.
On the PC System, click on the MY COMPUTER Icon and view the connected
components. Verify that the CDR/DVDR drives are accessible. If not, there may be a PCI
Card or cable connection problem.
Run the DiscJuggler and view the explorer. Are all the components shown? Loader, Drives
etc. if not then you may have to check the PC and hardware connection. The DiscJuggler has
online help that can assist in solving most problems within the CDR Software.
If you have any problems that you cannot solve call our service line.
37