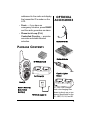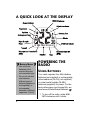
1
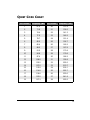
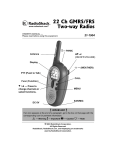
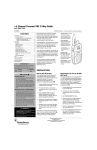
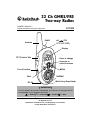
www.radioshack.comSM
22 Ch GMRS/FRS
Two-way Radios
OWNER’S MANUAL —
Please read before using this equipment.
21-1903
PANIC
(ON/
OFF/VOLUME)
off
Antenna
Display
PTT (Push to Talk)
Press to change
channels or
select functions.
Func (Function)
MENU
EAR/MIC
CALL
Wrist Carry Strap Holder
DC 6V
! IMPORTANT !
If an icon appears at the end of a paragraph, go to the box on that page with the
corresponding icon for pertinent information.
o — Warning ! — Important
— Caution Ô — Note
© 2003 RadioShack Corporation.
All Rights Reserved.
RadioShack, RadioShack.com, and Adaptaplug are trademarks
used by RadioShack Corporation.
CONTENTS
Package Contents ............................................................................ 5
A Quick Look at the Display ................................................................. 6
Powering the Radio .............................................................................. 6
Using Batteries ................................................................................. 6
Recharging Ni-Cd or Ni-MH Batteries ............................................... 8
Operation ........................................................................................... 10
Turning the Radios On/Off and Adjusting the Volume .................... 10
Transmitting .................................................................................... 10
FRS Frequencies Chart .................................................................. 11
Selecting a Channel ........................................................................ 12
Selecting Quiet Codes .................................................................... 12
Quiet Code Chart ............................................................................ 13
Using Scan ..................................................................................... 14
Using Key Lock ............................................................................... 14
Using Key Tone and Vibrate ........................................................... 14
Using VOX ...................................................................................... 15
Using APO ...................................................................................... 16
Using Hi/Lo Transmitter Power ....................................................... 16
Using Courtesy Tone ...................................................................... 17
Using a Headset ............................................................................. 17
Direct Call Operation .......................................................................... 17
Setting Home ID ............................................................................. 20
Setting Direct Call ........................................................................... 20
Call Melody ..................................................................................... 21
Using Panic ..................................................................................... 22
Using the Swivel-Belt Clip ............................................................... 22
Using an Optional Wrist Strap ......................................................... 23
Care ................................................................................................... 23
Service and Repair ............................................................................. 23
FCC Information ................................................................................. 24
FCC License Required ................................................................... 24
The FCC Wants You to Know ......................................................... 26
Safety Information ........................................................................... 27
Specifications ..................................................................................... 27
2
Thank you for purchasing the
RadioShack 22 Ch GMRS/FRS Twoway Radio. It provides short-range
voice radio communication to let
families and groups keep in touch with
each other on specific reserved
channels.
The radio is a lightweight, palm-sized
radio you can use to talk with another
person in the communication range (up
to 5 miles) who has a GMRS/FRS radio
set to the same frequency as yours.
Your radio has 22 channels and 38
different quiet codes, which you can
use to talk with another person who has
a GMRS or FRS radio set to the same
frequency as your radio. Your radio
also has auto-squelch, so you will not
hear anything on a channel unless
someone is transmitting nearby on the
same channel.
You can connect an optional speaker/
microphone and earphone to the radio
(neither supplied, available at your local
RadioShack store).
Your radio’s display has a backlight that
turns on for about 5 seconds when you
press any key except PTT.
3
Your radio’s other features include:
• Channel Scan — use to find other
GMRS/FRS users.
• Key Beep — each time you press
a key, except PTT or FUNC, the
radio beeps once.
• Vibrate — vibrates for 2 seconds
when receiving a signal if the radio
has been idle for more than 30
seconds.
• Voice Operated Transmission
(VOX) — enables standalone
usage and works with handsfree
accessory.
• Automatic Power Off — the radio
automatically turns off when the
radio is idle for 30, 60 or 90
minutes.
• Hi/Lo power selection — select
the transmit power 0.5W or 1.5W
for a GMRS channel.
• Courtesy Tone — at the end of
transmission, the radio (receiver
side) sounds a tone to confirm the
end of tramsmission.
• Direct Call — in the transmitter
you can select the receiver radio to
receive a call. In receiver, the radio
will receive the call that is
4
addressed to the radio and display
the transmitter ID number on the
LCD.
OPTIONAL
ACCESSORIES
• Panic — if you have an
emergency situation, press PANIC
and the radio generates an alarm.
• Phase-lock Loop (PLL)
Controlled Circuitry — provides
accurate and stable channel
selection.
Headset with Mic
PACKAGE CONTENTS
Alkaline Batteries
Ni-MH Batteries (8)
Dual Charger (1)
Cigarette-Lighter
Adapter
Radio (2)
Owner’s Manual (1)
Quick Start (1)
Belt Clip (1)
9V 500 mA adapter (1)
21-1930 Fast Charger
that cuts charging time
down to about one or two
hours. Specifically for the
21-1902, 03, 04, and 05.
5
A QUICK LOOK AT THE DISPLAY
MISS ID Indicator
Channel Indicator
500mW Low Power
Keypad Lock
Key Beep
Battery Level Meter
Courtesy Tone
Vibrate
Signal Strength
Meter
CTCSS Code Indicato
Transmit
Voice Operated Transmission
(VOX)
Ô Battery Notes Ô
•
•
6
Use only fresh
batteries of the
required size and
recommended type.
Do not mix old and
new batteries,
different types of
batteries (alkaline or
rechargeable), or
rechargeable
batteries of different
capacities. (Cont’d)
Function
Scan
Automatic Power Off
(APO)
POWERING THE
RADIO
USING BATTERIES
Your radio requires four AAA alkaline
batteries (not supplied) or rechargeable
nickel-cadmium (Ni-Cd) (not supplied)
or nickel-metal hydride (Ni-MH)
batteries (supplied) for power. For the
best performance and longest life, we
recommend RadioShack batteries. Ô
1. To turn off the radio, rotate VOL/
OFF clockwise until it clicks.
2. Slide down the battery
compartment cover and remove
the cover.
3. Set CHARGE ON/OFF inside the
battery compartment to OFF (to
use alkaline batteries) or to ON (to
charge Ni-MH or Ni-Cd
rechargeable batteries) when
charging the batteries through the
6V DC jack on the bottom of the
radio.
o
4. Install four AAA batteries
according to the polarity symbols
(+ and –) marked inside the battery
compartment.
Ô Battery Notes Ô
(Cont’d)
• Dispose of old
batteries promptly
and properly.
• Do not burn or bury
batteries.
• If you do not plan to
use the radios for a
month or more,
remove the batteries.
Batteries can leak
chemicals that can
destroy electronic
parts.
•
5. Replace the cover and push the
latch up until it clicks. Then rotate
VOL/OFF counterclockwise until it
clicks to turn on the radio.
o
WARNING
o
If you use nonrechargeable
batteries, be sure to
set CHARGE ON/
OFF to OFF. Nonrechargeable
batteries can get hot
and explode if you try
to recharge them.
7
CAUTION
You must use a Class 2
power source that
supplies regulated 6V
DC (Not more than 6V)
and delivers at least
900mA. Its center tip
must be set to positive
and its plug must fit the
radio’s DC 6V jack.
Using an adapter that
does not meet these
specifications could
damage the radio or the
adapter.
Ô NOTES Ô
•
Complete charging
takes about 10 hours.
• Using the optional
Smart Charger reduces charge time to
about 2 hours. The
Smart Charger is
available at your
local RadioShack
store
• You can use your
radio while charging
the batteries if you
connect it to a DCDC regulated and
filtered adapter. If
you connect it to an
AC-DC regulated
adapter, you cannot
use your radio when
charging.
8
appears on the display to indicate
how much battery power remains.
When ² flashes, replace alkaline
batteries or recharge Ni-Cd or Ni-MH
batteries.
RECHARGING NI-CD OR
NI-MH BATTERIES
The radio’s DC 6V jack is for charging
Ni-Cd or Ni-MH batteries and powering
the radio. You can recharge Ni-Cd or
Ni-MH batteries inside the radio at
home or in your vehicle, using a 6V,
900mA AC or DC adapter and a size F
AdaptaplugTM connector.
Ô
1. Rotate ON/OFF/VOLUME clockwise
until it clicks to turn off the radio.
2. Pull down the latch on the battery
compartment cover, then remove
the cover.
3. Set CHARGE ON/OFF to ON.
4. Place four Ni-Cd or Ni-MH
batteries in the compartment
according to the polarity symbols
(+ and –) marked inside. Then
replace the cover and push the
latch up until it clicks.
5. Attach the Adaptaplug to the
adapter so TIP reads positive (+).
6. Connect the Adaptaplug’s other
end to the radio’s DC 6V jack and
plug the adapter into a standard
AC outlet or vehicle’s power
source.
7. When charging is complete,
unplug the AC or DC adapter from
the power source, then disconnect
it from the radio’s DC 6V jack. !
Using the Supplied Dual
Charger or an Optional Smart
Charger
1. Connect the supplied AC-DC
adapter to the jack on the back of
the dual charger. Then plug the
other end into an AC wall socket.
2. Pull down the latch on the battery
compartment cover. Then remove
the cover.
3. Set CHARGE ON/OFF to ON.
! IMPORTANT !
The EPA
certified
RBRC®
Battery
Recycling
Seal on the
nickel-cadmium (Ni-Cd)
battery indicates
RadioShack is voluntarily
participating in an industry
program to collect and
recycle these batteries at
the end of their useful life,
when taken out of service in
the United States or
Canada. The RBRC
program provides a
convenient alternative to
placing used Ni-Cd batteries
into the trash or the
municipal waste stream,
which may be illegal in your
area. Please call 1-800THE-SHACK (1-800-8437422) for information on NiCd battery recycling and
disposal bans/restrictions in
your area. RadioShack’s
involvement in this program
is part of the company’s
commitment to preserving
our environment and
conserving our natural
resources.
9
Ô NOTES Ô
•
Complete charging
takes about 10
hours.
•
Use of this radio
outside the country in
which it was intended
to be distributed is
subject to
government
regulations and may
be prohibited.
•
•
•
10
To save power, the
radio automatically
stops transmitting
when you hold down
PTT for about two
minutes.
The dual charger
might not supply
enough current to
charge the batteries
if you use the radio to
transmit at the same
time.
To ensure proper
charging, use a
pencil eraser to clean
the contacts on the
bottom of the radio
and inside the dual
charger.
4. Place four Ni-Cd or Ni-MH
batteries in the radio’s battery
compartment according to the
polarity symbols (+ and –) marked
inside, then replace the cover and
push the latch up until it clicks.
5. Place the radio in the dual
charger.Ô
6. When charging is complete,
remove the radio from the dual
charger.
OPERATION
TURNING THE RADIOS
ON/OFF AND ADJUSTING
THE VOLUME
Rotate VOLUME/OFF to turn the radio
on or off and adjust the volume.Ô
TRANSMITTING
Hold down PTT to send a page to other
FRS radios set to the same channel
(and the same quiet code, if you
selected one). TX appears. Release
PTT to stop transmission.Ô
FRS FREQUENCIES CHART
Channel
Frequency (MHz)
Description
1
462.5625
FRS 1/GMRS Interstitial 1
2
462.5875
FRS 2/GMRS Interstitial 2
3
462.6125
FRS 3/GMRS Interstitial 3
4
462.6375
FRS 4/GMRS Interstitial 4
5
462.6625
FRS 5/GMRS Interstitial 5
6
462.6875
FRS 6/GMRS Interstitial 6
7
462.7125
FRS 7/GMRS Interstitial 7
8
467.5625
FRS 8
9
467.5875
FRS 9
10
467.6125
FRS 10
11
467.6375
FRS 11
12
467.6625
FRS 12
13
467.6875
FRS 13
14
467.7125
FRS 14
15
462.5500
GMRS Primary 1
16
462.5750
GMRS Primary 2
17
462.6000
GMRS Primary 3
18
462.6250
GMRS Primary 4
19
462.6500
GMRS Primary 5
20
462.6750
GMRS Primary 6
21
462.7000
GMRS Primary 7
22
462.7250
GMRS Primary 8
11
SELECTING A CHANNEL
Press e or d to select the desired
channel. The selected channel number
appears.
SELECTING QUIET CODES
Quiet codes let you talk and listen to
other radios set to the same channel
and quiet code. This is like having a
sub-channel within a channel, giving
you greater communication flexibility.
When you set a quiet code (there are
38 codes to choose from) and turn on
this feature, you can communicate with
anyone who has a radio set to the
same channel and quiet code.
To select the desired quiet code, hold
down FUNC. FUNC appears on the
display. Repeatedly press or hold e or
d until you see the code number you
want to use.
To turn off the quiet code feature, hold
down FUNC and repeatedly press or
hold e or d at the same time until the
quiet code number disappears.
12
QUIET CODE CHART
CTCSS No.
Frequency (Hz)
CTCSS No.
Frequency (Hz)
1
67.0
20
131.8
2
71.9
21
136.5
3
74.4
22
141.3
4
77.0
23
146.2
5
79.7
24
151.4
6
82.5
25
156.7
7
85.4
26
162.2
8
88.5
27
167.9
9
91.5
28
173.8
10
94.8
29
179.9
11
97.4
30
186.2
12
100.0
31
192.8
13
103.5
32
203.5
14
107.2
33
210.7
15
110.9
34
218.1
16
114.8
35
225.7
17
118.8
36
233.6
18
123.0
37
241.8
19
127.3
38
250.3
13
Ô NOTE Ô
• The radio
automatically scans
through quiet codes
while scanning
through the
channels. The quiet
code feature
automatically turns
on when a signal is
detected on a
channel and quiet
code, and turns off
after the signal
disappears.
• During scan, the
radio will not receive
Direct Call data.
• If you do not press a
key after 20 seconds
when you enter key
tone and vibrate
mode, VOX mode,
APO mode, setting
Hi/Lo transmitter
power mode and
courtesy tone mode,
the radio will exit
these modes without
saving the setting.
14
USING SCAN
Press and hold e or d to scan up and
down to find the desired channel and
quiet code. The radio automatically
scans through the channels and
pauses on each active channel. While
scanning, press e or d to change the
scanning direction. Press PTT to stop
scanning. Ô
USING KEY LOCK
To lock or unlock the keypad, hold
down FUNC and press PTT to lock or
unlock the keys.
appears when the
keys are locked. When the keypad is
locked, you can still transmit (press
PTT), send a call (press CALL) or
temporarily enable/disable Vox (press
PTT when Vox level is 1–4).Ô
USING KEY TONE AND
VIBRATE
You can set the radio so it sounds a
tone when you press any key except
PTT or FUNC.
You can also set the radio to vibrate.
When the radio is idle for 30 seconds,
the radio vibrates when it receives a
signal. Ô
To turn on the key tone and vibrate
feature, press MENU to activate the
Menu function and presse or d until
and ON appear. Press PTT to
store the setting.
Repeat this process to turn off key tone
and vibrate.
To turn on the key tone and turn off the
vibrate feature, press MENU to activate
the Menu function and press e or d
until
and ON appears. Press PTT
key to store the setting.
Ô NOTE Ô
Using Key Tone and
Vibrate
To turn off the key tone and turn on the
vibrate feature, press MENU to activate
the Menu function and press e or d
key until
and ON appears. Press
PTT to store the setting. Ô
When you do not press
a key after 20 seconds,
while in the Menu, the
radio exits the Menu
without saving your
settings.
When you do not press a key after 20
seconds, while in the Menu, the radio exits
the Menu without saving your settings.
Using VOX
USING VOX
Vox operation allows you to transmit a
voice message without pressing any
key. To activate Vox, continuously
press MENU until VOX appears. Press e
or d to select the desired level (1– 4)
(i.e. Lo–Hi sensitivity), select OFF to
turn Vox off. Press PTT to store the
setting. VOX flashes when Vox is
activated.Ô
• If you have selected
a Vox level, the
radio’s backlight
turns on for about 5
seconds when you
press PTT.
• You still can send a
page to the other
FRS radios in Vox
mode when the keys
are locked.
15
Press PTT to temporarily turn off Vox.
VOX stops flashing. Press PTT again to
turn on Vox. VOX flashes.
USING APO
You can set the radio to automatically
turn off when the radio is idle (no key is
pressed and nothing is transmitted or
received) for 30, 60 or 90 minutes. To
turn APO (Automatic Power Off) on/off,
continually press MENU key until APO
and 30, 60, 90 or OFF appears, press e
or d to select the desired amount of
time or OFF. If you select OFF, the radio
does not automatically turn off. Before
the radio shuts off, it beeps and vibrates.
To activate the radio, press any key.
Make sure the radio is set to ON by
setting the rotary switch to on. The radio
beeps and vibrates when you turn it on.
USING HI/LO
Ô NOTE Ô
Using Hi/Lo
Transmitter Power
The Hi/Lo transmit
selection is not available
when using FRS
Channels 8–14.
16
TRANSMITTER POWER
You can set the radio transmit power to
0.5W or 1.5W. The transmit power of
channels 8–14 is fixed at 0.5W only
(FRS channel). To select 1.5W transmit
power, make sure that the channel is
not on channels 8–14 and then press
MENU until Lo appears. If you select
OFF, the radio transmit power is 1.5W;
select ON to set the transmit power to
0.5W. Ô
USING COURTESY TONE
You can set your radio so the person
you are communicating with will hear a
tone when you finish transmitting. To
turn on the radio courtesy tone, press
MENU repeatedly.
appears and ON/
OFF flashes on the display. ON appears
when the courtesy tone is on, and OFF
appears when the courtesy tone is off.
Press e or d to turn the courtesy tone
on or off. Press PTT to store the setting.
USING A HEADSET
You can make or answer calls with
hands-free convenience using an
optional headset with a 3/32-inch plug
(not supplied, available at your local
RadioShack store) To connect a
headset, insert the headset’s plug into
the EAR/MIC jack on the bottom of the
radio. Ô
DIRECT CALL
OPERATION
The Direct Call data includes the
transmitter ID and receiver ID
information. You can use the
transmitter to select the receiver radio’s
ID number you want to call, and the
receiver radio only receives the Direct
Call data you select. The Direct Call
Ô NOTE Ô
Using a Headset
• Do not change your
headset’s mode
(VOX or PTT) while
the radio is in use. Be
sure to switch your
radio off to reset it
before switching
between VOX and
PTT.
• When you turn on
VOX after you
connect a headset to
the radio, the VOX
level is set to level 4.
If VOX is set to
another level, the
VOX will remain at
that level.
Direct Call
Operation
If a channel is being
used by another user,
your radio might miss
Caller ID messages due
to RF interference.
17
data communication is based on the
same Channel and CTCSS code
setting. You cannot establish
communication if the Channel and
CTCSS code for both radios are not the
same. Ô
Direct Call data is sent when user
presses CALL. The radio transmits
Direct Call data to the desired radio.
At the same time, the other radio
checks the receiving Direct Call data at
the same Channel and CTCSS code. If
the Call ID number matches its Home
ID (Receiver ID number) or equivalent
Group Call, then it recognizes that the
call is addressed to this radio. As a
result, the receiver will display the
Sender ID number on the display and
generate a call melody. There are five
different call melodies to let the user
determine who is transmitting a call
(Please refer to the call melody note
later).
After Direct Call transmission is
completed, the radio (Transmitter and
Receiver) will change its CTCSS code
setting to Private code for 15 seconds.
The Private code is used to avoid
interruption from the original Channel
and CTCSS code. In the 15-second
period, both radios can only transmit
18
and receive voice messages at the
original Channel with Private Code.
Also, the ID icon on both radios flashes
on the display to indicate this 15second period. When conversation is
made within this period, the 15-second
time- out is extended for another 15
seconds. To exit the 15-second period,
press CALL or wait for the 15-second
time-out.
After a 15-second time out, both radios
are restored to their original settings
and the display reverts back to the
display without Direct Call function.
On the other hand, if you do not press
any key on the receiver after a Direct
Call is received, the radio’s display
continues showing the received ID
number and MISS ID (Missed ID) flashes
until you press any key (except FUNC).
Also, the radio generates a beep to
remind you that there is an incoming
call and it continues beeping once
every 10 minutes for a period 30
minutes.To stop the beeps, press any
key except FUNC.
SETTING HOME ID
Home ID data allows you to enter the
ID number that will appear on the
receiving radio as you communicate
19
Ô NOTE Ô
• If you do not press a
key within 20
seconds when
setting the Home ID,
the radio
automatically exits
Home ID without
saving your settings.
• If Home ID is
changed, the radio
automatically resets
the Direct Call
number to Group
Call.
• If you press e or d
to change Direct Call
number and the
number is equal to
the Home ID. Then
the LCD will display
the next Direct Call
number in order to
prevent any conflict
of Home ID and
Direct Call.
20
with it. You can select Home ID
numbers 1–16.
1. Set the transmitter and receiver to
the same channel (and same quiet
code, if you select one)
2. Hold down FUNC and press CALL
to enter Setting Home ID mode.
Release all key and then press e
or d to select your desired Home
ID number.
3. Press PTT to store the setting. Ô.
SETTING DIRECT CALL
Direct Call data allows you to enter the
receiver’s radio ID number that you
want to call. The radio’s receiver only
receives the Call when the Direct Call
data is matched with it’s Home ID. You
can select Direct Call number 1–16 or
Group Call. Ô
1. Hold down CALL until the Direct
Call ID number flashes on the
display. Press e or d to select the
receiver’s home ID number or
Group option. (If you select
receiver’s Home ID number 1 ~ 16,
you can only send a page to one
user or several users with the
same ID home number). If you
select Õ, you can send a page to
all users.
2. Press PTT to store the setting.
CALL MELODY
When you press CALL to send out the direct call data, a melody
specific to the ID number sounds. Likewise, at the receiver side a
melody specific to the ID sounds as it receives the direct call
data. See the following for the melody and corresponding IDs.
Call Melody
No. ID
1
2
3
4
5
For
Transmitter
Call ID =
Group
Call
Call ID =
1~4
Call ID =
5~8
Call ID =
9~12
Call ID =
13~16
.
Call Melody
No. ID
1
2
3
4
5
For Receiver
Group
Call
Sender
ID = 1~4
Sender
ID = 5~8
Sender
ID =
9~12
Sender
ID =
13~16
21
Ô NOTE Ô
• You can activate the
alarm even if the
radio is turned off
(rotary switch Off) or
the battery is
charging or the
battery is low.
•
During the warning
tone and vibration
period, press PANIC
once to stop the
warning tone and
vibration.
USING PANIC
When an emergency occurs, you can
set the radio to generate an alarm
sound for safety. Ô
1. To activate alarm sound, press and
hold PANIC (about 0.5 seconds).
Release PANIC when the warning
tone sounds and the radio
vibrates.
2. After the warning tone sounds and
and the radio vibrates (about 2
seconds), the radio generates an
alarm sound.
3. To stop alarm sound, press and
hold PANIC (about 2 seconds) until
alarm stop and “STOP” appears on
the LCD.
USING THE SWIVEL-BELT
CLIP
To attach the belt clip, insert the clip
into the socket at the back of the radio
until it clicks. To remove the belt clip,
press the button at the tip of the clip
and pull out the clip.
22
USING AN OPTIONAL
WRIST STRAP
You can attach an optional wrist strap
(not supplied) to the radio. Slide the
wrist strap’s small loop under the bar
on the tip of the radio. You might need
to use a small screwdriver or
straightened paper clip to do this. Then
pull the strap’s large loop through the
small loop.
CARE
Keep the radio dry; if it gets wet, wipe it
dry immediately. Use and store the
radio only in normal temperatures.
Handle the radio carefully; do not drop
it. Keep the radio away from dust and
dirt, and wipe it with a damp cloth
occasionally to keep it looking new.
SERVICE AND
REPAIR !
If your radio is not performing as it
should, take it to your local RadioShack
store for assistance. To locate your
nearest RadioShack, use the store
locator feature on RadioShack's
website (www.radioshack.com), or call
1-800-The Shack (843-7422) and
! IMPORTANT !
FCC Information
Do not open your radio to
make any internal
adjustments. Your radio is
set up to transmit a
regulated signal on one of
22 assigned frequencies.
It is illegal to alter or adjust
the settings inside the
radio to exceed those
limitations. Any
adjustments to your radio
must be made by a
qualified technician using
the proper test equipment.
To be safe:
•
Never open your
radio’s case.
•
Never change or
replace anything in
your radio except the
batteries.
•
Your radio might cause
TV or radio
interference even
when it is operating
properly. To determine
whether your radio is
causing the
interference, turn it off.
(Continued)
23
! IMPORTANT !
(Continued)
If the interference goes
away, your radio is
causing it.
Try to eliminate the
interference by:
•
Moving your radio
away from the
receiver.
• Calling your local
RadioShack store for
help.
• If you cannot eliminate
the interference, the
FCC requires that you
stop using the radio.
This device complies with
Part 15 of the FCC Rules.
Operation is subject to the
following two conditions:
(1) This device may not
cause harmful
interference, and (2) this
device must accept any
interference received,
including interference that
may cause undesired
operation.
o
o
WARNING
There is a penalty for
any unlicensed
operation of a GRMS
radio.
24
follow the menu options. Modifying or
tampering with the radio's internal
components can cause a malfunction
and might invalidate its warranty and
void your FCC authorization to operate
it.
FCC INFORMATION
FCC LICENSE REQUIRED
The Federal Communications
Commission (FCC) requires you to
have a GMRS license before you
operate this radio. To obtain a license,
you must be at lease 18 years of age,
and cannot be a representative of a
foreign government.
You must complete FCC Forms 605
and 159 (Fee Remittance Advice) and
return them with the applicable fees
and Payment/Fee Type Code (PAZR)
to the FCC. To obtain the necessary
forms, contact the FCC at:
Federal Communications Commission
Wireless Bureau Applications
P.O. Box 358130
Pittsburgh, PA 15251-5130
1-888-CALLFCC (1-888-225-5322)
To obtain instructions on filing form 605
electronically, go to http://
www.fcc.gov.wtb/uls.
This radio is intended for
communications from base-to-mobile
or mobile-to-mobile stations. Base-tobase communication is not permitted.
When you receive your license from the
FCC, you are assigned a call sign. You
must give your call sign at the end of
every communication exchange or
once every 15 minutes during a
continuous communication.
The Personal Radio Steering Group
(PRSG) is the national user-advocacy
organization for the GMRS. The (PRSG
provides assistance with licensing and
other information about the GMRS,
including how to contact and
communicate with other GMRS
licensees.
Personal Radio Steering Group
P.O. Box 2851
Ann Arbor, MI 48106
www.provide.net/prsg/
25
THE FCC WANTS YOU TO
KNOW
This equipment has been tested and
found to comply with the limits for a
Class B digital device, pursuant to Part
15 of the FCC Rules. These limits are
designed to provide reasonable
protection against harmful interference
in a residential installation. This
equipment generates, uses, and can
radiate radio frequency energy and, if
not installed and used in accordance
with the instructions, may cause
harmful interference to radio
communications.
However, there is no guarantee that
interference will not occur in a particular
installation. If this equipment does
cause harmful interference to radio or
television reception, which can be
determined by turning the equipment
off and on, the user is encouraged to try
to correct the interference by one or
more of the following measures:
• Reorient or relocate the receiving
antenna.
• Increase the separation between
the equipment and receiver.
• Connect the equipment into an
outlet on a circuit different from
26
that to which the receiver is
connected.
• Consult your local RadioShack
store or an experienced radio/TV
technician for help.
SAFETY INFORMATION
Your wireless handheld portable transceiver contains a low power transmitter.
When the Push-To-Talk (PTT) button is
pressed, it sends out radio frequency
signals. The device is authorized to
operate at a duty factor not to exceed
fifty percent. In August 1996, the Federal
Communications Commission adopted
RF exposure guidelines with safety
levels for handheld wireless devices.
SPECIFICATIONS
Frequency Range 462.5500–467.7125MHz
Channels ................................................. 22
RF Output Power .........Hi power 1.5W ERP
Lo power 0.5W ERP
Power Supply ................................. 6.0V DC
(4 x AAA Alkaline)
Battery Life .......................... About 16 hours
(alkaline batteries)
Operation Temperature ............. -4 to 122ºF
(-20º to 50ºC)
Dimensions (HWD) ........ 105 × 62 × 36 mm
Weight ........................................ 108 grams
CAUTION
To maintain compliance
with the FCC’s RF
exposure guidelines,
hold the transmitter and
antenna at least 2 inches
from your face and
speak in a normal voice,
with the antenna pointed
up and away from your
face. If you wear the
handset on your body
while using the headset
accessory, use only the
supplied belt clip for this
product and when
transmitting take it out of
the belt to ensure the
antenna is at least 1 inch
(2.5cm) from your body.
Use only the supplied
antenna. Unauthorized
antennas, modifications,
or attachments could
damage the transmitter
and may violate FCC
regulations.
27
Specifications are typical; individual units
might vary. Specifications are subject to
change and improvement without notice.
Limited Ninety-Day Warranty
This product is warranted by RadioShack against manufacturing defects in material and workmanship under normal use for ninety (90) days from the date of purchase from RadioShack
company-owned stores and authorized RadioShack franchisees and dealers. EXCEPT AS
PROVIDED HEREIN, RadioShack MAKES NO EXPRESS WARRANTIES AND ANY IMPLIED WARRANTIES, INCLUDING THOSE OF MERCHANTABILITY AND FITNESS FOR A
PARTICULAR PURPOSE, ARE LIMITED IN DURATION TO THE DURATION OF THE WRITTEN LIMITED WARRANTIES CONTAINED HEREIN. EXCEPT AS PROVIDED HEREIN, RadioShack SHALL HAVE NO LIABILITY OR RESPONSIBILITY TO CUSTOMER OR ANY
OTHER PERSON OR ENTITY WITH RESPECT TO ANY LIABILITY, LOSS OR DAMAGE
CAUSED DIRECTLY OR INDIRECTLY BY USE OR PERFORMANCE OF THE PRODUCT
OR ARISING OUT OF ANY BREACH OF THIS WARRANTY, INCLUDING, BUT NOT LIMITED TO, ANY DAMAGES RESULTING FROM INCONVENIENCE, LOSS OF TIME, DATA,
PROPERTY, REVENUE, OR PROFIT OR ANY INDIRECT, SPECIAL, INCIDENTAL, OR
CONSEQUENTIAL DAMAGES, EVEN IF RadioShack HAS BEEN ADVISED OF THE POSSIBILITY OF SUCH DAMAGES.
Some states do not allow limitations on how long an implied warranty lasts or the exclusion or
limitation of incidental or consequential damages, so the above limitations or exclusions may
not apply to you.
In the event of a product defect during the warranty period, take the product and the RadioShack sales receipt as proof of purchase date to any RadioShack store. RadioShack will,
at its option, unless otherwise provided by law: (a) correct the defect by product repair without
charge for parts and labor; (b) replace the product with one of the same or similar design; or
(c) refund the purchase price. All replaced parts and products, and products on which a refund
is made, become the property of RadioShack. New or reconditioned parts and products may
be used in the performance of warranty service. Repaired or replaced parts and products are
warranted for the remainder of the original warranty period. You will be charged for repair or
replacement of the product made after the expiration of the warranty period.
This warranty does not cover: (a) damage or failure caused by or attributable to acts of God,
abuse, accident, misuse, improper or abnormal usage, failure to follow instructions, improper
installation or maintenance, alteration, lightning or other incidence of excess voltage or current; (b) any repairs other than those provided by a RadioShack Authorized Service Facility;
(c) consumables such as fuses or batteries; (d) cosmetic damage; (e) transportation, shipping
or insurance costs; or (f) costs of product removal, installation, set-up service adjustment or
reinstallation.
This warranty gives you specific legal rights, and you may also have other rights which vary
from state to state.
RadioShack Customer Relations, 200 Taylor Street, 6th Floor, Fort Worth, TX 76102
12/99
21-1903
AO0150AAA1
04A03
Printed in China