1
SPECIAL MESSAGE SECTION (U.S.A.)
This product utilizes batteries or an external power
supply (adapter). DO NOT connect this product to
any power supply or adapter other than one
described in the manual, on the name plate, or
specifically recommended by Yamaha.
This product should be used only with the components supplied or; a cart, rack, or stand that is
recommended by Yamaha. If a cart, etc., is used,
please observe all safety markings and instructions that accompany the accessory product.
SPECIFICATIONS SUBJECT TO CHANGE:
The information contained in this manual is believed to be correct at the time of printing. However, Yamaha reserves the right to change or
modify any of the specifications without notice or
obligation to update existing units.
This product, either alone or in combination with
an amplifier and headphones or speaker/s, may be
capable of producing sound levels that could
cause permanent hearing loss. DO NOT operate
for long periods of time at a high volume level or
at a level that is uncomfortable. If you experience
any hearing loss or ringing in the ears, you should
consult an audiologist. IMPORTANT: The louder
the sound, the shorter the time period before
damage occurs.
NOTICE:
Service charges incurred due to lack of knowledge
relating to how a function or effect works (when
the unit is operating as designed) are not covered
by the manufacturer’s warranty, and are therefore
the owners responsibility. Please study this
manual carefully and consult your dealer before
requesting service.
ENVIRONMENTAL ISSUES:
Yamaha strives to produce products that are both
user safe and environmentally friendly. We sincerely believe that our products and the production methods used to produce them, meet these
goals. In keeping with both the letter and the spirit
of the law, we want you to be aware of the following:
Battery Notice:
This product MAY contain a small non-rechargeable battery which (if applicable) is soldered in
place. The average life span of this type of battery
is approximately five years. When replacement
becomes necessary, contact a qualified service
representative to perform the replacement.
This product may also use “household” type batteries. Some of these may be rechargeable. Make
sure that the battery being charged is a rechargeable type and that the charger is intended for the
battery being charged.
When installing batteries, do not mix old batteries
with new, or with batteries of a different type.
Batteries MUST be installed correctly. Mismatches
or incorrect installation may result in overheating
and battery case rupture.
Warning:
Do not attempt to disassemble, or incinerate any
battery. Keep all batteries away from children.
Dispose of used batteries promptly and as regulated by the laws in your area. Note: Check with
any retailer of household type batteries in your
area for battery disposal information.
Disposal Notice:
Should this product become damaged beyond
repair, or for some reason its useful life is considered to be at an end, please observe all local,
state, and federal regulations that relate to the
disposal of products that contain lead, batteries,
plastics, etc. If your dealer is unable to assist you,
please contact Yamaha directly.
NAME PLATE LOCATION:
The name plate is located on the bottom of the
product. The model number, serial number, power
requirements, etc., are located on this plate. You
should record the model number, serial number,
and the date of purchase in the spaces provided
below and retain this manual as a permanent
record of your purchase.
Model
CBX-K2
Serial No.
Purchase Date
92-BP
2
PLEASE KEEP THIS MANUAL
PRECAUTIONS
PLEASE READ CAREFULLY BEFORE PROCEEDING
* Please keep these precautions in a safe place for future reference.
WARNING
Always follow the basic precautions listed below to avoid the possibility of serious injury or even death from electrical shock,
short-circuiting, damages, fire or other hazards. These precautions include, but are not limited to, the following:
• Do not open the instrument or attempt to disassemble the internal parts
or modify them in any way. The instrument contains no user-serviceable
parts. If it should appear to be malfunctioning, discontinue use immediately and have it inspected by qualified Yamaha service personnel.
• Do not expose the instrument to rain, use it near water or in damp or wet
conditions, or place containers on it containing liquids which might spill
into any openings.
• If the AC adaptor cord or plug becomes frayed or damaged, or if there is
a sudden loss of sound during use of the instrument, or if any unusual
smells or smoke should appear to be caused by it, immediately turn off
the power switch, disconnect the adaptor plug from the outlet, and have
the instrument inspected by qualified Yamaha service personnel.
• Use the specified adaptor (PA-1D or an equivalent recommended by
Yamaha) only. Using the wrong adaptor can result in damage to the instrument or overheating.
• Before cleaning the instrument, always remove the electric plug from the
outlet. Never insert or remove an electric plug with wet hands.
• Check the electric plug periodically and remove any dirt or dust which
may have accumulated on it.
CAUTION
Always follow the basic precautions listed below to avoid the possibility of physical injury to you or others, or damage to the
instrument or other property. These precautions include, but are not limited to, the following:
• Do not place the AC adaptor cord near heat sources such as heaters or
radiators, and do not excessively bend or otherwise damage the cord,
place heavy objects on it, or place it in a position where anyone could
walk on, trip over, or roll anything over it.
• Do not expose the instrument to excessive dust or vibrations, or extreme
cold or heat (such as in direct sunlight, near a heater, or in a car during the
day) to prevent the possibility of panel disfiguration or damage to the
internal components.
• When removing the electric plug from the instrument or an outlet, always
hold the plug itself and not the cord.
• Do not use the instrument near other electrical products such as televisions, radios, or speakers, since this might cause interference which can
affect proper operation of the other products.
• Do not connect the instrument to an electrical outlet using a multipleconnector. Doing so can result in lower sound quality, or possibly cause
overheating in the outlet.
• Unplug the AC power adaptor when not using the instrument, or during
electrical storms.
• Always make sure all batteries are inserted in conformity with the +/polarity markings. Failure to do so might result in overheating, fire, or
battery fluid leakage.
• Always replace all batteries at the same time. Do not use new batteries
together with old ones. Also, do not mix battery types, such as alkaline
batteries with manganese batteries, or batteries from different makers, or
different types of batteries from the same maker, since this can cause
overheating, fire, or battery fluid leakage.
• Do not place the instrument in an unstable position where it might accidentally fall over.
• Before moving the instrument, remove all connected adaptor and other cables.
• When cleaning the instrument, use a soft, dry cloth. Do not use paint
thinners, solvents, cleaning fluids, or chemical-impregnated wiping cloths.
Also, do not place vinyl, plastic or rubber objects on the instrument, since
this might discolor the panel or keyboard.
• Do not rest your weight on, or place heavy objects on the instrument, and
do not use excessive force on the buttons, switches or connectors.
• Do not operate the instrument for a long period of time at a high or uncomfortable volume level, since this can cause permanent hearing loss. If you
experience any hearing loss or ringing in the ears, consult a physician.
• Do not dispose of batteries in fire.
• Do not attempt to recharge batteries that are not intended to be charged.
• If the instrument is not to be in use for a long time, remove the batteries
from it, in order to prevent possible fluid leakage from the battery.
Always turn the power off when the instrument is not in use.
• Keep batteries away from children.
Make sure to discard used batteries according to local regulations.
• Before connecting the instrument to other electronic components, turn off
the power for all components. Before turning the power on or off for all
components, set all volume levels to minimum.
(4)-2
Yamaha cannot be held responsible for damage caused by improper use or modifications to the instrument, or data that is lost or destroyed.
* The LED display and diagrams in this owner’s manual are for instructional purposes only, and may be different from the ones on your instrument.
3
Welcome to the CBX-K2
Congratulations and thank you for purchasing the Yamaha CBX-K2 MIDI Keyboard!
The CBX-K2 is a sophisticated, yet compact MIDI keyboard controller, for use
with computers and MIDI music systems. It allows you to play connected tone
generators and rhythm machines, and enter performance data to sequencers and
computers. It features a sophisticated touch-sensitive keyboard that can be adjusted to cover the full 128-note MIDI range. It also provides a wealth of MIDI
controls that allow you to send virtually any MIDI message directly from the
keyboard. Moreover, the CBX-K2 has three built-in assignable controllers: Assignable Wheel, Assignable Slider and Assignable Footswitch. The Assignable Wheel
and Assignable Slider can be set to control virtually any parameter on your connected tone generator or sequencer in real time, while the Assignable Footswitch
can be used for sustain, certain sequencer controls, or as an alternate SHIFT button.
Because of its portable size, convenient battery/AC adaptor power supply, compatibility with General MIDI (GM) and XG, and extraordinarily powerful and
comprehensive MIDI control functions, the CBX-K2 is an invaluable tool — a
MIDI Swiss army knife, of sorts — for all MIDI musicians and performers.
IMPORTANT ■ The CBX-K2 does not contain an internal tone generator. In order
to play sounds from the CBX-K2, you need an external tone generator, such as the
Yamaha MU series or TG series tone generators.
NOTE ■ The many MIDI functions and features of the CBX-K2 may not be supported by your particular MIDI device. Be sure to refer to the owner’s manual of
your particular MIDI device when using it with the CBX-K2.
4
Contents
The CBX-K2 — What It Is and What It Can Do ............... 6
What It Is ................................................................. 6
What It Can Do ........................................................ 6
How to Use This Manual ................................................. 7
Panel Controls and Terminals ......................................... 8
■
■
Note Range of the CBX-K2 (with Octave Shift ) .... 9
Default Settings of the CBX-K2 ........................... 10
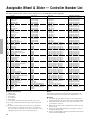
Assignable Wheel & Slider
— Controller Number List .............................................. 30
About MIDI
...................................................................... 31
MIDI Messages Transmitted by the CBX-K2 .............. 31
CHANNEL MESSAGES ........................................... 31
SYSTEM MESSAGES ............................................. 33
MIDI Data Format ........................................................... 34
MIDI Reception ....................................................... 34
MIDI Transmission ................................................... 34
MIDI Implementation Chart ...................................... 36
Guided Tour
Troubleshooting .............................................................. 37
Power Supply .................................................................. 12
■
Error Messages ............................................................... 38
Using a Power Adaptor ....................................... 12
■ Using Batteries .................................................. 12
■ When to Replace the Batteries ............................ 12
Specifications ................................................................. 39
Setting Up Your CBX-K2 ................................................. 13
Index ................................................................................ 40
About RPN and NRPN ....................................................... 39
What You’ll Need ..................................................... 13
Setup Examples ...................................................... 13
■ With Computer and Tone Generator .................... 13
■ With Sequencer ................................................. 14
■ With Tone Generator ........................................... 14
■ With Main Keyboard and Tone Generator ............ 15
Making the Connections .......................................... 15
Playing and Using Your CBX-K2 .................................... 16
Selecting and Playing Voices .................................... 16
Changing the Voice Banks ....................................... 17
Changing the Octave Range .................................... 17
Using the Pitch Bend Wheel, Assignable Wheel, and
Assignable Slider .................................................... 18
Re-assigning the Assignable Wheel and Slider ......... 18
Changing the Touch Sensitivity of the Keyboard ........ 19
Reference
Using the SHIFT-Related Functions
.............................. 20
Basic Operations ..................................................... 21
■ Selecting Group A and Group B Functions .......... 21
■ Entering Values .................................................. 21
■ Value Entry — Some Specific Examples
and Anomalies .................................................. 21
Setting the Functions ...................................................... 22
Group A Operations ................................................. 22
Group B Operations ................................................. 24
Group A Functions — List .............................................. 26
Group B Functions — List .............................................. 28
5
The CBX-K2 — What It Is and What It Can Do
What It Is
The CBX-K2 is a compact, highly portable 49-key MIDI
keyboard, designed especially for use with computers and
MIDI music systems. The CBX-K2 does not generate any
sound itself, but can be used as a keyboard controller for
playing sounds on a connected tone generator or rhythm
machine. It’s also ideal for recording to sequencers and
computers. The keyboard is touch-sensitive and its octave
range can be changed to cover the full 128-note MIDI
range.
The true power and flexibility of the CBX-K2 is in its
comprehensive MIDI controls. The CBX-K2 allows you to
send virtually any type of MIDI message to connected
MIDI devices. Pre-programmed commands provide easy
control of basic sequencer/rhythm machine functions such
as Start, Stop, Tempo and Song Select, while comprehensive program change commands let you easily select
program banks and voices.
Most importantly, though, the CBX-K2 has an Assignable
Wheel and Slider that can be set for control of any controller number. This means that you can use the Assignable
Wheel to control a wide variety of parameters on your
connected tone generator — such as Volume, Pan, Brightness, and the Depth of various effects — in real time. This
gives you expressive control over different aspects of the
sound in live performance.
The CBX-K2 is also the latest instrument in the Yamaha
line to support the XG format, a new addition to the
General MIDI standard. In short, XG provides for more
instrument sounds and variations, and greater expressive
control over voices and effects. With the use of the Assignable Wheel or Slider on the CBX-K2, you have direct realtime control over many of these newly supported functions
and parameters.
What It Can Do
Here are a few application ideas on how you can use the
CBX-K2. The list below is not comprehensive, but is
meant to be a general guide to the possibilities and provide
a starting point or springboard for your own creative ideas
and explorations.
● Using With a MIDI Tone Generator
In one of the most basic setups, you can play a connected
tone generator from the CBX-K2. Because it’s so compact
and portable, you can even use it as a hand-held keyboard
for live performance.
● Using as a Second Keyboard or Dedicated
MIDI Controller
The CBX-K2 is small enough to fit on top of nearly any
keyboard, making it perfect as a second keyboard. Since
the CBX-K2 has a MIDI IN terminal, you can connect it
between your main keyboard and your tone generator, and
use the extensive MIDI capabilities of the CBX-K2 for
greater expressive control during your performance.
● Using in a MIDI Music System
Combined with a laptop computer and a compact tone
generator (like the General MIDI/XG-compatible Yamaha
MU100R), the CBX-K2 gives you comprehensive music
making power — for recording, composing, arranging,
practicing, and editing — in a portable system that’s ready
to go wherever you go. The CBX-K2 is an ideal addition
to larger MIDI studios as well, since it provides far greater
MIDI control and flexibility than nearly any other keyboard
controller. Use it along side your main MIDI keyboard as a
kind of MIDI Swiss army knife — sending necessary MIDI
messages, working the real-time controllers, or editing
already recorded sequencer tracks.
● Multimedia
Since it’s portable and compatible with the General MIDI
and XG formats, the CBX-K2 is a natural for multimedia
applications. Because of its ease of use and comprehensive
functions, it’s the only keyboard you’ll ever need for
recording and editing MIDI data on your multimedia
creations.
6
How to Use This Manual
By and large, the CBX-K2 is very easy to use and this manual is self-explanatory. However, we strongly recommend that you
take time to read the manual — especially before trying some of the more sophisticated MIDI functions. Read through all of
the initial sections first, then go on to the “Guided Tour” to set up your CBX-K2, learn how to use its various functions, and
try out some of the practical application examples to help you become more familiar with its operations. For those who need
to delve deeper, the “Reference” section provides at-a-glance information and important details on all functions.
The following conventions are used throughout this manual:
* Panel buttons and controls are indicated as they appear on the actual instrument. (For example, C and
M.
* The functions and features assigned to the keyboard are shown like this: T and {.
* Unless indicated otherwise, L refers to either of the ENTER keys, J or K. However,
when you wish to enter a decimal value, make sure to press K. Likewise, when entering a hexadecimal
number, make sure to press J.
* Actual MIDI data messages (in hexadecimal) are indicated as follows: <<FE>> and <<En 00 40>>, etc.
* Operation steps are indicated as follows:
Example
Actual Operation
C+E
While holding down the C button, press E (D1).
C+U→L
While holding down the C button, first press U (Fm1), then
press L (either J or K).
7
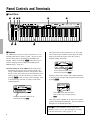
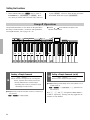
Panel Controls and Terminals
■ Front Panel
r
t uy
i
o
CONTROLLER
NUMBER LIST
B
SONG
SELECT
TIME SIGNATURE
TOP
BOTTOM MEASURE
SEQUENCER
STOP
CONTINUE
START
VOICE
MAP
POLY/
MONO
RESET SOUND OFF TG300B
CONTROL ALL CH RESET
CHANNEL DEVICE TOUCH
MERGE NUMBER SENSITIVITY
RESET
SYSTEM
PROGRAM
TEMPO
BANK PROGRAM
SELECT CHANGE
GM
ON
SOUND
OFF
XG
ON
MERGE
ON/OFF
w e
MIDI
CH
FIXED
VELOCITY
RPN CONTROLLER NRPN
DATA
DENSITY
WHEEL ASSIGN
RPN CONTROLLER NRPN
MSB 1ST/ FOOT SW
LSB 1ST ASSIGN
PB
DATA
DENSITY DENSITY
TRANSPOSE
DRUM
NUMBER
RPN CONTROLLER NRPN
The CBX-K2 has a 49-key, 4-octave keyboard (C1 to C5),
featuring initial touch (velocity) control. All note on, note
off and velocity data is transmitted via the MIDI OUT
terminal. When used with the C button, the keys are
used for changing various settings and sending special
MIDI messages. (Page 20.)
About the Functions of the CBX-K2: The functions are
divided into two groups: Group A and Group B. The
Group A and B functions are shown on the panel, above
the left section of the keyboard. Several functions can be
used by pressing only the relevant key; in other words,
pressing L is not necessary. These functions, such
as Sequencer Stop and Start, are shown on the panel
without underline.
TIME SIGNATURE
TOP
BOTTOM MEASURE
B
NRPN
EXPRESSION
HOLD1(DAMPER)
PORTAMENTO
HARMONIC
RELEASE TIME
ATTACK TIME
BRIGHTNESS
PORTA CTRL
1
2
91
93
94
REVERB
CHORUS
VARIATION
123
124
125
126
127
128
129
130
RPN
120 PB SENSITIVITY
121 FINE TUNE
122 COARSE TUNE
3
4
5
OTHERS
VIBRATO RATE
VIBRATO DEPTH
VIBRATO DELAY
LP FILTER CUTOFF
LP FILTER RESONANCE
HP FILTER CUTOFF
EQ LO GAIN
EQ HI GAIN
6
7
131
132
133
134
135
136
137
138
EQ LO FREQUENCY
EQ HI FREQUENCY
EG ATTACK TIME
EG DECAY TIME
EG RELEASE TIME
DRUM LP FILTER CUTOFF
DRUM LP FILTER RESONANCE
DRUM EG ATTACK RATE
8
9
A
B
139
140
141
142
143
144
145
146
DRUM EG DECAY RATE
DRUM PITCH COARSE
DRUM PITCH FINE
DRUM LEVEL
DRUM PAN
DRUM REVERB
DRUM CHORUS
DRUM VARIATION
C
D
E
152 CH PRESSURE
153 KEY PRESSURE
154 MASTER VOLUME
156 MASTER TUNING
157 VELOCITY
158 TEMPO
147 DRUM HP FILTER CUTOFF
148 DRUM EQ LO GAIN
149 DRUM EQ HI GAIN
150 DRUM EQ LO FREQUENCY
151 DRUM EQ HI FREQUENCY
ENTER
F
0
HEXA
DECIMAL
DECIMAL
CONTINUE
START
The right section of the keyboard serves as value entry
and is used for those functions whose names are underlined on the panel and require value entry, such as
Program Change and Tempo.
SONG
SELECT
TIME SIGNATURE
TOP
BOTTOM MEASURE
SEQUENCER
STOP
CONTINUE
START
TEMPO
These underlined functions require
value entry and pressing L.
Functions whose names appear with a dashed underline
on the panel (for example, GM ON and XG ON) require
pressing L.
RESET SOUND OFF TG300B
CONTROL ALL CH RESET
RESET
GM
ON
SEQUENCER
STOP
DRUM
NUMBER
11
64
65
71
72
73
74
84
q
q Keyboard
SONG
SELECT
CONTROL CHANGE
1 MODULATION
2 BREATH
5 PORTA TIME
6 DATA ENTRY
7 VOLUME
10 PANPOT
SLIDER ASSIGN
SOUND
OFF
XG
ON
TEMPO
These non-underlined functions can be
used without pressing L.
These functions with dashed underline
need no value entry, but require pressing
L.
Value entry on the CBX-K2 can be done in two number
systems: Decimal and Hexadecimal. The keys labeled A
through F are for Hexadecimal entry.
NOTE ■ The normal (default) velocity range of the
CBX-K2 is from 1 to 127. The range differs according
to the Touch Sensitivity setting (pages 19, 28).
8
Panel Controls and Terminals
w Pitch Bend Wheel (Pitch Bend)
This spring-loaded Wheel controls Pitch Bend. (Page 18.)
e Assignable Wheel
When the CBX-K2 is turned on, this Wheel (with center
detent) is set to control Modulation Depth of the connected
MIDI device. It can be set to control other functions; see
on pages 18 and 26 for details. Turning the Wheel will
momentarily show the currently assigned controller number
in the LED display.
r Assignable Slider
When the CBX-K2 is turned on, this Slider is set to control
the data entry of the connected MIDI device. It can be set
to control other functions; see on pages 18 and 26 for
details. Moving the Slider will momentarily show the
currently assigned controller number in the LED display.
t C Button
This button is used to access the “hidden” functions of the
CBX-K2. Used with the N /
M buttons (when the LED display is set to
Program Change, Bank MSB, or Bank LSB), it allows you
to step up or down through program numbers. (Page 16.)
Whenever turned on, the program number is set to 001.
Used with the keys of the keyboard, it allows you to access
the sophisticated MIDI control functions. (Page 20.)
y N / M Buttons
These buttons are used to change the octave range of the
keyboard, allowing you to play across the entire range of
MIDI notes (C-2 to G8). When the octave setting is
modified, the current octave setting is momentarily displayed on the LED. (Page 17.) Press both of these buttons
together to restore the normal octave setting (C1 to C5).
u N / M Lamps
These lamps provide several indications:
• During normal playing conditions, these (along with the
LED display) indicate the octave setting of the keyboard, up (M) or down
(N). Both light together for the normal
octave setting. When changing the octave setting, these
flash to indicate the number of octaves, up or down.
(Page 17.)
• When using some of the “hidden” functions, these flash
when a MIDI message is transmitted or when a function
is executed.
Note Range of the CBX-K2 (with Octave Shift)
Middle C
(C3 or MIDI note number 60)
C-2
(0)
C-1
(12)
C0
(24)
C1
(36)
C2
(48)
C3
(60)
C4
(72)
C5
(84)
C6
(96)
1 octave down
C7
(108)
C8
G8
(120) (127)
4 octaves up
2 octaves down
3 octaves up
2 octaves up
3 octaves down
1 octave up
Normal octave range
(default: when power is turned on)
This section is outside
the “legal” MIDI range
and plays notes Gm7
(116) through C8 (120).
9
Panel Controls and Terminals
• The right lamp flashes quickly when a MIDI error
happens. The lamp flashes until you press any one of
the panel buttons.
i LED Display
o CONTROLLER NUMBER LIST
This is a list of some of the main controller numbers (and
their names) that can be used with the Assignable Wheel
and Slider. (For a complete list, see on page 30.)
In normal playing conditions, this displays the currently
selected program number (when Y is
selected in ·; see on page 22).
When moving the Assignable Wheel or Slider, this flashes
the currently active Controller number. (When assigned to
RPN or NRPN, the display does not flash.) For the Wheel,
the default is 001 - Modulation; for the Slider, the default
is 006 - Data Entry.
When changing the octave setting, this momentarily indicates the number of octaves, up or down, from the normal
octave setting. The range is -3 (3 octaves down) to 0
(normal) to 4 (4 octaves up).
The display also indicates the status of the MIDI control
operations. Depending on the operation performed, the
display may:
• Flash rapidly, indicating the selected MIDI message has
been sent. (Ex.: When pressing C + Q.)
• Show the current condition or value. (Ex.: When
pressing C + R.) It also displays the entered
value when changing a function’s setting.
Default Settings of the CBX-K2
The CBX-K2 has no internal memory backup. As a result, all settings are returned to the factory default when turning
the power off. The basic factory default settings are listed below.
•
•
•
•
•
•
•
10
Merge: on
MIDI transmit channel: 1
Octave range: C1 – C5
Transpose: normal (no transposition)
Fixed velocity: off (keyboard is velocity sensitive)
Assignable Wheel: Modulation
Assignable Slider: Data entry MSB
■ User-configurable Defaults:
You can change certain power-on default settings of the
CBX-K2. These include:
* Reversing the MSB, LSB order. Hold down
N and turn the power on. (Pages 28,
29.)
Panel Controls and Terminals
■ Rear Panel
!0
!1
!2
!3
!4
!0 POWER Switch
!3 MIDI OUT Terminal
Push this switch in to turn on the power. Each time the
power is turned on, the CBX-K2 returns to the default
condition. (See boxed section on page 10.)
This is for connection to the MIDI IN terminal of another
MIDI device (such as a MIDI tone generator, sequencer or
computer that has a MIDI interface), for sending MIDI
messages to that device.
!1 DC IN Terminal
This is for connection to a PA-1D AC adaptor or another
adaptor recommended by Yamaha.
!2 MIDI IN Terminal
This is for connection to the MIDI OUT terminal of another
MIDI device (such as a MIDI keyboard, sequencer or
computer that has a MIDI interface), for input of that
device’s data. By using the MIDI Merge function, received
data can be combined with the data generated by the CBXK2 and transmitted via the MIDI OUT terminal.
!4 FOOT SWITCH Jack (1/4” phone)
This is for connection of a pedal switch (such as the
optional Yamaha FC4 or FC5). The default control for the
Footswitch is sustain on/off (Controller #64). It can be set
to control other functions; see on page 28 for details.
NOTE ■ Make sure that the Footswitch plug is properly
connected to the FOOT SWITCH terminal before
turning on the power.
■ Do not press the Footswitch while turning the power
on. Doing this changes the recognized polarity of the
Footswitch, resulting in reversed Footswitch operation.
11
Guided Tour
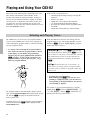
Setting Up the CBX-K2 in Your Music System
Whatever your system, you should follow the basic instructions below when setting up your CBX-K2. Use
the example illustrations as a general guide when making the connections with your own system.
Power Supply
Your CBX-K2 will run from the included power adaptor,
PA-1D or an equivalent. Batteries can also be used (see
below). However, we strongly recommend that you use the
power adaptor.
NOTE ■ Before making any connections, make sure that
all equipment to be connected is turned off.
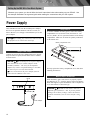
Using Batteries
To use the CBX-K2 on battery power, remove the battery
compartment cover (as shown below) and insert six 1.5V
AA size (SUM-3, R-6 or equivalent) batteries in the battery
compartment. Make sure to follow the polarity indications
on the bottom case.
Battery compartment cover
Using a Power Adaptor
Connect one end of the power adaptor (PA-1D) to the DC
IN jack on the rear panel, and the other end to a suitable
electrical outlet.
CAUTION!
■ Do not attempt to use a power adaptor
other than the PA-1D (or another adaptor recommended by Yamaha) . The use of an incompatible
adaptor may result in irreparable damage to the CBXK2, and even pose a serious shock hazard.
■ Be sure to disconnect the power adaptor from the
outlet when the CBX-K2 is not in use.
Securely replace the battery compartment cover when done
installing the batteries.
When to Replace the Batteries
DC IN
When the battery power runs too low to properly operate
the CBX-K2, an “E1” message appears in the LED display.
When this happens, replace all batteries with a complete set
of six new batteries of the same type.
STANDBY (?)
Power adaptor
12
CAUTION!
■ NEVER mix old and new batteries or
different types of batteries! Also, to prevent possible
damage due to battery leakage, remove the batteries
from the instrument if it is not to be used for a long
time.
Setting Up Your CBX-K2
All the devices must be turned off before making connections.
In this introductory section, you’ll learn how to set up the
CBX-K2 for use in your music system. A variety of setups
are covered here; read through the one that most closely
matches your own setup.
What You’ll Need
Since the CBX-K2 is strictly a MIDI controller and does
not generate any sound by itself, you’ll need other datareceiving and sound-producing equipment. Basically, you
will need:
* The CBX-K2 and PA-1D AC power adaptor (or a set of
batteries).
* A MIDI device (such as a tone generator, keyboard or
computer) which can receive and play back MIDI data,
and at least one MIDI cable.
* (Optional) An amplifier/speaker system, preferably
stereo, with proper audio connecting cables. Alternately, you can use a set of stereo headphones.
With Computer and Tone Generator
In the small MIDI system below, the CBX-K2 is connected
to a computer and a single tone generator. With the proper
sequencing software on the computer, the CBX-K2 can be
used both for recording performance data to the computer
and playing the sounds of the connected tone generator.
You can also conveniently use the CBX-K2 to start and stop
the sequencer.
For tone generators with a built-in MIDI interface (such as
the Yamaha MU100R)
CBX-K2
MIDI OUT
Setup Examples
Tone generator
MU100R
MIDI IN
TO HOST
NOTE ■ All devices must be turned off before making
connections.
■ The setup examples below show only the MIDI
connections. The audio connections would vary
according to the particular equipment you use. Refer
to the owner’s manuals of your other equipment for
audio connection instructions.
When connecting the instrument to other MIDI devices, be
sure to use only high-quality MIDI cables. Also, avoid
using cables longer than 15 meters, since long cables can
result in data errors.
Serial port
The HOST SELECT switch
on the MU100R allows you
to match the type of
computer, when connecting
directly to a computer.
Computer
Connect the MIDI OUT terminal on the CBX-K2 to the
MIDI IN terminal on the MU100R. The MU100R should be
connected to the proper port on the computer. (For
complete connection instructions, refer to the owner’s
manual of your particular tone generator.)
13
Setting Up Your CBX-K2
For tone generators without a built-in MIDI interface
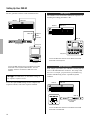
With Sequencer
The CBX-K2 can be used with a stand-alone sequencer, for
recording and editing performance data.
CBX-K2
MIDI OUT
CBX-K2
MIDI OUT
MIDI OUT
MIDI IN
MIDI
Interface
MIDI IN
MIDI IN
Tone generator
Serial port
Sequencer
Connect the MIDI OUT terminal on the CBX-K2 to the MIDI
IN terminal on the sequencer.
Computer
Connect the MIDI OUT terminal on the CBX-K2 to the MIDI
IN terminal on the computer’s MIDI interface. The tone
generator should be connected to a MIDI OUT on the
interface.
NOTE ■ Set the MIDI Thru (or Echo Back) setting on
the sequencer software to ON.
As for the required MIDI settings for the computer and
sequencer software, refer to the respective manuals.
With Tone Generator
In the simple system below, the CBX-K2 is used to play the
voices of the MU100R Tone Generator. This setup could
also serve as a simple, yet powerful live performance rig,
with the CBX-K2 being used as a portable keyboard
controller.
CBX-K2
MIDI OUT
MIDI IN
Tone generator
MU100R
Connect the MIDI OUT terminal on the CBX-K2 to the MIDI
IN terminal on the MU100R.
14
Setting Up Your CBX-K2
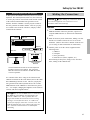
With Main Keyboard and Tone Generator
In this system, the CBX-K2 effectively serves as a second
keyboard. The main keyboard (in this case, the Clavinova)
is used to play both its own internal sounds and the sounds
of the connected multi-timbral tone generator on one
channel, while the CBX-K2 is used to play the sounds of
the tone generator on another channel. This lets you play
two sounds at once from the Clavinova, and play a third
sound from the CBX-K2.
Making the Connections
CAUTION!
■ Before making any connections, make
sure that all equipment to be connected is set to
minimum volume and turned off.
Operation
1. Connect the MIDI OUT terminal of the CBX-K2 to the
MIDI IN terminal of the tone generator, sequencer or
computer MIDI interface (as shown in the illustrations
above).
MIDI IN
MIDI OUT
2. Make all necessary audio connections, making sure first
that all level controls on those devices are set to the
minimum. (Refer to the owner’s manuals of the devices
you are using for more information on connections.)
CBX-K2
MIDI IN
MIDI OUT
MIDI keyboard
Tone generator
MU100R
3. Turn the power on for the various equipment in the
following order:
1) CBX-K2
2) Computer
3) Tone generator(s)
4) Audio devices (mixer, amplifier, etc.)
When turning off the power, simply reverse the above
order, turning off the CBX-K2 last.
Connect the MIDI OUT terminal on the main keyboard to
the MIDI IN terminal on the CBX-K2. Also connect the
MIDI OUT terminal on the CBX-K2 to the MIDI IN terminal
on the tone generator.
In a variation of the above setup, set the Clavinova and
CBX-K2 to transmit on the same channel, and set the CBXK2’s MIDI Merge function to ON. This lets you play the
tone generator from either keyboard and use the versatile
MIDI functions of the CBX-K2 to control the tone generator — for example, changing the brightness of the sound in
real time with the Assignable Wheel.
NOTE ■ When an external MIDI device is connected to
the MIDI IN of the CBX-K2, the LED display may
indicate a MIDI error. This is probably due to a
longer-than-normal interval between active sensing
messages received from the device, or could be the
result of an improper connection. In such a case, the
CBX-K2 automatically resets to Merge Off (pages 26,
34). Check the connected device or cable before
continuing.
15
Playing and Using Your CBX-K2
This section of the manual guides you through some of the
basic features and functions of the CBX-K2. It also
provides some advanced operation examples, so that you
can get a feel for what the CBX-K2 is capable of, and how
you can best use it. Master the basics in this section, and
you’ll have the experience and know-how to easily and
confidently use any of the more advanced functions covered
later in the Reference section.
In this section, you’ll learn how to:
• Transmit program change messages and play the
keyboard.
• Select a voice bank.
• Change the octave setting of the keyboard.
• Use the Pitch Bend and Assignable Wheels.
• Re-assign the controller for the Assignable Wheel
and Slider.
• Change the Touch Sensitivity of the keyboard.
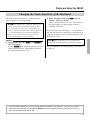
Selecting and Playing Voices
The CBX-K2 lets you select voices (or program numbers)
on your connected MIDI device in two ways: stepping up
or down through the program numbers, or directly selecting
a specific program number.
•
When the CBX-K2 is turned on, the starting point for
program change is 001. This means that when you first
hold down C and press M, program
number 002 will be selected.
To step up or down through the program numbers:
First, make sure that the program number is shown
in the display (see the Display Program Change
function, page 26). Then, simultaneously hold down
C and press M (to advance one
program number), or press N (to go
back one program number).
IMPORTANT! ■ Always release C before playing
the CBX-K2 keyboard. Holding down C accesses
the secondary A or B group or other functions, and you
may inadvertently execute one of these functions by
playing the keyboard while continuing to hold down
C.
NOTE ■ This function does not “wrap around.” In
other words, you cannot go back to program number
128 when at 001, or advance to program number 001
when at 128.
•
The program number in the LED display changes accordingly, and the OCTAVE SHIFT lamps quickly flash on and
off. Release C, and play the keyboard to hear the
newly selected voice.
To quickly move up or down through the program numbers,
continuously hold down C and the appropriate OCTAVE SHIFT button.
16
To change the program number:
While holding down C, press the key corresponding to Y (F1), then the keys
corresponding to the desired number, then the key
corresponding to K.
For example, to select program number 017, continue
holding down C and press Y, 1,
7, then K. Release C, and play the keyboard to hear the newly selected Voice.
Playing and Using Your CBX-K2
Changing the Voice Banks
Many currently available tone generators feature multiple
banks of voices. The CBX-K2 can be used to quickly and
easily select these additional banks. Some banks may not
be available on your particular tone generator; check the
manual for details.
2. While continuing to hold down C, enter the
number 64 (press 6, then 4), then press
K.
Operation
1. Simultaneously hold down C and press
T.
The LED display indicates the current Bank setting by
alternately flashing the MSB and LSB values. (In this
case, the default setting, both of these values are 000.)
MSB value
LSB value
This sets the Bank to 064 (LSB value). The LED
display alternately flashes the MSB and LSB values,
000 and 064.
To restore the original Bank (or select other Banks), hold
down C, press T, 0 (or another number
for a different Bank), and K.
MSB value
LSB value
The display alternately flashes the
MSB and LSB values.
Changing the Octave Range
The range of the 4-octave keyboard can be easily shifted up
or down to cover the full 10-1/2-octave (128-note) range of
MIDI notes. (See on page 9 for the note range.)
Operation
To shift the keyboard up one octave, press
M. To shift the keyboard down one
octave, press N.
You can instantly restore the normal octave range by
pressing both N/M buttons
simultaneously.
NOTE ■ At the highest octave setting, keys outside the
legal MIDI note range will repeat a previous octave.
When the octave range is changed, the LED display briefly
indicates the new setting. The OCTAVE SHIFT lamps
also rapidly flash one or more times, according to the
selected octave range. For example, when the setting is
changed to two octaves below normal, the left lamp flashes
twice.
17
Playing and Using Your CBX-K2
Using the Pitch Bend Wheel, Assignable Wheel, and Assignable Slider
These two wheels and slider let you control different
aspects of the sound in realtime as you play. These controls affect the connected MIDI instrument.
Move the Pitch Bend Wheel as you play to change the pitch
of the sound. Moving the wheel away from you bends the
pitch up. The Pitch Bend Wheel is spring-loaded for
returning to center (normal pitch).
Move the Assignable Wheel as you play to change the
modulation of the sound (MIDI Controller #1). Moving the
wheel away from you increases the modulation. Moving
the Assignable Slider changes the Data Entry value (MIDI
Controller #6). (Notice that the “006” flashes in the
display, indicating data for Controller #6 is being transmitted.) The Assignable Wheel and Assignable Slider can also
be set to control other functions; see the section below for
details.
Depending on the connected device and the selected voice,
there may be no response or change in the sound. Refer to
the owner’s manual of the particular device for details.
Re-assigning the Assignable Wheel and Slider
As mentioned above, the Assignable Wheel and Slider can
be used to control a variety of different functions. The
default setting for the Wheel is modulation (MIDI Controller #1), and the default for the Slider is data entry (MIDI
Controller #6). However, either can be set to control
volume, pan position, attack or release time, coarse tuning
or fine tuning, and reverb or chorus depth, among other
Controllers. (For a complete list of the available Controllers and their numbers, see on page 30.)
suited to control numbers such as #10 (Pan) and #73
(Attack Time) because of its center detent.
Try entering other Controller numbers, repeating steps 1
and 2 above. (A short list of Controllers is printed on the
panel. Try entering some of these; many—but not all—of
these will have an obvious effect on the sound as you move
the wheel.)
Assignable Slider / Operation
Assignable Wheel / Operation
1. Simultaneously hold down C and press
1. Simultaneously hold down C and press
S in the ‡ section.
S in the fi section.
The LED display indicates the current Assignable
Wheel’s Controller number.
The LED display indicates the current Assignable
Slider’s Controller number.
2. While continuing to hold down C, enter the
2.
While continuing to hold down C, enter the
number 10 (press 1, then 0), then press
K.
This sets the Assignable Wheel to Controller number 10
(Pan). Play the keyboard and move the Assignable Wheel
as you play, and hear how the sound moves left and right in
the stereo image as you move the Wheel. As you move the
Wheel, the currently assigned Controller number appears in
the LED display. The Assignable Wheel is particularly
18
desired Controller number (for example, “7” for
MIDI volume control), then press K.
Play the keyboard and move the Assignable Slider as
you play, and hear how the volume of the sound
changes (if you are using Controller #7).
* You can also assign RPN and NRPN numbers to the
Assignable Wheel or Slider. (Pages 26 and 30.)
Playing and Using Your CBX-K2
Changing the Touch Sensitivity of the Keyboard
The Touch Sensitivity function lets you change how the
Voices respond to your playing strength.
NOTE ■ Touch Sensitivity is a “Group B” function. The
“Group A” functions (such as Program Change, Bank
Select, and Controller, which were covered above) are
shown on the panel and explained in detail on pages 26
– 27. The Group B functions (listed and explained on
pages 28 – 29) are also shown on the panel but are
accessed differently than Group A functions.
Operation
1. Simultaneously hold down C, press ç,
2. While continuing to hold down C, enter the
number 1, then press K.
This sets Touch Sensitivity to 1 (easy). Now, when you
play the keyboard, even playing softly results in a
reasonably loud sound.
Try entering other values (the range is 1–10), and hear how
they affect the response of the keyboard. The default value
is 10, and can also be restored by simply turning the CBXK2 off and on again.
NOTE ■ When Fixed Velocity is set to a value other
than 0 (off), the Touch Sensitivity setting has no effect.
then ˙.
Pressing ç first (before any function key) calls
up the Group B functions. The LED display indicates
the current Touch Sensitivity value.
For more information on Touch Sensitivity, see footnote #5
on page 28.
This concludes the basic tour of some of the important functions of the CBX-K2. To find out more about
how to use your CBX-K2, look through the Reference section that follows and try out some of the functions and operations that interest you.
19
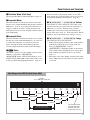
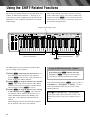
Reference
Using the SHIFT-Related Functions
The enormous flexibility and power of the CBX-K2 is in its
“hidden” or SHIFT-related functions — allowing you to
send virtually any kind of MIDI message directly from the
keyboard or use the Assignable Wheel/Slider for real-time
control change.
Many of the functions can be done with one or two keystrokes, while others require you to enter a number value
and press one of the L keys to execute the function.
All functions can be accessed or executed by using one of
the operations described below.
Displays current setting or value.
CONTROLLER
NUMBER LIST
B
SONG
SELECT
TIME SIGNATURE
TOP
BOTTOM MEASURE
SEQUENCER
STOP
CONTINUE
START
VOICE
MAP
POLY/
MONO
RESET SOUND OFF TG300B
CONTROL ALL CH RESET
CHANNEL DEVICE TOUCH
MERGE NUMBER SENSITIVITY
RESET
SYSTEM
PROGRAM
TEMPO
BANK PROGRAM
SELECT CHANGE
GM
ON
SOUND
OFF
XG
ON
MERGE
ON/OFF
MIDI
CH
FIXED
VELOCITY
RPN CONTROLLER NRPN
DATA
DENSITY
WHEEL ASSIGN
RPN CONTROLLER NRPN
SLIDER ASSIGN
TRANSPOSE
DRUM
NUMBER
CONTROL CHANGE
1 MODULATION
2 BREATH
5 PORTA TIME
6 DATA ENTRY
7 VOLUME
10 PANPOT
DATA
PB
DENSITY DENSITY
MSB 1ST/ FOOT SW
LSB 1ST ASSIGN
RPN CONTROLLER NRPN
MIDI functions
(Group A and Group B)
DRUM
NUMBER
B
Display
11
64
65
71
72
73
74
84
NRPN
EXPRESSION
HOLD1(DAMPER)
PORTAMENTO
HARMONIC
RELEASE TIME
ATTACK TIME
BRIGHTNESS
PORTA CTRL
1
2
91
93
94
REVERB
CHORUS
VARIATION
123
124
125
126
127
128
129
130
RPN
120 PB SENSITIVITY
121 FINE TUNE
122 COARSE TUNE
3
4
5
OTHERS
VIBRATO RATE
VIBRATO DEPTH
VIBRATO DELAY
LP FILTER CUTOFF
LP FILTER RESONANCE
HP FILTER CUTOFF
EQ LO GAIN
EQ HI GAIN
6
7
131
132
133
134
135
136
137
138
8
EQ LO FREQUENCY
EQ HI FREQUENCY
EG ATTACK TIME
EG DECAY TIME
EG RELEASE TIME
DRUM LP FILTER CUTOFF
DRUM LP FILTER RESONANCE
DRUM EG ATTACK RATE
9
A
B
139
140
141
142
143
144
145
146
DRUM EG DECAY RATE
DRUM PITCH COARSE
DRUM PITCH FINE
DRUM LEVEL
DRUM PAN
DRUM REVERB
DRUM CHORUS
DRUM VARIATION
C
D
E
Value entry
(Decimal and Hexadecimal)
152 CH PRESSURE
153 KEY PRESSURE
154 MASTER VOLUME
156 MASTER TUNING
157 VELOCITY
158 TEMPO
147 DRUM HP FILTER CUTOFF
148 DRUM EQ LO GAIN
149 DRUM EQ HI GAIN
150 DRUM EQ LO FREQUENCY
151 DRUM EQ HI FREQUENCY
ENTER
F
0
HEXA
DECIMAL
DECIMAL
L
keys
ç key
The MIDI functions can be generally divided into three
types, according to their operation.
1) Holding C and pressing the function’s key. For
2)
3)
20
these functions, such as Sequencer Stop and Start,
pressing L is not necessary. These functions are
shown on the panel without underline.
Holding C, pressing the function’s key and then
L. These functions are indicated with a dashed
underline on the panel (for example, GM ON and XG
ON) and require pressing L to execute.
Holding C, pressing the function’s key, entering
a value and then pressing L. These functions
are indicated with an underline on the panel (for example, PROGRAM CHANGE and TEMPO), and
require that a value (Decimal or Hexadecimal) be
entered.
When changing a function, the LED display indicates
the on/off status or the value of the function.
In using the SHIFT-related functions, remember
Keep holding down C until the end of the
operation. If C is released in mid-operation,
you’ll have to start the operation all over again.
In the instructions that follow, “L” refers to either of
the ENTER keys, J or K. In other
words, this means that either key can be used, unless
indicated otherwise.
NOTE ■ Both N / M
lamps flash briefly when a function is executed. The
LED display flashes briefly when a MIDI message is
sent.
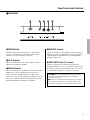
Using the SHIFT-Related Functions
Basic Operations
Selecting Group A and Group B Functions
● Selecting Group A Functions:
Hold down C and press the appropriate key. (See
on pages 26 – 27 for specific Group A functions and
how to use them.)
● Selecting Group B Functions:
Hold down C and press ç. The Group B
functions are available as long as you continue to hold
down C. (See on pages 28 – 29 for specific Group
B functions and how to use them.)
* 1 → 0 → 0 → 3 → K: results in a value of
MSB = 001, LSB = 003.
* 0 → 1 → 0 → 0 → 3 → K: results in a
value of MSB = 001, LSB = 003.
● Entering MSB/LSB Values with J (2 digit
bytes for MSB, 2 digit bytes for LSB; 4 digits total
message). For messages beginning with zeroes, the
first zeroes can be omitted.
Examples:
* 3 → J: results in a value of MSB = 00, LSB = 03.
* 0 → 3 → J: results in a value of MSB = 00,
Entering Values
Value entry on the CBX-K2 can be done in two number
systems: Decimal and Hexadecimal. The keys labeled A
through F are for Hexadecimal entry.
● Entering a decimal value:
Hold down C, press the appropriate function key,
enter the desired value in decimal format, then press
K.
LSB = 03.
* 1 → 0 → 3 → J: results in a value of MSB
= 01, LSB = 03.
* 0 → 1 → 0 → 3 → J: results in a value
of MSB = 01, LSB = 03.
When entering MSB and LSB values, the LED display
alternately flashes the MSB and LSB values in hexadecimal
or decimal form.
Display alternately flashes MSB and LSB
● Entering a hexadecimal value:
Hold down C, press the appropriate function key,
enter the desired value in hexadecimal format, then
press J.
Example — Setting the MIDI Transmit Channel to 12:
Dot in this position
indicates MSB.
Dot in this position
indicates LSB.
Decimal:
C+{→1→2→K
Hexadecimal:
C+{→c→J
* Also see the Decimal-Hexadecimal Conversion Chart
on page 33.)
Value Entry — Some Specific Examples
and Anomalies
● Entering MSB/LSB Values with K (3 digit bytes
for MSB, 3 digit bytes for LSB; 6 digits total message).
For messages beginning with zeroes, the first zeroes
can be omitted.
Examples:
* 3 → K: results in a value of MSB = 000, LSB = 003.
* 0 → 3 → K: results in a value of MSB = 000, LSB =
NOTE ■ The order of MSB and LSB entry can be
reversed. (See MSB 1ST/LSB 1ST on page 28.)
NOTES ON THE BASIC OPERATION
■ If you inadvertently press two or more function keys
while performing a function, the last pressed key has
priority.
■ If, after entering a value, you press another function
key before pressing L, the value will be cancelled.
■ If you enter a value that is outside of a function’s
range, it will be ignored. Legal messages can be one
byte in length (a value from 0 – 255) exception for
Tempo value and Measure Number.
003.
21
Setting the Functions
This section shows by example the operations for the basic
functions.
* Unless indicated otherwise, L refers to either of
the ENTER keys, J or K. How-
ever, when you wish to enter a decimal value, make sure
to press K. Likewise, when entering a hexadecimal number, make sure to press J.
Group A Operations
Group A function names are shown on the panel above the
corresponding keys. For the list and explanations of Group
A functions, refer to pages 26 – 27.
SONG
SELECT
TIME SIGNATURE
TOP
BOTTOM MEASURE
SEQUENCER
STOP
CONTINUE
START
VOICE
MAP
POLY/
MONO
RESET SOUND OFF TG300B
CONTROL ALL CH RESET
BANK PROGRAM
SELECT CHANGE
CHANNEL DEVICE TOUCH
MERGE NUMBER SENSITIVITY
RESET
PROGRAM
TEMPO
GM
ON
SOUND
OFF
SYSTEM
XG
ON
MERGE
ON/OFF
MIDI
CH
FIXED
VELOCITY
RPN CONTROLLER NRPN
DATA
DENSITY
WHEEL ASSIGN
RPN CONTROLLER NRPN
MSB 1ST/ FOOT SW
LSB 1ST ASSIGN
TRANSPOSE
DRUM
NUMBER
● Numbers
–
numbers below.
PB
DATA
DENSITY DENSITY
Operation: C + Function Key
DISPLAY
SLIDER ASSIGN
RPN CONTROLLER NRPN
PROGRAM BANK
CHANGE
MSB
DRUM
NUMBER
BANK
LSB
B
1
2
3
4
5
Setting a Simple Command with L
Sending a Simple Command
1
in the illustration correspond to the operation
3
Relevant Functions: Sequencer Stop/Continue/Start; Sound
Operation: C + Function Key → L
Relevant Functions: GM Mode On; XG System On; Display
Off
● Example: Setting the tone generator to XG Mode
● Example: Sending a Start command to a sequencer or rhythm
C+O→L
machine
C+E
You can use the Q and W keys in the same
way, to stop the sequencer or continue playback from the
stopped point.
NOTE ■ Either L key can be used for these
commands.
Setting a Specific Value for a Function
Setting a Simple Command (on/off)
2
Operation: C + Function Key → Value → L
4
Relevant Functions: Tempo; Program Change; MIDI Channel;
Operation: C + Function Key
Fixed Velocity; Controller; Drum Number; Transpose
Relevant Functions: Merge On/Off
Down/Up
● Example: Switching the MIDI Merge function of the CBX-K2 on or off
C+P
● Example: Changing the tempo value on a sequencer or rhythm
machine
C+R→1→4 →0 →K
22
Setting the Functions
5
Setting a Specific Value for a Function
(MSB, LSB)
Setting a Specific Value for a Specific
Controller
Operation: C + Function Key → MSB value → LSB
Operation: C + Function Key → Controller Number →
value → L
Relevant Functions: Bank Select; RPN; NRPN
7
L → {Value(s) → L}
Relevant Functions: RPN*; Controller; NRPN*
Functions marked with an asterisk (*) above require
● Example: This example shows how to use the Bank Select function to
that you enter two values: an MSB (Most Significant
select different banks. This example also shows you how to use
Byte) and an LSB (Least Significant Byte). (See
the functions that require entry of two values: MSB and LSB.
operation
In this example, we’ll enter a value of 012 (MSB) 034 (LSB)
C+T→0→1→2→0→3
→4→K
● Example: Changing the Portamento Time to 25.
C + S → 5 (Portamento Time) → L →
{2 → 5 → L }
C+T→0→c→2→2→
J
NOTE ■ Decimal values of MSB and LSB are 3 digits
each (6 digits total); hexadecimal values are 2 digits
each. Zeroes must be entered, unless they occur at the
beginning of the value. For example, for the decimal
value of 001 (MSB) 012 (LSB), the first two zeroes may
be omitted, but the third must be entered. In other
words, the value could be entered as 1 → 0 →
1 → 2.
6
Transpose Setting
Operation: C + G / H
To transpose up one semitone, use the H key
(F2). To transpose down one semitone, use the
G key (E2). Each repeated pressing of the
key while holding C transposes the pitch by an
additional semitone. To restore the normal default transpose setting, hold down C and press both
G / H keys simultaneously.
NOTE ■ You can also enter transpose values directly by
using operation
above.
, this page.)
The operation steps enclosed in braces ({}) can be repeated
or re-entered as long as C is held.
NOTE ■ This operation assigns a controller number for
the Assignable Wheel or Slider, and sends a specific
value for that controller number. You can also send a
specific value for the controller (in the Group B functions) without altering the controller assignment.
8
Selecting a Drum Number (when editing
a specific drum number with controller
numbers 136 – 151)
You can use operation
above to set the drum number
for editing a specific drum number with controller numbers
136 – 151. However, the following operation lets you set
the Drum number by playing it from the keyboard. This
allows you to hear the drum sound you’ll be editing, since
the last note played on the keyboard determines the drum
sound to be changed.
Without pressing C, find the desired drum number by
sound — by pressing keys on the keyboard. Next, hold
down C, press F, then L. This sets
the drum number to the last key pressed. Then (to set the
controller number for that drum sound), hold down C
and press S, then enter the controller number
(136 through 151). This sets the Controller Number for the
Drum parameter you wish to control with the Assignable
Wheel or Slider.
23
Setting the Functions
* Unless indicated otherwise, L refers to either of
the ENTER keys, J or K. However, when you wish to enter a decimal value, make sure
to press K. Likewise, when entering a hexadecimal number, make sure to press J.
Group B Operations
Group B function names are also shown on the panel above
the Group A function names. For the list and explanations
of Group B functions, refer to pages 28 – 29.
SONG
SELECT
TIME SIGNATURE
TOP
BOTTOM MEASURE
SEQUENCER
STOP
CONTINUE
START
VOICE
MAP
POLY/
MONO
RESET SOUND OFF TG300B
CONTROL ALL CH RESET
BANK PROGRAM
SELECT CHANGE
CHANNEL DEVICE TOUCH
MERGE NUMBER SENSITIVITY
RESET
PROGRAM
TEMPO
GM
ON
SOUND
OFF
RPN CONTROLLER NRPN
SYSTEM
XG
ON
MERGE
ON/OFF
MIDI
CH
FIXED
VELOCITY
DATA
DENSITY
WHEEL ASSIGN
RPN CONTROLLER NRPN
MSB 1ST/ FOOT SW
LSB 1ST ASSIGN
TRANSPOSE
DRUM
NUMBER
● Numbers
–
in the illustration correspond to the
operation numbers below.
PB
DATA
DENSITY DENSITY
DISPLAY
SLIDER ASSIGN
RPN CONTROLLER NRPN
DRUM
NUMBER
Sending a Simple Command
Operation: C + ç → Function Key
Relevant Functions: Time Signature Top*; Time Signature
9
PROGRAM BANK
CHANGE
MSB
BANK
LSB
B
1
2
3
4
5
Setting a Simple Command (on/off)
10
Operation: C + ç → Function Key → Value
Relevant Function: Merge On/Off (each channel)
Bottom*; Poly/Mono; Reset Controll; Sound Off (all
channels); MSB/LSB Invert; Footswitch Assign*
* Repeatedly press function key to select the various
values/settings for these functions.
● Example: Switching the MIDI Merge function of the CBX-K2 on or off
for MIDI channel 12
C + ç → ƒ → c (hexadecimal for
MIDI channel 12)
● Example: Sending a Reset All Controllers command to a sequencer or
tone generator
C+ç→å
24
Keys 1 – f and 0 correspond to MIDI channel 1–
15 and 16, respectively. Pressing each key toggles the on/
off status of each channel.
Setting the Functions
Sending a Simple Command with L
11
Operation: C + ç → Function Key → L
Relevant Function: TG300B Reset
● Example: Sending the current CBX-K2 settings to a MIDI storage
device or sequencer with the Bulk Dump Out function
C+ç→™→L
NOTE ■ Decimal values of MSB and LSB are 3 digits
each (6 digits total); hexadecimal values are 2 digits
each. Zeroes must be entered, unless they occur at the
beginning of the value. For an example of MSB = 012,
LSB = 034 above, the first zero may be omitted, but the
second must be entered. In other words, the value
could be entered as 1 → 2 → 0 → 3 →
4 → K.
Setting a Specific Value for a Function
Sending a Single-Byte Data Message
Operation: C + ç → Function Key → Value →
12
L
Relevant Functions: Song Select; Voice Map; Device
Number; Touch Sensitivity; Data Density (Wheel); PB
Density; Data Density (Slider); Measure Number
● Example: Changing the touch sensitivity of the CBX-K2 to 10
C+ç→˙→1→0→
14
This function allows you to quickly and easily
send a non-standard MIDI message of a single
byte. The effective range of this function is from
0–255; values outside of this range will be
ignored.
Operation: C + ç → {Value → L}
K
● Example: Sending a (decimal) value of 252
C + ç → {2 → 5 → 2 → K }
Setting a Specific Value for a Specific
Controller
The operation steps enclosed in braces ({}) can be repeated
or re-entered as long as C is held.
Operation: C + ç → Function Key →
Controller Number → L → {Value(s) → L}
13
Relevant Functions: RPN Direct Data Send*; Controller
Direct Data Send; NRPN Direct Data Send*
Functions marked with an asterisk (*) above require
that you enter two values: an MSB (Most Significant
Byte) and an LSB (Least Significant Byte). (See on
page 21 and operation
, page 23.)
● Example: Changing the Portamento Time of the tone generator’s voice
to 25.
C + ç → S → 5 (Portamento Time) →
K → {2 → 5 → K }
The operation steps enclosed in braces ({}) can be repeated
or re-entered as long as C is held.
NOTE ■ This operation transmits a value for the
specified controller number WITHOUT altering the
current controller assignment for the Assignable Wheel
or Assignable Slider.
25
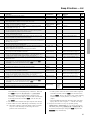
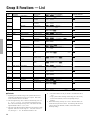
Group A Functions — List
Key
Panel Name
C1
SEQUENCER
Function name
Operation (press and hold [SHIFT])
STOP
Stop
C+Q
C#1
CONTINUE
Continue
C+W
D1
START
Start
C+E
D#1
TEMPO
Tempo
C + R → (tempo value) → L
BANK SELECT
Bank Select
C + T → (MSB) → (LSB) → L
PROGRAM CHANGE
Program Change
C+Y→
(program change number) → L
GM ON
GM System On
C+U→L
G1
ALL SOUND OFF
All Sound Off
(current channel)
C+I
G#1
XG ON
XG System On
C+O→L
MERGE ON/OFF
Merge On/Off(all channel)
C+P
A#1
MIDI CH
MIDI Transmit channel
C + { → (channel number) → L
B1
FIXED VELOCITY
Fixed Velocity
C + } → (velocity value) → L
RPN
Wheel Assign (RPN)
C + A → (MSB) → (LSB) → L
C#2
CONTROLLER
Wheel Assign
(controller number)
C + S → (controller number) → L
D2
NRPN
Wheel Assign (NRPN)
C + D → (MSB) → (LSB) → L
D#2
DRUM NUMBER
Drum Number (Wheel)
Select the desired drum sound from the keyboard (page 23)
then press C + F → L
Q
Transpose Down
C + G → { G} →
W
Transpose Up
RPN
Slider Assign (RPN)
C + A → (MSB) → (LSB) → L
G2
CONTROLLER
Slider Assign
(controller number)
C + S → (controller number) → L
G#2
NRPN
Slider Assign (NRPN)
C + D → (MSB) → (LSB) → L
A2
DRUM NUMBER
Drum Number (Slider)
Select the desired drum sound from the keyboard (page 23)
then press C + F → L
PROGRAM CHANGE
Display Program Change
C+Y→L
E1
PROGRAM
F1
F#1
A1
C2
E2
RESET
SYSTEM
WHEEL ASSIGN
TRANSPOSE
*1
Operation Examples
....(press repeatedly)
F2
C + H → { H} →
....(press repeatedly)
F#2
D#3
SLIDER ASSIGN
DISPLAY
E3
BANK MSB
Display Bank Select MSB
C+¢→L
F3
BANK LSB
Display Bank Select LSB
C+¶→L
● Footnotes
*1 The operation steps in braces ({}) can be repeated or re-entered as
long as C is held.
*2 Depending on the selected message or the particular device that is
connected to the CBX-K2, there may be no response. Refer to the
owner’s manual of the device for details.
*3 Be careful not to press the connected footswitch when footswitch is
assigned to “SUS”; the operation cannot be executed while the
footswitch is pressed.
*4 When Tempo is assigned to the Assignable Wheel or Slider, this
setting is ignored. When the Assignable Wheel or Slider is set to a
26
function other than Tempo, the current value is effective. The range
for this function is 20 – 300 bpm; when the Wheel or Slider is set to
control Tempo, the range is slightly narrower: 28 – 282 bpm. When
this is set to 0, “oFF” is shown in the display.
*5 The entry order of the MSB and LSB values can be changed by using
the MSB 1ST/LSB 1ST in Group B.
*6 The actual program change number transmitted by the CBX-K2 is the
displayed number minus one. For example, program number 001 on
the display is actually transmitted as 000.
*7 The value can also be easily increased or decreased. First, make sure
that the display is set appropriately (to Program Change or Bank
Group A Functions — List
Explanation
Range (Hexadecimal Default
in parentheses)
setting
MIDI Code
Notes
Stop command for sequencer/rhythm machine.
-
-
<<FC>>
*2
Continue command for sequencer/rhythm machine.
-
-
<<FB>>
*2
Start command for sequencer/rhythm machine.
-
-
<<FA>>
*2
Tempo entry for sequencer/rhythm machine. Setting to 0 disables the MIDI clock transmission.
When Assignable Wheel or Slider is set to Tempo (158), this is inactive.
0, 20-300(0, 14-12C)
0(oFF)
<<F8>>
*2, *4
This allows selection of voice banks on tone generators that support multiple banks. This
message must include both MSB and LSB values.
MSB:000-127(00-7F)
LSB:000-127(00-7F)
MSB:000
LSB:000
<<Bn 00 msb, Bn 20 LSB, Cn pp>>
*5, *7
Transmits the selected program change number. Stepping up or down through program
numbers is also possible by holding down C and using the N/
M buttons (page 16).
1-128(1-80)
1
<<Cn pp>>
*6, *7
This resets the connected tone generator to GM operation. Caution: Be careful when using
this, since it automatically changes whatever settings you’ve made on the tone generator.
(Only GM compatible tone generators respond to this message.)
-
-
<<F0 7E 7F 09 01 F7>>
*8
This turns all sounds off over the current MIDI channels. To turn all sounds off for all MIDI
channel, use All Sounds Off in Group B.
-
-
<<Bn 78 00>>
This resets the connected tone generator to XG operation. Caution: Be careful when using
this, since it automatically changes whatever settings you’ve made on the tone generator.
(Only XG compatible tone generators respond to this message.)
-
-
<<F0 43 1s 4C 00 00 7E 00 F7>>
*8
When set to ON, this merges all data received at MIDI IN with the data generated by the
CBX-K2. Merge can be set independently for each channel in the Group B. (For details about
MIDI Merge, refer to page 34.)
on, oFF
on
-
*9
This determines the MIDI transmit channel for the CBX-K2. This should be set to match the
MIDI receive channel of the connected MIDI device.
1-16(1-10)
1
-
*3
This sets a fixed velocity value for the keyboard; in other words, playing the keyboard at any
strength results in a certain velocity value. When this is set to 0 or “oFF”(initial touch on),
Touch sensitivity can be set in the Group B .
When the Assignable Wheel or Slider is set to Velocity(157), this is inactive.
0, 1-127(0, 1-7F)
0(oFF)
-
This determines the RPN (Registered Parameter Number) controller for the Assignable Wheel.
The message must include both MSB and LSB values.
MSB:000-127(00-7F)
LSB:000-127(00-7F)
-
<<Bn 64 LSB, Bn 65 MSB, Bn 06 vv>>
Refer to the Controller list on page 30.
*5, *10
This determines the Controller number for the Assignable Wheel. Though not all are listed on
the panel, any of the standard Control Change numbers (0 - 119) can be assigned. (For a
complete list of the available controllers and their numbers, see on page 30.)
0-158(0-9E)
1
<<Bn gg vv>>etc..
Refer to the Controller list on page 30.
*10
This determines the controller by using NRPN ( Non-Registered Parameter Number) for the
Assignable Wheel. Refer to the Controller list on page 30. The message must include both
MSB and LSB values.
MSB:000-127(00-7F)
LSB:000-127(00-7F)
-
<<Bn 62 LSB, Bn 63 MSB, Bn 06 vv>>
Refer to the Controller list on page 30.
*5, *10
This determines the drum number for use with the Wheel and the assigned drum-related
control number (136 - 151). The following alternate operation can also be used: C +
F → [note number (of desired drum sound)] → L
0-127(00-7F)
0
-
This lowers the key transposition by the specified amount (in semitones).
0-12(0-C)
0
-
*11
This raises the key transposition by the specified amount (in semitones).
0-12(0-C)
0
-
*11
This determines the RPN (Registered Parameter Number) controller for the Assignable Slider.
The message must include both MSB and LSB values.
MSB:000-127(00-7F)
LSB:000-127(00-7F)
-
<<Bn 64 lsb, Bn 65 msb, Bn 06 vv>>
Refer to the Controller list on page 30.
*5, *10
This determines the Controller number for the Assignable Slider. Though not all are listed on
the panel, any of the standard Control Change numbers (0-119) can be assigned. (For a
complete list of the available controllers and their numbers, see on page 30.)
0-158(0-9E)
6
<<Bn gg vv>>etc..
Refer to the Controller list on page 30.
*10
This determines the NRPN (Non-Registered Parameter Number) controller for the Assignable
Slider. The message must include both MSB and LSB values. (Refer to the Controller list on
page 30.)
MSB:000-127(00-7F)
LSB:000-127(00-7F)
-
<<Bn 62 lsb, Bn 63 msb, Bn 06 vv>>
Refer to the Controller list on page 30.
*5, *10
This determines the drum number for use with the Slider and the assigned drum-related
control number (136 - 151). The following alternate operation can also be used: C +
F → [note number (of desired drum sound)] → L
0-127(00-7F)
0
-
Changes the LED display to show the currently selected program number.
Toggles among
the three settings.
When power
is turned on
Program
Change is
selected.
-
Changes the LED display to show the currently selected Bank Select MSB value.
Changes the LED display to show the currently selected Bank Select LSB value.
Select MSB/LSB; see corresponding Group A functions). Then, hold
down C and press the N or M
button. (Hold down the appropriate button to change the value
continuously.) To directly change the value (decimal or hexadecimal)
for the displayed function, hold down C, enter the value, then
press L.
*8 The connected device initializes itself upon reception of this message.
*9 When a MIDI error results, MIDI Merge is automatically set to OFF.
*10 • When RPN or NRPN is assigned, the Wheel or Slider is automatically set to control Data Entry and will change the relevant
parameter on the connected device.
-
• To send a specific value for the current control number assignment
of the Wheel or Slider, hold down C, enter the desired value,
and press L. However, this cannot be done with the following
controller numbers: 153 (Key Pressure), 157 (Velocity), or 158
(Tempo).
• The assigned MSB and LSB values alternately appear in the LED
display. When no value is assigned, “---” is shown in the display.
*11 Transpose can be done in two ways: by repeatedly pressing
G or H key or by entering the transpose
value directly after pressing G or H key.
To restore the normal transpose setting, hold C and press both
fl keys simultaneously.
27
Group B Functions — List
Key
Panel Name
C1
SEQUENCER
Function name
Operation (press and hold [SHIFT] )
SONG SELECT
Song Select
C+ç→œ→
(song number) → L
C#1
TIME SIGNATURE TOP
Time Signature Top
(numerator)
C + ç → {¡}...(press repeatedly)
D1
TIME SIGNATURE BOTTOM
Time Signature Bottom
(denominator)
C + ç → {®}...(press repeatedly)
D#1
MEASURE
Measure Number
C+ç→†→
(measure number) → L
E1
-
VOICE MAP
Voice Map
C+ç→¥→
(Map number) → L
F1
-
POLY/MONO
Poly/Mono
C+ç→ø
F#1
RESET
RESET CONTROL
Reset All Controllers
C+ç→å
SOUND OFF ALL CH
All Sound Off (all channels)
C+ç→ß
TG300B
TG300B Reset
C+ç→™→L
CHANNEL MERGE
Merge On /Off
(each channel)
C+ç→ƒ→
G1
G#1
A1
SYSTEM
Operation Examples
(channel number)
A#1
DEVICE NUMBER
Device Number
C+ç→©→
(device number) → L
B1
TOUCH SENSITIVITY
Touch Sensitivity
C+ç→˙→
(value) → L
C2
-
RPN
Controller Direct Data Send
(RPN)
C + ç → A → (MSB) → (LSB) → L →
{(control value) → L }
C#2
-
CONTROLLER
Controller Direct data Send
(controller number)
C + ç → S → (controller number) →
L → {(controller value) → L }
D2
-
NRPN
Controller Direct Data Send
(NRPN)
C + ç → D → (MSB) → (LSB) →
L → {(controller value) → L }
D#2
WHEEL ASSIGN
DATA DENSITY
Data Density (Wheel)
C+ç→£→
(density value) → L
E2
-
MSB 1ST/LSB 1ST
MSB/LSB invert
C+ç→˚
F2
-
FOOT SW ASSIGN
Footswitch Assign
C + ç → { ¬}
*9
*9
*9
... (press repeatedly)
F#2
-
-
-
-
-
G2
-
-
-
-
-
G#2
-
PB DENSITY
Data Density
(Pitch Bend Wheel)
C+ç→§→
(density value) → L
A2
SLIDER ASSIGN
DATA DENSITY
Data Density (Slider)
C+ç→£→
(density value) → L
F#3
-
SELECT B
Single-byte Data Send
C + ç → {(single-byte data) → L}
● Footnotes
*1 Depending on the selected message or the particular device that is
connected to the CBX-K2, there may be no response. Refer to the
owner’s manual of the device for details.
*2 The Time Signature Top value is selected in the following order: 4, 5,
6, ... 15, 16, 1, 2, 3, 4, etc. (“4” is used as the starting point, since
that is the most commonly used Top value.) The order for the Time
Signature Bottom values is 4, 8, 16, 4, etc.
*3 The range for the Measure function depends on the currently set Time
Signature. When set to 4/4, the range is 1 – 999; when set to 8/4 or
16/8, the range is 1 – 512. The absolute maximum is 999.
28
*9
*4 • The channel number can only be entered as a hexadecimal value (1
– F, 0).
• Using system exclusive messages to turn Merge on or off can only
be done for all channels (as in the corresponding Group A
function).
*5 When Fixed Velocity (in Group A) is set to a value other than 0, the
Touch Sensitivity function is inactive. The following table shows the
velocity range for the minimum, medium, and maximum Touch
Sensitivity settings.
Group B Functions — List
Explanation
Range (Hexadecimal Default
in parentheses)
setting
MIDI Code
Notes
Song Select command for sequencer/rhythm machine.
0-127(00-7F)
0
<<F3 ss>>
*1
This determines the top (numerator) value of the time signature for sequencer/rhythm
machine, at the specified song position (see Measure Number below). When song position is
received this data will be used.
1-16
4
-
*2
This determines the bottom (denominator) value of the time signature for sequencer/rhythm
machine, at the specified song position (see Measure Number below). When song position is
received this data will be used.
4, 8, 16
4
-
*2
This determines the measure number (song position) for sequencer/rhythm machine. This is
used together with the Time Signature functions above, and should be entered before
specifying the Time Signature.
1-999(1-3E7)
(depending on specified
Time Signature)
1
<<F2 lsb msb>>
*1, *3
0
<<F0 43 1s 49 00 00 12 vv>>
This determines the Voice Map setting when used with the Yamaha MU100R Tone Generator.
(For details, see the MU100R Owner’s Manual.)
0-127(00-7F)
Sets the connected tone generator to Poly or Mono mode.
PoL, non
PoL
<<Bn 7E 00>>, <<Bn 7F 00>>
This resets all MIDI controller values on the connected device to their reset values (minimum
or center).
-
-
<<Bn 79 00>>
This turns all sounds off over all MIDI channels. To turn all sounds off for a single specific
MIDI channel, use the All Sound Off function in Group A.
-
-
<<B0 78 00, B1 78 00,…, BF 78 00>>
This performs a TG300B reset on a connected tone generator.
-
-
<<F0 41 10 42 12 40 00 7F 00 41 F7>>
This merges all data received over the specified MIDI channel with the data generated by the
CBX-K2. This function can be set independently for each channel. (For details about MIDI
Merge, refer to page 34.)
on, oFF
on
-
This determines the Device Number when independently transmitting certain messages (such
as XG On) to one of several connected MIDI devices.
1-16(1-10)
1
-
This determines the relative velocity sensitivity of the CBX-K2 keyboard. The lower the Touch
Sensitivity value, the higher the output velocity becomes. In other words, when this is set to a
value near 1, even soft playing strength results in a loud sound from the connected tone
generator. (1: easy - 10: hard)
1-10(1-A)
10
-
This allows you to directly send a specific value for a selected RPN controller number, without
altering the current controller assignment of the Assignable Wheel or Slider.
MSB:000-127(00-7F)
LSB:000-127(00-7F)
Control value:0-127
(00-7F)
-
<<Bn 64 lsb, Bn 65 msb, Bn 06 vv>>
Refer to the Controller list on page 30.
This allows you to directly send a specific value for a selected Control Change controller
number, without altering the current controller assignment of the Assignable Wheel or Slider.
Control number:0-156
(0-9C)
Control value:0-127
(00-7F)
-
<<Bn gg vv>>etc..
Refer to the Controller list on page 30.
This allows you to directly send a specific value for a selected NRPN controller number,
without altering the current controller assignment of the Assignable Wheel or Slider.
MSB:000-127(00-7F)
LSB:000-127(00-7F)
Control value:0-127
(00-7F)
-
<<Bn 62 lsb, Bn 63 msb, Bn 06 vv>>
Refer to the Controller list on page 30.
This determines the density of the data sent by the Assignable Wheel when it is set to a
continuous controller (such as modulation or volume). Set this to a value at or near 1, when
you wish to limit the amount of data sent (for example, when sequencer memory limits the
amount of data that can be recorded). (1: thin - 10: thick or full)
1-10(1-A)
10
-
This inverts the MSB/LSB value entry (so that LSB precedes MSB). You can also set this to
LSB 1ST by simultaneously holding down N and turning on the power.
MSB 1ST(MSB → LSB) MSB precedes
LSB 1ST(LSB → MSB) LSB
-
This determines the function for the connected footswitch. Available functions are: Sustain
(SUS), Continue/Stop for sequencer (Cnt), Start/Stop for sequencer (StA), SHIFT button
operation (SFt).
SUS, Cnt, StA, SFt
SUS
-
-
-
-
-
-
-
-
-
This determines the density of the data sent by the Pitch Bend Wheel.
1-10(1-A)
10
-
This determines the density of the data sent by the Assignable Slider when it is set to a
continuous controller (such as modulation or volume). Set this to a value at or near 1, when
you wish to limit the amount of data sent(for example, when sequencer memory limits the
amount of data that can be recorded). It can also be used to create special “step” effects for
certain controller numbers. (1: thin - 10: thick or full)
1-10(1-A)
10
-
This sends a data message of a single byte.
0-255(0-FF)
-
<<xx>> xx=single-byte data
Touch Sensitivity Value
Velocity Range
*4
*5
*6
*7
1 (1)
5 (5)
10 (A)
MSB 1ST(MSB → LSB)
32-127
(20-7F)
16-127
(10-7F)
1-127
(01-7F)
LSB 1ST(LSB → MSB)
*10
*8
toggle
toggle
*6 The following controller numbers cannot be used: 153 (Key Pressure),
157 (Velocity), or 158 (Tempo).
*7 When the MSB/LSB entry order is changed, the LED display appears
as follows to indicate the data order:
*8 The effective range is from 0 - 255; values outside of this range will
be ignored.
*9 The operation steps in braces ({}) can be repeated or re-entered as
long as C is held.
*10 Be careful not to press the connected footswitch while using this
function; the operation cannot be executed while the footswitch is
assigned to “SFt” and pressed.
29
Assignable Wheel & Slider — Controller Number List
For further details on these various control numbers refer to the MIDI Data Format supplement.
No.
1
2
4
5
6
7
10
11
64
65
66
67
71
72
73
74
84
91
93
94
120
121
122
123
124
125
126
127
128
129
130
131
132
133
134
135
136
137
138
139
140
141
142
143
144
145
146
147
148
149
150
151
152
153
154
155
156
157
158
Controller
Name
Modulation Depth
Breath Control
Foot Control
Portamento Time
Data Entry MSB
Main Volume
Pan
Expression
Hold 1 (Damper)
Portamento
Sostenuto (Chord Hold)
Soft Pedal
Harmonic Content
Release Time
Attack Time
Brightness
Portamento Control
Reverb Send Level
Chorus Send Level
Variation Effect Send Level
Pitch Bend Sensitivity
Fine Tuning
Coarse Tuning
Vibrato Rate
Vibrato Depth
Vibrato Delay
Low Pass Filter Cutoff Frequency
Low Pass Filter Resonance
High Pass Filter Cutoff Frequency
EQ Low Gain
EQ High Gain
EQ Low Frequency
EQ High Frequency
EG Attack Time
EG Decay Time
EG Release Time
Drum Low Pass Filter Cutoff Frequency
Drum Low Pass Filter Resonance
Drum EG Attack Rate
Drum EG Decay Rate
Drum Pitch Coarse
Drum Pitch Fine
Drum Level
Drum Pan
Drum Reverb Send Level
Drum Chorus Send Level
Drum Variation Send Level
Drum High Pass Filter Cutoff Frequency
Drum EQ Low Gain
Drum EQ High Gain
Drum EQ Low Frequency
Drum EQ High Frequency
Channel Pressure
Polyphonic Key Pressure
Master Volume
Master Balance
Master Tuning
Velocity
Tempo
Data Format
MIDI Code
Control Change
Control Change
Control Change
Control Change
Control Change
Control Change
Control Change
Control Change
Control Change
Control Change
Control Change
Control Change
Control Change
Control Change
Control Change
Control Change
Control Change
Control Change
Control Change
Control Change
RPN
RPN
RPN
NRPN
NRPN
NRPN
NRPN
NRPN
NRPN
NRPN
NRPN
NRPN
NRPN
NRPN
NRPN
NRPN
NRPN
NRPN
NRPN
NRPN
NRPN
NRPN
NRPN
NRPN
NRPN
NRPN
NRPN
NRPN
NRPN
NRPN
NRPN
NRPN
After Touch
After Touch
System Exclusive Messages
System Exclusive Messages
System Exclusive Messages
Others
Others
<<Bn gg vv>>
<<Bn gg vv>>
<<Bn gg vv>>
<<Bn gg vv>>
<<Bn gg vv>>
<<Bn gg vv>>
<<Bn gg vv>>
<<Bn gg vv>>
<<Bn gg vv>>
<<Bn gg vv>>
<<Bn gg vv>>
<<Bn gg vv>>
<<Bn gg vv>>
<<Bn gg vv>>
<<Bn gg vv>>
<<Bn gg vv>>
<<Bn gg vv>>
<<Bn gg vv>>
<<Bn gg vv>>
<<Bn gg vv>>
<<Bn 64 00, Bn 65 00, Bn 06 vv>>
<<Bn 64 01, Bn 65 00, Bn 06 vv>>
<<Bn 64 02, Bn 65 00, Bn 06 vv>>
<<Bn 62 08, Bn 63 01, Bn 06 vv>>
<<Bn 62 09, Bn 63 01, Bn 06 vv>>
<<Bn 62 0A, Bn 63 01, Bn 06 vv>>
<<Bn 62 20, Bn 63 01, Bn 06 vv>>
<<Bn 62 21, Bn 63 01, Bn 06 vv>>
<<Bn 62 24, Bn 63 01, Bn 06 vv>>
<<Bn 62 30, Bn 63 01, Bn 06 vv>>
<<Bn 62 31, Bn 63 01, Bn 06 vv>>
<<Bn 62 34, Bn 63 01, Bn 06 vv>>
<<Bn 62 35, Bn 63 01, Bn 06 vv>>
<<Bn 62 63, Bn 63 01, Bn 06 vv>>
<<Bn 62 64, Bn 63 01, Bn 06 vv>>
<<Bn 62 66, Bn 63 01, Bn 06 vv>>
<<Bn 62 rr, Bn 63 14, Bn 06 vv>>
<<Bn 62 rr, Bn 63 15, Bn 06 vv>>
<<Bn 62 rr, Bn 63 16, Bn 06 vv>>
<<Bn 62 rr, Bn 63 17, Bn 06 vv>>
<<Bn 62 rr, Bn 63 18, Bn 06 vv>>
<<Bn 62 rr, Bn 63 19, Bn 06 vv>>
<<Bn 62 rr, Bn 63 1A, Bn 06 vv>>
<<Bn 62 rr, Bn 63 1C, Bn 06 vv>>
<<Bn 62 rr, Bn 63 1D, Bn 06 vv>>
<<Bn 62 rr, Bn 63 1E, Bn 06 vv>>
<<Bn 62 rr, Bn 63 1F, Bn 06 vv>>
<<Bn 62 rr, Bn 63 24, Bn 06 vv>>
<<Bn 62 rr, Bn 63 30, Bn 06 vv>>
<<Bn 62 rr, Bn 63 31, Bn 06 vv>>
<<Bn 62 rr, Bn 63 34, Bn 06 vv>>
<<Bn 62 rr, Bn 63 35, Bn 06 vv>>
<<Dn vv>>
<<An tt vv>>
<<F0 7F 7F 04 01 ll mm F7>>
<<F0 7F 7F 04 02 ll mm F7>>
<<F0 43 1s 27 30 00 00 pm pl 00 F7>>
*4
*5
● MIDI Code abbreviation key
n: MIDI channel
gg: Control number
tt: Note number
s: Device number
rr: Drum number
vv: 8-bit resolution of the Wheel movement or Slider (range: 00–7F)
ll mm: 16-bit resolution of the Wheel movement or Slider (range: 0000–
7FFF)
pm pl: Wheel movement or Slider data of 8-bit values are divided into
two bytes (with pm = upper half of 8 bits and pl = lower half of 8
bits), converting 1-byte data into 2-byte data, each consisting of 4 bits.
The upper 4 digits are given values of 0 for both pm and pl.
30
Direct Data Send Range
(Hexadecimal in parentheses)
000-064-127 (00-40-7F)
000-064-127 (00-40-7F)
000-064-127 (00-40-7F)
000-064-127 (00-40-7F)
000-064-127 (00-40-7F)
000-064-127 (00-40-7F)
000-064-127 (00-40-7F)
000-064-127 (00-40-7F)
000-064-127 (00-40-7F)
000-064-127 (00-40-7F)
000-064-127 (00-40-7F)
000-064-127 (00-40-7F)
000-064-127 (00-40-7F)
000-064-127 (00-40-7F)
000-064-127 (00-40-7F)
000-064-127 (00-40-7F)
000-064-127 (00-40-7F)
000-064-127 (00-40-7F)
000-064-127 (00-40-7F)
000-064-127 (00-40-7F)
000-064-127 (00-40-7F)
000-064-127 (00-40-7F)
000-064-127 (00-40-7F)
000-064-127 (00-40-7F)
000-064-127 (00-40-7F)
000-064-127 (00-40-7F)
000-064-127 (00-40-7F)
000-064-127 (00-40-7F)
000-064-127 (00-40-7F)
000-064-127 (00-40-7F)
000-064-127 (00-40-7F)
000-064-127 (00-40-7F)
000-064-127 (00-40-7F)
000-064-127 (00-40-7F)
000-064-127 (00-40-7F)
000-064-127 (00-40-7F)
000-064-127 (00-40-7F)
000-064-127 (00-40-7F)
000-064-127 (00-40-7F)
000-064-127 (00-40-7F)
000-064-127 (00-40-7F)
000-064-127 (00-40-7F)
000-064-127 (00-40-7F)
000-064-127 (00-40-7F)
000-064-127 (00-40-7F)
000-064-127 (00-40-7F)
000-064-127 (00-40-7F)
000-064-127 (00-40-7F)
000-064-127 (00-40-7F)
000-064-127 (00-40-7F)
000-064-127 (00-40-7F)
000-064-127 (00-40-7F)
000-064-127 (00-40-7F)
— *1
000-064-127 (00-40-7F)
000-064-127 (00-40-7F)
014-064-114 (0E-40-72) *2
—
— *3
● NOTE
Even though not all of the numbers are listed here, the Assignable Wheel and
Slider can be assigned to any of the standard Control Change numbers: 0 –119.
● Footnotes
*1 This applies only to the highest note played. This control number is
unrelated to polyphonic key pressure after touch in the MIDI standard.
*2 Data from 00–0D is converted to a value of 0E, and data from 73–7F
is converted to a value of 72.
*3 When Tempo is assigned to the Assignable Wheel or Slider, the range
becomes 28–282.
*4 This does not output MIDI code directly, but changes the velocity of
the subsequently played notes.
*5 This does not output MIDI code directly, but changes the time interval
between transmitted MIDI clocks.
About MIDI
MIDI is an acronym that stands for Musical Instrument
Digital Interface, which allows electronic musical instruments to communicate with each other, by sending and
receiving compatible Note, Control Change, Program
Change and various other types of MIDI data, or messages.
The CBX-K2 can control a MIDI device by transmitting
note related data and various types of controller data.
MIDI Messages Transmitted by
the CBX-K2
MIDI messages can be divided into two groups: Channel
messages and System messages. Below is an explanation of
the various types of MIDI messages which the CBX-K2 can
receive and transmit.
Depending on the particular device that you are using, some
messages may not be available. Refer to the owner’s
manual of the device for details.
CHANNEL MESSAGES
Channel messages are the data related to the performance
on the keyboard for the specific channel.
■ Note On/Note Off (Key On/Key Off)
Messages which are generated when the keyboard is played.
bank select will not function when a GM System On
message is received.
■ Control Change
Control Change messages let you control volume, panning,
modulation, portamento time, brightness and various other
controller parameters, through specific Control Change
numbers which correspond to each of the various parameters.
● Modulation (Control #001)
Messages which control vibrato depth using the Modulation Wheel.
Setting the value to 127 produces maximum vibrato and
0 results in vibrato off.
● Portamento Time (Control #005)
Messages which control the duration of portamento, or a
continuous pitch glide between successively played
notes.
Setting the value to 127 produces maximum portamento
time and 0 results in minimum portamento time.
Portamento is turned on/off by Control #065.
● Data Entry MSB (Control #006)
● Data Entry LSB (Control #038)
Messages which set the value for the parameter specified by RPN or NRPN MSB/LSB. Parameter value is
determined by combining MSB and LSB.
Transmission note range = C-2 (0) - G8 (127), C3 = 60
● Main Volume (Control #007)
Messages which control the volume.
Velocity range = 1 - 127 (only Note On velocity is
transmitted)
Setting the value to 127 produces maximum volume and
0 results in volume off.
Note On: Generated when a key is pressed.
● Pan (Control #010)
Messages which control the stereo panning position of
each voice (for stereo output).
Note Off: Generated when a key is released.
Each message includes a specific note number which
corresponds to the key which is pressed, plus a velocity
value based on how hard the key is struck.
■ Bank Select
● Bank Select MSB (Control #000)
● Bank Select LSB (Control #032)
Messages (MSB/LSB) which set the voice bank of a
tone generator.
When used on an XG-compatible tone generator set to
XG operation, normal or drum voice bank is selected by
the MSB value, and the particular voice bank is selected
by the LSB value. With Yamaha MU-series instruments,
Setting the value to 127 positions the sound to the far
right and 0 positions the sound to the far left.
● Expression (Control #011)
Messages which control intonation expression of each
voice during performance.
Setting the value to 127 produces maximum volume and
0 results in volume off.
● Sustain Switch (Control #064)
Messages which control sustain on/off.
Setting the value between 64 - 127 turns the sustain on,
between 0 - 63 turns the sustain off. On the CBX-K2, a
connected footswitch can be assigned to control sustain
when “SUS” is set.
31
About MIDI
● Portamento Switch (Control #065)
Messages which control portamento on/off.
Setting the value between 64 -127 turns the portamento
on, between 0 - 63 turns the portamento off.
● Sostenuto Switch (Control #066)
Messages which control sostenuto on/off.
Setting the value between 64 - 127 turns sostenuto on,
between 0 - 63 turns sostenuto off.
When notes are held before and during the time
sostenuto is turned on, those notes (and only those
notes) will be sustained until sostenuto is turned off.
● Soft Pedal Switch (Control #067)
Messages which control soft pedal on/off.
Setting the value between 64 - 127 turns soft pedal on,
between 0 - 63 turns soft pedal off.
When soft pedal is on, the sound becomes softer and
lower in volume.
● Harmonic Content (Control #071)
Messages which adjust the VCF resonance set for each
voice.
Higher values will result in a more characteristic,
resonant sound. Depending on the voice, the effective
range may be narrower than the range available for
adjustment.
● Release Time (Control #072)
Messages which directly adjust the AEG release time set
for each voice.
● Attack Time (Control #073)
Messages which directly adjust the AEG attack time set
for each voice.
● Brightness (Control #074)
Messages which directly adjust the VCF cutoff frequency set for each voice.
Lower values will result in a softer sound. Depending on
the voice, the effective range may be narrower than the
range available for adjustment.
● Effect1 Depth (Reverb) (Control #091)
Messages which adjust the send level for the Reverb
effect.
● Effect3 Depth (Variation Chorus) (Control #093)
Messages which adjust the dry/wet balance for the
Chorus Variation Effect.
● Effect4 Depth (Variation Depth) (Control #094)
Messages which adjust the send level for the Variation
32 depth.
● Data Increment (Control #096)
● Decrement (Control #097) for RPN
Messages which increase or decrease the value of Pitch
Bend Sensitivity, Fine Tune, or Coarse Tune.
You must assign one of those parameters using the RPN
in the external device in advance.
● RPN (Registered Parameter Number) LSB (Control
#100)
● RPN (Registered Parameter Number) MSB (Control
#101)
Messages which offset, or add or subtract values from
the Pitch Bend Sensitivity, Fine Tune, or Coarse Tune
parameters.
First send the RPN MSB and RPN LSB to specify the
parameter which is to be controlled. Then use Data
Increment/Decrement to set the value of the specified
parameter.
Note that once the RPN has been set for a channel,
subsequent data entry will be recognized as the same
RPN’s value change. Therefore after you use the RPN,
you should set a Null (7FH, 7FH) value to avoid an
unexpected result.
Messages which can be transmitted are as follows:
RPN MSB
00
00
00
7F
RPN LSB
00
01
02
7F
Parameter
Pitch Bend Sensitivity
Fine Tune
Coarse Tune
Null
■ Channel Mode Messages
2nd Byte
120
121
123
126
127
3rd Byte
0
0
0
0-16
0
Message
All Sounds Off
Reset All Controllers
All Notes Off
Mono
Poly
● All Sounds Off (Control #120)
Clears all sounds currently sounding on the specified
channel. However, the status of channel messages such
as Note On and Hold On is maintained.
● Reset All Controllers (Control #121)
The values of the following controllers will be reset to
the defaults: Pitch Bend, Channel Pressure, Sustain
Switch, Modulation, Expression, Portamento, RPN*,
NRPN*, Volume, Pan.
* Number not specified; internal data will not change.
About MIDI
● All Notes Off (Control #123)
Clears all notes currently on for the specified channel.
note (when several notes are played together) when it is
applied.
However, if Sustain Switch or Sostenuto Switch is on,
notes will continue sounding until these are turned off.
■ Pitch Bend
Pitch Bend messages are continuous controller messages
that allow the pitch of designated notes to be raised or
lowered by a specified amount over a specified duration.
This message cannot be sent by any CBX-K2 operation;
however, when a MIDI error occurs, this message is sent
automatically.
● Mono (Control #126)
Performs the same function as when an All Sounds Off
message is received, and if the 3rd byte (mono number)
is in the range of 0 - 16, sets the corresponding channel
to Mono Mode (Mode 4 : m = 1).
SYSTEM MESSAGES
System messages are the data related to the overall system
of the device.
● Poly (Control #127)
Performs the same function as when an All Sounds Off
message is received, and sets the corresponding channel
to Poly Mode (Mode 3).
■ System Exclusive Messages
System Exclusive messages let you use the CBX-K2 to
control various functions on connected devices, including
master volume and master tuning, effect type and various
other parameters.
■ Program Change
Messages which select voices.
● Master Volume
This message controls the volume over all MIDI channels.
■ Channel Aftertouch
The CBX-K2 keyboard does not have aftertouch sensitivity and thus cannot send aftertouch messages by
keyboard pressure. However, Channel Aftertouch data
can be sent by the Assignable Wheel or Slider. Channel
Aftertouch affects the sound of all notes when it is
applied.
F0 7F 7F 04 01 ll mm F7 (Hexadecimal)
* mm(MSB) = appropriate volume value, ll(LSB) =
ignored
■ Active Sensing
Once FE (Active Sensing) has been received, if no MIDI
data is subsequently received for longer than an interval of
approximately 300msec, the CBX-K2 will register an
Active Sensing error.
■ Polyphonic Aftertouch
The CBX-K2 keyboard does not have aftertouch sensitivity and thus cannot send aftertouch messages by
keyboard pressure. However, Polyphonic Aftertouch
data can be sent by the Assignable Wheel or Slider.
Polyphonic Aftertouch affects the sound of only the top
Refer to the following MIDI Data Format for more information about the various messages.
● Decimal-Hexadecimal Conversion Chart
Dec
Hex
Dec
Hex
Dec
Hex
Dec
Hex
Dec
Hex
Dec
Hex
Dec
Hex
Dec
Hex
0
1
2
3
4
00
01
02
03
16
17
18
10
11
12
32
20
21
64
65
66
67
68
69
70
71
72
73
40
41
42
43
44
45
46
47
48
49
80
81
82
83
84
85
86
87
50
51
52
53
54
55
56
57
58
60
61
62
63
64
65
66
67
112
113
13
14
15
16
17
18
19
1A
1B
30
31
32
33
34
35
36
37
38
39
3A
96
97
98
19
20
21
22
23
24
25
26
27
48
49
50
51
52
53
54
55
56
57
58
70
71
72
73
74
75
76
59
1C
1D
1E
1F
3B
3C
4A
4B
28
29
30
31
74
75
76
77
78
79
5
6
7
8
9
10
11
12
13
14
15
04
05
06
07
08
09
0A
0B
0C
0D
0E
0F
33
34
35
36
37
38
39
40
41
42
43
44
45
22
23
24
25
26
27
28
29
2A
2B
2C
2D
46
47
2E
2F
60
61
62
63
3D
3E
3F
4C
4D
4E
4F
88
89
90
91
92
93
94
95
59
5A
5B
5C
5D
5E
5F
99
100
101
102
103
104
105
106
107
108
109
110
111
68
69
6A
6B
6C
6D
6E
6F
114
115
116
117
118
119
120
121
122
123
124
125
126
127
77
78
79
7A
7B
7C
7D
7E
7F
33
MIDI Data Format
MIDI Reception
● Merge-related Notes
When Merge is set to ON, MIDI messages received from an
external device at MIDI IN can be merged with the data
generated by the CBX-K2, and are transmitted as is from
MIDI OUT. However, there are some exceptions, as listed
below:
* Active sensing messages <<FE>>, All Note Off messages (<<Bn 7B 00>>) <<F4>> and <<F5>> will not be
merged.
* When the CBX-K2 is set to send <<F8>> messages,
<<F8>> messages from an external device will not be
merged.
* When the CBX-K2 is not set to send <<F8>> messages,
<<F8>> messages from an external device can be
merged.
* When Merge is set to ON, and an <<FE>> message has
not been received for over approximately 300 ms, an
Active Sensing error occurs.
* With the exception of System Exclusive data, messages
not conforming to the legal byte format will not be
merged. System Exclusive data that doesn’t conform to
the legal byte format can be merged.
* If during transmission of System Exclusive messages,
the messages are cut off or interrupted (for over approximately 400 ms), a MIDI error occurs.
* When Merge is set to on, and RPN/NRPN messages are
sent from both the CBX-K2 and an external device
connected to MIDI IN, the resulting messages may be
mixed and corrupted.
* When Merge is turned off while a key is held, a stuck
note results. This is because the CBX-K2 simply turns
Merge off, without changing the Note On status.
During merging of System Exclusive data, all operations
from the CBX-K2 are ignored, and <<FE>> and <<F8>>
messages from the CBX-K2 will be stopped. This may
cause some problems, as listed below:
* Any operations executed from the CBX-K2, in the
middle of a System Exclusive message (<<F0- F7>>)
sent from an external device, are ignored.
* CBX-K2 operations that start before or end after the
System Exclusive message will be incomplete.
To avoid these problems:
* Turn Merge off or disconnect the MIDI cable (if the
Merge function is not needed).
* Do not operate the CBX-K2 during reception of large
System Exclusive messages, such as bulk dumps.
* When receiving many short System Exclusive messages,
operate the CBX-K2 slowly, or avoid operating it at all.
34
● Response of the CBX-K2 During MIDI Errors
When a MIDI reception error occurs (such as buffer full,
Active Sensing, interruption of System Exclusive, etc.), the
CBX-K2 responds as follows:
1. Merge is set to OFF.
2. Damper Off, All Note Off, All Sound Off messages are
transmitted over all channels.
3. The M lamp flashes and the relevant
error number appears in the LED display.
To set Merge to ON again, hold down C and press
P.
MIDI Transmission
1. Transmit Condition
MIDI IN
<SW1> <SW2> <Filter>
Note on/off
<<9n>>
Polyphonic key pressure *1 <<An>>
Control change
<<Bn>>
All sound off
<<Bn 78 00>>
Reset all controller
<<Bn 79 00>>
All note off *2
<<Bn 7B 00>>
Program change
<<Cn>>
Channel pressure
<<Dn>>
Pitch change
<<En>>
System exclusive
<<F0....F7>>
Timing clock
<<F8>>
<SW1>
Start
<<FA>>
Continue
<<FB>>
Stop
<<FC>>
Active sensing
<<FE>>
Arbitrary 1byte data
<<xx>>
MIDI
OUT
*1 This applies only to the highest note played.
*2 This is output only when a MIDI error (such as Active
Sensing or buffer full) occurs.
<SW1> When the CBX-K2 is set to send <<F8>> messages, <<F8>> messages from the CBX-K2 will be
output. When the CBX-K2 is not set to send <<F8>>
messages, <<F8>> messages from the CBX-K2 will not
be output, but <<F8>> messages from a connected
external device will be merged.
<SW2> When Merge is set to ON, the incoming data is
merged.
<Filter> This is Merge On/Off for each channel.
MIDI Data Format
2. Overview
Transmitted data includes messages from the CBX-K2 itself
and messages from an external device connected to MIDI
IN. Besides conventional MIDI messages, single byte data
can also be transmitted.
3. Transmitted Data
<<9n kk vv>>
0-15
0-127
0 : note off, 1-127 : note on
(2) Polyphonic key pressure
<<An kk vv>>
n=Channel
0-15
kk=Note number
0-127
vv=Pressure value
0-127
* When pressing several keys simultaneously, after touch of only
the highest note number is output.
* Though the keyboard of the CBX-K2 itself has no after touch,
after touch data can be transmitted from the Assignable Wheel
or Slider when Channel pressure or Polyphonic key pressure is
assigned to the controller.
(3) Control change
<<Bn cc vv>>
n=Channel
0-15
cc=Control number
0-119
vv=Control value
* When RPN or NRPN is assigned to the Assignable Wheel or
Slider, the MSB, LSB and data entry values are transmitted in
a group each time.
(4) Program change
n=Channel
pp=Program number
<<Cn pp>>
0-15
0-127
(5) Channel pressure
<<Dn vv>>
n=Channel
0-15
vv=Pressure value
0-127
* Though the keyboard of the CBX-K2 itself has no after touch,
after touch data can be transmitted from the Assignable Wheel
or Slider when Channel pressure is assigned to the controller.
(6) Pitch bend change
<<En ll mm>>
n=Channel
0-15
ll=Pitch bend value
LSB 0-127
mm=Pitch bend value
MSB 0-127
* MSB and LSB data (depending on Pitch Bend Wheel position):
Maximum
Center
Minimum
MSB
0
64
127
<<Bn 7B 00>>
0-15
(4) Mono
n=Channel
<<Bn 7E 00>>
0-15
(5) Poly
n=Channel
<<Bn 7F 00>>
0-15
3.3 System Exclusive Messages
3.1 Channel Voice Messages
(1) Note on/off
n=Channel
kk=Note number
vv=Velocity
(3) All note off
n=Channel
LSB
0
0
126
* When MSB < 64, LSB = 0. When MSB > 64, LSB = (MSB 64) x 2.
3.2 Channel Mode Messages
(1) All sound off
n=Channel
<<Bn 78 00>>
0-15
(2) Reset all controller
n=Channel
<<Bn 79 00>>
0-15
(1) GM system on
<<F0 7E 7F 09 01 F7>>
(2) XG system on
n=Device number
<<F0 43 1n 4C 00 00 7E 00 F7>>
(3) Master volume
vv=Volume value
<<F0 7F 7F 04 01 00 vv F7>>
0-127
(4) Master balance
vv=Balance value
<<F0 7F 7F 04 02 00 vv F7>>
0-127
(5) Master tuning
s=Device number
pm=Tuning value MSB
pl=Tuning value LSB
<<F0 43 1s 27 30 00 00 pm pl 00 F7>>
0-15
(higher 4 bits of 1-byte data)
(lower 4 bits of 1-byte data)
(6) TG300B reset
<<F0 41 10 42 12 40 00 7F 00 41 F7>>
(7) MU100R Voice Map
s=Device number
vv=0 : MU basic
vv=1 : MU100R Native
<<F0 43 1s 49 00 00 12 vv F7>>
0-15
3.4 System Common Messages
(1) Song select
vv=Song number
<<F3 vv>>
0-127
(2) Song position pointer
<<F2 ll mm>>
ll=Song position pointer LSB 0-127
mm=Song position pointer MSB 0-127
3.5 System Real Time Messages
(1)
(2)
(3)
(4)
(5)
Timing clock
Start
Continue
Stop
Active sensing
<<F8>>
<<FA>>
<<FB>>
<<FC>>
<<FE>> Transmission should
not be paused for
longer than 250 ms.
3.6 Single-byte Data Transmission
(1) Single-byte data
<<xx>>xx=0-255
Separate from conventional MIDI message transmission, single
byte messages can also be transmitted.
3.7 Others
* Running Status bytes are not used. However, incoming
Running Status messages are added and transmitted.
* If the incoming Note Off messages include <<8n>> status, the
<<8n>> status is merged and output as is. (The CBX-K2
transmits Note Off messages as <<9n>> status with a velocity
of 0.)
35
YAMAHA
[ MIDI Sound Keyboard ]
Date:07-NOV-1997
Model CBX-K2 MIDI Implementation Chart
Version : 1.0
+----------------------------------------------------------------------+
:
: Transmitted
:
Recognized
:
Remarks
:
:
Function ... :
:
:
:
:-------------------+----------------+----------------+----------------:
:Basic
Default
: 1
: x
:
:
:Channel Changed
: 1 - 16
: x
:
:
:-------------------+----------------+----------------+----------------:
:
Default
: : x
:
:
:Mode
Messages : x
: x
:
:
:
Altered
: ************** : x
:
:
:-------------------+----------------+----------------+----------------:
:Note
: 0 - 127
: x
:
:
:Number : True voice: ************** : x
:
:
:-------------------+----------------+----------------+----------------:
:Velocity Note ON
: o 9nH,v=1-127 : x
:
:
:
Note OFF : x 9nH,v=0
: x
:
:
:-------------------+----------------+----------------+----------------:
:After
Key's
: o *1, *2
: x
:
:
:Touch
Ch's
: o *1
: x
:
:
:-------------------+----------------+----------------+----------------:
:Pitch Bend
: o
: x
:
:
:-------------------+----------------+----------------+----------------:
:
0-119 : o
: x
:Assignable
:
:
120 : o
: x
:All Sound Off
:
:
121 : o
: x
:Reset All Cntrls:
: Control
:
:
:
:
:
:
:
:
:
: Change
:
:
:
:
:
:
:
:
:
:
:
:
:
:
:
:
:
:
:
:
:
:
:
:
:
:
:
:
:
:
:
:
:
:
:
:
:
:
:
:-------------------+----------------+----------------+----------------:
:Prog
: o 0 - 127
: x
:
:
:Change : True #
: ***********
: x
:
:
:-------------------+----------------+----------------+----------------:
:System Exclusive
: o
: x
:
:
:-------------------+----------------+----------------+----------------:
:
: Song Pos. : o
: x
:
:
:common : Song Sel. : o
: x
:
:
:
: Tune
: x
: x
:
:
:-------------------+----------------+----------------+----------------:
:System
:Clock
: o
: x
:
:
:Real Time :Commands: o
: x
:
:
:-------------------+----------------+----------------+----------------:
:Aux :Local ON/OFF : x
: x
:
:
:
:All Notes OFF: x
: x
:
:
:Mes- :Active Sense : o
: o
:
:
:sages:Reset
: x
: x
:
:
:-------------------+----------------+----------------+----------------:
:Notes: *1 though the keyboard itself has no after touch,
:
:
after touch data can be transmitted from the ASSIGNABLE
:
:
WHEEL and ASSIGNABLE SLIDER when after touch is assigned
:
:
to the controllers.
:
:
*2 this applies only to the highest note played.
:
+-------------------+----------------+----------------+----------------+
36
Mode 1 : OMNI ON, POLY
Mode 2 : OMNI ON, MONO
o : Yes
Mode 3 : OMNI OFF, POLY
Mode 4 : OMNI OFF, MONO
x : No
Troubleshooting
Even though the CBX-K2 is easy to use, it may occasionally not function as you expect it to. If that happens, check
the possible problems and solutions below before assuming
that the instrument is faulty.
● (Problem)
— (Possible Cause and Solution)
● No sound from the connected device.
— The cables may have been connected incorrectly.
— Controller data, such as Volume, Expression and Master
Volume, may have been set to values too low to produce
sound.
— The Fixed Velocity setting may be too low.
● When the power is turned off and on again, the
settings you made have been cancelled.
— This is normal. The CBX-K2 has no internal memory backup.
● Sound is cut off.
— When incoming active sensing messages exceed that allowed
by the MIDI standard, the sound will automatically be cut off.
● A certain function does not respond or work properly.
— The connected MIDI device may not support the relevant
function on the CBX-K2.
● Specific functions/messages cannot be executed or
sent properly.
— While holding down C in the middle of an operation, you
may have inadvertently released C. Make sure to hold
down C for the duration of the operation.
● The connected device does not respond or synchronize to MIDI clock messages, or MIDI clock messages are not sent.
— Make sure that the Tempo setting on the CBX-K2 is set to a
value other than oFF. Also make sure that the connected
device is set properly for receiving MIDI clock messages. If
another device is connected to the MIDI IN of the CBX-K2
and that device is sending the MIDI clock messages, Merge
must be set to ON.
● The Tempo cannot be set.
— The Tempo setting is inactive when Tempo is assigned to the
Assignable Wheel or Slider.
● With Merge set to ON, tempo change messages sent
from an external device have no effect.
— If an external device is connected to the MIDI IN of the CBXK2, and the CBX-K2 is sending its own MIDI clock messages,
the MIDI clock messages of the external device will not be
sent via MIDI OUT. To have the external device’s clock
messages sent, set Tempo on the CBX-K2 to 0.
● Sending a bank select message also sends a program change message.
— This is normal. The CBX-K2 automatically sends the
currently set program change number together with a bank
select message.
● The RPN or NRPN controller number assigned to the
Assignable Wheel doesn’t function properly.
work properly.
— Please refer to the Merge-related Notes, page 34.
● Octave Shift function has no effect.
— Octave Shift cannot be changed while a key is being held
down.
● The error message “E2” appears in the LED display
and the M lamp flashes, indicating a
“MIDI buffer full” error.
— A MIDI “loop” may have been set up. To remedy this, set
MIDI Merge to OFF. (Pages 26 and 28.)
— Too much MIDI data (exceeding the receive capability of the
CBX-K2) may have been received at MIDI IN.
● An “E1” message appears in the LED display.
— The battery power is too low for proper operation. Replace all
batteries.
● The keyboard is not touch sensitive.
— Make sure that Fixed Velocity is set to oFF.
— When the Assignable Wheel or Slider is assigned to Velocity
(157), Touch Sensitivity does not function.
● The Fixed Velocity setting has no effect.
— The Fixed Velocity setting is inactive when Velocity is
assigned to the Assignable Wheel or Slider.
● Even when Touch Sensitivity is active, the effective
velocity range is narrower than expected.
— Please refer to Footnote #5 on page 28 for details on velocity
range.
● The All Sound Off function has no effect.
— All Sound Off in the Group A functions only applies to the
currently selected MIDI channel.
● The right-most five keys of the keyboard do not
sound at the expected pitch.
— When set to the highest octave range, the right-most five keys
are set one octave down.
● Some of the keys do not respond to after touch
pressure when playing several notes simultaneously.
— Polyphonic Key Pressure (After Touch) applies only to the
highest note played.
● Incoming data is not merged.
— Make sure that Merge is set to ON. Make sure also that the
Merge on/off function in Group B is set to ON for the relevant
MIDI channel.
● Some messages cannot be merged.
— Please refer to the Merge-related Notes, page 34.
● Merge is inadvertently set to OFF.
— When there is a MIDI error, Merge is automatically turned off.
Please also refer to the Merge-related Notes, page 34.
● The tone generator continues to sound after a key is
released.
— This may be caused by a MIDI error and may happen depending on the Merge setting. Please refer to the Merge-related
notes, page 34.
● When turning Merge off, the connected tone generator continues to sound.
— Execute the All Sound Off function (in the Group B functions;
pages 28 – 29).
— Please refer to the Merge-related Notes, page 34.
● The RPN or NRPN direct data send function doesn’t
37
Error Messages
The following messages may appear in the LED display during operation, indicating problems or incorrect operation.
E1
Batteries are low
The battery power is too low for operation. Replace all batteries with a
complete set of six new batteries of the same type.
E2
MIDI buffer full
Too much MIDI data has been received. Eliminate unnecessary MIDI data.
E3
Active Sensing error
This error occurs when a MIDI cable is connected to the MIDI IN terminal
of the CBX-K2 and Active Sensing messages <<FE>> have not been
received for a certain amount of time or the MIDI cable has been accidently disconnected.
E4
SysEx data error
The received System Exclusive message is incorrect. Confirm the contents
of the transmitted data (such as necessary MSB, LSB, etc.) and attempt the
operation again.
E5
MIDI framing error
An error occurred during the reception of MIDI data.
NOTE — About messages E2 – E5
■ Error messages E2 – E5 occur during the reception of MIDI data when Merge is
turned on. Exit from the error message by pressing C or any other panel
button.
■ When any of these error messages occurs, Merge is automatically turned off, and
the following messages are transmitted over all MIDI channels 1 – 16: Hold 1
(damper) OFF, All Note OFF, and All Sound OFF.
38
Specifications
● Keyboard
49 key keyboard (C1 – C5), velocity responsive
● Input/Output Terminals
MIDI IN, MIDI OUT, DC IN, FOOTSWITCH
● Functions
Basic: Octave Shift (-3 – +4 octaves), Pitch Bend
Wheel, Assignable Wheel, Assignable Slider,
MIDI Merge (MIDI IN)
MIDI Data: Sequencer control, MIDI clock, Bank Select,
Program Change, GM System On, XG System
On, TG300B Reset, Control Change, All Sound
Off, Reset All Controllers, and others
Assignable Parameters: Transpose (±12 semitones),
MIDI Transmit Channel, Fixed Velocity, Touch
Sensitivity, Device Number, Merge On/Off (each
channel), Pitch Bend Wheel density, Assignable
Slider density, Assignable Wheel density,
Footswitch function
● Power Supply
Yamaha PA-1D AC Power Adaptor, or six “AA” size,
SUM-3, R-6 or equivalent batteries.
● Dimensions (W x D x H)
817 x 202 x 85 mm (32-1/8" x 8" x 3-1/3")
● Weight (without batteries)
2.6 kg (5 lbs., 12 oz.)
* Specifications and appearance subject to change without
notice.
● Panel Controls and Indicators
SHIFT button, OCTAVE SHIFT Q/W buttons and
lamps, Pitch Bend Wheel, Assignable Wheel, Assignable Slider, POWER switch
● Display
8 segment, 3 digit
About RPN and NRPN
Registered Parameter Numbers (RPN) are controllers that
have been added to the MIDI specification and are
common among various MIDI devices of different
manufacturers. Unlike the Control Change numbers,
these use messages composed of three bytes: MSB, LSB
and Data Entry.
Non-Registered Parameter Numbers (NRPN) are controllers that have been created by one or more manufacturers, but have not been added to the MIDI specification.
Thus, NRPN functions may be found on some instruments and not others. The NRPN functions of the CBXK2 support all XG-compatible devices. Unlike the
Control Change numbers, these use messages composed
of three bytes: MSB, LSB and Data Entry.
Other RPN or NRPN messages not provided on the panel
can be transmitted using the RPN or NRPN functions in
Group A and B.
39
Index
A
All Sound Off (all channels) ...........
All Sound Off (current channel) .....
Assignable Slider ........................ 9,
Assignable Wheel ....................... 9,
28
26
18
18
B
Bank LSB (Display) ........................
Bank LSB ........................................
Bank MSB (Display) .......................
Bank MSB .......................................
Bank Select ............................... 17,
basic operations .............................
batteries ..........................................
Bottom (Time Signature) ................
hexadecimal ............................... 21,23
26
17
26
17
26
21
12
28
LED display ..................................... 10
28
15
26
26
26
33
31
33
32
31
31
31
33
33
33
33
33
11
26
31
28
28
28
28
28
30
D
Data Density (Pitch Bend) .............. 28
Data Density (Slider) ...................... 28
Data Density (Wheel) ..................... 28
DC IN terminal ................................ 11
decimal ....................................... 21,23
default settings ................................ 10
Device Number ............................... 28
Drum Number ............................ 23,26
Measure (Sequencer) .....................
Merge On/Off (all channels) ...........
Merge On/Off (each channel) ........
Merge ................................. 26, 28,
MIDI Data Format ...........................
MIDI IN terminal .............................
MIDI messages
Active Sensing .....................
Bank Select .........................
Channel Aftertouch .............
Channel Mode Message .....
Channel Message ...............
Control Change ...................
Note On/Note Off ................
Pitch Bend ...........................
Polyphonic Aftertouch .........
Program Change .................
System Exclusive ................
System Message .................
MIDI OUT terminal .........................
MIDI Transmit Channel ...................
MIDI, About .....................................
MSB 1ST/LSB 1ST .........................
MSB/LSB Invert ..............................
28
26
28
34
34
11
S
setup examples ............................... 13
SHIFT button .................................... 9
SHIFT-related functions .................. 20
single-byte message, sending ........ 25
Slider Assign ................................... 26
Specifications .................................. 39
Start (Sequencer) ........................... 26
Stop (Sequencer) ........................... 26
T
Tempo (Sequencer) ........................ 26
TG300B Reset ................................ 28
Time Signature ............................... 28
Top (Time Signature) ...................... 28
Touch Sensitivity ....................... 19, 28
Transpose ................................. 23, 26
Troubleshooting ............................... 37
V
values, entering ..............................
voice banks, changing ....................
Voice Map .......................................
voices, selecting and playing .........
21
17
28
16
W
Wheel Assign .................................. 26
X
XG On ............................................. 26
F
octave range, changing .................. 17
OCTAVE SHIFT Q/W buttons ........... 9
OCTAVE SHIFT Q/W lamps ............. 9
40
28
39
26
26
NRPN, About .................................. 39
NRPN (Slider Assign) ..................... 26
NRPN (Wheel Assign) .................... 26
O
GM On ............................................ 26
Group A functions, selecting .... 21, 22
Group A .................................... 21, 22
Reset All Controllers .......................
RPN, About .....................................
RPN (Slider Assign) .......................
RPN (Wheel Assign) ......................
N
Error Messages .............................. 38
G
R
M
E
Fixed Velocity .................................. 26
FOOT SWITCH jack ....................... 11
Footswitch Assign ........................... 28
POWER switch ............................... 11
Program Change (Display) ............. 26
Program Change ............................ 26
H
L
C
Channel Merge ...............................
connections .....................................
Continue (Sequencer) ....................
Controller (Slider Assign) ...............
Controller (Wheel Assign) ..............
Controller Direct Data Send
(controller number) .........................
Controller Direct Data Send
(NRPN) ...........................................
Controller Direct Data Send (RPN)
Controller Number List ...................
Group B functions, selecting .... 21, 24
Group B .................................... 21, 24
P
PB (Pitch Bend) Density ................
Pitch Bend Wheel ....................... 9,
Poly/Mono .......................................
power adaptor .................................
power supply ...................................
28
18
28
12
12
41
FCC INFORMATION (U.S.A.)
1. IMPORTANT NOTICE: DO NOT MODIFY THIS UNIT!
This product, when installed as indicated in the instructions contained in this manual, meets FCC requirements. Modifications not
expressly approved by Yamaha may void your authority, granted
by the FCC, to use the product.
2. IMPORTANT: When connecting this product to accessories and/
or another product use only high quality shielded cables. Cable/s
supplied with this product MUST be used. Follow all installation
instructions. Failure to follow instructions could void your FCC
authorization to use this product in the USA.
3. NOTE: This product has been tested and found to comply with
the requirements listed in FCC Regulations, Part 15 for Class “B”
digital devices. Compliance with these requirements provides a
reasonable level of assurance that your use of this product in a
residential environment will not result in harmful interference with
other electronic devices. This equipment generates/uses radio
frequencies and, if not installed and used according to the instructions found in the users manual, may cause interference harmful
to the operation of other electronic devices. Compliance with FCC
* This applies only to products distributed by YAMAHA CORPORATION OF AMERICA.
Entsorgung leerer Batterien (nur innerhalb Deutschlands)
Leisten Sie einen Beitrag zum Umweltschutz. Verbrauchte Batterien
oder Akkumulatoren dürfen nicht in den Hausmüll. Sie können bei
einer Sammelstelle für Altbatterien bzw. Sondermüll abgegeben
werden. Informieren Sie sich bei Ihrer Kommune.
regulations does not guarantee that interference will not occur in
all installations. If this product is found to be the source of interference, which can be determined by turning the unit “OFF” and
“ON”, please try to eliminate the problem by using one of the
following measures:
Relocate either this product or the device that is being affected by
the interference.
Utilize power outlets that are on different branch (circuit breaker
or fuse) circuits or install AC line filter/s.
In the case of radio or TV interference, relocate/reorient the antenna. If the antenna lead-in is 300 ohm ribbon lead, change the
lead-in to co-axial type cable.
If these corrective measures do not produce satisfactory results,
please contact the local retailer authorized to distribute this type
of product. If you can not locate the appropriate retailer, please
contact Yamaha Corporation of America, Electronic Service Division, 6600 Orangethorpe Ave, Buena Park, CA90620
The above statements apply ONLY to those products distributed
by Yamaha Corporation of America or its subsidiaries.
For details of products, please contact your nearest Yamaha or the
authorized distributor listed below.
Pour plus de détails sur les produits, veuillez-vous adresser à Yamaha
ou au distributeur le plus proche de vous figurant dans la liste suivante.
NORTH AMERICA
CANADA
Yamaha Canada Music Ltd.
135 Milner Avenue, Scarborough, Ontario,
M1S 3R1, Canada
Tel: 416-298-1311
U.S.A.
Yamaha Corporation of America
6600 Orangethorpe Ave., Buena Park, Calif. 90620,
U.S.A.
Tel: 714-522-9011
CENTRAL & SOUTH AMERICA
Die Einzelheiten zu Produkten sind bei Ihrer unten aufgeführten Niederlassung und bei Yamaha Vertragshändlern in den jeweiligen
Bestimmungsländern erhältlich.
Para detalles sobre productos, contacte su tienda Yamaha más cercana
o el distribuidor autorizado que se lista debajo.
ASIA
ITALY
Yamaha Musica Italia S.P.A.,
Combo Division
Viale Italia 88, 20020 Lainate (Milano), Italy
Tel: 02-935-771
SPAIN
Yamaha-Hazen Electronica Musical, S.A.
Jorge Juan 30, 28001, Madrid, Spain
Tel: 91-577-7270
PORTUGAL
Valentim de Carvalho CI SA
Estrada de Porto Salvo, Paço de Arcos 2780 Oeiras,
Portugal
Tel: 01-443-3398/4030/1823
GREECE
MEXICO
Yamaha de Mexico S.A. De C.V.,
Departamento de ventas
Javier Rojo Gomez No.1149, Col. Gpe Del
Moral, Deleg. Iztapalapa, 09300 Mexico, D.F.
Tel: 686-00-33
BRASIL
Yamaha Musical do Brasil LTDA.
Ave. Reboucas 2636, São Paulo, Brasil
Tel: 011-853-1377
Philippe Nakas S.A.
Navarinou Street 13, P.Code 10680, Athens, Greece
Tel: 01-364-7111
SWEDEN
Yamaha Music Argentina S.A.
Viamonte 1145 Piso2-B 1053,
Buenos Aires, Argentina
Tel: 1-371-7021
PANAMA AND OTHER LATIN
AMERICAN COUNTRIES/
CARIBBEAN COUNTRIES
Yamaha de Panama S.A.
Torre Banco General, Piso 7, Urbanización Marbella,
Calle 47 y Aquilino de la Guardia,
Ciudad de Panamá, Panamá
Tel: 507-269-5311
EUROPE
THE UNITED KINGDOM
Yamaha-Kemble Music (U.K.) Ltd.
Sherbourne Drive, Tilbrook, Milton Keynes,
MK7 8BL, England
Tel: 01908-366700
IRELAND
Danfay Ltd.
61D, Sallynoggin Road, Dun Laoghaire, Co. Dublin
Tel: 01-2859177
GERMANY/SWITZERLAND
Yamaha Europa GmbH.
Siemensstraße 22-34, 25462 Rellingen,
F.R. of Germany
Tel: 04101-3030
AUSTRIA
Yamaha Music Austria
Schleiergasse 20, A-1100 Wien Austria
Tel: 01-60203900
THE NETHERLANDS
Yamaha Music Nederland
Kanaalweg 18G, 3526KL, Utrecht, The Netherlands
Tel: 030-2828411
BELGIUM
Yamaha Music Belgium
Keiberg Imperiastraat 8, 1930 Zaventem, Belgium
Tel: 02-7258220
FRANCE
Yamaha Musique France,
Division Professionnelle
BP 70-77312 Marne-la-Vallée Cedex 2, France
Tel: 01-64-61-4000
Tom Lee Music Co., Ltd.
11/F., Silvercord Tower 1, 30 Canton Road,
Tsimshatsui, Kowloon, Hong Kong
Tel: 730-1098
INDONESIA
PT. Yamaha Music Indonesia (Distributor)
PT. Nusantik
Gedung Yamaha Music Center, Jalan Jend. Gatot
Subroto Kav. 4, Jakarta 12930, Indonesia
Tel: 21-520-2577
KOREA
Cosmos Corporation
#131-31, Neung-Dong, Sungdong-Ku, Seoul
Korea
Tel: 02-466-0021~5
MALAYSIA
Yamaha Music Malaysia, Sdn., Bhd.
16-28, Jalan SS 2/72, Petaling Jaya, Selangor,
Malaysia
Tel: 3-717-8977
Yamaha Scandinavia AB
J. A. Wettergrens Gata 1
Box 30053
S-400 43 Göteborg, Sweden
Tel: 031 89 34 00
PHILIPPINES
Yupangco Music Corporation
339 Gil J. Puyat Avenue, P.O. Box 885 MCPO,
Makati, Metro Manila, Philippines
Tel: 819-7551
DENMARK
ARGENTINA
HONG KONG
YS Copenhagen Liaison Office
Generatorvej 8B
DK-2730 Herlev, Denmark
Tel: 44 92 49 00
SINGAPORE
FINLAND
Warner Music Finland OY/Fazer Music
Aleksanterinkatu 11, P.O. Box 260
SF-00101 Helsinki, Finland
Tel: 0435 011
NORWAY
Norsk filial av Yamaha Scandinavia AB
Grini Næringspark 1
N-1345 Østerås, Norway
Tel: 67 16 77 70
Yamaha Music Asia Pte., Ltd.
Blk 202 Hougang, Street 21 #02-01,
Singapore 530202
Tel: 382-1922
TAIWAN
Yamaha KHS Music Co., Ltd.
10F, 150, Tun-Hwa Northroad,
Taipei, Taiwan, R.O.C.
Tel: 02-717-3812
THAILAND
Siam Music Yamaha Co., Ltd.
121/60-61 RS Tower 17th Floor,
Ratchadaphisek RD., Dindaeng,
Bangkok 10320, Thailand
Tel: 02-641-2951
ICELAND
Skifan HF
Skeifan 17 P.O. Box 8120
IS-128 Reykjavik, Iceland
Tel: 525 5000
OTHER EUROPEAN COUNTRIES
Yamaha Europa GmbH.
Siemensstraße 22-34, 25462 Rellingen, F.R. of
Germany
Tel: 04101-3030
THE PEOPLE’S REPUBLIC OF CHINA
AND OTHER ASIAN COUNTRIES
Yamaha Corporation,
International Marketing Division
Nakazawa-cho 10-1, Hamamatsu, Japan 430
Tel: 053-460-2317
AFRICA
Yamaha Corporation,
International Marketing Division
Nakazawa-cho 10-1, Hamamatsu, Japan 430
Tel: 053-460-2312
MIDDLE EAST
OCEANIA
AUSTRALIA
Yamaha Music Australia Pty. Ltd.
17-33 Market Street, South Melbourne, Vic. 3205,
Australia
Tel: 3-699-2388
NEW ZEALAND
Music Houses of N.Z. Ltd.
146/148 Captain Springs Road, Te Papapa,
Auckland, New Zealand
Tel: 9-634-0099
TURKEY/CYPRUS
Yamaha Europa GmbH.
Siemensstraße 22-34, 25462 Rellingen,
F.R. of Germany
Tel: 04101-3030
COUNTRIES AND TRUST
TERRITORIES IN PACIFIC OCEAN
OTHER COUNTRIES
Yamaha Corporation,
International Marketing Division
Nakazawa-cho 10-1, Hamamatsu, Japan 430
Tel: 053-460-2312
Yamaha Corporation,
International Marketing Division
Nakazawa-cho 10-1, Hamamatsu, Japan 430
Tel: 053-460-2317
HEAD OFFICE Yamaha Corporation, Electronic Musical Instrument Division
SY13
Nakazawa-cho 10-1, Hamamatsu, Japan 430
Tel: 053-460-2445
M.D.G., EMI Division © Yamaha Corporation 1998
VZ96900 801POCP1.3-01A0
Printed in Japan