1
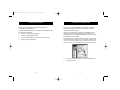
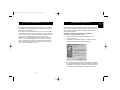
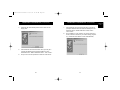
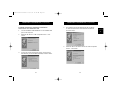
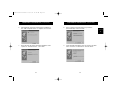
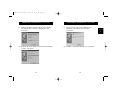
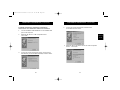
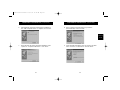
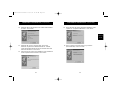
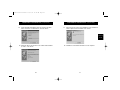
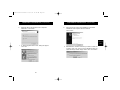
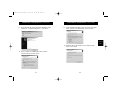
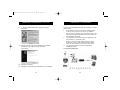
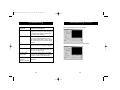
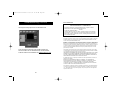
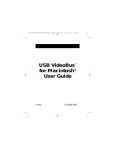
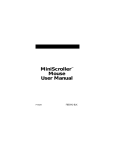
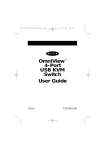
F5U208 user's manual 12/12/00 11:21 AM Page 1
USB VideoBus II™
User Guide
P73476
F5U208
F5U208 user's manual 12/12/00 11:21 AM Page 2
Introduction
Capture video and sound on your computer via the USB port!
Thank you for purchasing the Belkin Components
VideoBus II™ Adapter. With the VideoBus II, you can connect
your TV, VCR, or camcorder to your computer and capture
images, or even make full-motion movies! The VideoBus II
will accept any NTSC composite, PAL video input, or SECAM
video input and low level audio signal and convert it into a
PC-compatible digital video image and audio format. The
Belkin Components VideoBus II is the ideal device to bring
video and still images into your computer from various
standard video sources via the USB port. The VideoBus II
enables unparalleled throughput of up to 30 frames per
second for CIF size color images by using Belkin’s advanced
compression technology. This gives you superior live video
performance while using minimal USB and CPU resources,
leaving them available for other applications. Live audio and
video captured using the VideoBus II, originating from a
video camera, camcorder, VCR, or TV tuner, fully complies
with Video for Windows® standards and is compatible with
most video and imaging applications for Microsoft Win98®,
Win98®SE, Win2000®, and Millennium Edition (Me). Video
clips can be incorporated into programs such as Microsoft
PowerPoint. You can also stay in touch using software
packages such as Microsoft NetMeeting to hold video
conferencing sessions with your relatives, friends, customers,
or co-workers across the continent or across the ocean. The
VideoBus II also gives you the ability to create video e-mail
messages. Best yet, you can be a creative webmaster and
incorporate still images or video clips of family events and
business meetings that you captured on your camcorder onto
your website. Installation is a true Plug-and-Play experience.
Plug the VideoBus II cable into your PC and attach your
1
F5U208 user's manual 12/12/00 11:21 AM Page 2
Introduction
Features
(continued)
camcorder or any other video source to the VideoBus II yellow
RCA input jack and left and right audio jacks. Now you are ready
to begin capturing live video or creating amazing images!
•
•
•
•
•
•
•
•
•
2
Make your own movies using Windows® Movie Maker,
or most any video imaging application.
Includes award-winning video and photo-editing
software from MGI®.
Capture audio and video in the fastest and most
convenient way.
Connect your camcorder, VCR, digital camera, or any
standard video device directly to your PC and save the
playback in still-image format or full-motion video.
E-mail pictures or video clips to friends, relatives, and
business associates.
Set up your own live web cam with included
TeVeo™ software.
Video conference around the world using your
camcorder.
Easy-to-use Plug-and-Play operation.
Easy-to-install USB device doesn’t require opening
your computer.
3
F5U208 user's manual 12/12/00 11:21 AM Page 4
Specifications
•
•
•
•
•
•
•
•
•
•
•
•
Full-motion video–30 fps at CIF resolution video capture
via USB.
Motion video up to 15 fps at VGA resolution (progressive
video source) video capture via USB.
VGA (640 X 80) resolution still-image capture.
Audio input up to Stereo 16KHz/ 16-bit audio capture
via USB.
Software-controlled digital PAN and ZOOM.
Any Standard NTSC/PAL/SECAM video source is supported.
Any Standard low-level (RCA) audio source is supported.
Easy plug-and-play operation.
Fully compatible with Microsoft DirectShow®.
Compatible with popular video applications for Windows®.
Compatible with TWAIN applications for still image
capture.
Compatible with Microsoft Windows® 98, 98 SE, 2000, and
Windows® Me.
4
System Requirements
Minimum Recommended System
•
•
•
•
•
•
•
•
350 MHz Pentium II (or equivalent)
1 Free USB Port
64 MB of RAM
45 MB of free hard drive space for program
3 GB of free hard drive space for video editing (Ultra
DMA, SCSI-2 sub-system recommended)
Video card with 4 MB of video RAM, minimum 800 x
600 resolution at 16-bit hi-color (65,000 colors); Direct
Draw Drivers recommended
16-bit stereo sound card and speakers for audio playback
CD-ROM or DVD-ROM drive
Operating System Requirements
•
•
•
•
Windows®
Windows®
Windows®
Windows®
98
98 SE
2000
Me
5
F5U208 user's manual 12/12/00 11:21 AM Page 6
Getting Started
Please read this manual thoroughly before starting the
installation of the VideoBus II.
The recommended sequence for setting up the VideoBus II and
the software is as follows:
1. Install the MGI software packages.
2. Install the VideoBus II hardware.
3. Connect the VideoBus II to your camcorder, VCR, etc.
4. Begin using the VideoBus II.
Software Installation
Make sure to close all Windows programs before installing
the video and editing software. DO NOT PLUG IN THE
VideoBus II AT THIS POINT.
Open your CD-ROM drive and place the VideoBus II CD on
the tray. Close the tray by pressing the eject button. The
following screen will appear automatically. If you want to quit
the installation, click on EXIT.
If this screen does not appear, click the “Start” button found
on the bottom left corner of your screen. Scroll up and click on
"Run". In the "Run" window, type "d:\autorun.exe" and then
click "OK", where "d:" is the drive letter of your CD-ROM drive.
1.
6
Once the first screen appears, select the software that
you wish to install.
7
F5U208 user's manual 12/12/00 11:21 AM Page 8
Software Installation
Hardware Installation
(continued)
Windows
Me
The Manual for VideoWave III SE is located on the CD-ROM in
the following directory: d:\mgi\vw\docs where “d:” is the drive
letter of your CD-ROM drive.
The manuals are saved as PDF files. If you do not have Adobe
Acrobat Reader installed on your computer, you must install the
viewer. Click the “Start” button found on the bottom left corner
of your screen. Scroll up and click on "Run". In the "Run"
window, type "d:\mgi\vw\docs\pdf_view" and then click "OK",
where "d:" is the drive letter of your CD-ROM drive. Doubleclick on the folder that contains the language that you prefer.
Next, double-click on the self-extracting file in the folder. This
will set up Acrobat Reader for you.
IMPORTANT: Browse through this manual and find the section
that covers the hardware installation for the operating system
that you are using, and follow the installation instructions for
your operating system.
F5U208 VideoBus II Hardware Installation
Instructions for Windows® Me
1.
2.
3.
8
Plug the USB VideoBus II into a free USB port on the
computer or a hub.
A message box will appear telling you that the system is
updating the hardware information database.
The Add New Hardware Wizard will then appear, prompting
the user that Windows has found new hardware, which is a
"USB Device". Leave the line "Automatic search for a better
driver selected (Recommended)" selected. Click “Next”.
9
F5U208 user's manual 12/12/00 11:21 AM Page 10
Hardware Installation
Hardware Installation
(continued)
(continued)
Windows
Me
4.
Windows will automatically search for the driver on the
floppy disk.
7.
8.
5.
6.
After Windows has found the audio driver, you will be
prompted that Windows has finished installing the new
hardware device: "Belkin USB Video Cable, Audio".
Click “Finish”.
The installation is now complete. To capture video and
audio, follow the tutorial on your video editing program
(e.g., Windows Movie Maker or MGI VideoWave III).
After Windows has found the video driver, you will get a
prompt that Windows has finished installing the new
hardware device: "Belkin USB Video Cable". Click “Finish”.
Steps 3 and 4 will be repeated to install the video driver.
10
11
F5U208 user's manual 12/12/00 11:21 AM Page 12
Hardware Installation
F5U208 VideoBus II Hardware Installation
Instructions for Windows® 98
1.
2.
Hardware Installation
(continued)
4.
Connect the Belkin USB VideoBus II into an available USB
port on the computer.
Windows will detect a "USB Composite Device". Click
“Next”.
5.
3.
The following screen that appears will ask you where
to search for the drivers. Leave all boxes unchecked
and click “Next”.
Windows will find the built-in drivers for "USB Composite
Device". Click “Next”.
On the next screen that appears, select "Search for the
best driver for your device (Recommended)" and click “Next”.
12
(continued)
13
Windows
98
F5U208 user's manual 12/12/00 11:21 AM Page 14
Hardware Installation
6.
Hardware Installation
(continued)
After Windows copies the necessary files, installation of
the "USB Composite Device" is complete. Click “Finish”.
8.
(continued)
Select "Search for the best driver for your device
(Recommended)" and click “Next”.
Windows
98
7.
Next, Windows will detect the Belkin VideoBus II Audio
Capture as "Unknown Device". Click “Next”.
14
9.
Insert the Belkin VideoBus II Driver CD into the CD-ROM
drive. Check the "CD-ROM drive" and click “Next”.
15
F5U208 user's manual 12/12/00 11:21 AM Page 16
Hardware Installation
(continued)
10. Windows will find the drivers for the "Belkin USB
VideoBus II, Audio". Click “Next”.
Hardware Installation
(continued)
13. Next, Windows will detect the Belkin VideoBus II Audio
Capture as "Composite USB Device". Click “Next”.
Windows
98
11. Windows will copy the necessary files. At this time,
Windows may ask for the Windows 98 SE CD. If asked,
insert the Windows 98 SE CD into the CD-ROM drive and
follow the directions on the screen.
12. After the files are copied, the installation of the VideoBus II
Audio Capture drivers is finished. Click “Finish”.
16
14. Select "Search for the best driver for your device
(Recommended)" and click “Next”.
17
F5U208 user's manual 12/12/00 11:21 AM Page 18
Hardware Installation
(continued)
Hardware Installation
(continued)
15. Make sure the Belkin VideoBus II Driver CD is inserted in
the CD-ROM drive. Check the "CD-ROM drive" and
click “Next”.
17. After the files are copied, the installation of the
VideoBus II Video Capture driver is finished.
Click “Finish”.
16. Windows will find the drivers for the "Belkin USB VideoBus
II, Video". Click “Next”.
18. Installation of the Belkin VideoBus II is now complete.
18
19
Windows
98
F5U208 user's manual 12/12/00 11:21 AM Page 20
Hardware Installation
F5U208 VideoBus II Hardware Installation
Instructions for Windows® 98 Second Edition
1.
2.
Hardware Installation
(continued)
4.
(continued)
On the next screen that appears, leave all boxes
unchecked and click “Next”.
Connect the Belkin USB VideoBus II into an available USB
port on the computer.
Windows will detect a "USB Composite Device".
Click “Next”.
Windows
98 SE
5.
3.
Windows will find the built-in drivers for "USB Composite
Device". Click “Next”.
On the next screen that appears, select "Search for the
best driver for your device (Recommended)" and click “Next”.
20
21
F5U208 user's manual 12/12/00 11:21 AM Page 22
Hardware Installation
6.
Hardware Installation
(continued)
After Windows copies the necessary files, installation of
the "USB Composite Device" is complete. Click “Finish”.
8.
(continued)
Select "Search for the best driver for your device
(Recommended)" and click “Next”.
Windows
98 SE
7.
Next, Windows will detect the Belkin VideoBus II Audio
Capture as "Composite USB Device". Click “Next”.
22
9.
Insert the Belkin VideoBus II Driver CD into the CD-ROM
drive. Check the "CD-ROM drive" and click “Next”.
23
F5U208 user's manual 12/12/00 11:21 AM Page 24
Hardware Installation
(continued)
10. Windows will find the drivers for the "Belkin USB VideoBus
II, Audio". Click “Next”.
Hardware Installation
(continued)
13. Next, Windows will detect the Belkin VideoBus II Audio
Capture as "Composite USB Device". Click “Next”.
Windows
98 SE
11. Windows will copy the necessary files. At this time,
Windows may ask for the Windows 98 SE CD. If asked,
insert the Windows 98 SE CD into the CD-ROM drive and
follow the directions on the screen.
12. After the files are copied, the installation of the VideoBus II
Audio Capture drivers is finished. Click “Finish”.
24
14. Select "Search for the best driver for your device
(Recommended)" and click “Next”.
25
F5U208 user's manual 12/12/00 11:21 AM Page 26
Hardware Installation
(continued)
15. Insert the Belkin VideoBus II Driver CD into the CD-ROM
drive. Check the "CD-ROM drive" and click “Next”.
Hardware Installation
(continued)
17. After the files are copied, the installation of the VideoBus II
Video Capture driver is finished. Click “Finish”.
Windows
98 SE
16. Windows will find the drivers for the "Belkin USB VideoBus
II, Video". Click “Next”.
26
18. Installation of the Belkin VideoBus II is now complete.
27
F5U208 user's manual 12/12/00 11:21 AM Page 28
Hardware Installation
F5U208 VideoBus II Hardware Installation
Instructions for Windows® 2000
1.
2.
Hardware Installation
(continued)
4.
(continued)
Select "Search for a suitable driver for my device
(recommended)" and click “Next”.
Connect the Belkin USB VideoBus II into an available USB
port on the computer.
Windows will detect a "USB Composite Device" and
automatically install the necessary drivers.
Windows
2000
3.
The “Found New Hardware Wizard” screen will appear.
Click “Next”.
28
5.
Insert the Belkin VideoBus II Driver CD into the CD-ROM
drive. Select the "CD-ROM drive" and click “Next”.
29
F5U208 user's manual 12/12/00 11:21 AM Page 30
Hardware Installation
6.
Hardware Installation
(continued)
Windows will find the drivers for the Composite
USB Device. Click “Next”.
8.
(continued)
After the files are copied, the installation of the Belkin
VideoBus II Audio Capture drivers is finished.
Click “Finish”.
Windows
2000
7.
A "Digital Signature Not Found" dialog will appear.
Click “Yes”.
30
9.
IMPORTANT!!! Windows will ask if you want to restart the
computer. Click “No”. Due to a bug in Windows 2000, the
system will ask you restart. Simply click on "No" and continue.
31
F5U208 user's manual 12/12/00 11:21 AM Page 32
Hardware Installation
(continued)
10. Next, Windows will detect the Belkin VideoBus II Audio
Capture as "Composite USB Device". Click “Next”.
Hardware Installation
(continued)
12. Insert the Belkin VideoBus II Driver CD into the CD-ROM
Drive. Check the "CD-ROM drive" and click “Next”.
Windows
2000
13. Windows will find the drivers for the Composite USB
Device. Click “Next”.
11. Select "Search for a suitable driver for my device
(recommended)" and click “Next”.
32
33
F5U208 user's manual 12/12/00 11:21 AM Page 34
Hardware Installation
VideoBus II Connection
(continued)
14. A "Digital Signature Not Found" dialog will pop up.
Click “Yes”.
Connecting the VideoBus II between your computer and video
device is easy.
1.
2.
15. After the files are copied, the installation of the Belkin
VideoBus II Video Capture drivers is finished.
Click “Finish”.
3.
If not already connected, connect the VideoBus II USB
connector to an open port on your PC or USB Hub.
The first time the VideoBus II is connected to the PC, you
will need to follow the installation procedures outlined in
the installation instructions.
Connect the RCA A/V patch cords (not supplied) to your
video device (e.g. camcorder, VCR).
NOTE: If you have a video device that uses S-Video,
connect the S-Video cable instead of the RCA Video
Cable. Do not connect both composite and S-Video.
Connect the A/V patch cords to the appropriate
VideoBus II pigtails.
Connection Diagram
16. Restart the computer.
17. Installation of the Belkin USB VideoBus II is now complete.
34
35
F5U208 user's manual 12/12/00 11:21 AM Page 36
Recommendations
Enhancing Capture Performance
It is recommended that you perform the following steps to enable
the DMA transfer on your PC. Enabling this feature lets the
VideoBus II write data directly to the hard drive by bypassing
the microprocessor. In most cases, this will improve the quality
of the capture performance and provide for smooth, clear video
captures. If you are not sure if you need to enable DMA, install
the VideoBus II and perform a test by capturing thirty seconds
of video from a video source. If the capture is "choppy" or not
smooth, enabling the DMA should take care of this problem.
Enabling DMA
Your hard drive may not be able to sustain a high enough data
rate to provide a smooth capture of a video stream. The
performance of Ultra DMA hard drives is improved if the “DMA
transfer” option is enabled for the drive. This solution should
be approached with caution, as not all hard drives support this
feature, and they are not compatible with every system. If you
are unsure as to whether your system can handle DMA
transfers, please contact your hardware manufacturer.
To enable DMA transfer for hard drives under Windows:
1. On the Windows task bar, click Start, select Settings, then
click on Control Panel.
2. Double-click the System icon.
3. Click the Device Manager tab.
4. Find the device named “Disk Drives”, and click this icon.
You should see several drives listed. Find “Generic IDE
Disk Type 47”.
5. Highlight this drive, and click the Properties button.
36
Recommendations
(continued)
6.
7.
Click the Settings tab, and select the DMA control.
Click “OK” to exit this dialog, then click “OK” to exit the
Properties dialog.
8. Restart your computer to enable the changes.
Please note that if your system has a custom device driver for
your hard drive, it may not be possible to enable DMA.
Defragmenting your Hard Disk
To improve the performance of your captures, ensure that your
disk drives are defragmented before capturing video. Regularly
defragmenting your hard disk will help maintain optimum read
and write speeds, which is necessary for capturing video at
higher data rates.
To defragment your hard disk:
1. Shut down all running programs.
3. Launch the Windows “Disk Defragmenter” program from
the Start menu by pointing to Programs >> Accessories
>> System Tools >> Disk Defragmenter.
37
F5U208 user's manual 12/12/00 11:21 AM Page 38
Troubleshooting
PROBLEM
POSSIBLE CAUSE/REMEDY
No Audio
Check the RECORD settings in your
software to be sure that "Video and audio"
is selected. If only VIDEO is selected, then
only video will be captured.
No Audio
The Device settings may not be correct.
Select the "Belkin VideoBus II, Audio" as
the recording audio device. This is done in
the recording menu of most video editing
software.
No Video
Check RECORD settings to be sure that
"Video and audio" or "Video" is selected.
No Video
The Video Device may not be selected.
Select the "Belkin VideoBus II, Video" as
the video recording device.
No Video when
using S-Video
Be sure that S-Video cable is connected
to the camera and VideoBus II. Be sure that
S-Video is selected as the input source.
Capture loses
frames or
capture is choppy
Follow the directions for turning on hard
drive DMA.
38
Troubleshooting
(continued)
Selecting Recording Sources in Movie Maker
Selecting Recording Input Device in Movie Maker
39
F5U208 user's manual 12/12/00 11:21 AM Page 40
Troubleshooting
(continued)
Selecting Recording Input Device in VideoWave III SE
FCC Statement
DECLARATION OF CONFORMITY WITH FCC RULES FOR
ELECTROMAGNETIC COMPATIBILITY
We, Belkin Components, of 501 West Walnut Street, Compton CA 90220,
declare under our sole responsibility that the product:
F5U208
to which this declaration relates:
Complies with Part 15 of the FCC Rules. Operation is subject to the following
two conditions: (1) this device may not cause harmful interference, and (2) this
device must accept any interference received, including interference that may
cause undesired operation.
CE Declaration of Conformity
We, Belkin Components, declare under our sole responsibility that the F5U208, to which this
declaration relates, is in conformity with Generic Emissions Standard EN50081-1 and with
Generic Immunity Standard EN50082-1 1992.
Belkin Components Limited Lifetime Product Warranty
Belkin Components warrants this product against defects in materials and workmanship for
its lifetime. If a defect is discovered, Belkin will, at its option, repair or replace the product at
no charge provided it is returned during the warranty period, with transportation charges
prepaid, to the authorized Belkin dealer from whom you purchased the product. Proof of
purchase may be required.
FOR TECHNICAL SUPPORT ON THE INCLUDED MGI
PHOTOSUITE III SE OR VIDEOWAVE III SE PROGRAMS,
PLEASE CHECK MGI’S WEBSITE AT WWW.MGISOFT.COM.
This warranty does not apply if the product has been damaged by accident, abuse, misuse,
or misapplication; if the product has been modified without the written permission of Belkin;
or if any Belkin serial number has been removed or defaced.
THE WARRANTY AND REMEDIES SET FORTH ABOVE ARE EXCLUSIVE IN LIEU OF ALL OTHERS,
WHETHER ORAL OR WRITTEN, EXPRESSED OR IMPLIED. BELKIN SPECIFICALLY DISCLAIMS
ANY AND ALL IMPLIED WARRANTIES, INCLUDING, WITHOUT LIMITATION, WARRANTIES OF
MERCHANTABILITY AND FITNESS FOR A PARTICULAR PURPOSE.
No Belkin dealer, agent, or employee is authorized to make any modification, extension, or
addition to this warranty.
BELKIN IS NOT RESPONSIBLE FOR SPECIAL, INCIDENTAL, OR CONSEQUENTIAL
DAMAGES RESULTING FROM ANY BREACH OF WARRANTY, OR UNDER ANY OTHER
LEGAL THEORY, INCLUDING BUT NOT LIMITED TO LOST PROFITS, DOWNTIME,
GOODWILL, DAMAGE TO OR REPROGRAMMING, OR REPRODUCING ANY PROGRAM
OR DATA STORED IN OR USED WITH BELKIN PRODUCTS.
Some states do not allow the exclusion or limitation of incidental or consequential damages
or exclusions of implied warranties, so the above limitations of exclusions may not apply to
you. This warranty gives you specific legal rights, and you may also have other rights that
vary from state to state.
40
F5U208 user's manual 12/12/00 11:21 AM Page 42
belkin.com
Belkin Components
501 West Walnut Street
Compton • CA • 90220 • USA
Tel: 310.898.1100
Fax: 310.898.1111
Belkin Components, Ltd.
Unit 13 • Gatelodge Close • Round Spinney
Northampton • Northants • NN3 8RX • United Kingdom
Tel: +44 (0) 1604678300
Fax: +44 (0) 1604678330
Belkin Components B.V.
Diamantlaan 8 • 2132 WV
Hoofddorp • The Netherlands
Tel: +31 (0) 235698765
Fax: +31 (0) 235612694
© 2000 Belkin Components. All rights reserved. All trade names are registered trademarks of
respective manufacturers listed.