1
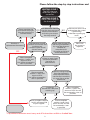
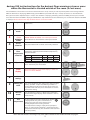
DEVI underfloor heating systems
A trouble shooting guide
www.devi.co.uk
Please follow the step-by-step instructions and
HEATING ISSUE 1
The RCD trips out
when the system is
turned on.
HEATING ISSUE 2
There is no display on
the thermostat.
Please complete the
visual checks on page 3.
Does the product pass
all three checks?
NO
Purchase a
replacement thermostat
YES
(heating issue 2 only)
YES
An electrician should
visit the site to ensure all
electrical connections
and wiring are correct.
Are they correct?
YES
Please complete
sections 1 and 2, and
return to DEVI.
You will be contacted as
soon as possible.
Please wait 24 hrs to
evaluate how the system
is performing.
Is the floor warming up
at all?
NO
The electrician should
conduct a resistance and
insulation test.
Is there an open circuit?
(No resistance).
YES
NO
NO
YES
Please make changes to
the wiring/connections
by using the diagrams
available at
www.devi.co.uk.
Also refer to the back
of the thermostat.
Please use
the system as
required.
Is there an earth fault?
(Continuity between
live/earth or
earth/neutral).
YES
Please complete
sections 1 and 2 and
return to DEVI.
You will be contacted as
soon as possible.
NO
Is there a voltage output
from the thermostat
when required? Please
use the test instructions
on page 5/6 to set the
thermostat.
NO
Exchange
thermostat. Is the floor
warming up?
YES
Please complete sections
1 and 3 and return 550
to your supplier.
NO
YES
Please complete
sections 1 and 5 and
return to DEVI. You will
be contacted as soon as
possible.
Please complete
sections 1 and 4 and
return to DEVI. You will
be contacted as soon
as possible.
*A qualified electrician must carry out all instructions within a shaded box.
2
complete the applicable forms where required
HEATING ISSUE 3
HEATING ISSUE 4
The floor is not
heating up at all.
The system is heating,
but not performing as
I would expect.
Please ensure that the
thermostat is set to the
quick set up on page 3.
Is the symbol
showing?
NO
NO
Please refer to the
Performance Trouble
Shooter on page 4.
Please refer to the user
guide/faq’s on
www.devi.co.uk
YES
If the issue is not
resolved, please complete
section 1 and 5 and
return to DEVI. You will be
contacted upon receipt.
Is the outer rim on the
thermostat flashing?
YES
Read the following fault number on the thermostat and follow instructions.
No
Error
Action
2
Configured as a master, but another master is
detected
Thermostat incorrectly
set during configuration, see step 2,
on page 5 and 6. Set to ALO.
3
Configured as a slave but cannot find any master
unit
Thermostat incorrectly set during
configuration, see step 2, on page 5 and 6.
Set to ALO.
4
The thermostat has switched itself off, due to
overheating
Call an elecrician, (let the thermostat cool for
a period then enter basic set-up to leave error
mode). Check all wiring, (diagrams on back of
thermostat and on www.devi.co.uk) and the
visual checks on page 4.
5
Sensor fault. Floor sensor short circuit
Call an electrician (Have an authorised
electrician check the floor sensor wiring and
obtain a resistance reading of 10K - 24K Ohms).
The floor sensor may have to be re-wired or
replaced.
6
Sensor fault. Floor sensor short circuit
Call an electrician (Have an authorised
electrician check the floor sensor wiring and
obtain a resistance reading of 10K - 24K Ohms).
The floor sensor may have to be re-wired or
replaced.
7
Clock is not set
Set the clock
(see page 11 of the devireg 550 user guide,
This can be downloaded on www.devi.co.uk).
If the error persists, please complete sections 1 and 5 and return to DEVI.
3
devireg 550 test instructions for the devimat floor warming system or areas
where the thermostat is situated outside of the room (ie. wet areas)
Please follow these instructions to ensure that the thermostat is set-up correctly in order to provide power to the heating elements.
NB. If the thermostat is displaying CODE initially you will ONLY be presented with step 1 and step 4; set these as described below.
Once you have either completed steps 1 and 4, or the controller is displaying something other than CODE, you must press and hold
the button until the word CODE is displayed and follow the steps below. To reset the thermostat, press and hold the button until CODE
is displayed. Please note that the setup for older versions can be seen in RED.
1
Setup code
Rotate button to select code 0044 and then press
button once.
2
Operating
mode
Rotate button to select ALO and then press the button
3
Temperature
readout
4
5
Adaptive
mode
Sensor
selection
Rotate button to select ºC and then press button
Rotate button to select AdAP and then press button
Rotate button to select ‘FS’ to activate the floor sensor,
then press button. This is a floor sensor only selection.
Maximum At ‘nt’ rotate button to select either of the following
temperature selection, maximum floor temperatures,
floor
then press button.
temperature
System Floor construction Tiles Timber Carpet
selection
devimat
devimat
Timber base
Concrete base
29-32ºC 27-32ºC 29-32ºC
40-45ºC 29-32ºC 40-45ºC
6
Off periods
LO should be displayed, you should rotate the dial to
select -30ºC then press the button.
7
Clock
display
Rotate the button to select clock display as either 24
hours or 12 hours AM/PM.
8
Save
settings
Press button once.
9
Setting the
clock
Press and hold button. The display now shows the time
and day (number 1 represents Monday, number 7 is
Sunday). Rotate the dial to show the correct time and
day of the week and then press the button to save the
correct time setting.
10
Manual
mode
Press the button so there is a black circle around the
outside of the digital display. The thermostat is now in
manual mode.
11
For test purposes, turn the setting up to 10 until
Test
temperature is displayed. This may take a few minutes to
display. This ensures that the thermostat is
sending output to the heating element.
This temperature setting is simply for test purposes.
When it is apparent that the floor is heating, lower the
temperature immediately. This should be evaluated over
a 24 hour period).
NB. If the thermostat is flashing at any time, please revert to the Trouble Shooter on page 2.
4
devireg 550 test instructions for the deviheat total heating system
Please follow these instructions to ensure that the thermostat is set-up correctly in order to provide power to the heating
elements. If the thermostat is displaying CODE initially you will ONLY be presented with step 1 and step 4; set these as described
below. Once you have either completed steps 1 and 4, or the controller is displayng something other than CODE, you must press
and hold the button until the word CODE is displayed and follow the steps below. To reset the thermostat, press and hold the
button until CODE is displayed. Please note that the setup for older versions can be seen in RED.
1
Setup code
Rotate button to select code 0044 and then press
button once.
2
Operating
mode
Rotate button to select ALO and then press the button
once.
3
Temperature
readout
Rotate button to select ºC and then press button.
Adaptive
mode
Sensor
selection
Rotate button to select AdAP and then press button
4
5
Rotate button to select rFS to activate the floor sensor,
then press button. This is a room and floor sensor
selection.
At nt rotate button to select either of the following
Maximum
temperature selection, maximum floor temperatures,
floor
then press button.
temperature
System Floor construction
Tiles
Timber Carpet
selection
Cable
Cable screed
40-45ºC
36ºC
40-45ºC
Cable
Timber suspended
36ºC
36ºC
36ºC
6
OFFS
This should be set to 0.0, if this is the case, press the
button to continue. If not, adjust setting and continue.
7
Off periods
LO should be displayed, you should rotate the dial to
select -15 degrees C then press the button.
8
Clock
display
Rotate the button to select clock display as either
24 hours or 12 hours AM/PM
9
Save
settings
Press button once.
10
Setting the
clock
Press and hold button. The display now shows the time
and day (number 1 represents Monday, number 7 is
Sunday). Rotate the dial to show the correct time and
day of the week and then press the button to save the
correct time setting.
11
Manual
mode
Press the button. A black circle around the outside of
the digital display should be displayed. The thermostat
is now in manual mode.
12
For test purposes, turn the temperature up to 35ºC until
Test
is displayed. This may take a few minutes. This
temperature
ensures that the thermostat is sending output to
the heating element. This temperature setting is simply
for test purposes. When it is apparent that the floor is
heating, lower temperature immediately. This should be
evaluated over a 24 hour period).
NB. If the thermostat is flashing at any time, please revert to the Trouble Shooter on page 2.
5
Visual checks
These instructions will help to identify whether the fault with your underfloor heating system has been
caused due to mis-installation/not following user instructions.
If these VISUAL checks are carried out correctly, the thermostat may not have to be returned to DEVI,
which will save you time.
VISUAL CHECK ONE
Cracked LCD display
This fault is caused when someone
attempts to remove the front cover of
the thermostat. This is normally
removed by carefully pushing down
on the plastic tab in the top central
grill. If care is not taken, the
implement used to push down the
tab slips and damages the display,
causing it to crack. This damage can
also be caused by over-tightening of
the screws.
VISUAL CHECK TWO
Blackening at the rear of the
thermostat
VISUAL CHECK THREE
Bent pins
This fault is caused when the
electrics entering the back of the
thermostat are stripped back too far,
exposing the live conductors. When
this happens, if these exposed wires
cross, they short and cause the fuse
to blow and the back of the
controller to be blackened.
Remove the front cover and inspect
the back of the LCD display. At the
back are a set of gold connector
pins, these leave the factory
straight, if they are bent or
distorted then a heavy hand has
been used to plug the display into
the base of the thermostat.
In all three examples, the thermostat would not be covered by the DEVI Warranty.
In this case a new thermostat should be purchased.
6
Performance trouble shooter
HEATING ISSUE
The system is not heating up to the
required temperature, or there is no
difference in performance between
settings 6 and 10.
POSSIBLE CAUSES
The floor temperature has
exceeded the maximum
temperature.
ACTION
Check the maximum floor
temperature is set correctly,
(see step 5 on pages 6 and 7).
Check the positioning of the floor
sensor is correct. (Floor sensor should
be completely in the conduit either
parallel to deviheat element or
directly underneath devimat.)
The system is heating outside the
time period. The time period is
indicated by the black segments
around the dial. (This may result in
high running costs).
The floor is heating up at variable
temperatures across the whole
floor.
The floor is heating above the
temperature required. (This may
result in high running costs).
The thermostat will not switch off
With devimat systems there may not
be enough output to heat the area.
Increase the available heating output
within the area by adding a
supplementary heating source.
The temperature has lowered to the
set LO amount.
Check the LO set-back is set correctly -15 for deviheat, -30 for devimat.
Reduce operating temperatures to
the following: deviheat -21º-24ºC, and
devimat (and all operating on floor
sensor only - wet areas, 4-7ºC)
The system will aim to reach the
displayed temperature for the time
set. (devireg intelligence based on
previous performance).
Set the timer to come on at the
time when the heat is required,
(not before).
The system is in manual mode.
Ensure that the time periods required
are displayed on the thermostat and
all segments that are outside the
intended time period are clear.
It is not possible for the element to
heat up at variable rates. This is the
result of an external influence on
the system.
Eg. Different underlying floor or
different floor covering.
Confirm that the floor structure is
standard throughout the floor/build.
The air/floor sensors are not
reading the correct temperature.
Check the positioning of the sensors.
(Floor sensor should be completely
within the conduit, either parallel to
the heating element or directly
underneath the devimat. Air sensor
should be positioned away from any
external factors that influence the air
temperature surrounding the
thermostat and therefore causing the
system to switch off early.
This may be a fault caused by a
fault with the electrical
connections.
Check electrical connections to the
thermostat (page 11 of the user
guide) and complete all visual checks
on page 4.
The thermostat will only switch off
in manual mode.
Press and hold the button so that all
segments around the outside are
filled, then quickly turn the dial anticlockwise.
Confirm that there is a heating
element beneath the area in question
and that the element has been
installed at the same Wm2 density
across the floor.
If you are still encountering a heating issue, please complete section 1 and 5 and then return to DEVI.
Please provide description of all checks carried out, eg. position of floor sensor, checking of maximum floor
temperature etc. You will then be contacted as soon as possible.
7
The DEVI warranty
You have purchased a deviheat system, which we are certain, will a high level of comfort and economy in
your home. deviheat provides a complete heating solutions with deviflex heating cables or devimat
heating mats, devireg thermostats and devifast fixing strip.
If, however, contrary to all expectations, a problem should occur with your heating system, we at DEVI, with
manufacturing units in Denmark, are, as European Union suppliers, subject to general product liability rules,
as stated in Directive 85/374/CEE and all relevant national laws which implies that:
DEVI provides a warranty for deviflex heating cables and devimat heating mats for a 10 year period and all
other DEVI Products for a 2 year period against defects in material and production.
The obligation of DEVI will be to repair or supply a new unit, free of charge without secondary charges linked
to repairing the unit. In case of defective devireg thermostats, DEVI reserves the right to repair the unit free
of charge and without unreasonable delay to the customer.
The DEVI warranty only covers connections made by authorised electricians and installations performed in
accordance with the installation instruction and does not cover faults caused by incorrect designs supplied
by others, incorrect installation or any subsequent damage, that may occur.
If DEVI is required to inspect or repair any defects caused by any of the above, then all work will be fully
chargeable. The DEVI warranty is void, if payment of the equipment is in default.
At all times, DEVI will respond honestly, efficiently and promptly to all queries and reasonable requests from
our customers.
The above mentioned warranty concerns product liability whereas matters in relation to legislation on sale
of goods shall be referred to national law.
N.B Unit = DEVI Installed equipment
8
www.devi.co.uk
THESE FORMS CAN BE COMPLETED AT www.devi.co.uk/troubleshooter
Section 1 - your details
Failure to complete all relevant fields and information to DEVI may result in a delay.
Name:
Company:
Company Address:
Post code:
Customer services Tel.
Co. Tel:
Mobile:
Fax:
E-mail address:
*Quote number of project (if applicable):
Your reference:
Site/property contact name:
Tel/Mob:
Fax:
E-mail:
Full site address:
Post code:
Postcode:
*Plot number (at time of build):
*Development name (at time of build:
* Please ignore if the thermostat was purchased through a retail outlet.
Section 2
DEVI can locate and repair the damaged heating element. On receipt of this form, DEVI will issue a quote
and a date for this service. In the unlikely event that the damage of the heating element is due to a
manufacturing fault, the standard DEVI warranty applies. Please complete as accurately as possible.
Product info
Please tick
Mat size or cable
devimat timber (100Wm2)
devimat concrete (150Wm2)
deviflex heating cables
Cable/mat checklist
Continuity between
live-neutral
Continuity between
live-earth
Continuity between
neutral-earth
Continuity between
earth-earth
YES/NO
Resistance (Ohms)
Section 3
Product type:
Date of purchase/quote number:
The thermostat may need to be returned for testing. Please confirm that the following have been tested by
ticking the boxes.
YES NO
1. I have set the thermostat in accordance to the instructions within the quick set-up guide
supplied and the following symbol is showing
and the outer-rim is not flashing.
2. The thermostat has been tested by a competent electrician and it is confirmed that there is
NO output coming from the thermostat.
3. The visual checks on page 3 have been carried out by a qualified electrician.
4. All electrical wiring/connections are in accordance with the wiring diagrams shown on
www.devi.co.uk and this has been confirmed by a competent electrician.
If any of the boxes are NOT ticked then refer to the Devi trouble shooter on page and .
If all the boxes have been ticked and checks completed thenplease return your thermoatat
to your supplier.
Signed: ……………………………………………..
Date: ………………………
Please return the product with this form to your supplier.
Section 4
Please confirm the following have been tested by ticking the boxes.
1. I have set the thermostat in accordance to the quick set-up guide supplied on page
and and the following symbol is showing
and the outer-rim is not flashing.
YES
NO
2. All electrical wiring/connections are in accordance with the wiring diagrams on the back
of the thermostat (or as shown on www.devi.co.uk) and this has been confirmed by a
competent electrician.
3. The circuit in the heating element is complete and it has been confirmed that there is not
an earth fault (no resistance between live/earth or neutral/earth).
4. The thermostat has been tested by a competent electrician and it is confirmed that there is
output coming from the thermostat.
5. The visual checks on page 4 have been carried out by a competent electrician.
If any of the boxes are NOT ticked then refer to the Devi trouble shooter on page 2 and 3.
If all the boxes have been ticked and checks completed then please now complete section 5 to give
extra detail of the heating issue you are encountering, then return the forms to Devi. You will be
contacted as soon as possible.
Signed: ……………………………………………..
Date: ………………………
Please now complete section 5, to give extra detail of the heating issue you are encountering and return
forms to DEVI, you will be contacted as soon as possible.
Section 3
Please give a detailed description of the heating issue you are encountering:
Please return this form to DEVI, you will be contacted as soon as possible.
DEVI Electroheat Ltd. • Brickfields Business Park • Woolpit, Suffolk IP30 9QS
F: 0845 434 9489
[email protected]
www.devi.co.uk/troubleshooter