1
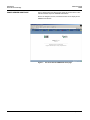
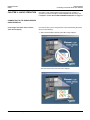
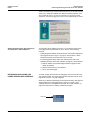
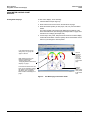
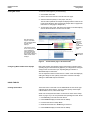
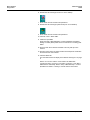
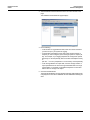
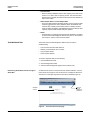
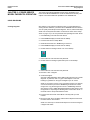
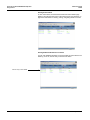
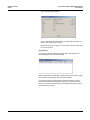
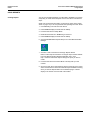
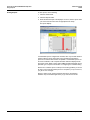
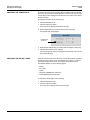
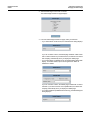
Instruction Bulletin
63230-216-217/A2
9/2002
POWERLOGIC® Power Server
PWRSRV710 and PWRSRV750 Models
User’s Guide
NOTICE
Read these instructions carefully and look at the equipment to become
familiar with the device before trying to install, operate, or maintain it. The
following special messages may appear throughout this bulletin or on the
equipment to warn of potential hazards or to call attention to information that
clarifies or simplifies a procedure.
The addition of either symbol to a “Danger” or “Warning” safety label
indicates that an electrical hazard exists which will result in personal injury if
the instructions are not followed.
This is the safety alert symbol. It is used to alert you to potential personal
injury hazards. Obey all safety messages that follow this symbol to avoid
possible injury or death.
DANGER
DANGER indicates an imminently hazardous situation which, if not
avoided, will result in death or serious injury.
WARNING
WARNING indicates a potentially hazardous situation which, if not
avoided, can result in death or serious injury.
CAUTION
CAUTION indicates a potentially hazardous situation which, if not
avoided, can result in minor or moderate injury.
CAUTION
CAUTION, used without the safety alert symbol, indicates a potentially
hazardous situation which, if not avoided, can result in property damage.
NOTE: Provides additional information to clarify or simplify a procedure.
PLEASE NOTE
Electrical equipment should be installed, operated, serviced, and maintained
only by qualified personnel. This document is not intended as an instruction
manual for untrained persons. No responsibility is assumed by Square D for
any consequences arising out of the use of this manual.
CLASS A FCC STATEMENT
This equipment has been tested and found to comply with the limits for a
Class A digital device, pursuant to part 15 of the FCC Rules. These limits are
designated to provide reasonable protection against harmful interference
when the equipment is operated in a commercial environment. This
equipment generates, uses, and can radiate radio frequency energy and, if
not installed and used in accordance with the instruction manual, may cause
harmful interference to radio communications. Operation of this equipment in
a residential area is likely to cause harmful interference in which case the
user will be required to correct the interference at his own expense.
63230-216-217/A2
9/2002
CONTENTS
Contents
CHAPTER 1—INTRODUCTION . . . . . . . . . . . . . . . . . . . . . . . . . . . . . . . . 1
Prerequisite Information Covered in the Power Server Setup Guide . . . . . 1
Terminology Used in this User’s Guide . . . . . . . . . . . . . . . . . . . . . . . . . . . . 1
Power Server Home Page . . . . . . . . . . . . . . . . . . . . . . . . . . . . . . . . . . . . . 2
CHAPTER 2—BASIC OPERATION . . . . . . . . . . . . . . . . . . . . . . . . . . . . . 3
Connecting to the Power Server User Interface . . . . . . . . . . . . . . . . . . . . . 3
Connecting to the Power Server with the Touch Screen Display . . . . 3
Connecting to the Power Server from a Remote PC . . . . . . . . . . . . . . 4
Adding the Power Server User Interface to Your Favorites in
Internet Explorer . . . . . . . . . . . . . . . . . . . . . . . . . . . . . . . . . . . . . . . . . 5
Refreshing (Reloading) the Power Server User Interface . . . . . . . . . . . . . . 5
Using Meter and Bar Chart Displays . . . . . . . . . . . . . . . . . . . . . . . . . . . . . . 6
Viewing Meter Displays . . . . . . . . . . . . . . . . . . . . . . . . . . . . . . . . . . . . 6
Viewing Bar Charts . . . . . . . . . . . . . . . . . . . . . . . . . . . . . . . . . . . . . . . 7
Configuring Meter and Bar Chart Displays . . . . . . . . . . . . . . . . . . . . . 7
Using Tables . . . . . . . . . . . . . . . . . . . . . . . . . . . . . . . . . . . . . . . . . . . . . . . . 7
Creating Quick Tables . . . . . . . . . . . . . . . . . . . . . . . . . . . . . . . . . . . . . 7
Viewing Real-Time Tables . . . . . . . . . . . . . . . . . . . . . . . . . . . . . . . . . . 9
Viewing a Single Device Table . . . . . . . . . . . . . . . . . . . . . . . . . . . 9
Viewing a Multiple Device Table . . . . . . . . . . . . . . . . . . . . . . . . . 10
Viewing Document Files . . . . . . . . . . . . . . . . . . . . . . . . . . . . . . . . . . . . . . 11
Database Management . . . . . . . . . . . . . . . . . . . . . . . . . . . . . . . . . . . . . . . 12
Database Growth Estimator . . . . . . . . . . . . . . . . . . . . . . . . . . . . . . . . 12
Database Statistics . . . . . . . . . . . . . . . . . . . . . . . . . . . . . . . . . . . . . . 14
Troubleshooting . . . . . . . . . . . . . . . . . . . . . . . . . . . . . . . . . . . . . . . . . . . . 15
Determining the Software Version Using the About Box . . . . . . . . . . 15
CHAPTER 3—POWER SERVER MODEL PWRSRV750 OPERATION . 17
Using Diagrams . . . . . . . . . . . . . . . . . . . . . . . . . . . . . . . . . . . . . . . . . . . . 17
Creating Diagrams . . . . . . . . . . . . . . . . . . . . . . . . . . . . . . . . . . . . . . . 17
Viewing Diagrams . . . . . . . . . . . . . . . . . . . . . . . . . . . . . . . . . . . . . . . 18
Using Alarms . . . . . . . . . . . . . . . . . . . . . . . . . . . . . . . . . . . . . . . . . . . . . . . 18
Configuring Alarms . . . . . . . . . . . . . . . . . . . . . . . . . . . . . . . . . . . . . . 18
Viewing Alarm Information . . . . . . . . . . . . . . . . . . . . . . . . . . . . . . . . . 19
Silencing Alarms . . . . . . . . . . . . . . . . . . . . . . . . . . . . . . . . . . . . . 19
Viewing Active Alarms . . . . . . . . . . . . . . . . . . . . . . . . . . . . . . . . 20
Viewing Detailed Information on an Alarm . . . . . . . . . . . . . . . . . 20
Popup Alarms . . . . . . . . . . . . . . . . . . . . . . . . . . . . . . . . . . . . . . . 21
Retrieving Information from the Alarm Log . . . . . . . . . . . . . . . . . 22
The Alarm Log Refresh Icon . . . . . . . . . . . . . . . . . . . . . . . . . . . . 22
Viewing Waveform Information From the Alarm Log . . . . . . . . . 23
Viewing PWRSRV750 System Information from the Alarm Log . 25
Using Waveforms . . . . . . . . . . . . . . . . . . . . . . . . . . . . . . . . . . . . . . . . . . . 26
Configuring Waveforms . . . . . . . . . . . . . . . . . . . . . . . . . . . . . . . . . . . 26
Viewing Waveform Information Only . . . . . . . . . . . . . . . . . . . . . . . . . 26
Zooming for a Closer View of Waveform Information . . . . . . . . . 27
Zooming for a Closer View of Waveforms with
Associated Transients . . . . . . . . . . . . . . . . . . . . . . . . . . . . . . . . 28
© 2002 Schneider Electric All Rights Reserved
i
Contents
63230-216-217/A2
9/2002
Using Reports . . . . . . . . . . . . . . . . . . . . . . . . . . . . . . . . . . . . . . . . . . . . . . 29
Creating Reports . . . . . . . . . . . . . . . . . . . . . . . . . . . . . . . . . . . . . . . . 29
Viewing Reports . . . . . . . . . . . . . . . . . . . . . . . . . . . . . . . . . . . . . . . . . 30
CHAPTER 4—SETTING USER PREFERENCES . . . . . . . . . . . . . . . . . . 31
Changing the Sample Rate . . . . . . . . . . . . . . . . . . . . . . . . . . . . . . . . . . . . 32
Changing the Default Page . . . . . . . . . . . . . . . . . . . . . . . . . . . . . . . . . . . . 32
Maximizing Screen Space for Viewing Data . . . . . . . . . . . . . . . . . . . . . . . 34
How Alarms Are Indicated—Audible, Popup View, or Both . . . . . . . . . . . 35
Number of Alarm Records Displayed . . . . . . . . . . . . . . . . . . . . . . . . . . . . 36
Working with Trees on the Power Server User Interface . . . . . . . . . . . . . 36
Resizing The Tree Portion of a Window (Left Side of the Page) . . . . 36
Working with Lists on the PWRSRV750 Power Server User Interface . . . 37
Resizing Columns in the Active Alarm Popup Window . . . . . . . . . . . 37
Sorting By Columns . . . . . . . . . . . . . . . . . . . . . . . . . . . . . . . . . . . . . . 37
INDEX . . . . . . . . . . . . . . . . . . . . . . . . . . . . . . . . . . . . . . . . . . . . . . . . . . . . 39
ii
© 2002 Schneider Electric All Rights Reserved
63230-216-217/A2
9/2002
CHAPTER 1—INTRODUCTION
Introduction
Prerequisite Information Covered in the Power Server Setup Guide
The POWERLOGIC Power Server products provide access to real-time
power system data using a standard web browser format. Two models are
available—the PWRSRV710 and the PWRSRV750.
The PWRSRV710 gives you access to real-time data and information. With
the PWRSRV710 you can do the following:
• View meters
• View bar charts
• View tables
• View documents
• Set user preferences
The PWRSRV750 has all the capabilities of the PWRSRV710. In addition,
the PWRSRV750 has enhanced features that allow you to do the following:
• Store and view historical information
• Configure and retrieve alarm information
• Create data diagrams and view them
This manual tells how to use the Power Server’s browser-based user
interface to view system information from the optional touchscreen display,
or from a remote PC using Internet Explorer (version 5.5 or higher).
PREREQUISITE INFORMATION
COVERED IN THE POWER SERVER
SETUP GUIDE
These instructions assume that the Power Server is installed, properly
configured to communicate to the devices in your system, and running. For
Power Server installation and setup instructions, see the Power Server
Setup Guide (instruction bulletin 63230-216-207). Also refer to the Setup
Guide to perform the following tasks required for procedures covered in this
User’s Guide:
• Using NetMeeting to access the Power Server. Refer to “Starting
NetMeeting” in the Power Server Setup Guide 63230-216-207.
• Pressing Ctrl-W to display the Power Server desktop. Refer to
“Configuring the POWERLOGIC System” in the Power Server Setup
Guide 63230-216-207.
• Putting the Power Server in Setup Mode. Refer to “Changing the Mode
from Run to Setup Mode” in the Power Server Setup Guide
63230-216-207.
• Putting the Power Server back in Run Mode. Refer to “Changing the Mode
from Setup to Run Mode” in the Power Server Setup Guide
63230-216-207.
TERMINOLOGY USED IN THIS USER’S
GUIDE
© 2002 Schneider Electric All Rights Reserved
Click vs. Touch — If you are using the touch screen display to view data, you
control the Power Server interface by touching tabs, buttons, etc. If you are
controlling the Power Server browser from a remote PC, you use your mouse
to point and click tabs, buttons, etc. For the sake of clarity, the instructions in
this manual will use only the word click. If you are a touch screen user,
assume that click means touch.
1
Introduction
Power Server Home Page
POWER SERVER HOME PAGE
63230-216-217/A2
9/2002
Figure 1 depicts the Power Server home page. All screens shown in this
instruction bulletin depict the PWRSRV750 interface.
NOTE: The Diagrams, Alarms, and Historical tabs do not display for the
PWRSRV710 interface.
Figure 1:
2
The Power Server PWRSRV750 home page
© 2002 Schneider Electric All Rights Reserved
63230-216-217/A2
9/2002
CHAPTER 2—BASIC OPERATION
Basic Operation
Connecting to the Power Server User Interface
Information in this chapter applies to both Power Server models. For
operation procedures that apply to Model PWRSRV750 specifically, refer
to Chapter 3—Power Server Model PWRSRV750 Operation on page 17.
CONNECTING TO THE POWER SERVER
USER INTERFACE
Connecting to the Power Server with the
Touch Screen Display
If it is the first time you are using the touch screen after starting the Power
Server, do the following:
1. Wait until the DO NOT TOUCH symbol Ø no longer displays.
Then the Power Server welcome screen displays.
© 2002 Schneider Electric All Rights Reserved
3
Basic Operation
Connecting to the Power Server User Interface
63230-216-217/A2
9/2002
2. Touch the welcome screen to launch the Power Server user interface.
The Power Server Home page displays.
If the touchscreen displays a black screen, simply touch the screen to
bring the display out of sleep mode.
Connecting to the Power Server from a
Remote PC
To connect to the Power Server from a remote PC, do the following:
1. Start Internet Explorer (version 5.5 or higher).
2. In the Address field, type http:// followed by the IP Address for the
Power Server.
3. Press Enter or click Go.
The Power Server splash screen displays briefly and then the home page
displays.
4
© 2002 Schneider Electric All Rights Reserved
63230-216-217/A2
9/2002
Basic Operation
Refreshing (Reloading) the Power Server User Interface
NOTE: The first time you connect to the Power Server, you will see a prompt
asking you to install the POWERLOGIC Web Downloading Interface. Click
Yes to install the control. You are only required to do this once for each
remote PC. You must be logged on to your PC as an Administrator to do this.
Adding the Power Server User Interface to
Your Favorites in Internet Explorer
To avoid typing the IP address every time, you can add the Power Server
home page to the Favorites folder. To do so, use one of the following
methods:
• If after typing the IP address, the Power Server user interface displays the
home page as shown in Figure 1 on page 2, click Favorites > Add to
Favorites and name your Power Server as you choose.
• If a default page was set up earlier (see “Working with Lists on the
PWRSRV750 Power Server User Interface” on page 37), do the following:
a. Restore defaults on the Default Page Preferences page and then
refresh the browser.
b. Add the Power Server to your Favorites.
c. Set up your default page.
REFRESHING (RELOADING) THE
POWER SERVER USER INTERFACE
To refresh (reload) the Power Server web pages, click the Home tab in the
user interface toolbar. The Power Server interface refreshes and the home
page shown in Figure 1 on page 2 displays.
NOTE: If you defined a default page in the Preferences dialog, that page will
display instead of the home page shown in Figure 1 on page 2. (See
“Working with Lists on the PWRSRV750 Power Server User Interface” on
page 37 for instructions on defining a default home page.)
Home tab
© 2002 Schneider Electric All Rights Reserved
5
Basic Operation
Using Meter and Bar Chart Displays
63230-216-217/A2
9/2002
USING METER AND BAR CHART
DISPLAYS
Viewing Meter Displays
To view meter displays, do the following:
1. Click the Meters tab (see Figure 2).
2. Select a device from the tree list on the left side of the page.
3. Select the desired quantity to view (amps, volts, etc.) from the Meters
toolbar.
The meters update at the sample rate displayed at the bottom of the
Power Server Browser. (See“Changing the Sample Rate” on page 32 for
instructions on modifying the sample rate.)
4. To view amps, volts, power, and power factor meters on the same display,
click the All Charts button. Click the quantity names at the bottom of each
meter to cycle through the various phases.
If you defined device groups
during setup, the groups will
appear in the tree.
Click the
All Charts
button to
view amps,
volts, PF,
and power
on the same
page.
Meter displays support color
bands to indicate normal
operating ranges. See
“Configuring Meter and Bar Chart
Displays” on page 7.
The maximum value shown in the
meter can be adjusted by setting
the ratings for each quantity of
that device. See “Configuring
Meter and Bar Chart Displays” on
page 7.
Click the
quantity
label to view
other phases
in All Charts
view.
Figure 2:
6
The Meters page in All Charts mode
© 2002 Schneider Electric All Rights Reserved
63230-216-217/A2
9/2002
Basic Operation
Using Tables
Viewing Bar Charts
To view bar charts (Figure 3), do the following:
1. Click the Bar Charts tab.
2. Select a device from the list on the left side of the page.
3. Select the desired quantity to view (amps, volts, etc.).
The bar charts update at the sample rate displayed at the bottom of the
Power Server Browser. (See“Changing the Sample Rate” on page 32 for
instructions on changing the sample rate.)
4. To view amps, volts, power, and power factor charts on the same display,
click the All Charts button. Scroll to view all charts.
Bar chart displays
support color bands.
See Configuring Meter
and Bar Chart
Displays.
Click the
All Charts
button to
view charts
for all
quantities on
the same
page.
The maximum value
shown in the bar chart
can be adjusted by
setting the ratings for
each quantity of that
device. See Configuring
Meter and Bar Chart
Displays.
Scroll to view
other charts.
Figure 3:
Configuring Meter and Bar Chart Displays
The Bar Charts page in All Charts mode
Both meter and bar chart displays support color bands to indicate normal
operating ranges. These bands only appear if you configure them during the
setup process. Find the index topic “Operating Range Indication” in
SMS-3000 Help for instructions.
You can adjust the maximum value shown in a meter or bar chart display by
setting the ratings for each quantity of that device. Find the index topic
“Ratings” in SMS-3000 Help for instructions.
USING TABLES
Creating Quick Tables
The Power Server comes with a set of default tables for each device type
supported by the Power Server. You can however quickly create simple
custom tables. To do so, follow these steps:
NOTE: See “Prerequisite Information Covered in the Power Server Setup
Guide” on page 1 if you are not yet familiar with operating the Power Server.
1. Use NetMeeting to access the Power Server.
2. Press Ctrl-W to display the Power Server desktop.
3. Put the Power Server in Setup Mode.
4. Redial the Power Server in NetMeeting to reconnect.
5. Press Ctrl-W to display the Power Server desktop.
© 2002 Schneider Electric All Rights Reserved
7
Basic Operation
Using Tables
63230-216-217/A2
9/2002
6. Double-click the Powerlogic Server icon on the desktop.
7. Enter master for both username and password.
8. Double-click the Powerlogic System Setup icon on the desktop.
9. Enter master for both username and password.
10. Click File > New > Quick Table.
11. Create the quick table.
Select the Help > SMS-3000 Help > Custom Quantities and Tables >
Adding a Custom (Quick) Table menu for instructions on creating quick
tables.
12. Put the Power Server back in Run Mode. This may take up to five
minutes.
13. Once the Power Server is started, restart Internet Explorer and browse
the Power Server user interface.
14. Click the Tables tab.
The new table should now display in the table list. See Figure 4 on page
9.
NOTE: You can also create a custom table in the SMS Table
Construction utility. To access it, click Start > Programs > Sms-3000 >
SMS-3000 PL Table Utility. Refer to Help > SMS-3000 Help > Custom
Quantities and Tables > Creating a Custom Table for instructions.
8
© 2002 Schneider Electric All Rights Reserved
63230-216-217/A2
9/2002
Viewing Real-Time Tables
Basic Operation
Using Tables
To view real-time tables, click the Tables tab. Two types of tables are
available. Single Device Tables let you view data from a single device. MultiDevice Tables let you view summary data from multiple devices in the same
table.
Viewing a Single Device Table
To view a single device table, do the following:
1. Click the Tables tab.
2. Click the Single Device Tables button to display the list of available single
device tables (Figure 4).
Figure 4:
Single Device Tables selection list
3. In the device list on the left side of the page, select the desired device.
The Power Server filters the tables list to show only tables that apply to
the selected device.
4. Select the desired table to view.
The table displays and the device tree view refreshes and filters the
appropriate devices compatible with that table.
The table data updates at the sample rate displayed at the bottom of the
Power Server Browser. (See“Changing the Sample Rate” on page 32 for
instructions on changing the sample rate.)
5. To view a different device using the same table, select a new device from
the device list.
6. To view a different table with the same device, click the Single Devices
Tables button to return to the Table Selection List.
7. To view a different table and a different device, click the Tables tab.
NOTE: You may first also select the table to be displayed, then select the
applicable device from the list of devices. If you select the table first, the
device tree view will refresh and filter the appropriate devices compatible
with that table.
© 2002 Schneider Electric All Rights Reserved
9
Basic Operation
Using Tables
63230-216-217/A2
9/2002
Viewing a Multiple Device Table
To view a multiple device table, do the following:
1. Click the Tables tab.
2. Click the Multi-Device Tables button to display a list of available tables.
3. Select the desired table to view.
The Power Server displays a dialog showing the list of devices that are
compatible with the selected table (Figure 5).
Figure 5:
Multiple Device Tables selection list
4. Select the desired device(s) from the devices list by moving them to the
list on the right side of the page. Choose devices by the following means:
• To select all devices, click
• To select individual devices, select one device and click
• To select all devices within a group, select the group name
and click
• To deselect all selected devices, click
5. Click Apply to display the table.
The table updates at the sample rate displayed at the bottom of the
Power Server Browser. (See“Changing the Sample Rate” on page 32 for
instructions on changing the sample rate.)
6. To view a different table, click the Multi-Device Tables button to return to
the Table Selection List.
10
© 2002 Schneider Electric All Rights Reserved
63230-216-217/A2
9/2002
VIEWING DOCUMENT FILES
Basic Operation
Viewing Document Files
The Power Server can store document files onboard for convenient
reference. For example, using the optional touch screen display, you can
easily access stored reference documents at the equipment.
Documents can be stored in either HTML format or Adobe Acrobat PDF
format. When you view a PDF document, the Power Server launches the
Adobe Acrobat Reader plug-in within the Power Server Browser. If you view
a PDF document from a remote browser that does not have Acrobat Reader
installed, you can download it from the Adobe website, www.adobe.com.
An HTML version of this manual is loaded on the Power Server. Additional
documents can be downloaded to the Power Server. For example, you might
want to store power equipment drawings, or manuals for drives or other
devices on the Power Server. Refer to the Power Server Setup Guide
(63230-216-207) for instructions on downloading PDF or HTML document
files to the Power Server.
To view files stored in the document library, do the following:
1. Click the Maintenance tab.
2. Click the Documentation button.
The Documentation page displays.
3. Choose from web pages or PDFs and then select the desired document
to be displayed.
When viewing large PDF files, it may take several minutes for the
document to open.
© 2002 Schneider Electric All Rights Reserved
11
Basic Operation
Database Management
63230-216-217/A2
9/2002
DATABASE MANAGEMENT
Two diagnostics pages are available to help you configure your Powerlogic
System and manage the database of information that the Power Server
collects. These pages are called the Database Growth Estimator page and
the Database Statistics page.
Database Growth Estimator
The Power Server stores all logged data in a History database. This
database is configured to hold a maximum amount of logged data for optimal
Power Server performance. Once it reaches this maximum size, the
Power Server deletes old data on a day-by-day basis to make space for new
data.
The Database Growth Estimator tool allows you to approximate how many
days of data the database will hold before it deletes old data. To use this tool,
do the following:
1. Click the Maintenance tab.
2. Click the Diagnostics button.
The Diagnostics page displays.
12
© 2002 Schneider Electric All Rights Reserved
63230-216-217/A2
9/2002
Basic Operation
Database Management
3. Select Database Growth Estimator from the list on the left side of the
page.
The Database Growth Estimator page displays.
4. Do the following:
• In the Number of Logged Devices field, enter the number of devices
you have set up in your system for logging.
• Ιn the Number of Samples Per Day field, enter the total number of
samples you have configured your Powerlogic System to acquire per
day. For example, if your logging templates are configured to upload
data every 15 minutes (default), then the number of Samples Per Day
is:
(60 mins. ÷ 15 mins.) samples/hour x 24 hours/day = 96 samples/day.
• In the Average Number of Topics field, enter the average number of
topics uploaded from the device through scheduled tasks or through
log templates. For example, the predefined templates on the Power
Server have an average of 25 topics.
5. Click the Calculate button.
The Approximate Number of Days displays indicating approximately how
many days the Power Server database can hold data before deleting old
data.
© 2002 Schneider Electric All Rights Reserved
13
Basic Operation
Database Management
Database Statistics
63230-216-217/A2
9/2002
The Database Statistics page allows you to view the current status of the
Power Server databases. From this page, you can tell when the Historical
data is approaching the 100% capacity when it will begin deleting old data.
To view the Database Statistics, do the following:
1. Click the Maintenance tab.
2. Click the Diagnostics button.
The Diagnostics page displays.
3. Select Database Statistics from the list on the left side of the page.
The Database Statistics page displays.
The following is an explanation of the information displayed:
• Database Space Used:
• System: The System database contains all data for your PowerLogic
system. If this database reaches 50% or higher, you will receive
alarms.
• Historical: The percentage displayed indicates the percentage of total
capacity of the database used.
14
© 2002 Schneider Electric All Rights Reserved
63230-216-217/A2
9/2002
Basic Operation
Troubleshooting
• Last FIFO Date:
• When the History database reaches 100% capacity, the Power Server
starts to run a “first in-first out” (FIFO) process. The Last FIFO Date
displayed is the last date and time that the Power Server deleted one
day’s worth of data.
• Oldest Sample Date and Latest Sample Date:
• These two dates represent the oldest and the most recent device data
samples logged into the History database. When the database has
reached 100% capacity and the Power Server is deleting old data,
these two dates get updated. If the database has not yet reached 100%
capacity, only the Latest Sample Date gets updated.
• Status
• Several tasks run to manage the Power Server databases. The status
of these various tasks display the last time the jobs ran, the results of
the execution, and the current execution status.
TROUBLESHOOTING
The Power Server provides diagnostic data that can be useful in
troubleshooting.
• A record of the last reboot date and time
• Gateway communications error counters
• A log of system alarms
• A list of system updates
To view the diagnostic data, do the following:
1. Click the Maintenance tab.
2. Click the Diagnostics button.
3. Select the desired diagnostic page from the selection tree.
Determining the Software Version Using the
About Box
To determine the version of the Power Server interface software, view the
Power Server home page or view the About box. To display the About box,
click the icon in the upper right of the Power Server interface (Figure 6).
Click the
icon to
display the
About box.
Software
version
Figure 6:
© 2002 Schneider Electric All Rights Reserved
The Power Server home page
15
Basic Operation
Troubleshooting
16
63230-216-217/A2
9/2002
© 2002 Schneider Electric All Rights Reserved
63230-216-217/A2
9/2002
CHAPTER 3—POWER SERVER
MODEL PWRSRV750 OPERATION
Power Server Model PWRSRV750 Operation
Using Diagrams
The Power Server Model PWRSRV750 has all the capabilities of the
Power Server Model PWRSRV710 as well as additional functionality. This
chapter covers these additional capabilities of the PWRSRV750.
USING DIAGRAMS
Creating Diagrams
GFX-1000 is a color graphics program that lets you create diagrams for
viewing real-time data from your Power Server PWRSRV750 user interface.
You can quickly create simple custom diagrams. To do so, follow these steps:
NOTE: See “Prerequisite Information Covered in the Power Server Setup
Guide” on page 1 if you are not yet familiar with operating the Power Server.
1. Use NetMeeting to access the Power Server.
2. Press Ctrl-W to display the Power Server desktop.
3. Put the Power Server in Setup Mode.
4. Redial the Power Server in NetMeeting to reconnect.
5. Press Ctrl-W to display the Power Server desktop.
6. Double-click the Powerlogic Server icon on the desktop.
7. Enter master for both username and password.
8. Double-click the Powerlogic System Setup icon on the desktop.
9. Enter master for both username and password.
10. Click File > New > Diagram.
11. Create the diagram.
See Help > SMS-3000 Help > GFX-1000 for instructions on how to create
diagrams. In particular, refer to “Types of GFX Objects” under this
heading for guidelines on the types of diagrams you can create.
NOTE: If you prefer to use one of your own backgrounds in your diagram,
use the File Transfer procedure in NetMeeting to transfer the custom
background. Copy the background from the C:\NetMeeting Received
files directory to the C:\SMS-3000\Drawings\Backgrounds directory. See
the appendix on “Uploading and Deleting Files on the Power Server” in
the Power Server Setup Guide 63230-216-207.
12. Put the Power Server back in Run Mode. This may take up to five
minutes.
13. Once the Power Server is started, restart Internet Explorer and browse
the Power Server user interface.
NOTE: It is necessary to restart Internet Explorer to see most changes to
a diagram take effect.
© 2002 Schneider Electric All Rights Reserved
17
Power Server Model PWRSRV750 Operation
Using Alarms
63230-216-217/A2
9/2002
14. Click the Diagrams tab.
The new diagram should display in the tree list on the left side of the
window. Refer to “Changing the Sample Rate” on page 32 for setting the
sample rate that data updates in diagrams. The default sample rate is ten
seconds.
Viewing Diagrams
To view diagrams, do the following:
1. Click the Diagrams tab.
2. Select the diagram from the list on the left side of the page.
The diagram displays.
USING ALARMS
Configuring Alarms
Using the PowerLogic System Setup application, you can configure analog,
digital, or onboard alarms that will be annunciated in the Power Server
PWRSRV750 user interface. The following information is available in online
Help:
• For an overview, see Help > SMS-3000 Help > Quick Starts > Quick Start:
Functions and Alarms.
• For configuring onboard alarms, see Help > SMS-3000 Help > Working
with Functions and Alarms > Setting Up On-Board Alarms.
• For digital alarms, see Help > SMS-3000 Help > Setting Up PC-Based
Functions and Alarms.
18
© 2002 Schneider Electric All Rights Reserved
63230-216-217/A2
9/2002
Viewing Alarm Information
Power Server Model PWRSRV750 Operation
Using Alarms
By default, the alarm icon is yellow and the alarm list is empty. When an
alarm becomes active (alarm pickup state), the alarm icon (Figure 7) starts
flashing and a new entry is added to the active alarm list and the alarm log
list.
This icon on the alarms tab
alternately flashes red and yellow to
indicate an active alarm.
Figure 7:
The Active Alarm indicator
An active alarm stays in the active alarm list as long as it is in a pickup state.
When it is no longer active (dropout state), it is deleted from the active alarm
list and a dropout alarm is added to the alarm log. The alarm icon continues
to flash to signal that alarm activity has occurred.
Silencing Alarms
You can “silence” alarms on your Power Server user interface by stopping
the alarm icon from flashing red. To silence an alarm, click the Silence Alarms
icon.
Click to silence alarms.
If a new alarm picks up, then the icon will start flashing again. If the Alarm
icon is flashing and no entries are in the Active Alarms list, it means that all
the active alarms have already dropped out. Click the Alarm Log to view
those alarms. See “Retrieving Information from the Alarm Log” on page 22.
NOTE: In case of bad communications or setup changes on devices, some
alarms may display in the active state even though they have dropped out
already. In this case, click the Home tab to refresh the user interface. If these
alarms still appear in the active alarm list, connect to the Power Server with
NetMeeting, click the Power Server application icon in the taskbar and restart
the Power Server.
© 2002 Schneider Electric All Rights Reserved
19
Power Server Model PWRSRV750 Operation
Using Alarms
63230-216-217/A2
9/2002
Viewing Active Alarms
To view active alarms, click the Alarms tab and the Active Alarms page
displays. See “Working with Trees on the Power Server User Interface” on
page 36 for information on resizing, sorting, and getting details on entries.
Viewing Detailed Information on an Alarm
You can view detailed information on an active alarm as well as those in the
alarm log. To do so, click the entry in the list for the alarm.
Click an entry to view details.
20
© 2002 Schneider Electric All Rights Reserved
63230-216-217/A2
9/2002
Power Server Model PWRSRV750 Operation
Using Alarms
The Information Dialog displays.
You can click the up and down arrows to scroll through information on
alarms on the page you are viewing.
NOTE: You can press Alt+N to go to the next alarm in the list. Press Alt+P
to go to the previous.
Popup Alarms
If you have set alarms to display as a popup alarm, they display in the
following dialog on top of the user interface:
Refer to “How Alarms Are Indicated—Audible, Popup View, or Both” on page
35 for details on selecting this method of alarm indication.
If you resize or move the popup dialog or resize the columns, the user
interface remembers those settings the next time you browse the Power
Server. If you close the popup dialog, it automatically pops back up when a
new alarm becomes active.
© 2002 Schneider Electric All Rights Reserved
21
Power Server Model PWRSRV750 Operation
Using Alarms
63230-216-217/A2
9/2002
Retrieving Information from the Alarm Log
To view a log of alarms, follow these steps:
1. Click the Alarms tab.
The Alarms page displays.
2. Click the Alarm Log button.
The Alarm Log displays.
Click here to sort
by waveforms.
You have the following choices for how to view the alarm log:
• Click All_Devices and then ALL ALARMS to view all alarms for all
devices in the Power Server system.
• Click a group and then ALL ALARMS to view all alarms for a particular
group of devices.
• Click All_Devices or the group name that includes the device and then
click the device itself to view all alarms for that device only.
NOTE: If a device in Meters, Bar Charts, Tables, or Waveforms was
selected prior to displaying the alarm log, then this device will be selected
by default in the Alarm Log view. Click All Alarms to display all the alarms.
The maximum number of entries displayed in the alarm log depends on the
alarm configuration. See “Number of Alarm Records Displayed” on page 36.
You can sort on any column, including the waveform column, which is the
unlabeled column to the left. To resize columns, refer to “Resizing Columns
in the Active Alarm Popup Window” on page 37.
The Alarm Log Refresh Icon
When a new entry is added to the Alarm Log, the Alarm Log Refresh icon
displays. It will display until you click the Alarm Log button.
When clicking the Alarm Log button, the number of records set in the
preferences is retrieved from the Power Server. See “Number of Alarm
Records Displayed” on page 36. When switching between devices in the tree
22
© 2002 Schneider Electric All Rights Reserved
63230-216-217/A2
9/2002
Power Server Model PWRSRV750 Operation
Using Alarms
view, the alarms are not updated. Watch for the refresh icon. The refresh icon
will display anytime new entries have been added in the alarm log on the
Power Server.
Viewing Waveform Information From the Alarm Log
If you configured a device to trigger a waveform on a particular alarm and
also assigned a PC task in the Power Server Setup to retrieve that waveform,
then a waveform icon appears next to that alarm once the waveform has
been retrieved from the device. All alarms within two seconds of the time of
the occurrence for a particular device have the waveform icon associated
with them.
Depending on the size of the waveform, you may see an alarm entry in the
alarm log with no icon associated. The Power Server waits to have the
waveform uploaded from the device before displaying the waveform icon
link.
For the icon feature to work properly, ensure that the Power Server has
uploaded all the latest waveforms from each device. See “Using Waveforms”
on page 26.
To view waveform information from the Alarm Log, follow these steps:
1. Click the Alarms tab.
The Active Alarms page displays.
2. Click the Alarm Log button.
The Alarm Log page displays.
Click the waveform icon to view the
waveform(s) associated with that
alarm.
© 2002 Schneider Electric All Rights Reserved
23
Power Server Model PWRSRV750 Operation
Using Alarms
63230-216-217/A2
9/2002
3. Click the waveform icon.
• If only one waveform is available for that alarm, then that waveform
displays.
• If multiple waveforms are available for the same alarm, the Waveform
Selection Dialog displays.
Click the type of waveform you want to view and make your selection
from the list. Click OK.
The waveform page displays.
4. You can click buttons on the waveform dialog toolbar to view the following
information:
• All—Click here to view graphs (all three voltage phases and all three
current phases) of the waveform.
• Va—Click here to view phase A voltage.
• Vb—Click here to view phase B voltage.
• Vc—Click here to view phase C voltage.
• Ia—Click here to view phase A current.
• Ib—Click here to view phase B current.
• Ic—Click here to view phase C current.
• In—Click here to view Neutral current.
• Ig/Ir—Click here to view ground current. If the device is a CM2000, click
here to view residual current.
24
© 2002 Schneider Electric All Rights Reserved
63230-216-217/A2
9/2002
Power Server Model PWRSRV750 Operation
Using Alarms
• 3—Click here to view two graphs—one with all three voltage phases
overlapped and the other with all three current phases overlapped.
• V/I—Click here to view each phase, both voltage and current, within a
single graph. You see phase A voltage and current in one graph, phase
B voltage and current in another, and phase C voltage and current in a
third.
• FFT—Click here to view the FFT cycle range.
• RMS—Click here to view the display as an RMS plot.
NOTE: If you select a type of graph that does not apply for a waveform of
that particular device, the “All” view displays instead.
Viewing PWRSRV750 System Information from the Alarm Log
The Power Server uses a scan utility to monitor itself for proper configuration.
It may trigger any of the following alarms if the utility detects certain criteria:
• Reports Alarm
• Waveforms Alarm
• Diagrams Alarm
• Disk Alarm
• Memory Alarm
These alarms will appear in the Alarm Log as “Scan Utility Device” entries. A
wrench icon displays beside them. Click the wrench icon to access the log of
alarms corresponding to these functions such as Reports, Waveforms, and
Disk Space.
Click the wrench icon
to view scan utility-based
alarm information.
To view the complete system log, do the following:
1. Click the Maintenance tab.
2. Click the Diagnostics button.
© 2002 Schneider Electric All Rights Reserved
25
Power Server Model PWRSRV750 Operation
Using Waveforms
63230-216-217/A2
9/2002
3. Click the Scan Log.
The Scan Log displays.
USING WAVEFORMS
Configuring Waveforms
You can view waveforms in the Power Server user interface if they are
uploaded on the Power Server. To configure waveforms to upload to the
Power Server, refer to the Onboard Files and Onboard Alarms sections for
the appropriate device types in Help > SMS-3000 Help > Setting Up Devices.
We recommend setting up a scheduled task to upload onboard waveforms
from each device. For example, you can schedule the task to run every night
at 11:00 pm. Refer to Help > SMS-3000 Help > Setting Up Devices > Working
with Functions and Alarms > Using Tasks to Automate Processes and see
the topics “Adding an Onboard Data Log/Waveform Task” and “Creating a
New Reference Time.”
Viewing Waveform Information Only
To view waveform information only, do the following:
1. Click the Historical tab.
The Historical page displays.
2. Click the Waveforms button.
The Waveforms page displays.
26
© 2002 Schneider Electric All Rights Reserved
63230-216-217/A2
9/2002
Power Server Model PWRSRV750 Operation
Using Waveforms
3. Choose a waveform for a particular device. Do the following:
a. Click All_Devices or the group name that includes the device.
b. Click the device that has information you want to view.
c. Click the type of waveform you want to view.
d. Select the appropriate time stamp.
The waveform historical page for your selection displays.
NOTE: If you selected a device in Meters, Bar Charts, Tables, or Alarm
Log, this device is selected by default when displaying waveform
information.
Zooming for a Closer View of Waveform Information
To zoom in for a closer view of transient or other waveform information, click
the graph of the waveform.
Click any graph to zoom in for a
closer view of that graph.
© 2002 Schneider Electric All Rights Reserved
27
Power Server Model PWRSRV750 Operation
Using Waveforms
63230-216-217/A2
9/2002
Zooming for a Closer View of Waveforms with Associated Transients
If you have a CM4000T in your system, you can click the square after
zooming in on a specific phase to view the transient waveform associated
with that waveform.
If you have a CM4000T
in your system, you
can click the square
after zooming in on a
specific phase to view
the transient waveform
associated with that
waveform.
The transient waveform capture displays.
• To zoom in further, continue clicking the area you want to magnify.
• To zoom out, click one of the tabs in the button bar.
28
© 2002 Schneider Electric All Rights Reserved
63230-216-217/A2
9/2002
Power Server Model PWRSRV750 Operation
Using Reports
USING REPORTS
Creating Reports
You can use Information Manager, a module that is available in the system
setup utility, to create historical reports on the Power Server. Follow these
steps:
NOTE: See “Prerequisite Information Covered in the Power Server Setup
Guide” on page 1 if you are not yet familiar with operating the Power Server.
1. Use NetMeeting to access the Power Server.
2. Press Ctrl-W to display the Power Server desktop.
3. Put the Power Server in Setup Mode.
4. Redial the Power Server in NetMeeting to reconnect.
5. Press Ctrl-W to display the Power Server desktop.
6. Click the POWERLOGIC Reports Setup icon to start SMS Information
Manager.
7. Click File > New to launch the PowerLogic Reports wizard.
Refer to online Help for instructions on using the report creation wizards.
From the SMS Information Manager application menu, click
Help > Contents and find the topic for the type of report you want to
create.
8. Put the Power Server back in Run Mode. This may take up to five
minutes.
9. Once the Power Server has restarted, click the Home tab on the Power
Server user interface to refresh and make the report available for viewing
when you click the Reports button on the Historical page. It should
display in the tree list on the left side of the window.
© 2002 Schneider Electric All Rights Reserved
29
Power Server Model PWRSRV750 Operation
Using Reports
Viewing Reports
63230-216-217/A2
9/2002
To view reports, do the following:
1. Click the Historical tab.
2. Click the Reports button.
3. Select the desired report to be displayed. To do so, click the report name
you want to view and then click the appropriate time stamp.
The report displays.
If a scheduled report is configured to overwrite, then only one date and time
is listed under the report name. Each report generated overwrites the
previous one and the date and time is updated. If a scheduled report is not
set to be overwritten, a list of reports with dates and times displays under
each report name. Refer to online help in SMS Information Manager for the
particular type of report for information on configuring the overwrite setting.
NOTE: If an “overwrite” report is in the process of being updated, you will not
be able to view it until the update process is complete. If you try to access it,
you get an error message.
NOTE: In Setup mode, existing scheduled reports are automatically
disabled. They are enabled again when you go back into Run mode.
30
© 2002 Schneider Electric All Rights Reserved
63230-216-217/A2
9/2002
CHAPTER 4—SETTING USER
PREFERENCES
Setting User Preferences
The Power Server provides several user-configurable preferences that you
can set on the Preferences page. This chapter covers procedures for setting
these preferences. It also covers other adjustments you can make for
viewing information on screens. Unless otherwise noted, information in this
chapter applies to both Power Server models. For procedures that apply to
Model PWRSRV750 specifically, see “Working with Lists on the
PWRSRV750 Power Server User Interface” on page 37.
To access the Preferences page, click the Maintenance tab, then the
Preferences button.
The Preferences page displays.
NOTE: Preferences are stored for each client (remote PC or touchscreen
display). In other words, changes you make to the user preferences on a
remote PC affect only that PC. In each category, you can click Restore
Defaults if you want to revert to default settings.
© 2002 Schneider Electric All Rights Reserved
31
Setting User Preferences
Changing the Sample Rate
CHANGING THE SAMPLE RATE
63230-216-217/A2
9/2002
By default, the Power Server samples data and updates real-time displays
once every five seconds and data in diagrams once every ten seconds. The
current sample rate is displayed in the lower left corner of the Power Server
Browser’s window.
To change the sample rate, do the following:
1. Click the Maintenance tab.
2. Click the Preferences button.
The Power Server displays the Preferences page.
3. Select Sample Rate from the list on the left side of the page.
The Sample Rate setup displays.
PWRSRV750
model only
4. Select desired sample rates for real time data and diagram data [750].
5. Click the Home button to save changes.
The new sample rate should be displayed in the lower left corner of the
Power Server Browser.
CHANGING THE DEFAULT PAGE
When you connect to the Power Server by entering its IP address in Internet
Explorer, the Power Server home page displays (see Figure 1 on page 2).
The Default Page preference lets you configure the Power Server to
automatically display any of the following pages:
•
•
•
•
•
Meters
Bar Charts
Tables
Diagrams (PWRSRV750 model only)
Alarms (PWRSRV750 model only)
To change the default page, do the following:
1. Click the Maintenance tab.
2. Click the Preferences button.
The Power Server displays the Preferences page.
32
© 2002 Schneider Electric All Rights Reserved
63230-216-217/A2
9/2002
Setting User Preferences
Changing the Default Page
3. Select Default Page from the tree on the left.
The Default Page Preferences page displays.
4. From the Default Page Preferences page, make your selection.
• If you select Meters or Bar Charts, the Default Device dialog displays.
If you do not select a device, the default page is Meters or Bar Charts
with no device selected. If you select a device, the meters or bar charts
start sampling automatically when you display the default page.
• If you select Tables, the Default Device and Default Table dialogs both
display. For Default Tables, options are Single Device Tables or
Multi-Device Tables.
If you do not select a device, the default page is Tables with no device
selected. If you select a device and compatible table, the tables start
sampling automatically when you display the default page.
• If you select Diagrams (PWRSRV750 model only), the Default Diagram
dialog displays.
© 2002 Schneider Electric All Rights Reserved
33
Setting User Preferences
Maximizing Screen Space for Viewing Data
63230-216-217/A2
9/2002
If you do not select a diagram, the default page is Diagrams with no
diagram selected. If you select a diagram, that diagram starts sampling
automatically when you display the default page.
• No additional options display if you select Alarms (PWRSRV750 model
only).
5. Make selections as needed from pulldown menus.
6. Click the Home tab to test your default configuration. The Power Server
should display the Power Server splash screen, then your chosen default
display. If you selected a Multi-Device table as the default, you’ll first have
to select the desired devices from a device selection dialog box.
MAXIMIZING SCREEN SPACE FOR
VIEWING DATA
The Tree Configuration preference lets you automatically collapse selection
trees to maximize the screen space available for viewing data. You make this
setting from the Tree Configuration page (Figure 8).
When the “Collapse Tree On Selection in” box is checked, the Power Server
collapses the selection trees after you’ve chosen what you want to view.
When the box is not checked, the trees remain open. Figure 9 illustrates a
table in collapsed tree view. To expand a collapsed tree, click the arrow also
illustrated in Figure 9 on page 35.
Figure 8:
34
The Tree Configuration page
© 2002 Schneider Electric All Rights Reserved
63230-216-217/A2
9/2002
Setting User Preferences
How Alarms Are Indicated—Audible, Popup View, or Both
Click here
to expand
the tree.
Figure 9:
HOW ALARMS ARE INDICATED—
AUDIBLE, POPUP VIEW, OR BOTH
Table in a Collapsed Tree View
You can set alarms to make an audible sound when entering a pickup state.
You can also have alarms display in a popup dialog that is visible anywhere
you browse in the user interface.
To select the method that alarms are indicated, do the following:
1. Click the Maintenance tab.
2. Click the Preferences button.
The Power Server displays the Preferences page.
3. Select Alarm Configuration from the list on the left side of the page.
The Alarm Configuration dialog displays.
Select Audible or
Popup or both.
4. Select Audible or Popup or both.
5. Click the Home tab to refresh and save your settings.
© 2002 Schneider Electric All Rights Reserved
35
Setting User Preferences
Number of Alarm Records Displayed
NUMBER OF ALARM RECORDS
DISPLAYED
63230-216-217/A2
9/2002
You can choose how many alarm records to display when you view the Alarm
Log. To do so, follow these steps:
1. Click the Maintenance tab.
2. Click the Preferences button.
The Power Server displays the Preferences page.
3. Select Alarm Configuration from the list on the left side of the page.
The Alarm Configuration dialog displays.
Select the
number of alarm
log records to
display.
4. Under Alarm Log Configuration, select the number of alarm log records
to retrieve from the Power Server.
5. Click the Home tab to refresh and save your settings.
WORKING WITH TREES ON THE POWER
SERVER USER INTERFACE
This section covers basic procedures for using trees on the Power Server.
Unless otherwise noted, information applies to both models. For additional
procedures that apply to Model PWRSRV750 specifically, see “Working with
Lists on the PWRSRV750 Power Server User Interface” on page 37.
Resizing The Tree Portion of a Window (Left
Side of the Page)
You can resize the tree portion of a window by clicking the right or left arrows
on the left side of the page. You can also collapse the tree entirely (close the
left side of the window).
Clicking decreases
the tree area on the
left side of a page.
Clicking increases
the tree area on the
left side of a page.
Clicking collapses
the tree entirely
(closes the left side
of the window).
When you refresh the browser or close Internet Explorer, these settings are
retained for the next time you browse the Power Server.
To restore the tree widths to the default setting, click the Restore Defaults
button on the Tree Configuration page under the Preferences button.
36
© 2002 Schneider Electric All Rights Reserved
63230-216-217/A2
9/2002
Setting User Preferences
Working with Lists on the PWRSRV750 Power Server User Interface
WORKING WITH LISTS ON THE
PWRSRV750 POWER SERVER USER
INTERFACE
This section covers procedures for using lists on the Power Server Model
PWRSRV750.
Resizing Columns in the Active Alarm Popup
Window
You can drag the borders of columns in the popup window to resize them.
You can resize the columns to fit the longest entry for that particular column.
To do so, follow these steps:
1. Point the mouse to the edge of the column so that the resizing tool
displays.
2. Double-click.
The column will automatically resize to the longest entry in the column.
Drag the borders of columns to
resize them. Double-clicking at the
edge of a column resizes to fit the
longest entry in that column.
Sorting By Columns
To sort by column, click the header of the column.
Click the header to
sort by column.
© 2002 Schneider Electric All Rights Reserved
37
Setting User Preferences
Working with Lists on the PWRSRV750 Power Server User Interface
38
63230-216-217/A2
9/2002
© 2002 Schneider Electric All Rights Reserved
63230-216-217/A2
9/2002
INDEX
Index
A
active alarm, 19
flashing, 19
alarm icon, 19
alarm log
retrieving information, 22
scan utility device entries, 25
viewing system information, 25
viewing waveform information, 23
Alarm Log Refresh Icon, 22
alarms
active alarms page, 23
Alt+N for next in list, 21
Alt+P for previous in list, 21
configuring, 18
diagrams, 25
disk, 25
memory, 25
page, 22
popup, 21
reports, 25
silencing, 19
viewing active, 20
viewing detailed information, 20
waveforms, 25
All Charts button, 6–7
B
bar charts, 7
black screen, 4
C
Calculate button, 13
CM4000T, 28
collapsed tree
expanding, 34
view, 34
columns
sorting by, 37
complete system log, 25
connecting to the Power Server
from a remote PC, 4
with the touch screen display, 3
current phases, 24
D
database
growth estimator, 12
history, 12
management, 12
number of days (approximate), 13
space used, 14
statistics, 14
default page
changing, 32
preference, 32
diagnostic data, 15
diagnostics, 25
© 2002 Schneider Electric All Rights Reserved
diagrams
background, 17
creating, 17
selecting as default page, 33
disk space, 25
DO NOT TOUCH symbol, 3
document files, 11
HTML, 11
PDF, 11
documentation, 11
F
FFT cycle range, 25
G
GFX-1000, 17
ground current, 24
H
historical data, 14
historical reports
creating, 29
home page, 2
Home tab, 5
I
information dialog, 21
Internet Explorer, 1
favorites folder, 5
L
Last FIFO Date, 15
M
maximizing screen space, 34
multi-device table, 34
Multi-Device Tables button, 10
multiple device table
viewing, 10
multiple waveforms, 24
N
NetMeeting, 1
number of
logged devices, 13
samples per day, 13
topics (average), 13
P
Power Server desktop, 1
POWERLOGIC
reports setup, 29
server, 8
system setup, 8
39
63230-216-217/A2
9/2002
Index
preferences, 31
remote PC, 31
touchscreen display, 31
tree configuration, 34
PWRSRV710, 1
PWRSRV750, 1, 17, 32, 37
Q
quick tables
creating, 17
R
real-time tables, 9
report creation wizards, 29
reports
overwriting, 30
viewing, 30
residual current, 24
resizing
window, 36
RMS plot, 25
run mode, 1
V
voltage phases, 24
W
waveform column, 22
waveform dialog toolbar, 24
waveform historical information, 27
waveform icon, 23
waveform information
viewing, 26
waveform page, 24
web downloading interface, 5
welcome screen, 4
wrench icon, 25
Z
zooming
waveform information, 27
waveforms with associated transients, 28
S
sample date
latest, 15
oldest, 15
sample rate
changing, 32
diagram data, 32
real time data, 32
updating tables, 10
scan log, 26
scan utility, 25
screen space
maximizing, 34
setup guide
topics covered, 1
setup mode, 1
silencing alarms, 19
single device table
viewing, 9
sleep mode, 4
SMS, 30
SMS Information Manager, 29
software version
determining, 15
sorting by columns, 37
status of tasks, 15
T
time stamp, 30
transient waveform capture, 28
tree configuration preference, 34
trees
working with, 36
troubleshooting, 15
© 2002 Schneider Electric All Rights Reserved
40
POWERLOGIC® Power Server Setup Guide
Schneider Electric Technical Support Contacts / Schneider Electric contactos de soporte técnico
/ Schneider Electric contacts pour l’assistance technique
For technical support and additional information, contact your local sales office or an office listed below. /
Para obtener soporte técnico e información adicional, póngase en contacto con su oficina local de ventas
o con una de las oficinas que aparecen a continuación./
Pour obtenir de l’assistance technique et des informations supplémentaires, contactez votre bureau de
vente local ou l’un des bureaux listés ci-dessous.
Argentina / Argentine
Viamonte 2850
1678 CASEROS
Provincia de BUENOS AIRES
tel - (54-11) 4716 8888
fax - (54-11) 4716 8888
Australia / Australie
77 Ricketts Road
Mount Waverley
VIC 3149
Australia
tel - (03) 9558 9876
fax - (03) 9558 8091
Brazil / Brasil / Brésil
Av. Da Saudade, s/n
CEP 13171-320
Sumare SP Brazil
tel - (19) 3873 97 44
fax - (19) 3873 94 94
Canada / Canadá
6675 Rexwood Road
Mississauga, Ontario L4V 1V1
tel - 1-615-287-3400
fax - 1-615-287-3404
Central America /
Centroamérica / Amérique
Centrale
1.5 km al oeste de la Embajada
Americana
San José, Costa Rica C.A.
Apdo 4123-1000,
San José, Costa Rica, C.A.
tel - (506) 232-60-55
fax - (506) 232-04-26
China / Chine
Schneider (Beijing)
Medium Voltage Co., Ltd.
Rm 709
No. 3 Yong Chang North Road
BJ Economic Technological
Development Area
Beijing 100176
P.R.C.
tel - (010) 6788 5557
fax - (010) 6788 0531
Colombia / Colombie
Schneider Electric de Colombia
CII 45A No. 102 - 48 Bogotá D.C.
tel - +57 (1) 426 97 00
fax - +57 (1) 426 97 40
Ecuador / Equateur
PO Box 17-11-6466 CCI
Av. Shyris y Rio Coca Esq.
Edif. Eurocentro, 2do Piso 17-11
6466 QUITO
tel - (593) 2 25 03 23
fax - (593) 2 43 49 40
Singapore / Singapur
10 Ang Mo Kio Street 65
#02-17/20
TechPoint
SINGAPORE 569059
tel - 484 7877
fax - 484 7800
France / Francia
PCR Usine M4
22 Rue du Vieux Chêne Meylan
38050 Grenoble
Cedex 9
tel - 04 76 60 62 35
fax - 04 76 39 40 72
Spain / España / Espagne
Schneider Electric España
Pl. Dr. Letamendi, 5-7
08007 BARCELONA
tel - 93.484.31.00
fax - 47.657.77.32
Taiwan
Suite 11-2, Presidential Financial
Plaza
11th Floor,
51 Keelung Road, Sec.2
TAIPEI 110
tel - 886-2-2733-1464
fax - 886-2-2733-6410
Indonesia / Indonésie
Ventura Building 7th Floor
Jl. R.A. Kartini Kav. 26
Cilandak, Jakarta 12430
tel - (62-21) 750 4406
fax - (62-21) 750 4415
Malaysia / Malasia / Malaisie
Schneider Malaysia Sdn Bhd
11, Jalan U1/19
Seksyen U1,
Hicom Glenmarie Industrial Park
40150 Shah Alam
Malaysia
tel - 603 78836 333
fax - 603 78836 188
Thailand / Tailandia / Thaïlande
Schneider (Thailand) Limited
Sales & Support Department
20th Floor, Richmond Bldg.
Klongton, Klongtoey, Bangkok
10110
tel - +66 (2) 324-6000
direct - +66 (2) 204-9842
fax - +66 (2) 204-9817
Mexico / México / Mexique
Calz. Rojo Gomez 1121
Col. Guadalupe del Moral
Mexico 09300
tel - 58 04 55 44
fax - 56 86 27 10
Peru / Péru
Schneider Electric Peru S.A.
Sede Central
Los Telares 231 - Urb. Vulcano Ate
Lima 3 - Peru
tel - (511) 348-4411
fax - (511) 348-0523
United Kingdom / Reino Unido /
Royaume-Uni
Schneider Electric Ltd.
PowerLogic Systems
Cheney Manor
SWINDON
Wiltshire SN2 2QG
tel - 44 (0) 1793 500 482
fax - 44 (0) 1793 500 428
United States / EE.UU /
Etats-Unis
295 Tech Park Drive, Suite 100
LaVergne, TN 37086
tel - 1-615-287-3400
fax - 1-615-287-3404
Philippines / Filipinas
1314 Batangas Street
Makati City 1234
METRO-MANILA
tel - (63 2) 844 84 18
fax - (63 2) 816 00 63
Bulletin No. 63230-216-217/A2
Class 3070
Venezuela
Schneider Electric Venezuela S.A.
Calle 6 con carrera 3
Zona Industrial II Comdibar
Barquisimeto - Edo. Lara
tel - 051-69.24.22 Ext. 242
fax - 051-69.11.62
9/2002