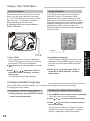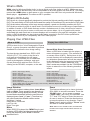
1
M 510
PORTABLE DVD/CD/MP3 PLAYER
OPERATING INSTRUCTIONS
Dear Customer
Thank you for purchasing this product.
For optimum performance and safety, please read the enclosed instructions completely and carefully
before connecting, operating or adjusting this product, keep this manual for future reference.
BEFORE USING THIS PLAYER
Important! Please read the following instructions before
attempting to operate the player
To prevent fire of shock hazard, do not expose the unit to rain or moisture.
Warnings
Use only shielded cables to connect I/O devices to this equipment.
Types of Warning Signs
There are two types of warning in this manual, indicated by the
following symbols:
Indicates a Warning or caution for operation.
Indicates a Warning or caution for safety.
Rain and Moisture Warning
To reduce the risk of fire or electric shock,
do not expose this appliance to rain or moisture.
Warning !
This symbol is intended to alert you to the presence of dangerous voltage with the product's
enclosure that may be of sufficient magnitude to constitute a risk of elect rical shoc k or fire.
Do not expose the unit to rain or moisture. Refer to th e war ning label or t ag in clude d, an d
exercise with extreme caution.
Caution !
This symbol is intended to alert you to the presence of important operating and maintenance
instructions in the literature accompanying the appliance. Refer to the User's Manual or
Operator's Manual for precautionary instructions.
Laser Warnings !
This product is equipped with a laser device. Be sure to observe the following precautions
when operating. Failure to observe these precautions could result in fire, bodily injury and
damage to the equipment.
1.Do not operate the controls, make any adjustments, or perform any procedures other than
as specified in this manual or in the DVD player installation guide.
2.Allow only authorized service technicians to repair the laser equipment.
All of the portable DVD player's systems comply with the appropriate safety standards,
including IEC 825. The laser itself complies with laser product performance standards set by
government agencies for a Class 1 laser product. The portable DVD player does not emit
hazardous light. The beam is totally enclosed at all time.
1
Power Cord Warnings !
If operating the portable DVD player from battery power, refer to Chapter 3 of this manual.
Use an approved power cord.
If the original power cord is missing or lost, purchase a power cord:
- That is approved for use in your country.
- That is rated for the product and for the voltage and current marked on the product's electrical
ratings label.
- That has a voltage and current rating greater than the voltage and current rating marked on
the product.
- With a minimum wire diameter of 0.75 mm2/18AWG
- That is between 1 and 1.8 meters long.
If you have questions about the type of power cord to use, contact your authorized service
provider.
Battery Warnings !
The portable DVD player comes with a Li-ion battery pack. There is a risk of fire and burns if
the battery pack is handled improperly.
-
Do not disassemble, crush, or puncture the battery pack.
Do not short the battery pack's external contacts.
Do not expose the battery pack to fire or water.
Do not attempt to open or service the battery pack.
Replace only with the battery pack designated for this product.
Discard used batteries according to the manufacturer's instructions.
Copyright
This product incorporates copyright protection technology that is protected by method claims
of certain U.S. patents and other intellectual property rights owned by Macrovision Corporation
and other rights owners. Use of this copyright protection technology must be authorized by
Macrovision Corporation, and is intended for home and other limited viewing uses only unless
otherwise authorized by Macrovision Corporation. Reverse engineering or disassembly is
prohibited.
Manufactured under license from Dolby Laboratories.
" Dolby" and the double-D symbol are trademarks of Dolby Laboratories.
Statement
This device complies with Part 15 of the FCC Rules. Operation is subject to the following two
conditions:
(1) This device may not cause harmful interference.
(2) This device must accept any interference received; including interference that may
cause undesired operation.
This Equipment has been tested and found to comply with the limits for a Class B digital device,
pursuant to Part 15 of the FCC rules. These limits are designed to provide reasonable protection
against harmful interference in a residential installation. This equipment generates, uses and
can radiate radio frequency energy and, if not installed and used in accordance with the
instructions, may cause harmful interference to radio communications. However, there is no
guarantee that interference will not occur in a particular installation. If this equipment does
cause harmful interference to radio or television reception, which can be determined by turning
the equipment off and on, the user is encouraged to try to correct the interference by one or
more of the following measures:
Reorient or relocate the receiving antenna. Increase the separation between the equipment
and receiver.
Connect the equipment into an outlet on a circuit different from that to which the receiver is
connected.
Consult the dealer or an experienced radio/TV technician for help.
2
Caution!
01. To reduce the risk of electric shock, do not remove cover (front or back). No user-serviceable
parts inside. Refer servicing to qualified service professional.
02. THIS PRODUCT APPLIES U.S. PATENT NOS. 4,631,603, 4,577,216, 4,819,098, AND 4,907,
093 LICENSED FOR LIMITED VIEWING USES ONLY.
03.The angle between panel and machine must not exceed 130 .
Important Safety Instructions
01.
02.
03.
04.
05.
06.
07.
Read these instructions.
Keep these instructions.
Heed all warnings.
Follow all instructions.
Do not use this apparatus near water.
Clean only with a damp cloth.
Do not block any of the ventilation openings. Install in accordance
with the manufacturer's instructions.
08. Do not install it near any heat sources such as radiators, heat registers,
stoves, or other apparatus (including amplifiers) that produce heat.
09. Do not defeat the safety purpose of the polarized-type plug: A polarized plug has two blades
with one wider than the other. The wider blade is provided for your safety. When the provided
plug does not fit into your outlet, consult an electrician for replacement of the obsolete outlet.
10. Protect the power cord from being walked on or pinched (particularly the plug, convenience
receptacles, and the point where they exit from the apparatus).
11. Only use attachments/accessories specified by the manufacturer.
12. Use only with a cart, stand, tripod, bracket, or table specified by the manufacturer, or sold with
the apparatus. When a cart is used, use with caution.
13. Unplug this apparatus during lightning, storms, or when unused for a long period of time.
14. Refer all servicing to qualified service personnel. Servicing is required when the apparatus
has been damaged in any way: ex. Power-supply cord or plug is damaged, liquid has been
spilled or objects have fallen into the apparatus, the apparatus has been exposed to rain or
moisture, does not operate normally, or has been dropped.
Please read all of these instructions thoroughly before operating the DVD Player.
Unplug the connector from DVD-Player to the system unit before cleaning. Do not use liquid or
aerosol cleaners.
Use a damp cloth for cleaning.
Use only attachments recommended by the manufacturer; un-approved attachments may be
hazardous.
Do not place the DVD-Player near water, for example near a bathtub, washbowl, kitchen sink, or
laundry tub, in a wet basement, or near a swimming pool.
Do not place the DVD-Player on an unstable cart, stand or table. If the DVD-Player falls, it could
injure a person or cause serious damage to the appliance.
Use only a cart or stand recommended by the manufacturer or sold with the mounting kit approved
by the manufacturer and follow the kit instructions.
This is a safety feature. If your outlet does not accommodate the three-wire plug, have an electrician
install the correct outlet, or use an adapter to ground the appliance safely. Do not defeat the safety
purpose of the grounded plug.
Do not allow anything to rest on the power cord. Do not locate the DVD-Player where people may
walk on the cord.
In order to avoid the damage of the DVD-Player from lightning and power surges, please unplug
all the connectors from the system unit when the DVD Player is under a spare time or lightning storm.
Do not ove rload powe r outlet a nd extensi on cords. Electric power overload will cause fire or electric
shock.
Never push any objects into the slot in the DVD-Player cabinet. It could touch dangerous voltage
points or short out parts resulting in a fire or electric shock. Never spill liquid on the DVD-Player.
If your DVD-Player does not operate normally, unplug it immediately and contact an authorized
technician.
To avoid electric shock, do not attempt to open the cabinet and repair any damaged parts. Unplug
3
the DVD-Player from the system unit and refer servicing to qualified service personnel under the
following conditions:
1. When the power cord or plug is damaged or frayed.
2. If liquid have been spilled onto the DVD-Player.
3. If the DVD-Player has been exposed to rain or moisture.
4. If the DVD-Player does not operate normally after you have followed the operating instructions.
Adjust only those controls covered by the operating instructions; improper adjustments to other
controls may result in damage and may require extensive work by a qualified technician to
restore the DVD-Player to normal operation.
5. If the DVD-Player has been dropped or the cabinet has been damaged.
6. When the video and audio of DVD-Player exhibits a distinct change in performance.
7. To reduce the risk of electric shock, do not remove the cover (front or back). No user-serviceable
parts inside. Refer servicing to qualified service professional.
8. This produ ct applies to U.S. Pat ent Nos. 4,631,603, 4,577,216, 4,819,098 and 4,907,093 Licensed
for limited viewing uses only.
9. DVD-Player is a high quality laser product. This player uses a visible laser beam that could cause
hazardous radiation exposure if directed to the eyes.
Notes on Discs
Handling precautions
Hold the disc by the edges so the surface will not be soiled with fingerprints. Fingerprints,
dirt and scratches can cause skipping and distortion.
Do not write on the label side with a ball-point pen or other writing tools.
Do not use record cleaning sprays, benzene, thinner, static electricity prevention liquids or
any other solvent.
Be careful not to drop or bend the disc.
Do not install more than 1 disc on the disc tray.
Do not try to close the disc tray when the disc is not installed properly.
Be sure to store the disc in its exclusive case.
If the Surface is soiled
Wipe gently with a soft, damp (water only) cloth.
When wiping discs, always move the cloth from the center hole toward the outer edge.
If you wipe the discs using a circular motion, circular scratches are likely to occur, which will
cause noise while playing.
If the disc is brought from cold to warm environment, moisture may form on the disc.
Wipe this moisture off with a soft, dry, lint-free cloth before using the disc.
Improper disc storage
You can damage discs if you store them in the following places:
Areas exposed to direct sunlight.
Humid or dusty areas.
Areas directly exposed to a heat outlet or heating appliance.
The player can not play discs
DVD region code is not suitable for your player.
Maintenance
Be sure to turn the power button OFF and disconnect the power plug before maintaining the
unit.
Wipe this unit with a dry soft cloth.
If the surface is extremely dirty, wipe clean with a cloth that has been dipped in a weak acid
and water solution and wrung out thoroughly, and then wipe again with a dry cloth.
Never use alcohol, benzene, thinner, cleaning fluid or other chemicals. And do not use
compressed air to remove dust.
4
Table of Contents
CHAPTER 1. (ACCESSORY LIST) ....................................................................... 6
CHAPTER 2. (QUICK USER GUIDE) .................................................................... 8
CHAPTER 3. (PREPARATIONS)
Parts and controls.........................................................................................................10
Remote control..............................................................................................................11
The meaning of indicators.............................................................................................12
Using the AC adapter....................................................................................................12
Using the battery pack..................................................................................................12
CHAPTER 4. (PLAYBACK (THE BASICS))
Playing back..................................................................................................................14
CHAPTER 5. (OPERATION WITH OSD)
Information about On Screen Display (OSD)................................................18
Detailed Description of each OSD Menu Icon...............................................18
Using a Title / DVD Menu.............................................................................19
Changing Subtitle Language......................................................................19
Changing Audio Soundtrack Language....................................................... 20
Viewing from another Angle.......................................................................20
Repeat Play..............................................................................................21
Zoom Feature.......................................................................................... 22
Program Play........................................................................................... 22
Playback with Mp3................................................................................... 22
What is WMA........................................................................................... 23
What is DVD-Audio................................................................................... 23
Playing Your JPEG Files....................................................................23
CHAPTER 6. (INITIAL SETTINGS)
Changing setup values................................................................................................24
General Setup Page ...................................................................................................24
Audio Setup Page .......................................................................................................25
Video Setup Page .......................................................................................................26
Preference Page .........................................................................................................28
Password Setup Page ................................................................................................29
Exit Setup Page ..........................................................................................................29
CHAPTER 7. (CONNECTION)
Connecting to a wide TV/ an AV TV..............................................................................30
Connecting to an audio equipment ..............................................................................31
Connecting to an active speakers system....................................................................31
Output sound from the optical output terminals of this unit..........................................32
CHAPTER 8. (OTHERS)
Troubleshooting...............................................................................................................33
Language codes.............................................................................................................34
Explanation of terms.......................................................................................................35
Specifications................................................................................................................36
5
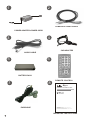
Check the contents of the package to make sure nothing is missing or damaged. Some
parts may be optional. Contact your dealer with any questions.
1. POWER ADAPTER+POWER CORD
2. COMPOSITE VIDEO CABLE
CHAPTER 1.
ACCESSORIES LIST
CHAPTER 1. (ACCESSORY LIST)
3. STEREO AUDIO CABLE
4. CAR ADAPTER
5. BATTERY PACK
6. REMOTE CONTROL
7. EARPHONE
8. OPERATING INSTRUCTIONS
Note on condensation
If the unit is suddenly moved from a cold place to a warm one, it may result in condensation
on the pickup lens causing malfunction or playback difficulties.
If this occur, leave the unit for a few hours, then try playback again.
To clean the unit
Use a soft cloth lightly moistened with a detergent solution.
Do not use strong solvents such as alcohol, benzene or thinner.
Selecting the Video System
The video system of the player can be set automatically according to the contents of the DVD
or VCD titles.
In general, the NTSC system is used in the USA and most Asian countries.
The PAL system is used in most European countries as well as China and Hong Kong.
Thank you for purchasing our product.
Before using the portable DVD player, we strongly recommend that you read the instructions
in this manual. They will guide you with the operation and the maintenance of the product.
Please keep this manual for future reference. To get started quickly using the portable DVD
player, see Chapter 2, Quick User Guide.
NOTE
Video CD:
Certain VCDs can not be played back in this unit due to their conditions. In some discs,
track numbers are displayed differently from the ones printed in their packages due to
conditions of readings.
6
1
2
COMPOSITE VIDEO CABLE
POWER ADAPTER+POWER CORD
4
3
CAR ADAPTER
AUDIO CABLE
6
5
BATTERY PACK
REMOTE CONTROL
7
8
M 510
PORTABLE DVD/CD/MP3 PLAYER
OPERATING INSTRUCTIONS
EARPHONE
Dear customer
Thank you for purchasing this product.
For optimum performance and safety, please read these instructions carefully.
Before connecting, operating or adjusting this product, please read these instructions
completely. Please keep this manual for future reference.
OPERATING INSTRUCTIONS
7
CHAPTER 2. (QUICK USER GUIDE)
2-1 Connecting the Power
Use only the AC adapter that was shipped with the player. Using a substitute may
result in damage to the player. Do not use the adapter of other equipments.
It is normal for heat to release from the adapter when it is connected to a power source.
Please disconnect the adapter from the source when the player is not in use.
CHAPTER 2.
QUICK USER GUIDE
Refer to Chapter 3 for instructions on how to install and use the battery pack.
1.Connect the power cord to the AC adapter.
2.Connect the power cord to a power source.
3.Connect the AC adapter to the DC IN jack on the left side of the player.
2-2 Opening the LCD screen
The LCD screen is embedded in the front cover.
To open the screen:
1.Press the cover lock at the top of the screen cover.
2.GENTLY lift the cover to the position.
DO NOT TOUCH THE SCREEN WITH SHARP OBJECTS ALWAYS CLOSE
THE COVER WHEN THE DVD PLAYER IS NOT IN USE.
2-3 Opening the Disc Cover
The disc cover inside the player protects the disc while it is being played.
It should be closed at all times except to change discs.
To open the disc cover, press the OPEN button on the left side of the cover.The cover
will be open.
Even though the laser beam will stop emitting when the cover is opened,
DO NOT LOOK AT THE LASER HEAD. The laser beam could still damage
your eyes.
8
2-4 Placing a Disc in
To place a disc in the player:
1.Open the disc cover.
2.Align the disc on the player.
3.Gently press the disc into place.
4.Close the disc cover.
DO NOT TOUCH THE LASER HEAD. AND AVOID DUST OR
DIRT ON THE LASER HEAD. Keep the disc cover closed at all
times to prevent dust or dirt from collecting on the laser head.
2-5 Turning the power ON
To turn the power on, push the POWER ON/OFF switch button at the left side of
the player to ON.
2-6 Playing a DISC
To play a disc, press the "
" button on the front of the player.
2-7 Stopping a Disc
To stop the disc, press the "
" button on the front of the player.
2-8 Turning the power OFF
To turn the power off, push the POWER ON/OFFswitch button at the left side of
the player to OFF.
NOTE:
During playback, few bright or dark flecks may appear on the TFT LCD, which is a normal
phenomenon in active matrix display technology, but not a malfunction.
9
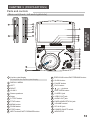
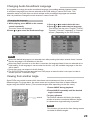
CHAPTER 3. (PREPARATIONS)
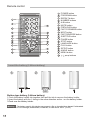
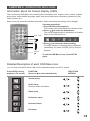
Parts and controls
S-VIDEO
Main unit (front, left and right side)
+
20
21
1
22
ON/OFF
CHAPTER 3.
PREPARATIONS
23
VOLUME
PHONE/OPTICAL
AUDIO
DC IN
VIDEO
25
24
26
2
3
4
5
6
CD/DVD/MP3 PLAYER
7
AUDIO
ANGLE
8
SEARCH
MUTE
TITLE
9
10
11
12
13
14
15
16
18
19
17
27
1 Liquid crystal display
Do not push the liquid crystal display .
14 PREVIOUS button/PAST REWIND button
15 SLOW button
2 DISPLAY MENU
16 PAUSE button
3 LEFT
4 RIGHT
17 PLAY button
5 16:9/4:3
19 DISC OPEN button
6 Stereo speakers
7 Setup
21 VIDEO OUT jack
8 S-TITLE button
9 TITLE button
18
buttons
20 S-VIDEO jack
22 AUDIO OUT jack
23 EARPHONE/OPTICAL jack
24 VOLUME control
10 MENU button
11 ZOOM button
25 DC IN 9V jack
12 STOP button
26 POWER ON/OFF switch
13 NEXT button/PAST FORWARD button
27 INDICATOR
10
Remote control
1
2
3
1
4
5
2
4
6
7
3
8
5
6
9
7
8
10
9
10
11
12
13
13
11
12
15
14
14
15
16
17
18
19
16
17
18
19
POWER button
PROGRAM button
REPEAT button
NUMBER buttons
A-B button
MUTE button
PREVIOUS button
FAST FORWARD button
NEXT button
FAST REVERSE button
SUBTITLE button
PAUSE button
STOP button
LANGUAGE button
PLAY button
SETUP button
ANGLE button
MENU button
buttons
Insert the battery (Lithium battery)
1.
2.
3.
+
3V
Button-type battery (Lithium battery)
1.Pinch the battery holder clip together then pull the tab to remove the battery holder.
2.Insert the battery with the + facing in the same direction as the + on the battery holder.
3.Push over the battery holder.
Warning : The battery used in this device may present a fire or chemical burn hazard if mistreated.
Do not recharge, disassemble, incinerate, or heat above 100oC (212oF)
11
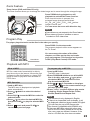
Indicators
There are two indicators at the front side of the player.
1.The left indicator indicates the capacity of the battery.
If the battery pack is not full, the color of the indicator is red. If the battery pack is full, indicator
turns green.
2.The right indicator indicates the status of the player.
If the POWER ON/OFF is set to ON, the indicator is green. If the POWER ON/OFF is set to OFF,
the indicator is off.
CHAPTER 3.
PREPARATIONS
NOTE
If the battery pack is not in latch slot, when you use the adaptor to supply the power of the player,
the left indicator is green.
Using the car adapter
+
DC IN
ON/OFF
1
To DC IN 9V jack
1. Connect the car adapter
to the main unit.
Insert the car adapter plug to the
DC IN 9V jack of the main unit.
2. Insert the plug of car
adapter to the car
lighter socket.
You may need to use the supplied
car adapter depending on the
shape of the car lighter socket.
2
To car lighter socket
Using the battery pack
Charging the battery pack
1. Connect the power to the battery pack.
2. Insert one end of the supplied power cord to the adapter socket.
Use only the supplied power cord.
3. Insert the plug of car adapter to the car lighter socket.
You may need to use the supplied car adapter depending on the shape of the car lighter socket.
When recharging is completed
The charge indicator turns green. After making sure the color of the indicator is green, disconnect the AC
adapter and the supplied power cord.
12
The Duration to Recharge the Battery
Recharge time
Recharge and playback time depends on battery pack capacity and the temperature condition.
Capacity
Recharge Time
Playback Time
Standard
Option
4000 mAh
3-5 hours
2 hours
4500 mAh
6-8 hours
3 hours
* The table above is based on the temperature condition of 20oC (68oF).
NOTES
A new battery pack which has not yet been used or one which has not been used for more than one
month may not be fully charged . This is due to the characteristic of this battery, and is not a malfunction.
In this case, recharge it two or three times before the first use.
Noises may be generated on the TV or the radio during recharging. In this case, use a power socket far
from them.
Do not recharge or discharge the battery near a heating equipment such as a heater or in the direct
sunlight.
Using the battery pack (continued)
Connecting the battery pack to the unit
1. Fit the claws of the battery pack into
the latch slot at the bottom of this
unit.
Battery pack
13
2. Disconnecting the battery pack
Slide the latch release and slide the battery
pack off as shown below.
CHAPTER 4. (PLAYBACK (THE BASICS))
Playing back
+
DC IN
1. Slide POWER switch on the main
unit toward ON to turn the power on.
ON/OFF
The power cannot be turned ON using the POWER
button on the remote control.
When using the battery pack, the power may
not be turned on at once. In this case, turn the
power on again after 3 seconds. If the unit is still
not turned on, recharge the battery pack.
POWER ON/OFF
OPEN
2. Press OPEN to open the display
panel.
CHAPTER 4.
PLAYBACK
3. Put your finger on the pit DISC
OPEN at the front side of this
unit and open the disc cover.
DISC OPEN
4. Load a disc with the label side up
and push down around the center
of it. The disc is fixed with a click.
A disc with the label side up
5. Close the disc cover.
NOTES
This unit automatically begins playing the disc.
Load only one disc.
After loading or removing a disc, make sure to close the disc cover. If the inside of the unit be
comes dusty, it will cause a malfunction.
When playing a DVD disc, set the PAL/NTSC button on the remote control to suit the color
system of the disc playing during stop or power off. Otherwise, the full potential quality of the
disc may not be regenerated.
When the menu screen is displayed
The menu screen may be displayed first after loading a DVD or video CD version 2.0 with PBC ON
which contains a menu.
You cannot select the program in the menu screen while the on screen display appears.
Turn off the on screen display before selecting the program.
14
Playing back (continued)
DVD : Use
or the number buttons to select which program you would like to view.
Then press ENTER to begin playback. Press TOP MENU or MENU to return to the menu screen.
Video CD : Use the number buttons to select which sound track you would like to listen to.
Playback begins. Press MENU to return to the menu screen.
When PBC is set to ON, you cannot select the program with the main unit.
For either DVD or Video CDs, menu continuations and the exact operating procedures for using the
menu may vary from disc to disc. Follow the instructions on the menu screen.
To turn the power off
Slide the POWER switch on the main unit toward OFF, or press POWER on the remote control.
After playing back a disc
Slide the ON/OFF switch toward "OFF" to turn the power off.
If stop mode or pause mode lasts for more than 5 minutes, the unit automatically enters standby mode (Auto
power saving). While the liquid crystal display is off, the power indicator remains lit. Press Play to turn on the
power again.
Removing the disc
Caution
Make sure that the disc stops and is completely still before you remove the disc.
If you touch the spinning disc, you may hurt your finger.
1.Press
to stop playback.
2.Put your finger on the pit DISC OPEN on the left side of this unit and open the disc cover.
3.Remove the disc from the groove, Do not touch the surface of the disc.
4.Close the disc cover.
To listen through the headphones
Insert the headphones into the Phones Jack on the right side.
SPEAK
0-9, +10
PLAY
PLAY
Both
and on the player have double
functions press slightly for fast forward
or fast rewind, Press 3-5 seconds for the
previous or the next program.
15
Stopping playback
Fast Forward, Rewind
Press
This unit remembers the point at which
playback stopped (Resume function). When
(Play) is pressed, playback begins from
the resumed point.
Press
or
on the player.
Or, press
or
on the remote control.
The program is fast forwarding or reversing at
high speed.
Playing back (continued)
To clear the resumed point
Press
again during stop.
It is also cleared when the disc cover is
opened.
Still (Pause)
Press
during playback.
To return to normal playback.
Press
(play) or .
Previous and Next
Return to the previous chapter or track:
For DVD, video CD with PBC on, and audio
CD:
Pressing
once skips to the beginning of
the chapter (track) currently being played,
and pressing
two times skips to the previous
chapter (track).
For video CD with PBC off:
Pressing
once skips to the previous track.
2X
4X
8X
16 X
2X) (
4X) (
8X) (
16X) (
32 X
32X)
To return to normal playback
Press
(Play).
When on the player, or slow button on the
remote control is pressed repeatedly during
DVD or Video CD playback. The playback
speed changes each time the button is
pressed. as shown below.
1/2x
1/4x
1/8x 1/16x
To return to normal playback press
(play).
NOTE
There is no audio during fast forward or rewind
and slow motion (DVD and Video CD only). During audio CD play, the sound is heard intermittently.
In some discs, the speed displayed on the
screen may be different from the actual speed.
Display mode on the liquid
crystal display
The liquid crystal display can be displayed in
the scale 16:9 or 4:3.
Press Display Mode on the unit.
CHAPTER 4.
PLAYBACK
1.Operation on the player
Press
3-5 seconds for next chapter or
track.
Press
3-5 seconds for previous chapter
or track.
2.Operation on the Remote Control
Press
or
during playback.
Skip to the next chapter or track:
The disc position advances one chapter or
track each time the button is pressed.
(
Each time you press MODE, the display
changes as follows:
To skip to the desired chapter or track
directly using the remote control (video CD,
audio CD)
Enter the desired track number using the
number buttons on the remote control.
Example: To play track10
Press +10, 0 on the remote control.
Playback begins.
Full ( 16:9 )
When
or
on the player, or
or
is
pressed repeatedly during DVD or video CD
playback, the playback speed changes each
time the button is pressed, as shown below.
Normal ( 4:3)
Black belts appear on the left
and right sides.
16
NOTE
When using the using with the AC adaptor,
" two buttons simultaneously to
"and "
Press"
access the Factory Menu options.
the liquid crystal display is brighter when the
power is turned on.
When using with the battery pack, the liquid
crystal display is dimmer when the power is
" two buttons
Press " " and"
simultaneously to enter the
Auto Adjust function.
turned on.
Press "
options.
" button to access the OSD Menu
Press" "one time to enter
the increase " " and decrease
"
" function of R parameter.
Press " " one time to
enter the Contrast
adjustment.
Press" " two times to enter
the increase" "and decrease
"
" function of G parameter.
Press " " two times to
enter the Brightness
adjustment.
Press" " three times to enter
the increase" "and decrease
"
" function of B parameter.
Press "
" three times to
enter the Language selection.
Press " " four times to enter
the Phase function.
Press "
" four times and
" to Exit
then press " "or "
the menu options.
Press " " five times to enter
the Clock reset function.
Press" "six times to enter
the Reset function.
Press " " seven times and
"to Exit
then press " " or"
the Factory Menu options.
17
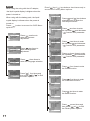
CHAPTER 5. (OPERATION WITH OSD)
Information about On Screen Display (OSD)
This unit features OSD Menu Icons showing disc information ( title, chapter, track, number, elapsed
playing time, audio/subtitile language, angle, and sound) and player information (repeat play, play
mode, marker, etc.).
Some icons only show the indicated information. Other icons allow the settings to be changed.
0-9, +10
Common procedures
1.Press SETUP during playback.
Title function can be accessed from the stop mode.
2.Press / to select the desired item.
The current selected item is indicated by a Shadow
frame on its OSD menu icon.
3.Press / to select the desired setting.
For some functions, the setting will be registered
immediately; for others, ENTER (PLAY) must be
pressed.
PLAY
To exit the OSD Menu Icons, Press SETUP
again.
Detailed Description of each OSD Menu Icon
You can view information about a disc and its operational status on the TV screen.
Press SETUP during
playback. (TV screen)
FUNCTION
(Press / to select desired item)
SELECTION
METHOD
General setup
Audio setup
Show the audio information
Video setup
Preference setup
Password setup
Exit setup
18
Using a Title / DVD Menu
Using a Title Menu
Using a DVD Menu
Some movie discs may contain two or more
titles. If the disc has a title menu recorded
on it, the TITLE button can be used to select
the movie title. ( The details of operation
differ depending on the disc used. )
Selecting a title may not be possible on
certain DVD discs.
Some DVDs have unique menu structures
called DVD menus. For example, DVDs
programmed with complex contents provide
guide menus, and those recorded with various
languages provide menus for audio and subtitle
language. Although the DVD menu's contents
and operation differ from disc to disc, the
following explains the basic operation when this
feature is used.
MENU
2.Press / / / and press PLAY, or
press the numeric button(s), to select
desired item.
Changing Subtitle Language
When playing discs contain subtitles, you can display the subtitles on the screen or change
the language of the subtitles.
Changing the subtitles during playback
1. During playback, press SUBTITLE on the
remote control repeatedly.
Changing the subtitles default setting
1. Press MENU on the remote control repeatedly.
The DVD menu icons are displayed.
2.Press
or
to select the Preference Page.
3.Press
or to select the subtitle icon and
desired language.
This function can be set to "English","French",
"Spanish","Chinese","Japanese" or "German"
and etc. (Depending on the DVD format).
19
CHAPTER 5.
2.Press / / / and press PLAY, or
press the numeric button(s), to select
desired title.
The selected title now starts playing.
1.Press Menu during play.
The DVD menu available on the disc is now
displayed. Pressing MENU again to resume
play from the scene when MENU was first
pressed.
ADVANCED OPERATIONS
TITLE
1.Press TITLE.
A list of the titles on the disc is displayed.
Press TITLE again to resume play from the
scene when TITLE was first pressed.
Resume play may not be possible on certain
discs.
Changing Audio Soundtrack Language
It is possible to change the audio soundtrack language (or encoding method, channel number)
to a different language from the one selected at the initial setting in case of DVD disc. This
operation works only with discs on which multiple audio soundtrack languages are recorded.
And it is possible to change the audio channel in case of audio CD.
Changing the language
1. While playing, press MENU on the remote
control repeatedly.
The menu icons are displayed.
2.Press or to select the Preference Page.
3.Press or to select the Audio icon.
4.Press or to select desired language.
This function can be set to "English","French",
"Spanish","Chinese","Japanese" or "German"
and etc. (Depending on the DVD format).
NOTE
When the desired language is not selected even after pressing the button several times, it means
that the language is not available on the disc.
When the power is turned on or the disc is removed, the language heard is the one selected at he
initial setting. If this language is not recorded on the disc, only the available language on the disc
will be heard.
Some discs may not respond to Audio feature.
The DVD/VCD disc must be removed from DVD player or leave the disc cover open in order to
access open the "Preference Page".
Viewing from another Angle
Some DVDs may contain scenes which have been shot simultaneously from a number of
different angles. For these discs, the same scene can be viewed from each of these different
angles using the ANGLE button. (The recorded angles differ depending on the disc used.)
1.Press ANGLE during playback.
2.Press ANGLE repeatedly until the desired
angle is selected.
ANGLE
For your reference
The ANGLE indicator will blink in the display
window at scenes recorded at different angles
to indicate that angle switching is possible.
NOTE
This function only works for discs having scenes
recorded at different angles.
20
Repeat Play
Repeat viewing (listening)
Press REPEAT during playback.
Each time this button is pressed, the disc will repeat a chapter or title (DVD) or a track
(CD/Video CD).
Repeating viewing(listening)
Press REPEAT during playback.
Each time this button is pressed, the LCD screen
changes as shown below and the disc will repeat
a chapter or title (DVD) or a track (CD/Video CD).
REPEAT
Press REPEAT during play. Each time this button is
pressed, repeat options are shown as follows:
Repeat Chapter
Repeat Title
Repeat All
Cancel Repeat Mode
NOTE
1. Press "A-B" to repeat play between two intervals.
Press "A-B" (1), to set the beginning of the repeat
cycle. Press "A-B" again (2), to set the end of the
repeat cycle. This process will enable constant
repeat playing between (1) and (2).
2. Press "A-B" again to end the process and return
to normal play mode.
NOTE
A-B REPEAT
21
A-B repeat play works only with discs for which the
elapsed playing time appears in the unit's display
during playback. This function is not available for MP3
discs. Some subtitles recorded around point A or B
may fail to appear.
CHAPTER 5.
Repeating sections between two specific points (A-B repeat)
ADVANCED OPERATIONS
Repeat play works only with discs for which the elapsed
playing time appears in the unit's display during
playback. Repeat play may not work correctly with
some DVDs. For MP3 disc, there are three modes to
repeat the contents: Folder (default value), Rep-one
and Folder Rep.
Zoom Feature
Zoom feature (DVD and Video CD only)
The Zoom function allows you to enlarge the video image and to move through the enlarged image.
ZOOM
Press ZOOM during playback or still
playback to activate the Zoom function.
Each time this button is pressed, the
enlarged image changes as followed:
2X 3X 4X 1/2X 1/3X 1/4X restore
image's normal size.
You can move the scene with direction key.
NOTE
Some discs may not respond to the Zoom feature.
Zoom does not work on subtitles or menus
included on DVD video discs.
Program Play
The player plays the tracks on the disc in the order you specify.
Press PROG. On the stop mode.
The program playback menu screen appears on
the TV screen.
PROGRAM
You can arrange the orders of the titles,
chapters, or tracks on the disc and create
your own program. This function is only active
in PBC (Play Back Control) OFF mode.
Playback with MP3
What is MP3?
MP3 is a new music format which is able to
play the music on the internet. We are the first
company to offer this function in a home DVD
player in order to play MP3 files recorded on
CD-R discs.
MP3 Operation
1.Load an MP3 disc.
The MP3 menu is displayed and playback
starts automatically.
2.Press / button to select the desired
folder.
3.Press PLAY to see the MP3 list under the
selected folder.
4.Press /
to select the desired MP3 file.
And press PLAY to play the selected MP3
file.
5.Select
mark and press PLAY to
return to the previous page.
To program play an MP3 file
1.Load an MP3 disc.
The MP3 menu is displayed.
2.Press PROGRAM button to see all the MP3
files in the disc and press / to select
the desired MP3 file and press PLAY to
play the selected MP3 file.
3.Press
or
3-5 seconds on the player
or press
or
on the remote control to go
the next / previous page.
4.Press "1/ALL" to select different play modes
including: Single, Repeat Folder, Folder,
Shuffle, Random and Repeat One.
NOTE
The file name is only displayed in English.
If there is an impossible code to display, it will
be displayed underlined signs instead of English.
This unit can play up to 200 files per disc.
Disc format is compatible with ISO9660 only.
If there are MP3 files mixed with other data
files on the CD-R disc, please do not use the
disc; use a new one instead. However, if the
disc is a CD-RW disc, this does not matter.
22
What is WMA
WMA, short for Windows Media Audio, is also a digital audio files similar to a MP3. WMAs are more
efficient than MP3s because they can be compressed to an even smaller size than MP3s. This simply
means that a WMA takes up less space on your computer like a MP3 but only works with Windows
Media player. Application: The same as MP3 operation.
What is DVD-Audio
DVD-Audio is a format specifically designed to provide the highest possible audio fidelity capable on
DVD. The audio fidelity of DVD-Audio far exceeds the quality of conventional CD's and audio on DVD-Video.
DVD-Audio takes advantage of the large storage capacity, speed and flexibility possible with DVD.
DVD-Audio provides for audio in stereo and in multi-channel surround in a wide range of specifications.
In addition to audio, a DVD-Audio disk can contain a limited amount of video, which can be used to
display text, such as lyrics or notes; or stills such as a photo album. Up to 16 graphic stills can be
associated with each track and on-screen displays can be used for lyrics and disc navigation, As an
option, a DVD-Audio disc can also include audio tracks recorded in the DVD-Video specification
(Dolby Digital and DTS) for compatibility with DVD-Video players.
Playing Your JPEG Files
What is JPEG?
JPEG is short for the "Joint Photographic Experts
Group", a group of experts nominated to produce
standards for continuous tone image coding.
Mode 1 :Wipe Top(by default)
Mode 2 :Wipe Bottom
Mode 4 :Wipe Right
Mode 3 :Wipe Left
Mode 6 :Diagonal Wipe Right Top
Mode 5 :Diagonal Wipe Left Top
Mode 8 :Diagonal Wipe Right Bottom
Mode 7 :Diagonal Wipe Left Bottom
Mode10:Extend From Center V
Mode 9 :Extend From Center H
Mode12:Compress To Center V
Mode11:Compress To Center H
Mode14:Window V
Mode13:Window H
Mode16:Move In from Top
Mode15:Wipe From Edge To Center
Press " 1/ALL" button to select different play modes including : Random, Repeat One, Repeat All,
Repeat Off,Single and Shuffle.
Image Rotation
Zoom
There are four modes to rotate a picture: Invert, Mirror,
Left, and Right. These operations are allowed only
when a picture is being displayed normally, and will
be cancelled automatically when the next picture is
displayed (press "next " or "prev ") The arrow key
are used to select the different rotation modes:
Up-Mirror / Vertical
Down-Mirror /Horizontal
Left-Turn left
Right-Turn right
This features allows you to view a picture at
50%~200% in several increments. Press the
"ZOOM" button. An on screen message
("Zoom 100%") will verify your selection. Use
"F.F." And "F.R." Keys to control the amount
of zoom in and out. Press the direction keys
to move the picture in any direction. Press "
Zoom" button again to exit the " Zoom" mode
and back to normal operation.
Menu
23
When JPEG CD is played, the "MENU" key is used
to display JPEG folders and the corresponding files.
During the playback, press "STOP" to access
thumbnail menu.
Note: When in the "ZOOM" mode, the Slideshow
transition and image transformation features are
disabled.
CHAPTER 5.
Normal Slide Show Presentation
When a JPEG disc is loaded into the player, a
menu will appear on screen. (The same as the
on screen menu of MP3) . Each picture in the
current directory will be displayed consecutively
in a slideshow presentation and will be automatically displayed using the largest size that fits in
your LCD screen. Sixteen slideshow "transition" modes are provided. Use the "PROGRAM"
button to select one of the following transition
effects:
ADVANCED OPERATIONS
The best known standard from JPEG is ISO
10918-1(ITU-T T.81), which is the first of a
multi-part set of standards for still image
compression. This allows you to create files
(such as photographs, drawings, and most
clip-art) that can be archived on a CD-R for
viewing on the RDV650, computer, or the web.
Playing Your JPEG Files
CHAPTER 6. (INITIAL SETTINGS)
Changing setup values
Use the Setup Menu display to change the system configuration. In this section, each item on
the Setup Menu display will be described. Use " / / / "buttons to select the item you want
and press " PLAY" or "ENTER" button to confirm.
General Setup Page
TV Display:
The type of TV display(4:3 or 16:9) connected to the
player can be wide-screen picture type for 4:3 display
mode can be reset. Select "General Setup Page".
You will see the following table on the screen. Press
" /
" toselect "TV Display". Press "PLAY" to confirm your choice. This setting can only be changed
on the setup menu.
Normal /PS:
Select this option when you connect a normal TV to the
player. Displays the wide picture with a portion automatically
cut off (the left and right edges).
Normal/ LB:
Select this for a conventional sized TV set. Black bands
appear in both upper and lower sides. (Letter-Box Style)
Wide:
Select this for a wide-screen TV set, played in full size.
Setting the side-screen TV to FULL mode is also necessary.
OSD Lang:
The setup menu can be shown in another languages.
You can choose another language by pressing " / "
to select "OSD Lang". Turning the power off will not
affect the setting. The setting can only be changed
from the setup menu.
Note: Some DVD may not include the pre-selected
languages. In this case, the player automatically displays the
menu that is consistent with the disc's initial language setting.
Captions:
Press " / " to select " Captions". This function
allows you to turn the subtitles on or off.
Screen Saver:
Press " / " to select "Screen Saver" This function
can be set to "ON" or "OFF".
Last Memory:
Press " / " to select "Last Memory". When the
setting is "ON", the player starts memorizing the last
memory of the last disk. This function only works
when the player is powered on.
24
Changing setup values (continued)
Audio Setup Page
Priority
Audio setup options should only be changed
if the DVD player is connected to a LEFT or
RIGHT surround sound processor.
Speaker Setup
Downmix:
Switches the mixing down methods wh en yo u pla y a
DVD with rear signal components. This function
can be set to "LT/RT", "Stereo", "V SURR ".
Post Drc:
This is selected to adjust post dynamic range
compression function to obtain the different
compression results.
SPDIF Setup
SPDIF OUTPUT :
Press" / " to select "SPDIF Output" .
Speaker Setup
CD:
Press" / " to select "CD" digital output while
"SPDIF Output" is set to "Manual".
SPDIF Setup
MPEG:
Press" / " to select "MPEG" digital output
while "SPDIF Output" is set to "Manual".
PCM Channel:
Press" / " to select "PCM" channel digital
output while "SPDIF Output" is set to "Manual".
LPCM Out:
Press" / " to select "LPCM Out" frequency.
2 channel 48k and 96K.
Dolby Digital Setup
DUAL MONO :
This is the output mode of the L and R signals of
the set audio output. If it is set to "Mix-Mono", this
function only works when the DVD is being played
in 2 channel.
Dolby Digital Setup
25
Dynamic:
Press" / " to adjust the linear compression rate
of the signal.
CHAPTER 6
DTS :
Press" / " to select "DTS" digital output while
"SPDIF Output" is set to "Manual".
INITIAL SETTINGS
DOLBY DIGITAL :
Press" / " to select "Dolby digital" output
while "SPDIF Output" is set to "Manual".
Changing setup values (continued)
Equalizer
EQ Type:
There are 7 types of EQ setting.You may select the
favorite sound effect depending on the playing disc.
Bass Boost:
Enable the "Bass Boost" function.
Super Bass:
Enable the "Super Bass" function.
This function only works when "Bass Boost" is on.
Equalizer
Treble Boost :
Enable the "Treble Boost" function.
3D Processing
Reverb Mode:
3D PROCESSING MODE selection. There are 7 options
including "Concert, Living Room, Hall, Bathroom, Cave,
Arena, Church".
3D Processing
Video Setup Page
Select this function to enter the following menu:
Component
The primitive Component setup is Vga output. If the value of
Component is set to Off, there is no picture on the player.
If you want to see the picture on the player again,
just turn off the power and reset.
TV CVBS
Set this function "on" to output the video signal on the
player to TV. During the period of TV CVBS output, the
screen of the player is blue. If you want to see the video signal on the player again, just set this function"off".
Or, turn off the power and reset.
Video Setup
S VIDEO:
Set this function "on" to output the video signal on the
player to TV. During the period of S VIDEO output, the
screen of the player is blue.If you want to see the video
signal on the player again, just set this function"off".Or,
turn off the power and reset.
QUALITY:
There are seven selective items in this function. They are Sharpness, brightness, contrast, Gamma, Hue, Saturation and
Luma Delay. Press PLAY or "ENTER" to enter the selective
items and press or to select which item you want to set.
And then press or to set the value of the selected item.
26
Changing setup values (continued)
Sharpness:
There are three selective items: High, Medium and
Low.
Press " / " to select which item you want to set.
Press PLAY or " ENTER" to confirm.
Video Quality Setup
Gamma:
There are three selective items: High, Medium, Low
and None.
Press" / "to select which item you want to set.
Press PLAY or "ENTER" to confirm.
Hue:
Press PLAY or "ENTER" to enter Hue setup window.
Press " / " to adjust "Hue".
Press PLAY or "ENTER" to return to "Hue".
Saturation:
Press PLAY or "ENTER" to enter Saturation setup
window.
Press " / " to adjust "Saturation".
Press PLAY or "ENTER" to return to "Saturation".
Luma Delay:
There are two selective items: 0T and 1T.
Press" / "to select which item you want to set.
Press PLAY or "ENTER" to confirm.
27
CHAPTER 6
Contrast:
Press PLAY or "ENTER" to enter Contrast setup
window.
Press " / " to adjust "Contrast".
Press PLAY or "ENTER" to return to "Contrast".
INITIAL SETTINGS
Brightness:
Press PLAY or "ENTER" to enter Brightness setup
window.
Press " / " to adjust "Brightness".
Press PLAY or "ENTER" to return to "Brightness".
Preference Page
TV Type :
Press " / " to select "TV Type". Select the TV type
according to the TV set. (Including NTSC, PAL and
Multi.)
PBC :
Playback control. This is the function especially for
VCD. Press "PBC" (On) to allow to program selected
chapter. After this material is completed, the root
menu will appear. Press "PBC" (Off) to play movie
uninterrupted.
Audio :
This function can be set to "English","French",
"Spanish","Chinese","Japanese" or "German" and
etc. (depending on the DVD format).
Subtitle :
This function can be set to "English","French",
"Spanish","Chinese","Japanese" or "German" and
etc. (depending on the DVD format).
Disc Menu :
This function can be set to "English","French",
"Spanish","Chinese","Japanese" or "German" and
etc. (depending on the DVD format).
Parental :
Move the arrow to "Parental" There are 8 options
of selections. Parental control only works with
DVD discs that have this protection system
encoded. Parental control does not work for
VCD or audio CD discs.
Country Region :
Set up the parental control country region.
Default :
This function will change all parameter to the
default setting.
Note:
If you want to access the Preference Setup Page, pleasemake sure there is no disk inside the DVD player.
You cannot adjust the settings of the Preference Setup Page while a disc is inside the player.
28
Password Setup Page
Password Mode:
Press " / " to select "Password Mode" to"On"
or "Off".
Password :
The initial factory setting for "Old
Password" is 123456 . You need
to enter this number if you want to
change the password.
Note:
Do not forget your password. Currently, There is no way to override the password.
Exit Setup Page
Exit Setup Menu :
Press PLAY to exit the Setup Menu.
29
CHAPTER 7. (CONNECTION)
Before connecting
Turn off the power of this unit and the equipment to be connected.
Refer to the instructions for the equipment to be connected.
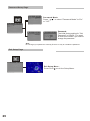
Connecting to a wide TV/ an AV TV
VOLUME
PHONE/OPTICAL
AUDIO
VIDEO
S-VIDEO
To VIDEO OUT jack
To AUDIO OUT jack
Video connecting cable(supplied)
Audio connecting cable(supplied)
To Audio input jacks
To video input jack
CHAPTER 7
CONNECTION
To connect to a TV set equipped with S-video (optional) input
Use the S-video connecting cable instead of the video connecting cable to connect the
S-VIDEO jack of this unit and the S-VIDEO input jack of the TV set.
S-video connecting cable (optional)
To set the color system of the connected TV
Use the setup menu to change the TV (PAL/NTSC) color system, refer to Preference Page.
30
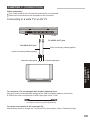
Connecting to an audio equipment
VOLUME
PHONE/OPTICAL
AUDIO
VIDEO
S-VIDEO
To audio input jacks
To AUDIO OUT jack
Audio connecting cable(supplied)
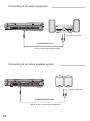
Connecting to an active speaker system
VOLUME
PHONE/OPTICAL
AUDIO
VIDEO
S-VIDEO
To audio input jacks
EARPHONE/OPTICAL
Optical Audio connecting cable(optional)
31
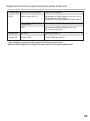
Output sound from the optical output terminals of this unit
Playing disc Audio recording system
DVD
Dolby digital (AC-3)
Output audio signals
Bit stream of Dolby digital (AC-3) (2ch-5.1ch)
PCM (48kHz/16bit) (2ch)*1
Select it in the initial setting "Digital output".
Linear PCM 48kHz/96kHz Linear PCM (48kHz/16bit) (2ch)*2
16/20/24 bit
DTS
Bit stream of Dolby digital(1ch-5.1ch)
No output PCM signal
Video CD
MPEG1
PCM (44.1kHz)*1
Audio CD
Linear PCM
Linear PCM (44.1kHz)*1
This changes condensed audio signals to PCM and outputs them.
When a 96kHz-24bit disc is played, the audio signals are output in 48khz-16bit.
•••••••• ••••••••••
32
CHAPTER8. (OTHERS)
Troubleshooting
If something seems to be wrong with your DVD player, first check the items in the table below.
General
The power does not turn on.
Connect the AC adapter correctly or insert the
battery pack correctly.
Check that POWER switch is not set to OFF.
The power can not be turned on by POWER button
of the remote control while the power switch is off.
The power automatically turns off.
In stop mode, the unit automatically enters the power
saving mode after 10 minutes when using with the AC
adapter, and using with the battery pack (Auto power
saving). Press POWER button of the remote control to
turn on the power again.
Buttons on the main unit or on the remote
control do not function.
In some discs, the operation may be prohibited.
Check that POWER switch is not set to OFF.
The unit does not work correctly.
Remove the AC adapter and the rechargeable
battery, then attach them again.
The unit is warmed during playback.
This is not a malfunction.
Pictures are distorted during forward / backward search.
This is not a malfunction.
The liquid crystal display.
For the liquid crystal display of this unit, high quality
wide screen liquid crystal, composed of 230 thousand
pixels. Sometimes a few of pixels may appear black
or some other colors due to the property of the liquid
crystal parts, but this is not a malfunction.
Operations
Playback does not start by pressing
Playback stops immediately.
(play).
The player is affected by condensation. Wait
approximately one or two hours.
If the disc is dirty, wipe it with a cleaning cloth.
Insert the disc correctly with the label side up.
Menu playback cannot be done in a video
CD.
Menu playback can be done only on a video CD
with PBC function.
Menu display is not in specified language.
Check "Disc Menu" of language in initial settings.
Sound and picture
No sound coming out from the connected
speakers.
Subtitles are not displayed.
Subtitles are not displayed in a DVD in which
subtitles are not recorded.
If the subtitle is set to "OFF". Set it to "ON".
Check if the connection is correct.
No picture appearing on the TV screen.
Check if the connection is correct.
Set the input switch on the TV set to "video".
Set the player INPUT/OUTPUT switch to "OUTPUT".
No picture appearing on the liquid crystal
display.
Check if the INPUT/OUTPUT switch of the player
is set to "OUTPUT" .
33
Audio /subtitle language can not be
changed.
It can not be changed on a disc that only one
language is recorded.
The menu display may be used to change the
language instead of the audio/subtitle change
operation.
Troubleshooting (continued)
Remote control
The remote control does not work.
Make sure the battery is inserted with the
correct polarity.
If the battery has very little power, replace
it with new one.
Point it toward the remote sensor.
Operate it within 5 meters from the remote
sensor.
Remove any object put between the remote
control and the remote sensor.
Check that the POWER switch is not set to
"OFF".
The DVD player is a piece of precision
equipment. Make sure not to bump or
jar the player during playback, or at any
other time.
Language codes
Language
Code
Language
Code
Language
Code
Language
6565
Afar
7285
Hungarian
7784
Maltese
8472
Thai
6566
Abkhazian
7289
Armenian
7789
Burmese
8473
Tigrinya
6570
Afrikaans
7365
Interlingua
7865
Nauru
8475
Turkmen
6577
Amharic
7378
Indonesian
7869
Nepali
8476
Tagalog
6582
Arabic
7383
Icelandic
7876
Dutch
8479
Tonga
6583
Assamese
7387
Hebrew
7879
Norwegian
8482
Turkish
6588
Aymara
7465
Japanese
7982
Oriya
8484
Tatar
6590
Azerbaijani
7473
Yiddish
8065
Punjabi
8487
Twi
6665
Bashkir
7487
Javanese
8076
Polish
8575
Ukrainian
6669
Byelorussian
7565
Georgian
8083
Pashto;Pushto
8582
Urdu
6671
Bulgariar
7575
Kazakh
8084
Portuguese
8590
Uzbek
6672
Bihari
7576
Greenlandic
8185
Quechua
8673
6678
Bengali;Bangla
7577
Cambodian
8277
Rhaeto-Romance 8679
Vietnamese
..
Volapuk
6679
Tibetan
7578
Kannada
8279
Romanian
8779
Wolof
6682
Breton
7579
Korean
8285
Russian
8872
Xhosa
6765
Catalan
7583
Kashmirl
8365
Sanskrit
8979
Yoruba
6779
Corsican
7585
Kurdish
8368
Sindhi
9072
Chinese
6783
Czech
7589
Kirghiz
8372
Serbo-Croatian
9085
Zulu
6789
Welsh
7665
Latin
8373
Singhalese
6865
Danish
7678
Lingala
8375
Slovak
6869
German
7679
Laothian
8376
Slovenian
6890
Bhutani
7684
Lithuanian
8377
Samoan
6976
Greek
7686
Latvian;Lettish
8378
Shona
6978
English
7771
Malagasy
8379
Somali
6979
Esperanto
7773
Maori
8381
Albanian
6983
Spanish
7775
Macedonian
8382
Serbian
6984
Estonian
7776
Malayalam
8385
Sundanese
6985
Basque
7778
Mongolian
8386
Swedish
7065
Persian
7779
Moidavian
8387
Swahili
7073
Finnish
7782
Marathi
8465
Tamil
7074
Fiji
7783
Malay
8469
Telugu
CHAPTER 8
OTHERS
Code
34
Explanation of terms
Interactive DVD
With this DVD disc, the story is changeable by
user's selection, and/or the direction of view is
changeable.
Title, chapter (DVD)
A DVD disc is divided into large parts (title) and
smaller parts (chapter).
Each part has a number which is called title
number or chapter number.
Track (video CD/audio CD)
A video CD or an audio CD is divided into some
parts (track).
Each part has a number which is called a track
number.
MPEG ( Moving Picture Experts Group)
MPEG is the international standard format for
moving pictures provided by the Moving Picture
Experts Group organized under ISO (international
Organization for Standardization) and IEC
(International Electro-technical Commission).
MPEG provided MPEG1 in 1991, and MPEG2 in
1994. MPEG2 enables play in higher quality than
MPEG1.
Dolby digital (AC-3)
A technique for digital audio compression
developed by Dolby Corporation.
Not only stereo (2 ch) sound, but also 5.1ch
sound can be compressed by it. A large amount
of data can be held in a disc efficiently.
S-VIDEO OUT terminal
As this terminal divides the video signals into
color signal and brightness signal to transmit
them to the TV set, the picture becomes clearer.
We recommend connecting an S-VIDEO cord
to the TV set and S-VIDEO terminal.
Dolby PRO Logic decoder
Equipment in which 4 channel signals recorded
in 2 channels by Dolby surround (pro logic) are
reverted to signals in 4 channels when playing
them back. As compared with the surround
sounds of 5.1 ch of Dolby digital (AC-3),
separation between channels is worse and
surround signal is played back only within 7 kHz.
Pan & scan screen
This signifies that the screen recorded in widescreen format is displayed with left and right
portions cut off.
Playback control (video CD Version 2.0)
A video CD with the playback control function
can be played back by following the menu
display interactively.
Letter box screen
This signifies that the screen recorded in widescreen format is displayed with black bands at
the top and bottom of the screen.
35
Linear PCM audio( LPCM)
This is the signal recording system for audio CD.
While the signals are recorded by 44.1 kHz/16
bit in audio CD, by 48kHz/16 bit -96kHz /24 bit
in DVD. As a result, DVD is played back in higher
quality sound than in audio CD.
CHAPTER 8
OTHERS
36