1
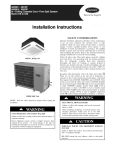
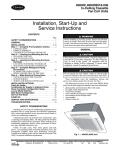
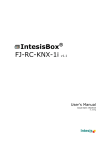
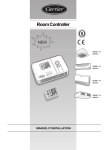
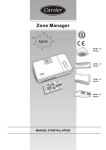
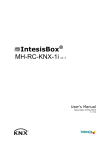
Infrared Remote
40KMC------301
40KMQ------301
OWNER’ S MANUAL
This control system only operates with 40KMC------301 and 40KMQ------301 Cassette indoor
units.
For installation instructions of this unit, refer to the relevant manuals.
Contents
Page
General information ....................................................................................
2
Display of selected functions ......................................................................
3
Use of the remote control ............................................................................
4-6
Troubleshooting ..........................................................................................
7
ENGLISH
Infrared Remote
Owner’ s manual
GB - 1
Infrared Remote
General information
year. The remote control used batteries must be disposed of
according to the standards in force.
• If the air conditioner does not operate normally after replacing
the batteries, remove the batteries, refit them and press the
reset button “O” again after 5 seconds.
BEEP
The remote control operates with two 1.5 V non re-chargeable
batteries.
When the symbol
appears in the display, this indicates that
the batteries are exhausted.
How to insert batteries:
Open embedded cover. Remove the cover of the battery
compartment at the back of the remote control by pressing the tab
toward inside, in the direction of the arrow.
A
A
1
B
2
F
The maximum operating range for the remote control is approx. 5 m.
No obstructions such as curtains or plants should be between
control and unit.
Direct sun on the unit receiver may interfere with good signal
reception. The control must be directed toward the unit receiver
when pressing the buttons of the desired functions. An acoustical
acknowledgement sound (beep) will indicate that signal has been
received.
AM
PM
• Remove the used batteries and insert new batteries.
The remote control uses two alkaline batteries (1.5 V, LR03x2).
• Press the reset button “O” with a sharp object to reset the remote
control.
• Do not use used batteries or batteries of different types, as this
may cause the unit to malfunction.
• The average battery life during normal use is approximately one
�
Display readout
A.
Mode selection button
B.
ON/OFF button
C.
Increase temperature button
D.
Decrease temperature button
E.
Fan speed selection button
F.
Set / select personal setting button
A
B
D
G.
Vertical louver button (not used)
H.
Horizontal louver button
E
I.
ON timer button
G
H
J
K
M
N
J.
DAILY timer button (Everyday)
K.
Cancel / clock set button
L.
OFF timer button
M.
Sleep timer button (night)
N.
Ionizer button (not used)
O.
Reset button
�
A
A
1
B
2
F
AM
PM
C
F
I
L
O
GB - 2
• A mounting bracket for the remote control is supplied with the
unit. Install the mounting bracket on the wall where the remote
signal can be easily received from the remote.
Infrared Remote
Display of selected functions
ENGLISH
1
3
2
5
4
7
6
8
10
9
11
17
12
13
15
16
14
1. Operating mode (from left to right):
• Ventilation (fan only)
• Heating (heat pump models only)
• Automatic (heat pump models only)
• Cooling and dehumidification
• Dehumidification only
2. Signal transmission symbol
3. Temperature selected
4. Address selector
5. Temperature unit of measurement (°C or °F)
6. Unit configuration
7. Batteries exhausted indicator
8. Vertical louver swing indicator (vertical louver is not available)
9. Louver positioning (Flap)
10. Fan speed
11. Personalisation active
12. ON timer selected
13. Night timer active
14. DAILY timer active (Everyday)
15. ON timer, OFF timer and current time
16. OFF timer selected
17. Ionizer active (ionizer is not available)
GB - 3
Infrared Remote
Use of the remote control
Current time adjusting
and reset
buttons (buttons N and O)
Selection of the operating mode
(button A)
Press current time adjusting button
for at least 5 seconds to
adjust the current time.
Press reset button “O” with a sharp object if the remote control is
not operating properly or after replacing the batteries.
With this button the operating mode of the air conditioner can be
selected.
By repeatedly pressing this button the available modes will be
selected in sequence.
The choosen mode is shown as follows, while the unit will
acknowledge signal receipt with a confirming beep.
Setting current time
(button
)
Indicated Symbol
Ventilation (fan only).
Heating (heat pump model only)
1.
With the remote control ON or
for at
OFF, press button
least 5 seconds.
Automatic (heat pump model only)
F
Cooling with dehumidification.
PM
Dehumidification only.
Temperature setting
2.
The time digits start to flash.
or
Press either button
to set the current hour.
to move to
Press button
minutes and set them.
UP
(button C)
DOWN
(button D)
F
3. For this setting always use
either button
4.
or
.
Once the current time is set,
to confirm it.
press button
Start / Stop
(button B)
When the air conditioner is not in operation, the remote control
readout will display the time of day only (in case other symbols are
lit, turn control off by pressing button ).
to start the air conditioner.
Press button
All selected and memorized functions will light up and appear; the
unit will operate according to the functions selected.
Press button
to stop the air conditioner.
All indicators on the unit will go out, and the control will display
only the current time.
If the unit does not stop, turn the control on (by pressing button
) and repeat the operation.
If button
(air conditioner starting) is pressed too soon after a
stop, the compressor will not start for 3/5 minutes due to the
inherent protection against frequent compressor cycling.
The unit will only emit a “beep”, when the signals are received
correctly.
The green unit ON lamp of the indoor unit display illuminates.
GB - 4
Pressing the UP
and DOWN
buttons will increase or
decrease the temperature from the previously set value.
The unit will confirm signal receipt with a beep, and the value of
the set temperature on the display will change accordingly.
The temperature can be set between 63°F (17°C) and 90°F (32°C)
at 1 degree intervals.
In cooling mode, if the temperature selected is higher than the
room temperature the unit will not start; the same applies for the
heating mode, if the selected temperature is lower than the room
temperature.
Selecting direction of horizontal air
flow louver (button H)
The air flow direction can be adjusted up and down to optimize air
distribution in the room.
Press button
repeatedly to choose one of the following louver
positions:
Auto Louver: represented by repeating the following display
sequence:
Position 1-6: represented by the corresponding position on the
louver icon being visible. Position 6 points down:
Swing louver: represented by the louver icon cycling through 6
positions.
Selecting direction of vertical air flow
louver (button G)
This option is not available.
Infrared Remote
Use of the remote control
ENGLISH
7. Louver positioning
Selecting the fan speed
(button E)
The fan speed can be selected by pressing button
Now this icon is flashing.
Use button , to select desired position.
for confirmation.
Press button
Now all icons are fixed on display.
If you want to cancel selections up to here
inserted, push button ; if you want to
cancel all options once timer has been set,
push button
and then .
.
Indicated symbol
Low speed
(for night operation)
Medium speed
High speed
(at start-up, to reach temperature)
About the ON Timer
Automatic (fan speed will automatically switch to the
value required for optimum comfort).
Cycle between low, medium, and high fanspeeds icons
repeatedly .
• When the ON Timer function is operating, the unit senses the
room air temperature right before the start-up time.
• If you want to warm or cool the room at desired time, set the
timer 30 minutes eariler than start time.
ON timer procedure
OFF timer procedure
1. ON TIMER button
(button I)
1. OFF TIMER button
Press this button, even if the remote control
is OFF. The relevant icon and time figure
will start to flash.
If 10 seconds have elapsed and no button
is pressed, the remote control turns OFF (if
it was already OFF when button
was
pressed) or timer function automatically
deactivates.
2. HOUR/MINUTE selection buttons
(buttons
2. HOUR/MINUTE buttons
(buttons
and
·
3. HOUR/MINUTE buttons
and
)
If the unit is OFF: to select the start-up
time, use the temperature control buttons
(buttons
and ).
First select the hours and, after have
confirmed these by pressing button ,
select the minutes using either button
or .
To definitively set the time, press button
again.
Personalisation
and hold it
On the display, the personalisation icon
will start flashing.
2. Press button , to select the operating mode.
3. Press either button
4. Using button
5. Using button
5. Desired temperature
Choose the fan speed, using button
.
When the selection has been completed,
press button
for confirmation.
The icon will stop flashing.
(button F)
1. With the remote control ON or OFF, press button
pressed for more than 5 seconds.
Choose the unit operating mode.
The icons will flash.
To select the mode, use the button .
Once the mode has been decided, press
button . The icon of the selected mode
will stop flashing.
6. Fan speed
)
If you want to memorize a personalised operating mode,
recallable at any time, proceed as follows:
4. Operating mode
To select the desired temperature, (the
or
value is flashing, use either button
Push button , to confirm the selection.
Numbers will stop flashing.
and
To set the clock time, press either button
or .
To move from hour to minute, press
button .
When the ON Timer function is operating,
the unit senses the room air temperature
right before the start-up time. Press button
again to confirm.
)
If the unit is ON, the only possible selection
is the start-up time. The unit will operate
with the selections shown on the display.
(buttons
(button L)
Press button .
The OFF timer icon and numbers for time
selection are flashing.
This function can be set even if the remote
control is OFF.
.
or
to select the desired temperature.
select the fan speed.
select the louver operation.
6. When all options have been entered, press button
memorise them.
to
At this point, all selected and memorised functions can be
activated through button , whatever the unit operating mode.
Once the personalised mode has been entered, press one of the
buttons ,
, ,
to exit.
If you want to change one or more memorised parametres, begin
again from point 1.
GB - 5
Infrared Remote
Use of the remote control
DAILY timer
(Everyday - button J)
Push the button
when the ON or OFF timer is active. The icon
will appear on display.
In this way the ON and OFF timer memorization will be repeated
every day.
To disactivate the daily function, press again the button .
SLEEP timer
function with delayed
switching off (Button M)
Press this button to set the SLEEP timer with remote control on.
The icon will appear on the display.
This procedure permits setting the remaining unit operating time.
1. “1:hr” will be displayed together with the
Combination of ON, OFF and DAILY timer
procedure
icon.
2. Press button
(temperature increase).
The display will show the following
settings in sequence:
1 hr, 2 hr, 3 hr, 4 hr, 5 hr, 6 hr, 7 hr and 9 hr.
If you want operation to start at 5.30 P.M. and stop at 10.30 P.M.,
proceed as follows:
1. Select ON timer at 5:30 P.M.
2. Select OFF timer at 10:30 P.M.
3. Select the desired operating mode (button
3. Once the remaining operating hours have
been selected with either button
again press button
to confirm.
).
,
4. When the SLEEP timer is set, the unit will
PM
PM
or
control the set temperature to avoid
overcooling or overheating during
operation.
The set temperature will change as follows:
If you want to stop operation at 10:30 P.M. and start again at 7:30
A.M. with the same operating mode, proceed as follows:
1. Select OFF timer at 10:30 P.M. during operation
2. Select ON timer at 7:30 A.M.
°C
(°F)
+1,0°C (+1,8 ˚F)
+1,0°C (+1,8 ˚F)
AM
PM
SET
TEMP.
120
60
If you want Everyday operation to start at 5.30 P.M. and stop at
10.30 P.M., proceed as follows:
1. Select ON timer at 5:30 P.M.
2. Select OFF timer at 10:30 P.M.
3. Press the Everyday button (daily button
SET TIME
(Cooling only or dehumidification)
°C
).
(°F)
-1°C (+1,8 ˚F)
PM
PM
TIME (MIN.)
-1°C (+1,8 ˚F)
SET
TEMP.
PM
60
120
TIME (MIN.)
SET TIME
(Heating)
Cancellation of ON, OFF and DAILY timer
procedure
1. If you want to cancel On or OFF timer
A
1
B
2
PM
GB - 6
setting, press the following buttons in
sequence:
• button
or ;
.
• button
To deactivate the Everyday function, press
button .
The Everyday function will remain operative until one of the two timers (ON or OFF)
is active.
Address selector (Ab)
If two indoor units are installed in the same room, they can be
individually controlled (the signal sent to one unit is not received by
the other unit), or you can control both indoor units with a single
remote control.
For configuration refer to the unit installation manual.
Ionizer function button
This option is not available.
Infrared Remote
Troubleshooting
After inserting the batteries in the remote control, the display
does not illuminate:
• The batteries are exhausted or the polarity is incorrect; replace
the batteries or check polarity.
ENGLISH
When pressing any function button, the remote control
shows the function requested on the display, but the unit
does not acknowledge the signal with a “beep” and does not
carry out the function:
• The remote control batteries are exhausted; replace the
batteries.
When pressing the recessed clock adjustment button, the
hour figures on the display do not flash:
• The recessed button has not been pressed correctly; keep it
pressed for at least 5 seconds.
When pressing any button all symbols appear on the display:
• The remote control has not been pointed correctly to the unit
receiver; turn the remote control OFF and repeat the operation,
pointing the remote control in the correct direction.
• There are obstacles (curtains, partitions, etc.) between the
remote control and the unit; repeat the operation after having
removed the obstacles.
• The remote control has been irreversibly damaged; replace with
a new one.
• The receiver on unit or the remote control is exposed to intense
sun radiation; avoid direct sunlight on the unit, draw curtains or
shut shades, or move the remote control.
When pressing the start button, the unit does not
acknowledge the signal with a “beep”:
• Signal transmission is obstructed by severe electromagnetic field
interference; avoid sending signals when computers or
household appliances (food processors, coffee makers, etc.) are
operating close by.
Cellular or cordless telephones may also interfere with the
control.
• The main switch is switched OFF, place the switch in the ON
position.
• The remote control batteries are exhausted; replace the
batteries.
• The remote control has not been pointed correctly at the unit
receiver; turn the remote control OFF and repeat the operation,
pointing the remote control in the correct direction.
• There are obstacles (curtains, partitions, etc.) between the
remote control and the unit; repeat the operation after having
removed the obstacles.
The remote control display does not change when any button
is pressed:
• The triangle symbol 2
is ON, whilst another signal is being
transmitted; wait for signal 2
to disappear and then repeat the
operation.
• The receiver on the unit or the remote control is exposed to
intense sun radiation; avoid direct sunlight on the unit, draw
curtains or shut shades, or move the remote control.
• Signal transmission is obstructed by severe electromagnetic
field interference; avoid sending signals when computers or
household appliances (food processors, coffee makers, etc.) are
operating close by.
Cellular or cordless telephones may also interfere with the
control.
When pressing the stop button the unit does not turn OFF
and does not acknowledge the signal with a “beep”:
• The remote control batteries are exhausted; replace the
batteries.
• The remote control has not been pointed correctly to the unit
receiver; turn the remote control OFF and repeat the operation,
pointing the remote control in the correct direction.
• There are obstacles (curtains, partitions, etc.) between the
remote control and the unit; repeat the operation after having
removed the obstacles.
• The receiver on unit or the remote control is exposed to intense
sun radiation; avoid direct sunlight on the unit, draw curtains or
shut shades, or move the remote control.
• Signal transmission is obstructed by severe electromagnetic
field interference; avoid sending signals when computers or
household appliances (food processors, coffee makers, etc.) are
operating close by.
Cellular or cordless telephones may also interfere with the
control.
GB - 7
L010127H32 - 0306
Via R. Sanzio, 9 - 20058 Villasanta (MI) Italy - Tel. 039/3636.1
The manufacturer reserves the right to change any product specifications without notice.
March, 2006.
Printed in Italy