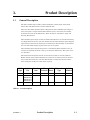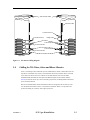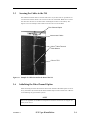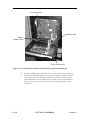
1
The Tape Library Experts TM Fibre Channel Option Installation and Operation Manual 501440 Rev. G Important Manual/Firmware Revision Information This manual and the operating firmware for the Tape Library System (TLS) are revised periodically as the product is improved. This manual was revised to correspond with the firmware version indicated below. Do not use this manual with prior versions of the firmware. Check with Qualstar Technical Support about use of this manual with older or newer firmware. Manual Corresponding Firmware Fibre Channel Installation and Operation Manual 501440 Rev. G, 22 November 2004 TLS Executive Firmware 700105 Version: 2.23 Copyright Notice Copyright© 2004 by Qualstar Corporation — All Rights Reserved Information contained in this document is copyrighted by Qualstar Corporation. It is intended for use by Qualstar's customers and prospective customers to evaluate, integrate, operate and maintain Qualstar products. Customers and prospective customers may reproduce this document as needed for these uses. Reproduction in whole or in part for any other use or by any other party is prohibited without prior written permission from Qualstar Corporation. Every effort has been made to keep the information contained in this document current and accurate as of the date of publication or revision. However, no guarantee is given or implied that the document is error-free or that it is accurate concerning any specification. Qualstar reserves the right to modify the design or specification without notice. Qualstar and the Qualstar logo are registered trademarks of Qualstar Corporation. Chaparral is a registered trademark of Chaparral Network Storage, Inc. VELCRO is a registered trademark of Velcro Industries B.V. All other trademarks are the property of their respective owners. 501440 Rev. G i Notices Qualstar products are covered by one or more of the following patents: 6,271,982 and 6,560,061. Other patents pending. Qualstar equipment is manufactured from new parts, or new and used parts. In some cases, Qualstar equipment may not be new and may have been previously installed. Regardless, Qualstar’s warranty terms apply unless the equipment is specifically identified by Qualstar as “used” or “refurbished”. This equipment has been tested and found to comply with the limits for a Class A computing device pursuant to Part 15 of the FCC Rules. These limits are designed to provide reasonable protection against harmful interference when the equipment is operated in a commercial environment. This equipment generates, uses, and can radiate radio frequency energy and, if not installed and used in accordance with the instructions manual, may cause harmful interference to radio communications. Operation of this equipment in a residential area may cause unacceptable interference to radio and TV reception in which case the user, at his own expense, will be required to take whatever steps are necessary to correct the interference. European Union Directive 89/336/EEC and Standard EN55022 (Electromagnetic Compatibility) Warning This is a Class A product. In a domestic environment, this product may cause radio interference in which case the user may be required to take adequate measures. QUALSTAR CORPORATION 3990-B Heritage Oak Court Simi Valley CA 93063 FAX: (805) 583-7749 Phone: (805) 583-7744 E-Mail: [email protected] E-Mail: [email protected] Web: www.qualstar.com ii 501440 Rev. G Table of Contents 1. Introduction................................................................................................................... 1-1 1.1 Who Should Read This Manual................................................................................... 1-1 1.2 Important Safety Information ..................................................................................... 1-2 2. Unpacking ...................................................................................................................... 2-1 3. Product Description .................................................................................................... 3-1 3.1 General Description ..................................................................................................... 3-1 3.2 Models ........................................................................................................................... 3-2 4. FCO Type A Installation ............................................................................................. 4-1 4.1 Fibre Channel Option (FCO) Type A Installation Considerations.............................. 4-1 4.1.1 Operating Environment........................................................................................ 4-1 4.1.2 Ventilation ............................................................................................................. 4-1 4.2 Drive Cabling for TLS-5/6/8000 and 58/68/88xxx Libraries...................................... 4-1 4.2.1 4.3 Drive Cabling......................................................................................................... 4-1 Installing a Fibre Channel Option .............................................................................. 4-3 4.3.1 Installation ............................................................................................................ 4-3 4.4 Initializing the Fibre Channel Option ...................................................................... 4-10 4.5 Configuring the Fibre Channel Loop ID ................................................................... 4-12 4.6 Configuring the Fibre Channel SCSI Devices Interface.......................................... 4-13 5. FCO Type B Installation ............................................................................................. 5-1 5.1 Fibre Channel Option (FCO) Type B Installation Considerations.............................. 5-1 5.1.1 Operating Environment........................................................................................ 5-1 5.1.2 Ventilation ............................................................................................................. 5-1 5.2 FCO Type B Interconnect Cabling .............................................................................. 5-1 5.3 Cabling for TLS-412xxx Libraries............................................................................... 5-3 5.4 Cabling for TLS-58xxx, 68xxx and 88xxx Libraries................................................... 5-5 5.5 Securing the Cables to the TLS................................................................................... 5-9 5.6 Initializing the Fibre Channel Option ........................................................................ 5-9 5.7 Configuring the Fibre Channel Loop ID ................................................................... 5-11 5.8 Configuring the Fibre Channel SCSI Devices Interface.......................................... 5-12 6. FCO Type C Installation ............................................................................................. 6-1 6.1 Fibre Channel Option (FCO) Type C Installation Considerations.............................. 6-1 6.1.1 Operating Environment........................................................................................ 6-1 6.1.2 Ventilation ............................................................................................................. 6-1 6.2 FCO Type C Interconnect Cabling .............................................................................. 6-1 6.3 Cabling for TLS-4000, TLS-46xxx and TLS-412xxx Libraries.................................. 6-4 6.4 Cabling for TLS-5/6/8000 and 58/68/88xxx Libraries ................................................ 6-8 6.5 Installing a Fibre Channel Option ............................................................................ 6-11 501440 Rev. G iii 6.5.1 6.6 Initializing the Fibre Channel Option ...................................................................... 6-17 6.7 Configuring the Fibre Channel Loop ID ................................................................... 6-19 6.8 Configuring the Fibre Channel SCSI Devices Interface.......................................... 6-21 7. The Configuration Menu ............................................................................................ 7-1 7.1 Configuration Menu ..................................................................................................... 7-4 7.2 Configuration\Advanced ............................................................................................. 7-4 7.3 Configuration\Advanced\Changer\Mechanics Menu .............................................. 7-5 7.3.1 Fibre Channel........................................................................................................ 7-5 7.3.2 Fibre Channel Left ................................................................................................ 7-5 7.3.3 Fibre Channel Right ............................................................................................. 7-6 7.4 Configuration\Advanced\Fibre Channel (Left or Right) Menu ............................... 7-6 7.4.1 Alarm...................................................................................................................... 7-6 7.4.2 Ch0 / Ch1 FC Speed (Fibre Channel Type B and C)........................................... 7-7 7.4.3 Ch0..Ch5 SCSI ID (Fibre Channel Type B and C).............................................. 7-7 7.4.4 Ch0..Ch5 SCSI Speed (Fibre Channel Type B and C) ........................................ 7-7 7.4.5 CLEAR LOG .......................................................................................................... 7-7 7.4.6 Router LUN ........................................................................................................... 7-7 7.5 Configuration\Advanced\Fibre Channel (Left or Right)\Set Time Menu.............. 7-8 7.5.1 Date Day ................................................................................................................ 7-8 7.5.2 Date Month ............................................................................................................ 7-8 7.5.3 Date Year ............................................................................................................... 7-8 7.5.4 Time Hour .............................................................................................................. 7-8 7.5.5 Time Minute .......................................................................................................... 7-8 7.5.6 SET TIME .............................................................................................................. 7-8 7.6 Configuration\Fibre Channel Menu........................................................................... 7-9 7.6.1 Id Mode (Left or Right) ......................................................................................... 7-9 7.6.2 Loop Id (Left or Right) .......................................................................................... 7-9 7.6.3 Topology 0 / Topology 1 (Left or Right) .............................................................. 7-10 7.7 Configuration\Fibre Channel\Device (Left or Right) Menu .................................. 7-12 7.7.1 7.8 RESCAN .............................................................................................................. 7-12 Configuration\Fibre Channel\Device (Left or Right) Menu .................................. 7-13 7.8.1 SCSI Channel ...................................................................................................... 7-13 7.8.2 SCSI ID ................................................................................................................ 7-13 7.8.3 SCSI Lun.............................................................................................................. 7-13 7.8.4 Manuf ................................................................................................................... 7-13 7.8.5 Model.................................................................................................................... 7-13 8. iv Installation .......................................................................................................... 6-11 Maintenance Menu....................................................................................................... 8-1 8.1 Maintenance Menu....................................................................................................... 8-3 8.2 Maintenance\Fibre Channel Menu ............................................................................ 8-4 501440 Rev. G 8.3 Maintenance\Fibre Channel\Info (Left or Right) Status Screen ............................ 8-4 8.3.1 Backplane Id .......................................................................................................... 8-4 8.3.2 Base Lvl ................................................................................................................. 8-4 8.3.3 Board Rev............................................................................................................... 8-5 8.3.4 CPLD Rev .............................................................................................................. 8-5 8.3.5 Memory (MB)......................................................................................................... 8-5 8.3.6 Daughtr Bd Id........................................................................................................ 8-5 8.3.7 FW Rev................................................................................................................... 8-5 8.3.8 Loader Rev ............................................................................................................. 8-5 8.3.9 Prod. Id................................................................................................................... 8-5 8.3.10 S/N .......................................................................................................................... 8-5 8.3.11 +2.5V (Type C FCO only) ...................................................................................... 8-5 8.3.12 +3.3V ...................................................................................................................... 8-5 8.3.13 +5V ......................................................................................................................... 8-5 8.3.14 +12V (Type A and B FCOs only) .......................................................................... 8-5 8.3.15 Air Temp ................................................................................................................ 8-6 8.3.16 CPU Temp (Type A and B FCOs only)................................................................. 8-6 8.3.17 UPDATE ................................................................................................................ 8-6 8.4 9. Maintenance\Fibre Channel\ Log (Left or Right) Status Screen ............................ 8-6 Repacking....................................................................................................................... 9-1 9.1 Repacking the Fibre Channel Option ......................................................................... 9-1 9.2 Preparation for Packing ............................................................................................... 9-1 9.3 Packing the Fibre Channel Option ............................................................................. 9-6 501440 Rev. G v 1. 1.1 Introduction Who Should Read This Manual This manual covers the TLS Fibre Channel Option (FCO) and is written for the installing technician and the user/operator. For information about the operation of various libraries, SCSI interface, or other information outside the scope of this manual, please refer to the appropriate documents listed below. Subject SCSI Command Information Installation and Operation Service Specifications Document Qualstar Document Number TLS-4000 SCSI-2 Interface Manual 500523 TLS-5000/6000/8000 SCSI-2 Interface Manual 501205 TLS-4000 Installation and Operation Manual 501370 TLS-412xxx Installation and Operation Manual 501300 TLS-5000/6000/8000 Installation and Operation Manual 501450 TLS-4000 Technical Service Manual 501380 TLS-412xxx Technical Service Manual 501290 TLS-5000/6000/8000 Technical Service Manual 501090 TLS-4000 Product Specification 500563 TLS-412xxx Product Specification 500119 TLS-5000 Product Specification 501561 TLS-6000 Product Specification 501080 TLS-8000 Product Specification 501498 Supported Tape Drives Product Information Note PIN-014 Approved Data Cartridges Product Information Note PIN-038 SCSI-2 Specifications ANSI Document X3.131-1994 N/A SCSI SPI-2 Specifications ANSI Document X3.302-1998 N/A Table 1-1 Applicable Documents 501440 Rev. G Introduction 1-1 Although Qualstar has made every effort to insure the accuracy of the information contained in this manual, no guarantee is expressed or implied that the manual is error-free. Qualstar reserves the right to make changes at any time without prior notification. The Qualstar TLS is a sophisticated, state-of-the-art computer peripheral. It should only be serviced by a competent service technician who is experienced with the operation and maintenance of tape libraries, and only after reading and understanding this manual and the Installation and Operation and Technical Service Manuals for the respective libraries. 1.2 Important Safety Information All of the operating instructions and maintenance procedures in Qualstar manuals must be followed to prevent personal injury or damage to the equipment. In the interests of safety, there are two kinds of warnings used in Qualstar documents, as shown below. DANGER PERSONAL INJURY MAY RESULT IF YOU DO NOT FULLY COMPLY WITH THE HANDLING, OPERATING, OR SERVICE INSTRUCTIONS FOUND IN A DANGER PARAGRAPH. GEFAHR UNSACHGEMAESSE BENUTZUNG, BEDLENUNG ODER RAPARATUR AUFGRUND VON NICHTBEACHTUNG DER SICHERHEITSANWEISUNG KANN ZU VERIETZUNGEN FUEHREN. CAUTION EQUIPMENT DAMAGE OR LOSS OF DATA may result if you do not fully comply with the handling, operating, or service instructions found in a CAUTION paragraph. In addition, useful information and tips may be found throughout the document in the following formats: NOTE SPECIAL ATTENTION to explanatory statements found in a NOTE paragraph will help you avoid mistakes and/or save time. 1-2 Introduction 501440 Rev. G 2. Unpacking When not delivered installed on a library, the Fibre Channel Option is shipped in a specially designed carton. The shipping carton contains the following items: A Fibre Channel Option This Installation and Operation Manual NOTE Before unpacking the unit, check the shipping container for damage, and report all shipping damage to the carrier before opening the carton. 1. Open the carton and lift out the FCO assembly. 2. Remove the packing material from the FCO assembly and put it back into the carton. NOTE Be sure to save the shipping carton and packing material in case reshipment should ever become necessary. 501440 Rev. G Unpacking 2-1 3. 3.1 Product Description General Description The Fibre Channel Option (FCO) connects TLS-4000, 412xxx, 5000, 58xxx, 6000, 68xxx, 8000 and 88xxx libraries to Fibre Channel (FC). There are three Fibre Channel Option configurations. Fibre Channel Option Type A and C incorporate a single channel Fibre Channel router, enclosed in an assembly, mounted to the back of the TLS library. These models are available for single and dual bay TLS libraries. Fibre Channel Option Types A and C for TLS-412xxx libraries are installed when they are shipped from the factory. All other models have the Fibre Channel Option shipped separately from the libraries and require installation in the field. They are attached to the rear of the TLS, taking the place of the rear service panel. Fibre Channel Option Type B incorporates a dual channel Fibre Channel router, enclosed in an assembly mounted to the top of a dual bay TLS library. This option is factory installed. The installation and operation of the various library models is virtually identical. Models 412xxx, 58xxx, 68xxx and 88xxx are referred to as dual bay libraries because they contain dual drive bays. All other TLS models are single bay libraries. Differences among the models are noted where required. FCO Type Qualstar P/N Transfer Rate FC Channels SCCI Buses FC Interface Type Q-Link Included A* 501420-01-2 1GB Single 2 GBIC-1GB No B 501375-01-8 501375-02-6 501375-03-4 501375-04-2 2GB Dual 6 GBIC-2GB Yes C 501420-02-0 2GB Single 2 SFP-2GB Yes * Discontinued Table 3-1 FCO Descriptions 501440 Rev. G Product Description 3-1 3.2 Models Type A Fibre Channel Options Right* Left* TLS-412xxx TLS-4000 * Left and Right are as viewed from the front. Figure 3-1 Type A Fibre Channel Options Installed on TLS-4000 & 412xxx Libraries 3-2 Product Description 501440 Rev. G Type B Fibre Channel Option Figure 3-2 Type B Fibre Channel Option Installed on a TLS-412xxx Library 501440 Rev. G Product Description 3-3 Type C Fibre Channel Options Right* Left* TLS-412xxx TLS-4000 * Left and Right are as viewed from the front. Figure 3-3 Type C Fibre Channel Options Installed on TLS-4000 & 412xxx Libraries 3-4 Product Description 501440 Rev. G 4. FCO Type A Installation 4.1 Fibre Channel Option (FCO) Type A Installation Considerations 4.1.1 Operating Environment A TLS with the Fibre Channel Option is designed to operate in an ambient environo o o o ment from 41 F to 95 F (5 C to 35 C), 20% to 80% relative humidity, and at altitudes from -1000 to +10,000 feet. Moisture must not be allowed to condense inside the system. 4.1.2 Ventilation When selecting a location for the TLS, be sure to provide sufficient space behind the unit to allow for cable connections. Also, be sure nothing will block the air intake at the inlet air filters or the top air vent slots. 4.2 Drive Cabling for TLS-5/6/8000 and 58/68/88xxx Libraries Prior to installing a Fibre Channel Option on TLS-5000, 58xxx, 6000, 68xxx, 8000 or 88xxx libraries the tape drive assemblies may need to be installed in the library and the drives will need to be cabled as shown in this section. Refer to the Installation section in the TLS-5000/6000/8000 Installation and Operation Manual (Qualstar document number 501450) for details about tape drive assembly preparation, enabling SCSI termination power and installation. 4.2.1 Drive Cabling After the tape drive assemblies have been installed the following steps outline the actions necessary to properly cable the tape drives prior to FCO installation. See Figure 4-1 and Figure 4-2. 1. 501440 Rev. G Remove power from the TLS: first turn the power switch off and then remove the power cord. FCO Type A Installation 4-1 TLS-62xx Filler Plate { | Filler Plate } ~ Bridge Cables Bridge Cable Drive 1 Drive 2 Bridge Cable Terminator Terminator Figure 4-1 TLS-62xx and 82xx Drive Cabling Diagram Steps 2 through 4 apply to TLS-62xx and 82xx libraries only. 2. Attach a terminator at connector 6 as shown in Figure 4-1. 3. Connect a SCSI Bridge Cable from connector 2 to the top tape drive as shown at connector 2 and 3 in Figure 4-1. 4. Connect a Bridge Cable Connector to the top and bottom tape drives as shown at connectors 4 and 5 in Figure 4-1. Steps 5 through 10 apply to TLS-54xx/64xx/84xx and either side of 58xxx/68xxx/88xxx libraries only. Note that if both sides of a58xxx, 68xxx or 88xxx library will have FCO’s installed, the drive cabling needs to be identical. 4-2 5. Refer to the TLS-5000/6000/8000 Installation and Operation Manual (Qualstar document number 501450) for information about removing the service panel(s) on the rear of the library. 6. Connect a Bridge Cable Connector to tape drives T1 and T2 as shown at connectors 4 and 5 in Figure 4-2. 7. Connect a Bridge Cable Connector to tape drives T3 and T4 as shown at connectors 8 and 9 in Figure 4-2. 8. Attach a terminator at connectors 6 and 10 as shown in Figure 4-2. 9. Connect the shorter Changer SCSI Bridge Cable from connector 2 to the top tape drive as shown at connector 3 in Figure 4-1. 10. Connect the longer Changer SCSI Bridge Cable from connector 1 to tape drive D3 as shown at connector 7 in Figure 4-1. 11. After the SCSI cable connections are complete, see the TLS-5000/6000/8000 Installation and Operation Manual (Qualstar document number 501450) for information about reinstalling the service panel(s). FCO Type A Installation 501440 Rev. G |{ TLS-84xx or one side of a 88xxx dual sided library Bridge Cables (4) | { Bridge Cables Drive 1 Terminator Drive 2 } ~ Terminators (2) Drive 3 Bridge Cables Drive 4 Terminator Figure 4-2 TLS-54xx, 58xxx, 64xx, 68xxx, 84xx and 88xxx Drive Cabling Diagram 4.3 Installing a Fibre Channel Option CAUTION Be sure to turn the library’s power off before installing or removing a Fibre Channel Option. 4.3.1 Installation The following steps outline the actions necessary to install a Fibre Channel Option onto a library. 501440 Rev. G 1. Remove power from the TLS: first turn the power switch off and then remove the power cord. 2. Using a Phillips screwdriver remove the six screws securing the service panel on the rear of the library – refer to Figure 4-4. Depending of the model of library, the service panel may not have ventilation slots. Care must be taken to not remove the four screws securing the heatsink panels. Save the service panel for possible future use. 3. For TLS-4212 and 4222 libraries only, the aluminum bracket attached to the top of the FCO must be removed before the FCO is installed. Use a Phillips screwdriver to remove the two screws and the bracket from the top of the FCO. See Figure 4-3. FCO Type A Installation 4-3 2 Screws Bracket Phillips Screwdriver FCO Figure 4-3 Remove the Bracket Before Attaching the FCO to TLS-4212 and 4222 Libraries Phillips Screws (6) Do not remove these screws Do not remove these screws Figure 4-4 Service Panel 4. 4-4 Place the lower lip of the FCO inside the bottom edge of the service panel opening and tilt the FCO upwards, making sure that the heatsink panel screws align with the openings in the FCO. See Figure 4-5. The hinge surfaces should rest flat against the rear of the library. FCO Type A Installation 501440 Rev. G 5. Using a Phillips screwdriver, secure the FCO to the rear of the library at the FCO’s two top captive screws. See Figure 4-5. 6. Using two of the screws that were removed with the service panel, attach the FCO’s two hinges to the rear of the library. See Figure 4-5. Captive Screws (4) Executive PCBA Screw Holes (6) Fibre Channel Option Heatsink Panel Screws (4) FCO’s Hinges (2) Bottom Edge of Service Panel Opening Figure 4-5 Rear View of TLS 7. Loosen the two top captive screws on the FCO that were tightened in step number four. Carefully guide the FCO backwards as it pivots on the hinges and comes to its open position. See Figure 4-6. FCO in Open Position Figure 4-6 Fibre Channel Option in the Open Position 501440 Rev. G FCO Type A Installation 4-5 8. Connect the AUXPWR cable to the AUXPWR connectors on the Executive PCBA and to the Fibre Channel Option. See Figure 4-7 and Figure 4-9. Executive PCBA SERIAL Ribbon Cable AUXPWR Cable Fibre Channel Option Figure 4-7 Executive PCBA and Fibre Channel Option (Executive III PCBA Shown) 9. 4-6 The FCO’s SERIAL ribbon cable will connect to differently named connectors on the Executive PCBA depending on which version of Executive PCBA is installed in the library. Executive III PCBA’s will have part number 501387-printed on them and Executive IV boards will have part number 501447- on them. Refer to Figure 4-8 to determine which version of Executive PCBA the FCO is being connected to. FCO Type A Installation 501440 Rev. G PCBA NO. 501387- = Executive III PCBA NO. 501447- = Executive IV SERIAL SE/LVD SERLA LVD/SE AUXPWR AUXPWR Figure 4-8 Executive PCBA Identification 10. Make sure that the Red edge of the ribbon cable faces to the right side when the cable is installed. Connect the SERIAL ribbon cable to the SERIAL connector on Executive III PCBA’s or to the SERLA connector on Executive IV PCBA’s. Route the SERIAL cable under the AUXPWR cable as shown in Figure 4-7 and connect it to the SERIAL connector on the FCO (Figure 4-9). SERIAL Connector on Executive PCBA AUXPWR Connector on Fibre Channel Option AUXPWR Connector on Executive PCBA SERIAL Ribbon Cable Note: Red edge faces right. AUXPWR Cable SERIAL Connector on Fibre Channel Option Figure 4-9 Detail of AUXPWR and SERIAL Connections (Executive III PCBA Shown) 501440 Rev. G FCO Type A Installation 4-7 Model TLS-4212 CH0 Cable CH1 Cable CH2 Cable X X None TLS-4222 X X None TLS-4420 X X X TLS-4440 X X X TLS-4480 X X X TLS-4660 X X X TLS-46120 X X X TLS-412xxx with 1 FCO X X X Left Side X X X Right Side X X X TLS-5433 X X X TLS-5466 X X X TLS-58xxx with 1 FCO X X X Left Side X X X Right Side X X X TLS-6210 X X None TLS-4121xxx with 2 FCO’s TLS-58xxx with 2 FCO’s TLS-6220 X X None TLS-6430 X X X TLS-6460 X X X TLS-68xxx with 1 FCO X X X TLS-68xxx with 2 FCO’s Left Side X X X Right Side X X X TLS-8211 X X None TLS-8222 X X None TLS-8433 X X X TLS-8466 X X X TLS-88xxx with 1 FCO X X X Left Side X X X Right Side X X X TLS-88xxx with 2 FCO’s Table 4-1 SCSI Cable Connections for each Library Model 4-8 FCO Type A Installation 501440 Rev. G 11. For TLS-44xx, 46xx and 412xxx libraries only, connect the SCSI Bus ribbon cable from the farthest away set of tape drives (labeled CH2) to the CH2 connector on the Fibre Channel Option. For TLS-42xx, 44xx, 46xx and 412xxx libraries only, connect the SCSI Bus ribbon cable from the nearest set of tape drives (labeled CH1) to the CH1 connector on the Fibre Channel Option. See Figure 4-10. Skip to step 12. 12. For TLS-62xx and 82xx libraries only, connect the SCSI Bus ribbon cable (labeled CH1) from connector 2 as seen in Figure 4-1 to the CH1 connector on the Fibre Channel Option. See Figure 4-10. Skip to step 12. 13. For TLS-54xx, 58xxx, 64xx, 68xxx, 84xx and 88xxx libraries only, connect the SCSI Bus ribbon cable (labeled CH2) from connector 2 as seen in Figure 4-2 to the CH2 connector on the Fibre Channel Option. Connect the SCSI Bus ribbon cable (labeled CH1) from connector 1 as seen in Figure 4-2 to the CH1 connector on the Fibre Channel Option. See Figure 4-10. CH2 Connector CH0 Connector CH1 Connector Figure 4-10 Channel Connections 14. Finally, connect the SCSI Bus ribbon cable (labeled CH0) from the SE/LVD or LVD/SE (Executive PCBA version dependent) connector on the Executive PCBA to the CH0 connector on the Fibre Channel Option. See Figure 4-10. 15. Carefully lift the FCO until it touches the rear of the TLS. Using a Phillips screwdriver, secure the Fibre Channel Option to the rear of the TLS by tightening all four of the captive screws. Refer to Figure 4-5 for captive screw locations. 501440 Rev. G FCO Type A Installation 4-9 Small side of “D” connector facing you when oriented correctly for insertion. Figure 4-11 End View of “D” Connector on GBIC Adapter 16. Prepare to insert the appropriate GBIC (gigabit interface converter) adapter into the FCO. Note that the GBIC adapter is keyed and the small side of the “D” connector is facing you when oriented correctly. See Figure 4-11. Locate the rectangular opening in the bottom of the Fibre Channel Option and insert the GBIC adapter, “D” connector end first. Then carefully guide the GBIC adapter into the FCO until it clicks into place. Refer to Figure 4-12. GBIC adapter fully inserted into Fibre Channel Option. Rectangular opening in bottom of Fibre Channel Option. Figure 4-12 Inserting GBIC Adapter into Fibre Channel Option 4.4 Initializing the Fibre Channel Option After physically installing the Fibre Channel Option onto the library, disconnect (if connected) the Fibre Channel Option from the FC host or Hub to avoid affecting any operational systems. NOTE Refer to the applicable TLS Installation and Operation manual for instructions on using the TLS Library and its menus. 4-10 FCO Type A Installation 501440 Rev. G Apply power to the TLS library. During initialization, the library will reposition the cartridge handler and tape magazine carrousel. The tape drives and magazines will be scanned to inventory the contents of the library. The third line of the LCD displays the status of these operations. If the Fibre Channel Option (FCO) is enabled and busy, it will also display status information on the third line of the LCD. If there is more than one message to be displayed, they will cycle at one-second intervals. Table 4-2 shows the possible messages that can appear while the FCO is initializing. Qualstar•••••TLS-4000 FC: Please Wait On single Fibre Channel Option installations, status messages are prefixed with “FC:”. On dual installations, status messages for the left module are prefixed with “FCL:” and status messages for right module are prefixed with “FCR:”. The right and left module’s statue messages will alternate. Status message Status Condition Please Wait Waiting for Fibre Channel Option to complete restart initialization. Reading Config Reading the Fibre Channel Option configuration data. Checking Config Checking the Fibre Channel Option configuration. Setting Config Setting the Fibre Channel Option configuration. Controller Reset Resetting the Fibre Channel Option. Table 4-2 Possible Fibre Channel Status Messages If a serial communications error to the Fibre Channel Option is detected, the following warning will be displayed. Fibre Channel Communications error detected ENTER to continue Note that on dual bay libraries with two Fibre Channel Options installed the left or right FCO will be specified in the message. Pressing the ENTER key will clear the message. This warning message can be caused by an incorrectly installed serial cable. If the message reoccurs after checking the cables and clearing the message using the ENTER key several times, it may require power cycling the library, to reset the FCO. If this problem occurs, please contact the Technical Support department at Qualstar so that corrective action can be taken. The initialization procedure can take up to several minutes. If the host system is started while FCO status messages are still present, the host may miss seeing the Fibre Channel devices because the system is still busy. The host should be instructed to scan for Fibre Channel devices after the FCO has been configured and line three is clear in the TLS Library’s LCD display. 501440 Rev. G FCO Type A Installation 4-11 4.5 Configuring the Fibre Channel Loop ID The Id Mode must be configured for either “Soft” or “Fixed” addressing. Using “Soft” addressing, the Fibre Channel Option connects to an arbitrated loop using the first available AL_PA, scanning from the highest valid address to the lowest. Using “Fixed” addressing, the user selects a specific arbitrated loop address (AL_PA) to connect with. If the selected address is not available, the Fibre Channel Option will connect with the first available address it finds. The use of “Soft” or “Fixed” addressing is based on the user’s installation requirements. Soft addressing can be configured when address conflicts are not likely. If the Fibre Channel Option is connected directly to the computer’s HBA (Host Bus Adapter), the selection of a specific Loop Id is not usually required. For example, Emulex HBA drivers scan for an available address starting from the low Fibre Channel address range. The FCO begins scanning for an available address starting from the high Fibre Channel address range. This avoids address conflicts and the FCO Loop Id will be assigned the same value each time it is restarted. Hard addressing should be configured if address conflicts can occur. This can happen if the FCO is connected to a Fibre Channel Hub. Since many HBA drivers map the Fibre Channel Loop Id to a SCSI Bus/Target address, this mandates that the Fibre Channel Loop Id be very stable, and cannot be allowed to change if the system is simply restarted. This might happen if soft addressing were used and the Fibre Channel Option found its previous address taken. Selecting a fixed address is a way to prevent the FCO Loop Id from changing if the system is restarted. If the computer’s HBA uses the World Wide Port Name (WWPN) convention instead of the Loop Id to map to a SCSI Bus/Target/Lun address, the value of the Loop Id is no longer important. The WWPN is always unique and consistent under all conditions. In the future, all addressing will likely use the WWPN. C••••••Fibre•Channel •Device Id Mode 0: SOFT Loop Id 0: nnn Topology 0: LOOP Single Bay or one side of a Dual Bay Library C••••••Fibre•Channel •Device Left •Device Right L Id Mode 0: SOFT L Loop Id 0: nnn L Topology 0: LOOP R Id Mode 0: SOFT R Loop Id 0: nnn R Topology 0: LOOP Dual Bay Library with two FCO’s The Configuration\Fibre Channel menu panel displays the SCSI device interface and configures the Fibre Channel Interface to host. The menu sets the Fibre Channel Option host topology. The “Topology” has two selections, LOOP and FABRIC. The LOOP selection configures the Fibre Channel Option for Arbitrated Loop (FC-AL) operation. The FABRIC selection configures the Fibre Channel Option for Switch Fabric (FC_SW) operation. If the mode is LOOP, the Id Mode and Loop Id entries are available. 4-12 FCO Type A Installation 501440 Rev. G The Id Mode menu item has two selections, FIXED or SOFT. If the mode is FIXED, the Loop Id entry is displayed. If the Id Mode is SOFT, the Loop ID is automatically assigned by the FCO. During the Fibre Channel Arbitrated Loop (FC-AL) initialization process, a unique Arbitrated Loop Physical Address (AL_PA) value is assigned to each port on the loop. Not all of the 256 hex values are allowed as AL_PA values per FC-AL. The Loop Id value is used to represent the 126 addresses that the FCO can use. Table 7-1 shows how a Loop Id value maps to an AL_PA. If the Id Mode is “SOFT”, the FCO will attempt to obtain an available Loop Id, in the following order: 0, 1, 2, etc. 4.6 Configuring the Fibre Channel SCSI Devices Interface To establish the SCSI device configuration the Fibre Channel Option is commanded to “Rescan” its three SCSI device buses. The three SCSI device channels, starting with Channel 0, begin scanning for SCSI devices using ascending SCSI Target Ids. After all three channels have been scanned, the FCO builds a SCSI device table, that it uses to map SCSI Targets to the host as logical devices (LUNs). C••••••Fibre•Channel •Device Id Mode 0: SOFT Loop Id 0: nnn Topology 0: LOOP Single Bay or one side of a Dual Bay Library C••••••Fibre•Channel •Device Left •Device Right L Id Mode 0: SOFT L Loop Id 0: nnn L Topology 0: LOOP R Id Mode 0: SOFT R Loop Id 0: nnn R Topology 0: LOOP Dual Bay Library with two FCO’s For single bay libraries or dual bay libraries with only one Fibre Channel Option installed, press the V (UP) or W (DOWN) key to move the pointer to Device. Press the ENTER key to enter the Configuration\Fibre Channel\Device menu. For dual bay libraries with two Fibre Channel Options installed, press the V (UP) or W (DOWN) key to move the pointer to either Device Left or Device Right. The left and right orientation is as viewed from the front of the library. Press the ENTER key to enter the Configuration\Fibre Channel\Device (Left or Right) menu. The Configuration\Fibre Channel\Device menu panels display a list of SCSI devices attached to the Fibre Channel Option. A TLS library with a single Fibre Channel Option displays the title CFC···········Device. A dual-bay library with two Fibre Channel Options installed, displays the title CFC······Device Left or CFC·····Device Right to correspond to the Fibre Channel Option in the left and right side. 501440 Rev. G FCO O Type A Installation 4-13 CFC•••••••••••Device •0 •1 •2 •3 •4 •5 •6 •7 •8 •9 •10 •11 •12 •13 •14 •15 RESCAN CFC••••••Device Left CFC•••••Device Right •0 •1 •2 •3 •4 •5 •6 •7 •8 •9 •10 •11 •12 •13 •14 •15 RESCAN Single Bay or one side of a Dual Bay Library Dual Bay Library with two FCO’s The Fibre Channel Option assembles a list of SCSI devices it detects on its three SCSI channels. This menu displays the SCSI devices that a Fibre Channel Option has detected. To initiate the scan operation, press the W (DOWN) key to move the pointer to RESCAN and press the ENTER key. The RESCAN item will disappear and return when the operation completes. CAUTION The RESCAN operation should be performed with the Library disconnected from the host. The Fibre Channel Option is restarted and SCSI device address maybe modified. Press the EXIT key to return to the top LCD display and wait for the third line to clear of status messages. 4-14 FCO Type A Installation 501440 Rev. G 5. FCO Type B Installation 5.1 Fibre Channel Option (FCO) Type B Installation Considerations 5.1.1 Operating Environment A TLS with the Fibre Channel Option is designed to operate in an ambient environo o o o ment from 41 F to 95 F (5 C to 35 C), 20% to 80% relative humidity, and at altitudes from -1000 to +10,000 feet. Moisture must not be allowed to condense inside the system. 5.1.2 Ventilation When selecting a location for the TLS, be sure to provide sufficient space behind the unit to allow for cable connections. Also, be sure nothing will block the air intake at the inlet air filters or the top air vent slots. 5.2 FCO Type B Interconnect Cabling The Type B Fibre Channel Option bridge/router is factory installed on the top of TLS412xxx, TLS-58xxx, TLS-68xxx and TLS-88xxx libraries. All the bridge/router interconnect and power cables are accessed at the rear of the unit. FIBRE CHANNEL 0 Power Switch SCSI 3 SCSI 5 SCSI 1 SCSI 2 SCSI 4 SCSI 0 AC Power Receptacle ETHERNET SERIAL FIBRE CHANNEL 1 ST LED AT LED 1 SCSI 3 LED SCSI 5 LED SCSI 1 LED SCSI 2 LED SCSI 4 LED SCSI 0 LED FAIL OVER (Fibre Channel 1) AT LED 0 (Ethernet) (Fibre Channel 0) ST LED LK LED LK LED 1 (Fibre Channel 1) (Ethernet) LK LED 0 FT LED (Fibre Channel 0) Figure 5-1 Rear View of the Type B Fibre Channel Bridge/Router (FCO) 501440 Rev. G FCO Type B Installation 5-1 The following table briefly describes the components located on the rear of the FCO. Component Description SCSI Channel 0 through 5 The SCSI Ultra 160 channels used to attach the TLS medium changer and tape drives. Fibre Channel 0 and 1 GBIC transceiver sockets. The receptacles are for 2 Gbit Fibre Channel GBIC transceivers. Ethernet The Ethernet management interface (not supported). Fail Over Not applicable. Serial The RS-232 communications port used by the TLS library for configuration and control of the Fibre Channel router. SCSI LEDs 0 through 5 On (green) when the SCSI bus is active or busy. AT LED 0 and 1 (Fibre Channel) On (green) when the Fibre Channel is active. Off when there is no Fibre Channel I/O activity. LK LED 0 and 1 (Fibre Channel) On (green) when the Fibre Channel link is connected and established. Off when the Fibre Channel link is disconnected and/or not established. ST LED (Ethernet) On (green) when then 10BaseT link is active or busy. LK LED (Ethernet) Solid on (green) when the 10BaseT link is connected. ST LED Solid on (yellow) when the FCO is operational. FT LED Solid on (red) when a fatal error condition is present. This indicator will be on during power-on diagnostics, and is extinguished after successful completion of the power-on sequence. Table 5-1 Components Located on Rear of FCO 5-2 FCO Type B Installation 501440 Rev. G 5.3 Cabling for TLS-412xxx Libraries Note that all TLS-412xxx models are shipped from the factory without the SCSI interconnect cables or terminators installed. Table 5-2 represents the preferred cabling for a library with 12 tape drives. Connectors on Rear of FCO Connectors on Rear of TLS-412xxx SCSI Channel 0 Left Medium Changer Left Tape Drive 1 (LT1) Left Tape Drive 2 (LT2) SCSI Channel 1 Left Tape Drive 3 (LT3) Left Tape Drive 4 (LT4) SCSI Channel 2 Left Tape Drive 5 (LT5) Left Tape Drive 6 (LT6) SCSI Channel 3 Right Tape Drive 1 (RT1) Right Tape Drive 2 (RT2) SCSI Channel 4 Right Tape Drive 3 (RT3) Right Tape Drive 4 (RT4) SCSI Channel 5 Right Tape Drive 5 (RT5) Right Tape Drive 6 (RT6) Serial DB9 (Right Executive IV, SERL A) Table 5-2 Preferred Fibre Channel Option Cable Connections The following steps outline the actions necessary to connect the cables from the FCO to the TLS. Please see Figure 5-2 and Figure 5-3. 501440 Rev. G 1. Remove power from the TLS: first turn the power switch off and then remove the power cord. 2. Remove power from the FCO: first turn the power switch off and then remove the power cord. 3. Connect a SCSI Cable from the SCSI Channel 0 connector on the FCO to connector A on the left side on the TLS. 4. Connect the SCSI Bridge Cable (very short cable) from connector B to C. 5. Connect a SCSI Cable from the SCSI Channel 1 connector on the FCO to connector E. 6. Connect a SCSI Cable from the SCSI Channel 2 connector on the FCO to connector G. 7. Attach an LVD SCSI terminator at connectors D, F and H. 8. Connect a SCSI Cable from the SCSI Channel 3 connector on the FCO to connector I on the right side on the TLS. FCO Type B Installation 5-3 9. Connect a SCSI Cable from the SCSI Channel 4 connector on the FCO to connector K. 10. Connect a SCSI Cable from the SCSI Channel 5 connector on the FCO to connector M. 11. Attach an LVD SCSI terminator at connectors J, L and N. 12. Connect the cable from the serial connector on the FCO to the DB9 connector on the TLS. SCSI Channel Connectors 0-5 Serial Connector DB9 Connector A B I C J K D E L M F G N H SCSI Connectors Right Side As viewed from the front. Left Side Figure 5-2 Connector Locations on the Rear of the TLS-412xxx 5-4 FCO Type B Installation 501440 Rev. G FCO SCSI Channel Cables FCO Executive PCBA To SCSI Channel 0 To SCSI Channel 3 Bridge Cable Drive 1 Terminators Drive 2 To SCSI Channel 1 Drive 3 To SCSI Channel 4 Drive 4 Terminators To SCSI Channel 2 Drive 5 To SCSI Channel 5 Drive 6 Terminators Right Side Drive 1 Drive 2 Drive 3 Drive 4 Drive 5 Drive 6 Left Side Figure 5-3 TLS-412xxx Cabling Diagram 5.4 Cabling for TLS-58xxx, 68xxx and 88xxx Libraries Prior to installing a Fibre Channel Option on TLS-58xxx, 68xxx or 88xxx libraries the tape drive assemblies may need to be installed in the library and the drives will need to be cabled as shown in section 4. Refer to the Installation section in the TLS5000/6000/8000 Installation and Operation Manual (Qualstar document number 501450) for details about tape drive assembly preparation, enabling SCSI termination power and installation. Note that all TLS-58xxx, 68xxx and 88xxx models are shipped from the factory without the SCSI interconnect cables or terminators installed. Table 5-3 represents the preferred cabling for a library with eight tape drives. 501440 Rev. G FCO Type B Installation 5-5 Connectors on Rear of FCO SCSI Channel 0 Connectors on Rear of TLS-58xxx, 68xxx and 88xxx Left Medium Changer Left Tape Drive 1 (LT1) Left Tape Drive 2 (LT2) SCSI Channel 1 Left Tape Drive 3 (LT3) Left Tape Drive 4 (LT4) SCSI Channel 2 Right Tape Drive 1 (RT1) Right Tape Drive 2 (RT2) SCSI Channel 3 Right Tape Drive 3 (RT3) Right Tape Drive 4 (RT4) Serial DB9 (Right Executive IV, SERL A) Table 5-3 Preferred Fibre Channel Option Cable Connections The following steps outline the actions necessary to connect the cables from the FCO to the TLS. Please see Figure 5-4 and Figure 5-5. 5-6 1. Remove power from the TLS: first turn the power switch off and then remove the power cord. 2. Remove power from the FCO: first turn the power switch off and then remove the power cord. 3. Connect a SCSI Cable from the SCSI Channel 0 connector on the FCO to connector A on the left side on the TLS. 4. Connect a SCSI Bridge Cable (very short cable) from connector B to C. 5. Connect a SCSI Bridge Cable from connector D to E. 6. Connect a SCSI Cable from the SCSI Channel 1 connector on the FCO to connector G. 7. Connect a SCSI Bridge Cable from connector H to I. 8. Attach a terminator at connectors F and J. 9. Connect a SCSI Cable from the SCSI Channel 2 connector on the FCO to connector K on the right side on the TLS. 10. Connect a SCSI Bridge Cable from connector L to M. 11. Connect a SCSI Cable from the SCSI Channel 3 connector on the FCO to connector O. 12. Connect a SCSI Bridge Cable from connector P to Q. 13. Attach a terminator at connectors N and R. FCO Type B Installation 501440 Rev. G 14. Connect the cable from the serial connector on the FCO to the DB9 connector on the TLS. SCSI Channel Connectors 0-5 Serial Connector DB9 Connector A K L C D M N E F O P G H Q R I J Right Side As viewed from the front. B SCSI Connectors Left Side Figure 5-4 Connector Locations on the Rear of the TLS-58xxx/68xxx/88xxx 501440 Rev. G FCO Type B Installation 5-7 SCSI Channel Cables FCO FCO Executive PCBA Bridge Cable Bridge Cables To SCSI Channel 2 A Drive 1 To SCSI Channel 0 B Drive 1 Terminators Drive 2 Drive 3 Drive 4 To SCSI Channel 1 To SCSI Channel 3 Bridge Cables Drive 2 Drive 3 Drive 4 Terminators Right Side Left Side Figure 5-5 TLS-58xxx/68xxx/88xxx Cabling Diagram 5-8 FCO Type B Installation 501440 Rev. G 5.5 Securing the Cables to the TLS Two adhesive backed cable tie mounts and Velcro® style cable ties are provided to secure the interconnect cables to be secured to the rear of the TLS. Make sure to insert the cable ties into the tie mounts before attaching the mounts to the library. See Figure 5-6 for an example of the cables secured to the rear of the TLS. Fibre Channel Option Interconnect Cables Velcro® Cable Ties and Cable Mounts Rear of TLS Figure 5-6 Example of Cables Secured to the Rear of the TLS 5.6 Initializing the Fibre Channel Option After attaching all of the interconnect cables from the Fibre Channel Option to the library, disconnect (if connected) the Fibre Channel Option from the FC host or Hub to avoid affecting any operational systems. NOTE Refer to the applicable TLS Installation and Operation manual for instructions on using the TLS Library and its menus. 501440 Rev. G FCO Type B Installation 5-9 Attach the power cord to the FCO and then push the power switch to the on position. Apply power to the TLS library. During initialization, the library will reposition the cartridge handler and tape magazine carrousel. The tape drives and magazines will be scanned to inventory the contents of the library. The third line of the LCD displays the status of these operations. If the Fibre Channel Option (FCO) is enabled and busy, it will also display status information on the third line of the LCD. If there is more than one message to be displayed, they will cycle at one-second intervals. Table 4-2 shows the possible messages that can appear while the FCO is initializing. Qualstar•••TLS-412180 FC: Please Wait On single Fibre Channel Option installations, status messages are prefixed with “FC:”. Status message Status Condition Please Wait Waiting for Fibre Channel Option to complete restart initialization. Reading Config Reading the Fibre Channel Option configuration data. Checking Config Checking the Fibre Channel Option configuration. Setting Config Setting the Fibre Channel Option configuration. Controller Reset Resetting the Fibre Channel Option. Table 5-4 Possible Fibre Channel Status Messages If a serial communications error to the Fibre Channel Option is detected, the following warning will be displayed. Fibre Channel Communications error detected ENTER to continue Pressing the ENTER key will clear the message. This warning message can be caused by an incorrectly installed serial cable. If the message reoccurs after checking the cables and clearing the message using the ENTER key several times, it may require power cycling the library, to reset the FCO. If this problem occurs, please contact the Technical Support department at Qualstar so that corrective action can be taken. The initialization procedure can take up to several minutes. If the host system is started while FCO status messages are still present, the host may miss seeing the Fibre Channel devices because the system is still busy. The host should be instructed to scan for Fibre Channel devices after the FCO has been configured and line three is clear in the TLS Library’s LCD display. 5-10 FCO Type B Installation 501440 Rev. G 5.7 Configuring the Fibre Channel Loop ID The Id Mode must be configured for either “Soft” or “Fixed” addressing. Using “Soft” addressing, the Fibre Channel Option connects to an arbitrated loop using the first available AL_PA, scanning from the highest valid address to the lowest. Using “Fixed” addressing, the user selects a specific arbitrated loop address (AL_PA) to connect with. If the selected address is not available, the Fibre Channel Option will connect with the first available address it finds. The use of “Soft” or “Fixed” addressing is based on the user’s installation requirements. Soft addressing can be configured when address conflicts are not likely. If the Fibre Channel Option is connected directly to the computer’s HBA (Host Bus Adapter), the selection of a specific Loop Id is not usually required. For example, Emulex HBA drivers scan for an available address starting from the low Fibre Channel address range. The FCO begins scanning for an available address starting from the high Fibre Channel address range. This avoids address conflicts and the FCO Loop Id will be assigned the same value each time it is restarted. Hard addressing should be configured if address conflicts can occur. This can happen if the FCO is connected to a Fibre Channel Hub. Since many HBA drivers map the Fibre Channel Loop Id to a SCSI Bus/Target address, this mandates that the Fibre Channel Loop Id be very stable, and cannot be allowed to change if the system is simply restarted. This might happen if soft addressing were used and the Fibre Channel Option found its previous address taken. Selecting a fixed address is a way to prevent the FCO Loop Id from changing if the system is restarted. If the computer’s HBA uses the World Wide Port Name (WWPN) convention instead of the Loop Id to map to a SCSI Bus/Target/Lun address, the value of the Loop Id is no longer important. The WWPN is always unique and consistent under all conditions. In the future, all addressing will likely use the WWPN. C••••••Fibre•Channel •Device Id Mode 0: SOFT Loop Id 0: nnn Topology 0: LOOP Id Mode 1: SOFT Loop Id 1: nnn Topology 1: LOOP The Configuration\Fibre Channel menu panel displays the SCSI device interface and configures the Fibre Channel Interface to host. The menu sets the Fibre Channel Option host topology. The Fibre Channel option 648-0003-0 provides two FC host ports. These two ports provide a redundant connection to the router. Each is independently configured as port 0 and port 1. The “Topology” has two selections, LOOP and FABRIC. The LOOP selection configures the Fibre Channel port for Arbitrated Loop (FC-AL) operation. The FABRIC selection configures the Fibre Channel port for Switch Fabric (FC_SW) operation. If the mode is LOOP, the Id Mode and Loop Id entries are available. 501440 Rev. G FCO Type B Installation 5-11 The Id Mode menu item has two selections, FIXED or SOFT. If the mode is FIXED, the Loop Id entry is displayed. If the Id Mode is SOFT, the Loop ID is automatically assigned by the FCO. During the Fibre Channel Arbitrated Loop (FC-AL) initialization process, a unique Arbitrated Loop Physical Address (AL_PA) value is assigned to each port on the loop. Not all of the 256 hex values are allowed as AL_PA values per FC-AL. The Loop Id value is used to represent the 126 addresses that the FCO can use. Table 7-1 shows how a Loop Id value maps to an AL_PA. If the Id Mode is “SOFT”, the FCO will attempt to obtain an available Loop Id, in the following order: 0, 1, 2, etc. 5.8 Configuring the Fibre Channel SCSI Devices Interface To establish the SCSI device configuration the Fibre Channel Option is commanded to “Rescan” its six SCSI device buses. The six SCSI device channels, starting with Channel 0, begin scanning for SCSI devices using ascending SCSI Target Ids. After all six channels have been scanned, the FCO builds a SCSI device table, that it uses to map SCSI Targets to the host as logical devices (LUNs). Press the V (UP) or W (DOWN) key to move the pointer to Device. Press the ENTER key to enter the Configuration\Fibre Channel\Device menu. The Configuration\Fibre Channel\Device menu panels display a list of SCSI devices attached to the Fibre Channel Option. A TLS library with a single Fibre Channel Option displays the title CFC···········Device. CFC•••••••••••Device •0 •1 •2 •3 •4 •5 •6 •7 •8 •9 •10 •11 •12 •13 •14 •15 RESCAN The Fibre Channel Option assembles a list of SCSI devices it detects on its six SCSI channels. This menu displays the SCSI devices that a Fibre Channel Option has detected. To initiate the scan operation, press the W (DOWN) key to move the pointer to RESCAN and press the ENTER key. The RESCAN item will disappear and return when the operation completes. 5-12 FCO Type B Installation 501440 Rev. G CAUTION The RESCAN operation should be performed with the Library disconnected from the host. The Fibre Channel Option is restarted and SCSI device address maybe modified. Press the EXIT key to return to the top LCD display and wait for the third line to clear of status messages. 501440 Rev. G FCO Type B Installation 5-13 6. FCO Type C Installation 6.1 Fibre Channel Option (FCO) Type C Installation Considerations 6.1.1 Operating Environment A TLS with the Fibre Channel Option is designed to operate in an ambient environo o o o ment from 41 F to 95 F (5 C to 35 C), 20% to 80% relative humidity, and at altitudes from -1000 to +10,000 feet. Moisture must not be allowed to condense inside the system. 6.1.2 Ventilation When selecting a location for the TLS, be sure to provide sufficient space behind the unit to allow for cable connections. Also, be sure nothing will block the air intake at the inlet air filters or the top air vent slots. 6.2 FCO Type C Interconnect Cabling The Fibre Channel Option for TLS-412xxx libraries is installed when they are shipped from the factory. All other models have the Fibre Channel Option shipped separately from the libraries and require installation in the field. They are attached to the rear of the TLS, taking the place of the rear service panel. All the bridge/router interconnect cables are accessed at the rear of the unit. 501440 Rev. G FCO Type C Installation 6-1 Fibre Channel 0 Serial Jumper Connectors Q-Link 10BaseT SCSI Channel 1 SCSI Channel 0 Reset Button ACTIVITY CHANNEL 1 LED (SCSI) +5V EXEC LED LINK LED (Fibre Channel) FAULT LED ACTIVITY CHANNEL 0 LED (SCSI) ACTIVITY LED (Fibre Channel) +5V FCO LED +12V LED LINK LED (Q-Link) STATUS OK LED ACTIVITY LED (Q-Link) Figure 6-1 Bottom View of the Type C Fibre Channel Bridge/Router (FCO) The following table briefly describes the components located on the bottom of the FCO. 6-2 FCO Type C Installation 501440 Rev. G Component Description Fibre Channel 0 Small Form Factor Pluggable (SFP) transceiver socket. The receptacle is a 2 Gbit Fibre Channel SFP transceiver. SCSI Channel 0 and 1 The SCSI Ultra 160 channels used to attach the TLS medium changer and tape drives. Serial Jumper Connectors The serial bridge cable provides a serial communication link between the FCO and the TLS library. This interface is used to configure the FCO. Reset Button The reset button is used to reset the Q-Link processor. Q-Link 10 BaseT The Q-Link Ethernet interface connection. Activity LED (Fibre Channel) On (green) when the Fibre Channel is active. Off when there is no Fibre Channel I/O activity. Link LED (Fibre Channel) On (green) when the Fibre Channel link is connected and established. Off when the Fibre Channel link is disconnected and/or not established. Activity Channel 0 &1 LEDs (SCSI) On (green) when SCSI bus is active or busy. Fault LED Solid on (red) when a fatal error condition is present. This indicator will be on during power-on diagnostics, and is extinguished after successful completion of the power-on sequence. Status OK LED Solid on (yellow) when the FCO is operational. +5V FCO LED Solid on (green) when the FCO +5volt power is present. +5V EXEC LED Solid on (green) when the Executive PCBA +5volt power is present. +12V LED Solid on (green) when the Executive PCBA +12volt power is present. Link LED (Q-Link) Solid on (green) when the 10BaseT link is connected. Activity LED (Q-Link) On (yellow) when then 10BaseT link is active or busy. Table 6-1 Components Located on Bottom of FCO 501440 Rev. G FCO Type C Installation 6-3 6.3 Cabling for TLS-4000, TLS-46xxx and TLS-412xxx Libraries Note that all TLS models are shipped from the factory without the SCSI interconnect cables or terminators installed. The following figures and tables represent the preferred cabling for a library with two to twelve tape drives. FCO Executive PCBA SCSI Channel 0 Drive 1 Drive 2 Terminator Figure 6-2 TLS-42xx Cabling Diagram Connectors on Rear of FCO FCO: SCSI Channel 0 Connectors on Rear of TLS-42xx Medium Changer Tape Drive 1 (T1) Tape Drive 2 (T2) FCO: SCSI Channel 1 None FCO: Serial Jumper Table 6-2 Preferred TLS-42xx Fibre Channel Option Cable Connections 6-4 FCO Type C Installation 501440 Rev. G Executive PCBA FCO SCSI Channel 0 SCSI Channel 1 Drive 1 Drive 2 Terminators Drive 3 Drive 4 Figure 6-3 TLS-44xx Cabling Diagram Connectors on Rear of FCO FCO: SCSI Channel 0 Connectors on Rear of TLS-44xx Medium Changer Tape Drive 1 (T1) Tape Drive 2 (T2) FCO: SCSI Channel 1 Tape Drive 3 (T3) Tape Drive 4 (T4) FCO: Serial Jumper Table 6-3 Preferred TLS-44xx Fibre Channel Option Cable Connections 501440 Rev. G FCO Type C Installation 6-5 Executive PCBA FCO SCSI Channel 0 SCSI Channel 1 Drive 1 Drive 2 Drive 3 Drive 4 Terminators Drive 5 Drive 6 Figure 6-4 TLS-46xxx Cabling Diagram Connectors on Rear of FCO FCO: SCSI Channel 0 Connectors on Rear of TLS-46xxx Medium Changer Tape Drive 1 (T1) Tape Drive 2 (T2) Tape Drive 3 (T3) FCO: SCSI Channel 1 Tape Drive 4 (T4) Tape Drive 5 (T5) Tape Drive 6 (T6) FCO: Serial Jumper Table 6-4 Preferred TLS-46xxx Fibre Channel Option Cable Connections 6-6 FCO Type C Installation 501440 Rev. G FCO FCO Executive PCBA Executive PCBA SCSI Channel 0 SCSI Channel 1 SCSI Channel 0 SCSI Channel 1 Bridge Cable Bridge Cable Drive 1 Drive 1 Drive 2 Drive 2 Terminators Drive 3 Drive 3 Drive 4 Drive 4 Drive 5 Drive 5 Drive 6 Drive 6 Terminators Right Side Left Side Figure 6-5 TLS-412xxx Cabling Diagram Connectors on Rear of FCO Left FCO: SCSI Channel 0 Connectors on Rear of TLS-412xxx Left Medium Changer Left Tape Drive 1 (LT1) Left Tape Drive 2 (LT2) Left Tape Drive 3 (LT3) Left FCO: SCSI Channel 1 Left Tape Drive 4 (LT4) Left Tape Drive 5 (LT5) Left Tape Drive 6 (LT6) Left FCO: Serial Jumper Right FCO: SCSI Channel 0 Right Medium Changer Right Tape Drive 1 (RT1) Right Tape Drive 2 (RT2) Right Tape Drive 3 (RT3) Right FCO: SCSI Channel 1 Right Tape Drive 4 (RT4) Right Tape Drive 5 (RT5) Right Tape Drive 6 (RT6) Right FCO: Serial Jumper Table 6-5 Preferred TLS-412xxx Fibre Channel Option Cable Connections 501440 Rev. G FCO Type C Installation 6-7 6.4 Cabling for TLS-5/6/8000 and 58/68/88xxx Libraries Prior to installing a Fibre Channel Option on TLS-5000, 58xxx, 6000, 68xxx, 8000 or 88xxx libraries the tape drive assemblies may need to be installed in the library and the drives will need to be cabled as shown in this section. Refer to the Installation section in the TLS-5000/6000/8000 Installation and Operation Manual (Qualstar document number 501450) for details about tape drive assembly preparation, enabling SCSI termination power and installation. Note that all TLS models are shipped from the factory without the SCSI interconnect cables or terminators installed. The following figures and tables represent the preferred cabling for a library with two to eight tape drives. Executive PCBA FCO SCSI Channel 0 SCSI Channel 1 Terminator Drive 1 Bridge Cable Drive 2 Terminator Figure 6-6 TLS-62xx and 82xx Cabling Diagram Connectors on Rear of FCO Connectors on Rear of TLS-62xx or TLS-82xx FCO: SCSI Channel 0 Medium Changer FCO: SCSI Channel 1 Tape Drive 1 (T1) Tape Drive 2 (T2) FCO: Serial Jumper Table 6-6 Preferred TLS-62xx and 82xx Fibre Channel Option Cable Connection 6-8 FCO Type C Installation 501440 Rev. G FCO Executive PCBA SCSI Channel 0 SCSI Channel 1 Drive 1 Bridge Cable Drive 2 Terminator Drive 3 Bridge Cable Terminator Drive 4 Figure 6-7 TLS-54xx, 64xx and 84xx Cabling Diagram Connectors on Rear of FCO FCO: SCSI Channel 0 Connectors on Rear of TLS-54xx, 64xx and TLS-84xx Medium Changer Tape Drive 1 (T1) Tape Drive 2 (T2) FCO: SCSI Channel 1 Tape Drive 3 (T3) Tape Drive 4 (T4) FCO: Serial Jumper Table 6-7 Preferred TLS-54xx, 64xx and 84xx Fibre Channel Option Cable Connections 501440 Rev. G FCO Type C Installation 6-9 FCO FCO SCSI Channel 1 Executive PCBA Executive PCBA SCSI Channel 0 SCSI Channel 0 SCSI Channel 1 Drive 1 Bridge Cable Drive 2 Terminators Drive 3 Bridge Cable Drive 4 Terminators Right Side Drive 1 Drive 2 Drive 3 Drive 4 Left Side Figure 6-8 TLS-58xxx, 68xxx and 88xxx Cabling Diagram Connectors on Rear of FCO Connectors on Rear of TLS-58xxx, 68xxx and TLS-88xxx Left FCO: SCSI Channel 0 Left Medium Changer Left Tape Drive 1 (LT1) Left Tape Drive 2 (LT2) Left FCO: SCSI Channel 1 Left Tape Drive 3 (LT3) Left Tape Drive 4 (LT4) Left FCO: Serial Jumper Right FCO: SCSI Channel 0 Right Medium Changer Right Tape Drive 1 (RT1) Right Tape Drive 2 (RT2) Right FCO: SCSI Channel 1 Right Tape Drive 3 (RT3) Right Tape Drive 4 (RT4) Right FCO: Serial Jumper Table 6-8 Preferred 58xxx, 68xxx and 88xxx Fibre Channel Option Cable Connections 6-10 FCO Type C Installation 501440 Rev. G 6.5 Installing a Fibre Channel Option CAUTION Be sure to turn the library’s power off before installing or removing a Fibre Channel Option. 6.5.1 Installation The following steps outline the actions necessary to install a Fibre Channel Option onto a library. 1. Remove power from the TLS: first turn the power switch off and then remove the power cord. 2. Using a Phillips screwdriver remove the six screws securing the service panel on the rear of the library – refer to Figure 6-9. Depending of the model of library, the service panel may not have ventilation slots. Care must be taken to not remove the four screws securing the heatsink panels. Save the service panel for possible future use. Phillips Screws (6) Do not remove these screws Do not remove these screws Figure 6-9 Service Panel 3. 501440 Rev. G Place the lower lip of the FCO inside the bottom edge of the service panel opening and tilt the FCO upwards, making sure that the heatsink panel screws align FCO Type C Installation 6-11 with the openings in the FCO. See Figure 6-10. The hinge surfaces should rest flat against the rear of the library. 4. Using a Phillips screwdriver, secure the FCO to the rear of the library at the FCO’s two top captive screws. See Figure 6-10. 5. Using two of the screws that were removed with the service panel, attach the FCO’s two hinges to the rear of the library. See Figure 6-10. Captive Screws (4) Executive PCBA Screw Holes (6) Fibre Channel Option Heatsink Panel Screws (4) FCO’s Hinges (2) Bottom Edge of Service Panel Opening Figure 6-10 Rear View of TLS 6. 6-12 Loosen the two top captive screws on the FCO that were tightened in step number four. Carefully guide the FCO backwards as it pivots on the hinges and comes to its open position. See Figure 6-11. FCO Type C Installation 501440 Rev. G FCO in Open Position Figure 6-11 Fibre Channel Option in the Open Position 7. 501440 Rev. G Connect the AUXPWR cable to the AUXPWR connector on the Executive PCBA and to the PWRIN connector on the Fibre Channel Option. See Figure 6-12 and Figure 6-14. FCO Type C Installation 6-13 Executive PCBA AUXPWR Cable SERIAL Ribbon Cables Fibre Channel Option Figure 6-12 Executive PCBA and Fibre Channel Option (Executive IV PCBA Shown) 8. 6-14 The FCO’s SERIAL ribbon cable will connect to differently named connectors on the Executive PCBA depending on which version of Executive PCBA is installed in the library. Executive III PCBA’s will have part number 501387-printed on them and Executive IV boards will have part number 501447- on them. Refer to Figure 6-13 to determine which version of Executive PCBA the FCO is being connected to. FCO Type C Installation 501440 Rev. G PCBA NO. 501387- = Executive III PCBA NO. 501447- = Executive IV SERLB SERIAL SE/LVD SERLA AUXPWR LVD/SE AUXPWR Figure 6-13 Executive PCBA Identification 9. Make sure that the Red edge of the ribbon cable faces to the right side when the cable is installed. Connect the SERIAL ribbon cable to the SERIAL connector on Executive III PCBA’s or to the SERLA connector on Executive IV PCBA’s. Route the SERIAL cable under the AUXPWR cable as shown in Figure 6-12 and connect it to the FCO_A connector on the FCO (Figure 6-14). 10. For those FCOs that also have Q-Link, connect the second SERIAL ribbon cable to the SERLB connector on the Executive IV PCBA. Route the second SERIAL cable under the AUXPWR cable as shown in Figure 6-12 and connect it to the Q_LINK connector on the FCO (Figure 6-14). 501440 Rev. G FCO Type C Installation 6-15 SERLA and SERLB Connectors on Executive IV PCBA SERIAL Ribbon Cables Note: Red edge faces right. AUXPWR Connector on Executive PCBA FCO_A Connector on Fibre Channel Option AUXPWR Cable Q_LINK Connector on Fibre Channel Option PWRIN Connector on Fibre Channel Option Figure 6-14 Detail of Connections (Executive IV PCBA Shown) 11. Carefully lift the FCO until it touches the rear of the TLS. Using a Phillips screwdriver, secure the Fibre Channel Option to the rear of the TLS by tightening all four of the captive screws. Refer to Figure 6-10 for captive screw locations. 12. Install the FCO serial communication bridge cable. The serial communication bridge cable is a short telephone type cable with a six-conductor RJ11 plug on each end. Insert each ended of the serial communication bridge cable (P/N510149-01-6) into the RJ11 jacks on the FCO. See Figure 6-15. Serial Jumper Connectors (RJ11) Fibre Channel 0 SFP Interface External Cable to Host Ethernet Interface (RJ45) SCSI Channel 1 SCSI Channel 0 Serial Communication Bridge Cable 6-16 FCO Type C Installation Reset Button 501440 Rev. G Figure 6-15 Install the FCO serial communications bridge cable (bottom view of the FCO) 13. Prepare to insert the appropriate SFP (Small Form Factor Pluggable) transceiver into the FCO. Note that the SFP adapter is keyed and the small circuit board connector is facing you when oriented correctly. See Figure 6-16. Locate the rectangular opening in the bottom of the Fibre Channel Option and insert the SFP transceiver connector end first. Then carefully guide the SFP transceiver into the FCO until it clicks into place. Refer to Figure 6-17. Small circuit board is facing you when oriented correctly for insertion. Figure 6-16 End View of Small Form Factor Pluggable Transceiver Rectangular opening in bottom of Fibre Channel Option. SFP adapter fully inserted into Fibre Channel Option. Figure 6-17 Inserting SFP Adapter into Fibre Channel Option 6.6 Initializing the Fibre Channel Option After physically installing the Fibre Channel Option onto the library, disconnect (if connected) the Fibre Channel Option from the FC host or Hub to avoid affecting any operational systems. NOTE Refer to the applicable TLS Installation and Operation manual for instructions on using the TLS Library and its menus. 501440 Rev. G FCO Type C Installation 6-17 Apply power to the TLS library. During initialization, the library will reposition the cartridge handler and tape magazine carrousel. The tape drives and magazines will be scanned to inventory the contents of the library. The third line of the LCD displays the status of these operations. If the Fibre Channel Option (FCO) is enabled and busy, it will also display status information on the third line of the LCD. If there is more than one message to be displayed, they will cycle at one-second intervals. Table 6-9 shows the possible messages that can appear while the FCO is initializing. Qualstar•••••TLS-4000 FC: Please Wait On single Fibre Channel Option installations, status messages are prefixed with “FC:”. On dual installations, status messages for the left module are prefixed with “FCL:” and status messages for right module are prefixed with “FCR:”. The right and left module’s statue messages will alternate. Status message Status Condition Please Wait Waiting for Fibre Channel Option to complete restart initialization. Reading Config Reading the Fibre Channel Option configuration data. Checking Config Checking the Fibre Channel Option configuration. Setting Config Setting the Fibre Channel Option configuration. Controller Reset Resetting the Fibre Channel Option. Table 6-9 Possible Fibre Channel Status Messages If a serial communications error to the Fibre Channel Option is detected, the following warning will be displayed. Fibre Channel Communications error detected ENTER to continue Note that on dual bay libraries with two Fibre Channel Options installed the left or right FCO will be specified in the message. Pressing the ENTER key will clear the message. This warning message can be caused by an incorrectly installed serial cable. If the message reoccurs after checking the cables and clearing the message using the ENTER key several times, it may require power cycling the library, to reset the FCO. If this problem occurs, please contact the Technical Support department at Qualstar so that corrective action can be taken. The initialization procedure can take up to several minutes. If the host system is started while FCO status messages are still present, the host may miss seeing the Fibre Channel devices because the system is still busy. The host should be instructed to scan for Fibre Channel devices after the FCO has been configured and line three is clear in the TLS Library’s LCD display. 6-18 FCO Type C Installation 501440 Rev. G 6.7 Configuring the Fibre Channel Loop ID The Id Mode must be configured for either “Soft” or “Fixed” addressing. Using “Soft” addressing, the Fibre Channel Option connects to an arbitrated loop using the first available AL_PA, scanning from the highest valid address to the lowest. Using “Fixed” addressing, the user selects a specific arbitrated loop address (AL_PA) to connect with. If the selected address is not available, the Fibre Channel Option will connect with the first available address it finds. The use of “Soft” or “Fixed” addressing is based on the user’s installation requirements. Soft addressing can be configured when address conflicts are not likely. If the Fibre Channel Option is connected directly to the computer’s HBA (Host Bus Adapter), the selection of a specific Loop Id is not usually required. For example, Emulex HBA drivers scan for an available address starting from the low Fibre Channel address range. The FCO begins scanning for an available address starting from the high Fibre Channel address range. This avoids address conflicts and the FCO Loop Id will be assigned the same value each time it is restarted. Hard addressing should be configured if address conflicts can occur. This can happen if the FCO is connected to a Fibre Channel Hub. Since many HBA drivers map the Fibre Channel Loop Id to a SCSI Bus/Target address, this mandates that the Fibre Channel Loop Id be very stable, and cannot be allowed to change if the system is simply restarted. This might happen if soft addressing were used and the Fibre Channel Option found its previous address taken. Selecting a fixed address is a way to prevent the FCO Loop Id from changing if the system is restarted. If the computer’s HBA uses the World Wide Port Name (WWPN) convention instead of the Loop Id to map to a SCSI Bus/Target/Lun address, the value of the Loop Id is no longer important. The WWPN is always unique and consistent under all conditions. In the future, all addressing will likely use the WWPN. C••••••Fibre•Channel •Device Id Mode 0: SOFT Loop Id 0: nnn Topology 0: LOOP Single Bay or one side of a Dual Bay Library C••••••Fibre•Channel •Device Left •Device Right L Id Mode 0: SOFT L Loop Id 0: nnn L Topology 0: LOOP R Id Mode 0: SOFT R Loop Id 0: nnn R Topology 0: LOOP Dual Bay Library with two FCO’s The Configuration\Fibre Channel menu panel displays the SCSI device interface and configures the Fibre Channel Interface to host. The menu sets the Fibre Channel Option host topology. The “Topology” has two selections, LOOP and FABRIC. The LOOP selection configures the Fibre Channel Option for Arbitrated Loop (FC-AL) operation. The FABRIC selection configures the Fibre Channel Option for Switch Fabric (FC_SW) operation. If the mode is LOOP, the Id Mode and Loop Id entries are available. 501440 Rev. G FCO O Type C Installation 6-19 The Id Mode menu item has two selections, FIXED or SOFT. If the mode is FIXED, the Loop Id entry is displayed. If the Id Mode is SOFT, the Loop ID is automatically assigned by the FCO. During the Fibre Channel Arbitrated Loop (FC-AL) initialization process, a unique Arbitrated Loop Physical Address (AL_PA) value is assigned to each port on the loop. Not all of the 256 hex values are allowed as AL_PA values per FC-AL. The Loop Id value is used to represent the 126 addresses that the FCO can use. Table 7-1 shows how a Loop Id value maps to an AL_PA. If the Id Mode is “SOFT”, the FCO will attempt to obtain an available Loop Id, in the following order: 0, 1, 2, etc. 6-20 FCO Type C Installation 501440 Rev. G 6.8 Configuring the Fibre Channel SCSI Devices Interface To establish the SCSI device configuration the Fibre Channel Option is commanded to “Rescan” its three SCSI device buses. The three SCSI device channels, starting with Channel 0, begin scanning for SCSI devices using ascending SCSI Target Ids. After all three channels have been scanned, the FCO builds a SCSI device table, that it uses to map SCSI Targets to the host as logical devices (LUNs). C••••••Fibre•Channel •Device Id Mode 0: SOFT Loop Id 0: nnn Topology 0: LOOP Single Bay or one side of a Dual Bay Library C••••••Fibre•Channel •Device Left •Device Right L Id Mode 0: SOFT L Loop Id 0: nnn L Topology 0: LOOP R Id Mode 0: SOFT R Loop Id 0: nnn R Topology 0: LOOP Dual Bay Library with two FCO’s For single bay libraries or dual bay libraries with only one Fibre Channel Option installed, press the V (UP) or W (DOWN) key to move the pointer to Device. Press the ENTER key to enter the Configuration\Fibre Channel\Device menu. For dual bay libraries with two Fibre Channel Options installed, press the V (UP) or W (DOWN) key to move the pointer to either Device Left or Device Right. The left and right orientation is as viewed from the front of the library. Press the ENTER key to enter the Configuration\Fibre Channel\Device (Left or Right) menu. The Configuration\Fibre Channel\Device menu panels display a list of SCSI devices attached to the Fibre Channel Option. A TLS library with a single Fibre Channel Option displays the title CFC···········Device. A dual-bay library with two Fibre Channel Options installed, displays the title CFC······Device Left or CFC·····Device Right to correspond to the Fibre Channel Option in the left and right side. 501440 Rev. G FCO O Type C Installation 6-21 CFC•••••••••••Device •0 •1 •2 •3 •4 •5 •6 •7 •8 •9 •10 •11 •12 •13 •14 •15 RESCAN CFC••••••Device Left CFC•••••Device Right •0 •1 •2 •3 •4 •5 •6 •7 •8 •9 •10 •11 •12 •13 •14 •15 RESCAN Single Bay or one side of a Dual Bay Library Dual Bay Library with two FCO’s The Fibre Channel Option assembles a list of SCSI devices it detects on its three SCSI channels. This menu displays the SCSI devices that a Fibre Channel Option has detected. To initiate the scan operation, press the W (DOWN) key to move the pointer to RESCAN and press the ENTER key. The RESCAN item will disappear and return when the operation completes. CAUTION The RESCAN operation should be performed with the Library disconnected from the host. The Fibre Channel Option is restarted and SCSI device address maybe modified. Press the EXIT key to return to the top LCD display and wait for the third line to clear of status messages. 6-22 FCO Type C Installation 501440 Rev. G 7. The Configuration Menu .......Configuration .Advanced .Drive .Fibre Channel SCSI ID: dd SCSI ID Left: dd SCSI ID Right: dd .Security SET TO DEFAULTS C...........Advanced .Changer .Control Panel .Fibre Channel .FC Left .FC Right .Library .Log .SCSI .SCSI Left .SCSI Right .SCSI Inquiry LEGEND = = = = location designator decimal digit hexadecimal digit alphanumeric character C.Advanced...Changer Busy: WAIT .Door Lock Door Open: ABORT Filter Days: ddd .Inventory .I/O Port LabelCheckChar:YES .Mechanics Power On Clear:YES UsePrivateSlot:YES CA.Changer.Mechanics Model: NONE BCR: NONE Carriage: A Door Lock: NONE FibreCh: A FC Left: NONE FC Right: NONE I/O Port: A Q-Link: NONE Shuttle: NONE CA.Changer..I/O Port CALL Key: 1 MIN Export: YES Extended:NOT READY Import: YES Import Scan: YES Slot Access: BOTH CA.Changer.Inventory Fixed Labels: SOME Invalidate: SENTRY Label Scan: ALWAYS Mag. Labels: SOME Seq. Labels: SOME Source Drive: NO SourceI/O Port: NO CA.Changer.Door Lock Motion: NO Prevent: NO CA.....Control Panel .Alarm Backlight: ON Contrast: dd .Display CACP.........Display Dispaly: CURRENT Line 1: DEFAULT 1-10: ?????????? 11-20: ?????????? Line 2: DEFAULT 1-10: ?????????? 11-20: ?????????? Line 3: DEFAULT 1-10: ?????????? 11-20: ?????????? Line 4: DEFAULT 1-10: ?????????? 11-20: ?????????? COPY TO CURRENT COPY TO SAVED CACP...........Alarm Door Open: dddd Handler Error:dddd Inventory Vio:dddd I/O Waiting: dddd Low Power: dddd CA.....Fibre.Channel CA...........FC.Left CA..........FC.Right Alarm: NO Ch0 FC Speed: AUTO Ch1 FC Speed: AUTO Ch0 SCSI ID: dd Ch1 SCSI ID: dd Ch2 SCSI ID: dd Ch3 SCSI ID: dd Ch4 SCSI ID: dd Ch5 SCSI ID: dd Ch0 SCSI Speed:160 Ch1 SCSI Speed:160 Ch2 SCSI Speed:160 Ch3 SCSI Speed:160 Ch4 SCSI Speed:160 Ch5 SCSI Speed:160 CLEAR LOG Router LUN: SOFT .Set Time CAFC........Set Time CAFCL.......Set Time CAFCR.......Set Time Date Day: dd Date Month: dd Date Year: dddd Time Hour: dd Time Minute: dd SET TIME Configuration..Drive .T1: NONE .T2: NONE .T3: NONE .T4: NONE .T5: NONE .T6: NONE .LT1: NONE .LT2: NONE .LT3: NONE .LT4: NONE .LT5: NONE .LT6: NONE .RT1: NONE .RT2: NONE .RT3: NONE .RT4: NONE .RT5: NONE .RT6: NONE C.Drive..........?T? Mdl: NONE SN:??????????????? Enabled: YES Revision: xxxx SCSI Bus: CHANGER SCSI Id: dd WWN: xxxxxxxx xxxxxxxx Clean Loc.: llllll Mode: RANDOM Eject: HOST Start: MANUAL Input First:llllll Input Last: llllll Input Slots: ddd OutputFirst:llllll OutputLast: llllll OutputSlots: ddd C......Fibre Channel .Device .Device Left .Device Right Id Mode 0: SOFT Loop Id 0: nnn Topology 0: LOOP Id Mode 1: SOFT Loop Id 1: nnn Topology 1: LOOP L Id Mode 0: SOFT L Loop Id 0: nnn L Topology 0: LOOP L Id Mode 1: SOFT L Loop Id 1: nnn L Topology 1: LOOP R Id Mode 0: SOFT R Loop Id 0: nnn R Topology 0: LOOP R Id Mode 1: SOFT R Loop Id 1: nnn R Topology 1: LOOP C...........Security Configuration: OFF Inventory: OFF Master: OFF CFC...........Device CFC......Device.Left CFC.....Device.Right .0: ?????????????? .1: ?????????????? .2: ?????????????? .3: ?????????????? .4: ?????????????? .5: ?????????????? .6: ?????????????? .7: ?????????????? .8: ?????????????? .9: ?????????????? .10:?????????????? .11:?????????????? .12:?????????????? .13:?????????????? .14:?????????????? .15:?????????????? RESCAN CFC Device........?? CFC Device Left...?? CFC Device Right..?? SCSI Channel: d SCSI Id: dd SCSI Lun: d Manuf:???????????? Model:???????????? Continued in Figure 7-2 Figure 7-1 The TLS Configuration Menu (Part 1) 501440 Rev. G The Configuration Menu 7-1 Continued from Figure 7-1 C.Advanced.......Log BDC: OFF Clean: ON Configuration: ON DriveBay: OFF Executive: ON FC Events: ON FC Replies: ON FC States: ON I2c: OFF Inventory: ON Ioport: ON RBT Actions: ON RBT Client: ON RBT Events: ON RBT I/O Port: ON RBT Machines: ON RBT Operations: ON RBT States: ON SCSI Commands: ON SCSI Interrupt: ON SCSI Phases: ON SCSI States: ON Sequential: ON C.Advanced......SCSI C.Advanced.SCSI.Left CA........SCSI.Right .Library Disconnect: ON Enable: ON Interface: LVD/SE LUN: 0 Parity: ABORT Synchronous: OFF C.Advanced...Library .a: ENABLED .b: DISABLED .c: DISABLED .d: DISABLED LEGEND = = = = C.Advanced.LIbrary.? Enable: ON Drive First:llllll Drive Last: llllll Drives: dd Fixed First:llllll Fixed Last: llllll Fixeds: dd Slot First: llllll Slot Last: llllll Slots: ddd VIOP First: llllll VIOP Last: llllll VIOPs: ddd DT Access: ??????? DT Serial: 00 FILL .ElementAddress Inq: NATIVE Storage Order: MAG Volume Tag Pad:SPC location designator decimal digit hexadecimal digit alphanumeric character CAL.?.ElementAddress Display: SAVED Data Transfr:ddddd Imp/Export: ddddd Medium Trans:ddddd Storage: ddddd COPY TO SAVED CA.SCSI......Library CAS.Left.....Library CAS.Right....Library Initiator 0: a Initiator 1: a Initiator 2: a Initiator 3: a Initiator 4: a Initiator 5: a Initiator 6: a Initiator 7: a Initiator 8: a Initiator 9: a Initiator 10: a Initiator 11: a Initiator 12: a Initiator 13: a Initiator 14: a Initiator 15: a CA......SCSI.Inquiry Set: NATIVE xxxxxxxxxxxxxxxx ???????? ???????????????? ???? xxxxxxxxxxxxxxxx xxxxxxxxxxxxxxxx xxxxxxxx Figure 7-2 The TLS Configuration Menu (Part 2) 7-2 The Configuration Menu 501440 Rev. G The Configuration menu is used to customize the operation of the TLS to meet the system requirements. The Configuration menu consists of several sub-menus, some affecting the unit's interaction with the SCSI system, and others affecting the unit's interaction with the user. Once the items in the Configuration menu have been customized, the Configuration menu should not have to be revisited, unless the configuration of the changer or the SCSI system (e.g. adding or removing tape drives) is changed. The following sections explain the Fibre Channel menus in detail. An explanation of the remaining menu items are contained in the specific TLS models Technical Service Manual. Not all values or menu items appear at all times; some depend upon the model of library in use, other configuration parameters and incomplete prerequisite conditions. NOTE The menus in this chapter reflect revision 2.23 of the Executive PCBA EPROM software. If an earlier revision of the software is being used, some menu items may not appear in the menus. Additionally, the menus in this chapter represent both single bay and dual bay libraries. Menu items that are specific to dual bay libraries contain the words “Left or Right” or the letters “L or R”. The Legends in Figure 7-1 and Figure 7-2 indicate the types of digits found in the value items of the Configuration menu's sub-menus. An explanation of each type is given below in Figure 7-3. Legend d Explanation Decimal digit (0-9): A Decimal value contains one or more decimal digits, indicating the present value of the item. Examples: Face value: This value indicates which carousel face is currently presented to the carriage. Face values range from 1 to 6. Element address (sometimes abbreviated Elem.): This value is the address used by the SCSI host to select a system element. Address values range from 0 to 65535. l Location digit: This value describes the physical location of a cartridge, tape drive, etc. Examples: A01, B10, 6B09, T1, 5F x Hexadecimal digit (0-9, A-F): A hexadecimal value contains one or more hexadecimal digits, indicating the present value of the item. ? Alphanumeric character: An alphanumeric value contains one or more alphanumeric characters, indicating the present value of the item. Figure 7-3 Legend of Configuration Menu’s Digits 501440 Rev. G The Configuration Menu 7-3 7.1 Configuration Menu •••••••Configuration •Advanced •Drive •Fibre Channel SCSI ID: dd SCSI ID Left: dd SCSI ID Right: dd •Security SET TO DEFAULTS This menu is the root configuration menu. It contains sub-menus and commands. NOTE Sub-menus for single bay libraries and dual side libraries with only one Fibre Channel Option installed are displayed as being non-side specific. Dual bay libraries that have Fibre Channel Options installed on both the left and right sides will display Left and Right sub-menu’s. 7.2 Configuration\Advanced C••••••••••••Advanced •Changer •Control Panel •Fibre Channel •FC Left •FC Right •Library •Log •SCSI •SCSI Left •SCSI Right •SCSI Inquiry This Configuration\Advanced menu lists multiple sub-menus. 7-4 The Configuration Menu 501440 Rev. G 7.3 Configuration\Advanced\Changer\Mechanics Menu CA•Changer•Mechanics Model: 4210 BCR: NONE Carriage B Door Lock: NONE FibreCh: A FC Left: NONE FC Right: NONE I/O Port: A Q-Link: NONE Shuttle: NONE The Configuration\Advanced\Changer\Mechanics menu describes the hardware configuration of the TLS. The values in this menu are factory-set to reflect the unit's configuration at the time of shipping and are not changeable. 7.3.1 Fibre Channel This value defines whether a Fibre Channel Option is currently installed on a single bay library. Fibre Channel is a multiple-choice value with the options listed below: NONE 7.3.2 No Fibre Channel Option A Fibre Channel hatch with one Fibre Channel (1Gb) and three SCSI (Ultra2) B Fibre Channel with two Fibre Channels (2Gb) and six SCSI (Ultra160) C Fibre Channel hatch with one Fibre Channel (2Gb) and two SCSI (Ultra160) Fibre Channel Left This value defines whether a Fibre Channel Option is currently installed on the left side of a dual bay library. Fibre Channel Left is a multiple-choice value with the options listed below: NONE 501440 Rev. G No Fibre Channel Option A Fibre Channel hatch with one Fibre Channel (1Gb) and three SCSI (Ultra2) B Fibre Channel with two Fibre Channels (2Gb) and six SCSI (Ultra160) C Fibre Channel hatch with one Fibre Channel (2Gb) and two SCSI (Ultra160) The Configuration Menu 7-5 7.3.3 Fibre Channel Right This value defines whether a Fibre Channel Option is currently installed on the right side of a dual bay library. Fibre Channel Right is a multiple-choice value with the options listed below: NONE 7.4 No Fibre Channel Option A Fibre Channel hatch with one Fibre Channel (1Gb) and three SCSI (Ultra2) B Fibre Channel with two Fibre Channels (2Gb) and six SCSI (Ultra160) C Fibre Channel hatch with one Fibre Channel (2Gb) and two SCSI (Ultra160) Configuration\Advanced\Fibre Channel (Left or Right) Menu CA•••••Fibre•Channel CA•••••••••••FC•Left CA••••••••••FC•Right Alarm: NO Ch0 FC Speed: AUTO Ch1 FC Speed: AUTO Ch0 SCSI ID: dd Ch1 SCSI ID: dd Ch2 SCSI ID: dd Ch3 SCSI ID: dd Ch4 SCSI ID: dd Ch5 SCSI ID: dd Ch0 SCSI Speed:160 Ch1 SCSI Speed:160 Ch2 SCSI Speed:160 Ch3 SCSI Speed:160 Ch4 SCSI Speed:160 Ch5 SCSI Speed:160 CLEAR LOG Router LUN: SOFT •Set Time This menu permits control of certain aspects of the Fiber Channel Options operation. 7.4.1 Alarm An audible alarm on the Fibre Channel Option interface is sounded if a warning or error event is reported by the Fibre Channel Option. 7-6 YES If the Alarm value is set to YES, the audible alarm is enabled. NO If the Alarm value is set to NO, the audible alarm is disabled. The Configuration Menu 501440 Rev. G 7.4.2 Ch0 / Ch1 FC Speed (Fibre Channel Type B and C) This value is a selection AUTO, 1Gb or 2Gb, that corresponds to the FC link speed. If AUTO, the link will attempt to negotiate the highest possible speed of 2Gb. If the Selection is 1Gb, the link will only negotiate the lower 1Gb speed. If the selection is 2Gb, the link will only negotiate the higher 2Gb speed. The number of entries will depend on the Fibre Channel Option selected. The default is AUTO. 7.4.3 Ch0..Ch5 SCSI ID (Fibre Channel Type B and C) This value is a number from 0 to 15 that corresponds to the SCSI Channel (0..5) initiator id. The number of entries will depend on the Fibre Channel Option selected. The default SCSI Id is 7. 7.4.4 Ch0..Ch5 SCSI Speed (Fibre Channel Type B and C) This value is a selection 160, 80, or 40, that corresponds to the highest negotiated SCSI bus speed of the FC SCSI Channel 0..5 Initiator. The number of entries will depend on the Fibre Channel Option selected. The default is SCSI Speed 160. 7.4.5 CLEAR LOG Invoking this command will clear the Fibre Channel Option internal event log. 7.4.6 Router LUN The Fibre Channel Option interface is assigned a SCSI address Lun, for configuration and management features. This menu options selects the method used to assign the router Lun address. NONE The Router Lun is disabled. No address is assigned. SOFT The Router Lun is assigned the next address after the last physical SCSI device. 0-15 Assigns the Router Lun an address value of 0 to 15. The default value is 0. NOTE For Windows NT/2000 users: Type B Fibre Channel option’s require the Router Lun to be set to 0 for libraries with 7 or more drives. 501440 Rev. G The Configuration Menu 7-7 7.5 Configuration\Advanced\Fibre Channel (Left or Right)\Set Time Menu CAFC••••••••Set Time CAFCL•••••••Set Time CAFCR•••••••Set Time Date Day: dd Date Month: dd Date Year: dddd Time Hour: dd Time Minute: dd SET TIME The Configuration\Advanced\Fibre Channel (Left or Right) \Set Time menu is used to set the Fibre Channel Option’s real time clock. The date and time values that are displayed are not current. They reflect the values obtained from the last Fibre Channel power-on or configuration update. The Fibre Channel Option uses the real time clock to timestamp log events. Note that the time is not critical to normal operations. 7.5.1 Date Day This value is a number from 1 to 31. 7.5.2 Date Month This value is a number from 1 to 12. 7.5.3 Date Year This value is a number from 1970 to dddd. 7.5.4 Time Hour This value is a number from 0 to 23. 7.5.5 Time Minute This value is a number from 0 to 59. 7.5.6 SET TIME Invoking this command will set the Fibre Channel Option’s real time clock to the date/time values that are displayed. 7-8 The Configuration Menu 501440 Rev. G 7.6 Configuration\Fibre Channel Menu C••••••Fibre•Channel •Device •Device Left •Device Right Id Mode 0: SOFT Loop Id 0: nnn Topology 0: LOOP Id Mode 1: SOFT Loop Id 1: nnn Topology 1: LOOP L Id Mode 0: SOFT L Loop Id 0: nnn L Topology 0: LOOP L Id Mode 1: SOFT L Loop Id 1: nnn L Topology 1: LOOP R Id Mode 0: SOFT R Loop Id 0: nnn R Topology 0: LOOP R Id Mode 1: SOFT R Loop Id 1: nnn R Topology 1: LOOP The Configuration\Fibre Channel menu is used to configure the Fibre Channel Option to the host. 7.6.1 Id Mode (Left or Right) This value represents the Id Mode, which must be configured for either “Soft” or “Fixed” addressing. Using “Soft” addressing, the Fibre Channel Option connects to an arbitrated loop using the first available AL_PA, scanning from the highest valid address to the lowest. Using “Fixed” addressing, the user selects a specific arbitrated loop address (AL_PA) to connect with. If the selected address is not available, the Fibre Channel Option will connect with the first available address it finds 7.6.2 FIXED The “Loop Id” entry is displayed. SOFT The Loop Id is automatically assigned by the Fibre Channel loop insertion protocol. Loop Id (Left or Right) During the Fibre Channel Arbitrated Loop (FC-AL) initialization process, a unique Arbitrated Loop Physical Address (AL_PA) value is assigned to each port on the loop. Not all of the 256 hex values are allowed as AL_PA values per FC-AL. The Loop Id value is used to represent the 126 addresses that the Fibre Channel Option can use. Table 7-1 shows how a Loop Id value maps to an AL_PA. If “SOFT” is requested for the “Loop Id”, the Fibre Channel Option will attempt to obtain an available Loop Id, in the following order: 0, 1, 2, etc. 501440 Rev. G The Configuration Menu 7-9 7.6.3 Topology 0 / Topology 1 (Left or Right) This value sets the Fibre Channel Option host topology. The “Topology” has two selections, LOOP and FABRIC. The LOOP selection configures the Fibre Channel Option for Arbitrated Loop (FC-AL) operation. The FABRIC selection configures the Fibre Channel Option for Switch Fabric (FC_SW) operation. If the mode is LOOP, the Id Mode and Loop Id entries are available. 7-10 LOOP The LOOP value configures the Fibre Channel Option for Arbitrated LOOP (FC-AL) operation. FABRIC The FABRIC value configures the Fibre Channel Option for Switch Fabric (FC_SW) operation. The Configuration Menu 501440 Rev. G Loop Id AL_PA Loop Id AL_PA Loop Id AL_PA Loop Id AL_PA (decimal) (hex) (decimal) (hex) (decimal) (hex) (decimal) (hex) 0 EF 32 B2 64 72 96 3A 1 E8 33 B1 65 71 97 39 2 E4 34 AE 66 6E 98 36 3 E2 35 AD 67 6D 99 35 4 E1 36 AC 68 6C 100 34 5 E0 37 AB 69 6B 101 33 6 DC 38 AA 70 6A 102 32 7 DA 39 A9 71 69 103 31 8 D9 40 A7 72 67 104 2E 9 D6 41 A6 73 66 105 2D 10 D5 42 A5 74 65 106 2C 11 D4 43 A3 75 63 107 2B 12 D3 44 9F 76 5C 108 2A 13 D2 45 9E 77 5A 109 29 14 D1 46 9D 78 59 110 27 15 CE 47 9B 79 56 111 26 16 CD 48 98 80 55 112 25 17 CC 49 97 81 54 113 23 18 CB 50 90 82 53 114 1F 19 CA 51 8F 83 52 115 1E 20 C9 52 88 84 51 116 1D 21 C7 53 84 85 4E 117 1B 22 C6 54 82 86 4D 118 18 23 C5 55 81 87 4C 119 17 24 C3 56 80 88 4B 120 10 25 BC 57 7C 89 4A 121 0F 26 BA 58 7A 90 49 122 08 27 B9 59 79 91 47 123 04 28 B6 60 76 92 46 124 02 29 B5 61 75 93 45 125 01 30 B4 62 74 94 43 31 B3 63 73 95 3C Table 7-1 Arbitrated Loop Physical Addresses 501440 Rev. G The Configuration Menu 7-11 7.7 Configuration\Fibre Channel\Device (Left or Right) Menu CFC•••••••••••Device CFC••••••Device Left CFC•••••Device Right •0: ?????????????? •1: ?????????????? •2: ?????????????? •3: ?????????????? •4: ?????????????? •5: ?????????????? •6: ?????????????? •7: ?????????????? •8: ?????????????? •9: ?????????????? •10:?????????????? •11:?????????????? •12:?????????????? •13:?????????????? •14:?????????????? •15:?????????????? RESCAN The Configuration\Fibre Channel\Device (Left or Right) menu displays a listing of the SCSI devices attached to the Fibre Channel Option. This menu presents a list of the first 16 LUN assignments. 7.7.1 RESCAN Invoking this command will cause the Fibre Channel Option to rescan the buses for SCSI devices. Note, the RESCAN command will disrupt host communication, so a warning message will be displayed. When the warning message appears, press the ENTER key to continue the RESCAN operation. CAUTION The RESCAN operation should be performed with the Library disconnected from the host. The Fibre Channel Option is restarted and SCSI device address maybe modified. 7-12 The Configuration Menu 501440 Rev. G 7.8 Configuration\Fibre Channel\Device (Left or Right) Menu CFC Device••••••••?? CFC Device Left•••?? CFC Device Right••?? SCSI Channel: d SCSI Id: dd SCSI Lun: d Manuf:???????????? Model:???????????? The Configuration\Fibre Channel\Device (Left or Right) menu displays information that the Fibre Channel Option has obtained from attached SCSI devices. 7.8.1 SCSI Channel This value is the Fibre Channel Option SCSI channel (0-2) that the device is connected to. 7.8.2 SCSI ID This value is the SCSI Id of the device. 7.8.3 SCSI Lun This value is the is the SCSI Lun of the device. 7.8.4 Manuf This value is the SCSI device manufacturer’s string. 7.8.5 Model This value is the SCSI device model string. 501440 Rev. G The Configuration Menu 7-13 8. Maintenance Menu .........Maintenance .Display Log .Display Prevents .Display Revision .Display Stats. .Display Voltage .Fibre Channel SN: dddddddddd .Test Inventory .Test Keyboard .Test LC Display M........Display Log .Display .Display Left .Display Right BDC: OFF Clean OFF Configuration: OFF DriveBay: OFF Executive: OFF FC Events: OFF FC Replies: OFF FC States: OFF I2c: OFF Inventory: OFF Ioport OFF RBT Actions: OFF RBT Client: OFF RBT Events: OFF RBT I/O Port: OFF RBT Machines: OFF RBT Operations:OFF RBT States: OFF SCSI Commands: ON SCSI Interrupt:OFF SCSI Phases: OFF SCSI States: OFF Sequential: OFF CLEAR LOCK UNLOCK MDL.Display....Entry MDLD.Left......Entry MDLD.Right.....Entry At:ddddddddd.ddddd BDC: OFF Clean OFF Configuration: OFF DriveBay: OFF Executive: OFF FC Events: OFF FC Replies: OFF FC States: OFF I2c: OFF Inventory: OFF Ioport OFF RBT Actions: OFF RBT Client: OFF RBT Events: OFF RBT I/O Port: OFF RBT Machines: OFF RBT Operations:OFF RBT States: OFF SCSI Commands: ON SCSI Interrupt:OFF SCSI Phases: OFF SCSI States: OFF Sequential: OFF LOCK M...Display Prevents Initiator 0 Initiator 1 Initiator 2 Initiator 3 Initiator 4 Initiator 5 Initiator 6 Initiator 7 Initiator 8 Initiator 9 Initiator 10 Initiator 11 Initiator 12 Initiator 13 Initiator 14 Initiator 15 Initiator L0 Initiator L1 Initiator L2 Initiator L3 Initiator L4 Initiator L5 Initiator L6 Initiator L7 Initiator L8 Initiator L9 Initiator L10 Initiator L11 Initiator L12 Initiator L13 Initiator L14 Initiator L15 Initiator R0 Initiator R1 Initiator R2 Initiator R3 Initiator R4 Initiator R5 Initiator R6 Initiator R7 Initiator R8 Initiator R9 Initiator R10 Initiator R11 Initiator R12 Initiator R13 Initiator R14 Initiator R15 M...Display Revision Date: mm/dd/yyyy Part Number:700105 Revision: d.dd Checksum: xxxx M.....Display Stats. .Left .Right Aborts: dddddddddd DoorOpn:dddddddddd Exchang:dddddddddd Filter: dddddddddd Grips: dddddddddd I Calls:dddddddddd I Moves:dddddddddd I Steps:dddddddddd Minutes:dddddddddd Moves :dddddddddd Picks: dddddddddd Places: dddddddddd PowerOn:dddddddddd Resets: dddddddddd S Cmnds:dddddddddd X Moves:dddddddddd X Steps:dddddddddd Y Moves:dddddddddd Y Steps:dddddddddd Z Moves:dddddddddd Z Steps:dddddddddd MDS.............Left MDS............Right Grips: dddddddddd Picks: dddddddddd Places: dddddddddd X Moves:dddddddddd X Steps:dddddddddd Y Moves:dddddddddd Y Steps:dddddddddd Z Moves:dddddddddd Z Steps:dddddddddd Continued in Figure 8-2 Figure 8-1 The TLS Maintenance Menu (Part 1) 501440 Rev. G u Maintenance Menu 8-1 The Maintenance menu is used to display detailed information about the TLS and its operating history, and to test the functionality of the liquid crystal display and menu control keys. The Maintenance menu is available to the system user and is considered safe. The user cannot break anything by using, or misusing, this menu. Diagrams showing the entire structure of the Maintenance menu system are shown in Figure 8-1 and Figure 8-2. The following sections explain the Fibre Channel menus in detail. An explanation of the remaining menu items are contained in the specific TLS models Technical Service Manual. Not all values or menu items appear at all times; some depend upon the model of library in use, other configuration parameters and incomplete prerequisite conditions. Continued from Figure 8-1 M....Display .Left .Right +3.3V: +5V: +12V: dd.ddd dd.ddd dd.ddd MDV.............Left MDV............Right +3.3V: dd.ddd +5V: dd.ddd +12V: dd.ddd M.....Test Inventory # Cartridges: ddddd # Labels: ddddd CLEAR START STOP M......Fibre Channel .Info .Info Left .Info Right .Log .Log Left .Log Right Voltage M......Test Keyboard ENTER & EXIT to exit Up? Ex? Re? Do? En? Me? ddddd MFC.............Info MFC........Info Left MFC.......Info Right Backplane Id: ddd Base Lvl: xxxxxxx Board Rev: a CPLD Rev: dd Memory (MB): dddd Daughtr Bd Id: ddd FW Rev: aaaa Loader Rev: aaaaa Prod. Id.: aaaaaa S/N: aaaaaa +3.3V: ddd +5V: ddd +12V: dddd Air Temp (C): +ddd CPU Temp (C): +ddd UPDATE MFC..............Log MFCL........Log Left MFCR.......Log Right M....Test LC Display !"#$%&'()*+,-./ 0123456789:;<=>? @ABCDEFGHIJKLMNO .............Private M....Test LC Display PQRSTUVWXYZ[\]^_ `abcdefghijklmno pqrstuvwxyz{|}~ Private menu access for setting passwords. See Section 5.3. ~ displays as a right-pointing arrow. displays as a left-pointing arrow. \ displays as yen symbol. (This screen blinks.) Figure 8-2 The TLS Maintenance Menu (Part 2) 8-2 Maintenance Menu 501440 Rev. G NOTE The menus in this chapter reflect revision 2.23 of the Executive PCBA EPROM software. If an earlier revision of the software is being used, some menu items may not appear in the menus. Additionally, the menus in this chapter represent both single bay and dual bay libraries. Menu items that are specific to dual bay libraries contain the words “Left or Right” or the letters “L or R”. 8.1 Maintenance Menu .........Maintenance .Display Log .Display Prevents .Display Revision .Display Stats. .Display Voltage .Fibre Channel SN: dddddddddd .Test Inventory .Test Keyboard .Test LC Display The Maintenance menu contains multiple Display items. Display items look like the sub-menus found in the Configuration and Operation menus, but they generally do not contain editable values or executable functions. We prefer to call the Display items status screens, because they display the present status of various TLS elements. NOTE Sub-menus for single bay libraries and dual side libraries with only one Fibre Channel Option installed are displayed as being non-side specific. Dual bay libraries that have Fibre Channel Options installed on both the left and right sides will display Left and Right sub-menu’s. 501440 Rev. G Maintenance Menu 8-3 8.2 Maintenance\Fibre Channel Menu M......Fibre Channel .Info .Info Left .Info Right .Log .Log Left .Log Right The Fibre Channel menu is partitioned into status screens, Info and Log. The Info screen displays version and environmental information from the Fibre Channel Option. The Log screen accesses and displays the Fibre Channel Option’s internal event log. 8.3 Maintenance\Fibre Channel\Info (Left or Right) Status Screen MFC.............Info MFC........Info Left MFC.......Info Right Backplane Id: ddd Base Lvl: xxxxxxx Board Rev: a CPLD Rev: dd Memory (MB): dddd Daughtr Bd Id: ddd FW Rev: aaaa Loader Rev: aaaaa Prod. Id.: aaaaaa S/N: aaaaaa +2.5V: ddd +3.3V: ddd +5V: ddd +12V: dddd Air Temp (C): +ddd CPU Temp (C): +ddd UPDATE The Fibre Channel Info status screen displays the Fibre Channel Option’s configuration and environmental information. The displayed information was obtained at power-on, from the last configuration change, or from the last UPDATE request. 8.3.1 Backplane Id This value identifies the type of backplane. The value of 001 should be displayed for type A and B Fibre Channel Options. Type C FCOs will display the value of 007. 8.3.2 Base Lvl This value identifies the base-level revision. 8-4 Maintenance Menu 501440 Rev. G 8.3.3 Board Rev This value identifies the board level revision. 8.3.4 CPLD Rev This value identifies the CPLD revision. 8.3.5 Memory (MB) This value specifies the amount of memory. 8.3.6 Daughtr Bd Id This value identifies the type of daughter board. 8.3.7 FW Rev This value identifies the firmware revision. 8.3.8 Loader Rev This value identifies the loader revision. 8.3.9 Prod. Id. This value identifies the product model name. 8.3.10 S/N This value identifies the board serial number. 8.3.11 +2.5V (Type C FCO only) This value displays the +2.5V voltage. 8.3.12 +3.3V This value displays the +3.3V voltage. 8.3.13 +5V This value displays the +5V voltage. 8.3.14 +12V (Type A and B FCOs only) This value displays the +12V voltage. This item is not applicable to type C FCO models. 501440 Rev. G Maintenance Menu 8-5 8.3.15 Air Temp This value displays the board’s temperature in degrees Celsius. 8.3.16 CPU Temp (Type A and B FCOs only) This value displays the CPU’s temperature in degrees Celsius. This item is not applicable to type C FCO models. 8.3.17 UPDATE This menu item is visible when communications to the Fibre Channel Option is in an idle state. Invoking this command will cause the Fibre Channel Option to update the configuration and environmental information. It takes approximately 35 seconds to obtain new information after the UPDATE command has been invoked. 8.4 Maintenance\Fibre Channel\ Log (Left or Right) Status Screen MFC..............Log MFC.........Log Left MFC........Log Right The Fibre Channel Log status screen displays the Fibre Channel Option’s internal event log. The information is provided to assist in troubleshooting problems and is not required for normal library operation. The event log is saved in non-volatile memory and is not lost when the library power is removed. The first line in the status screen indicates the Fibre Channel Option selected. The second line contains the event sequence number and a timestamp. Lines three and four contain event text description. If the second line ends with an up arrow, newer events are available for viewing. If the last line ends with a down arrow, older events are available for viewing. These older or newer events can be viewed by using the V (UP) and W (DOWN) keys to scroll the display. Since the event data is stored in the Fibre Channel Option, a small time delay occurs after each request to retrieve the information for display. 8-6 Maintenance Menu 501440 Rev. G Event Sequence Number Timestamp Year (1970-20xx) Timestamp Month (1-12) Timestamp Hour (0-23) Timestamp Day (1-31) Event Text Description Line Timestamp Minute (1-59) Figure 8-3 Log Status Screen Sample 501440 Rev. G Maintenance Menu 8-7 Event text description "CNTRL_REBOOT_CMPL" Event Code Program Label CONTROLLER_REBOOT_COMPLETE "DIAGNOSTIC_FAILURE" DIAGNOSTIC_FAILURE "POWER_FAILURE" POWER_FAILURE "RESCAN_BUS_COMPLETE" RESCAN_BUS_COMPLETE "UPDATE_FIRMWARE_CMPL" UPDATE_FIRMWARE_COMPLETE "BATTERY_FAILURE" BATTERY_FAILURE "UNIT_MAPPING" UNIT_MAPPING "SET_CNTRL_PARAMS" SET_CONTROLLER_PARAMS "SET_CNTRL_TIMEDATE" SET_CONTROLLER_TIMEDATE "RESTORE_CNTRL_DFLT" RESTORE_CONTROLLER_DEFAULT "UTILITY_ABORT" UTILITY_ABORT "EVENT_LOG_CLEAR" EVENT_LOG_CLEAR "AD_WARNING" AD_WARNING "AD_FAILURE" AD_FAILURE "CONFIG_HAS_CHANGED" CONFIGURATION_HAS_CHANGED "AD_OK" AD_OK "SDRAM_CORR_ECC_ERR" SDRAM_CORR_ECC_ERR "SDRAM_UNCORR_ECC_ERR" SDRAM_UNCORR_ECC_ERR "POWER_UP" POWER_UP "HOST_TERMIN_WARNING" HOST_TERMINATION_WARNING "BATTERY_CHARGE_CMPL" BATTERY_CHARGE_COMPLETE "TRANSPRT_MODE_CHANGE" TRANSPORT_MODE_CHANGE "BATTERY_HW_FAIL_INFO" BATTERY_HW_FAILURE_INFO "SHUTDOWN_CNTRL" SHUTDOWN_CONTROLLER "ENCLOSURE_FAILURE" ENCLOSURE_FAILURE "BATTERY_TEMP_WARNING" BATTERY_TEMPERATURE_WARNING "CONFIG_DEFAULTS" CONFIGURATION_DEFAULTS "MODEL_SPECIFIC" MODEL_SPECIFIC Table 8-1 Event Text Descriptions 8-8 Maintenance Menu 501440 Rev. G 9. Repacking This chapter explains how to properly repack type A and type C Fibre Channel Options for shipping. The following items were packed in the original shipping carton: Fibre Channel Option This Installation and Operation Manual 9.1 Repacking the Fibre Channel Option With the exception of Fibre Channel Options that are shipped from the factory installed on libraries, the FCO was originally shipped in a specially-designed carton. When shipping the FCO, use the original shipping carton and packing materials. If the original shipping carton and packing materials are not available, order new shipping materials by calling Qualstar Technical Support. 9.2 Preparation for Packing CAUTION Be sure to turn the library’s power off before installing or removing a Fibre Channel Option. Prepare the FCO for packing as follows: 501440 Rev. G 1. Remove power from the TLS: first turn the power switch off and then remove the power cord. 2. If the FCO is connected the FC host or Hub, disconnect it. 3. Carefully remove the GBIC (gigabit interface converter) adapter from a type A FCO or the SFP (Small Form Factor Pluggable) adapter from a type C FCO. They are located in the bottom of the FCO. See Figure 9-1. Store the GBIC or SFP adapter in a safe location. Repacking 9-1 SFP adapter fully inserted into a type B Fibre Channel Option. GBIC adapter fully inserted into a type A Fibre Channel Option. Figure 9-1 Remove the GBIC or SFP Adapter from the Fibre Channel Option 4. Using a Phillips screwdriver, loosen the four captive screws on the FCO (see Figure 9-2) and carefully guide the FCO backwards as it pivots on the hinges and comes to its open position. See Figure 9-2. Captive Screws (4) Fibre Channel Option FCO in Open Position Figure 9-2 Fibre Channel Option in Closed and Open Positions (Type A Shown) 9-2 Repacking 501440 Rev. G CAUTION SCSI Bus ribbon cables are fragile and can be damaged by pulling on the cable instead of the pull-tab provided at each connector. Steps 5 through 8 only apply to type A Fibre Channel Options. 5. Carefully disconnect the SCSI Bus ribbon cable (labeled CH0) from the CH0 connector on the Fibre Channel Option. See Figure 9-3. CH2 Connector CH0 Connector CH1 Connector Figure 9-3 Channel Connections in Type A FCO 6. 501440 Rev. G Carefully disconnect the SCSI Bus ribbon cable (labeled CH1) from the CH1 connector on the FCO and then disconnect the last ribbon cable from the CH2 connector (if present). See Figure 9-3. Repacking 9-3 7. Carefully disconnect the AUXPWR cable from the AUXPWR connector on the Fibre Channel Option. See Figure 9-4. AUXPWR Connector on Fibre Channel Option Executive PCBA SERIAL Ribbon Cable SERIAL Connector on Fibre Channel Option AUXPWR Cable Figure 9-4 Detail of AUXPWR and SERIAL Connections in a Type A FCO 8. Carefully disconnect the SERIAL ribbon cable from the SERIAL connector on the Fibre Channel Option. See Figure 9-4. Steps 9 and 10 only apply to type C Fibre Channel Options. 9. 9-4 Carefully disconnect the AUXPWR cable from the PWRIN connector on the Fibre Channel Option. See Figure 9-5. Repacking 501440 Rev. G SERLA and SERLB Connectors on Executive IV PCBA SERIAL Ribbon Cables Note: Red edge faces right. AUXPWR Connector on Executive PCBA FCO_A Connector on Fibre Channel Option AUXPWR Cable Q_LINK Connector on Fibre Channel Option PWRIN Connector on Fibre Channel Option Figure 9-5 Detail of Connections in a Type C FCO 10. Carefully disconnect the SERIAL ribbon cable from the FCO_A connector on the Fibre Channel Option. For those FCOs that also have Q-Link, carefully disconnect the SERIAL ribbon cable from the Q_Link connector on the FCO. See Figure 9-5. 11. Slowly lift the FCO until it touches the rear of the TLS. Using a Phillips screwdriver, secure the Fibre Channel Option to the rear of the TLS by tightening the two top captive screws. See Figure 9-6. 501440 Rev. G Repacking 9-5 Top 2 Captive Screws in the FCO Screws that secure the FCO hinges (2) Figure 9-6 Screw Locations in an FCO (Type A Shown) 9.3 12. Remove the two screws from the hinges on the FCO. Save the screws for future use. 13. While supporting the FCO with one hand, loosen the two captive screws at the top of the FCO. 14. Carefully remove the FCO unit from the rear of the library. Packing the Fibre Channel Option 1. 9-6 Using the packing material that came with the FCO, place the FCO into the shipping carton and seal with shipping tape. Repacking 501440 Rev. G