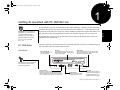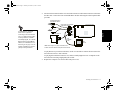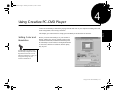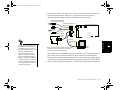
1
PC-DVD 5x Drive
Dxr2 Decoder Card
User Guide
On-line Version
Español
Français
Creative PC-DVD 5x Drive
Creative Dxr2 Decoder Card
Creative PC-DVD Encore Software
Português
Getting Started
English
Dvd-fm.book Page i Thursday, December 17, 1998 9:44 AM
Dvd-fm.book Page ii Thursday, December 17, 1998 9:44 AM
This product incorporates copyright protection technology that is protected by method claims of certain U.S. patents and other
intellectual property rights owned by Macrovision Corporation and other rights owners. Use of this copyright protection
technology must be authorized by Macrovision Corporation, and is intended for home and other limited viewing uses only
unless otherwise authorized by Macrovision Corporation. Reverse engineering or disassembly is prohibited.
Information in this document is subject to change without notice and does not represent a commitment on the part of Creative
Technology Ltd. No part of this document may be reproduced or transmitted in any form or by any means, electronic or
mechanical, including photocopying and recording, for any purpose without the written permission of Creative Technology Ltd.
The software described in this document is furnished under a license agreement and may be used or copied only in accordance
with the terms of the license agreement. It is against the law to copy the software on any other medium except as specifically
allowed in the license agreement. The licensee may make one copy of the software for backup purposes.
Copyright © 1998 Creative Technology Ltd. All rights reserved.
Version 1.0 (January 1999)
Sound Blaster is a registered trademark and PC-DVD, Dxr2, DynamicXtended Resolution, and Encore are trademarks of
Creative Technology Ltd. in the United States and/or other countries.
Dolby and the double-D symbol are registered trademarks of Dolby Laboratories Licensing Corp. All specifications are subject
to change without prior notice.
Microsoft , MS-DOS, Windows, and the Windows Logo are registered trademarks of Microsoft Corporation in the United
States and/or other countries.
All other products are trademarks or registered trademarks of their respective owners.
Dvd-fm.book Page iii Thursday, December 17, 1998 9:44 AM
Creative End-User
Software License
Agreement
PLEASE READ THIS DOCUMENT CAREFULLY BEFORE USING THE SOFTWARE. BY USING THE SOFTWARE, YOU ARE AGREEING TO BECOME BOUND BY THE TERMS OF THIS
AGREEMENT. IF YOU DO NOT AGREE TO THE TERMS OF THE AGREEMENT, YOU MUST NOT USE THE SOFTWARE. PROMPTLY RETURN, WITHIN 15 DAYS, THE SOFTWARE,
ALL RELATED DOCUMENTATION AND ACCOMPANYING ITEMS TO THE PLACE OF ACQUISITION FOR A FULL REFUND.
License
1. Grant of License
The Software is licensed, not sold, to you for use only under the terms of this Agreement. You own the disk or other media on which the Software is originally or subsequently recorded or fixed; but, as
between you and Creative (and, to the extent applicable, its licensors), Creative retains all title to and ownership of the Software and reserves all rights not expressly granted to you.
This is a legal agreement between you and Creative Technology Ltd. and its subsidiaries (“Creative”). This Agreement states the terms and conditions upon which Creative offers to license the software sealed
in the disk package together with all related documentation and accompanying items including, but not limited to, the executable programs, drivers, libraries and data files associated with such programs
(collectively, the “Software”).
2. For Use on a Single Computer
The Software may be used by you only on a single computer with a single CPU. You may transfer the machine-readable portion of the Software from one computer to another computer, provided that (a) the
Software (including any portion or copy thereof) is erased from the first computer and (b) there is no possibility that the Software will be used on more than one computer at a time.
3. Stand-Alone Basis
You may use the Software only on a stand-alone basis, such that the Software and the functions it provides are accessible only to persons who are physically present at the location of the computer on which
the Software is loaded. You may not allow the Software or its functions to be accessed remotely, or transmit all or any portion of the Software through any network or communication line.
4. One Archival Copy
You may make one (1) archival copy of the machine-readable portion of the Software for backup purposes only in support of your use of the Software on a single computer, provided that you reproduce on
the copy all copyright and other proprietary rights notices included on the originals of the Software.
5. No Merger or Integration
You may not merge any portion of the Software into, or integrate any portion of the Software with, any other program, except to the extent expressly permitted by the laws of the jurisdiction where you are
located. Any portion of the Software merged into or integrated with another program, if any, will continue to be subject to the terms and conditions of this Agreement, and you must reproduce on the merged
or integrated portion all copyright and other proprietary rights notices included in the originals of the Software.
6. Network Version
If you have purchased a “network” version of the Software, this Agreement applies to the installation of the Software on a single “file server”. It may not be copied onto multiple systems. Each “node”
connected to the “file server” must also have its own license of a “node copy” of the Software, which becomes a license only for that specific “node”.
7. Transfer of License
You may transfer your license of the Software, provided that (a) you transfer all portions of the Software or copies thereof, (b) you do not retain any portion of the Software or any copy thereof, and (c) the
transferee reads and agrees to be bound by the terms and conditions of this Agreement.
8. Limitations on Using, Copying, and Modifying the Software
Except to the extent expressly permitted by this Agreement or by the laws of the jurisdiction where you acquired the Software, you may not use, copy or modify the Software. Nor may you sub-license any
of your rights under this Agreement.
9. Decompiling, Disassembling, or Reverse Engineering
You acknowledge that the Software contains trade secrets and other proprietary information of Creative and its licensors. Except to the extent expressly permitted by this Agreement or by the laws of the
jurisdiction where you are located, you may not decompile, disassemble or otherwise reverse engineer the Software, or engage in any other activities to obtain underlying information that is not visible to the
user in connection with normal use of the Software. In any event, you will notify Creative of any information derived from reverse engineering or such other activities, and the results thereof will constitute
the confidential information of Creative that may be used only in connection with the Software.
Termination
The license granted to you is effective until terminated. You may terminate it at any time by returning the Software (including any portions or copies thereof) to Creative. The license will also terminate
automatically without any notice from Creative if you fail to comply with any term or condition of this Agreement. You agree upon such termination to return the Software (including any portions or copies
thereof) to Creative. Upon termination, Creative may also enforce any rights provided by law. The provisions of this Agreement that protect the proprietary rights of Creative will continue in force after termination.
Limited Warranty
Creative warrants, as the sole warranty, that the disks on which the Software is furnished will be free of defects, as set forth in the Warranty Card or printed manual included with the Software. No distributor,
dealer or any other entity or person is authorized to expand or alter this warranty or any other provisions of this Agreement. Any representation, other than the warranties set forth in this Agreement, will not bind
Creative.
Creative does not warrant that the functions contained in the Software will meet your requirements or that the operation of the Software will be uninterrupted or error-free. EXCEPT AS STATED ABOVE IN
THIS AGREEMENT, THE SOFTWARE IS PROVIDED AS-IS WITHOUT WARRANTY OF ANY KIND, EITHER EXPRESS OR IMPLIED, INCLUDING, BUT NOT LIMITED TO, ANY
IMPLIED WARRANTIES OF MERCHANTABILITY AND FITNESS FOR A PARTICULAR PURPOSE.
You assume full responsibility for the selection of the Software to achieve your intended results, and for the installation, use and results obtained from the Software. You also assume the entire risk as it applies
to the quality and performance of the Software. Should the Software prove defective, you (and not Creative, or its distributors or dealers) assume the entire cost of all necessary servicing, repair or correction.
This warranty gives you specific legal rights, and you may also have other rights which vary from country/state to country/state. Some countries/states do not allow the exclusion of implied warranties, so the
above exclusion may not apply to you. Creative disclaims all warranties of any kind if the Software was customized, repackaged or altered in any way by any third party other than Creative.
Limitation of Remedies and
Damages
THE ONLY REMEDY FOR BREACH OF WARRANTY WILL BE THAT SET FORTH IN THE WARRANTY CARD OR PRINTED MANUAL INCLUDED WITH THE SOFTWARE. IN NO EVENT
WILL CREATIVE OR ITS LICENSORS BE LIABLE FOR ANY INDIRECT, INCIDENTAL, SPECIAL OR CONSEQUENTIAL DAMAGES OR FOR ANY LOST PROFITS, LOST SAVINGS, LOST
REVENUES OR LOST DATA ARISING FROM OR RELATING TO THE SOFTWARE OR THIS AGREEMENT, EVEN IF CREATIVE OR ITS LICENSORS HAVE BEEN ADVISED OF THE
POSSIBILITY OF SUCH DAMAGES. IN NO EVENT WILL CREATIVE’S LIABILITY OR DAMAGES TO YOU OR ANY OTHER PERSON EVER EXCEED THE AMOUNT PAID BY YOU TO USE
THE SOFTWARE, REGARDLESS OF THE FORM OF THE CLAIM. Some countries/states do not allow the limitation or exclusion of liability for incidental or consequential damages, so the above limitation
or exclusion may not apply to you.
Product Returns
If you must ship the software to Creative or an authorized Creative distributor or dealer, you must prepay shipping and either insure the software or assume all risk of loss or damage in transit.
Dvd-fm.book Page iv Thursday, December 17, 1998 9:44 AM
U.S. Government Restricted
Rights
All Software and related documentation are provided with restricted rights. Use, duplication or disclosure by the U.S. Government is subject to restrictions as set forth in subdivision (b)(3)(ii) of the Rights in
Technical Data and Computer Software Clause at 252.227-7013. If you are sub-licensing or using the Software outside of the United States, you will comply with the applicable local laws of your country, U.S.
export control law, and the English version of this Agreement.
Contractor/Manufacturer
The Contractor/Manufacturer for the Software is:
General
This Agreement is binding on you as well as your employees, employers, contractors and agents, and on any successors and assignees. Neither the Software nor any information derived therefrom may be exported
except in accordance with the laws of the U.S. or other applicable provisions. This Agreement is governed by the laws of the State of California (except to the extent federal law governs copyrights and federally
registered trademarks). This Agreement is the entire agreement between us and supersedes any other understandings or agreements, including, but not limited to, advertising, with respect to the Software. If any
provision of this Agreement is deemed invalid or unenforceable by any country or government agency having jurisdiction, that particular provision will be deemed modified to the extent necessary to make the
provision valid and enforceable, and the remaining provisions will remain in full force and effect. For questions concerning this Agreement, please contact Creative at the address stated above. For questions on
product or technical matters, contact the Creative technical support center nearest you.
Hardware Warranty
Creative Technology Ltd. (“Creative”) warrants to the original end-user purchaser only that the hardware product will be free of defects in materials and workmanship for a period of one year from the date of
purchase. The physical media (whether CD-ROM or diskettes) enclosed herein are also warranted to be free of defects in materials and workmanship for a period of 60 days from the date of purchase, or such
other period as may be expressly required by applicable law (“Warranty Period”).
Creative Technology Ltd.
Creative Resource
31 International Business Park
Singapore 609921
Should there be a material or workmanship defect in the hardware product or accompanying item(s) during the Warranty Period, the end-user purchaser shall obtain a Return Merchandise Authorization (RMA)
number from the nearest support center and be responsible for all efforts and costs incurred in transporting/mailing/shipping/insuring the defective hardware or item(s) to and from the support center. A copy of
a dated proof of purchase (e.g., a store receipt) should be enclosed in the returned package, with the RMA number clearly indicated on the outside.
Creative's entire liability and your remedy will be, at Creative's sole discretion, the repair or replacement (with the same or similar model) of any hardware or accompanying item(s) not meeting the “Limited
Warranty” explained above that is returned to Creative or an authorized distributor or dealer during the Warranty Period with a copy of your receipt.
To the maximum extent permitted by applicable law, Creative disclaims all other warranties, expressed or implied, including the warranties of merchantability or fitness for a particular purpose with respect to the
use of this product and the program license granted herein. Creative also disclaims any warranty or obligation to support products for all operating environments - for example, by ensuring interoperability with
future versions of operating systems or other future software or hardware. In no event shall Creative or its licensors be liable for any indirect, incidental, special or consequential damages or for any lost profits,
lost savings, lost data, personal injury, and so on, arising from or relating to the use of this software or hardware product, even if Creative or its licensors have been advised of the possibility of such damages.
Specifically, this warranty does not cover failures of the product which result from accident, abuse, misuse (including but not limited to improper installation, or connection to incorrect voltages or power points),
alterations (by persons other than Creative or its authorized repair agents), moisture, corrosive environments, shipping, high voltage surges, or abnormal working conditions (including but not limited to lightning
and water damage) after purchase. In no event will Creative's liability or damages to you, or any other person, ever exceed the purchase price you paid for the product, regardless of the form of the claim.
This warranty does not cover normal wear and tear, or in the case of communications products, the use of the product outside the borders of the country intended for use (as indicated by local telecommunication
approval stickers).
Note: This warranty gives you specific legal rights. You may have other rights which vary from country/state to country/state. Certain limitations in this warranty are not permitted by the jurisdiction of some
countries/states, so some limitations here may not apply to you.
Dvd-fm.book Page v Thursday, December 17, 1998 9:44 AM
Contents
Introduction
Before You Begin........................................................................................................................................xi
System Requirements.....................................................................................................................xi
Document Conventions ................................................................................................................ xii
Text.................................................................................................................................... xii
Icons.................................................................................................................................. xii
1
Getting Acquainted with PC-DVD Encore............................................1
PC-DVD Drive.............................................................................................................................................1
Front Panel .......................................................................................................................................1
Rear Panel ........................................................................................................................................2
Dxr2 Decoder Card......................................................................................................................................3
Accessories...................................................................................................................................................4
2
Installing PC-DVD Encore......................................................................5
Step 1: Learn the Windows 95 Version......................................................................................................5
Step 2: Insert the Dxr2 Decoder Card........................................................................................................6
Step 3: Install the Drive in Your Computer ...............................................................................................7
Step 4: Connect PC-DVD to Your Computer.............................................................................................9
Secondary IDE Connector ..............................................................................................................9
Secondary IDE Connector with CD-ROM Drive ........................................................................10
Primary IDE Connector with Hard Disk Drive............................................................................11
Step 5: Connect Other Devices to the Dxr2.............................................................................................12
Sample Configuration for a Theater-like Sound System.................................................14
Contents
v
Dvd-fm.book Page vi Thursday, December 17, 1998 9:44 AM
3
Installing Software .............................................................................. 15
Windows 95................................................................................................................................................15
Step 1: Install PC-DVD Encore Device Drivers .........................................................................16
Step 2: Install the PC-DVD Player Application..........................................................................17
Enabling DMA Transfer (Windows 95 OSR2) ...............................................................17
Windows 98................................................................................................................................................18
Windows NT ..............................................................................................................................................18
4
Using Creative PC-DVD Player........................................................... 19
Setting Color and Resolution ....................................................................................................................19
Using PC-DVD Player ..............................................................................................................................21
Creative PC-DVD Player ..............................................................................................................22
Status Display....................................................................................................................24
Setting the Video Configuration ...................................................................................................24
DVD Menu (Title).........................................................................................................................26
Language Settings .........................................................................................................................26
Appendix
A
Technical Specifications.................................................................... 27
PC-DVD Drive...........................................................................................................................................27
Dxr2 Decoder Card....................................................................................................................................28
B
Regional Codes................................................................................. 29
C
Troubleshooting.................................................................................. 31
Sound..........................................................................................................................................................31
PC-DVD Drive...........................................................................................................................................31
Video...........................................................................................................................................................32
DVD Playback ...........................................................................................................................................34
DVD Title...................................................................................................................................................34
Upgrading Your Operating System with PC-DVD..................................................................................34
Contents
vi
Dvd-fm.book Page vii Thursday, December 17, 1998 9:44 AM
ESPAÑOL
Introducción ....................................................................................... E-i
Antes de comenzar....................................................................................................................................E-i
Requisitos de sistema ...................................................................................................................E-i
Convenciones de la documentación............................................................................................E-ii
Texto.................................................................................................................................E-ii
Iconos...............................................................................................................................E-ii
1
Familiarización con PC-DVD Encore.................................................E-1
Unidad PC-DVD......................................................................................................................................E-2
Panel frontal .................................................................................................................................E-2
Panel posterior..............................................................................................................................E-3
Tarjeta descodificadora Dxr2...................................................................................................................E-4
Accesorios ................................................................................................................................................E-5
2
Instalación de Creative PC-DVD Encore ..........................................E-7
Paso 1:
Paso 2:
Paso 3:
Paso 4:
Identificación de la versión de Windows 95.............................................................................E-7
Instalación de la tarjeta descodificadora Dxr2..........................................................................E-8
Instalación de la unidad en el equipo PC..................................................................................E-9
Conexión de la unidad PC-DVD al equipo PC ......................................................................E-11
Conector IDE secundario ..........................................................................................................E-11
Conector IDE secundario con CD-ROM .................................................................................E-12
Conector IDE primario con disco duro ....................................................................................E-13
Paso 5: Conexión de otros dispositivos a la tarjeta Dxr2 ....................................................................E-14
Configuración de muestra para establecer un sistema de sonido de calidad
cinematográfica...........................................................................................................E-16
3
Instalación del software
Windows 95............................................................................................................................................E-17
Paso 1: Instalación de los controladores de dispositivos PC-DVD........................................E-18
Paso 2: Instalación de la aplicación de reproducción PC-DVD Player .................................E-19
Habilitación de transferencia DMA (Windows 95 OSR2 solamente)........................E-19
Windows 98............................................................................................................................................E-20
Windows NT ..........................................................................................................................................E-20
Contents
vii
Dvd-fm.book Page viii Thursday, December 17, 1998 9:44 AM
FRANÇAIS
Introduction......................................................................................... F-i
Préparatifs.................................................................................................................................................. F-i
Configuration exigée .................................................................................................................... F-i
Conventions typographiques.......................................................................................................F-ii
Texte.................................................................................................................................F-ii
Icônes...............................................................................................................................F-ii
1
Prise en main du Creative PC-DVD Encore.......................................F-1
Lecteur de PC-DVD ................................................................................................................................ F-2
Panneau avant .............................................................................................................................. F-2
Panneau arrière ............................................................................................................................ F-3
Carte de décodage Dxr2 .......................................................................................................................... F-4
Accessoires............................................................................................................................................... F-5
2
Installation de Creative PC-DVD Encore ...........................................F-7
Etape 1 : Vérification de la version de Windows 95.............................................................................. F-7
Etape 2 : Insertion de la carte de décodage Dxr2................................................................................... F-8
Etape 3 : Installation du lecteur dans votre ordinateur........................................................................... F-9
Etape 4 : Connexion du lecteur PC-DVD à l’ordinateur ..................................................................... F-11
Connecteur IDE secondaire ...................................................................................................... F-11
Connecteur IDE secondaire avec le lecteur de CD-ROM....................................................... F-12
Connecteur IDE primaire avec le disque dur ........................................................................... F-13
Etape 5 : Connexion d’autres périphériques à la carte Dxr2 ............................................................... F-14
Exemple de configuration pour système de type salle de cinéma .............................. F-16
3
Installation du logiciel......................................................................F-17
Windows 95............................................................................................................................................ F-17
Etape 1 : Installation du pilote de périphérique Dxr2.............................................................. F-18
Etape 2 : Installation de l’application pour lecteur PC-DVD.................................................. F-19
Validation des transferts DMA (Windows 95 OSR2) ................................................. F-19
Windows 98............................................................................................................................................ F-20
Windows NT .......................................................................................................................................... F-20
Contents viii
Dvd-fm.book Page ix Thursday, December 17, 1998 9:44 AM
PORTUGUÊS
Introdução.......................................................................................... P-i
Antes de Começar.....................................................................................................................................P-i
Requisitos do Sistema...................................................................................................................P-i
Convenções da Documentação ...................................................................................................P-ii
Texto.................................................................................................................................P-ii
Ícones ...............................................................................................................................P-ii
1
Introdução ao PC-DVD Encore .........................................................P-1
Unidade de PC-DVD ...............................................................................................................................P-2
Painel frontal da unidade de PC-DVD........................................................................................P-2
Painel posterior da unidade de PC-DVD....................................................................................P-3
Placa Decodificadora Dxr2......................................................................................................................P-4
Acessórios ................................................................................................................................................P-5
2
Como Instalar Creative PC-DVD Encore...........................................P-7
Etapa 1: Identifique a sua Versão do Windows 95 ................................................................................P-7
Etapa 2: Insira a Placa Decodificadora Dxr2.........................................................................................P-8
Etapa 3: Instale a Unidade no seu Computador ....................................................................................P-9
Etapa 4: Conecte o PC-DVD ao Computador.....................................................................................P-11
Conector IDE Secundário .........................................................................................................P-11
Conector IDE Secundário com Unidade de CD-ROM ...........................................................P-12
Conector IDE Principal com Unidade de Disco Rígido..........................................................P-13
Etapa 5: Conecte Outros Dispositivos ao Dxr2...................................................................................P-14
Exemplo de Configuração para um Sistema com Qualidade de Cinema...................P-16
3
Como Instalar o Software................................................................P-17
Windows 95............................................................................................................................................P-17
Etapa 1: Instalar o Driver de Creative PC-DVD Encore.........................................................P-18
Etapa 2: Instalar o Aplicativo PC-DVD Player.......................................................................P-19
Como Ativar a Transferência de DMA (Windows 95 OSR2) ....................................P-19
Windows 98............................................................................................................................................P-20
Windows NT ..........................................................................................................................................P-20
Contents
ix
Dvd-fm.book Page xi Thursday, December 17, 1998 9:44 AM
Introduction
Before You Begin
The README file on the Creative PC-DVD Encore diskette contains information and changes that were
not available at the time of printing. Read the file before you continue.
You may want to make a backup copy of the diskette before you begin. In addition, read the following:
System Requirements
❑
System Requirements
❑
Document Conventions
Miniumum system requirements for PC-DVD Encore are as follows:
❑
A Pentium® 100 MHz PC or compatible
❑
16 MB RAM
❑
8 MB available hard disk space
❑
SVGA graphics adapter with 2 MB RAM (minimum 800x600 at 256 colors, 16-bit color support
recommended)
❑
PCI expansion slot for the Dxr2 decoder card
❑
Enhanced IDE connector on the motherboard or PCI interface card (bus mastering with DMA
support recommended)
❑
Drive bay (half-height) for the Creative PC-DVD drive (drive rails may be required for some
systems and are not included)
❑
Sound Blaster or 100 percent compatible Sound Blaster audio card (Sound Blaster 32, AWE32,
or Sound Blaster AWE64 is highly recommended)
❑
Microsoft® Windows® 95, Windows 98, or Windows NT
Introduction xi
English
Congratulations on your purchase of Creative PC-DVD™ Encore! This guide provides you with
information on how to install and operate the PC-DVD Encore hardware and software.
Dvd-fm.book Page xii Thursday, December 17, 1998 9:44 AM
Document
Conventions
Text
Icons
The following conventions help you locate and identify the information you need.
Text Element
Use
bold
Text that must be entered exactly as it appears.
italic
On the DOS command line, italic text represents information you are to provide,
usually described in a list following the command. Also, word or phrase that is being
defined; title of a book or manual.
UPPERCASE
Key name, directory name, file name, or acronym.
Icon
Use
Note.
Warning.
Introduction xii
Dvd-fm.book Page 1 Thursday, December 17, 1998 9:44 AM
Getting Acquainted with PC-DVD Encore
CAUTION: Use of controls or
adjustments, or performance of
procedures other than those
specified herein may result in
hazardous radiation exposure.
Do not open the PC-DVD
drive case.
PC-DVD Drive
PC-DVD Encore represents a breakthrough in optical disc technology. A digital video disc (DVD) has a
maximum data capacity more than twenty-five times that of an ordinary CD—a full length movie with
digital audio can be placed on a single disc! The PC-DVD drive and the Dxr2 decoder card enable you to
play full-motion video with multi-channel sound on your personal computer, or on your television.
PC-DVD Encore can play not only the lastest DVD movies but also CD formats such as audio CDs,
CD-ROM software, and CD-R.
The basic controls for your PC-DVD drive are on the front panel; the connectors for attaching the power,
data, and audio cables are located on the rear panel.
Front Panel
Stereo Phone jack
connects headphones or
powered speakers.
Disc tray
is a motorized loading system on which
DVDs or CDs are placed. To eject the tray,
press the Eject button.
Eject button
ejects or closes the disc tray. To eject the disc
tray, exit an application accessing the PC-DVD
drive before you press the button.
The appearance of your PC-DVD
drive’s front panel may differ
from the figure shown.
Volume control
adjusts the volume of headphones or powered
speakers connected to the fStereo Phone jack.
This control does not effect the audio from devices
(such as speakers) connected to your audio card.
Busy indicator
lights up whenever the drive
is reading data from a disc.
Eject hole
can be used to eject the disc
tray by inserting and pushing a
straightened paper clip into
the Eject hole as shown below.
Getting Acquainted with PC-DVD Encore 1
English
1
Dvd-fm.book Page 2 Thursday, December 17, 1998 9:44 AM
To open the disc tray manually:
Turn off the power to your
computer before inserting the
paper clip into the Eject hole.
Rear Panel
Pull the ejected
tray out gently.
Avoid using
excessive force to
pull out the tray as
this may damage
your drive
CD Audio connector
sends audio from the PC-DVD drive through
the Dxr2 card to the audio card when
connected by a CD audio cable.
Enhanced IDE Data connector
transfers data between the PC-DVD drive and
devices, such as your computer’s hard disk and
motherboard, when connected by an IDE data cable.
Power In connector
connects an electrical power cable
from your PC power supply to the
drive.
Digital Audio connector
connects to a digital audio tape (DAT) or
professional audio system for digital
recording.
Note: This connector follows the EBUIEC958 standard set by the European
Broadcast Union (EBU).
Master/Slave jumper
sets the PC-DVD drive as master or
slave when you connect it to another
PC-DVD or CD-ROM drive.
Note: Cable Select is reserved and
must not be used.
Master
Slave
(default)
Getting Acquainted with PC-DVD Encore 2
Dvd-fm.book Page 3 Thursday, December 17, 1998 9:44 AM
The DynamicXtended Resolution, or Dxr2, decoder card allows you to playback MPEG-1, MPEG-2, and
digital video discs (DVDs) on your monitor at resolutions up to 1280x1024 pixels and a rate of 30 frames
per second.
Your Dxr2 decoder card has the jacks and connectors shown below.
Dolby Digital (AC-3) S/PDIF jack
connects an external Dolby Digital device that
supports AC-3 specifications.
TV Out jack
connects to your television monitor
using the TV Out cable provided.
Audio Out connector
connects to the CD
audio connector of your
audio card.
Audio In connectors
connects to your PC-DVD
drive and/or CD-ROM drive.
DIGITAL_OUT
English
Dxr2 Decoder
Card
VGA In connector
connects to the VGA card in your computer
using the VGA loopback cable. The
loopback cable sends video signals from
the VGA card to the Dxr2 decoder card.
Monitor Out connector
connects to the VGA monitor using the VGA
monitor cable, allowing you to send video signals
from the Dxr2 decoder card to the VGA monitor.
Digital Out connector
connects to the I2S connector on your audio card. NOTE:
Your Dxr2 decoder card may not have this connector.
Your audio card may not have this connector. Refer to
your audio card manual for more information.
Getting Acquainted with PC-DVD Encore 3
Dvd-fm.book Page 4 Thursday, December 17, 1998 9:44 AM
Accessories
Your PC-DVD Encore includes:
❑
Audio cable with dual connectors
❑
PC-DVD audio cable
❑
VGA loopback cable
❑
TV out cable
❑
IDE data cable
To audio card
To PC-DVD drive
To Dxr2
decoder card or
audio card
PC-DVD audio cable
Dual connector
audio cable
To Dxr2
decoder card
VGA loopback cable
connects your VGA card to
the Dxr2 decoder card.
The TV Out cable is
approximately 6 feet in length.
To extend the length, you will
need a female-to-female adapter,
available from Creative Labs
Customer Service, and an
additional S-Video cable with
male connectors at each end.
IDE data cable
connects the PC-DVD drive to the
motherboard or IDE interface card.
S-Video plug
Composite
video out plug
TV Out cable
connects your television
monitor to the Dxr2
decoder card.
Getting Acquainted with PC-DVD Encore 4
Dvd-fm.book Page 5 Thursday, December 17, 1998 9:44 AM
Installing PC-DVD Encore
2
Step 1: Learn the
Windows 95
Version
❑
Step 1: Learn the Windows 95 Version
❑
Step 2: Insert the Dxr2 Decoder Card
❑
Step 3: Install the Drive in Your Computer
❑
Step 4: Connect PC-DVD to Your Computer
❑
Step 5: Connect Other Devices to the Dxr2
English
This chapter explains how to install and set up the PC-DVD drive and the Dxr2 decoder card in your
computer:
How you install Creative PC-DVD Encore may be determined by your version of Windows 95. If you do
not know your version number, follow this step to learn it. If you already know your version number, go
to “Step 2: Insert the Dxr2 Decoder Card” on page 6.
To obtain the Windows 95 version number:
1.
Click the Start button, point to Settings, and click Control Panel.
2.
On the Control Panel, double-click the System icon.
Your Windows 95 version number is displayed in the General tab page of the Systems Properties
dialog.
3.
Note the version number:
❑ 4.00.950
❑ 4.00.950A
❑ 4.00.950B
4.
Shut down Windows 95 and switch off the power.
5.
Proceed to “Step 2: Insert the Dxr2 Decoder Card.”
Installing PC-DVD Encore 5
Dvd-fm.book Page 6 Thursday, December 17, 1998 9:44 AM
Step 2: Insert the
Dxr2 Decoder
Card
Use slot one or the available slot
having the highest priority in
your computer for best
performance and compatibility.
See your computer’s manual for
information on expansion slots
and their priorities.
Do not force the Dxr2 decoder
card into the slot. If it does not fit
properly, remove it and try again.
The Dxr2 decoder card fits a PCI expansion slot.
To install the Dxr2 decoder card:
1.
Turn off the power to your computer and any connected devices. Disconnect the power cord
from the electrical source.
2.
Touch a metal surface on the computer to ground
yourself and discharge any static electricity.
3.
Remove the cover from the computer.
4.
Locate a free PCI expansion slot for the Dxr2
decoder card. The relative length and position of the
PCI expansion slots are shown in the figure to the
right.
5.
Note: Refer to
your computer’s
manual for help in
locating a slot.
PCI slot
ISA slot
Remove the metal plate from the expansion slot.
VL slot
6.
Align the Dxr2 decoder card with the PCI slot and
press it into the slot as shown. The card must sit firmly
inside the PCI slot.
7.
Secure the Dxr2 decoder card in the slot by replacing the
screw removed with the slot cover.
Proceed to “Step 3: Install the Drive in Your Computer.”
8.
B. Fasten the card to
the slot with a screw.
A. Press the Dxr2
decoder card
into the slot.
PCI slot
Installing PC-DVD Encore 6
Step 3: Install the
Drive in Your
Computer
1.
Insert the PC-DVD drive into the drive bay
as shown.
2.
Connect a PC power cable to the PC-DVD
drive. The computer’s power supply is
usually located in a rear corner; several
power cables extend from the box with
connectors available for internal devices.
You may want to connect the
cables as described below before
you insert the drive into the bay.
Then, feed the cables through the
bay as you insert the drive.
Set the Master/Slave jumpers to
Master as shown in the figure on
page 2, unless you know that you
will be connecting to the Primary
IDE connector with the hard disk
drive.
Power In
connector
Power cable
Installing PC-DVD Encore 7
English
Dvd-fm.book Page 7 Thursday, December 17, 1998 9:44 AM
Dvd-fm.book Page 8 Thursday, December 17, 1998 9:44 AM
3.
Connect the IDE data cable to
the PC-DVD drive.
Be sure that you are connecting
the correct end of the PC-DVD
audio cable to the drive. See the
figure on page 4 for a detail of the
connector for the Dxr2 decoder
card—use the other end for the
PC-DVD drive.
Pin1
Note: Align the
colored stripe on the
IDE data cable to
pin 1 of the IDE data
connector.
Colored
stripe
IDE data
connector
4.
IDE data
cable
Connect the PC-DVD audio
cable to the PC-DVD drive.
PC-DVD
audio cable
Installing PC-DVD Encore 8
Dvd-fm.book Page 9 Thursday, December 17, 1998 9:44 AM
Step 4: Connect
PC-DVD to Your
Computer
You can now connect the PC-DVD drive to the IDE controller on your computer’s motherboard. The
motherboard should have two IDE connectors: Primary is usually used by your hard disk drive;
secondary is used by devices such as CD-ROM drives. Refer to your computer’s documentation for the
location of the IDE connectors.
Secondary IDE
Connector
❑
Secondary IDE connector (recommended)
See “Secondary IDE Connector,” below.
❑
Secondary IDE connector with CD-ROM drive
See “Secondary IDE Connector with CD-ROM Drive” on page 10.
❑
Primary IDE connector with hard disk drive
See “Primary IDE Connector with Hard Disk Drive” on page 11.
English
Connect the PC-DVD drive to one of the following:
To connect the PC-DVD drive to the secondary IDE connector:
1.
Set the the PC-DVD drive as the master drive by placing the
jumper block as shown.
2.
Locate the secondary IDE connector on the motherboard.
3.
Connect the IDE data cable to the secondary IDE connector, align
the colored stripe on the cable to pin 1 of the IDE connector.
4.
Connect the PC-DVD audio cable to the Dxr2 decoder card’s Audio In connector (see “Dxr2
Decoder Card” on page 3).
5.
Slide the drive back into place and use the screws provided to secure it to the computer. Proceed
to “Step 5: Connect Other Devices to the Dxr2” on page 12.
Master
Slave
(default)
Installing PC-DVD Encore 9
Dvd-fm.book Page 10 Thursday, December 17, 1998 9:44 AM
Secondary IDE
Connector with
CD-ROM Drive
Daisy-chaining the PC-DVD
drive with a CD-ROM drive may
be used with Windows 95 OSR2
(version 4.00.950B) only—it is
not recommended for other
versions of Windows 95.
To connect to the secondary IDE connector with a CD-ROM drive:
1.
Locate the secondary IDE connector on the motherboard.
2.
Set the jumpers on the PC-DVD drive as master and the jumpers on the CD-ROM drive as slave
(see the figure on page 2).
3.
Connect the PC-DVD drive to the CD-ROM drive with the IDE data cable as shown below.
4.
Connect your new PC-DVD drive to the secondary IDE connector using the IDE data cable as
shown below.
5.
Connect the PC-DVD audio cable to the Dxr2 decoder card’s Audio In (1) connector, and the CD
audio cable to the Dxr2 decoder card’s Audio In (2) connector (see the figure page 3 for location
of the connectors).
PC-DVD drive
(master)
IDE data
connector
Pin 1
Power
cable
Colored
stripe
CD-ROM drive
(slave)
Pin 1
PC-DVD
audio cable
Power
cable
CD audio cable
Note: Align the colored stripe on
the IDE data cable to pin 1 of the
drives’ IDE data connectors.
To secondary
IDE connector.
6.
Slide the drives into place and secure them to the computer using the screws provided.
7.
Proceed to “Step 5: Connect Other Devices to the Dxr2” on page 12.
Installing PC-DVD Encore 10
Dvd-fm.book Page 11 Thursday, December 17, 1998 9:44 AM
To connect the PC-DVD drive to the primary IDE connector with the hard disk:
1.
Back up the files on your hard disk drive before you proceed.
2.
Set the jumpers on the PC-DVD drive and the hard disk drive (see page 2). Set the hard disk drive
to master; set the PC-DVD drive to slave.
3.
Connect the power cable and IDE data cable to your hard disk drive.
PC-DVD drive
(slave)
English
Primary IDE Connector
with Hard Disk Drive
Power
cable
Hard disk drive
(master)
PC-DVD
audio cable
Pin 1
Power
cable
Colored
stripe
IDE data cable
Note: Align the colored
stripe of the IDE data cable
to pin 1 of the hard disk
drive’s data connector.
To primary IDE
connector.
4.
Connect the PC-DVD audio cable to the Dxr2 decoder card’s Audio In connector (see figure on
page 3).
5.
Slide the drives back into place and secure them to the computer (screws are provided for the PCDVD drive).
Proceed to “Step 5: Connect Other Devices to the Dxr2.”
6.
Installing PC-DVD Encore 11
Dvd-fm.book Page 12 Thursday, December 17, 1998 9:44 AM
Step 5: Connect
Other Devices to
the Dxr2
To connect devices to the Dxr2 decoder card:
1.
Connect the PC-DVD drive and other devices (CD-ROM drive, audio card, etc.) to the Dxr2
using the audio cables.
PC-DVD drive
Audio
card
CD audio
connector
Connect powered
speakers to the
Line Out jack.
CD-ROM drive
Dual connector
audio cable
JST to ATAPI
audio cable
Note: Connect only one of the CD
audio connector’s to your audio
card. Refer to your audio card’s
documentation for the location of
the CD audio connector.
DIGITAL_OUT
Audio In (1)
connector
Audio In (2 )
connector
CD audio
cable
Audio Out
connector
Dxr2 decoder card
Installing PC-DVD Encore 12
Dvd-fm.book Page 13 Thursday, December 17, 1998 9:44 AM
2.
Disconnect the monitor from the VGA card and reconnect it to the bottom connector on the Dxr2
decoder card. Connect the VGA card and the Dxr2 decoder card using the VGA loopback cable
provided.
To Dolby Digital (AC-3)
audio decoder device
Dolby Digital (AC-3) S/PDIF
cable (not included)
S-Video
TV Out cable
English
To TV set
A Sound Blaster compatible
audio card is required for
connecting to the Dxr2 decoder
card. To obtain the high-quality
sound reproduction available
with Dolby Digital, use a Sound
Blaster AWE32, Sound Blaster
AWE64, or Sound Blaster Live!
See the figure on page 14 for an
example installation for theaterquality sound reproduction.
Dxr2 decoder card
Composite video out
VGA
card
VGA
Loopback
cable
VGA
monitor
Note: Refer to Figure on page 3 for details on the
location of the Dxr2 decoder card’s jacks and connectors.
To play DVDs on your television monitor, use the TV Out cable to connect the television to the
Dxr2 decoder card’s TV Out connector.
To play digital sound from a DVD or CD, connect a Dolby Digital receiver or amplifier to the
Dxr2 decoder card using a high-quality RCA cable.
3.
Replace the computer cover and reconnect the power cord.
Installing PC-DVD Encore 13
Dvd-fm.book Page 14 Thursday, December 17, 1998 9:44 AM
Sample Configuration for a
Theater-like Sound System
Center
speaker
Powered
subwoofer
Television
Front
speaker
Front
speaker
Dolby Digital (AC-3)
decoder device
Personal
computer
system
Rear speaker
Rear speaker
Installing PC-DVD Encore 14
Dvd-fm.book Page 15 Thursday, December 17, 1998 9:44 AM
Installing Software
3
PC-DVD Encore includes a diskette containing the driver that controls the PC-DVD drive and Dxr2
decoder drive, and a CD-ROM containing the DVD application “Creative PC-DVD Player.”
To install the DVD software, you need to:
Windows 95
❑
Step 1: Install PC-DVD Encore Device Drivers
❑
Step 2: Install the PC-DVD Player Application
When you restart your computer to install the software, Windows 95 should automatically detect the PCDVD drive and the Dxr2 decoder card.
If you need to install the driver and software manually, click the Start button on the Windows 95 Taskbar,
select Settings, and click on Control Panel. On the Control Panel, double click on the Add New Hardware
icon and follow the on-screen instructions. See your Windows 95 manual for more information.
The instructions that follow show
the installation in Windows 95
and Windows 95 OSR2. If you
are not sure which version you
have, see “Step 1: Learn the
Windows 95 Version” on page 5.
Installing Software 15
English
After you install your PC-DVD drive and Dxr2 decoder card, you may install the PC-DVD software.
Dvd-fm.book Page 16 Thursday, December 17, 1998 9:44 AM
Step 1: Install PC-DVD
Encore Device Drivers
For Windows 95 version 4.00.950 and 4.00.950A:
1. Restart your computer. When Windows 95
starts, new hardware installed in your
computer is automatically detected and the
New Hardware Found dialog is displayed.
Follow the instructions on screen.
2. Insert the PC-DVD Encore installation
diskette into floppy disk drive A or B.
3. Select “Driver from disk provided by the
hardware manufacturer” and click OK.
4.
5.
6.
7.
In the Install From Disk dialog, type A:\ (or B:\) and
click the OK button to copy the driver to the hard disk.
Follow the instructions on the screen to complete the
installation.
Windows may prompt you to restart your computer,
remove the diskette from the floppy disk drive and click the Yes button.
If the prompt does not appear, remove the diskette from the disk drive and restart your computer.
Proceed to “Step 2: Install the PC-DVD Player Application.”
For Windows 95 version 4.00.950B (OSR2):
1. Restart your computer. When Windows 95 starts, it automatically detects the new hardware
installed in your computer.
2. Insert the Creative PC-DVD Encore diskette into your floppy disk drive and click Next.
3. When Windows 95 prompts you for the device driver, click the Finish button.
4. On the Insert Disk dialog, click the OK button.
5. On the Copying Files dialog, type A:\ (A:\ or B:\ is your floppy disk drive) and click the OK button
to copy the device drivers to your hard disk.
6. When Windows prompts you to restart your system, remove the diskette from the floppy disk
drive, select the Yes option, and click the OK button.
7. Proceed to “Step 2: Install the PC-DVD Player Application.”
Installing Software 16
Dvd-fm.book Page 17 Thursday, December 17, 1998 9:44 AM
Step 2: Install the
PC-DVD Player
Application
The PC-DVD Player installation gives you three options:
❑ Typical
❑ Compact
❑ Custom
Compact installation reduces the hard disk space required by not installing some files, such as the Help
files; Custom installation allows you to select the components you want to install.
To install Creative PC-DVD Player:
1.
2.
3.
4.
5.
Enabling DMA Transfer
(Windows 95 OSR2)
Insert the PC-DVD Encore CD into your PC-DVD drive.
If the setup program does not run automatically, follow numbers 2 and 3, below. If the setup
program does run automatically, go to number 4, below.
Click the Start button and click Run.
In the Run dialog, type D:\WINDOWS\SETUP (D is your PC-DVD drive) and click OK.
Follow the instructions on screen to complete the installation.
Once the application is installed, remove the application CD from the PC-DVD drive and
proceed to the next chapter Chapter 4, “Using Creative PC-DVD Player”.
Enabling DMA transfer improves the smoothness of the video display.
To enable DMA transfer:
1. Click the Start button on the Windows 95 Taskbar, select Settings, and click Control Panel.
2. On the Control Panel, double-click the System icon.
3. On the System Properties page, click the Device Manager tab.
4. On the Device Manager tab page, double-click CDROM, then select Creative DVD-ROM.
5. Click the Properties button.
6. On the DVD-ROM drive’s properties dialog, click the Settings tab.
7. In the Options group, select the DMA check box.
Installing Software 17
English
When the PC-DVD Player application is installed using Typical, a program group is created in
Windows 95 that includes:
❑ PC-DVD Player
❑ PC-DVD Help
❑ Readme
Dvd-fm.book Page 18 Thursday, December 17, 1998 9:44 AM
Windows 98
The following instructions describe the installation of the PC-DVD drivers and software in Windows 98.
To install in Windows 98:
1.
The Windows 98 Add New Hardware Wizard automatically detects the Dxr2 decoder card and
attempts to locate the driver media provided by the manufacturer. Insert the PC-DVD Encore
installation diskette and click the Next button.
2.
Select the Search For The Best Driver For Your Device (Recommended) option and click the
Next button.
3.
Clear all check boxes and check only the Specify a Location check box. Type or click the Browse
button and point to the driver path: D:\WINDOWS (D: represents your CD-ROM drive). Click
the Next button.
4.
Click the Next button to install the Windows 98 drivers.
5.
Click the Finish button when the installation is complete.
6.
Restart your computer for the changes to take effect.
7.
After Windows 98 restarts, insert the PC-DVD Encore CD into your PC-DVD drive.
• If the setup program does not run automatically, follow numbers 8 and 9 below.
• If the setup program does run automatically, go to number 10 below.
8.
Click the Start button and click Run.
9.
In the Run dialog, type D:\WINDOWS\SETUP (D: is your PC-DVD drive) and click OK.
10. Follow the instructions on screen to complete the installation.
11. Once the application is installed, remove the application CD from the PC-DVD drive and
proceed to Chapter 4, “Using Creative PC-DVD Player.”
Windows NT
The following instructions describe the PC-DVD software installation in Windows NT 4.0.
To install in Windows NT 4.0
1. Click the Start button on the Taskbar, select Settings, and click on Control Panel.
2. On the Control Panel, double-click the Multimedia icon.
3. On the Audio Devices tab page, click the Add option, and choose the Unlisted or Updated Driver
option. Click the OK button.
4. Insert the PC-DVD installation CD and follow the instructions for each screen to complete the
installation.
Installing Software 18
Dvd-fm.book Page 19 Thursday, December 17, 1998 9:44 AM
4
Using Creative PC-DVD Player
This chapter gives instructions for setting up PC-DVD Player and describes its functions.
Setting Color and
Resolution
Before you use PC-DVD Player, set your monitor to
display “High Color (16-bit)” graphics with a screen
resolution of 800x600 (minimum of 640x480) pixels.
PC-DVD Player works with less color depth (minimum
of 256 colors) and lower resolutions, but the quality
may be poor.
PC-DVD Player prompts you to
automatically configure the video
alignment the first time it is run
following installation, or after you
change the settings for your
monitor in Windows 95.
Using Creative PC-DVD Player 19
English
Creative PC-DVD Player controls the playing of DVDs and CDs on your computer including video and
audio configuration, and viewing constraints.
Dvd-fm.book Page 20 Thursday, December 17, 1998 9:44 AM
To set your system color and resolution:
If you change the display color or
screen resolution setting while
PC-DVD Player is running, you
must restart the application for the
changes to take effect.
Also, some video cards have a
utility for changing the color and
resolution settings. The settings
in the utility and in Windows 95
Display Properties Settings page
should be the same. If the
settings do not correspond,
conflicts may occur. See the
documentation for your video
card for more information.
1.
Click the Start button on the Taskbar, select Settings, and click on Control Panel.
2.
On the Windows Control Panel, double-click the Display icon.
3.
On the Display Properties dialog, click the Settings tab.
From the Color Palette list, select “High Color (16-bit),” use the Desktop Area slider to set the
resolution to 800x600 pixels, and click the OK button.
4.
5.
Windows displays a message that it is about to resize your desktop. When Windows reappears,
you have 15 seconds to accept the settings; after 15 seconds, the old settings are restored. If the
settings are correct, click the Yes button.
On some computers, you may have to restart your computer for the new settings to take effect.
Some video drivers and video card utilities allow you to change the refresh rate of your monitor. If you
experience difficulties with the video when playing DVD titles, try changing the refresh rate to improve
the quality, 60 Hz is recommended.
Run a movie DVD or movie file to
align the video before running a
game or other application from the
PC-DVD drive.
Using Creative PC-DVD Player 20
Dvd-fm.book Page 21 Thursday, December 17, 1998 9:44 AM
Using PC-DVD
Player
Before you begin configuring PC-DVD Player, select the PC-DVD Readme icon and read the text for
updated information that may not be included in this manual.
The first time you start PC-DVD
Player, you may be asked if you
would like PC-DVD Player to
automatically configure its video to
conform to the current Windows 95
settings. The configuration process
may temporarily corrupt the video.
❑
Place a DVD in the PC-DVD drive’s disc tray and start your computer. If the DVD supports
AutoPlay, Windows 95 automatically opens the PC-DVD Player and video display, and begins
playing the title.
❑
With Windows 95 running, click on the Start button on the Taskbar, select Programs, select PCDVD Encore, and click on PC-DVD Player. If there is no disc in the PC-DVD drive, you are
notified that the tray is empty and the Player displays. If there is a disc in the tray, the Player and
video display are opened, and the title begins playing automatically.
When playing a title, you can
switch between the framed display
and full screen by double-clicking
the left mouse button with the
pointer in the viewing area. To
return to the framed display,
double-click the left mouse button.
Using Creative PC-DVD Player 21
English
PC-DVD Player can be started in two ways:
Dvd-fm.book Page 22 Thursday, December 17, 1998 9:44 AM
Creative PC-DVD
Player
PC-DVD Player interface is shown below.
Close
Minimize
Search Chapter
Search Time
Status display
Select Media
You can switch between the
three display modes by clicking
the View button.
Increase Volume
Decrease Volume
Mute
Repeat
Title/Chapter
Configuration
Repeat A-B
Eject/Close
Stop
Play
Details on PC-DVD Player
features are available in the Help
files. To display the Help files,
click the right mouse button with
the pointer in the PC-DVD
viewing area, and click on Help on
the menu.
Numeric Pad for Video CDs
Pause
Step Backward Step Forward
Slow Motion Backward
Audio Menu
Previous
Fast Rewind
DVD Menu
Return button
Click this to return to the
previous menu (if any).
Player
Subpicture Menu
Audio Menu
Angle Menu
Slow Motion Forward
Next
Fast Forward
Aspect Ratio Menu
Parental Control Menu
Bookmark Menu
Menu Navigator Pad
Description
Up arrow moves the cursor up on DVD menus.
Down arrow moves the cursor down on DVD menus.
Left arrow moves down by page in DVD menu selections.
Right arrow moves up by page in DVD menu selections.
Center arrow opens selected DVD menu item.
Displays a list of chapters in a DVD title.
Using Creative PC-DVD Player 22
Dvd-fm.book Page 23 Thursday, December 17, 1998 9:44 AM
Player
Description
Opens the Search menu for selecting a point of time within the title.
Select Media displays a menu of available drive and directory locations. You can use
the Play File dialog to select and search for viewable files.
Marks a segment on the disc that is to be repeated. Press once at the beginning of the
segment; press a second time at the end of the segment. The segment repeats until
settings are cleared by pushing the button again.
Opens the PC-DVD Player settings menu with items for Video and Advanced
Configuration, and Language. See “Setting the Video Configuration” on page 24.
Volume control; click on the up arrow to increase volume or on the down arrow to
decrease the volume.
To mute sound, click on the speaker symbol below the volume arrows. When sound
is muted, the
symbol appears over the speaker symbol in the Status Display.
Opens the DVD menu on the disc. See “DVD Menu (Title)” on page 4-26.
Subpicture menu displays a list of languages available for captions.
Audio Menu
Angle Menu; if no additional camera angles are available, the button is grayed out.
Aspect Ratio menu offers choices for viewing if available on disc.
Parental Control menu
Bookmark menu; press the button to set a bookmark; when one or more bookmarks
are set, a list of bookmarks is available for selection and organization.
Using Creative PC-DVD Player 23
English
Repeats the current chapter (or the complete title). Click button to enable/disable
repeat.
Dvd-fm.book Page 24 Thursday, December 17, 1998 9:44 AM
Status Display
Information that relates to the current DVD title is given in the Status Display.
Time elapsed
Caption language
(if enabled)
The Status Display for Video CDs
is slightly different than shown.
Sound track
language
Camera angle
(if available)
Parental control
setting
Volume level
Audio status; when muted,
is displayed
Relative speed: Blank indicates
normal speed; arrow indicates
forward or reverse
Setting the Video
Configuration
To set PC-DVD defaults:
1.
Before setting the video configuration, pause or stop any disc that is currently playing. On the
PC-DVD Player, click the Configuration button
.
2.
On the Configuration page, select the Video tab.
3.
On the Video tab page, you can adjust:
❑ Brightness (relative lightness/brightness): Move the
slider to the left to decrease; move the slider to the right
to increase brightness.
❑
Contrast (difference between dark and light colors):
Move the slider to the left to decrease; move the slider
to the right to increase contrast.
❑
Saturation (vividness of colors): Move the slider to the
left to decrease; move the slider to the right to increase
saturation.
❑
In the Video Output box, select the Format Type “Keep Output Same as Source” if you TV
supports the output format of the DVD-Video disc. If your TV supports only PAL and the
TV video output is in a different format, select the Format Type “Forced to PAL.” If your
TV supports only PAL and the TV video output is also PAL, select “Keep Output Same as
Source.”
After adjusting the video, you may return to the previously saved settings by pressing Cancel.
Using Creative PC-DVD Player 24
Dvd-fm.book Page 25 Thursday, December 17, 1998 9:44 AM
4.
Click on the Advanced button to display the Advanced
Configuration dialog.
5.
On the Advanced Configuration dialog, select the
Alignment tab.
6.
Click the Auto Align button, and then click the OK button.
During the automatic configuration, your video display will
be corrupted for up to 30 seconds.
8.
If the automatic configuration is not successful, you may
manually adjust the alignment:
a.
On the Advanced Configuration dialog, clear the Color
Key On check box. The overlay video is displayed on
top of the VGA display.
b.
To vertically align the video with the DVD Video window, move the Y-Offset slider.
c.
To horizontally align the video with the DVD Video window, move the X-Offset slider and
the Ratio slider. Continue to adjust the sliders until the blue line around the video is
eliminated and the picture is aligned.
d.
Enable Color Key On.
e.
If traces of blue remain around the edges of the video display, move the Color Key 1 slider
to reduce the blue lines. Move the Color Key 2 slider to the left to eliminate any traces of
blue.
f.
If the edges of the subtitles or captions appear jagged, adjust the In Delay slider.
g.
If the video is now correct, press the OK button to save the settings and return to the
Configuration page. You may return to the previously saved settings by pressing the Restore
button.
English
7.
On the Configuration page, click Advanced to open the Advanced Configuration page and select
Video Adjustment.
Using Creative PC-DVD Player 25
Dvd-fm.book Page 26 Thursday, December 17, 1998 9:44 AM
9.
On the Video Adjustment page:
Gain Control
a. Increase/decrease the intensity of red, green, and blue in
the video display by moving the slider left (decrease) or
right (increase).
b. Increase/decrease the combined colors by moving the
Common Gain slider.
c. When the color intensity is correct, click OK to save the
settings and return to the Configuration dialog.
To return to the previously saved settings, click the
Restore button and click OK to exit Video Adjustment.
Video Cropping
a. To crop the left edge of your video display, move the Left Cropping slider to the right.
b. To crop the right edge of your video display, move the Right Cropping slider to the right.
c. If you experience distortion at the left or right edge of the video display, move the In_Align
Delay slider left/right until the distortion is eliminated.
10. Exit the Advanced Configuration page by clicking the OK button.
DVD Menu (Title)
To display a DVD menu, click the
button on the PC-DVD Player. You must have a DVD in the PCDVD drive to display a DVD menu—the menu displayed depends on the information encoded on the disc.
In general, a title menu includes such items as:
❑ List of scenes or chapters from which you can select and playback
❑ Cast: A list of the primary members of the cast, often with film biographies
❑ Trailer: The “Coming Attraction” theatrical teaser for the title
❑ Production Notes: A message from the title’s director or producer, usually about the making of
the film and/or locations
Language Settings
The Configuration page includes a Language tab page for setting the default language for audio, captions
(subpicture), and menus. If the current disc supports the language choices on the Language tab page, they
are used. If the language choices are not available, the default languages encoded on the disc are used.
Changes made to language choices during playback are used immediately. They do not take effect until
you stop (or pause) and restart (resume) the playback.
Using Creative PC-DVD Player 26
Dvd-fm.book Page 27 Thursday, December 17, 1998 9:44 AM
A
Technical Specifications
Average Access Time (random)
DVD
140 msec
CD
90 msec
Buffer Memory
Data Capacity
DVD
CD
English
PC-DVD Drive
512 KB
One-sided/single layer: 4.7 GB
One-sided/double layer: 8.5 GB
748 MB (Mode 2)
656 MB (Mode 1)
Data Transfer Rate (Sequential)
DVD
6,760 KB/sec (5X)
CD
4,800 KB/sec max. (32X)
Disc Formats Supported
q CD:
CD-Audio
CD-I
CD-WO
Video CD
q DVD:
DVD-5
DVD-10
CD-ROM
CD-ROM/XA
CD-I Ready
CD-I Bridge
CD-RW
Photo CD
Enhanced Music CD
DVD-9
DVD-R
Technical Specifications
27
Dvd-fm.book Page 28 Thursday, December 17, 1998 9:44 AM
Dxr2 Decoder
Card
DynamicXtended Resolution
q Picture Enhancement Technology
q Double scans to 60 fields per second
q Resolution enhancement up to 1280x1024 full screen
q Dynamic vertical and horizontal interpolation filters
Connections
q RCA jack S/PDIF Out (5.1 channel Dolby Digital (AC-3)* audio)
q JST audio output connector (downmix 5.1 channels to stereo)
q High density connector for:
- S-Video output
- Composite Video output
q DB-15 VGA Out
q DB-15 VGA In
Video Playback
q DVD 1.0, MPEG-2 and MPEG-1
q 30 frames per second (NTSC)
q Full screen/window display of up to 1280x1024
q Analog video overlay function
q Simultaneous TV and Computer Display
Audio Playback
q Dolby Digital (AC-3)* ready, 5.1 channel (DVD) digital coded bit stream
q Linear PCM
q MPEG Audio (Video-CD)
VGA Compatibility
q Support Windows resolution up to 1280x1024 at 24-bit color/pixel
* Dolby Digital (AC-3) 5.1 channel audio requires an amplifier or receiver with Dolby Digital
coaxial input.
Technical Specifications
28
Dvd-fm.book Page 29 Thursday, December 17, 1998 9:44 AM
Regional codes are part of the DVD standard—your regional code (Region 1) is embedded in the DVD
software. Regional codes on DVDs are optional. Discs without codes will play on any player or drive in
any country.
There are six major DVD regions:
• Region 1: United States and Canada
• Region 2: Japan, Europe, Middle East, South Africa
• Region 3: Southeast Asia (including Hong Kong)
• Region 4: Australia, New Zealand, Central and South America
• Region 5: Northwest Asia, Africa (except South Africa)
• Region 6:
China
Regional Codes 29
English
Regional Codes
B
Dvd-fm.book Page 31 Thursday, December 17, 1998 9:44 AM
Troubleshooting
C
Sound
PROBLEM
Cause
Solution
PC-DVD Drive
PROBLEM
Cause
Solution
No sound from speakers.
This may be caused by one of the following:
❑ The audio cable or speakers are not connected properly.
❑ The volume is not adjusted to an audible level.
❑ The drive may be faulty.
Try one of the following:
❑ Ensure that the PC-DVD drive, Dxr2 decoder card, and audio card are connected as
shown in the figures in “Step 5: Connect Other Devices to the Dxr2” on page 12. Also,
ensure that the speakers are connected to the audio card’s Speaker Out jack.
Click the Start button on the Windows 95 Taskbar, select Programs, select Accessories,
select Multimedia, and click on Media Player. Open the Device menu and click on CD
Audio. Adjust the volume control slider, if necessary.
Or, if a speaker icon is displayed in the right end of the Windows 95 Taskbar, click the
icon to display the volume control; make sure the Mute checkbox is clear and adjust the
volume control slider as needed.
❑ Connect your headphones to the Stereo Phone jack on the front panel of the PC-DVD
drive. If there is no sound from the headphones when an audio CD is playing in the
PC-DVD drive, consult your dealer about the possibly faulty drive.
On attempting to play a disc, the following message appears: “Disc does not contain
DVD Video data”
PC-DVD Player cannot find the title track and/or information files.
Click on OK to close the message—the disc may be in standard CD-ROM format and may play.
Troubleshooting 31
English
This appendix helps solve problems that you may encounter while installing or using PC-DVD Encore.
Dvd-fm.book Page 32 Thursday, December 17, 1998 9:44 AM
PROBLEM
Cause
Solution
Following hardware installation, the following message appears: “Unable to locate
DVD-ROM drive assume drive D:. Error1”
The PC-DVD drive may not have been configured by Windows 95 or may be disconnected.
❑ Check the cable connections.
❑ Run the Windows 95 Add New Hardware wizard and allow Windows 95 to detect and
install the PC-DVD drive.
PROBLEM
Cause
Solution
The PC-DVD drive is not switched on when the system is restarted.
The power cable is not connected.
Ensure that the power cable is connected to the drive.
PROBLEM
Cause
Solution
PC-DVD drive is not detected.
The IDE data cable is not connected correctly.
Ensure that the IDE data cable is connected properly to the drive and the computer.
PROBLEM
Cause
Solution
Your computer does not recognize the PC-DVD drive.
The driver for the PC-DVD drive or the Dxr2 decoder card is not installed properly.
Re-install the drivers using the installation diskette.
PROBLEM
Cause
The disc tray cannot be ejected.
❒ The eject command is not being transmitted to the PC-DVD drive by your computer.
❑ An application that is currently running is preventing the eject command.
❑ The IDE data cable is not connected correctly.
❒ Turn off the computer. If you have a disc in the disc tray, insert a straightened paper clip
into the Eject hole on the drive’s front panel to eject the disc tray. Restart your computer.
❑ Close the application that is running and restart your computer.
❑ Check the IDE data cable connect between the PC-DVD drive and the computer.
Solution
Video
PROBLEM
Cause
Solution
When attempting to play a DVD, a message is displayed: “The Interactive DVD
Browser requires ActiveMovie. ActiveMovie either is not installed or not functional.”
ActiveMovie was either not installed or is being used by another application.
❒ Check the Windows 95 Taskbar to see if a multimedia application may be running.
❑ Install ActiveMovie: Place the PC-DVD Encore installation CD in the PC-DVD drive;
use Windows 95 Explorer to locate the AMOVIE.EXE file in the AMOVIE directory.
Double-click to install the English-language version of ActiveMovie.
Troubleshooting 32
PROBLEM
Cause
Solution
During video configuration the following message appears: “Auto Alignment failed.”
The Dxr2 decoder card cable not be properly connected.
❒ Check the cable connections on the Dxr2 card, particularly, VGA IN and VGA out.
❑ Start PC-DVD Player, press the Settings button, and select Video Configuration. Press
the Auto button to have the video automatically configured.
PROBLEM
Cause
The video displayed on the monitor is blue or partially blue.
❒ VGA loopback cable is not connected correctly.
❑ Video alignment is not set correctly.
❑ Colorkey value is not set correctly.
❒ Check the VGA loopback cable connection. Try reversing the cable connections.
❑ Open the Video Configuration utility and set the video alignment. Use the Auto button
to configure the video. If this does not work, try make minor adjustments manually.
❑ Change the color combination of the Windows 95 desktop. Click the right mouse button
on the Windows 95 desktop and click on Properties. On the Display Properties page,
click on the Appearance tab. On the Appearance tab page, select Desktop in the Item
list and select a different color from the list. Click on OK to make the change.
Solution
PROBLEM
Cause
Changing settings in CMOS
incorrectly can cause the
system to stop functioning.
Some of the following steps
may not apply to your
computer’s CMOS. Refer to
your computer’s CMOS
documentation for details.
Solution
The video displayed on the monitor is not smooth.
❒ Bus mastering device driver is not installed.
❑ CMOS settings for the PC-DVD drive are not correct.
❑ DMA transfer is not enabled. (Windows 95 OSR2 only.)
❒ Obtain the bus master device driver from your computer manufacturer or dealer.
❑ Do the following in CMOS:
1. Restart your system.
2. During the memory check, press the DELETE key to display the CMOS setup menu.
3. Select Integrated Peripherals and press ENTER.
4. Set your PC-DVD drive’s PIO to Mode 4. For example, if the PC-DVD drive is
connected as Slave to the primary IDE, set IDE Primary Slave PIO to Mode 4.
5. Press ESC to return to the CMOS setup menu.
6. Select Save & Exit Setup and press ENTER.
7. Press the Y key and then press ENTER.
❑ Enable the DMA transfer. See “Enabling DMA Transfer (Windows 95 OSR2)” on page 17.
Troubleshooting 33
English
Dvd-fm.book Page 33 Thursday, December 17, 1998 9:44 AM
Dvd-fm.book Page 34 Thursday, December 17, 1998 9:44 AM
DVD Playback
DVD Title
PROBLEM
Cause
Solution
Error playing back .VOB files from DVD movie titles.
The .VOB files in DVD titles are protected by copyright.
Use Creative PC-DVD Player’s Open File dialog to playback DVD titles.
PROBLEM
Cause
Error playing back .MPG files.
The .MPG files may not conform to MPEG-1 or MPEG-2 format.
PROBLEM
If the DVD has a capacity greater than 4 GB, the size is not read correctly by Windows
95.
This is a limitation of Windows 95 drivers that was corrected in Windows 95 OSR2.
Microsoft has corrected the problem with Windows 95 OSR2 and within Windows 98.
Creative is currently working on device drivers that will correct the situation; check our
website for the availability of the drivers. DVDs still function properly with the PC-DVD
drive.
Cause
Solution
Upgrading Your
Operating System
with PC-DVD
To upgrade from DOS to Windows 95 using the PC-DVD drive (as a CD-ROM drive), install the DOS
driver for your PC-DVD drive:
1. Switch on your computer.
2. Insert the Creative PC-DVD Encore installation diskette into your floppy disk drive.
3. At the DOS prompt, type A:\INSTALL.EXE (A:\ is your floppy disk drive).
4. Follow the instructions on the screen to enable the PC-DVD drive to be recognized as a
CD-ROM drive.
5. Install Windows 95, then install the PC-DVD software.
Troubleshooting 34
Dvd-fm.book Page i Thursday, December 17, 1998 9:44 AM
Introducción
!Felicitaciones por la adquisición de Creative PC-DVD™ Encore! Esta guía proporciona
información acerca de cómo instalar y operar el hardware y software PC-DVD Encore.
El archivo README (LÉAME) incluido en el disco Creative PC-DVD Encore contiene
información y cambios que no estaban disponibles al momento de publicar esta guía.
Recomendamos leer dicho archivo antes de continuar.
Recomendamos también hacer una copia de seguridad del disco antes de comenzar y leer las
siguientes secciones:
❑ Requisitos de sistema
❑ Convenciones de la documentación
Requisitos de sistema
Los requisitos mínimos de sistema para PC-DVD Encore son los siguientes:
❑ Equipo Pentium® 100 MHz PC o compatible
❑ 16 MB de RAM
❑ 8 MB de almacenamiento disponible en el disco duro
❑ Adaptador gráfico SVGA con 2 MB de RAM (Resolución mínima de 800 x 600 a 256
colores. Se recomienda compatibilidad con colores de 16 bits)
❑ Ranura de expansión PCI para la tarjeta descodificadora Dxr2
❑ Compartimiento de media altura para la unidad Creative PC-DVD (algunos sistemas
pueden requerir rieles de instalación, los cuales no se incluyen)
❑ Tarjeta de sonido Sound Blaster o 100 % compatible con Sound Blaster (se recomienda
extremadamente el uso de una tarjeta Sound Blaster 32, AWE32, o bien Sound Blaster
AWE4)
❑ Microsoft® Windows® 95, Windows 98, or Windows NT
Introducción
E-i
Español
Antes de
comenzar
Dvd-fm.book Page ii Thursday, December 17, 1998 9:44 AM
Convenciones de la
documentación
Las siguientes convenciones ayudan a identificar y encontrar la información contenida en esta
documentación.
Texto
Elemento
Uso
negritas
Texto que debe escribirse tal cual se indica.
cursivas
En la línea de comandos del DOS, el texto en cursiva indica información
que debe proporcionar el usuario y generalmente se incluye seguida de un
comando.
También se usa en una palabra o frase que se define a continuación o bien
el título de un libro o manual.
MAYÚSCULAS
Nombre de una tecla, directorio, archivo o sigla.
Iconos
Icono
Uso
Nota.
Advertencia.
Introducción
E-ii
Dvd-fm.book Page 1 Thursday, December 17, 1998 9:44 AM
Familiarización con PC-DVD Encore
1
PC-DVD Encore puede reproducir no sólo las películas DVD más recientes, si no que también los demás
formatos de CD, como por ejemplo CDs de música, software en CD-ROM y CD-R.
PRECAUCIÓN: El uso de
otros controles o ajustes, o
realizar procedimientos fuera
de los explicados en esta guía
puede resultar en exposición
peligrosa a la radiación.
Familiarización con PC-DVD Encore
E-1
Español
PC-DVD Encore representa un adelanto sorprendente en tecnología de discos ópticos. Un disco de vídeo
digital (DVD) posee una capacidad máxima de almacenamiento de datos más de veinticinco veces
superior a la de los CDs normales. Por ejemplo, !en un solo disco se puede incluir una película de largo
metraje con banda sonora digital! La unidad PC-DVD y la tarjeta descodificadora Dxr2 permiten
reproducir vídeo de movimiento continuo con sonido multicanal a través de un equipo PC o de un
aparato de TV.
Dvd-fm.book Page 2 Thursday, December 17, 1998 9:44 AM
Unidad PC-DVD
Los controles básicos de la unidad PC-DVD se encuentran en el panel frontal de la misma. Los
conectores para la alimentación, transferencia de datos y sonido se encuentran en el panel posterior.
Panel frontal
Enchufe para auriculares estéreo
sirve para conectar auriculares o
altavoces amplificados.
Bandeja del disco
esta es una bandeja mecanizada que
se utiliza para cargar los DVDs o
CDs. Presionar el botón de
Expulsión para abrir la bandeja.
Botón de expulsión
se utiliza para abrir o cerrar la bandeja del disco.
Nota: si se desea abrir la bandeja y sacar un disco,
salir antes de cualquier aplicación que esté utilizando
la unidad PC-DVD y sólo después presionar el botón
de expulsión.
La apariencia del panel frontal de
la unidad PC-DVD adquirida
puede diferir ligeramente de la
ilustración siguiente.
Control de volumen
ajusta el volumen de los auriculares o de los altavoces
amplificados que se conectan al enchufe para
auriculares estéreo. Este control no afecta el sonido de
los dispositivos que estén conectados directamente a
la tarjeta de sonido (como por ejemplo altavoces).
Indicador de actividad
se enciende cada vez que
la unidad está leyendo
información contenida en
un disco.
Orificio de expulsión
se puede utilizar para extraer la bandeja
del disco, si fuera necesario, insertando
una presilla de papel recta tal como se
muestra a continuación.
Nota: Apagar la alimentación eléctrica
del equipo PC antes de insertar una
presilla de papel en el orificio de
expulsión de la bandeja del disco.
Extraer la bandeja
suavemente. El
uso de fuerza
excesiva para
extraer la bandeja
puede dañar la
unidad.
Familiarización con PC-DVD Encore
E-2
Dvd-fm.book Page 3 Thursday, December 17, 1998 9:44 AM
Conector IDE mejorado para transmisión de datos
transfiere datos entre la unidad de PC-DVD y los demás dispositivos,
como por ejemplo el disco duro o la tarjeta principal del equipo PC,
cuando se conecta usando un cable de datos IDE.
Conector de sonido CD
envía sonido de la unidad PC-DVD a través del
descodificador Dxr2 a la tarjeta de sonido cuando se
conecta usando un cable de sonido para CD.
Conector de entrada de
alimentación
se conecta al cable de
alimentación eléctrica
proveniente de la fuente de
Conector de sonido digital
se conecta a una cinta de
sonido digital (DAT) o un
sistema de sonido profesional para
realizar grabaciones digitales.
Nota: Este conector cumple con la
norma EBU-IEC958 establecida
por la Unión de Radiodifusión
Europea (EBU).
Puente de selección Principal/
subordinada
establece a la unidad PC-DVD como
principal o bien subordinada cuando se
la conecta a otra unidad PC-DVD o
CD-ROM.
Nota: La Selección del cable está
reservada y no debe utilizarse.
Principa
Subordinada
(opción
predeterminada)
Familiarización con PC-DVD Encore
E-3
Español
Panel posterior
Dvd-fm.book Page 4 Thursday, December 17, 1998 9:44 AM
Tarjeta
descodificadora
Dxr2
La tarjeta DynamicXtended Resolution, o bien “Dxr2”, permite reproducir discos de vídeo MPEG-1,
MPEG-2 y digitales (DVDs) en la pantalla del equipo PC con una resolución de hasta 1280 x 1024 pixeles
y a una velocidad de hasta 30 fotogramas por segundo.
La tarjeta descodificadora Dxr2 posee los siguientes enchufes y conectores.
Conector de salida de sonido
se conecta al enchufe de sonido CD
de la tarjeta de sonido.
Enchufe Dolby Digital (AC-3) S/PDIF
se conecta a un dispositivo Dolby
Digital externo compatible con las
especificaciones AC-3.
Enchufe de salida para TV
se conecta al aparato de televisión
usando el cable de salida para TV
Conectores de entrada de sonido
se conecta a la unidad PC-DVD y/o a
la unidad CD-ROM.
DIGITAL_OUT
Enchufe de entrada VGA
se conecta a la tarjeta VGA del
equipo PC usando un cable de
retroalimentación. Este cable envía
las señales de vídeo desde la tarjeta
Conector de salida para monitor
se conecta al monitor VGA usando el
cable correspondiente y permite enviar señales de
vídeo desde la tarjeta descodificadora Dxr2 al monitor
VGA.
Conector de salida de digital
se conecta al enchufe de entrada I2S de la tarjeta de audio.
Nota: Su tarjeta Dxr2 puede no tener este connector. Su
tarjeta audio puede no tener este conector. Refiera a su
manual de tarjeta audio para más información.
Familiarización con PC-DVD Encore
E-4
Dvd-fm.book Page 5 Thursday, December 17, 1998 9:44 AM
Accesorios
El kit PC-DVD Encore incluye lo siguiente:
❑ Conector de sonido con enchufes dobles
❑ Cable de sonido PC-DVD
❑ Cable de retroalimentación VGA
❑ Cable de salida para TV
❑ Cable de datos IDE
A la tarjeta de sonido
A la unidad PC-DVD
A la tarjeta descodificadora
Dxr2 o a la tarjeta de sonido
Cable de sonido PC-DVD
Cable de sonido con
conector doble
El cable de salida para TV es de
aproximadamente 6 pies de largo.
Para alargar este cable se necesita
un adaptador de hembra a
hembra, disponible a través del
Departamento de Servicio a los
Clientes de Creative Labs, y un
cable S-Video adicional con
conectores macho en cada
extremo.
Cable de retroalimentación VGA
conecta la tarjeta VGA del equipo
PC a la tarjeta descodificadora Dxr2.
Español
A la tarjeta
descodificado
ra Dxr2
Cable de datos IDE
conecta la unidad PC-DVD a la
tarjeta principal del equipo PC o a
una tarjeta de interfaz IDE.
Enchufe S-Video
Enchufe de salida de
vídeo compuesto
Cable de salida para TV
conecta un monitor de TV a la
tarjeta descodificadora Dxr2.
Familiarización con PC-DVD Encore
E-5
Dvd-fm.book Page 7 Thursday, December 17, 1998 9:44 AM
Instalación de Creative PC-DVD Encore
2
Este capítulo explica cómo instalar y configurar la unidad PC-DVD y la tarjeta descodificadora Dxr2 en
el equipo PC:
❑ Paso 1: Identificación de la versión de Windows 95
❑ Paso 2: Instalación de la tarjeta descodificadora Dxr2
❑ Paso 3: Instalación de la unidad en el equipo PC
❑ Paso 4: Conexión de la unidad PC-DVD al equipo PC
Paso 1:
Identificación de la
versión de
Windows 95
La instalación de Creative PC-DVD Encore varía dependiendo de la versión de Windows 95. Si se
desconoce la versión de Windows 95 instalada en el equipo, usar los pasos siguientes para identificarla.
Si ya se conoce la versión, continuar con el “Paso 2: Instalación de la tarjeta descodificadora Dxr2” en
página E-8.
Para identificar la versión de Windows 95:
1. Hacer clic en el botón Inicio, seleccionar Configuración y hacer clic el Panel de control.
2. En el Panel de control, hacer doble clic en el icono Sistema.
La versión de Windows 95 aparece indicada en la ficha General del cuadro de diálogo
Propiedades del sistema.
3. Tomar nota de la versión de Windows 95:
❑ 4.00.950
❑ 4.00.950A
❑ 4.00.950B
4. Salir de Windows 95 y apagar el equipo.
5. Seguir con el “Paso 2: Instalación de la tarjeta descodificadora Dxr2”.
Instalación de Creative PC-DVD Encore
E-7
Español
❑ Paso 5: Conexión de otros dispositivos a la tarjeta Dxr2
Dvd-fm.book Page 8 Thursday, December 17, 1998 9:44 AM
Paso 2:Instalación
de la tarjeta
descodificadora
Dxr2
La tarjeta descodificadora Dxr2 se introduce en una ranura de expansión PCI.
Para instalar la tarjeta descodificadora Dxr2:
1. Apagar el equipo PC y todos los demás dispositivos conectados a este. Desconectar el cable
de alimentación eléctrica.
2. Tocar una superficie metálica del exterior del
equipo para descargar la electricidad estática
del cuerpo.
Nota: Consultar el
manual del equipo PC
para obtener ayuda al
identificar las ranuras.
3. Sacar la cubierta del equipo.
Utilizar la ranura número uno del
equipo PC, si se encuentra
disponible, para obtener los
mejores resultados en cuanto a
desempeño y compatibilidad.
Consultar la documentación del
equipo PC para obtener más
información acerca de las ranuras
de expansión.
No forzar la tarjeta descodificadora
Dxr2 dentro de la ranura. Si ésta no
entra fácilmente, sacarla e intentar
nuevamente.
4. Encontrar una ranura PCI disponible para
instalar la tarjeta descodificadora Dxr2. La
posición relativa de las ranuras de expansión
PCI y el largo de las mismas se ilustran.
5. Quitar la cubierta metálica de la ranura de
expansión.
6. Alinear la tarjeta descodificadora Dxr2
con la ranura de expansión PCI y
presionarla hasta que entre fácilmente, tal
como se muestra. La tarjeta debe quedar
asentada firmemente dentro de la ranura
PCI.
Ranura
PCI
Ranura
ISA
RanuraVL
B. Atornillar la tarjeta en su lugar
con el tornillo de sujeción.
A. Presionar la tarjeta
descodificadora Dxr2 para
introducirla en la ranura.
7. Asegurar la tarjeta descodificadora Dxr2
en la ranura usando el tornillo de sujeción
de la cubierta metálica de la misma.
8. Seguir con el “Paso 3: Instalación de la
unidad en el equipo PC”.
Ranura PCI
Instalación de Creative PC-DVD Encore
E-8
Dvd-fm.book Page 9 Thursday, December 17, 1998 9:44 AM
Se recomienda conectar los
cables como se describe más
adelante antes de insertar la
unidad en el compartimiento
para la misma. En tal caso,
insertar los cables a través del
compartimiento a la vez que se
desliza la unidad.
1. Insertar la unidad PC-DVD en el
compartimiento como se muestra.
2. Conectar el cable de alimentación
desde el equipo PC a la unidad PCDVD. Por lo general, la fuente de
alimentación del equipo se
encuentra en una de las esquinas
posteriores y de ella salen varios
cables de alimentación con
conectores para dispositivos
adicionales internos.
Conector de la
toma de
alimentació
Español
Paso 3: Instalación
de la unidad en el
equipo PC
Cable de
abastecimiento
Instalación de Creative PC-DVD Encore
E-9
Dvd-fm.book Page 10 Thursday, December 17, 1998 9:44 AM
Cerciorarse de conectar el extremo
correcto del cable de sonido PCDVD a la unidad. Consultar la
figura en la página E-4 para
obtener detalles acerca del
conector para la tarjeta
descodificadora Dxr2. Conectar el
otro extremo a la unidad PC-DVD.
3. Conectar el cable de
transferencia de datos
IDE a la unidad PCDVD.
Pin1
Nota: Alinear la banda
de color del cable de
datos IDE con el pin 1
del conector para
datos IDE.
Banda de
color
Conector para
datos IDE
Cable para
datos IDE
4. Conectar el cable de
sonido PC-DVD a la
unidad PC-DVD.
Cable de sonido
PC-DVD
Instalación de Creative PC-DVD Encore
E-10
Dvd-fm.book Page 11 Thursday, December 17, 1998 9:44 AM
Paso 4: Conexión
de la unidad
PC-DVD al equipo
PC
Ahora se puede conectar la unidad PC-DVD al controlador IDE de la tarjeta principal del equipo PC. La
tarjeta principal del equipo debe tener dos conectores IDE: El primario por lo general se usa para el disco
duro del equipo y el secundario está reservado para dispositivos tales como unidades de CD-ROM.
Consultar la documentación del equipo PC para obtener información acerca de la ubicación de los
conectores IDE.
Conectar la unidad PC-DVD a uno de los siguientes conectores:
❑ Conector IDE secundario (se recomienda)
Consultar “Conector IDE secundario”, más abajo.
❑ Conector IDE secundario con CD-ROM
Consultar “Conector IDE secundario con CD-ROM” en página E-12.
❑ Conector IDE primario con disco duro
Consultar “Conector IDE primario con disco duro” en página E-13.
Si el equipo tiene una unidad de CD-ROM IDE instalada, consultar el “Paso 5: Conexión de otros
dispositivos a la tarjeta Dxr2” en página E-14.
Español
Conector IDE secundario
Para conectar la unidad PC-DVD al conector IDE secundario:
1. Establecer la unidad PC-DVD como la principal
colocando el puente como se muestra.
2. Ubicar el conector IDE secundario en la tarjeta principal
del equipo.
3. Conectar el cable de datos IDE al conector IDE
secundario, alineando la banda de color del mismo al pin
1 del conector IDE.
Principal
Subordinada
(opción
predeterminada)
4. Conectar el cable de sonido PC-DVD al conector de entrada de sonido de la tarjeta
descodificadora Dxr2 (página E-4).
5. Deslizar la unidad hasta que quede bien colocada en el compartimiento y atornillarla con
los tornillos provistos. Seguir con el “Paso 5: Conexión de otros dispositivos a la tarjeta
Dxr2” en página E-14.
Instalación de Creative PC-DVD Encore
E-11
Dvd-fm.book Page 12 Thursday, December 17, 1998 9:44 AM
Conector IDE secundario
con CD-ROM
Para conectar el conector IDE secundario con una unidad CD-ROM:
1. Encontrar el conector IDE secundario en la tarjeta principal del equipo.
2. Establecer los puentes de la unidad PC-DVD para configurarla como principal y los puentes
de la unidad de CD-ROM para configurarla como subordinada (página E-3).
3. Conectar la unidad PC-DVD a la unidad de CD-ROM con el cable de datos IDE, tal como
se muestra más adelante.
4. Conectar la unidad PC-DVD al conector IDE secundario usando del cable de datos IDE, tal
como se muestra más adelante.
Usar con Windows 95 OSR2
(4.00.950B) solamente. No se
recomienda para otras versiones de
Windows 95. Consultar el “Paso 1:
Identificación de la versión de
Windows 95” en página E-7.
5. Conectar el cable de sonido PC-DVD al conector de entrada de sonido (1) de la tarjeta
descodificadora Dxr2 y el cable de sonido CD al conector de entrada de sonido (2) de la
tarjeta descodificadora Dxr2 (página E-4).
Unidad PC-DVD
(principal)
Conector de
datos IDE
Pin 1
Cable de
alimentación
Banda de
color
Unidad de CD-ROM
(subordinada)
Pin 1
Cable de
sonido PC-DVD
Cable de sonido CD
Nota: Alinear la banda de color del
cable de datos IDE con el pin 1 del
conector para datos IDE de la unidad
Cable de
alimentación
Al conector IDE
secundario
6. Deslizar las unidades hasta que queden bien colocadas en sus compartimientos y
atornillarlas con los tornillos provistos.
7. Seguir con el “Paso 5: Conexión de otros dispositivos a la tarjeta Dxr2” en página E-14.
Instalación de Creative PC-DVD Encore
E-12
Dvd-fm.book Page 13 Thursday, December 17, 1998 9:44 AM
Para conectar la unidad PC-DVD al conector IDE primario conjuntamente con una unidad de disco duro:
1. Crear una copia de respaldo de la información contenida en el disco duro antes de proceder.
2. Configurar los puentes de identificación en la unidad PC-DVD y en el disco duro (ver la
figura en la página E-3). Establecer el disco duro como principal y la unidad PC-DVD
como subordinada.
3. Conectar el cable de alimentación y el cable de datos IDE al disco duro del equipo.
Unidad PC-DVD
(subordinada)
Cable de
alimentación
Unidad de disco
duro (principal)
Cable de
sonido PC-DVD
Español
Conector IDE primario
con disco duro
Pin 1
Cable de
alimentación
Banda de
color
Cable de datos IDE
Nota: Alinear la banda de color
del cable de datos IDE con el pin
1 del conector para datos IDE
de la unidad de disco duro.
Al conector IDE
primario
4. Conectar el cable de sonido PC-DVD al conector de entrada de la tarjeta descodificadora
Dxr2 (figura en la página E-4).
5. Deslizar las unidades hasta que queden bien colocadas en sus compartimientos y
atornillarlas (con los tornillos provistos, para la unidad PC-DVD).
6. Seguir con el “Paso 5: Conexión de otros dispositivos a la tarjeta Dxr2.”
Instalación de Creative PC-DVD Encore
E-13
Dvd-fm.book Page 14 Thursday, December 17, 1998 9:44 AM
Paso 5: Conexión
de otros dispositivos
a la tarjeta Dxr2
Para conectar otros dispositivos a la tarjeta descodificadora Dxr2:
1. Conectar la unidad PC-DVD y otros dispositivos (unidad de CD-ROM, tarjeta de sonido,
etc.) a la tarjeta Dxr2 usando los cables de sonido.
Tarjeta de sonido
Unidad PC-DVD
Conecte los altavoces
amplificados al
enchufe de salida
para linea.
Conector de
sonido CD
Unidad de CD-ROM
Cable de conexión doble
Cable de
sonido JST
a ATAPI
DIGITAL_OUT
Nota: Conecte sólo uno de los
conectores de sonido CD al
conector de sonido de la
tarjeta de sonido. Consultar la
documentación de la misma
para identificarlo.
Conector de entrada
de sonido (1)
Conector de
salida de sonido
Conector de
entrada de
sonido (2)
Cable de sonido
CD-ROM (no se
incluye)
Tarjeta
descodificadora Dxr2
Instalación de Creative PC-DVD Encore
E-14
Dvd-fm.book Page 15 Thursday, December 17, 1998 9:44 AM
2. Desconectar el monitor de la tarjeta VGA y volver a conectarlo al conector inferior de la
tarjeta descodificadora Dxr2 (Figura 2-11). Conectar la tarjeta VGA y la tarjeta
descodificadora Dxr2 usando el cable de retroalimentación VGA provisto.
A un dispositivo descodificador
de sonido Dolby Digital (AC-3)
S-Video
Al aparato
de TV
Cable Dolby Digital (AC-3)
S/PDIF (no se incluye)
Tarjeta descodificadora Dxr2
Cable de salida
para TV
Salida de vídeo compuesto
Tarjeta
VGA
Se requiere una tarjeta de sonido
Sound Blaster o compatible con
Sound Blaster para conectar a la
tarjeta descodificadora Dxr2. Para
obtener la calidad de sonido
superior disponible con Dolby
Digital, se recomienda usar una
tarjeta de sonido Sound Blaster
AWE32 o Sound Blaster AWE64.
Consultar la figura en la página E16 para un ejemplo de instalación
de con reproducción de sonido de
calidad cinematográfica.
Nota: Consultar la figura en la página E-4 para obtener
más detalles acerca de la ubicación los conectores y
enchufes de la tarjeta descodificadora Dxr2.
Español
Cable de
retroalimentación
VGA
Monitor
VGA
Para reproducir discos DVD usando el aparato de televisión, usar el cable de salida para TV
para conectar el TV al conector de salida para TV de la tarjeta descodificadora Dxr2.
Para reproducir sonido digital de un disco DVD o CD, conectar un receptor Dolby Digital
o un amplificador a la tarjeta descodificadora Dxr2 usando un cable RCA de alta calidad.
3. Volver a colocar la cubierta del equipo PC y reconectar el cable de alimentación principal.
Instalación de Creative PC-DVD Encore
E-15
Dvd-fm.book Page 16 Thursday, December 17, 1998 9:44 AM
Configuración de muestra
para establecer un sistema
de sonido de calidad
cinematográfica
Altavoz
central
Subwoofer
amplificado
Televisión
Altavoz
frontal
Altavoz
frontal
Dispositivo descodificador
Dolby Digital (AC-3)
Equipo
PC
Altavoz
posterior
Altavoz
posterior
Instalación de Creative PC-DVD Encore
E-16
Dvd-fm.book Page 17 Thursday, December 17, 1998 9:44 AM
3
Instalación del software
Después de instalar Creative PC-DVD Encore en el equipo PC hay que proseguir a instalar el software
correspondiente.
Para instalar el software DVD se deben seguir los siguientes pasos:
❑ Paso 1: Instalación de los controladores de dispositivos DVD
❑ Paso 2: Instalación de la aplicación de reproducción PC-DVD Player
Windows 95
Las instrucciones que aparecen a
continuación muestran la
instalación en Windows 95 y
Windows 95 OSR2. Las pantallas
de instalación varían de acuerdo a
la versión de Windows 95
instalada.
Cuando encienda su equipo, Windows 95 detecta automáticamente que se ha instalado hardware nuevo y
solicita el disco de instalación del software correspondiente. La instalación puede variar dependiendo del
software y hardware que se haya instalado anteriormente y del orden en el cual Windows 95 detecta el
nuevo hardware.
Si se necesita instalar los controladores y el software manualmente, hacer clic en el botón Inicio de la
Barra de tareas de Windows 95, seleccionar Configuración y hacer clic en el Panel de control. En el Panel
de control, hacer doble clic en el icono Agregar nuevo hardware y seguir las instrucciones que aparecen
en pantalla. Consultar el manual de Windows 95 para obtener más información.
Instalación del software
E-17
Español
PC-DVD Encore incluye un disco que contiene el controlador para la unidad PC-DVD y la tarjeta
descodificadora Dxr2, además de un CD que contiene la aplicación DVD “Creative PC-DVD Player.”
Dvd-fm.book Page 18 Thursday, December 17, 1998 9:44 AM
Paso 1:
Instalación de los
controladores de
dispositivos PC-DVD
Para Windows 95 versión 4.00.950 y 4.00.950A:
1. Volver a encender el equipo PC. Al iniciarse
Windows 95 se detecta automáticamente el
nuevo hardware instalado y aparece el cuadro de
diálogo “Nuevo hardware encontrado.” Seguir
las instrucciones que aparecen en pantalla.
2. Insertar el disco de instalación de PC-DVD
controladores en la unidad A o B del equipo.
3. Seleccionar “Controlador de un disco
proporcionado por el fabricante de hardware” y
hacer clic en el botón Aceptar.
4. En el cuadro de diálogo Instalar desde disco, escribir A:\
(o bien B:\) y hacer clic en el botón Aceptar para que se
cargue el controlador de la tarjeta descodificadora Dxr2
en el disco duro.
5. Seguir las instrucciones que aparecen en pantalla para
finalizar la instalación.
6. Cuando el sistema solicite reiniciar el equipo, sacar el disco de la unidad y hacer clic en
el botón Sí.
7. Seguir con el “Paso 2: Instalación de la aplicación de reproducción PC-DVD Player.”
Para Windows 95 versión 4.00.950B:
1. Volver a encender el equipo PC. Al iniciarse Windows 95 se detecta automáticamente el nuevo
hardware instalado en el equipo.
2. Insertar el disco Creative PC-DVD Controladores en la unidad de disco correspondiente y
presionar el botón Siguiente.
3. Cuando Windows 95 solicite el controlador del dispositivo. hacer clic en Finalizar.
4. En el cuadro de diálogo Insertar disco , hacer clic en el botón Aceptar.
5. En el cuadro de diálogo Copiar archivos de, escribir A:\ (A:\ o bien B:\ representa la unidad de
disco) y hacer clic en el botón Aceptar para copiar los controladores de dispositivos al disco duro.
6. Cuando el sistema solicite reiniciar el equipo, sacar el disco de la unidad, seleccionar la opción
Sí y hacer clic en Aceptar.
7. Seguir con el “Paso 2: Instalación de la aplicación de reproducción PC-DVD Player.”
Instalación del software
E-18
Dvd-fm.book Page 19 Thursday, December 17, 1998 9:44 AM
Paso 2: Instalación de
la aplicación de
reproducción
PC-DVD Player
La instalación de PC-DVD Player permite tres opciones:
❑ Típica
❑ Compacta
❑ Personalizada
Al instalar la aplicación PC-DVD Player usando la opción Típica, en Windows 95 se crea un grupo de
programas que incluye:
❑ Aplicación PC-DVD Player
❑ Ayuda para PC-DVD
❑ Archivo de lectura
Para instalar Creative PC-DVD Player:
1. Insertar el CD de la aplicación en la unidad PC-DVD.
Si el programa de instalación no se ejecuta automáticamente, seguir los pasos 2 y 3 que aparecen a
continuación. Si el programa de instalación se ejecuta automáticamente, proseguir con el paso 4.
2. Hacer clic en el botón Inicio y después en Ejecutar.
3. En el diálogo ejecutar, escribir D:\WINDOWS\SETUP, hacer clic en Aceptar.
4. Seguir las instrucciones que aparecen en pantalla para finalizar la instalación.
5. Una vez instalada la aplicación, remueva el CD de aplicación del lector PC-DVD y proceda al
Capítulo 4, “Utilización del Creative PC-DVD Playe.”
Habilitación de
transferencia DMA
(Windows 95 OSR2
solamente)
La habilitación de la transferencia DMA mejora la uniformidad de la presentación de vídeo.
Para habilitar la transferencia DMA:
1. Hacer clic en Inicio de la Barra de tareas, seleccionar Configuración y hacer clic en Panel de control.
2. En el Panel de control hacer doble clic en el icono Sistema.
3. En la página Propiedades del sistema, hacer clic en la ficha Administrador de dispositivos.
4. En la ficha Administrador de dispositivos, hacer doble clic en CDROM y después seleccionar
Creative DVD-ROM.
5. Hacer clic en Propiedades.
6. En el diálogo de las propiedades de la unidad DVD-ROM, hacer clic en la ficha Propiedades.
7. En el grupo Opciones, marcar la opción DMA.
Instalación del software
E-19
Español
Compacta reduce el espacio requerido en el disco duro al no instalar algunos de los archivos, como por
ejemplo los de Ayuda. Personalizada permite seleccionar los componentes que se desea instalar.
Dvd-fm.book Page 20 Thursday, December 17, 1998 9:44 AM
Windows 98
Las siguientes instrucciones describen la instalación de los controladores y el software PC-DVD en
Windows 98.
Para instalar en Windows 98:
1.
El Wizard de Agregar Nuevo Soporte Físico de Windows 98 automáticamente detecta la tarjeta
decodificadora Dxr2 y tratar de ubicar el controlador media provisto por el fabricante. Inserte el
disquete de instalación de PC-DVD Encore y haga clic en el botón Continuar.
2.
Seleccione la opción Buscar el Mejor Controlador para su Dispositivo (Recomendado) y haga
clic en el botón Continuar.
3.
Borre todas las casillas de verificación y seleccione solamente la casilla Especificar una Ubicación.
Escriba o haga clic en el botón Examinar y apunte hacia el camino del controlador: D:\WINDOWS
(D: representa su lector CD-ROM). Haga clic en Continuar.
4.
Haga clic en el botón Continuar para instalar los controladores de Windows 98.
5.
Haga clic en el botón Terminar una vez terminada la instalación.
6.
Reinicie su computador para que tomen efecto los cambios.
7.
Una vez se reinicie Windows 98, inserte el CD PC-DVD Encore en su lector PC-DVD.
• Si el programa de montaje no se ejecuta automáticamente, siga los números 8 y 9 más abajo.
• Si el programa de montaje se ejecuta automáticamente, vaya al número 10 más abajo.
8.
Haga clic en el botón Iniciar y haga clic en Ejecutar.
9.
En el dialogo Ejecutar, escriba D:\WINDOWS\SETUP y haga clic en Aceptar.
10. Siga las instrucciones en la pantalla para completar la instalación.
11. Una vez instalada la aplicación, remueva el CD de aplicación del lector PC-DVD y proceda al
Capítulo 4, “Utilización del Creative PC-DVD Player.”
Windows NT
Las siguientes instrucciones describen la instalación en Windows NT 4.0.
Para instalar en Windows NT 4.0:
1. Haga clic en Iniciar en la Barra de Tarea, seleccione Parámetros, y haga clic en Panel de Control.
2. En el Panel de Control, haga doble clic en el icono Multimedia.
3. En la página tabulada Dispositivos de Audio, haga clic en Agregar opción y escoja la opción
Controlador No Enumerado o Actualizado. Haga clic en el botón Aceptar.
4. Inserte el disco de instalación de Creative PC-DVD Drivers (controladores) y siga las instrucciones
para cada pantalla para terminar la instalación.
Instalación del software
E-20