1
r
Owner’s Manual
We’d like to take a moment to thank you for purchasing the Roland KR-3 Digital Intelligent Piano.
In order to enjoy reliable performance for many years
to come, please take the time to read this manual in its
entirety.
Main features
❏ Three instruments in one
The KR-3 can be used as piano, organ, or “keyboard”
(i.e. a synthesizer with automatic accompaniment) –
all at the touch of a button.
❏ 270 Tones (sounds) and 136 Styles built-in
Support for a wide range of musical genres. Additional
“Acoustic” Styles are provided on the included Style
disk.
❏ Piano Tones that rely on stereo sampling
The technology used ensures that your KR-3 provides
some of the finest concert grand piano sounds available on electronic musical instruments.
❏ 64-voice polyphony
Up to 64 voices can be played simultaneously. (In
most instances your KR-3 is 64-voice polyphonic.)
❏ Simple yet versatile Composer
Simple recording.
Playback of commercial music data.
A comprehensive Composer menu:
❏ GM (General MIDI) and GS compatible
• General MIDI System m
The General MIDI System is a set of recommendations which seeks to standardize the MIDI support
features of sound generating devices. Sound generating devices and musical data (disks) carrying the General MIDI logo conform to the General MIDI
specifications. This means that whenever you play
back music data marked with the General MIDI logo,
the musical response will be identical when played on
any device which also carries the General MIDI logo.
• GS Format g
Roland developed the GS Format to standardize the
response of sound generators when MIDI is used for
the production of music. By using a GS Format sound
generating device, you can be assured that you will
always obtain a faithful, high-quality rendition of any
commercially available music data that carries the GS
Format logo.
The KR-3’s tone generator fully supports both the
General MIDI system and the GS Format—so you can
use music data that is designed for either standard.
❏ Reads and writes SMF Music Data
The KR-3 is capable of playing Standard MIDI Files,
such as “SMF Music Data” (720 KB/1.44 MB format
3.5 inch floppy disks).
• 16-track Sequencer
• Chord Sequencer
• Song Edit
• Style Composer
• Style Converter
Copyright © 2002 ROLAND EUROPE spa.
All rights reserved. No part of this publication may be reproduced in any form without the written permission of ROLAND EUROPE spa.
1
KR-3 Owner’s Manual—Contents
Contents
1. Important notes. . . . . . . . . . . . . . . . . . . . . . . . 5
10.Function Menu . . . . . . . . . . . . . . . . . . . . . . . .40
2. Panel descriptions . . . . . . . . . . . . . . . . . . . . . . 6
10.1 Piano screen functions. . . . . . . . . . . . . . . . . . . . . . . . . . .40
10.2 Organ screen functions . . . . . . . . . . . . . . . . . . . . . . . . . .42
10.3 Basic screen functions . . . . . . . . . . . . . . . . . . . . . . . . . . .42
3. Before using the KR-3 . . . . . . . . . . . . . . . . . . . 9
3.1
3.2
3.3
3.4
3.5
9
9
9
9
9
11.Music Assistant, Pad buttons, pedals . . . . . .43
4. Basic operation and display . . . . . . . . . . . . . 11
12.Utility Menu . . . . . . . . . . . . . . . . . . . . . . . . . .46
5. Overview of the KR-3 . . . . . . . . . . . . . . . . . . 12
12.1 Operating procedure. . . . . . . . . . . . . . . . . . . . . . . . . . . .46
12.2 Utility functions . . . . . . . . . . . . . . . . . . . . . . . . . . . . . . . .46
5.1
5.2
5.3
5.4
Setting up the music rest . . . . . . . . . . . . . . . . . . . . . . . . .
Connecting the power cable . . . . . . . . . . . . . . . . . . . . . .
Turning the instrument on and off. . . . . . . . . . . . . . . . .
Using headphones . . . . . . . . . . . . . . . . . . . . . . . . . . . . . .
Connecting external amplifiers and other devices. . . . .
Introduction of the main functions — [DEMO] . . . . . .
Performance functions. . . . . . . . . . . . . . . . . . . . . . . . . .
Playing back songs on disk . . . . . . . . . . . . . . . . . . . . . .
Pitch Bend and Transpose . . . . . . . . . . . . . . . . . . . . . . .
12
13
16
17
6. Tones and related functions. . . . . . . . . . . . . 18
6.1 Selecting Tones. . . . . . . . . . . . . . . . . . . . . . . . . . . . . . . . 18
Drum sounds and sound effects — [DRUMS/SFX] . . . . . . 18
Adding effects to Tones. . . . . . . . . . . . . . . . . . . . . . . . . . . . . . 19
Octave Shift: changing the pitch by octaves . . . . . . . . . . . . . 19
6.2 Keyboard modes. . . . . . . . . . . . . . . . . . . . . . . . . . . . . . . 20
7. Playing with accompaniment (Arranger) . . 22
7.1
7.2
7.3
7.4
7.5
7.6
7.7
7.8
What is an Arranger?. . . . . . . . . . . . . . . . . . . . . . . . . . .
Selecting Music Styles. . . . . . . . . . . . . . . . . . . . . . . . . . .
Starting and stopping Styles . . . . . . . . . . . . . . . . . . . . .
Style tempo. . . . . . . . . . . . . . . . . . . . . . . . . . . . . . . . . . .
Accompaniment and melody volume balance . . . . . . .
Switching Style arrangements (divisions) . . . . . . . . . . .
Easy fingering – Chord Intelligence . . . . . . . . . . . . . . .
Melody Intelligence . . . . . . . . . . . . . . . . . . . . . . . . . . . .
22
23
24
25
25
26
27
28
8. Recording and Playback . . . . . . . . . . . . . . . . 29
8.1
8.2
8.3
8.4
8.5
8.6
Recording . . . . . . . . . . . . . . . . . . . . . . . . . . . . . . . . . . . .
Playing back a Composer song . . . . . . . . . . . . . . . . . . .
Track Mute: Muting specific tracks . . . . . . . . . . . . . . . .
Playing back songs without tempo changes . . . . . . . .
Erasing the Composer song . . . . . . . . . . . . . . . . . . . . . .
Saving a song to disk . . . . . . . . . . . . . . . . . . . . . . . . . . .
29
31
31
31
31
32
9. Composer Menu. . . . . . . . . . . . . . . . . . . . . . . 32
9.1
9.2
9.3
9.4
9.5
9.6
9.7
9.8
2
16-track Sequencer. . . . . . . . . . . . . . . . . . . . . . . . . . . . .
Chord Sequencer . . . . . . . . . . . . . . . . . . . . . . . . . . . . . .
Recording Mode. . . . . . . . . . . . . . . . . . . . . . . . . . . . . . .
Formatting disks. . . . . . . . . . . . . . . . . . . . . . . . . . . . . . .
Style Composer. . . . . . . . . . . . . . . . . . . . . . . . . . . . . . . .
Style Converter . . . . . . . . . . . . . . . . . . . . . . . . . . . . . . . .
Saving User Styles. . . . . . . . . . . . . . . . . . . . . . . . . . . . . .
Song Edit. . . . . . . . . . . . . . . . . . . . . . . . . . . . . . . . . . . . .
32
33
34
34
35
36
37
37
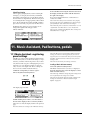
11.1 Music Assistant : registering panel settings . . . . . . . . . .43
11.2 Performance Pad buttons: additional or frequently used
functions44
11.3 Pedal functions. . . . . . . . . . . . . . . . . . . . . . . . . . . . . . . . .45
Master Tune . . . . . . . . . . . . . . . . . . . . . . . . . . . . . . . . . . . . . . . 46
Key Touch/Key Transpose. . . . . . . . . . . . . . . . . . . . . . . . . . . . 46
Metronome Volume and Beat. . . . . . . . . . . . . . . . . . . . . . . . . 47
Selecting a different Reverb and/or Chorus effect. . . . . . . . . 47
Expansion Tone . . . . . . . . . . . . . . . . . . . . . . . . . . . . . . . . . . . . 47
Lyric: switching off the display of lyrics . . . . . . . . . . . . . . . . . 47
Pitch Bend Range . . . . . . . . . . . . . . . . . . . . . . . . . . . . . . . . . . . 47
Program Change (and Bank Select) . . . . . . . . . . . . . . . . . . . . 48
MIDI: TX MIDI Ch./Local Control . . . . . . . . . . . . . . . . . . . . 48
Music Assistant Arranger Update . . . . . . . . . . . . . . . . . . . . . . 49
Memory Backup . . . . . . . . . . . . . . . . . . . . . . . . . . . . . . . . . . . . 49
Factory Preset (initialization) . . . . . . . . . . . . . . . . . . . . . . . . . 49
Link to 16TRK Sequencer . . . . . . . . . . . . . . . . . . . . . . . . . . . . 49
13.Connecting MIDI instruments . . . . . . . . . . . .50
14.Appendix. . . . . . . . . . . . . . . . . . . . . . . . . . . . .51
14.1 DSP effects . . . . . . . . . . . . . . . . . . . . . . . . . . . . . . . . . . . .51
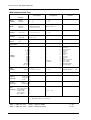
14.2 Specifications . . . . . . . . . . . . . . . . . . . . . . . . . . . . . . . . . .51
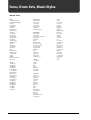
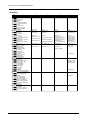
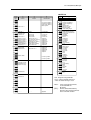
Tones, Drum Sets, Music Styles. . . . . . . . . . .52
KR-3 –
Using the unit safely
Used for instructions intended to alert
the user to the risk of injury or material
damage should the unit be used
improperly.
The
symbol alerts the user to items that must never
be carried out (are forbidden). The specific thing that
must not be done is indicated by the design contained
within the circle. In the case of the symbol at left, it
means that the unit must never be disassembled.
to damage or
caused with
and all its
to domestic
The ● symbol alerts the user to things that must be
carried out. The specific thing that must be done is
indicated by the design contained within the circle. In
the case of the symbol at left, it means that the powercord plug must be unplugged from the outlet.
ENGLISH
* Material damage refers
other adverse effects
respect to the home
furnishings, as well
animals or pets.
ENGLISH
The
symbol alerts the user to important instructions
or warnings.The specific meaning of the symbol is
determined by the design contained within the
triangle. In the case of the symbol at left, it is used for
general cautions, warnings, or alerts to danger.
Used for instructions intended to alert
the user to the risk of death or severe
injury should the unit be used
improperly.
009
001
• Before using this unit, make sure to read the
instructions below, and the Owner’s Manual.
......................................................................................................
• Do not open or perform any internal modifications on the unit.
......................................................................................................
003
• Do not attempt to repair the unit, or replace parts
within it (except when this manual provides specific instructions directing you to do so). Refer all
servicing to your retailer, the nearest Roland Service Center, or an authorized Roland distributor,
as listed on the “Information” page.
......................................................................................................
004
007
• Make sure you always have the unit placed so it is
level and sure to remain stable. Never place it on
stands that could wobble, or on inclined surfaces.
......................................................................................................
008a
• This unit, either alone or in combination with an
amplifier and headphones or speakers, may be
capable of producing sound levels that could
cause permanent hearing loss. Do not operate for
a long period of time at a high volume level, or at
a level that is uncomfortable. If you experience
any hearing loss or ringing in the ears, you
should immediately stop using the unit, and consult an audiologist.
......................................................................................................
011
ENGLISH
• Never use or store the unit in places that are:
• Subject to temperature extremes (e.g., direct
sunlight in an enclosed vehicle, near a heating
duct, on top of heat-generating equipment); or
are
• Damp (e.g., baths, washrooms, on wet floors);
or are
• Humid; or are
• Exposed to rain; or are
• Dusty; or are
• Subject to high levels of vibration.
......................................................................................................
010
ENGLISH
002a
• Do not excessively twist or bend the power cord,
nor place heavy objects on it. Doing so can damage the cord, producing severed elements and
short circuits. Damaged cords are fire and shock
hazards!
......................................................................................................
• Do not allow any objects (e.g., flammable material, coins, pins); or liquids of any kind (water,
soft drinks, etc.) to penetrate the unit.
......................................................................................................
013
• In households with small children, an adult
should provide supervision until the child is
capable of following all the rules essential for the
safe operation of the unit.
......................................................................................................
014
• Protect the unit from strong impact.
(Do not drop it!)
......................................................................................................
• The unit should be connected to a power supply
only of the type described in the operating
instructions, or as marked on the unit.
......................................................................................................
3
KR-3 Owner’s Manual—Contents
015
• Do not force the unit’s power-supply cord to
share an outlet with an unreasonable number of
other devices. Be especially careful when using
extension cords—the total power used by all
devices you have connected to the extension
cord’s outlet must never exceed the power rating
(watts/amperes) for the extension cord. Excessive
loads can cause the insulation on the cord to heat
up and eventually melt through.
......................................................................................................
016
• Before using the unit in a foreign country, consult with your retailer, the nearest Roland Service
Center, or an authorized Roland distributor, as
listed on the “Information” page.
......................................................................................................
101a
• The unit should be located so that its location or
position does not interfere with its proper ventilation.
......................................................................................................
102b
• Always grasp the plug on the power-supply cord
when plugging into, or unplugging from, an outlet or this unit.
......................................................................................................
104
• Try to prevent cords and cables from becoming
entangled. Also, all cords and cables should be
placed so they are out of the reach of children.
......................................................................................................
106
• Never climb on top of, nor place heavy objects on
the unit.
......................................................................................................
107b
• Never handle the power cord or its plugs with wet
hands when plugging into, or unplugging from,
an outlet or this unit.
......................................................................................................
108d: Selection
• Before moving the instrument take note of the
precautions listed below. At least two persons are
required to safely lift and move the unit. It should
be handled carefully, all the while keeping it level.
Make sure to have a firm grip, to protect yourself
from injury and the instrument from damage.
• Check to make sure the knob bolts securing the
unit to the stand have not become loose. Fasten
them again securely whenever you notice any
loosening.
• Disconnect the power cord.
• Disconnect all cords coming from external
devices.
• Raise the adjusters on the stand.
• Close the lid.
• Remove the music stand.
......................................................................................................
109a
• Before cleaning the unit, turn off the power and
unplug the power cord from the outlet.
4
......................................................................................................
110a
• Whenever you suspect the possibility of lightning
in your area, pull the plug on the power cord out
of the outlet.
......................................................................................................
116
• Be careful when opening/closing the lid so you do
not get your fingers pinched. Adult supervision is
recommended whenever small children use the
unit.
......................................................................................................
118
• Should you remove the screws fastening the
stand, make sure to put them in a safe place out
of children's reach, so there is no chance of them
being swallowed accidentally.
......................................................................................................
KR-3 –
1. Important notes
❏ Power supply
• Before connecting the KR-3 to other devices, turn off the
power to all units. This will help prevent malfunctions
and/or damage .
• Do not use the KR-3 on the same power circuit with any
device that will generate line noise; an electric motor or
variable lighting system for example.
❏ Placement
❏ Maintenance
❏ Repairs and data backup
❏ Additional precautions
• Please be aware that the contents of memory can be irretrievably lost as a result of a malfunction, or the improper
operation of the instrument. To protect yourself against
the risk of losing important data, we recommend that
you periodically save a backup copy of important data to
a high-quality floppy disk. Bear in mind, however, that it
may be impossible to restore the contents of data that was
stored on a floppy disk. Roland Corporation assumes no
liability concerning such loss of data.
• Use a reasonable amount of care when operating the
instrument’s buttons, sliders other controls. Rough handling can lead to malfunctions.
• Never strike or apply strong pressure to the display.
• Avoid using the KR-3 immediately after it has been
moved to a location with a significantly higher or lower
level of humidity. Rapid changes in the environment can
cause condensation to form inside the drive, which will
adversely affect the operation of the drive and/or damage
floppy disks. When the instrument has been moved,
switch it on and wait at least one hour before using the
disk drive.
• To insert a disk, push it gently but firmly into the drive—
it will click into place. To remove a disk, press the EJECT
button.
• Never attempt to remove a floppy disk from the drive
while the drive is operating (the indicator is brightly lit);
damage could result to both the disk and the drive.
• Remove any disk from the drive before powering up or
down.
• To prevent damage to the disk drive’s heads, always try to
hold the floppy disk in a level position (not tilted in any
direction) while inserting it into the drive.
❏ Handling floppy disks
• Floppy disks contain a plastic disk with a thin magnetic
coating. Microscopic precision is required to enable storage of large amounts of data on such a small surface area.
To preserve their integrity, please observe the following
when handling floppy disks:
• Never touch the magnetic medium inside the disk.
• Do not use or store floppy disks in dirty or dusty areas.
• Do not subject floppy disks to temperature extremes
(e.g., direct sunlight in an enclosed vehicle). Recommended temperature range: 10 to 50° C (50 to 122° F).
• Do not expose floppy disks to strong magnetic fields,
such as those generated by loudspeakers.
5
ENGLISH
• Please be aware that data contained in the KR-3’s memory may be lost when the instrument is sent for repairs.
Important data should always be backed up on a floppy
disk, or written down on paper (if possible). During
repairs, due care is taken to avoid the loss of data. However, in certain cases (such as when circuitry related to
memory itself is out of order), we regret that it may not
be possible to restore the data, and Roland assumes no
liability concerning such loss of data.
❏ Floppy disk drive
ENGLISH
• For everyday cleaning wipe the instrument with a soft,
dry cloth or one that has been slightly dampened with
water. To remove stubborn dirt, use a mild, non-abrasive
detergent. Afterwards, be sure to wipe the instrument
thoroughly with a soft, dry cloth.
• Never use benzene, thinners, alcohol or solvents of any
kind, to avoid the possibility of discoloration and/or
deformation.
Before using floppy disks
ENGLISH
• This instrument may interfere with radio and television
reception. Do not use this instrument in the vicinity of
such receivers.
• Do not place the instrument near devices that produce a
strong magnetic field (e.g., loudspeakers).
• Install the instrument on a solid, level surface.
• Do not move the instrument or subject it to vibration
while the disk drive is operating.
• Do not expose the KR-3 to direct sunlight, place it near
devices that radiate heat, leave it inside an enclosed vehicle, or otherwise subject it to temperature extremes.
Excessive heat can deform or discolor the unit.
• When connecting/disconnecting all cables, grasp the connector itself—never pull on the cable. This way you will
avoid causing shorts, or damage to the cable wires.
• A small amount of heat will radiate from the instrument
during normal operation.
• To avoid disturbing your neighbors, try to keep the
instrument’s volume at a reasonable level. At times, it
may be preferable to use headphones.
• When you need to transport the KR-3, package it in the
box (including padding) that it came in or use a hard or
soft case.
ENGLISH
In addition to the items listed under “IMPORTANT
SAFETY INSTRUCTIONS” and “USING THE UNIT
SAFELY”, please read and observe the following:
KR-3 Owner’s Manual—Panel descriptions
• Disks containing important performance data for this
unit should always be locked (have their write protect tab
slid to the “Protect” position) before you insert them into
the drive of another instrument (except the PR-300, or a
product of the HP-G, MT, KR, or Atelier families), or into
a computer’s drive. Otherwise, when performing any disk
operations (such as checking the contents of the disk, or
loading data), you risk rendering the disk unreadable by
the KR-3’s disk drive.
• The identification label should be firmly affixed to the
disk. If the label comes loose while the disk is in the drive,
it may be difficult to remove the disk.
• Put the disk back into its case for storage.
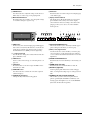
• Floppy disks have a “WRITE PROTECT” tab which can
protect the disk from accidental erasure. It is recommended that the tab be kept in the PROTECT position,
and moved to the WRITE position only when you wish to
write new data onto the disk.
Rear side of the disk
WRITE
(you can save new data to disk)
Write protect tab
PROTECT
(prevents writing to disk)
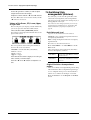
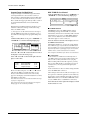
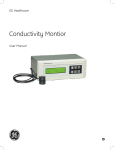
2. Panel descriptions
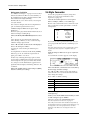
2.1 Front panel
A
B
C
D
E
F
Q
G
H
I
J
K
L
M
A UTILITY button
Press this button to access the KR-3’s Utility functions
(see “Utility Menu” on page 46).
B DEMO button
This button provides access to an on-screen Help
function with explanations of the KR-3’s functions,
games allowing you to identify sounds and chords, etc.
It also allows you to listen to the internal demo songs.
C Part Balance ACCOMP and KEYBOARD buttons
Use the [ACCOMP] button to set the volume of each
individual accompaniment part. The [KEYBOARD]
button provides access to a display page where you can
set the volume of the part(s) played via the keyboard.
D MUSIC STYLE buttons
Use these buttons to select Music Style groups. Refer
to “Internal Music Styles & Disk Styles” at the end of
this manual.
E Tempo indicators
These indicators flash in the rhythm of the selected
Music Style, sequence, or Song to indicate the tempo
and time signature. Depending on the time signature,
not all indicators may be used, or the last indicator
may flash several times (e.g. for 6/8).
F SONG button
Press this button to load songs you recorded using the
KR-3’s Song Composer and saved to floppy disk.
6
N
O
P
R
G VOLUME knob
Adjusts the instrument’s overall volume.
H BRILLIANCE knob
Allows you to make the overall sound brighter or
darker.
I PERFORMANCE PAD buttons
Various functions can be assigned to these buttons
(see “Performance Pad buttons: additional or frequently used functions” on page 44).
J TO VARIATION & TO ORIGINAL buttons
These buttons have two functions: you can use them
to select the accompaniment pattern for a Music Style
or to switch from the accompaniment pattern to a FillIn during a performance.
K SYNC button
Allows you to start a Music Style by playing on the
keyboard.
L START/STOP button
Used to start or stop a Style performance.
M INTRO/ENDING button
Press this button when you want to start a Style performance with an introduction, or to stop Music Style
playback with a musical ending.
KR-3 – Front panel
P EXIT button
Press this button to return to the previous display page
or the Master page.
O MUSIC ASSISTANT button
Press this button if you wish to store the panel settings
or recall the settings for a given song.
Q Display and related buttons
The display shows all the information you need in a
given situation. The soft keys next to the display
(whose function varies according to the selected display page) allow you to select one of the available
menu options.
S
T
U
V
ENGLISH
N TEMPO buttons
Use these buttons to adjust the tempo of the selected
Music Style or of the song you are playing back.
W
Q
X
R HOLD button
In most cases, the selected display page will disappear
after a few seconds. Press this button to “lock” the currently selected display page. Press it again to release
the Hold function, or [EXIT] to leave it right away.
S
LCD contrast knob
Use this knob to change the contrast whenever the display is difficult to read.
Y
Z
X ONE TOUCH PROGRAM buttons
These buttons allow you to instantly recall the appropriate settings for the music you want to play.
Y Whole, Lower, Upper buttons
Use these buttons to select whether you want to play
one sound (Tone) on the entire keyboard (“Whole”),
or one sound for the left hand and another one for the
right hand.
Z MELODY INTELLIGENCE button
Press this button to add a harmony to the melody you
play.
U SAVE button
Press this button to save the Song in the KR-3’s internal memory to disk.
a POWER switch (left side)
Press this button to switch the KR-3 on and off.
W TRANSPOSE [b]/[#] buttons
Change the key of the music being played.
ENGLISH
T TONE buttons
Used to select a Tone Group (see “Selecting Tones” on
page 18).
V COMPOSER section
Use these buttons to control the on-board sequencer
(called Composer).
ENGLISH
R
b Disk drive (right side)
Used for playing back material recorded on floppy
disks, or saving and loading songs or settings to/from
disk.
ENGLISH
c PHONES jacks (left, below the keyboard)
This is where you can connect two pairs of headphones (preferably Roland RH-25 or RH-50). Connecting a pair of headphones to one of the PHONES
jacks turns off the built-in speakers.
7
KR-3 Owner’s Manual—Panel descriptions
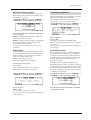
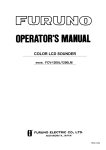
2.2 Connections
A
B
C
A MIDI connectors (Out, In)
Use these connectors to exchange MIDI data with
external MIDI devices.
B OUTPUT R/L (MONO) sockets
To connect the KR-3 to an external amplifier or mixing console, or to record your music with a tape
recorder, connect these jacks to the external device
(see “Sending audio to external equipment” on
page 9).
8
D
E
C INPUT R/L (MONO) sockets
This is where you can connect the audio outputs of
another MIDI instrument, a CD or cassette player, etc.
The signals of that audio source will be amplified and
mixed with the KR-3’s own audio signals.
D PEDAL socket
This is where you can connect the pedal cable of the
stand.
E AC IN
The supplied power cord connects here.
KR-3 – Connecting the power cable
3. Before using the KR-3
3.1 Setting up the music rest
3.2 Connecting the power cable
3.4 Using headphones
You can connect one or two pairs of stereo headphones (preferably Roland RH-25, RH-50) that carry
the same signal as the one sent to the OUTPUT R, L/
MONO jacks. Connecting a pair of headphones to one
of the PHONES jack turns off the built-in speakers.
There are two jacks, so that two pairs of headphones
can be connected.
ENGLISH
The music rest sets up easily with two sections folding
to the inside. To put the stand away, hold it firmly with
your hands, undo the fittings, and slowly collapse the
rest.
1. Set the [POWER] switch on the front panel (left
side) to the OFF position.
Note: If you are not going to use the instrument for some
time, unplug the power cord from the socket.
3.3 Turning the instrument on
and off
LEFT
side (below
keyboard)
LEFT
SIDEthe(below
the keyboard)
Two pairs
of headphones
can be conTwo
pairs
of headphones
nected.
can be connected.
The volume of the headphones can be adjusted using
the main [VOLUME] knob.
ENGLISH
2. After plugging the power cable included with your
instrument into the AC IN jack, plug the other end
into a wall socket.
Note: Please use stereo headphones, preferably the Roland
RH-50, RH-25.
Note: Listening at excessive volume levels for extended periods may result in impaired hearing – please take appropriate caution.
1. Before turning the instrument on, lower the volume with the [VOLUME] knob on the front panel.
ENGLISH
3.5 Connecting external
amplifiers and other devices
If the KR-3’s amplification system doesn’t deliver
enough power for your application, you can take
advantage of its OUTPUT jacks.
Sending audio to external equipment
2. Press the [POWER] switch to the left of the keyboard.
TheThe
power
is on
when
thethe
switch
is pressed.
power
is ON
when
switch
is pressed.
OFF
TheThe
power
is off
when
the the
switch
is pressed.
power
is OFF
when
switch
is pressed again.
A few seconds after turning the power on you will be
able to hear the notes you play on the keyboard.
If you wish to amplify the KR-3 through an external
system, or record your music using a tape recorder,
connect the KR-3’s OUTPUT jacks to the AUX IN,
LINE IN, or CH IN jacks of the external (keyboard)
amplifier, mixer, or tape deck.
ENGLISH
ON
Before connecting the KR-3 to another piece of equipment, turn off the power to both devices.
Note: In order to protect its circuits, the instrument requires
a few moments after powering up before it is ready for operation.
To the AUX IN/LINE IN jacks of the external amplifier/
mixer, etc.
Note: If you are connecting the KR-3 to a device with a
monaural input, be sure to use the L/MONO jack.
Note: For cassette decks or HiFi amplifiers, you need audio
leads with mono jacks at one end and (usually) RCA/cinch
jacks at the other.
9
KR-3 Owner’s Manual—Before using the KR-3
After connecting the KR-3 to the amplifier, etc., be
sure to switch on the KR-3 and the external device(s)
in the following sequence:
1. First turn on the power to the KR-3.
2. Then turn on the power to the mixing console,
amp, etc. (in that order).
Receiving audio signals from external sources
You can connect the audio outputs of an external
MIDI instrument, CD or cassette player, etc., to the
INPUT jacks. That has the advantage that such signals
can be amplified by the KR-3 and are therefore also
present in the headphones (if connected).
To connect an external signal source, follow the
instructions above but be sure to connect the LINE
OUT, etc., jacks of the external source to the KR-3’s
INPUT jacks.
From the LINE OUT, etc., jacks of the external instrument, CD player, etc.
10
KR-3 – Connecting external amplifiers and other devices
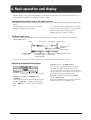
4. Basic operation and display
The KR-3 features a large-sized screen that keeps you informed about the status of your instrument and allows you to
access functions for which there is (usually) no button or slider.
This Owner’s Manual uses the following typographic conventions to indicate panel buttons and items appearing on the
display.
[ ]— This indicates a button or slider on the panel.
Example: the TONE [PIANO] button.
ENGLISH
Typographic conventions used in this owner’s manual
< >— This indicates an item appearing on the display.
To choose such an item, press the corresponding soft
button (located below or next to the item).
Example: the <Layer> button (see below).
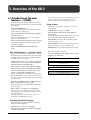
The Basic/Home screen
Tempo
Chosen Style
ENGLISH
Here is the display page (called Basic screen) that will be displayed every time you press the One Touch Program
[ARRANGER] button.
Time signature Current measure
Metronome On/Off
Tone Name
(Upper or Whole)
Selection of another
Style level
Registering performance Two Tones can
functions to the [PAD] be played together
buttons and pedals
Access the Function menu
ENGLISH
Note: If you can hardly read what is being displayed, use the CONTRAST knob to change the display contrast.
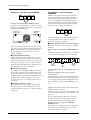
Navigating through the display pages
Go to the previous page
Go to the next page
Returning to the previous screen, or to the Basic
screen— [EXIT] button
By pressing the [EXIT] button, you will be returned to
the previous screen, or to the Basic screen.
11
ENGLISH
Changing screen pages— <√√PAGE> and
<PAGE®®>
Some screens may comprise multiple display pages. By
pressing <PAGE®®> you will go to the next page.
Press <√√PAGE> to return to the previous display
page.
Retaining a screen— the [HOLD] button
Some screens are only displayed for a few seconds,
after which you will be returned to the previous
screen, or to the Basic screen. If you do not want the
screen to change, you can “lock” the current screen on
the display by pressing the [HOLD] button.
KR-3 Owner’s Manual—Overview of the KR-3
5. Overview of the KR-3
5.1 Introduction of the main
functions — [DEMO]
Let’s take a look at the most striking features of your
KR-3. Just follow the instructions or items that appear
on the display.
1. Press the [DEMO] button.
A “Demo” screen appears on the display. The Demo
screen is made up of three pages.
2. Press <▲> and <▼> to the right of the display to
select another page.
The screen changes, allowing you to view the introduction to other functions.
3. Press a button below the display to choose an item.
A screen showing the functions and controls of the
selected item appears.
4. Press the [DEMO] button to leave the Demo
screen.
Tone and Style demo — <Sound>/<Style>
To give you a better idea of the KR-3’s Tones (sounds)
and Music Styles (accompaniments) and their quality,
the KR-3 comes with a Sound and Style Demo function. Here is how to use them.
1. On the Demo screen, press <Sound> for a demonstration of the Tones, or <Style> for an explanation
and demonstration of the Music Styles.
2. Press <Demo> at the bottom right of the display.
3. Use the buttons to the left and right of the display
to choose the instrument you want to hear, or press
<Next> to audition the next Music Style.
A demo song using the selected Tone or Music Style is
played. The number of demo songs varies according to
the Tone you select. When the first song ends, the next
one starts to play.
4. You can start playback of the second demo by pressing the same button (or <Next>) again.
The performance stops automatically when all songs
have been played.
5. Press <Exit> or <To Menu> to stop playback.
Note: All rights reserved. Unauthorized use of the demo
songs for purposes other than private enjoyment is a violation of applicable laws.
Note: The performance data of the demo songs are not
transmitted to the MIDI OUT connector.
Choosing the display language
The Basic menu and part of the Demo menu can be
displayed in other languages.
1. On the Demo screen, press <Language>.
2. Use the buttons to the left and right of the display
to choose the language.
12
Note: This setting reverts to the original language when the
power is switched off. If you prefer the KR-3 to select
another language, see “Memory Backup” on page 49.
Using <Game>
The <Game> option lets you play a note- or chordguessing game.
1. On the Demo screen, press <Game>.
2. Use the buttons at the bottom of the display to
select a game.
From left to right, the games displayed are “Guess the
Note”, “Guess the Chord”, and “Chord Practice.”
Guess the Note— Listen to the sound that’s played,
and guess what note it is.
Guess the Chord— Listen to the chord that’s played,
and guess what notes are used to make it up.
Chord Practice— Look at the chord and try to play it.
Here’s how the game progresses:
3. Use the buttons below the display to choose either
“Beginner” or “Advanced”.
The question appears on the display.
The display waits a few seconds and then gives you a first hint
(center of the screen).
After a few more seconds, the second hint appears
in the center of the screen.
Try to answer before time runs out. The faster you give the correct
answer, the better your score.
KR-3 – Performance functions
5.2 Performance functions
Each time you press the <▼Close> button, the lid of
the piano shown on the screen will close more, creating a mellower tone.
Brilliance knob
The KR-3 features a metronome function. Use the
metronome whenever you want to practice at a given
tempo. By pressing the button to the right of the metronome icon, you can turn the metronome on and off.
Use the [Brilliance] knob to make the overall sound
brighter or darker.
By pressing the One Touch Program [PIANO],
[ORGAN], or [ARRANGER] buttons, you will access
suitable settings (registrations) for the kind of music
you wish to play. To play a piano piece, for instance,
press the [PIANO] button. Press [ORGAN] to transform your KR-3 into an organ. To play a song using
the automatic accompaniment, press [ARRANGER].
Piano music — One Touch Program [PIANO]
When desired, adjust the tempo with the TEMPO [+]
and [–] buttons. Pressing the [+] and [–] buttons
simultaneously will return the keyboard to the default
(preset) tempo.
Note: You can change the metronome’s volume and time
signature. Please refer to “Metronome volume and beat” on
page 40.
Note: The metronome always uses the same time signature
(beat) and tempo as the currently selected Style.
■ Using the pedals
The KR-3 features a PEDAL jack where you should
connect the pedals that are built into the stand. Each
time you switch on the KR-3, or whenever you press
the One Touch Program [PIANO] button, the functions of these pedals are as follows:
ENGLISH
One Touch Program: Selecting the
“instrument type”
ENGLISH
■ Using the metronome
The settings assigned to this button are loaded every
time you turn the power on.
Soft Pedal
(other functions
can be assigned
to this pedal)
A picture of a piano will be displayed to signal that you
can play a piano sound on the entire keyboard. The
Tone that is selected is called “Grand Piano 1”.
Metronome
ENGLISH
1. Press the One Touch Program [PIANO] button.
Damper Pedal
Soft (left)— Pressing the Soft pedal yields a softer
tone.
Damper (right)— Press the Damper pedal to sustain
all notes being played.
■ The Function menu — <Func...>
Opening and
closing the lid
Function
■ Adjusting the piano tone
With the KR-3, you can simulate changes in tone of a
grand piano that come about when the piano’s lid is
opened or closed.
This feature is used to make various useful settings for
piano performances. For more detailed information,
please refer to “Function Menu” on page 40.
Please note that your KR-3 comes with a variety of
Tones (not just piano sounds). See “Selecting Tones”
on page 18 for how to select them.
2. Press the One Touch Program [PIANO] button,
and the Piano screen will appear.
Pressing <▲Open> and <▼Close> adjusts the
amount of the “opening” of the piano lid.
Each time you press the <▲Open> button, the lid of
the piano shown on the screen will open more, creating a brighter tone.
13
ENGLISH
Note: The function of the left (Soft) pedal differs in
Arranger and Split modes. See also “Pedal functions” on
page 45.
KR-3 Owner’s Manual—Overview of the KR-3
Organ music — One Touch Program [ORGAN]
Press the One Touch Program [ORGAN] button.
A picture of an organ will appear on the screen, with
the keyboard being split at F#3 into Lower (left hand)
and Upper (right hand) parts.
Switching the
Rotary Speed
Accompaniment — One Touch Program
[ARRANGER]
The KR-3 comes with an “Arranger” function that
provides an automatic, yet interactive, accompaniment you can use as backing for your melodies and
solos. 111 accompaniments (called Music Styles) covering all popular musical genres are built-in. Other
Styles can be loaded from the supplied floppy disk,
while you can also create your own Styles.
Metronome
ON/OFF
The Arranger is interactive: it always adapts the key of
the accompaniments to the chords you play (see
“What is an Arranger?” on page 22).
Selecting another organ Type
Function
The Tones currently assigned to the left (Lower) and
right (Upper) halves of the keyboard are called “Lower
Organ 1” and “Jazz Organ 1”. These Tones make up
the Jazz Organ type. See below for how to choose
another organ Type.
■ Adjusting the Rotary Effect
■ Simple explanation of how to use the Arranger
Here’s what you need to do to be able to use the KR-3’s
Arranger:
1. Press the One Touch Program [ARRANGER] button.
The keyboard is now split at F#3 into a Lower (left half
of the keyboard) and an Upper section (right half).
The Jazz Organ has a rotary effect added to it. This
simulates the effect obtained with those famous rotary
speakers that are indispensable for a true organ sound.
To change the rotation speed, press of the soft button
assigned to this function. Each press toggles the rotation speed between S (Slow) and F (Fast).
■ Selecting an organ Type
Use <√Type> and <Type®> to make your selection.
The selected organ Type is memorized until power is
turned off. In other words, if you select another One
Touch Program mode and then press [ORGAN] again,
the KR-3 will use the last organ Type you selected.
Note: When the power is switched off, the KR-3 reverts to
“Jazz Organ”.
■ The Function menu —<Func...>
This feature is used to make settings for the various
functions related to organ performances. For more
detailed information, please refer to “Function Menu”
on page 40.
F#3
Lefthand:
hand:
Left
accompaniment
accompaniment
Right
Right hand:
hand:
melody
melody
2. Select a Music Style (see “Selecting Music Styles” on
page 23).
3. Play a chord in the Lower section to start the
accompaniment.
Style playback starts with an introduction. Wait until
the Intro is finished before you start playing the melody in the Upper section. If the accompaniment is too
fast, you can slow it down with the TEMPO [–] button.
The KR-3 has a number of features that make playing
with the Arranger even easier:
• For major chords, you only need to press the key of the
root note (see “Easy fingering – Chord Intelligence” on
page 27).
• You can release the keys in the Lower section after
playing the desired chord. The Arranger will go on
playing in that key until you play another chord.
4. At the end of your song, press the [INTRO/
ENDING] button.
How about trying using the Arranger in a real-life situation? We’ve prepared a little piece you probably
know. Here’s what to do to play it:
14
KR-3 – Performance functions
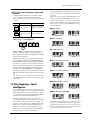
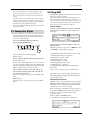
Example: “When The Saints Go Marching In”
When The Saints Go Marching In
Graphic chord display
American Traditional
C
Right
Left
2. Press the Music Style [Big Band/Swing] button.
8
( Eight-measure Intro )
C
E
F
C
E
F
G
G
Right D
Left G chord
E
E
D
E
F
1. C
Right C
Left C chord
E
G
C
C chord
C
Right G F
Left F chord
E
F
C
E
G
E
C chord
C
E
G
G
C
G chord
D
2. C
C
E
F
C
C chord
To Variation
Intro/Ending
ENGLISH
4. Start the accompaniment by pressing the C key (see
the score for the chords to play).
As explained above, this is the easy way of playing
chords: by pressing the C, you actually play a C major
chord.
C
C
F
(The Style “Jazz Band” has now been selected.) After a
few seconds, the display returns to the Basic screen.
G
C chord
ENGLISH
3. From the list of Music Styles shown on the display,
select <Jazz Band>.
Right
Left
ENGLISH
1. Press the One Touch Program [ARRANGER] button.
The Basic screen will be displayed. The names of the
chords you play in the Lower section appear on the
display:
Once you feel you master the basic version of “The
Saints”, try adding some variation here and there.
Where “To Variation” is indicated in the music, press
the [TO VARIATION] button. Of course, there is a lot
more you can do with the KR-3’s Arranger.
The Arranger will start with an eight-measure Intro.
Wait until the Intro is finished before playing the melody.
Here are the “chords” you need for “The Saints”:
F
Left
F 3
ENGLISH
C
G
Right
Remember that you can slow down the tempo by
pressing the TEMPO [–] button. If you think the
accompaniment is too slow, press TEMPO [+]
instead.
Pressing the [+] and [–] buttons simultaneously will
return the Arranger to the default tempo of the Jazz
Band Style.
5. At the end of the song, press the [INTRO/ENDING] button.
If you want to play the song again, press the [SYNC]
button and play the first chord (C).
Note: There are various ways to start and stop a Style (see
“Starting and stopping Styles” on page 24).
15
KR-3 Owner’s Manual—Overview of the KR-3
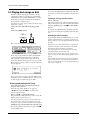
5.3 Playing back songs on disk
The KR-3 is fitted with a floppy disk drive. Among
other things, it allows you to listen to commercially
available music data (Standard MIDI Files) or to play
back songs you created and saved onto disk. Here is
how to listen to such music data:
Note: Before using disks, please carefully read “Before using
floppy disks” on page 5.
1. Insert the music data disk into the floppy disk
drive.
2. Press the [SONG] button.
If you press the [RESET] button, playback stops and
the song is rewound to the beginning of the first measure.
Listening to all songs one after another
6. Press <All Song>.
The entire group of songs will begin playing in order.
The set will repeat if you do not stop the performance.
7. To stop playback, press <STOP■> or the [STOP]
button.
If you press the [RESET] button, playback stops and
the song is rewound to the beginning of the first measure.
Rewinding and fast forwarding
The “Song Select” function will be displayed.
Every song you play back from disk is automatically
copied to the KR-3’s internal Composer memory.
(The advantage of that is that you can remove the
music data disk after listening to the song once.) If the
KR-3’s memory already contains a song, the following
message appears:
If you don’t want to lose the song in the KR-3’s internal memory, press <CANCEL> and see “Saving a song
to disk” on page 32. Otherwise, press <OK>.
Selecting and playing back Songs
3. Use the buttons next to the display to select the
song you want to listen to.
If not all songs of the disk fit on one page, use
<√√PAGE> and <PAGE®®> to jump to the
desired Song Select page.
4. Press <Play®> or the [PLAY] button.
The performance will begin. After several seconds, the
display returns to previous screen.
Note: For songs that do not begin on the downbeat of the
first measure, “PU” (Pickup) will be displayed when the
song begins. After that, measure numbers will be displayed.
5. Playback stops automatically at the end of the song.
You can stop playback any time by pressing <STOP■>
or the [STOP] button.
16
By pressing the [FWD] and [BWD] buttons, you can
advance to later measures or return to previous ones.
Doing so allows you to start playback from the desired
measure.
Each press of one of the buttons moves you ahead or
back one measure at a time, and when you hold the
button down, the movement is continuous.
Note: Depending on the size of the song data, rewinding
and fast forwarding may take some time.
Note: It is also possible to mute one of the song parts and
play it yourself. See “Track Mute: Muting specific tracks” on
page 31.
Note: The KR-3 provides a function for practising difficult
passages. Such passages can be marked and repeated over
and over. See “Marker function: repeatedly playing back the
same section” on page 41.
KR-3 – Pitch Bend and Transpose
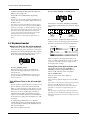
5.4 Pitch Bend and Transpose
ENGLISH
The KR-3’s left pedal (Soft) can be used to bend the
notes you play. To do so, you must assign it the Pitch
Bend function (see “Pedal functions” on page 45 for
details) and specify whether you want to bend the
notes upward (“Bend Up”) or downward (“Bend
Down”). Furthermore, you must set the “Pitch Bend
Range” (see page 47), i.e. the interval (or number of
semitones) by which the notes will be shifted when
you press the Soft pedal.
ENGLISH
If you are playing a C and want to shift it to D by
pressing the pedal, set Pitch Bend Range to “2” (two
semitones, i.e. one whole tone) and select “Bend Up”
as Pedal Assign function. To bend to the G below the C
you are playing, set the Range value to “5” and Pedal
Assign to “Bend Down” (select “7” and “Bend Up” to
shift to the G above the C).
If you find the key of a song difficult to sing in, select a
different one with the TRANSPOSE [b]/[#] buttons.
ENGLISH
Each time you press the [b] button, the key will be
lowered a semitone; each time you press the [#] button, the key will be raised a semitone. Pressing the [b]/
[#] buttons simultaneously will return the song to the
original key.
Note: The transposition interval can also be set via the display. See “Key Touch/Key Transpose” on page 46.
ENGLISH
17
KR-3 Owner’s Manual—Tones and related functions
6. Tones and related functions
6.1 Selecting Tones
The KR-3 comes with a host of instrument sounds
(called Tones). These Tones are divided into eight categories, called Groups.
1. Press [UTILITY] and use <√√PAGE> or
<PAGE®®> to select the following display page.
Selecting “normal” Tones
1. Press the TONE button of the Group that contains
the Tone you need.
The button’s indicator will go on, and a Tone select
screen (e.g. Whole Mode Tone) will be displayed.
2. Use the buttons to the left and right of the display
to select a Tone.
See “Expansion Tones” at the end of this manual for a
list of the available Tones.
Note: You can use Expansion Tones for recording the melody with the KR-3’s Composer (see page 32).
Each Tone Group contains a varying number of Tones.
2. Select a Tone by pressing the buttons to the side of
the display screen.
The name of the Tone selected will be highlighted on
the display. Play a few notes on the keyboard to confirm that the Tone is what you had in mind.
Drum sounds and sound effects —
[DRUMS/SFX]
Instead of playing melodies, you can also “drum” on
the KR-3’s keyboard, or play sound effects, such as
trains noises, helicopter sounds, etc.
Press the [DRUMS/SFX] button (indicator lights).
The Tone Select screen is composed of multiple pages.
Use <√√PAGE> and <PAGE®®> to turn to
another page.
Note: If you want to try out several Tones from a Tone
Group, pressing the [HOLD] button will lock the Tone
Select screen and keep it from vanishing after a few seconds
of inaction.
Note: See “Normal Tones” at the end of this manual for the
number and kinds of Tones each Group contains.
You may wonder why we use “Normal Tones” rather
than just “Tones”. That is because the above procedure
does not provide access to all Tones the KR-3 contains.
See “Selecting Expansion Tones” for more details
about how to access all Tones.
Note: See also “Selecting Tones for the Upper and Lower
parts” on page 20 for how to assign Tones in Split mode.
Selecting Expansion Tones
Expansion Tones can only be assigned to the Upper
part (Whole Keyboard, Split, and Arranger modes).
Caution— Expansion Tones are only temporarily
selected and cannot be written to a Music Assistant
memory (see page 43). Whenever you select another
mode (for example, if you change from Whole mode
to Split mode), the Upper part returns to last “normal” Tone you selected.
The display switches to the “Drum Screen”. Every key
is now assigned to a different drum or percussion
sound. Play a few notes and listen – and watch the display.
Note: See “Drum Sets” at the end of this manual for details
about the assignments of drum sounds and sound effects to
the keyboard.
Press the [DRUMS/SFX] button once more (or the
[EXIT] button), to return to the previous screen.
Toggling between drum sounds and sound effects
1. If necessary, press [DRUMS/SFX] again (indicator
must light).
2. Press <SFX>.
The display will switch to the “SFX Screen”. Play a few
notes on the keyboard. This time, you will hear sound
effects rather than drum sounds. Again, the display
will show you pictures of the sounds being played.
3. Press <Drums>.
The display jumps to the Drum Screen. With each
press of the button you will toggle between drums
sounds and effects.
18
KR-3 – Pitch Bend and Transpose
Selecting Drum Set Types
ENGLISH
Press <√Type> or <Type®>.
Each time you press one of these buttons, the drum set
type will change, and the names of the drum sounds
appearing on the display will change.
1. Select <DSP…> on the Tone Select screen.
The display now jumps to a screen similar to the following:
Note: There is one SFX set.
Adding effects to Tones
Reverberation (REV)
Reverb is a digital effect that gives the impression that
you are playing in a concert hall.
1. Press the [UTILITY] button.
2. Use the buttons to the left of the display to select
the Type (kind of effect), and set its Depth with the
buttons to the right of the display.
Select “OFF” from the Type screen if you don’t need a
DSP effect.
Note: The KR-3 contains several Reverb programs (called
Types), so that you can always use the Reverb type that best
suits your needs. See “Reverb Types” on page 47.
Note: You cannot adjust the Reverb Depth of the Arranger
parts or the sounds played back by the Composer function.
Adding other effects — DSP effect
DSP is short for Digital Signal Processor. Of course, the
Reverb effect is also digital, but we preferred not to use
“multi-effect” here because that term may be misleading. What it boils down to, however, is that the DSP
effect contains a variety of effects programs, one of
which you can select for the song you are about to
play. See “DSP effects” on page 51 for a list of all DSP
effects the KR-3 contains.
Your KR-3 also contains a Chorus effect. Chorus is an
effect that creates a more spacious, “fatter” sound.
1. After pressing <DSP…> on the Tone Select screen,
press <PAGE®®>.
The display now jumps to a page similar to the following:
2. Turn the Chorus on and off with the buttons to the
left of the display, and select the Chorus Depth with
the buttons to the right of the display.
After several seconds, the display returns to the previous screen.
Note: The KR-3 contains several Chorus programs (called
Types), so that you can always use the Chorus type that best
suits your needs. See “Chorus Types” on page 47.
Octave Shift: changing the pitch by
octaves
Octave Shift is a function that changes the pitch of a
sound in octave steps. Octave Shift can be set independently for the Lower and Upper parts.
To give you an idea of the flexibility of this system,
here is an example: suppose you assign the same Tone
(E.Piano 1) to both the Upper and Lower keyboard
section. Though you are using the same sound, it is
assigned to two parts you can shift individually. Thus,
by setting Octave Shift to “+1” for the Lower part,
while leaving it at “0” for the Upper part, you create an
overlap of the octaves immediately to the left (Lower)
and right (Upper) of the split point. You could use this
feature for playing intricate parts.
19
ENGLISH
That, in turn, is a good thing because other parts (the
Arranger and Composer parts) are also processed by
the same Reverb effect. If REV were assigned to the
volume of the effect itself, selecting the Min value
would also strip the accompaniment of Reverb.
Chorus effect
ENGLISH
2. Usethe <▲> and <▼> buttons to the left of the display to modify the Reverb balance.
Setting the value to “100” gives you maximum Reverb,
while selecting “0” removes all Reverb from the sound.
The REV parameter actually increases or decreases the
Reverb Depth for the sound that is assigned to the
keyboard, i.e. the part volume for the signal that is fed
to the Reverb effect. Setting a high Reverb value means
that you effectively increase the effect volume for the
keyboard part. It works much the same way as a cathedral: the louder you sing, the more Reverb you hear. In
the case of the cathedral, singing louder means that
you increase the effect send level, i.e. the level of the
signal (your voice) that will be processed by the acoustic environment. The overall volume of the effect
(cathedral) itself, however, does not change.
ENGLISH
Note: Only one DSP effect can be used at a time.
Note: When you select Upper, Lower, or Whole and choose
the Rotary Effect, you can switch the rotation speed with the
button at the upper left of the display.
KR-3 Owner’s Manual—Tones and related functions
1. Start by selecting the Tone you need on the Tone
Select screen (see page 18).
2. Select the octave (shift amount) by pressing
<Octave>.
You can raise or lower the pitch by a maximum of two
octaves. After a few seconds, the display will revert to
the Basic screen.
Note: When you switch off the KR-3, the Octave Shift settings return to their preset values. If you’d like the KR-3 to
memorize your settings, see “Memory Backup” on page 49.
Note: When using Octave Shift, you may sometimes notice
that notes to the far right of the keyboard sound in the
“wrong” octave. That is because all Tones have an upper
limit beyond which they cannot be transposed.
Note: You cannot use Octave Shift in Whole mode (see
below).
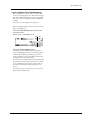
6.2 Keyboard modes
Whole: one Tone for the entire keyboard
Press the SPLIT [LOWER] or [UPPER] button.
The indicators of both the [LOWER] and [UPPER]
buttons light to signal that the keyboard has been split
at F#3:
F#3
Lower part:
one Tone
Upper part:
different Tone
Play a few notes to confirm that different Tones are
assigned to the Lower and Upper parts. In Split mode,
the names of both Tones being used are displayed.
Lower Tone
Upper Tone
In Whole mode, one Tone is assigned to the entire keyboard, thus allowing you to play piano or other parts
involving both your left and right hand. That explains
why Whole is automatically selected when you press
the One Touch Program [PIANO] button.
The Tone assigned to the Upper Part will be used
when you switch to Whole mode (see above). When
you power on the KR-3, the Tone assigned to the
Lower part will be “Strings.”
Press the [WHOLE] button.
The button’s indicator will go on, and the Tone
selected for the Upper part will be assigned to the
entire keyboard.
Note: If you press the [WHOLE] button while using the
Arranger, the KR-3 will switch to Piano Style Arranger
mode (see page 23).
Split: different Tones in the left and right
hand
It is also possible to split the keyboard, so that you can
play two different sounds with your left and right
hand, e.g. a bass and a piano sound. The key (or note)
where the keyboard is divided is called the split point.
You are free to choose another split point, but do
remember that the KR-3 automatically selects F#3
whenever you switch it off. Just for your information:
the key that acts as split point is the highest note of the
Lower part.
As organ playing usually involves two different
sounds, the keyboard is automatically split whenever
you press the One Touch Program [ORGAN] button
and select “Jazz Organ”.
Here is how to split the keyboard:
20
Selecting Tones for the Upper and Lower parts
1. Press the button of the part ([LOWER] or
[UPPER]) you wish to assign another Tone to.
The arrow (®) will jump to the selected Part.
2. Press a TONE button.
The Tone Select screen will be displayed.
3. Select a Tone.
After several seconds, the display reverts to the Basic
screen.
Note: There is no need to select a part by pressing its button
when an arrow (®) appears next to its name.
Note: You can change the location where the keyboard is
split. Refer to “Lower Tone on/off and split point” on
page 42.
Note: Sometimes, the pitch changes when the keyboard is
split. That is because the KR-3 automatically selects a suitable Octave Shift value to avoid notes sounding way too low
or too high.
KR-3 – Keyboard modes
Layer: using two Tones simultaneously
ENGLISH
The word Layer is used to describe a situation where
every note you play triggers two Tones. The most popular Tone combination for layers is piano and strings
but you are free to use whichever Tone combination
you like.
Note: Layers are only available for the Upper part.
Here’s an example of how to layer two Tones (let’s use
piano and strings here).
1. Press the TONE [PIANO] button and select the
desired piano Tone.
2. Press <Layer> on the Basic screen.
Upper Tone
ENGLISH
Layer Tone
ENGLISH
3. Press the TONE [STRINGS] button.
The indicator of the TONE button you have just
pressed will light. Play a few notes on the keyboard to
confirm that the KR-3 is producing a piano and a
strings sound. Let’s agree to call the two Tones being
used “Upper Tone” and “Layer Tone”.
You can now select another Tone of the Strings group,
if you like. If, after choosing a Layer Tone, you decide
to use another Upper Tone, press <Layer> again (to
leave Layer mode) and select the desired Tone (see
above).
Note: Another way to select the Layer mode is to press two
TONE buttons simultaneously.
ENGLISH
21
KR-3 Owner’s Manual—Playing with accompaniment (Arranger)
7. Playing with accompaniment (Arranger)
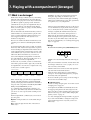
7.1 What is an Arranger?
Think of the Arranger’s Music Styles as your backing
band. The following illustration shows that this suggestion is not as preposterous as it may sound because
your KR-3 is capable of playing several “variations”
(called divisions) of a given accompaniment. All you
have to do is make up your mind about the kind of
music you want to play: is it going to be salsa, rhumba,
pop-rock, or big band?
You are the band leader, which means that you have to
tell the members of your band what to play. In other
words, you must explain how many bars there are to
each song part and how the melody and/or solo
should be accompanied.
There are two main levels: Basic and Advanced, each
consisting of two divisions called Original and Variation.
As its name implies, Basic is the “normal” accompaniment level, with only the basic ingredients of a professional sounding accompaniment. The Advanced level,
on the other hand, may contain another version of the
selected Music Style or just a more elaborate one. On
either level (Basic and Advanced) you can choose
between the Original accompaniment or an alternative (called Variation). The latter usually adds one or
two parts to the current accompaniment.
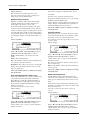
As the leader of your band, you have to tell the musicians what to play and when to play it. If you want the
accompaniment to become more complex as the song
evolves, here is a useful sequence:
The bass and accompaniment parts rely on the chord
or note information you play in the chord recognition
area, i.e. the keyboard zone you have assigned to the
Arranger (originally the left half of the keyboard).
Also note that you can use the drum patterns of a
Music Style in other One Touch Program modes
(Piano and Organ). These patterns can be started in
the same way as entire Music Styles (with bass and
melodic accompaniments). See “Starting and stopping
Styles” on page 24.
Settings
Press the One Touch Program [ARRANGER] button.
The KR-3 now automatically makes the following settings:
• The Sync Start function is turned on. This means that
the Arranger will start as soon as you play one or several notes with your left hand.
• The Intro function is activated so that Style playback
will start with a musical introduction.
Typical song structure
1st Verse
2nd Verse
1st Chorus
3rd Verse
2nd Chorus
Basic
Original
Basic/
Variation
Advanced/
Original
Basic/
Variation
Advanced/
Variation
Other elements help you refine the accompaniment.
Instead of abruptly changing to Advanced/Original,
you may want to play a short transition to announce a
new part of the song. That is what Fill In [TO VARIATION] and [TO ORIGINAL] are for.
See “Switching Style arrangements (divisions)” on
page 26 for other Music Style divisions and functions
you can use to create a professional sounding accompaniment.
Each accompaniment (or Music Style) can consist of
up to five parts:
Rhythm— This part takes care of the drums and percussion.
Bass— This part plays the bass line of the selected
Music Style.
22
Accomp. 1~3— These are the melodic accompaniment parts. Depending on the Music Style you
selected, only a few of them actually play something,
which can be anything from a piano line, a guitar line,
an organ line, etc., to a synth pad line.
• The keyboard is split at F#3. Use your left hand to
“transpose” the accompaniment pattern(s), and play
the melody with your right hand.
• It selects a suitable (preset) tempo as well as an Upper
Tone for the selected Music Style.
■ Additional notes
• Feel free to change the split point “Lower Tone on/off
and split point” on page 42.
• As in Split mode, the KR-3 automatically selects the
most appropriate pitch for the Tone assigned to the
Upper part. If you want to shift the pitch of the Upper
Tone in octave steps, see “Octave Shift: changing the
pitch by octaves” on page 19.
• See “Auto: changing the Arranger defaults” on page 42
if you don’t want the KR-3 to change the tempo and
select another Upper Tone every time you choose a
Music Style.
KR-3 – Selecting Music Styles
Piano Style Arranger — chord recognition on the
entire keyboard
Note: In Piano Style Arranger mode, you cannot use the
Chord Intelligence function (see page 27). You will have to
play full chords using normal fingering.
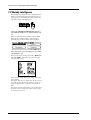
7.2 Selecting Music Styles
The KR-3 contains 136 Music Styles. These Styles are
divided into six Groups (see the MUSIC STYLE buttons and list on the front panel).
1. Press a MUSIC STYLE button.
4. Play a note or chord to the left of the split point.
The Arranger starts playing the introduction of the
Music Style you selected. Press the [START/STOP]
button.
Note: Whenever the Arranger is not playing, the left half of
the keyboard is reassigned to the Chord and Bass parts.
That allows you to play your own chord backing and bass
notes. You could use this for transitions, etc. See “Chord
Tone Setting” on page 43 for how to assign a Tone to those
parts.
Using Style disks (User Styles)
The KR-3 comes with a Style Disk that contains additional Music Styles and 16 Acoustic styles. These Styles
need to be loaded into the KR-3’s internal memory
and will be erased when you switch off your instrument.
Note: See “Internal Music Styles & Disk Styles” at the end of
this manual for a list of the Music Styles on the supplied
Style disk.
Note: Loading Music Styles from disk means that the Style
in the KR-3’s User Style memory will be erased. Always save
your own Styles to disk before loading another one. See
“Saving User Styles” on page 37.
ENGLISH
The button’s indicator will light, and a “Music Style”
screen, like the one shown below, will be displayed.
Note: The number of Styles in each group varies.
ENGLISH
The Piano Style Arranger mode works as follows: the
Arranger decodes every chord you play – no matter
where you play it. Causing the Arranger to play
another chord requires that you play at least a triad
(i.e. the three notes that make up a chord). You are free
to play more than three chord notes but remember
that two notes won’t cause the Arranger change
chords.
As always, the display returns to the previous page
after a few seconds of inaction. If you want to take
your time and try out several Music Styles of the
selected Group, press the [HOLD] button.
ENGLISH
If you press the [WHOLE] button after pressing the
One Touch Program [ARRANGER] button, the entire
keyboard will be scanned for chord information for
the Arranger. This is probably the mode you will select
if you are a pianist. Let’s agree to call this mode Piano
Style Arranger mode.
The name of the Music Style you select will be highlighted on the display. The Music Style screen is spread
over multiple pages. Use <√√PAGE> and
<PAGE®®> to jump to another page if the Music
Style you need doesn’t appear on the display.
1. Insert the Style Disk into the disk drive.
2. Press the [DISK/USER] button.
There are two sets of settings that prepare everything
for you (“A” and “B”): a suitable sound for your right
hand, matching effect settings, etc. Befor selecting a
Music Style, you should therefore decide whether to
work with set <A> or <B>:
2. Press the button below the display that correspond
to the presets you wish to use.
You need to do so before selecting a Musicc Style (see
the next step).
3. Select a Music Style by pressing the buttons to the
side of the display.
ENGLISH
Once a Music Style Group has been selected, you can
choose a Style from that Group.
A list of the Styles on disk will be displayed.
3. Use the buttons next to the display to select the
Style you want to load.
The name of the selected Style will be highlighted.
The indicator of the [DISK/USER] button remains lit
to signal that the KR-3 now contains a User Style. To
select it, press [DISK/USER].
Note: When you switch off your KR-3, the Style you loaded
from disk is erased. You will have to load it again next time
you wish to use it.
Note: If you insert the Style disk into the drive before
switching on the KR-3, it will automatically load the “Easy
Listen” Style.
Note: Unlike internal Music Styles, Styles loaded from disk
contain no default Upper Tone setting.
23
KR-3 Owner’s Manual—Playing with accompaniment (Arranger)
7.3 Starting and stopping Styles
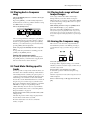
Starting a Music Style
You may remember that by pressing One Touch Program [ARRANGER] you also select a number of settings, one of which is called Sync Start. Let’s look at
that function first.
Starting automatically (Sync Start)
■ Starting with a musical introduction
You can start Style playback in much the same way as a
band or orchestra – with a nice introduction (called
Intro). The length of the introduction depends on the
Style you selected. Some Intros are two measures long,
others eight, and so on.
Starting manually
If you prefer to be in complete control of the Arranger
and therefore do not want it to start as soon as you
play one or several notes, there are two options.
■ Starting with an Intro
1. If necessary, press the [SYNC] button to switch off
the Sync Start function.
Remember that you can now play your own chords
and bass notes using the Chord and Bass parts that are
automatically assigned to the Lower section of the keyboard.
2. Press the [INTRO/ENDING] button to start Style
playback with the corresponding Intro.
1. Press the [SYNC] button.
The [SYNC] button’s indicator will light, and the
TEMPO and [INTRO/ENDING] indicators will begin
flashing.
Now all you have to do is to play a note or a chord in
the chord recognition area (either the left half of the
keyboard, or anywhere in Piano Style Arranger mode)
to start the Arranger.
2. Play a note or chord in the chord recognition area.
The Arranger now plays the Intro pattern. The
INTRO/ENDING indicator will light, and go off at the
end of the Intro.
To cancel Sync Start, just press the [SYNC] button
once more.
■ Shorter/simpler Intro
• Press the [SYNC] button (indicator lights).
• Press the Fill In [TO ORIGINAL] button (indicator
flashes).
• Play in the chord recognition area of the keyboard.
Style playback will begin with a short Intro.
■ Starting without an Intro
1. Press the [SYNC] button.
The [SYNC] button’s indicator will light, and the
TEMPO and [INTRO/ENDING] indicators will begin
flashing.
2. Press the flashing [INTRO/ENDING] button (indicator goes off).
3. Play a note or chord in the chord recognition area.
During the Intro, the [INTRO/ENDING] button’s
indicator will be lit. When the Intro is over, the indicator will go off.
■ Starting without an Intro
1. If necessary, press the [SYNC] button to switch off
the Sync Start function.
2. Press the [START/STOP] button. The Style will
begin playing.
Stopping a Music Style
There are two ways to stop Style playback:
Stopping a Style with an Ending
An Ending is usually referred to as a Coda. This is a
musical way of ending a song, some of the most
impressive examples can be found in classical music.
But also in pop music, a song usually doesn’t just stop.
If that is what you are after, here is what to do:
Press the [INTRO/ENDING] button while the Music
Style is running.
During the ending, the [INTRO/ENDING] button’s
indicator will be lit. When the Ending is over, the indicator will go off.
Again, the length of the Ending depends on the Music
Style you select.
■ If you want to shorten/simplify the Ending:
• Press the Fill In [TO ORIGINAL] button (indicator
starts flashing).
• While the [TO ORIGINAL] button’s indicator is flashing, press the [START/STOP] button.
Stopping a Music Style immediately
Press the [START/STOP] button.
24
KR-3 – Style tempo
Alternatives for starting and ending Music Style
playback
Global balance
You can adjust the balance of volume of the accompaniment (Music Style) and the Upper Tone you use to
play the melody.
ENGLISH
Using a PAD button or a footswitch, you can fade in
(whereby the volume gradually increases) to the start
of a Style, or fade out (whereby the volume gradually
decreases) to the end of a Style. Please refer to “Performance Pad buttons: additional or frequently used
functions” on page 44 and “Pedal functions” on
page 45.
7.5 Accompaniment and melody
volume balance
7.4 Style tempo
Every Style also contains a preset tempo value. If you
think the Style is too slow or too fast, here is how to
change it:
Adjusting the volume of each part — Part
Volume
Press TEMPO [+] to increase the tempo and TEMPO
[–] to decrease it.
The tempo value appears in the upper left part of the
display. Additionally, you can confirm the tempo and
time signature by looking at the TEMPO indicators.
ENGLISH
Press [UTILITY] and use the <▲> and <▼> to the
right of the display to adjust the volume balance.
The BAL function adjusts the balance of the overall
accompaniment volume and that of the melody
(Upper). With the Part Volume buttons, you can
adjust the volume of individual parts, or prevent a
part from even sounding.
These Tones are assigned or related to the Arranger
(the automatic accompaniment).
1. Press the Part Volume [ACCOMP] button.
For each part, a bar graph and numerical value are displayed on screen. The correspondence between the
parts and what is shown on the screen is as follows:
<Rhythm>— Drums
<Bass>— Accompaniment Bass and Bass Tones
<Accomp>— Accompaniment parts (1~3)
<Chord>— Chord Tone (see “Chord Tone Setting”
on page 43 for details about the Chord and Bass
Tones).
25
ENGLISH
Volume of the Rhythm, Bass, Accomp, and
Chord/Bass Tones
ENGLISH
There are two Part Volume buttons: [ACCOMP] and
[KEYBOARD]. Press [ACCOMP] if you want to
change the volume of an accompaniment part, and the
[KEYBOARD] button to adjust the volume of a part
that can be assigned to the keyboard.
KR-3 Owner’s Manual—Playing with accompaniment (Arranger)
2. Select the part whose volume you wish to adjust
using the buttons below the display.
3. Adjust its volume with the <▲> and <▼> buttons.
Press the <▲> button to increase the volume, and the
<▼> button to decrease it.
Volume of the Drums, SFX, Lower, Upper,
or Layer Tone
These are the parts you can play yourself, which is why
you need to press the other Part Volume button.
1. Press the Part Volume [KEYBOARD] button.
For each part, a bar graph and numerical value are displayed on the screen.
7.6 Switching Style
arrangements (divisions)
For each Style, you can select the particulars of the
orchestration (arrangement) and accompaniment
pattern type. You can do this before starting a Style, or
during playback of the Style.
Note: There are other Arranger functions you can use by
assigning them to a PAD button. See “Performance Pad
buttons: additional or frequently used functions” on
page 44.
Basic/Advanced: Level
At power on, the “Advanced” level is selected.
Advanced— more complex arrangement with more
accompanying instruments.
Basic— simple arrangement with fewer accompanying instruments.
Here is how to select the desired level:
The correspondence between the parts and what is
shown on the screen is as follows:
<Drs/SFX>— Drums and SFX (sound effects)
<Lower>— Lower
<Layer>— Layer
<Upper>— Upper
2. Use the buttons below the display to select the part
whose volume you wish to adjust.
3. Use the <▲> and <▼> buttons to adjust the volume.
Press <Advnc√Basic> or <Advnc®Basic> on the
Basic screen.
The correspondence between the levels and what is
shown on the display is as follows:
<Advnc√Basic>
Appears when Basic Arrangement is
selected. Press <Advnc √Basic> to switch to
the Advanced level.
<Advnc®Basic>
Appears when Advanced Arrrangement is
selected. Press <Advnc ®Basic> to switch to
Basic level.
Original/Variation: Accompaniment
pattern
There are two kinds of accompaniment patterns: Original and Variation. The accompaniment pattern type
is set to “Original” when power to the instrument is
turned on. See “What is an Arranger?” for details.
Press <To Variation> or <To Original> on the Basic
screen.
26
KR-3 – Easy fingering – Chord Intelligence
Fill-Ins (transitions between Original and
Variation)
In Original mode
In Variation mode
Plays the Original Fill.
Plays the Original Fill and
selects the Original pattern.
Plays the Variation Fill
and selects the Variation
pattern.
Plays the Variation Fill.
Here is how to play chords in Chord Intelligent and
normal (without Chord Intelligence) modes. All
examples are based on a “C” chord. For other chords,
either count the distance of the indicated keys from
the root note, or refer to “Chord Intelligence” at the
end of this manual.
■ Major chords:
Chord Intelligence
Normal
■ Minor chords (m):
Chord Intelligence
ENGLISH
Press these buttons now. Start with [TO VARIATION], next press [TO ORIGINAL].
ENGLISH
To Original and To Variation are two fills (or transitions) you can use at the end of a musical phrase
(verse, chorus, bridge). The two buttons do two things
at a time:
Note: Chord Intelligence is normally set to “On,” but you
can turn it off. See “Auto: changing the Arranger defaults”
on page 42.
Normal
■ Seventh chords (7):
Think of a Fill as the moment in a song when the
drummer is allowed to play a roll and the bassist and
keyboard players vary their accompaniment by adding
a few notes here and there.
■ Major Seventh chords (M7):
Chord Intelligence
Normal
■ Minor seventh chords (m7):
Chord Intelligence
Normal
ENGLISH
Note: Every time you stop a Music Style in One Touch Program ARRANGER mode, the KR-3 will select the Original
pattern again.
Normal
ENGLISH
Fill-Ins last one bar, but you can produce shorter fills
by proceeding as follows: press [TO VARIATION] or
[TO ORIGINAL] on the first through the penultimate
beat of a bar (i.e. the 1st, 2nd or 3rd beat of a 4/4 bar,
or the 1st or 2nd beat of a 3/4 bar) to start the fill right
away. It will then last until the end of the current bar.
If you press the [TO VARIATION] or [TO ORIGINAL] button on the last beat of the current bar, the fill
will start on the following downbeat and last an entire
bar.
Chord Intelligence
■ Diminished (dim) chords:
7.7 Easy fingering – Chord
Intelligence
As stated before, the Arranger relies on the chords you
play for choosing the key of the accompaniment. Playing chords isn’t always easy, especially when you need
to concentrate on your melody. That is why the KR-3
features a function called Chord Intelligence.
It is intelligent in that it allows you to play major
chords by pressing just one key (the root note), while
minor chords can be played with two keys, and complex chords with only three keys. Unlike other brands,
Roland uses a musical system for simplifying chord
fingering, so that once you understand the “intelligent” versions, you will have little trouble supplying
the “missing” notes and playing full chords.
Chord Intelligence
Normal
■ Minor Major Seventh (mM7):
Chord Intelligence
Normal
Note: Even in Chord Intelligence mode, you can play chords
the usual way. Sometimes, however, you may get a result
that doesn’t quite live up to your expectations. Furthermore,
the name of the chord that appears on the display may not
be the one you thought you were playing.
27
KR-3 Owner’s Manual—Playing with accompaniment (Arranger)
7.8 Melody Intelligence
The Arranger of your KR-3 can not only play chords
but also a counter-melody based on the chords you
play in the chord recognition area. This counter-melody will be added to the Upper part.
1. Press the [MELODY INTELLIGENCE] button to
switch Melody Intelligence on (indicator lights) and
off.
When you press the button and the indicator lights,
harmony voices will be added to your melody. A
screen like the one shown below will be displayed.
2. Use the buttons next to the display to select a Melody Intelligence type.
There are five pages you can select with <√√PAGE>
and <PAGE®®>. Select the type you need for the
song you want to play:
After several seconds, the previous screen will return
to the display.
Note: When “Full Auto” or “Tempo Lock” has been selected
(see “Auto: changing the Arranger defaults”), the type of
Melody Intelligence that is set may vary according to the
Style.
Note: Please note that not all harmony voices will be played
at all times, which is usually due to the fact that you play
extremely high or low notes.
28
8. Recording and Playback
8.1 Recording
KR-3 – Recording
2. Begin recording.
The KR-3 also features a “Composer” that functions
like a tape recorder but is, of course, digital. You can
record your own songs, as well as play songs using
commercially available music data. Please be aware
that the Composer records instructions (called MIDI
messages) rather than sounds. That explains why you
cannot record your singing or any other part picked
up using the microphone.
Rhythm
Accompaniment
and bass
Whole, Layer
Upper
Lower
Note: Remember that you can use the Rhythm section when
playing a piano or organ piece. If that is what you want to
do, see the preceding bullet.
Two measures of count-in will sound, after which
recording will begin. The [PLAY] indicator now lights.
3. When the song is finished, press the [STOP] or
[RESET] button.
The indicator on the button for the track on which the
performance was recorded will light.
Note: Recording will also stop if you stop the Style (see
above) by pressing either the [INTRO/ENDING] or the
[START/STOP] button.
Note: It is also possible to keep the Composer from deactivating the Record Standby mode whenever you stop recording. See “Recording Mode” on page 34.
Note: If the internal memory of your KR-3 already contains
a song, you will be unable to select songs from a disk. If that
is what you want to do, first save your song to another disk
(see page 32), then erase the song in the KR-3’s internal
memory (see “Erasing the Composer song” on page 31).
Alternatively, press <OK> in response to the message “User
Song will be erased. Are you sure?”
Note: Remember that there is only one DSP effect. That is
why it is impossible to use different DSP types for different
tracks.
Cautions to take after recording
If, after recording, the power is turned off, the
recorded performance will be erased. Ifyou want to
save performances you’ve recorded, please refer to
“Saving a song to disk”.
ENGLISH
On devices like tape recorders, sounds that are played
back via the left speaker and those that are played back
via the right speaker are recorded onto separate places
on tape. These “places” are called “tracks”. As you see,
your KR-3 provides five tracks in Normal mode, i.e.
five places where MIDI messages can be recorded. The
advantage of working with tracks is that you can rerecord or change (edit) just one part (on one track)
while listening to the other tracks.
• To record a piano or organ piece without accompaniment, press the [PLAY] button.
ENGLISH
What is a track?
• When you are ready to record the melody of a song
with Arranger backing, start Style playback (see
“Starting a Music Style”), and recording begins.
ENGLISH
You can store one song at a time. During recording,
the data is automatically separated and recorded onto
five separate tracks.
ENGLISH
Normal recording
Let’s record something
1. Press the [REC] button.
The Composer goes into standby mode. The [REC]
indicator lights, while the [PLAY] indicator flashes.
The tracks onto which the performance is recorded
are selected automatically, and the track button’s indicator will flash.
In Whole Keyboard mode, you can record onto any
track except the Rhythm track. In that case, the track
whose button was last pressed will be the recording
track.
Note: If a disk has been inserted into the disk drive, or after
playing back a song on disk, you need to press the [SONG]
button to bring up the Song Select screen. Select <U: User
Song> and press the [REC] button.
29
KR-3 Owner’s Manual—Recording and Playback
Recording Minus-One performances
Minus-One refers to a technique whereby a Standard
MIDI File is used as backing, while you can mute the
part you wish to play (usually the melody). Thanks to
a clever system, you can mute any part of a Standard
MIDI File and play (and record) it yourself. If you just
want to have fun with a Standard MIDI File without
recording your performance, see “Track Mute: Muting
specific tracks” on page 31.
Correcting minor mistakes
Let us now look at the advantages of working with
tracks. If you don’t like a particular line (the melody,
say), you can correct it without re-recording the entire
song. Here is how to:
1. Press the [REC] button (indicator lights).
1. Insert a music data disk into the disk drive.
2. Press the [SONG] button.
The Song Select screen will be displayed.
3. Select a song with the soft buttons surrounding the
display. If necessary, use <√√PAGE> and
<PAGE®®> to jump to another Song Select page.
2. Press the button of the track you want to fix.
The track button’s indicator and the [PLAY] indicator
will flash.
4. Press the [REC] button (indicator lights).
Now you need to select the track you wish to record
your part to.
3. Press the [PLAY] button.
Two measures of count-in will sound, after which
recording will begin.
5. See below for which button to press.
As you know, the available parts are closely linked to
the Keyboard modes. That is why you need to perform
several actions to ensure that the right sound will be
used for recording.
4. Play the correct (or desired) version of the part.
[Whole]— Press One Touch Program [PIANO].
[Lower], [Upper]— Press the [LOWER] button and
select the Split mode.
[Rhythm]— Press the [Drums/SFX] button and select
<Drum Set> or <SFX>.
Note: You cannot record onto the [BASS/ACCOMP] track.
Note: If you select a part other than the ones shown above,
nothing will be recorded on the corresponding track. Please
be aware that Minus-One recording will erase all data on
the selected track.
6. Press the button of the track you want to record to
(indicator flashes).
7. Press the [PLAY] button.
Two measures of count-in will sound, after which
recording will begin.
8. Press the [STOP] or [RESET] button to stop
recording.
The indicator of the track button you pressed now
lights to signal that the track contains data.
Note: See also “Saving a song to disk” on page 32. Be aware,
however, that due to copyright protection of the Standard
MIDI File you used, it may not be possible to save a MinusOne song to disk.
Note: If you record in Whole mode, the Tone of the Lower
and Upper parts you are playing may change. That is
because a Standard MIDI File also contains so-called program change messages that tell your KR-3 which Tones to
use.
30
5. Press the [STOP] or [RESET] button when you’re
done.
Notes about correcting mistakes
• If the re-recorded bit is shorter than the original track,
all notes that lie beyond the point where you stopped
recording will remain. To erase the entire track, see
“Erase: removing data from a track or song” on
page 38 and go back to step (1).
• There is no need to start at the beginning of the song.
Use the [BWD] and [FWD] buttons to call up the
measure where you want to start recording, and press
the [REC] button. Press the [PLAY] button, and
recording will begin after two measures of count-in.
• It is also possible to add (overdub) additional notes to
a track without erasing what you have previously
recorded. See “Recording Mode” on page 34 for
details.
KR-3 – Playing back a Composer song
8.2 Playing back a Composer
song
8.4 Playing back songs without
tempo changes
Some songs on music data disks contain tempo
changes. When you use these kinds of songs for
Minus-One play or recording, you may find it difficult
to follow these tempo changes. Here is how to ignore
these tempo changes.
2. Press the [PLAY] button.
While holding down the Composer [STOP] button,
press either the Tempo [+] or [–] button.
The tempo value will be highlighted on the display.
ENGLISH
1. Press the [RESET] button to “rewind” to the beginning of the song.
By pressing [RESET], you will actually jump back to
the first measure of the song, which is similar to using
the SKIP function of a CD player.
Note: If at this point you play back another song, or carry
out the above step once again, the Composer will revert to
the normal tempo mode and play back the song with tempo
changes.
3. The song stops automatically when the song is finished.
To stop while the performance is running, press the
[STOP] or the [RESET] button.
ENGLISH
The recorded performance will begin to play. If there
is a particular passage you want to listen to, select its
measure by pressing [FWD] and then press [PLAY].
Likewise, you could rewind to a previous measure by
pressing [BWD] and start playback.
8.5 Erasing the Composer song
Here is how to erase the entire song in the KR-3’s
internal memory. Before even thinking of doing so,
you should save songs you wish to keep to disk (see
below).
Starting with a metronome count-in
8.3 Track Mute: Muting specific
tracks
You can also use the Track Mute function to switch off
the part of a pre-recorded song you yourself would
like to play (usually the melody). Playing to a Standard
MIDI File or Composer song backing is called
“Minus-One Play.” You can also record your MinusOne performance. Please refer to “Recording MinusOne performances” on page 30.
2. If you want to erase the data, press <OK>.
To cancel the operation without erasing the song,
press <Cancel>.
After the song has been erased, the Song Select screen
will be displayed.
3. Press <U: User Song> at the upper left of the display.
Press the button of the track you wish to mute (indicator goes off).
The track in question will no longer be played back.
You can mute several tracks, if you like.
Press the track button once more to switch the
track(s) on again.
31
ENGLISH
It is also possible to temporarily switch off (mute) certain tracks. You could take advantage of this function
when adding intricate (usually syncopated) parts to a
complex accompaniment. Muting all distracting parts
indeed helps you concentrate on the work at hand.
1. Press the [SONG] button.
A message will be displayed, asking you to confirm
whether you want to erase the song if you have not yet
saved the song to disk.
ENGLISH
By pressing the [PLAY] button while holding down
the [STOP] button, you can have the song play back
after two metronome count-in measures.
KR-3 Owner’s Manual—Composer Menu
8.6 Saving a song to disk
The display now jumps to the Song Save screen.
The song in the Composer’s memory is erased when
the power is turned off. If you don’t want to lose it,
please use the method shown below.
The number of songs that can be saved onto a disk
depends on the amount of performance data they
contain, but the maximum number of songs you can
save is 99.
Note: New disks or disks which have been used on other
equipment cannot be used just as they are. Please refer to
“Formatting disks” on page 34.
3. Use the <▲> and <▼> buttons to the right of the
display to select a song number.
You can choose any number between “1” and “99”. Do
note, however, that selecting a song number that
already contains data means that the song in question
will be overwritten by your new song.
1. Insert a disk you want to save your song to into the
disk drive. Make sure the write protect tab is set to
“Write”.
You can save onto the following disks:
4. Enter a name for your song with <√> and <®>
below the display, and <▲> and <▼> to the left of
the screen.
The characters you can use to do this are listed below:
• New disks formatted on the KR-3.
• Disks already containing KR-3, KR-75, E-300, or
E-500 songs.
Blank ! “ # $ % & ‘ ( ) * + , - . / 0 1 2 3 4 5 6 7 8 9 : ; < = > ? @
ABCDEFGHIJKLMNOPQRSTUVWXYZ[\]^_`
abcdefghijklmnopqrstuvwxyz{}|~
2. Press the Composer [SAVE] button.
5. Press <Save>.
Press [EXIT] instead if you do not want to save your
song after all.
9. Composer Menu
Functions of the Composer Menu
1. Press the Composer [MENU] button.
The display now jumps to the Composer Menu.
9.1 16-track Sequencer
This sequencer allows you to record up to 16 different
parts onto separate tracks using different Tones. Needless to say that you should take advantage of the
sequencer to record your own songs with original
arrangements.
Note: See “Link to 16TRK Sequencer” on page 49 for a
parameter you may want to set first.
Choose one of the seven functions “on the menu”.
2. Use the buttons next to the display to select the
function.
The Composer Menu has two pages. Use the
<√√PAGE> and <PAGE®®> buttons to bring up
the other page.
1. On the Composer Menu, press <16trk Sequencer>.
The display now jumps to a 16-Track Sequencer screen
that looks similar to the following.
To leave the menu, press the [EXIT] button. The display then returns to the previous screen.
The [WHOLE] button also lights to signal that the
KR-3 will now function in Whole mode. The 16-track
Sequencer indeed only uses one Tone for each track,
so you cannot record in Split or Layer modes.
32
KR-3 – Chord Sequencer
2. Use <√> and <®> to the lower right of the display
to select the track you wish to record.
The currently selected track appears in reverse video
on the display.
3. Get ready to play.
Choose the Tone and make the necessary settings for
the performance.
Note: You can only assign Drum Sets to the “D” track, while
the “S” track only triggers sound effects.
Use <VOL+> and <VOL–> to the left of the display to
set the volume level of each track.
The Chord Sequencer allows you to “pre-program” the
chord progression and Style divisions to be used by
the Arranger. Doing so will allow you to concentrate
on the melody because the Chord Sequencer will take
care of feeding the Arranger with the correct chord
information and selecting the desired Style division.
ENGLISH
Note: Drum or SFX parts can only be recorded on the “D”
or “S” tracks.
9.2 Chord Sequencer
1. Press <Chord Sequencer> on the Composer Menu
page.
A Chord Sequencer screen like the one below appears
on the display.
Current measure
Note: To record the volume settings, press the [RESET] button while holding the [REC] button.
5. Press the [STOP] button to stop recording.
A “❏” appears next to the track that was recorded.
6. Repeat steps 2, 3, 4, and 5 to record other parts.
You can delete the data of a selected track by pressing
<CLR>.
Muting or playing selected tracks
<Mute>
Choosing a track and pressing <Mute> switches off
playback of that track. A dotted “ ❏” appears next to
the muted track. Each press of <Mute> toggles
between Mute on and off.
<Solo>
Choose a track and press <Solo> if you want to listen
to a track without hearing the others. Each press of
<Solo> toggles between Solo on and off.
Tracks vs. MIDI channels
The relationship between tracks and MIDI channels is
as follows:
Track
1 2 3 4 5 6 7 8 9 D S 12 13 14 15 16
MIDI channel 1 2 3 4 5 6 7 8 9 10 11 12 13 14 15 16
Note: When using 16-track Sequencer, the Composer’s five
Track buttons do not function.
Note: Set the beat of the metronome before recording with
the 16-track Sequencer. The Composer will use the metronome settings (time signature and tempo) in effect at the
time you start recording the first track.
Division
(For more information on divisions, see “Muting
parts of a division” on page 36.)
2. Use the MUSIC STYLE buttons to choose a Style
group.
After several seconds, the display returns to the Chord
Sequencer screen.
3. Use <INS> to insert the desired number of blank
measures for the song you wish to input.
4. Use the <√> and <®> at the bottom right of the
display or the [BWD] and [FWD] buttons to move
the cursor (▲) to the position where the chord and
division are to be input.
5. To enter a chord, play it in the lower half of the keyboard.
The chord display serves as a guide for entering
chords. If you have doubts about the correct way of
playing a given chord, just look at what the display
says.
■ Here are the other things you can program:
• Entering an Intro or Ending: press the [INTRO/
ENDING] button.
• Changing the Style Level: press <Advnc®Basic> (or
<Advnc√Basic>).
• Entering a Fill-In: press the desired Fill In button.
(By assigning other functions to the PAD buttons or
the left pedal, you can also use functions such as
“Break.”)
You can also insert and delete measures by pressing
<INS>, <DEL>, and <CLR> next to the display.
<INS>— Inserts a single blank measure at the position of the cursor.
33
ENGLISH
Note: There is only one DSP effect, so that you can only use
one DSP Type for all 16 tracks. You should therefore use a
DSP Type that can either be used for several tracks or
restrict the use of the DSP effect to only one track.
Chord name
ENGLISH
If you want to start recording halfway into the song,
use the Composer [FWD] and [BWD] buttons to
move to the desired measure.
ENGLISH
4. Press the [REC] button and then the [PLAY] button.
Two bars are counted down, and after that recording
starts.
KR-3 Owner’s Manual—Composer Menu
<DEL>— Deletes a single measure after the position
of the cursor, and shifts all subsequent bars to the left.
<CLR>— Deletes the information (chords and divisions) at the position of the cursor.
Note: Activate the Leading Bass function if you wish to play
complex chords, such as “Fm/C”. See “Performance Pad
buttons: additional or frequently used functions” on
page 44.
6. Press the Composer [PLAY] button to check your
Chord Sequence.
The accompaniment you’ve created is played, starting
from the position of the cursor.
Press the Composer [STOP] button to stop playback.
7. When you’ve finished inputting the accompaniment, press <EXEC> at the right-hand side of the display.
After several seconds, the display returns to the Composer Menu screen.
8. Press the Composer [PLAY] button.
The accompaniment you’ve created is played, so try
playing the melody along with the accompaniment as
backing.
Note: Once <EXEC> has been pressed, what you’ve input
cannot be corrected. Always check whether everything has
been entered correctly before you press <EXEC>.
Note: An Intro can only be input at the start of a song.
Entering an Intro causes the number of measures corresponding to the Intro’s length to be inserted automatically.
9.3 Recording Mode
You can select the recording method and the way that
recording is stopped.
1. On the Composer Menu, press <Recording Mode>.
A screen like the one below appears on the display.
because it allows you to start with the bass drum and
snare drum and to add the HiHat and cymbals the second time around.
Note: If you choose Mix to add notes to a melodic part, be
sure to switch on the Link function (see page 49). Otherwise, the track may suddenly use a different Tone.
Punch In/Out— This mode allows you to use a footswitch (or a PAD button) to start and stop recording
while listening to your song. Select this mode to correct minor mistakes (such as flat notes here and there,
or shaky timing of a phrase). Press the pedal (or PAD
button) again to cancel recording and returns to the
playback state.
Punch-in recording can only be performed when
“Punch In/Out” has been set as the footswitch (or the
PAD button) function. To perform recording, be sure
to set the pedal function before you start. See “Pedal
functions” on page 45 and “Performance Pad buttons:
additional or frequently used functions” on page 44.
Note: Punch-in recording erases the previously recorded
performance (same as Replace mode).
Stopping a recording (Rec Stop)
Arranger Stop— Recording ends as soon as you stop
the Arranger.
Composer Stop— Pressing the Composer [STOP]
button ends recording. In this case, you can stop the
Arranger and go on recording until you press the
[STOP] button.
9.4 Formatting disks
In order to use new disks or disks which have been
used on other equipment, it will be necessary to “format” such disks.
Note: When a disk is formatted, all the data stored on it is
completely erased. As a rule, you should always check the
contents of a used disk (either on the KR-3 or on a PC)
before formatting it.
1. Set the Write Protect tab on the disk to the “Write”
position and insert the disk into the disk drive.
2. Use the buttons on the left side of the display to
select the recording method (Rec Mode), and the buttons on the right side of the display to select how
recording ends (Rec Stop).
2. Press <Disk Format> on the Composer Menu
screen.
A screen like the one shown below will be displayed.
Recording method (Rec Mode)
Replace— This is the usual recording mode. When
recording to a track that already contains data, you
overwrite the previous version up to the point where
you stop recording. (This is also the case when you
start recording without playing anything: the Composer will then record the equivalent number of rests.)
Mix— Allows you to add new notes to an existing
recording without overwriting the previous version.
This mode is ideal for programming the drums
34
3. If you really want to format the disk, press <OK>.
When the formatting operation begins, a countdown
will begin on the screen.
To cancel the operation, press <Cancel> shown on the
screen, or the [EXIT] button.
Note: Never remove a disk that is being formatted. Doing so
may damage both the disk and the floppy drive.
KR-3 – Style Composer
9.5 Style Composer
Every Music Style of the KR-3 is made up of five parts
that are assigned to Arranger tracks (see below).
Note: The User Style is deleted when the power is turned off.
Do not forget to save it to disk (see “Saving User Styles” on
page 37).
You can also use the Composer [REC] button to end
your programming session. To stop the operation,
press the [Exit] button.
Note: Press <Advnc®Basic> (or <Advnc√Basic>) at the
lower left of the display to change the Style Level.
Note: Please note that Rhythm parts can only be assigned to
“R”, while bass parts can only be assigned to “Bass”. The “A”
parts, on the other hand can be freely assigned to memories
A1~A3.
ENGLISH
1. On the Composer Menu screen, press <Style Composer>.
The rhythm part of the currently selected Music Style
is played back, and a screen like the one below appears
on the display.
5. Press the <EXEC> button or the Composer [REC]
button to confirm your settings.
The User Style is temporarily saved in the memory
assigned to the [DISK/USER] button (indicator lights)
and can be selected by pressing this button (see also
“Using Style disks (User Styles)” on page 23).
ENGLISH
The KR-3 has a function called “Style Composer” that
lets you compile new Music Styles from existing Style
parts. Thus, you could take the bass part from the
“Slow Waltz 1” Style, add the drums of the “Waltz”
Style and use the melodic accompaniment of the
“Vienna Waltz” Style. Music Styles you create with the
Style Composer (or the Style Converter, see “Style
Converter” on page 36) are called “User Styles”.
4. Repeat steps 2 and 3 to make the settings for the
remaining parts.
You can use <VOL+> and <VOL-> to the left of the
display to set the volume level for each track.
As stated earlier, not all Music Styles use all available
Arranger tracks (R, Bass, and A1~A3). If a given track
is empty, select another one. Likewise, you don’t have
to copy Style parts to all available Arranger tracks.
Editing your User Style
See the above chart for the correspondences between
Track buttons and Arranger parts.
The Track buttons correspond to the parts as follows.
Arranger track
Display
Rhythm
R
Bass
Bass
Accompaniment 1 A1
Accompaniment 2 A2
Accompaniment 3 A3
Track button
[Rhythm]
[Bass/Accomp]
[Lower]
[Upper]
[Whole]
Note: You cannot use Arranger parts of a User Style because
the KR-3 has only one User Style memory – the one you are
copying Style parts to.
2. Use the MUSIC STYLE buttons and the buttons
next to the display to select the Style that contains the
desired rhythm part.
Every time you select another Music Style, the rhythm
that is played back changes. After several seconds, the
display returns to the Style Composer screen.
2. Use <√> and <®> at the bottom of the display to
select the part on screen that you wish to change.
You can also select it by pressing the corresponding
Track button (indicator must light).
3. Use the MUSIC STYLE buttons and the buttons
next to the display to select the desired Style.
Every time the Style is changed, the parts that are
played back change.
4. Use <√> and <®> at the bottom of the display to
select another part.
5. If necessary, repeat steps 2, 3, and 4 until you’re
happy with your User Style.
Press the <CLR> button to temporarily mute the
selected Arranger part.
6. Press the <EXEC> button or the Composer [REC]
button to confirm your settings.
3. After choosing the rhythm, use <√> and <®> at
the lower right of the display to select another part.
You can also choose a Part by pressing the Track buttons (see above). The selected part will be played along
with the “R” and any other part you have already copied.
35
ENGLISH
The tempo of a “composed” Style is determined by the
tempo of the “R” track. You can change it, however,
with the TEMPO [+]/[–] buttons.
1. On the Composer Menu screen, press <Style
Composer>.
The User Style is played back and the indicators of all
Arranger tracks that contain data light.
ENGLISH
The part names are displayed at the center of the
screen. The part that appears in reverse video is currently selected.
KR-3 Owner’s Manual—Composer Menu
Muting parts of a division
See “What is an Arranger?” on page 22 for more information about Divisions. Here is a brief summary of
the available divisions: Intro, Original, Variation, Fill
In To Variation/To Original, Ending.
The KR-3 allows you to silence (mute) selected parts
of a Style division.
You could, for example, mute the Accompaniment 1
part of a Variation pattern. Here’s how to:
9.6 Style Converter
You can also program User Styles by using short
phrases of a song recorded with the 16-track
Sequencer (see page 32).
1. Use the 16-track Sequencer to record a performance of “Major”, “Minor”, or “Seventh” type.
Because only certain tracks can be converted to Style
data, you should record the performance on the following tracks.
1. On the Composer Menu screen, press <Style
Composer>.
The User Style is played back and the Track buttons of
all active Arranger tracks light up.
2. Press the Fill In [TO VARIATION] button to select
it.
Some divisions are not played back continuously
(Intro, Ending or Fill-in), so carry out the next step
while the Arranger plays it back.
Track
2
7
8
9
D
Arranger Part
Bass
Accomp1
Accomp2
Accomp3
Rhythm
If you want to create a “professional” Style, don’t forget to program the Intro, Fill-ins, and Ending as you
record.
3. Use <√> and <®> at the bottom of the display to
choose “A1”, then press <Mute>.
(You can also select another part and then press
<Mute>.)
Note: You want to brush up your song data before converting them into a User Style. See “Song Edit” below for
details.
Accompaniment 1 is muted, and the Track [UPPER]
indicator goes out. To switch the A1 part back on
again, press <Mute> once more.
2. On the Composer Menu screen, press <Style Converter>.
A screen like the one below appears on the display.
Another way of muting an Arranger part is to hold
down Composer [FWD] button and press the Track
button assigned to the part you wish to mute. In this
case, each press of the Track button toggles between
playback (indicator lights) and muting (indicator off)
of the Part.
4. Press the <EXEC> button or the Composer [REC]
button to confirm your settings.
3. For each division, select the bars to be used, the key,
the chord type, and other settings.
Use <√> and <®> at the bottom of the display to
select the items to be set, and use the buttons on the
left to change the settings.
Press <CLR> to disable a setting.
Division:
Accompaniment pattern.
From:
Starting measure of the excerpt.
For:
Number of bars from the starting measure.
Key:
Key of the excerpt.
Chord:
Chord type of the excerpt (select Major, Minor, or Seventh.)
4. Press the Composer [PLAY] button to listen to the
isolated passage.
5. After you’ve checked all the divisions that you want
to make settings for, press <EXEC>.
The Style is saved to the [DISK/USER] button.
Note: For information on divisions, see page 22.
Note: Only certain tracks can be handled as Style data. If
the performance has been recorded with the Composer, or if
the song data is not on the specified tracks, use Track
Exchange on the Edit screen to change the tracks. See
page 39.
36
KR-3 – Saving User Styles
9.7 Saving User Styles
9.8 Song Edit
The KR-3 has eight functions that you can use to edit
the songs you have recorded.
Note: After carrying out one of the following functions, it
may be impossible to restore the previous settings. Also,
songs recorded with Arranger backing may sometimes yield
surprising (and highly irritating) results. We recommend
that you save your song to disk before editing it.
Steps for editing
1. On the Composer Menu screen, press <Song Edit>.
An Edit Menu screen like the one below appears on
the display.
1. Insert a formatted disk into the disk drive.
2. Press the [DISK/USER] button.
2. Use the buttons next to the display to choose the
editing function.
The Edit screen has two pages. Use <√√PAGE> and
<PAGE®®> to bring up the other page.
3. Press <Save>.
5. Enter a name for the User Style with <√> and
<®> below the display and the <▲> and <▼> buttons to the left of the screen.
Please refer to page 32 for the list of the available characters.
Note: If you want to cancel the operation, press the [EXIT]
button.
Note: To cancel an operation, press the [EXIT] button.
You can also edit a song on a floppy disk: Insert the
disk in the disk drive and play back the performance
one time. Then edit it.
Setup: tempo and volume
Changes in tempo and volume that are made with the
TEMPO and Part Volume buttons are only temporary.
If you like your new settings better than the original
ones, here is how to correct your song:
Before selecting the Song Edit screen, set the tempo by
pressing the TEMPO buttons, and set the volume of
the tracks you want to change in the 16-track
Sequencer screen.
1. Press <Setup> on the Edit screen.
A screen like the one shown below will appear.
37
ENGLISH
6. Press <Save>.
ENGLISH
4. Select a number with the <▲> and <▼> buttons to
the left of the screen.
You can choose any number between “1” and “99”. Do
note, however, that selecting a User Style number that
already contains data means that the Style in question
will be overwritten by your new User Style.
1. Changing the Tempo and Volume of a song –Setup.
2. Aligning imperfect Notes – Quantize
3. Erasing notes or tracks – Erase
4. Duplicating phrases – Copy
5. Deleting measures – Delete
6. Inserting blank measures – Insert
7. Changing the key – Transpose
8. Swapping and copying tracks – Track Exchange/
Track Copy
ENGLISH
You can save User Styles onto floppy disks. You can
call up Styles that have been saved to disk in the same
way you do with Style disks.
The Song Select Screen will be displayed.
ENGLISH
Note: If “Fill to Variation” or “Fill to Original” has been
chosen for “Division”, only one measure can be cut out.
Note: Preset selections are used for divisions which are not
selected.
Note: Be careful to remove all data types except the following from your song before converting it to a User Style: Performance information from the keyboard (notes and pedal
information), Reverb Depth, Chorus Depth.
Note: Once <EXEC> has been pressed, the previous settings
cannot be recovered.
KR-3 Owner’s Manual—Composer Menu
2. Press <Execute>.
The new tempo and volume values are stored.
Event refers to the types of data that will be erased:
• All: all data
Note: You can also change the setting by holding down
[REC] and pressing the [RESET] button.
• Note: the notes you played on the keyboard.
Quantize: timing corrections
• Except Note: all data except the notes (e.g. footswitch,
Pitch Bend, and Modulation data).
Quantize is a function that corrects minor timing
problems. It shifts the notes whose timing is not
exactly right to the nearest “correct” unit.
• Tempo: all tempo settings (changes) except the preset
tempo. “Tempo” erases all tempo data, regardless of
what Track numbers have been selected.
Be careful, though, because the timing of the quantized notes may be mathematically correct, while the
result is not what you expected. Always select a resolution value that is fine enough to accept all note values
you play. If the shortest notes of your accompaniment
are 1/16th note triplets, set the Resolution value to 1/
16t.
3. Press the <EXEC> button to confirm your settings
and edit the data.
1. Press <Quantize>.
Note: All data present at the copy destination is overwritten
by what is copied.
Copy(ing) measures
This copies a portion of a track to another bar of the
same track. Use this function if you’d rather not play
the chorus or verse of a song more than once.
1. Press <Copy>.
2. Use <√> and <®> below the display to select a
parameter, and set the value with <+> and <–>.
Track— Track number (you can also select “All”
tracks)
From— The starting measure
For — The number of bars from the starting measure
(you can also select “All” measures).
Resolution— Note value to be used for correcting the
timing. (Select the length of the shortest note of the
data to be quantized.)
2. Use <√> and <®> below the display to select a
parameter, and set the value with <+> and <–>.
“Track”, “From”, “For”: see step (2) under “Quantize:
timing corrections”.
To — The copy destination measure (“End” refers to
the end of the song).
Times— The number of times the selected measures
are to be copied.
3. Press the <EXEC> button to confirm your settings
and edit the data.
3. Press the <EXEC> button to confirm your settings
and edit the data.
Erase: removing data from a track or song
Delete: removing measures
Erase is a function that erases a portion of the selected
song, without removing the measures themselves.
That will leave you with the equivalent number of
blank measures. You could then record new data in
those measures using the Punch In/Out recording
method (see page 34).
Note: The notes you erase cannot be restored.
1. Press <Erase>.
Though similar to Erase, the Delete function also
removes the selected measures. You cannot select the
data type to be deleted because Delete removes everything.
Delete means “remove all measures within the specified range” (for example bars 1 and 2 of a track, so that
bar 3 becomes bar 1).
Note: Once a measure has been deleted, it cannot be
restored.
1. Press <Delete>.
2. Use <√> and <®> below the display to select a
parameter, and set the value with <+> and <–>.
“Track”, “From”, “For”: see step (2) under “Quantize:
timing corrections”.
38
2. Use <√> and <®> below the display to select a
parameter, and set the value with <+> and <–>.
“Track”, “From”, “For”: see step (2) under “Quantize:
timing corrections”.
KR-3 – Song Edit
3. Press the <EXEC> button to confirm your settings
and edit the data.
Insert: adding blank measures
Here, you can choose to exchange the data of one track
against that of another track or to copy data from one
track to another (so that they both play the same from
start to finish).
1. Press <Trk Exchng/Copy>.
ENGLISH
Insert allows you to make a track longer by adding
rests at the specified position. This will make room for
new data and shift data that lie behind the From position further to the right. New data can be added using
the Punch In/Out method (see page 34) or by copying
excerpts.
Track Exchange/Track Copy: swapping and copying tracks
Note: The Insert function does not provide a To pointer.
Instead, you have to specify the length of the insert using the
For value. “For 2” thus means “insert 2 bars”.
1. Press <Insert>.
3. Press the <EXEC> button to confirm your settings
and edit the data.
2. Use <√> and <®> below the display to select a
parameter, and set the value with <+> and <–>.
“Track”, “From”: see step (2) under “Quantize: correcting the timing”.
ENGLISH
2. Use <√> and <®> below the display to select a
parameter, and set the value with <+> and <–>.
Mode— Track Exchange: Swaps tracks
Track Copy: Copies a track
Note: When copying a track, data existing at the copy destination is overwritten by what is copied.
For— The number of bars to insert.
3. Press the <EXEC> button to confirm your settings
and edit the data.
ENGLISH
Transpose: changing the key
Transpose allows you to change the key of what has
already been recorded. It can be invaluable for tricky
phrases that you want to play only once.
1. Press <Transpose>.
ENGLISH
2. Use <√> and <®> below the display to select a
parameter, and set the value with <+> and <–>.
“Track”, “From”, “For”: see step (2) under “Quantize:
timing corrections”.
Bias— Amount of transposition. A value within the
range of -24~+24 semitones (-2~+2 octaves) can be
specified.
3. Press the <EXEC> button to confirm your settings
and edit the data.
39
KR-3 Owner’s Manual—Function Menu
10. Function Menu
The Basic, Piano, and Organ screens provide access to several convenient functions you could take advantage of for
optimizing your KR-3’s response.
Operating procedure for the Function Menu
1. Press <Func...>.
The Function menu will appear on the screen.
2. Select a function with the buttons below the display.
3. Set the function with the buttons to the side of
the display.
Simultaneously press <▲> and <▼> to revert to the
default setting. The display automatically returns to
the previous page after several seconds of inaction. If
you can’t wait to do something else, press the [EXIT]
button.
If you want to cancel the operation, press the [EXIT]
button before changing the settings.
10.1 Piano screen functions
Metronome volume and beat
1. Press <Metronome>.
“Volume” (1~10) and “Beat” will be displayed.
2. Adjust the volume and beat (time signature) with
the buttons next to the display.
Note: The volume is set to “5” when the power is turned on.
The available Beat settings are: 0/4, 2/4, 3/4~7/4, 3/8,
6/8, 9/8, 12/8. The metronome always uses the time
signature of the last Music Style you selected, so that
you could set the Beat by selecting a Style with the
appropriate time signature.
Note: You cannot change the Beat in the Arranger mode or
when you are using the Composer function.
Key Touch (velocity sensitivity)
You can adjust the way in which the KR-3 translates
the velocity data.
1. Press <Key Touch>.
The touch level will appear in the right half of the
screen. Refer to this scale when making settings as you
play on the keyboard.
The velocity of the last note you played is displayed on
the left-hand side of the screen. You can refer to this
when setting the touch as you play the keyboard.
2. Move the arrow (▼) with the buttons to the right of
the screen.
Each time you move the arrow, the touch level
changes. The velocity sensitivity and the arrow correspond in the following way:
Light
Little strength is required to play fortissimo.
Heavy
Select this setting for maximum expressiveness: even
small variations of the force with which you strike a
key produce audible changes. The trade-off is, however, that you have to strike the keys forcefully to
achieve the maximum volume.
(Center)
Normal setting. Velocity sensitivity closest to that of
an acoustic piano.
Note: You can also change the velocity sensitivity using the
Utility Menu (see page 46).
Tuning
You can select the tuning of the keyboard.
1. Press <Tuning>.
■ Stretch Tuning
“Stretch Tuning” is a method of tuning unique to
pianos. Compared with equal tuning, low notes are
tuned slightly lower, while high notes are tuned
slightly higher. At power on, this parameter is set to
On.
2. Set the Stretch Tuning ON/OFF with the buttons to
the left of the display.
ON— Like an acoustic piano, the low range is a little
flat, and the upper range a little sharp.
OFF — The tuning of all notes is scientifically correct.
■ Temperament
“Temperament” refers to alternative ways of tuning an
instrument. Some of the options provided here allow
you to play Baroque and Classical pieces with the tuning of those periods.
3. Set the tuning method with the buttons to the right
of the display.
You can choose from the following seven types of tuning.
EQUAL— The most common kind of tuning today. In
this tuning, an octave is divided into twelve equal
steps.
40
KR-3 – Piano screen functions
PYTHAGOREAN— Uses the Pythagorean scale.
Devised by Pythagoras, the fourth and fifth are kept
from becoming ambiguous in this tuning.
JUST (MINOR)— With this tuning you can achieve
the same effect as for Just Major, this time for pieces in
a minor key.
MEAN TONE— A partial compromise of the Just
(Major) tuning, to make transposition possible.
WERCKMEISTER— A combination of Mean Tone
and Pythagorean tunings.
5. Press <A:5>.
The KR-3 will return to the beginning of the fifth
measure, and begin playing back again.
You can press the <Mark A> button before, during, or
after playback.
The KR-3 memorizes the next downbeat. In other
words, if you press <Mark A> on the fourth beat of
measure 4, for example, the beginning of measure 5
will be marked. A more precise approach would be to
stop playback, fast forward or rewind to the desired
measure and then press <Mark A>.
■ Repeated playback (Repeat)
When performing with these alternative tunings, you
need to specify the fundamental tone (the root for a
major key, the sixth for minor) to match the key of the
song you are performing.
When you are accompanying another instrument,
please tune to the fundamental tones of that instrument.
6. See steps (2) and (3) above.
7. Go to the measure where you want the loop to end
by pressing the [FWD] and [BWD] buttons.
The measure number appears in the upper right of the
screen. Select measure 9.
8. Press <Mark B>.
Here is what you have just programmed:
Marker A assigned here
Note: The temperament you select here applies to all KR-3
parts (the keyboard parts, the Arranger parts, and the Composer tracks/parts).
Marker B assigned here
Region for repeated playback
ENGLISH
4. Set the Key note by pressing the key while holding
down <Tuning>.
You need to do this for all temperaments except Equal.
Example: Repeating playback of measures 5- 8
ENGLISH
KIRNBERGER— An improvement of the Mean Tone
and Just (Major) tunings, it is a tuning which allows
greater freedom of transposition.
4. Press the [PLAY] button.
Playback of the performance will begin at the beginning of measure 5.
ENGLISH
JUST (MAJOR)— In this tuning, the third and fifth
are kept from becoming too ambiguous. Choose this
setting for pieces in a major key.
3. Press <Mark A>.
<Mark A> changes to “A:5.”
Marker function: repeatedly playing back the
same section
The KR-3 also provides a Marker and loop function
for you to practice difficult solos or to repeat a given
song part.
Markers are placed at the beginning of measures.
9. Press <Repeat>.
The song will return to measure five, where Mark A is
located.
10. Press the [PLAY] button.
Measures 5~8 will play back repeatedly.
You can place markers at two locations in a song.
When you put a marker in a song, playback will start
from the beginning of the measure where the A
marker is put.
By way of example, let’s place a Marker at the beginning of measure 5.
Note: If you forgot to program <Mark B>, the song will
repeat between <Mark A> and the end of the song.
Note: Likewise, if a song only has a <Mark B>, pressing
<Repeat> will start a loop between the beginning of the
song and <Mark B>.
■ Erasing Marks
Hold down <Clear> and press either <A: (the measure
number)> or <B: (the measure number)> to erase a
marker.
2. Go to the target measure by pressing the [FWD]
and [BWD] buttons.
The measure number appears in the upper right of the
screen. Select measure 5.
41
ENGLISH
1. Press <Marker>.
Measure
KR-3 Owner’s Manual—Function Menu
10.2 Organ screen functions
For information on using markers, see above.
Using the Arranger
You may remember that we told you that, by pressing
the [START/STOP] or [INTRO/ENDING] button,
you can start playback of the drum pattern of the
selected Music or User Style. The Organ screen does,
however, provide an Arranger function that allows you
to use entire Music Styles (with bass and accompaniment lines). The split point can be set anywhere
between the B1 and the B6.
10.3 Basic screen functions
Note: See above for how to set the split point.
Note: See page 41 for information on using markers.
Auto: changing the Arranger defaults
You may remember that selecting a Music Style means
that the KR-3 automatically loads its preset tempo,
selects an Upper Tone that matches the mood of the
Styles, and activates the Chord Intelligence function.
Here is how to keep the KR-3 from loading some or all
of these settings:
1. Press <Auto>.
1. Press <Arranger>.
2. Using the button to the side of the display, you can
turn the Arranger function on and off.
At power on, this function will be set to Off.
Lower Tone on/off and split point
You can switch the Lower Tone on and off and set the
split point anywhere between the B1 and the B6.
1. Press <Split>.
2. Select what you are going to change with the buttons to the left of the display.
■ One Touch Prg
Full Aut— By selecting a Music Style, you also recall
its preset tempo, a suitable Upper Tone and a few
other settings (see “Settings” on page 22).
Tone Lock— The KR-3 no longer selects an Upper
Tone when you choose another Music Style.
Tempo Lock— The KR-3 no longer sets the preset
tempo of the selected Music Style.
Tone, Tempo Lock— Selecting another Music Style
no longer loads the preset tempo and Upper Tone.
■ Turning the Lower Tone on and off
Use the buttons to the left of the display to switch the
Lower Tone on or off.
■ Changing the Split point
Use the buttons to the right of the display to select the
Split point.
Each time you press the button, the Split point will
shift one key.
Note: You can also set the split point by pressing the key
where you want the keyboard to be split while holding down
<Split>.
42
OFF— In this mode, the KR-3 loads none of the settings related to the Music Style you select (see “Settings” on page 22).
Note: Full Auto is switched on by default.
■ Chord Intelligence ON/OFF
3. Switch the Chord Intelligence function on/off with
the buttons to the right of the display.
Chord Intelligence is set to be switched on by default.
For more detailed information about Chord Intelligence, please refer to “Easy fingering – Chord Intelligence” on page 27.
KR-3 – Basic screen functions
Chord Tone Setting
Ordinarily these Tones are preset, but they can be
changed through the following procedure.
1. Press <Chord>.
2. Select the Bass Tone using the buttons to the left of
the display, and the Chord Tone with the buttons to
the right of the display.
If you don’t want the Bass Tone or Chord Tone to
sound, select “OFF.”
Note: Some Tones allow you to sustain the notes you play
until you play other notes (Hold function), thus freeing up
your left hand for other tasks between the changes.
Note: When the power is turned on, <Chord Tone> is set to
“Soft E.Piano” and <Bass Tone> is set to “Fretless Bs”.
Note: See also “Volume of the Rhythm, Bass, Accomp, and
Chord/Bass Tones” on page 25.
ENGLISH
After stopping Style playback (or before starting the
Arranger), you can play chords with your left hand
that will be sounded the way you play them (without
the automatic accompaniment). The Tone being used
for sounding the chords is appropriately called “Chord
Tone.” Along with the Chord Tone, the KR-3 will also
play a bass note with (you guessed it) the “Bass Tone”.
ENGLISH
11. Music Assistant, Pad buttons, pedals
11.1 Music Assistant : registering
panel settings
1. Make the settings that you want to register.
2. Press the [Music Assistant] button.
ENGLISH
The KR-3 is equipped with 32 Music Assistant memories that allow you to store almost all settings (or registrations) you make on the front panel. So far, we have
only discussed the easy part of changing the preset settings. Later on, you will discover that you can also
carry out a lot of in-depth work. Those settings can
also be saved to a Music Assistant memory.
Note: The KR-3 comes with a number of Music Assistant
settings you could use a starting points for your own settings. Feel free to overwrite them when you run out of internal Music Assistant memories. Otherwise save your own
settings to disk.
Note: You can also name your settings (see below).
Loading a Music Assistant memory
1. Press the [Music Assistant] button
The Music Assistant screen (see above) is displayed.
2. Use the buttons to the side of the display to select a
Music Assistant memory.
The display responds with:
3. While holding down <Write>, use the buttons to
the side of the display to choose a memory number.
After a few seconds, the display returns to the previous
page.
Note: You cannot store settings to the <Manual> memory.
43
ENGLISH
Note: Choosing <Manual> changes the panel settings to the
ones in effect before the settings were recalled.
Note: You can also decide when the settings relating to the
Arranger are loaded. See “Music Assistant Arranger
Update” on page 49.
KR-3 Owner’s Manual—Music Assistant, Pad buttons, pedals
Naming (or renaming) a Music Assistant memory
Here is how to name or rename a Music Assistant
memory:
1. On the Music Assistant screen, hold down the
[Music Assistant] button and select a memory.
2. Use <√> and <®> below the display and <▲>
and <▼> to the left of the display to enter the name.
See page 32 for a list of available characters.
3. Press <Execute>.
Saving Music Assistant settings to disk
You can store up to 32 Music Assistant settings,
including Manual settings, on the KR-3. These 32 settings make up one set, and up to 99 sets can be saved
on a disk.
4. Use <▲> and <▼> to the right of the display to
choose the set.
5. Press <Load> at the bottom right of the display.
Note: Please bear in mind that loading a set means that all
32 internal Music Assistant memories will be overwritten.
You may want to save them to disk first (see above).
Note: To stop the operation, press the [EXIT] button.
11.2 Performance Pad buttons:
additional or frequently used
functions
You can assign a wide variety of performance-related
functions to the two Performance Pad buttons on the
panel. After a function has been assigned, it can be
called up by pressing the corresponding Pad button.
Music Assistant settings can only be saved on a disk
that has been formatted by the KR-3. If you’re using a
new disk, first format it (see page 34), then carry out
the following steps.
1. Set the Write Protect tab on the disk to the “Write”
position and insert the disk into the disk drive.
1. On the Basic screen, press <Pad/Pedal>.
2. Press the [Music Assistant] button.
The Music Assistant screen is displayed.
3. Press <Disk...>.
4. Use <▲> and <▼> to the right of the display to
select a number.
You can choose any number between “1” and “99”. Do
note, however, that selecting a number that already
contains data means that the set in question (i.e. 32
Music Assistant settings) will be overwritten by your
new set.
5. Use <√> and <®> below the display and <▲>
and <▼> to the left of the display to enter a name.
See page 32 for a list of available characters.
6. Press <Save> at the bottom right of the display.
Note: To cancel without saving the Set, press the [EXIT]
button.
Loading a Music Assistant set from disk
1. Insert the floppy disk that contains the desired
Music Assistant file into the disk drive.
2. Press the [Music Assistant] button.
The Music Assistant screen is displayed.
3. Press <Disk...>.
44
2. Use <▲> and <▼> next to the display to assign a
function to “Pad 1” and “Pad 2.”
Press [EXIT] if you’ve changed your mind about
assigning one of the following functions to a Performance Pad button.
Here are the functions you can assign to the Performance Pad buttons:
Leading Bass— This switches the Leading Bass function on or off. During normal Style Play, the root of
the chord played is used as the bass note, but when the
Leading Bass function is used, the lowest note of the
chord actually played is used as the bass note. This
means that the bass note changes when an inverted
chord is used.
Note: If you assign this function to a footswitch, the Leading
Bass function is “On” whenever the footswitch is depressed.
Break— Break is a great function for Rock’n’Roll
songs and ballads. Use it to halt the Arrangement
either for the remainder of the current bar or for an
entire bar (when pressed on the last beat of a bar).
Usually, the melody or solo continues during such a
silent (tacet) bar. Break allows you to achieve the
breaks in “Great Balls Of Fire”, for example.
KR-3 – Pedal functions
Fill In To Variation.— This has the same function as
the [TO VARIATION] button.
Fill In To Original.— This has the same effect as the
[TO ORIGINAL] button.
Original/Variation— This changes to Original or
Variation without inserting a Fill-in.
You can also assign other functions to left pedal (Soft).
1. On the Basic screen, press <Pad/Pdl>.
2. Press <Page>.
ENGLISH
Fill In— This inserts a Fill-in, but the accompaniment
pattern thereafter does not change.
11.3 Pedal functions
3. Use <▲> and <▼> to the side of the display to
select the functions of the SOFT footswitch.
Basic/Advanced— This has the same effect as pressing
<Advnc√Basic> or <Advnc®Basic>.
Simple Intro/Ending— This function allows you to
select the simple version of an Intro or Ending at the
press of a button.
Arranger Intro/Ending— This has the same effect as
the [INTRO/ENDING] button.
Soft for Upper— The footswitch acts as Soft pedal
(affecting the Upper Part or the Whole Part).
Arranger Start/Stop— This has the same effect as the
[START/STOP] button.
Sostenuto for Upper— The pedal acts as Sostenuto
pedal (affecting the Upper Part or the Whole Part).
Fade In/Out— This function allows you to fade in
(whereby the volume gradually increases) when the
Arranger is started, or to fade out (whereby the volume gradually decreases) at the end of your song.
Damper for Lower— The footswitch acts as separate
Damper pedal for the Lower part.
Chorus ON/OFF— This switches the Chorus effect
for the Whole or Upper Tones on or off.
DSP ON/OFF— This switches the DSP effect on or
off.
Glide— When the button assigned to this function is
pressed, the pitch drops momentarily, then gradually
rises to its original level. This is effective when used to
play a Hawaiian guitar, and the like.
Composer Play/Stop— This has the same effect as the
Composer [PLAY] and [STOP] buttons.
Punch In/Out— When you select this function, you
can activate and deactivate the recording process during playback. See page 34 for details.
After a few seconds, the display returns to the previous
screen.
Note: When you press the One Touch Program [PIANO]
button, the pedals once again assume their “official” functions (Soft and Sustain).
45
ENGLISH
Metronome ON/OFF— This switches the metronome
on or off.
Bend Down— Select this function if you want to use
the left pedal to shift the pitch of the notes you are
playing downward. The interval (range) can be set
using the Pitch Bend Range parameter. To shift a “C”
to the “G” note below the C, set Pitch Bend Range to
“5” and select “Bend Down”.
ENGLISH
Rotary Speed Fast/Slow— This changes the speed of
the Rotary effect.
Bend Up— Select this function if you want to use the
left pedal to shift the pitch of the notes you are playing
upward. The interval (range) can be set using the
Pitch Bend Range parameter (see page 47). To shift a
“C” to the “G” note above the C, set Pitch Bend Range
to “7” and select “Bend Up”. “Bend Up” is probably
what you will use most of the time.
ENGLISH
Melody Intelligence— This has the same effect as the
[MELODY INTELLIGENCE] button.
In addition to the following functions, all functions
listed under “Pad buttons: additional or frequently
used functions” can be assigned to either footswitch.
KR-3 Owner’s Manual—Utility Menu
12. Utility Menu
12.1 Operating procedure
1. Press the [UTILITY] button.
The Utility Menu screen appears. You can now select
the function you wish to set.
2. Use <√√PAGE> and <PAGE®®> to jump to
another Utility page.
The Utility Menu is made up of 14 pages.
3. Use the buttons to the side and below the display to
make the settings for each of the functions.
To return to the settings in effect when the power was
first turned on, simultaneously press <▲> and <▼>.
The display automatically returns to the original
screen after a few seconds. You can also return to the
original screen by pressing the [EXIT] button.
Note: If you want to cancel the operation, press the [EXIT]
button before changing any settings.
12.2 Utility functions
Master Tune
Master Tune allows you to tune your KR-3 to acoustic
instruments that cannot be tuned. Like all electronic
musical instruments, your KR-3 is set to A4= 440Hz,
which may be flat for certain acoustic instruments.
Please note that the KR-3 will revert to A4= 440Hz
whenever you switch it on.
1. On the Utility Menu screen, press <√√PAGE> or
<PAGE®®> to select the following display page:
Key Touch/Key Transpose
1. On the Utility Menu screen, press <√√PAGE> or
<PAGE®®> to select the following display page.
■ Key Touch (velocity sensitivity)
Except for the fact that there are five options here, this
function does the same as “Key Touch (velocity sensitivity)” on page 40.
2. Use the buttons on the left of the display to set the
Key Touch.
For “Light”, “Medium”, and “Heavy”, see page 40.
Super Light— Playing fortissimo doesn’t require
much strength.
Super Heavy— This setting is probably only useful for
practising purposes.
■ Transpose
If you are used to playing a song in a particular key,
the Transpose function will allow you to keep playing
in that key while sounding in another one. Doing so
will allow you to accommodate the singer or musician
you play with or to play to a Standard MIDI File backing that (for some inexplicable reason) was recorded
in another key than the one you normally choose.
This function has the same effect as using the TRANSPOSE buttons, only here you see the value you set.
3. Use the buttons to the right of the display to select
the amount of transposition.
Your setting (–12~0~12) appears on the display. The
key changes in semitone steps.
Example: When you select “2”.
Transpose +2
Thisisis what
what you
play,...
This
you
play,...
2. Use the buttons to the left and right of the display
to set the standard pitch (415.3~466.2Hz).
Note: This setting affects all sounds, including songs played
back from a disk.
46
...thisisis what
what you
hear.
...this
you
hear.
Note: Key Transpose affects the entire keyboard and thus
also the chords sent to the Arranger.
Note: You can also set the desired transposition interval
with the TRANSPOSE [+] and [–] buttons. Press these buttons simultaneously to return to normal pitch (no transposition).
KR-3 – Utility functions
Metronome Volume and Beat
Expansion Tone
1. On the Utility Menu screen, press <√√PAGE> or
<PAGE®®> to select the following display page:
See “Selecting Expansion Tones” on page 18.
Lyric: switching off the display of lyrics
1. On the Utility Menu screen, press <√√PAGE> or
<PAGE®®> to select the following display page:
ENGLISH
When using the KR-3 to play music data containing
Lyrics, the lyrics are shown on the display. You can
switch off this display of the lyrics.
2. Use the buttons to the left and right of the display
to set the desired values.
For Volume, a higher value produces a louder sound.
Selecting a different Reverb and/or Chorus effect
As stated earlier, the KR-3 provides several types of
Reverb and Chorus effects. Choose the one that
matches the mood of the song you wish to play.
1. On the Utility Menu screen, press <√√PAGE> or
<PAGE®®> to select the following display page:
2. Use the buttons to the left and right of the display
to select On or Off.
Now press any button on the front panel to hide the
lyrics that are already being displayed. Press [PLAY] if
you want to pursue your Karaoke performance.
ENGLISH
Note: Whenever you press a MUSIC STYLE button, the
Beat value (time signature) is automatically set to match
the time signature of the Music Style.
Note: Beat cannot be changed during Style playback or
when using the Composer.
Pitch Bend Range
This sets the maximum amount of change (range) that
control how much the pitch changes when you press
the Soft pedal. This only works when you assign the
“Bend Up” or “Bend Down” function to the left pedal
(see page 45).
2. Use the buttons to the left of the display to choose
the Reverb type, and the buttons to the right to
choose the Chorus type.
ENGLISH
1. On the Utility Menu screen, press <√√PAGE> or
<PAGE®®> to select the following display page:
■ Reverb Types
2. Use the buttons to the left and right of the display
to set the value.
The value can be set to any number from 0 to 12 (in
semitone steps, for a maximum of one octave).
■ Chorus Types
Chorus 1— A light chorus with slow undulations
Chorus 2— A light chorus with rapid undulations
Chorus 3— A strong chorus with slow undulations
Chorus 4— A deep chorus with rapid undulations
Feedback Cho.— A soft sound with an effect like a
flanger
Flanger— An effect that reminds you of a jet taking
off and landing (ideal for guitar sounds).
Short Delay— A delay with a short delay time
Short Dly (FB)— A short delay with many repetitions
Note: The type you select here is applied to all Tones
(including the Arranger and the Composer).
47
ENGLISH
Room 1— Reverberation of a conference room
Room 2— Reverberation of a small live-stage house
Room 3— Reverberation with a feeling of spaciousness
Hall 1— Reverberation of a large concert hall
Hall 2— Reverberation of a small concert hall
Plate— Bright, metallic reverberations
Delay— A sound that is repeated like an echo
Panning Delay— A delay sound that moves back and
forth between the left and right speakers
KR-3 Owner’s Manual—Utility Menu
Program Change (and Bank Select)
MIDI: TX MIDI Ch./Local Control
“Program changes” are MIDI messages that tell the
receiving instrument to select another sound (or
Tone) and also contain information about which Tone
to select. There may be situations where you would
like to double the Upper part melody with a sound of
an external instrument that is not automatically
selected.
1. On the Utility Menu screen, press <√√PAGE> or
<PAGE®®> to select the following display page:
Enter the Program Change function. It allows you to
transmit sound select messages without choosing
Tones on the KR-3 itself.
(*) Let’s agree to use the term sound select message to
describe MIDI message clusters consisting of one or
two bank select messages and a program change message.
1. On the Utility Menu screen, press <√√PAGE> or
<PAGE®®> to select the following display page:
2. Use the <√> and <®> buttons at the lower left of
the display to select the message type.
3. Use <▲> and <▼> to the left and right of the display to set the value.
Display
CC 00
CC 20
PC
MIDI message
Bank Select MSB
Bank Select LSB
Program Change
Value
0~127
0~127
1~128
Please note that each press of a <▲> or <▼> button
will cause the KR-3 to transmit the value you set.
Always set the numbers in the same order as they
appear on the display: start with CC00, then set CC20,
and finally set a PC value.
Note: Most instruments do not understand CC20 messages,
so feel free to skip that one.
Note: Sound select messages transmitted on the Program
Change page are not executed by the KR-3.
48
■ TX MIDI Channel
TX MIDI Ch refers to the MIDI channel used for
transmitting messages from the KR-3 to external
instruments (TX is short for transmit). If the external
instrument is set to receive on (RX) MIDI channel 3,
select “3” here. Otherwise, the external instrument
will neither play nor select sounds, etc.
2. Use the buttons to the left of the display to choose
the MIDI transmit channel.
That channel number (1~16) appears on the display.
Note: MIDI messages sent from the external MIDI instrument to the KR-3 are received on all channels. However, all
keyboard information (of the Upper, Layer, Lower, Chord,
and Bass Tones) will be transmitted on one channel.
Note: Composer and Music Style data are not transmitted.
■ Local Control
Local Control is a switch between the keyboard of
your KR-3 and its tone generator. This switch is usually set to On so that you hear the notes you play.
When working with an external sequencer, you may
have to select Off, though, to avoid that every note is
sounded twice (once by yourself and again by the
sequencer).
Local Control has no effect on what is being transmitted to the MIDI OUT connector.
After setting Local Control to Off, do not forget to set
the sequencer’s Soft Thru parameter to On. That way,
the messages can be transmitted from the sequencer’s
MIDI OUT connector to the KR-3’s MIDI IN connector (use a MIDI cable to establish this connection).
3. Use the buttons on the right of the display to switch
Local Control on or off.
KR-3 – Utility functions
Music Assistant Arranger Update
You can also set when the Arranger’s settings will
change after you have selected another Musicc Assistant memory (see page 43).
This returns all settings stored in the KR-3 to their initial values when shipped from the factory.
Note: The Music Assistant memories also return to their
initial settings, so be sure to save them to disk first.
1. On the Utility Menu screen, press <√√PAGE> or
<PAGE®®> to select the following display page:
Delayed— Arranger-related settings are only recalled
if you hold down the soft button assigned to the
desired Music Assistant memory.
2. Press <Execute>.
3. Press <OK>.
All settings are returned to their initial values.
Note: All other programmable settings will be selected
immediately.
Note: To cancel the operation without initializing the KR-3,
press <Cancel>.
Note: Do not turn the instrument off until the display shows
“Reset complete”.
Memory Backup
Link to 16TRK Sequencer
Some settings return to their initial values when the
power is switched off. The Memory Backup function
makes it possible to save such settings so that they
don’t revert to their initial values.
• Basic screen and Demo screen language
• Stretch Tuning, Temperament
• Octave Shift
• Types and depth of DSP effects for each Tone
• Chorus effect on/off status for each Tone
Normally, such as when taking advantage of the
Minus-One facility, it is wiser to set Link to off. Doing
so means that you can select whichever Tone you like
for the part you play. If Link is set to On, the keyboard
uses the Tone assigned to the track you select, thereby
overruling you own selection.
1. On the Utility Menu screen, press <√√PAGE> or
<PAGE®®> to select the following display page:
2. Press <Execute>.
2. Use the buttons to the left and right of the display
to switch Link on or off.
ENGLISH
1. On the Utility Menu screen, press <√√PAGE> or
<PAGE®®> to select the following display page:
ENGLISH
The following settings can be saved:
Link is a function you may need when working with
the 16-track Sequencer. It allows you to establish a
connection between the selected Composer track (in
16-track Sequencer mode) and the keyboard, so that
the keyboard triggers the same Tone as the one
assigned to the track.
ENGLISH
2. Use the buttons to the left and right of the display
to select an option.
Instant— Arranger-related settings are called up as
soon as the memory is selected.
ENGLISH
1. On the Utility Menu screen, press <√√PAGE> or
<PAGE®®> to select the following display page:
Factory Preset (initialization)
3. Press <OK>.
Note: To stop the operation, press <Cancel>.
Note: Do not turn the instrument off until the display shows
“Backup complete”.
49
KR-3 Owner’s Manual—Connecting MIDI instruments
13. Connecting MIDI instruments
MIDI is a language that translates every action relating
to music into binary digits that can be transferred via a
MIDI cable. It is a universal standard, which means
that musical data can be sent to and received by
instruments of different types and manufacturers.
Furthermore, MIDI allows you to connect your KR-3
to a computer or hardware sequencer.
■ Caution
The KR-3 only transmits “realtime” MIDI data. Thus,
only the notes you play on the keyboard as well as the
Pitch Bend, Modulation, and pedal data are transmitted (but not the Arranger or Composer data). If you
want to use the data of a Music Style (notes and sound
select messages) on your computer, you can record
them (see page 29), save them to disk, and then
import them into your sequencer (software) as Standard MIDI File.
The KR-3 does not receive SysEx messages when the
Composer is being used.
MIDI messages are transmitted and received using
three connectors and special MIDI cables:
• MIDI IN: This connector receives messages from
other MIDI devices.
• MIDI OUT: This connector transmits MIDI messages
generated on your KR-3
• MIDI THRU: This connector “echoes back” all MIDI
messages received via MIDI IN. The KR-3 does not
provide a MIDI THRU connector.
Here is how to connect the KR-3 to an external sound
module, sequencer, etc. When working with an external sequencer, be sure to establish both connections
and to set Local Control (see page 48) to Off.
KR-777/177
KR-3
External
device
ExternalMIDI
MIDI device
Note: You don’t always need two MIDI cables. Just look at
the arrows in the above illustration for deciding which ports
you need to connect the cables to.
50
KR-3 – DSP effects
14. Appendix
14.1 DSP effects
Overdrive: Distorts the sound a little
Distortion: Distorts the sound a lot
Phaser: Gives a swelling sound
Enhancer: Makes the sound brighter and seemingly louder
Auto Wah: Changes the timbre in cycles
Compressor: Limits the dynamic range by reducing higher volumes
Gate Reverb: A reverb that ends abruptly
Rotary: Modulation effect of a rotating speaker
Hexa Chorus: Lends thickness and breadth to the sound
Tremolo Chorus: Thick tremolo effect
Stereo Chorus: A stereo chorus
Stereo Flanger: Adds metallic reverberations to the sound
Step Flanger: A flanger with stepwise changes in pitch
Stereo Delay: Adds a delay to the stereo sound
Modulation Delay: A delay that adds undulations to the delayed sound
Triple Tap Delay: A three-way delay
17. Quadruple Tap Delay: A four-way delay
18. 2-Voice Pitch Shifter: Adds two pitch-shifted notes to the original sound
19. Feedback Pitch Shifter: Adds a single pitch-shifted note the original sound
20. Overdrive → Chorus: Overdrive that is processed by a chorus
21. Overdrive →Flanger: Overdrive that is processed by a flanger
22. Overdrive →Delay: Overdrive that is processed by a delay
23. Distortion →Chorus: Distortion that is processed by a chorus
24. Distortion →Flanger: Distortion that is processed by a flanger
25. Distortion →Delay: Distortion that is processed by a delay
26. Enhancer →Chorus: Enhancer that is processed by a chorus
27. Enhancer →Flanger: Enhancer that is processed by flanger
28. Enhancer →Delay: Enhancer that is processed by a delay
29. Chorus →Delay: Chorus that is processed by a delay
30. Flanger →Delay: Flanger that is processed by a delay
31. Chorus →Flanger: Chorus that is processed by a flanger.
32. Sympathetic Resonance: A resonance effect that is produced every time you
press the Damper pedal.
ENGLISH
14.2 Specifications
Keyboard
88 weighted keys
Keyboard modes
Disk Format: 720K bytes (2DD), 1.44M bytes (2HD)
Songs: Max. 99
Note Storage: ± 120,000 notes (2DD), ± 240,000 notes (2HD)
Lyrics
Yes
ENGLISH
Whole, Split, Layer, Split Arranger, Piano Style Arranger, Manual
Drum/SFX
Velocity sensitivity
Languages
Super Light, Light, Medium, Heavy, Super Heavy
4 languages (English, German, French, Japanese)
Maximum polyphony
Display
64 voices
AGD (Animated Graphic Display) 240 x 64 dots, graphic LCD
Tones
Rated Output Power
8 Groups, 124 Variations
(Tone Expansion Mode: 270 variations)
20W x 2???
Music Styles
117/230/230VE/240VA, power cable (supplied)
Internal: 136 Styles, Disk: 32 Styles
Expandable using (MSA) Music Style disks.
Speakers
Manual Drum/SFX Sets
Dimensions
Drum Set: 8/SFX Set: 1
1400 (W) x 940 (D) x 945 (H) mm???
Programmable Music Styles
Options
Yes
Reverb (8 types), Chorus (8 types), DSP (32 types)
MSA Music Style Disks, SMF Music Data
Headphones (RH25/50)
LVC-1 Lyrics to Video Converter
Melody Intelligence
Weight
18 types
102kg???
Music Assistant
Accessories
Internal: 32 memories, Disk: Max. 99 sets
Owner’s Manual, Music Style/Acoustic Style Disk
Stand
AC power cable
Composer
Tracks: 16 (Easy Mode: 5 tracks), Song: 1
Note Storage: ±30,000 notes, Tempo: = 20~250
Resolution: 120 ticks per quarter note
Recording methods: Realtime, Step (in Chord Sequencer Mode)
Playback: Standard MIDI File (Format 0/1), KR Songs
Save: Standard MIDI File (Format 0)
Edit: Setup, Copy, Quantize, Erase, Delete, Insert, Transpose,
Track exchange, Track Copy
Power Supply
KR-777: 16cm x2 (woofer), 5.5cm x2 (tweeter)???
ENGLISH
Effects
ENGLISH
1.
2.
3.
4.
5.
6.
7.
8.
9.
10.
11.
12.
13.
14.
15.
16.
Note: In the interest of product improvement, the specifications and/or appearance of this instrument are subject to
change without prior notice.
Disk drive/data storage
3.5 inch micro floppy disk drive
51
KR-3 Owner’s Manual—Tones, Drum Sets, Music Styles
Tones, Drum Sets, Music Styles
Normal Tones
Piano
Grand Piano1 (Soft)
Grand Piano2 (Bright)
E.Piano 1
Soft E.Piano
Vibraphone
E.Piano 2
Honky-Tonk1
MIDI Piano2
Marimba
60's E.Piano
Steel Drums
Hard E.Piano
Upright Piano
Rock Piano
Honky-Tonk2
MIDI Piano1
Celesta
Xylophone
Glockenspiel
Music Box
Clav .
Harpsichord 1
Harpsichord 2
Tubular-bell
Santur
Kalimba
Baraofon (Balafon)
Vibra Bells
Organ
Jazz Organ1
Jazz Organ2
Full Organ1
Full Organ2
Lower Organ1
Lower Organ2
Church Organ
Organ Flute
Theater Organ
Trem. Flute
Rock Organ 1
Rock Organ 2
Jazz Organ 3
Jazz Organ 4
Full Organ 3
Full Organ 4
Pop Organ
VS Organ
Accordion
52
Harmonica
Nylon Guitar
Gut Guitar
Steel Guitar
Jazz Guitar
12-str Guitar
Mandolin
Hawaiian Guitar
Guitar/Bass
JC E. Guitar
Acoustic Bs.
Acoustic Bs. + Cymbal
Fingered Bs.
Picked Bs.
Banjo
Muted Guitar
Overdrive Guitar
Distortion Guitar
Power Guitar
Rock Rhythm
Shamisen
Koto
Fretless Bs.
Slap Bass 1
Organ Bass
Synth Bass 101
Strings
Slow Strings
Strings
Violin
Cello
Harp
Orchestra
Syn Strings
Warm Pad
Sax/Brass
Blow Sax
Soprano Sax
Trumpet
Trombone
Alt Sax
Clarinet
Muted Tp
Brass 1
Oboe
Flute
French Horn
Synth Brass 1
Bassoon
Pan Flute
French Horn Solo
Synth Brass 2
Voice
Choir
Voice Oohs
Pop Voice
Syn Vox
Fantasia
Brightness
Harpvox
Orchestra Hit
Pizzicato
Poly Synth
CC Solo
Whistle
Saw Wave
Saw
Doctor Solo
Syn. Calliope
Charang
Bass & Lead
Pan Flute
Shakuhachi
Square Wave
Ocarina
Metal Pad
Sweep Pad
Sound Track
Atmosphere
Crystal
Sitar
KR-3 – Tones, Drum Sets, Music Styles
Internal & Disk Music Styles
Trad./Kids
1 Foxing
2 Broadway
3 Kids1
4 Kids3
5 Hawaiian
6 Dixieland
7 Kids2
8 Kids 6/8
9 Foxtrot
10 Charleston
11 Kids Waltz
12 Kids 4/4
13 Euro Polka
14 Polka
15 Sl Waltz
16 SlJazz Waltz
17 March 6/8
18 March 4/4
19 Musette
20 Fast Waltz
21 azz Waltz
22 March 2/4
23 Last Dance
24 Slow Waltz 1
ENGLISH
REFERENCE
Big Band/Swing
1 Jazz Z Band
2 SatrdayNight
3 Sw Combo
4 Small Combo
5 Big Serenade
6 BigBnd Bld 2
7 Organ Swing
8 FstSwing
9 Fast BigBand
10 BigBnd Swing
11 Sl Swing
12 Club Piano
13 Jazz Band
14 Big Band
15 Vocal Swing
16 Medium Swing
17 Boogie
18 Boogie Band
19 BigBand Pop
20 Slow Shuffle
21 Shuffle
22 BrtSwing
Latin/Gospel
1 Smooth Bossa
2 Lets Salsa
3 Gospel Choir
4 Gospel
5 Sweet Rhumba
6 Jo Bossa
7 Chapel
8 PDoble
9 Bossa Nova 1
10 Cha Cha Cha
11 Dance Samba
12 Reggae
13 ArgenTango
14 TradMerengue
15 Brassy Mambo
16 Orch Beguine
ENGLISH
Ballad/Acoustic
1 Ballad1
2 MediumBallad
3 G Bossa
4 P Ballad
5 Love Songs
6 PianoBallad
7 G Pop
8 P Jazz
9 12/8 Ballad
10 Ballad 1
11 P Night
12 G Slow
13 16BtBallad1
14 16BtBallad2
15 G FstPop
16 Classic 1
17 PianoBallad2
18 PianoBallad3
19 60's Ballad
20 Stride Piano
21 Piano Boogie
22 PianoBallad4
Oldies/Country
1 50's
2 Slow Dance
3 Easy Country
4 New Country
5 50's Dance
6 Rock'n Time
7 Country Rock
8 C&W Ballad
9 Dreamin'
10 Early Rock
11 Cntry Ballad
12 Hoedown.
13 Rock'n'Night
14 Rock'n Roll2
15 Cntry Swing
16 TwoStep
17 Mersey Beat
18 Beach Sound
19 Bluegrass
20 Cntry Waltzl
21 Rock'n Cntry
22 Summer Days
23 Train Beat
24 Tejano
25 Twistin
26 Twist
27 Train Beat
28 Country
29 Sl Rock2
ENGLISH
Pop/Rock
1 8B Pop2
2 Stevie
3 Sh Rock
4 Techno
5 16B Pop1
6 Dance
7 8B Pop3
8 8B Pop4
9 16B Pop4
10 Swingin
11 BluesBros
12 Blues
13 TR808 Ballad
14 '70s 8-Beat
15 16-Beat Pop1
16 16B Pop3
17 Swing Pop
18 16BeatPop
19 House
20 Rock1
21 Rock2
22 Rock3
23 Pop1
53
KR-3 Owner’s Manual—Tones, Drum Sets, Music Styles
Drum Sets
PC#
CC32
Type
25
26
27
28
29
30
31
32
33
34
35
C2 36
37
38
39
40
41
42
43
44
45
46
47
C3 48
49
50
51
52
53
54
55
56
57
58
59
C4 60
61
62
63
64
65
66
67
68
69
70
71
C5 72
73
74
75
76
77
78
79
80
81
82
83
C6 84
85
86
87
88
54
1
64
STANDARD
Bar Chime
Finger Snap
High Q
Slap
Scratch Push [EXC7]
Scratch Pull [EXC7]
Sticks
Square Click
Metronome Click
Metronome Bell
Std Kick 2
Std Kick 1
Side Stick
Std Snr 1
Hand Clap
Std Snr 2
Low Tom 2
Closed Hi-hat 1 [EXC1]
Low Tom 1
Pedal Hi-hat 1 [EXC1]
Mid Tom 2
Open Hi-hat 1 [EXC1]
Mid Tom 1
High Tom 2
Crash Cymbal1
High Tom 1
Ride Cymbal 1
Chinese Cymbal
Ride Bell
Tambourine
Splash Cymbal
Cowbell
Crash Cymbal 2
Vibra-slap
Ride Cymbal 2
High Bongo
Low Bongo
Mute High Conga
Open High Conga
Low Conga
High Timbale
Low Timbale
High Agogo
Low Agogo
Cabasa
Maracas
Short Hi Whistle [EXC2]
Long Low Whistle [EXC2]
Short Guiro [EXC3]
Long Guiro [EXC3]
Claves
High Wood Block
Low Wood Block
Mute Cuica [EXC4]
Open Cuica [EXC4]
Mute Triangle [EXC5]
Open Triangle [EXC5]
Shaker
Jingle Bell
Bell Tree
Castanets
Mute Surdo [EXC6]
Open Surdo [EXC6]
-----
17
0
POWER
9
64
ROOM
---------
25
0
ELECTRONIC
Std Kick 1
Room Kick
Kick 2
MONDO Kick
Kick 2
Elec BD
Room Snr 1
Gated SD
Elec SD
Std Snr 1
Room Low Tom 2
Snare 2
Room Mid Tom 1
Room Hi Tom 2
Open Hi-hat 2 [EXC1]
Room Mid Tom 1
Room Hi Tom 2
Gated SD
Elec Low Tom 2
Closed Hi-hat 2 [EXC1]
Elec Low Tom 1
Pedal Hi-hat 2 [EXC1]
Elec Mid Tom 2
Open Hi-hat 2 [EXC1]
Elec Mid Tom 1
Elec Hi Tom 2
Room Hi Tom 1
Room Hi Tom 1
Elec Hi Tom 1
Closed Hi-hat 2 [EXC1]
Room Low Tom 1
Pedal Hi-hat 2 [EXC1]
Room Mid Tom 2
26
0
TR-808
Kick 2
808 Bass Drum 1
808 Rim Shot
808 Snare Drum
Snare 2
808 Low Tom 2
808 CHH [EXC1]
808 Low Tom 1
808 CHH [EXC1]
808 Mid Tom 2
808 OHH [EXC1]
808 Mid Tom 1
808 Hi Tom 2
808 Cymbal
808 Hi Tom 1
Reverse Cymbal
808 Cowbell
808 High Conga
808 Mid Conga
808 Low Conga
808 Maracas
808 Claves
-----
-----
-----
-----
KR-3 – Tones, Drum Sets, Music Styles
● SFX Set
41
64
BRUSH
26
64
DANCE
49
0
ORCHESTRA
PC#
CC32
Type
39
25
40
26
Close Hi-hat [EXC1]
Pedal Hi-hat [EXC1]
Open Hi-hat [EXC1]
Ride Cymbal
27
28
29
30
Dance Snr 1
31
47
34
37
38
Std Kick 1
808 Bass Drum 2
808 Rim Shot
TR-909 Snr
39
40
42
43
44
45
46
47
C3 48
49
50
Dance Snr 2
808 Low Tom 2
808 CHH [EXC1]
808 Low Tom 1
808 CHH [EXC1]
808 Mid Tom 2
808 OHH [EXC1]
808 Mid Tom 1
808 Hi Tom 2
808 Cymbal
808 Hi Tom 1
Kick 2
Kick 1
Concert BD 2
Concert BD 1
Brush Tap
Brush Slap
Brush Swirl
Brush Low Tom 2
Closed Hi-hat 2 [EXC1]
Brush Low Tom 1
Pedal Hi-hat 2 [EXC1]
Brush Mid Tom 2
Open Hi-hat 2 [EXC1]
Brush Mid Tom 1
Brush Hi Tom 2
Concert SD
Castanets
Concert SD
Timpani F
Timpani F#
Timpani G
Timpani G#
Timpani A
Timpani A#
Timpani B
Timpani c
Timpani c#
Timpani d
Timpani d#
Timpani e
Timpani f
Brush Hi Tom 1
51
52
53
54
55
56
57
58
59
C4 60
61
62
63
64
65
66
67
68
54
69
55
56
70
808 Cowbell
Concert Cymbal 2
57
Concert Cymbal 1
71
C5 72
73
74
C4 60
75
61
62
63
64
76
808 High Conga
808 Mid Conga
808 Low Conga
77
78
79
80
66
81
67
82
68
83
69
70
71
808 Maracas
C6 84
85
ENGLISH
58
59
65
49
50
51
52
53
C3 48
High Q
Slap
Scratch Push [EXC7]
Scratch Pull [EXC7]
Sticks
Square Click
Metronome Click
Metronome Bell
Guitar sliding Finger
Guitar cutting noise (down)
Guitar cutting noise (up)
String slap of double bass
Fl.Key Click
Laughing
Screaming
Punch
Heart Beat
Footsteps1
Footsteps2
Applause
Door Creaking
Door
Scratch
Wind Chimes
Car-Engine
Car-Stop
Car-Pass
Car-Crash
Siren
Train
Jetplane
Helicopter
Starship
Gun Shot
Machine Gun
Lasergun
Explosion
Dog
Horse-Gallop
Birds
Rain
Thunder
Wind
Seashore
Stream
Bubble
Cat
ENGLISH
41
44
46
32
C2 36
42
43
45
33
35
41
57
0
SFX
ENGLISH
PC#
CC32
Type
C5 72
73
74
808 Claves
77
REFERENCE
75
PC# : Program Change Number
CC32 : Value of Control Change 32
* Value of Control Change is set 0.
76
78
79
80
81
Blank :
82
83
----- :
[EXC] :
C6 84
85
86
87
88
-----
-----
Applause
same percussion instruments
as the Standard Set
No sound
will not sound simultaneously
with other percussion instruments
of the same EXC number
55
KR-3 Owner’s Manual—Tones, Drum Sets, Music Styles
Chord Intelligence
56
C
C#
D
E
E
F
CM7
C#M7
DM7
E M7
EM7
FM7
C7
C#7
D7
E 7
E7
F7
Cm
C#m
Dm
E m
Em
Fm
Cm7
C#m7
Dm7
E m7
Em7
Fm7
CmM7
C#mM7
DmM7
E mM7
EmM7
FmM7
Cdim
C#dim
Ddim
E dim
Edim
Fdim
Cm7 ( 5 )
C#m7 ( 5 )
Dm7 ( 5 )
E m7 ( 5 )
Em7 ( 5 )
Fm7 ( 5 )
Caug
C#aug
Daug
E aug
Eaug
Faug
Csus4
C#sus4
Dsus4
E sus4
Esus4
Fsus4
C7sus4
C#7sus4
D7sus4
E 7sus4
E7sus4
F7sus4
KR-3 – Tones, Drum Sets, Music Styles
B
B
F#M7
GM7
A M7
AM7
B M7
BM7
F#7
G7
A 7
A7
B 7
B7
F#m
Gm
A m
Am
B m
Bm
F#m7
Gm7
A m7
Am7
B m7
Bm7
F#mM7
GmM7
A mM7
AmM7
B mM7
BmM7
F#dim
Gdim
A dim
Adim
B dim
Bdim
F#m7 ( 5 )
Gm7 ( 5 )
A m7 ( 5 )
Am7 ( 5 )
B m7 ( 5 )
Bm7 ( 5 )
F#aug
Gaug
A aug
Aaug
B aug
Baug
F#sus4
Gsus4
A sus4
Asus4
B sus4
Bsus4
F#7sus4
G7sus4
A 7sus4
A7sus4
B 7sus4
B7sus4
REFERENCE
A
ENGLISH
A
ENGLISH
G
ENGLISH
F#
57
KR-3 Owner’s Manual—Tones, Drum Sets, Music Styles
MIDI Implementation Chart
Transmitted
Recognized
Remarks
Function…
Basic
Channel
Default
Changed
1
1 — 16
1 — 16
1 — 16
Mode
Default
Messages
Altered
Mode 3
OMNI OFF, POLY
****************
Mode 3
Mode 3, 4 (M = 1)
True Voice
0—127
****************
0 — 127
0 — 127
Velocity
Note ON
Note OFF
O
X 8n v = 64
O
X
After
Touch
Key’s
Ch’s
X
X
O
O
*1
*1
O
O
*1
O
X
X
X
O
X
X
O
X
O
O
O
O
O
X
X
O
O
O
O
O
O
O
O
O
O
O
O
O (Reverb)
O (Chorus)
O
O
*1
*1
*1
*1
*1
*1
*1
*1
*1
*1
*1
*1
*1
*1
*1
*1
0—127
****************
O
0 — 127
*1
O
O
: Song Pos
: Song Sel
: Tune
X
X
X
X
X
X
: Clock
: Commands
X
X
X
X
X
X
X
X
O
X
O (120, 126, 127)
O
O
O (123 — 127)
O
X
Note
Number :
Pitch Bend
0, 32
1
5
6, 38
7
10
11
64
65
66
67
84
91
93
98, 99
100, 101
Control
Change
Prog
Change
: True #
System Exclusive
System
Common
System
Real Time
: All Sounds OFF
Aux
: Reset All Controllers
Message : Local ON/OFF
: All Notes OFF
: Active Sensing
: System Reset
Notes
*2
Bank Select
Modulation
Portamento time
Data entry
Volume
Panpot
Expression
Hold 1
Portamento
Sostenuto
Soft
Portamento control
Effect 1 depth
Effect 3 depth
NRPN LSB, MSB
RPN LSB, MSB
Program Number 1 — 128
* 1 O X is selectable
* 2 Recognize as M = 1 even if M ≠ 1
Mode 1 : OMNI ON, POLY
Mode 2 : OMNI ON, MONO
O : Yes
Mode 3 : OMNI OFF, POLY
Mode 4 : OMNI OFF, MONO
X : No
58
KR-3 – Tones, Drum Sets, Music Styles
Notes
ENGLISH
ENGLISH
ENGLISH
REFERENCE
59
KR-3 Owner’s Manual—Tones, Drum Sets, Music Styles
Notes
60
KR-3 – Tones, Drum Sets, Music Styles
Distributors
Information
AFRICA
EGYPT
Al Fanny Trading Office
9, EBN Hagar A1 Askalany Street,
ARD E1 Golf, Heliopolis,
Cairo 11341, EGYPT
TEL: 20-2-417-1828
REUNION
Maison FO - YAM Marcel
25 Rue Jules Hermann,
Chaudron - BP79 97 491
Ste Clotilde Cedex,
REUNION ISLAND
TEL: (0262) 218-429
SINGAPORE
Swee Lee Company
150 Sims Drive,
SINGAPORE 387381
TEL: 846-3676
CRISTOFORI MUSIC PTE
LTD
Blk 3014, Bedok Industrial Park E,
#02-2148, SINGAPORE 489980
TEL: 243 9555
TAIWAN
PANAMA
ITALY
ISRAEL
SUPRO MUNDIAL, S.A.
Roland Italy S. p. A.
Boulevard Andrews, Albrook,
Panama City, REP. DE PANAMA
TEL: 315-0101
Viale delle Industrie 8,
20020 Arese, Milano, ITALY
TEL: (02) 937-78300
Halilit P. Greenspoon &
Sons Ltd.
PARAGUAY
NORWAY
Distribuidora De
Instrumentos Musicales
J.E. Olear y ESQ. Manduvira
Asuncion PARAGUAY
TEL: (021) 492-124
Roland Scandinavia Avd.
Kontor Norge
Easa Husain Al-Yousifi
VIDEO Broadcast S.A.
POLAND
SOUTH AFRICA
Portinari 199 (ESQ. HALS),
San Borja, Lima 41,
REP. OF PERU
TEL: (01) 4758226
P. P. H. Brzostowicz
UL. Gibraltarska 4.
PL-03664 Warszawa POLAND
TEL: (022) 679 44 19
That Other Music Shop
(PTY) Ltd.
THAILAND
URUGUAY
PORTUGAL
P.O.Box 32918, Braamfontein 2017
Johannesbourg, SOUTH AFRICA
TEL: (011) 403 4105
Paul Bothner (PTY) Ltd.
17 Werdmuller Centre,
Main Road, Claremont 7708
SOUTH AFRICA
P.O.BOX 23032, Claremont 7735,
SOUTH AFRICA
TEL: (021) 674 4030
ASIA
CHINA
6 Huangmuchang Chao Yang
District, Beijing, CHINA
TEL: (010) 6774 7491
Shanghai Xingtong Acoustics
Equipment CO.,Ltd.
5F. No.1500 Pingliang Road
New East Club Plaza, Shanghai,
CHINA
TEL: (021) 5580-0800
HONG KONG
Tom Lee Music Co., Ltd.
Service Division
22-32 Pun Shan Street, Tsuen
Wan, New Territories,
HONG KONG
TEL: 2415 0911
INDIA
409, Nirman Kendra Mahalaxmi
Flats Compound Off. Dr. Edwin
Moses Road, Mumbai-400011,
INDIA
TEL: (022) 498 3079
INDONESIA
Av. Francisco de Miranda,
Centro Parque de Cristal, Nivel
C2 Local 20 Caracas
VENEZUELA
TEL: (212) 285-8586
Piata Libertatii 1,
RO-4200 Gheorghehi
TEL: (095) 169-5043
EUROPE
AUSTRALIA
AUSTRIA
Roland Corporation
Australia Pty., Ltd.
38 Campbell Avenue
Dee Why West. NSW 2099
AUSTRALIA
TEL: (02) 9982 8266
NEW ZEALAND
Roland Corporation Ltd.
32 Shaddock Street, Mount Eden,
Auckland, NEW ZEALAND
TEL: (09) 3098 715
CENTRAL/LATIN
AMERICA
ARGENTINA
Instrumentos Musicales S.A.
Av.Santa Fe 2055
(1123) Buenos Aires
ARGENTINA
TEL: (011) 4508-2700
Roland Brasil Ltda
Rua San Jose, 780 Sala B
Parque Industrial San Jose
Cotia - Sao Paulo - SP, BRAZIL
TEL: (011) 4615 5666
JUAN Bansbach
Instrumentos Musicales
Ave.1. Calle 11, Apartado 10237,
San Jose, COSTA RICA
TEL: 258-0211
CHILE
1461-9, Seocho-Dong,
Seocho Ku, Seoul, KOREA
TEL: (02) 3486-8855
Comercial Fancy
140 & 142, Jalan Bukit Bintang
55100 Kuala Lumpur, MALAYSIA
TEL: (03) 2144-3333
PHILIPPINES
G.A. Yupangco & Co. Inc.
339 Gil J. Puyat Avenue
Makati, Metro Manila 1200,
PHILIPPINES
TEL: (02) 899 9801
Siemensstrasse 4, P.O. Box 74,
A-6063 RUM, AUSTRIA
TEL: (0512) 26 44 260
BELGIUM/HOLLAND/
LUXEMBOURG
Roland Benelux N. V.
Houtstraat 3, B-2260, Oevel
(Westerlo) BELGIUM
TEL: (014) 575811
DENMARK
Roland Scandinavia A/S
Nordhavnsvej 7, Postbox 880,
DK-2100 Copenhagen
DENMARK
TEL: (039)16 6200
FRANCE
4, Rue Paul Henri SPAAK,
Parc de l'Esplanade, F 77 462 St.
Thibault, Lagny Cedex FRANCE
TEL: 01 600 73 500
BRAZIL
Cosmos Corporation
Roland Austria GES.M.B.H.
Roland France SA
COSTA RICA
BENTLEY MUSIC SDN BHD
Al Emadi Co. (Badie Studio
& Stores)
Musicland Digital C.A.
ROMANIA
J1. Cideng Timur No. 15J-150
Jakarta Pusat
INDONESIA
TEL: (021) 6324170
MALAYSIA
QATAR
VENEZUELA
138 Tran Quang Khai St.,
District 1
Ho Chi Minh City
VIETNAM
TEL: (08) 844-4068
AUSTRALIA/
NEW ZEALAND
S.A.
Rut.: 96.919.420-1
Nataniel Cox #739, 4th Floor
Santiago - Centro, CHILE
TEL: (02) 688-9540
EL SALVADOR
OMNI MUSIC
75 Avenida Norte y Final
Alameda Juan Pablo ,
Edificio No.4010 San Salvador,
EL SALVADOR
TEL: 262-0788
MEXICO
Casa Veerkamp, s.a. de c.v.
Av. Toluca No. 323, Col. Olivar
de los Padres 01780 Mexico D.F.
MEXICO
TEL: 668-0480
FINLAND
Roland Scandinavia As,
Filial Finland
Lauttasaarentie 54 B
Fin-00201 Helsinki, FINLAND
TEL: (9) 682 4020
GERMANY
Roland Elektronische
Musikinstrumente HmbH.
FBS LINES
RUSSIA
MuTek
3-Bogatyrskaya Str. 1.k.l
107 564 Moscow, RUSSIA
TEL: (095) 169 5043
SPAIN
Roland Electronics
de España, S. A.
Calle Bolivia 239, 08020
Barcelona, SPAIN
TEL: (93) 308 1000
SWEDEN
Roland Scandinavia A/S
SWEDISH SALES OFFICE
Danvik Center 28, 2 tr.
S-131 30 Nacka SWEDEN
TEL: (08) 702 0020
SWITZERLAND
Roland (Switzerland) AG
Musitronic AG
Gerberstrasse 5, Postfach,
CH-4410 Liestal, SWITZERLAND
TEL: (061) 927-8383
UKRAINE
TIC-TAC
Mira Str. 19/108
P.O. Box 180
295400 Munkachevo, UKRAINE
TEL: (03131) 414-40
UNITED KINGDOM
Roland (U.K.) Ltd.
Atlantic Close, Swansea
Enterprise Park, SWANSEA
SA7 9FJ,
UNITED KINGDOM
TEL: (01792) 700139
Oststrasse 96, 22844 Norderstedt,
GERMANY
TEL: (040) 52 60090
MIDDLE EAST
GREECE
BAHRAIN
STOLLAS S.A.
Music Sound Light
155, New National Road
Patras 26442, GREECE
TEL: (061) 43-5400
HUNGARY
Intermusica Ltd.
Warehouse Area ‘DEPO’ Pf.83
H-2046 Torokbalint, HUNGARY
TEL: (23) 511011
IRELAND
Roland Ireland
Audio House, Belmont Court,
Donnybrook, Dublin 4.
Republic of IRELAND
TEL: (01) 2603501
A. Chahine & Fils
Gerge Zeidan St., Chahine Bldg.,
Achrafieh, P.O.Box: 16-5857
Beirut, LEBANON
TEL: (01) 20-1441
Cais Das Pedras, 8/9-1 Dto
4050-465 PORTO
PORTUGAL
TEL: (022) 608 00 60
Saigon Music
PT Citra IntiRama
KOREA
Francisco Acuna de Figueroa 1771
C.P.: 11.800
Montevideo, URUGUAY
TEL: (02) 924-2335
LEBANON
Moon Stores
No.16, Bab Al Bahrain Avenue,
P.O.Box 247, Manama 304,
State of BAHRAIN
TEL: 211 005
CYPRUS
Radex Sound Equipment Ltd.
17, Diagorou Street, Nicosia,
CYPRUS
TEL: (02) 66-9426
P.O. Box 62,
Doha, QATAR
TEL: 4423-554
SAUDI ARABIA
aDawliah Universal
Electronics APL
Corniche Road, Aldossary Bldg.,
1st Floor, Alkhobar,
SAUDI ARABIA
P.O.Box 2154, Alkhobar 31952
SAUDI ARABIA
TEL: (03) 898 2081
SYRIA
Technical Light & Sound
Center
Bldg. No. 47,
Khaled Ebn Al Walid St.
Damascus, SYRIA
TEL: (011) 221-1230
TURKEY
Barkat muzik aletleri ithalat
ve ihracat Ltd Sti
Siraselviler Caddesi Siraselviler
Pasaji No:74/20
Taksim - Istanbul, TURKEY
TEL: (0212) 2499324
U.A.E.
Zak Electronics & Musical
Instruments Co. L.L.C.
Zabeel Road, Al Sherooq Bldg.,
No. 14, Grand Floor, Dubai, U.A.E.
TEL: (04) 3360715
REFERENCE
Rivera Digitec (India) Pvt. Ltd.
VIETNAM
Todo Musica S.A.
Abdullah Salem Street,
Safat, KUWAIT
TEL: 243-6399
ENGLISH
Beijing Xinghai Musical
Instruments Co., Ltd.
330 Verng NakornKasem, Soi 2,
Bangkok 10100, THAILAND
TEL: (02) 2248821
Tecnologias Musica e Audio,
Roland Portugal, S.A.
KUWAIT
ENGLISH
PERU
Theera Music Co. , Ltd.
JORDAN
AMMAN Trading Agency
245 Prince Mohammad St.,
Amman 1118, JORDAN
TEL: (06) 464-1200
Room 5, 9fl. No. 112 Chung Shan
N.Road Sec.2, Taipei, TAIWAN,
R.O.C.
TEL: (02) 2561 3339
11 Melle St., Braamfontein,
Johannesbourg, SOUTH AFRICA
8 Retzif Ha'aliya Hashnya St.
Tel-Aviv-Yafo ISRAEL
TEL: (03) 6823666
Lilleakerveien 2 Postboks 95
Lilleaker N-0216 Oslo
NORWAY
TEL: 273 0074
ROLAND TAIWAN
ENTERPRISE CO., LTD.
ENGLISH
When you need repair service, call your nearest Roland Service Center or authorized Roland distributor in your country as
shown below.
NORTH AMERICA
CANADA
Roland Canada Music Ltd.
(Head Office)
5480 Parkwood Way Richmond
B. C., V6V 2M4 CANADA
TEL: (0604) 270 6626
Roland Canada Music Ltd.
(Toronto Office)
Unit 2, 109 Woodbine Downs
Blvd, Etobicoke, ON
M9W 6Y1 CANADA
TEL: (0416) 213 9707
U. S. A.
Roland Corporation U.S.
5100 S. Eastern Avenue
Los Angeles, CA 90040-2938,
U. S. A.
TEL: (323) 890 3700
IRAN
MOCO, INC.
No.41 Nike St., Dr.Shariyati Ave.,
Roberoye Cerahe Mirdamad
Tehran, IRAN
TEL: (021) 285-4169
As of January 1, 2002 (Roland)
61
KR-3 Owner’s Manual—Tones, Drum Sets, Music Styles
62