1
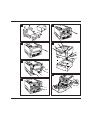
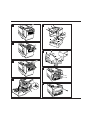
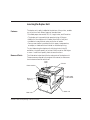
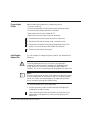
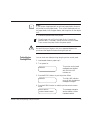
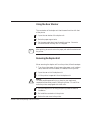
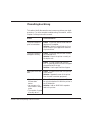
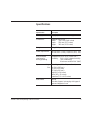
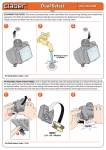
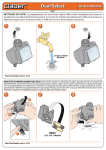
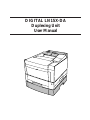
DIGITAL LN15X-DA
Duplexing Unit
User Manual
A
E
B
F
C
G
D
H
L
I
M
J
N
K
O
IL-2
Preface
This user’s manual provides installation procedures and some other
important information. For solving problems, also refer to the User’s
Manual of the printer.
Icons draw your attention to advisory messages, as illustrated below.
A line precedes and follows the message to show where the message
begins and ends.
Conventions
☞
!
✍
Caution:
Ignoring this information could result in personal injury.
Notice:
Ignoring this information could result in loss of data or harm to your
equipment.
Important:
These notes contain remarks, tips, and other useful supplementary
information.
DIGITAL LN15-DA Duplexing Unit User Manual
1
Learning the Duplex Unit
Features
The duplex unit, easily installed at the bottom of the printer, enables
you to print on both sides of paper of standard sizes.
• Printable paper sizes are A4, B5, A5, Legal, Letter, and Executive.
• The duplex unit copes with high-speed printing of 14 ppm.
• Addition of the duplex unit increases just a little in foot print.
• Installation is easy without extra connection of cables.
• Face-up rear stacker is provided for thick paper, transparencies,
envelopes, or labels which are limited to one-sided printing.
To print data using the duplex unit with the printer in the PS
emulation, the total capacity of printer’s RAMs must be 10M bytes
or more. Insufficient capacity restricts some functions.
Names of Parts
The illustration below identifies the main parts of the duplex unit.
These names are referred to throughout the manual, so take some
time to become familiar with them.
Lock
lever
Printer
Rear stacker
Rear
opening
Rear unit
DIGITAL LN15-DA Duplexing Unit User Manual
Paper path
select lever
Base unit
2
Paper Paths
The illustration below shows the routes of paper feeding in the
printer including the duplex unit and other standard and optional
components. Understanding of these paths are useful to remove
jammed paper.
Printer
w
MFF
w
q
q
®
q, w
q
q: First printing
w: Second printing
®: Reverse feeding
w
Paper tray
®
Optional paper tray
Duplex unit
Setting Up
Unpacking the
Duplex Unit
✍
A Remove cushions and securing tape. As you unpack the duplex unit,
check it carefully for damage. If you find damage, notify your dealer.
This user’s manual is the only accessory of the duplex unit.
Important:
Save the original carton and packing materials in case you need to
store or transport your duplex unit.
DIGITAL LN15-DA Duplexing Unit User Manual
3
Preparing the
Printer
Before installing the duplex unit, prepare your printer.
• First turn power off.
• Disconnect the power cord from both printer and power outlet.
• Disconnect the interface cable from the printer.
• Remove the multi-function feeder (MFF).
• Remove the rear cover from the printer as follows:
B 1. Remove the screw securing the rear cover to the printer.
C 2. Bending the left side of the rear cover, remove the cover.
D 3. Remove the rear stacker sliding along the guide grooves in the
printer. Be sure to store the rear stacker for future use.
E 4. Return the rear cover to the printer.
Installing the
Duplex Unit
It is not necessary to change the printer location, but remember the
following:
Caution:
!
To avoid possible personal injury or harm to your equipment,
cooperate with another person in assembling or disassembling the
printer, duplex unit, multi-function feeder, and paper feeder (if
installed). Do not lift or move the printer as equipped with other units.
☞
Notice:
Be sure to keep the rear opening of the duplex unit away from a wall
or another equipment so as to open the rear unit for clearing paper
jam or not to block the reverse operation of paper that comes out
and in the opening during two-sided printing.
To install the duplex unit, follow these steps:
1. Move the printer to clear its location and put the duplex unit
instead with the rear unit open.
F
Then, positioning the holes at the bottom of the printer to the
guide studs on the duplex unit, put the printer gently on the
duplex unit.
DIGITAL LN15-DA Duplexing Unit User Manual
4
☞
Notice:
If your printer is equipped with an optional paper feeder, dismount
the printer from the paper feeder. Then, mount the duplex unit on
the paper feeder, lock the paper feeder, and the printer on the duplex
unit.
2. Connect the power cord to the printer.
G 3. Close the rear unit until its lock lever clicks. Connect the
interface cable. If necessary, mount the multi-function feeder.
Then, connect the power cord to the power outlet.
!
Testing Duplex
Printing Offline
Caution:
Be careful that your fingers or hair is not squeezed between the
printer and the duplex unit when closing the rear unit.
You can check two-sided printing using the printer control panel.
1. Load several sheets in paper tray 1.
2. Turn power on.
READY
The printer control panel
message shows READY
with the ONLINE
indicator on.
3. Press the READY button to put the printer offline.
READY
The ONLINE indicator
turns off with the READY
message unchanged.
4. Press the MENU button to make the printer enter the menu
mode.
SETUP MENU
PAGE FORMAT MENU
DIGITAL LN15-DA Duplexing Unit User Manual
The message changes to
SETUP MENU PAGE
FORMAT MENU.
5
5. Press the ENTER button to select the page format menu.
COPIES
1*
The message changes to
COPIES 1*.
6. Press the MENU button five times to display the desired item of
the page format menu.
DUPLEX MODE
OFF*
The message changes to
DUPLEX MODE OFF*.
7. Press the + button once to change the parameter.
DUPLEX MODE
ON
The message changes to
DUPLEX MODE ON.
8. Press the ENTER button to select the new parameter.
DUPLEX MODE
ON*
An asterisk follows the
message like DUPLEX
MODE ON*.
9. Press the READY button to exit the page format menu.
READY
The message changes to
READY and the ONLINE
indicator turns on.
10.Press the READY button again to put the printer offline.
READY
The ONLINE indicator
turns off with READY
unchanged.
11.Press the SELF TEST button five or more seconds to start self test
printing.
SELF TEST
The message changes to
SELF TEST, the DATA
indicator flashes, and the
status report is printed on
both sides of a sheet.
12.Check that the printing is successful.
DIGITAL LN15-DA Duplexing Unit User Manual
6
Using the Rear Stacker
The rear stacker of the duplex unit has the same function with that
of the printer.
H 1. Open the rear stacker of the duplex unit.
I
2. Raise the paper support wire.
J 3. Set the paper path select lever forward the printer. Be sure to
move the lever all the way until it is stopped.
☞
Notice:
After printing, be sure to return the paper path select lever backward
the printer.
Removing the Duplex Unit
When removing the duplex unit from the printer, follow these steps:
1. Turn the printer power off and remove the power cord, interface
cable, and multi-function feeder (if installed) from the printer.
K 2. Open the rear unit of the duplex unit.
L 3. Lift the printer to separate it from the duplex unit.
!
Caution:
To avoid possible personal injury or harm to your equipment,
cooperate with another person in lifting the printer. Do not lift or
move the printer as equipped with other units.
M 4. Store the duplex unit flat using the packing materials saved at
installation
N 5. Re-install the rear stacker in the printer.
O 6. Return the rear cover to the printer.
DIGITAL LN15-DA Duplexing Unit User Manual
7
If Something Goes Wrong
This section briefly discusses the most common problems you might
encounter. For more complete troubleshooting information, refer to
Chapter 6 of the printer user’s manual.
Problem
Causes and solutions
The printer does not
print on both sides.
Cause: The printer cannot know that the
duplex unit is installed.
Solution: Set the Duplex Mode to On on
a print menu of your application software
or printer driver.
The printer does not
feed paper correctly.
Cause: The printer does not seat correctly
on the duplex unit.
Solution: Mount the printer correctly on
the duplex unit.
Cause: The size of paper fed from the
MFF or manually does not match the paper
size specified with the job.
Solution: Use the specified size of paper.
Paper jams at the rear
door.
Cause: The space at the rear of the printer
is too narrow.
Solution: Separate the rear of the printer
from the wall or another equipment.
• Paper is faced up in
the face-down
stacker.
• Jam recovery = On
has no effect in setup
mode.
• The number of copies
is forcibly set to 1.
Cause: The RAM capacity is insufficient
for using the duplex unit with the printer in
the PS emulation.
Solution: Add an 8MB RAM expansion
card to the printer.
DIGITAL LN15-DA Duplexing Unit User Manual
8
Specifications
Specification
Description
Feeding speed
14 pages per minute for A4-size paper
Dimensions
Together with printer
Width:
376.5 mm (14.8 inches)
Depth:
550 mm (21.7 inches)
Height: 393 mm (15.5 inches)
Weight
11 kg (24.3 pounds)
Power requirements
100-120 VAC (±10%), 50/60 Hz (+2%, -4%)
220-240 VAC (±10%), 50/60 Hz (+2%, -4%)
Environmental
requirements
during operating
Temperature: 10° to 35°C (50° to 95°F)
Humidity: 20% to 80% relative humidity
(non-condensing)
Maximum wet bulb 29°C (84°F)
Paper
Rear stacker
DIGITAL LN15-DA Duplexing Unit User Manual
Weight 60 to 90 g/m2 (16 to 24 pound bond)
Size A4 (210 x 297 mm)
B5 (182 x 257 mm)
A5 (148 x 210 mm)
Legal (8.5 x 14 inches)
Letter (8.5 x 11 inches)
Executive (7.25 x 10.5 inches)
Face up
20 sheets of paper, but varying with types of
paper and degrees of curls
9