1
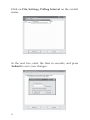
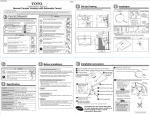
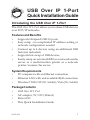
USB Over IP 1-Port
Quick Installation Guide
Introducing the USB Over IP 1-Port
The USB Over IP 1-Port allows you to share USB devices
over TCP/IP networks.
Features and Benefits
•
•
•
•
•
Supports Hi-Speed USB 2.0 ports
Easy setup - no complicated IP address setting or
network configuration needed
Connect up to 4 devices using an additional USB
hub (not included)
Supports hot-swap of USB devices
Easily setup an external HDD as a network media
server or a multi-function printer as a network
printer/scanner/fax server
System Requirements
•
•
•
PC computer with an Ethernet connection
Ethernet LAN with and available RJ45 connection
Windows® 2000/XP (32-/64-bit)/Vista (32-/64-bit)
Package Contents
•
•
•
•
USB Over IP 1-Port
AC adapter, 5V/12V (300mA)
Driver CD
This Quick Installation Guide
04-0542A
1
Layout
USB Port
Network LED
Power LED
Network Port
Reset Button
Power Adapter Jack
Figure 1: USB Over IP 1-Port Layout
Hardware Installation
Make sure that your USB devices are powered off and
that the USB Over IP 1-Port's power adapter is
disconnected.
1.
2.
3.
Connect the USB Over IP 1-Port to a router or switch
on your Ethernet network.
Connect your USB device to the USB Over IP 1-Port.
Connect the power adapter to the USB Over IP
1-Port. When the Network LED indicator lights up,
the server is properly connected to the network.
Driver Installation
Please make sure the USB Over IP 1-Port is connected to
your network before proceeding with driver installation.
1.
2.
2
Insert the driver CD. The installation will start
automatically. If not, double click Launch.exe from
the driver CD root directory.
Click Install and follow the on screen instructions to
complete the installation.
USB Over IP 1-Port Utility
This utility must be running in order to use the USB Over
IP 1-Port.
Starting the USB Over IP 1-Port Utility
To start the utility, double click the shortcut icon located
on the desktop or go to the programs folder in which you
installed the program and double click on the USB Over
IP 1-Port icon.
Main Dialog Box
The main dialog box, consists of a Control Menu (File,
View and Help), tree view, Search button to get the
current USB Over IP servers and devices in the network,
and a button that toggles between Config and Connect
depending on the node you select on the tree view. It
toggles to Config when a server is selected on the tree
view and to Connect when a USB device is selected.
3
Status of Servers and Devices
In addition to displaying all USB Over IP 1-Port servers
and devices, the tree view also tells you the status of all
the servers and devices that are accessible to you. A
server is either accessible or inaccessible. An inacessible
server will not show up on the tree view. An inaccessible
server is either disconnected from the network, powered
off or suffers other technical difficulties that prevent it
from being accessed. Devices, however, have several
kinds of status. Each status is represented by an icon of
a different color.
Ready
A device with ready status is indicated by a square green
icon. This green icon indicates that the device is
unoccupied and ready to be connected.
Occupied by Yourself
When you are connected to a device, the greeen icon
turns into an orange icon to signify the establishment of
the connection.
Occupied by Another Computer
A red icon indicates that the device is occupied by
another computer, you are prohibited to connect to that
device.
Self Occupied with Error
When an error happens on the device you are connected
to, you will see a small exclamation mark appear at the
lower right corner of the orange icon. For example, an
out-of-paper error if you are using a printer.
4
Occupied by Others with Error
When an error happens on the device connected to another
user, you will see a small exclamation mark appear at the
lower right corner of the red icon. This error could be an
out-of-paper error if you are using a printer.
Free with Error
A green icon with an exclamation mark indicates that this
device is not connected to anyone but has some type of
problem, such as out of ink/paper. It is recommended
that you get this problem solved before connecting to it.
Unsupported Device
When a device is not supported by the USB Over IP
1-Port, such a device will be indentified by a red cross.
Connecting to an unsupported device is not allowed.
Accessing a Device
The first time you connect to a device, you are prompted
to install the driver for it. If the driver is already installed
in the system the installation will complete by itself.
Otherwise, use the driver installation routine for the
device. Please note that you will have to do this only once
for each USB device you connect to.
Polling Interval
The USB Over IP 1-Port program periodically polls your
network to find out the status of all the connected servers
and devices. Any change in status of the servers or
devices will be updated in the tree view in the main
dialog box. The default polling interval is every 10
minutes. To change the interval, follow the instructions
on the next page.
5
Click on File, Settings, Polling Interval on the control
menu.
In the next box, enter the time in seconds, and press
Submit to save your changes.
6
Server Configuration User Interface
This web-based user interface (UI) allows you to configure
the settings of the USB Over IP 1-Port via the computer's
default web browser. Select the target server, in the tree
view of the Main Dialog box, and click on the Config
button. The system's default web browser will pop up
and display the Device Status page similar to the image
below.
Menu
Device Status
Displays status of Server and devices. Up to 4 devices are
supported by the USB Over IP 1-Port when a USB hub is
used with it.
7
Network
Displays network status of the USB Over IP 1-Port and
provides access to network settings. From the Network
Setting section, you can Enable/Disable DHCP support
(default is Enabled), if your network does not have a
DHCP server or it is disabled enter an IP Address and
Subnet Mask (obtain from your network administrator),
or change the Server Name. A password is not needed
unless you have set a password.
Reset Device
Allows you to reboot the server. A password is not
needed unless you have set a password. An alternate
method to reset the server is via the reset button on the
back of the unit, use a pointed object such as the tip of a
pen and press the button for 5 seconds then release.
8
Factory Default
Returns the USB Over IP 1-Port to factory default settings.
A password is not needed unless you have set a password.
Firmware Update
Allows you to upload the latest firmware for the USB
Over IP 1-Port. Click on the Browse button to browse to
the location of the firmware on your PC, then click on the
Submit button to update the firmware. A password is
not needed unless you have set a password.
9
Password Change
Allows you to add or change the existing password. By
default the USB Over IP 1-Port does not have a default
password.
10
Technical Support and Warranty
QUESTIONS? SIIG’s Online Support has answers! Simply visit our
web site at www.siig.com and click Support. Our online support
database is updated daily with new drivers and solutions. Answers
to your questions could be just a few clicks away. You can also submit
questions online and a technical support analysts will promptly
respond.
SIIG offers a 5-year manufacturer warranty with this product. Please
see our web site for more warranty details. If you encounter any
problems with this product, please follow the procedures below.
A) If it is within the store's return policy period, please return the
product to the store where you purchased from.
B) If your purchase has passed the store's return policy period, please
follow these steps to have the product repaired or replaced.
Step 1: Submit your RMA request.
Go to www.siig.com, click Support, then RMA to submit a
request to SIIG RMA. If the product is determined to be
defective, an RMA number will be issued.
Step 2: After obtaining an RMA number, ship the product.
• Properly pack the product for shipping. All software, cable(s)
and any other accessories that came with the original package
must be included.
• Clearly write your RMA number on the top of the returned
package. SIIG will refuse to accept any shipping package, and
will not be responsible for a product returned without an
RMA number posted on the outside of the shipping carton.
• You are responsible for the cost of shipping. Ship the product
to the following address:
SIIG, Inc.
6078 Stewart Avenue
Fremont, CA 94538-3152, USA
RMA #:
• SIIG will ship the repaired or replaced product via Ground
in the U.S. and International Economy outside of the U.S. at
no cost to the customer.
11
About SIIG, Inc.
Founded in 1985, SIIG, Inc. is a leading computer upgrade manufacturer
of I/O connectivity products, including PCIe, PCI & ISA serial and
parallel ports, USB, Serial ATA & UltraATA controllers, FireWire
(1394a/b), networking, sound cards, and other accessories. SIIG is the
premier one-stop source of upgrades.
SIIG products offer comprehensive user manuals, many user-friendly
features, and are backed by an extensive manufacturer warranty.
High quality control standards are evident by the overall ease of
installation and compatibility of our products, as well as one of the
lowest defective return rates in the industry. SIIG products can be
found in computer retail stores, mail order catalogs, through major
distributors, system integrators, and VARs in the Americas and the
UK, and through e-commerce sites.
PRODUCT NAME
USB Over IP 1-Port
FCC RULES: TESTED TO COMPLY WITH FCC PART 15, CLASS
B OPERATING ENVIRONMENT: FOR HOME OR OFFICE USE
FCC COMPLIANCE STATEMENT:
This device complies with part 15 of the FCC Rules. Operation is
subject to the following two conditions: (1) This device may not cause
harmful interference, and (2) this device must accept any interference
received, including interference that may cause undesired operation.
THE PARTY RESPONSIBLE FOR PRODUCT COMPLIANCE
SIIG, Inc.
6078 Stewart Avenue
Fremont, CA 94538-3152, USA
Ph: 510-657-8688
USB Over IP 1-Port is a trademark of SIIG, Inc. SIIG and the SIIG logo are registered trademarks of SIIG,
Inc. Microsoft, Windows and Windows Vista are either registered trademarks or trademarks of
Microsoft Corporation in the United States and/or other countries. Other names used in this publication
are for identification only and may be trademarks of their respective companies.
January, 2009
Copyright © 2009 by SIIG, Inc. All rights reserved.