1
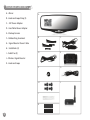
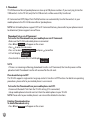
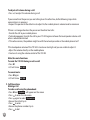
rearview mirror
backup camera & speakerphone
TABLE OF CONTENTS
Specifications �������������������������������������������������������������������������������������������������������������������������������������������������������������������������������� 1
Package Contents ����������������������������������������������������������������������������������������������������������������������������������������������������������������������� 2
Prior to Installation ���������������������������������������������������������������������������������������������������������������������������������������������������������������� 3
Installation Instructions ���������������������������������������������������������������������������������������������������������������������������������������������������� 5
Warranty / Liabilities ��������������������������������������������������������������������������������������������������������������������������������������������������������������� 9
Operations �������������������������������������������������������������������������������������������������������������������������������������������������������������������������������������12
Button Functions and Operation ���������������������������������������������������������������������������������������������������������������������������������19
LED Indication ������������������������������������������������������������������������������������������������������������������������������������������������������������������������������19
Testing and Troubleshooting �����������������������������������������������������������������������������������������������������������������������������������������21
CUSTOMER SERVICE / CONTACT ����������������������������������������������������������������������������������������������������������������������������������������������22
FCC/ ICC ����������������������������������������������������������������������������������������������������������������������������������������������������������������������������������������������22
Specifications
• 2.4” Color TFT LCD Monitor
• 2.4GHz Wireless Technology
• Image sensor: CMOS, 640x480 pixel
• Bluetooth® Spec.: v2.1
• Weight: 380g
• Phonebook Capacity: 950 Entries
• Profiles Support: Headset, Handsfree, AVRCP & OPP
• Operating Range: 10 Meters
• Input Voltage: DC10~13.5V
• Noise / Echo Reduction: DSP Noise & Echo Reduction
• Operating Temperature: -10ºC to 50ºC
• Storage Temperature: -20ºC to 60ºC
1
Package Contents
A – Mirror
A
B – Hook and Loop Strap (2)
C – 12V Power Adapter
D – Hard Wire Power Adapter
E – Backup Camera
F – Rubber Ring Grommet
B
C
D
E
F
G
H
J
G – Signal Booster Power Cable
H – Scotchloks (4)
I – Cable Ties (4)
J – Wireless Signal Booster
K – Hook and Loop
I
K
2
Prior to Installation
Read all the installation instructions carefully before installing the product. Improper installation will void
manufacturer’s warranty. The installation instructions do not apply to all types of vehicles, and are written
as guidelines to assist in installing the system.
Consult an experienced technician if you are not comfortable installing the product. You can also contact
Winplus at 866.294.9244 to speak to one of our installation specialist if you have any specific questions
regarding Rearview Mirror Vehicle Back-Up Camera with Bluetooth® Hands-Free Speakerphone System.
BEFORE using the Rearview Vehicle Back-Up Camera with Bluetooth® Hands-Free Speakerphone System,
please read the following safety information. ALWAYS use the system as outlined here.
! WARNING:
• A failure to read and follow these warnings and instructions may result in a serious accident, including
damaged property or a serious injury, including loss of life.
• The Rearview Mirror Vehicle Back-Up Camera with Bluetooth® Hands-Free Speakerphone System is
designed as an aid to the driver in detecting large stationary objects to help avoid damaging the vehicle.
However, you, the driver, must use it safely and properly.
Use of the Rearview Mirror Vehicle Back-Up Camera with Bluetooth® Hands-Free System is not a substitute
for safe, proper and legal driving.
• Never back up while looking only at the screen. You should always check behind and around the vehicle
when backing up just as you would if the vehicle did not have the Rearview Mirror Vehicle Back-Up
Camera with Bluetooth® Hands-Free Speakerphone System. Always make sure your intended path is
clear. If you back up while looking only at the monitor, you may hit a vehicle, pedestrian, bicyclist, child,
pet or other object resulting in injury or death. Always back up slowly.
• Never depend on the Rearview Mirror Vehicle Back-Up Camera with Bluetooth® Hands-Free Speakerphone
System entirely when backing up. The image on the screen is different from actual conditions. Objects
viewed in the rear view monitor differ from actual distance because a wide-angle lens is used. Objects
in the rear view monitor will appear visually opposite than when viewed in the rear view and outside
mirrors. Use the inside mirror or glance over your shoulder to properly judge distances to other objects.
• The Rearview Mirror Vehicle Back-Up Camera with Bluetooth® Hands-Free Speakerphone System’s “night
vision” feature is an aid to a driver but is limited. Always use your own eyes to confirm the vehicle’s
surroundings, as the displayed image may be faint or dark, distorted, or not entirely visible. Always check
behind and all around the vehicle visually and with mirrors before proceeding.
3
• The area displayed by the Rearview Mirror Vehicle Back-Up Camera with Bluetooth® Hands-Free
Speakerphone System is limited. The Rearview Mirror Vehicle Back-Up Camera with Bluetooth® HandsFree Speakerphone System does not display objects that are close to or below the bumper, underneath
the vehicle, or objects out of the camera’s field of view. The area displayed on the screen may vary
according to vehicle orientation or road conditions.
• The Rearview Mirror Vehicle Back-Up Camera with Bluetooth® Hands-Free Speakerphone System
is not intended for use during longer backing maneuvers or backing into potential crossing traffic or
pedestrians. Crossing traffic or pedestrians may be approaching outside of the camera’s field of view.
• Be sure to check the camera’s position and mounting angle before each use.
• Make sure the trunk, hatch, or backdoor is completely and securely closed when backing up.
• If the back of the vehicle is hit, the position and mounting angle of the Rearview Mirror Vehicle Back-Up
Camera with Bluetooth® Hands-Free Speakerphone System may change.
• When washing the vehicle with high pressure water, be sure not to spray it around the camera. Otherwise,
water may enter the camera unit causing water condensation on the lens, a malfunction, fire or an electric
shock.
• Do not strike the camera. It is a precision instrument. Otherwise, it may malfunction or cause damage
resulting in a fire or an electric shock.
• This product will only provide images of items that are within the field of view of the camera. Thus, it is
imperative that the camera should be kept clean and unobstructed, and should mounted so that its field
of view includes the entire area behind your vehicle.
• Distracted driving is dangerous. Always use the Bluetooth® Device in a manner that does not reduce your
attention and ability to drive carefully and safely.
• Adhere to all applicable traffic laws and motor vehicle regulations applicable to the device.
• Consult local laws and regulations for any restrictions on installation or use.
• Never allow children to play with the device. Small parts may be a choking hazard.
4
Installation Instructions
Mirror Installation – uses parts A thru D
1. Attach black Hook and Loop straps (Part B) to the
back of the Yada mirror by sliding the metal clip
into the mirror brackets. Push in all the way until
the straps are secure.
2. Make sure the connection for each strap is facing
the same way – rather up or down – to allow for
easy adjusting of the mirror.
4. Start by matching up the mirrors at the top, with
the spring clamps wrapping around the original
rearview mirror.
5. Pull the Yada mirror down to allow the spring
clamps on the bottom to snap into place around
the original rear view mirror. Tip: Use both hand
on either side of the mirror to snap into place
evenly. Make sure the mirror is centered before
snapping into place.
3. Open the Hook and Loop straps and allow them
to hang freely in the FRONT of the mirror, so there
is no obstruction between the Yada mirror and
your original rear view mirror.
6. Once the Yada mirror is in place, reach behind and
one by one reattach the Hook and Loop straps
together to hold the Yada mirror tight in place.
5
7. At this time you can trim off any excess strap with
a scissor.
Camera Installation– uses parts E through K
Note: Camera installation on diesel vehicles requires
special wiring. Please visit our FAQ’s at www.
letsyada.com or call customer support for additional
instructions.
Caution: This unit is designed to operate on a 12V DC
NEGATIVE GROUND electrical system. Connecting to
other types of electrical systems will cause damage
to your vehicle. Please contact the manufacturer if
you are unaware of the system type in your vehicle.
8. Remove the Yada mirror protective overlay.
9. Now power the mirror.
a. 12V Power Adapter
i. Take the 12V Power Adapter (Part C) and plug in adapter to top of the Yada mirror. Plug other end into 12v Power Port in your car.
b. Hard wire
i. Take the Hard Wire Power Adapter (Part D) and plug adapter into the top of the mirror. Run cable to fuse box and connect to fused accessory power source.
Refer to your vehicle owner manual for location of available accessory fuses.
10.At this time, the Yada mirror is ready to be
powered on and can be used as a Bluetooth®
Speaker for your car.
6
At the end of this step, the Camera will be mounted
on the back of your license plate, with the cables
connected and ready to set up the Wireless Signal
Booster.
1. Locate the reverse tail lights wiring in your trunk
or rear hatch. You may need to remove the interior
panel in order to locate. You only need to attach the
signal booster power wire to ONE of the tail lights,
not both. If you cannot manually locate the tail light
cables, please contact the vehicle manufacturer or
reference a wiring diagram for your vehicle.
2. At your tail light, remove the light bulb socket
from the reverse light housing.
3. Determine the reverse light power wires for your
car, designating the positive and negative wires.
If you are not sure of which are the power wires,
then please contact your vehicle manufacturer or
reference a wiring diagram for your vehicle.
4. Connecting the Power Cables:
a. Take the open wire end of this cable, and connect
it to the power wires of your car (as determined in
step 3). Using the Scotchlok Connectors, connect
the Camera’s Red wire to reverse light’s Positive
wire. Connect the camera’s Black Wire to reverse
light’s Negative wire.
Power Cable (Part G) into the Wireless Signal
Booster.
d. Determine the best place to mount the Signal
Booster. Now it is time to install the camera
5. Remove your license plate
6. Determine the best route for the Camera Cable
from the top of your license plate to the Signal
Booster. You may need to drill a small hole in the
panel behind where the license plate is situated.
b. Use pliers to squeeze the metal tabs of the Scotchlok Connectors and ensure a solid
connection, then snap the plastic cover closed
c. Place the fixed adapter from the Signal Booster
7. Take the Camera (Part E) and run the attached
cable through the Rubber Ring Grommet (Part
F), then from the outside of your car to the inside
where the Signal Booster is. Pull the cable through
so that there is a small amount of slack and you can
still move the Camera around the license plate.
7
8. Plug the attached wire from the Camera into the
Wireless Signal Booster (Part J). Ensure that the
wires are not tangled.
9. You are now ready to test the camera.
10.While sitting in the driver’s seat of the car with the
key in the accessory position, turn on the Rearview
Mirror by pressing the (power) button. The Mirror
will automatically start when connected to a
power source.
11.Put the vehicle in reverse. If you have a clear picture
put the vehicle back in park and turn the key to the
off position. You are now ready for final steps.
12.Take the Wireless Signal Booster (Part J) and using
the double sided Velcro (Part K) attach the box to
the inside of your car.
13.Use the provided cable ties (Part I) to secure wires
neatly within your car.
14.Replace the light socket back into the reverse light
housing.
15.Replace any interior panels which may have been
removed to access the tail light and close your
trunk or rear hatch.
8
16.Standing with the license plate in one hand and the
camera in the other hand, slide the Camera along
the top of the license plate in order to determine
the placement. Best placement is in the center of
the license plate. If you have a rear hatch handle
you may need to remove the camera bracket,
turn the bracket upside down and reattach to the
camera. You would then mount the camera from
the bottom of the license plate.
17.Peel off the lining to the double sided tape already
attached to the Camera and press firmly to the
license plate to secure the Camera. Make sure the
back of the license plate is clean before attaching
double sided tape.
18.Press the license plate and the Camera mounting
firmly to the car to secure and get full contact
between the license plate and the double sided
tape. Screw the license plate back onto the rear
of your vehicle.
19.Once license plate and Camera are secure, you
can adjust the vertical angle of the camera to your
specific need.
20.As a last check, note the position of the view from
the camera when you place the vehicle in reverse.
Adjust the angle of the camera as necessary to
achieve the best rear view.
Warranty / Liabilities
WINPLUS NORTH AMERICA
LIMITED WARRANTY
Winplus North America warrants, to the original purchaser, that its products are free from defects in material
and workmanship for 1 year from the date of original purchase. Where permitted by law, Winplus North
America’s liability shall be limited to that set forth in this limited express warranty. This limited express
warranty shall be the exclusive remedy of the purchaser and Winplus North America makes no other
warranty of any kind aside from the limited express warranty stated above.
NOTE: Warranty only applies for North American customers or purchases made in the North America.
CONDITIONS OF WARRANTY
If during the 1 year warranty period your new product is found to be defective, Winplus North America
will repair such defect, or replace the product, without charge for parts or labor subject to the following
conditions:
1. All repairs must be performed by Winplus North America.
2. All warranty claims must be accompanied by a copy of the sales receipt or bill of sale.
3. The equipment must not have been altered or damaged through negligence, accident, improper
operation, or failure to follow the product instructions for installation, use, or care.
4. The replacement of parts is excluded from the warranty when replacement is necessary due to normal
wear and tear.
5. Repair or replacement parts supplied by Winplus North America under this warranty are protected only
for the unexpired portion of the original warranty.
6. This is a “repair or replace” warranty only, and does not cover the costs incurred for the installation,
removal or reinstallation of the product, or damage to any mobile phone device or vehicle.
OWNER’S RESPONSIBILITIES:
Winplus North America will make every effort to provide warranty service within a reasonable period of
time. SHOULD YOU HAVE ANY QUESTIONS ABOUT SERVICE RECEIVED OR IF YOU WOULD LIKE ASSISTANCE
IN OBTAINING SERVICE, PLEASE CALL TOLL FREE 1.866.294.9244 DURING REGULAR BUSINESS HOURS
MONDAY THROUGH FRIDAY 9:00AM TO 5:00PM.
NOTE: Toll Free # is for North America Customers ONLY. See Customer service section for customer contact
numbers for other regions/offices.
9
For customer service and technical support, please call us at 1.866.294.9244 or email us at customercare@
winplususa.com. If at that time it is determined that a replacement unit is needed, the support representative
will issue a Return Authorization and instruct on how to get a new unit.
Winplus North America makes no other warranty of any kind aside from the limited express warranty stated
herein.
DISCLAIMER OF WARRANTIES, INCLUDING WARRANTY OF MERCHANTABILITY AND WARRANTY OF
FITNESS FOR PARTICULAR PURPOSE: EXCEPT AS SPECIFICALLY SET FORTH HEREIN, NO WARRANTY OR
REPRESENTATION, EXPRESS OR IMPLIED, IS MADE AS TO THE REARVIEW MIRROR BACKUP CAMERA. EXCEPT
AS EXPRESSLY SET FORTH HEREIN, WINPLUS NORTH AMERICA AND/OR ITS AFFILIATES EXPRESSLY DISCLAIMS,
WITHOUT LIMITATION, ANY STATUTORY WARRANTIES AND ALL IMPLIED WARRANTIES, INCLUDING ANY
IMPLIED WARRANTY OF MERCHANTABILITY OR FITNESS FOR A PARTICULAR PURPOSE.
Winplus North America and/or its affiliates does not guarantee or promise that the user of our Rearview
Mirror Backup Camera will not be in an accident or otherwise not collide with an object and/or person. Our
Rearview Mirror Backup Camera are not intended in any way to be substitute for careful and cautious driving
or for the consistent adherence to all applicable traffic laws and motor vehicle safety regulations.
The Rearview Mirror Backup Camera is not intended to be a substitute for rearview mirrors or for any other
motor vehicle equipment mandated by law. Even when properly installed, our Rearview Mirror Backup
Camera has a limited field of vision and do not provide a comprehensive view of the rear area of the vehicle.
You should always look around outside your vehicle and use your mirrors to confirm rearward clearance and
that your vehicle can back up safely.
Winplus North America and/or its affiliates are not responsible for a user’s intended or actual use of the
Rearview Mirror Backup Camera. In no event shall Winplus North America and/or its affiliates have any
liability for any losses (whether direct or indirect, in contract, tort or otherwise) incurred in connection with
the Rearview Mirror Backup Camera, including but not limited to damaged property, personal injury and/
or loss of life. Neither shall Winplus North America and/or its affiliates have any liability for any decision,
action or inaction taken by any person in reliance on the Rearview Mirror Backup Camera, or for any delays,
inaccuracies and/or errors in connection with the Rearview Mirror Backup Camera and its functioning.
Winplus North America and/or its affiliates shall have no responsibility or liability for damage and/or injury
resulting from accidents occurring with vehicles having the Rearview Mirror Backup Camera installed, and
Winplus North America and/or its affiliates, the manufacturer, distributor and seller shall not be liable for any
injury, loss or damage, incidental or consequential, arising out of the use or intended use of the product.
10
WINPLUS EUROPE
LIMITED WARRANTY
Winplus warrants, to the original purchaser, that its products are free from defects in material and
workmanship for 12 months from the date of original purchase. Where permitted by law, Winplus liability
shall be limited to that set forth in this limited express warranty. This limited express warranty shall be the
exclusive remedy of the purchaser and Winplus makes no other warranty of any kind aside from the limited
express warranty stated above.
OWNER’S RESPONSIBILITIES:
In order to provide you with the proper warranty service, we request that you adhere to the following
procedure:
1. Include a copy of your sales receipt or bill of sale with your unit when it is returned for warranty service.
2. If it is necessary to return your product for service, please return it securely packed, preferably in the
original shipping box, and freight and insurance prepaid to the following address:
ATTN: WINPLUS BLUETOOTH PRODUCTS RETURNS
Unit 4, Two Counties Estate, Falconer Road,
Haverhill, Suffolk CB9 7XZ, UK
3. Please include a detailed explanation of the problem you are having.
4. If your product is found by Winplus to have a defect in material or workmanship, within the warranty
period, it will be repaired or replaced at no charge and returned to you prepaid.
Winplus makes no other warranty of any kind aside from the limited express warranty stated herein.
WINPLUS AUSTRALIA / HONG KONG
LIMITED WARRANTY
This Yada product is warranted against faulty workmanship for a period of 2 years from date of purchase.
Liability is limited to replacement of the product and claims for associated or consequential loss or damage
will not be accepted. Warranty is void and does not apply if the product has been damaged or rendered
faulty by accident, abuse, misuse, incorrect application or if the product has been modified or tampered
with. Proof of purchase is required to validate warranty claims. If this product is faulty, simply return it to
the place of purchase with your receipt for a replacement product. No refunds or credits will be issued.
Replacement is limited to a Yada product of the same or similar model.
11
Operations
2.4” LCD screen
volume/menu +
volume/menu send (blue/red LED)
charging port
microphone
menu
end(yellow LED)
parking assistant
A.Power ON/OFF
• YD-V43 will automatically turn ON when it is connected to a power source
• Hold to turn YD-V43 ON/OFF
• When turned ON, YD-V43 will enter search mode Connecting
• To search again, press once to activate search mode
NOTE: For automatic connection, please make sure Bluetooth® mode on your mobile phone is activated and
you must have successfully paired and connected to YD-V43 at least once in order to activate this feature.
B.Pairing/Linking
Pairing Bluetooth® enabled devices like mobile phones with the YD-V43 Rearview Mirror Speakerphone
authorizes the devices to work with each other. This step only needs to be performed once.
Before Pairing the YD-V43 Bluetooth® Speakerphone:
• Ensure the Bluetooth® on your mobile phone is activated
• Ensure the YD-V43 Rearview Mirror Speakerphone is plugged into a 12V power source
12
Follow the steps below to pair your YD-V43 with your mobile phone:
• Power ON the device
• Press and hold M for 2 seconds
• Screen will indicate Pairing Mode
NOTE: YD-V43 is now in pairing mode
• Activate the Bluetooth® settings of your mobile phone
NOTE: The following steps are general procedure; to access Bluetooth® Menu for your mobile phone,
please refer to your phone user manual.
• Select SET-UP or CONNECT from your mobile phone menu
• Find and select OPTION to discover Bluetooth® devices; establishing a connection may take several
minutes
• If found, phone display should indicate YD-V43 device was detected or Select “YD-V43” from the list
• Phone should give you a prompt asking if you want to pair the device
• Select OK or ACCEPT and wait for prompt to enter passkey or PIN
• Enter the code 0000
• Select “OK” to pair and connect the YD-V43 and the handset
• When pairing is complete, the YD-V43’s LCD will show Connected
(Phone’s ID)
NOTE: The YD-V43 can pair with more than one phone, however it can only connect to one phone at a
time. If you wish to pair to a second phone, disable or turn OFF Bluetooth® on the phone already paired.
NOTE: If the YD-V43 and mobile handset did not successfully pair, follow the steps below to retry
pairing:
• Turn the YD-V43 OFF & ON
• Turn OFF all other Bluetooth® devices before starting the pairing process
• Repeat the pairing instructions from the beginning
To Link YD-V43 to your mobile phone after pairing:
• Press of your YD-V43 or
• Establishing the connection via your mobile phone
NOTE: Make sure Bluetooth® has been activated on your mobile phone before you press
(Please refer to your mobile’s operation manual about connecting Bluetooth® devices)
.
13
C.Phonebook
YD-V43 Rearview Mirror Speakerphone can store up to 950 phone numbers. If you are trying to transfer
1100 contacts to the YD-V43, only the first 950 contacts will be successfully transferred.
AT Command and OPP (Object Push Profile) function can automatically transfer the contacts in your
mobile phone to the YD-V43 Rearview Mirror Speakerphone.
NOTE: Not all mobile phones support OPP or AT Command features, please refer to your phone manual
to determine if phone supports one of these.
Phonebook Set-up via AT Command
To transfer the Phonebook from your mobile phone via AT Command:
• Make sure the YD-V43 and mobile phone is connected
• Press M and Contacts will appear on the screen
• Press to enter the sub-menu
• Press +/- to select Download Contact and press to confirm
• LCD will display Pb Loading...
Total XXX
• Once transfer is successful, LCD will display Completed
Total XXX
NOTE:
• If there is an incoming call during phonebook transfer via AT Command, the transfer process will be
placed on hold. Phonebook transfer will resume after the call ends.
Phonebook Set-up via OPP
The YD-V43 supports single contact or group contacts transfer via OPP function. For details on operating
procedures, please refer to your mobile phone’s user manual.
To transfer the Phonebook from your mobile phone via OPP:
• Disconnect Bluetooth® link from the YD-V43 setting (if it is connected)
• Setup mobile phone to transfer contacts from the mobile phone to your YD-V43
NOTE: Please refer to your mobile phone’s user manual for detailed instructions.
Deleting Phonebook entries
To delete Phonebook entry:
• Press M and Contacts will appear on the screen
14
• Press to enter the sub-menu
• Press +/- to select Delete Contacts and press to confirm
• LCD will display [Yes] [No]
• Select [Yes] and press to confirm
• LCD will display Pb Deleted when phonebook is cleared
NOTE: YD-V43 does not allow deleting of a single entry, ALL entries will be deleted after confirmation.
Speed Dial Set-up
NOTE: Phonebook should be set up first to activate speed dialing.
To set up speed dialing:
• Press M and Contacts will appear on the screen
• Press to enter the sub-menu
• Press +/- to select Quick Dial and press to confirm
• Browse for an empty memory slot by pressing +/-. There are a total of 3 memory slots for speed dialing
with each slot represented by the [+], [-] and [M]
• Press to set contact number
• Browse the initials by +/• Press to enter
• Browse the phone number that you wish to set to speed dial by +/• Press to confirm
NOTE: Memory slot will automatically replace old contacts with new contacts are set to that slot.
D.Display Setting
• Press M and select Display Setting by +/ • Press to enter the sub-menu
• The status bar is shown on the screen.
This indicates the settings level of the LCD display
• Press M to select
• Press +/- to adjust to desired level
CONTRAST
BRIGHTNESS
COLOR
E.Volume Adjustments
To adjust ring volume:
• Press +/- to adjust ring volume
15
To adjust call volume during a call:
• Press +/- to adjust the volume during a call
If you cannot hear the person you are talking to on the other line, do the following steps while
conversation is in progress:
• Request the person on the other line to adjust his/her mobile phone’s volume level to maximum
If there is a strong echo when the person on the other line talks:
• Transfer the call to your mobile phone
• If echo disappeared, transfer the call to your YD-V43 again and lower the loud speaker volume until
echo is reduced/eliminated
• If the echo remains, the problem might be with the network provider or the mobile phone itself
If the loudspeaker volume of the YD-V43 is too low or too high and you are unable to adjust it:
• Adjust the volume directly on the mobile phone
• Fine tune it using the volume control of the YD-V43
Mute/Un-mute Functions
To mute the YD-V43 during an active call:
• Press M
• LCD will show MIC OFF
To cancel mute:
• Press M again
• LCD will show MIC ON
F. Call Operations
Making a Call
To make a call using the phonebook:
• Press M and Contacts will appear on the screen
• Press to enter the sub-menu
• Press again to select Contact List
• Browse the initials by +/ • Press to enter
• Browse the phone numbers by +/ • Press to dial
16
Last Number Re-dial:
• Press once
• Press +/- until you find the desired number (Total 20 records including missed calls, outgoing &
incoming calls)
• Press again to dial
To make a call using the Speed Dial function:
• Press and hold M , + or - for 2 seconds
• Phone will automatically dial the number set to Speed Dial for that particular button
To make a call using the Voice Dial function:
To enter voice dialing mode:
• Hold for 2 seconds
• Say the name after you hear the tone
NOTE: If the YD-V43 failed to recognize the voice/name. Press
voice dialing.
to exit and repeat the above steps for
NOTE: Voice Dialing is a feature of your mobile phone. Please refer to your phone’s user manual for voice
command operation.
Answering Calls
To answer calls via the YD-V43:
• Press when ring tone is heard or
• Answer the call via the mobile handset
To end a call:
• Press or
• End call using the mobile handset
To reject a call:
• Press when ring tone is heard
Caller ID Display
NOTE: Caller ID Display is a network service, please consult your network provider for details.
17
Caller ID can be displayed in 3 ways:
a) By Name & Phone Number
YD-V43 can display the caller’s name when receiving call. To display caller’s name, the name must be
stored in the phonebook
b) By Phone Number
Phone number will be displayed if there is no record of that number in the phonebook
c) Withheld Number
When a caller withholds his number, nothing will be displayed
DTMF (Dial Tone Modulation Frequency)
• Press and hold M for 2 seconds during a call
• Select number by +/• Press to confirm
Call Waiting
NOTE: Call Waiting is a network service, please consult your network provider for details.
To answer an incoming call during a conversation:
• Press to hold Line 1 & accept the incoming call (Line 2) or
• Press to end Line 1 & accept the incoming call
To switch calls between the two lines:
• Press to switch between lines
Interchanging YD-V43 and Handset
You may interchange the call between your handset and YD-V43 while conversation is ongoing.
To shift from YD-V43 to handset or vice versa:
• Press and hold for 2 seconds
F. Parking Assistant
To turn the on-screen display guideline ON/OFF:
• Press once
NOTE: Interference may occur if Bluetooth® function & Backup Camera function are activate at the
same time.
18
Button Functions and Operation
BUTTON
M
FUNCTION
OPERATION
Go to Menu
Press 1 time
DTMF (Dial Tone
Modulation Frequency)
Press and hold for 2 seconds (Activated only
when the line is connected)
Quick Dial
BUTTON
Press and hold for 2 seconds
(Screen shows “Pairing Mode”)
Mute / Un-mute
Press 1 time
Make / Receive call
Press 1 time
Voice dialing
Press and hold for 2 seconds to enter voice
dialing mode
OPERATION
Press and hold for 2 seconds
End Call
Press 1 time
Reject Call
Press 1 time
End L1 & receive L2 in call
waiting mode
Press 1 time
Press and hold for 2 seconds
Pairing
FUNCTION
Power ON/OFF
+
NO
Press 1 time
Increase Volume
Press repeatedly until you reach desired
volume level
Scroll Upward
Press repeatedly until you find desired
entry/menu item
Press repeatedly until you find desired
entry/menu item
Redial
Press 1 time
Move left
Conversation transfer
While conversation is ongoing, press and
hold for 2 seconds
Quick Dial
Press and hold for 2 seconds
Decrease Volume
Press repeatedly until you reach desired
volume level
Scroll downward
Press repeatedly until you find desired
entry/menu item
Move right
Press repeatedly until you find desired
entry/menu item
Quick Dial
Press and hold for 2 seconds
Parking Assistant ON/OFF
Press 1 time
Hold L1 & receive L2 in call
waiting mode
Press 1 time
Switch between L1 & L2 in
call waiting mode
Press 1 time
Bluetooth® link connection
Press 1 time
YES
Press 1 time
-
LED Indication
LED
INDICATION
RED Light
Device ON but No connection
BLUE Light
Device ON and connected
YELLOW Light
Standby
19
SAFE OPERATING TIPS
• If you replace the tires, the area displayed on the monitor may change and you may need to adjust the
camera.
• There is a plastic cover over the camera. Do not scratch the cover when cleaning dirt or snow from the
cover.
• The camera has a water resistant construction. Do not detach, disassemble or modify it. This may cause
incorrect operation. Camera is water resistant but not waterproof.
• Do not submerged camera in water, which can cause internal damage to the camera.
• If the temperature changes rapidly, such as when hot water is poured on the vehicle in cold weather,
the system may not operate normally. Camera can withstand the effects of rain, snow, and inclement
weather.
• When the temperature is extremely high or low, the screen may not clearly display objects.
• When strong light directly enters a camera, objects may not be displayed clearly.
• The screen may flicker under fluorescent light.
• The colors of objects on the rear view monitor may differ somewhat from those of the actual object.
• If dirt, rain or snow attaches to the camera, the monitor may not clearly display objects. If water droplets,
snow or mud adhere to the camera lens, rinse with water and wipe with a dry cloth.
• Do not use alcohol, benzene or thinner to clean the camera. This will cause discoloration. To clean the
camera, wipe with a clean a cloth dampened with mild cleaner diluted with water and then wipe with a
dry cloth.
• Will work up to 30 feet. Working distance varies depending on the interference between the monitor and
the camera.
• The system is only designed for backup/reserving purposes. WINPLUS is not responsible for damages on
the system or the vehicle if used for other purposes.
• ALWAYS engage Parking/Emergency/Hand Brakes of the vehicle when testing the system.
• Like most wireless device devices, the system may cause interference to other wireless devices or
vice versa. Wireless devices such as WIFI routers, Bluetooth® devices, and mobile handsets may cause
interference with the monitor. If this happens you will notice rolling lines, blurry images, or static images
on the monitor.
• The system is designed to ADD safety and protection. The device was NOT designed to replace other safe
driving habits. Double checking and looking around before backing up is STILL the safest way.
SAFETY AROUND AND BEHIND OTHER VEHICLES
Using a rear-view camera is not enough to completely overcome a vehicle’s blind spot. Many preventable
injuries and deaths occur in driveways or parking lots when drivers do not see children, pets, or others near
their vehicles. Here are a few safety tips that will help you to avoid a backover accident.
• Walk completely around your vehicle before getting in. Check for kids, toys, and pets before entering the
vehicle and starting the engine.
20
• Know where children are. Have children stand in a place where they are in full view.
• Be aware of young children. Young children are small and hard to see.
• Parents, caregivers and all adults need to be vigilant in supervising children, especially when children are
in the yard, driveway or parking lot playing near parked cars.
• Roll down your window so you will be able to hear what is happening outside your vehicle.
• Owners of SUVs, trucks, and vans need to take extra care to avoid hitting or running over a child.
• Teach children to move away from a vehicle whenever it is started.
Testing and Troubleshooting
Testing:
1. Connect vehicle battery cables
2. Turn ignition to “ON” position without starting the engine
3. Engage parking brakes and put the car in reverse
4. Wait for monitor to show rear view image.
If you are unable to pair your mobile phone with the YD-V43:
• Turn OFF the YD-V43 and turn it ON again
• Turn OFF all other Bluetooth® devices before you start pairing
• Ensure your mobile handset’s Bluetooth® feature is activated. Please refer to your mobile handset user
guide for specific instructions
• Repeat pairing procedures
• Ensure the YD-V43 is within a maximum of 10 meters of your mobile handset(s) or Bluetooth® enabled
device and there are no obstructions, such as wall or other electronic devices, in between as it may cause
interference transmission
The YD-V43 Rearview Mirror Speakerphone is compliant with and adopts the Bluetooth® Specification V2.1.
However, interoperability between the device and other Bluetooth®-enabled products is not guaranteed
because it depends on compatibility. For more information on the compatibility between the device and
other Bluetooth®-enabled products, please contact Customer Service.
21
CUSTOMER SERVICE / CONTACT
For questions or issues regarding the product, please visit www.letsyada.com or contact Winplus in your area/region to speak to our
customer service representative:
Winplus North America
Winplus Europe
Winplus Australia
Winplus New Zealand
Winplus Asia
Tel.: 866-294-9244
Tel.: 909-752-3074
Tel.: 44-1440-713888
Tel.: 61-3-9720-4143
Tel.: 64-9-5254575
Tel.: 852-2798-8932
You can also contact us online by visiting www.winplus.com for more information about the product.
IF YOU ARE EXPERIENCING ANY ISSUES WITH THE PRODUCT DURING OPERATION, DO NOT RETURN THE PRODUCT TO THE STORE.
CONTACT WINPLUS DIRECTLY FOR INSTRUCTIONS ON HOW TO RETURN/EXCHANGE THE PRODUCT.
FCC/ ICC
Federal Communication Commission Interference Statement
This equipment has been tested and found to comply with the limits for a Class B digital device, pursuant
to Part 15 of the FCC Rules. These limits are designed to provide reasonable protection against harmful
interference in a residential installation. This equipment generates, uses and can radiate radio frequency
energy and, if not installed and used in accordance with the instructions, may cause harmful interference
to radio communications. However, there is no guarantee that interference will not occur in a particular
installation. If this equipment does cause harmful interference to radio or television reception, which can be
determined by turning the equipment off and on, the user is encouraged to try to correct the interference
by one of the following measures:
• Reorient or relocate the receiving antenna
• Increase the separation between the equipment and receiver
• Connect the equipment into an outlet on a circuit different from that to which the receiver is connected
• Consult the dealer or an experienced radio/TV technician for help
This device complies with Part 15 of the FCC Rules. Operation is subject to the following two conditions: (1)
This device may not cause harmful interference, and (2) This device must accept any interference received,
including interference that may cause undesired operation.
FCC Caution: Any changes or modifications not expressly approved by the party responsible for compliance
22
could void the user’s authority to operate this equipment.
IMPORTANT NOTE
FCC Radiation Exposure Statement:
This equipment complies with FCC radiation exposure limits set forth for an uncontrolled environment. End
users must follow the specific operating instructions for satisfying RF exposure compliance.
This transmitter must not be co-located or operating in conjunction with any other antenna or transmitter.
To comply with FCC RF exposure requirements, the device and the antenna for this device must be
installed to ensure a minimum separation distance of 20cm or more from a person’s body. Other operating
configurations should be avoided.
IC Statement
Operation is subject to the following two conditions:
1. This device may not cause interference and
2. This device must accept any interference, including interference that may cause undesired operation of the device.
This device has been designed to operate with an antenna having a maximum gain of 0 dBi. Antenna having
a higher gain is strictly prohibited per regulations of Industry Canada. The required antenna impedance is
50 ohms.
IMPORTANT NOTE:
IC Radiation Exposure Statements:
This equipment complies with IC radiation exposure limits set forth for an uncontrolled environment. End
users must follow the specific operating instructions for satisfying RF exposure compliance.
This transmitter must not be co-located or operating in conjunction with any other antenna or transmitter.
23
NORTH AMERICA
EUROPE
AUSTRALIA
NEW ZEALAND
ASIA
820 South Wanamaker Avenue,
Ontario, CA 91761
Unit 4, Two Counties Estate, Falconer Road,
Haverhill, Suffolk CB9 7XZ, U.K.
Unit 2, 991 Mountain Hwy Boronia,
Victoria, Australia, 3155
22-24 Olive Road, Penrose,
Auckland, New Zealand
Suites 6-11, 7th Floor, Corporation Park,
11 On Lai Street, Shatin, N.T., Hong Kong
www.winplus.com
Tel: 909-752-3074
Fax: 310-496-2740
Tel: 44-1440-713888
Fax: 44-1440-713889
Tel: 61-3-9720-4143
Fax: 61-3-9720-4165
Tel: 64-9-5254575
Fax: 64-9-5256817
Tel: 852-2798-8932
Fax: 852-2795-0241
www.letsyada.com
© 2011 Winplus North America Inc. All Rights Reserved. Winplus, the logo design, and Yada are trademarks or
registered trademarks of Winplus North America Inc. The Bluetooth® word mark and logos are owned by the
Bluetooth SIG, Inc. and any use of such marks by Winplus North America Inc. is under license.
ML-50326 V1.0