1
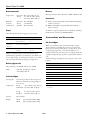
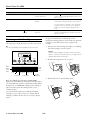
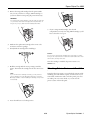
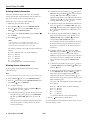
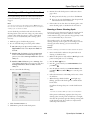
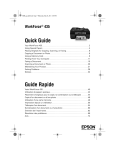
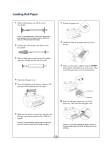
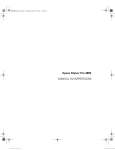
Epson Stylus Pro 4800
Printer Parts
Printer Specifications
-
Printing
Roll paper cover
Top cover
Paper lever
Control
panel
Printing
method
On-demand ink jet
Nozzle
configuration
Photo ink set:
Black: 180 nozzles × 3 (photo black/matte
black, light black, light light black)
Color: 180 nozzles × 5 (cyan, magenta, light
cyan, light magenta, yellow)
Resolution
Maximum 2880 dpi × 1440 dpi
Print direction
Bidirectional/Unidirectional
Control code
Epson ESC/P® Raster
Line spacing
1/6 inch or programmable in
1/1440-inch increments
Paper feed speed 215 ±10 milliseconds per 1/4-inch line
Ink cartridge
compartments
RAM
Paper lever
64MB
Electrical
Roll paper
spindle
Specification
Description
Input voltage range
90 to 264 V
Rated frequency range
50 to 60 Hz
Input frequency range
49 to 61 Hz
Rated current
1.0 A at 120 V
0.5 A at 220 V
Power consumption
Approx. 52 W or less (ISO 10561
Letter Pattern)
5 W or less in standby mode
1 W or less in power off mode
Mechanical
Dimensions
Width: 33.9 inches (848 mm)
Depth: 30.1 inches (764 mm)
Height: 14 inches (354 mm)
Weight
88 lb (40 kg) without ink cartridges
AC inlet
USB interface
connector
®
IEEE 1394 FireWire
interface connector
8/05
Epson Stylus Pro 4800 - 1
Epson Stylus Pro 4800
Environmental
Drivers
Temperature
Mac OS® X 10.3.9 or later, Windows® 2000 or Windows XP
Humidity
(without
condensation)
Operation: 50 to 95 °F (10 to 35 °C)
Storage:
–4 to 104 °F (–20 to 40 °C)
1 month at 104 °F (40 °C)
Interfaces
❏ USB 1.1 and 2.0 compatible, recommended cable length up
to 10 feet (3 meters)
Operation: 20 to 80% RH
Storage:
5 to 85% RH
Optimal: 40 to 45% RH
❏ IEEE-1394 FireWire,® recommended cable length up to
10 feet (3 meters)
In addition, a Type B expansion slot is available for installing
an Ethernet™ network card (10/100 BaseTX).
Paper
The following table shows the paper sizes you can use:
Roll paper
Cut sheets
Size
8.3 to 17 in. wide
(211 to 432 mm)
8 × 10 in. up to 17 x 22
in.
Maximum
external roll
diameter
2 in. core: 4 in. (103 mm)
3 in. core: 6 in. (150 mm)
—
Thickness
3.15 to 19.7 mil (0.8 to
0.5 mm)
3.15 to 59 mil (0.8 to
1.5 mm)
Consumables and Accessories
Ink Cartridges
When you install the printer’s first ink cartridges, it takes
about 8 minutes to initialize the printer. Do not interrrupt
this process by turning off the printer, opening the top cover,
or releasing the paper lever, or the printer will have to reinitialize. In that case, there may not be enough ink left in the
original cartridges and you may have to replace them with new
ones.
Always test samples of paper stock in the printer before
purchasing large quantities or printing large jobs. When you
use non-Epson paper or other media, you may need to adjust
various settings and create special paper configurations.
Use the following cartridges before the expiration date on the
package:
Safety Approvals
Cartridge
110 ml
220 ml*
Safety standards UL 60950, CSA 22.2 No. 60950
Matte Black
T543800
T544800
Photo Black
T564100
T565100
Cyan
T564200
T565200
Magenta
T564300
T565300
Yellow
T564400
T565400
Light Cyan
T564500
T565500
Light Magenta
T564600
T565600
Light Black
T564700
T565700
Light Light Black
T564900
T565900
EMC
FCC Part 15 Subpart B, Class B,
CSA C108.8 Class B
Ink Cartridges
Cartridge life
Temperature
2 years from production date if unopened;
within 6 months after opening package, at
77 °F (25 °C)
*
Storage
–22 to 104 °F (–30 to 40 °C);
(uninstalled): 1 month at 104 °F (40 °C)
Storage
(installed):
–4 to 104 °F (–20 to 40 °C);
1 month at 104 °F (40 °C)
Capacity
110 or 220 ml
Weight
110 ml
approximately 0.44 lb (200g)
220 ml
approximately 0.85 lb (385g)
2 - Epson Stylus Pro 4800
8/05
When using these cartridges, you must leave the ink compartment
door open.
Epson Stylus Pro 4800
User-Replaceable Parts
Control Panel
You can order these user-replaceable parts:
Part
Part number
Relacement Ink Maintenance Tank
C12C890191
Replacement Printer Cutter Blade
C12C815291
Options
The following optional equipment and software are available:
Part
Part number
Epson Stylus Pro 4800 Printer Cabinet Stand
C4800STAND
Internal 10/100 BaseTX (Ethernet) Type-B Print Server
(interface card)
C12C824052
Paper Roller Spindle (Normal Tension) — 2- or 3-inch
C12C811171
Paper Roller Spindle (High Tension) — 2- or 3-inch
C12C811191
One-year extended warranty
EPP48B1*
Two-year extended warranty
EPP48B2*
Power button
Pause light
and button
Hold for 3
seconds to
cancel a print
job or reset
the printer.
Ink light
Left arrow or
Paper Source
button
Hold for 3
seconds to
cut roll paper
after printing.
Up arrow
button
Paper light
Down arrow
button (press
to load/eject
paper)
Menu
button
Hold for 3
seconds
to clean
the print
head.
*Must be purchased within 12 months of purchase.
Epson Paper and Other Media
Epson papers, which are especially designed for the inks used
in the printer, ensure high-quality results. You can purchase
additional roll paper spindles and other accessories or options
from the Epson Pro Graphics web site
(http://prographics.epson.com) or your authorized Epson
dealer.
8/05
Epson Stylus Pro 4800 - 3
Epson Stylus Pro 4800
Error Messages
When a problem occurs, a message appears on the display and
the lights on the control panel come on or flash.
Message/Light
Light
CHANGE PAPER TYPE
COMMAND ERROR
Paper light on
—
Explanation
Response
Paper loaded does not match the
source selected.
Press the
Paper Source button to select the correct
setting: either
(for paper in the tray, or
or
for roll paper).
You’re using the wrong printer driver.
Press the
Pause button and hold it for 3 seconds to
cancel the print job. Make sure you installed the
correct driver for your printer.
Damaged data was sent to the printer
or the data has an incorrect command.
The installed printer driver is not
correct for the printer.
Press the
Pause button and hold it for 3 seconds to
cancel the print job.
Stop printing, and press the
Pause button for 3
seconds. Then make sure that the installed printer
driver is correct for the printer.
DRIVER INK SET SETTING IS
WRONG
—
The black ink cartridge option does
not match what is selected in the
driver
Stop printing, and then press and hold the
Pause
button for 3 seconds. Select the correct black ink
cartridge option in the driver. If you want to continue
printing, press the
Pause button.
Non-Epson genuine ink cartridge is
installed.
Press the
Pause button for 3 seconds to cancel
printing. If you want to continue printing, press the
Pause button.
—
Cut sheet needs to be loaded
manually.
Load the sheet in the manual feed slot. .
FORBIDDEN MEDIA FROM P.
TRAY
—
Cut sheet needs to be loaded
manually.
Load the sheet in the manual feed slot.
INK LOW
B Ink light flashing
Ink cartridge(s) are nearly empty
(printing continues).
Make sure you have replacement cartridges available.
INK OUT
B Ink light on
Ink cartridge(s) are empty (printing
stops).
Replace the ink cartridge(s) indicated on the LCD
panel.
INVALID INK CRTG
B Ink light on
You tried to install the wrong ink
cartridge.
If you are installing ink cartridges for the first time, you
must install the cartridges that came with your printer.
MISMATCH ERROR
Note:
These messages alternate.
FEED SHEET PAPER
FEED SHEET PAPER
MANUALLY
If you are replacing ink cartridges, check the package
and product code. You must use the ink cartridges
designed for your printer. Other cartridges will not
work.
LOAD PAPER
Paper light on
Paper lever is in the released position
while loading paper.
After you finish loading paper, pull the paper lever all
the way forward, to the secured position.
LOAD ROLL PAPER
Paper light on
Paper source setting in printer driver
is different from control panel.
Make sure the right paper is loaded and the paper
source setting is the same on the control panel and
printer driver.
—
One or both ink levers are raised.
Pull the lever or levers down to lock the ink cartridges.
MNT REQ.
—
A printer part will need to be replaced
soon.
Note the code number and contact Epson.
MNT TK NEAR FULL
—
The maintenance tank is almost full.
Make sure you have a replacement maintenance tank.
MNT TNK FULL
B Ink light on
The maintenance tank is full.
Replace the maintenance tank.
LOAD SHEET PAPER IN P.
TRAY
LOWER INK LEVERS
LOWER L (or R) INK LVR
4 - Epson Stylus Pro 4800
8/05
Epson Stylus Pro 4800
Message/Light
Light
Explanation
Response
NO BORDERLESS WITH THIS
SIZE
—
Borderless setting selected for A2size sheets (11.7 × 16.5)
Change the setting in the printer driver, or load
different-size paper.
NO INK CRTG
B Ink light on
Ink cartridge(s) not installed or ink
lever raised.
Install ink cartridges or lower the ink lever.
NO MNT TNK
—
The maintenance tank is not installed.
Make sure the maintenance tank is fully inserted.
Cut sheet paper is not loaded straight.
Load the paper correctly.
RELOAD PAPER
Note:
These messages alternate.
NOT STRAIGHT RELOAD
Paper light on
NOZZLES STILL CLOGGED
—
Head cleaning did not clear the
nozzles.
Run the head cleaning utility again. If the nozzles are
still clogged, contact Epson.
OPTION I/F ERROR
—
Wrong interface card installed.
Turn off the printer and remove the card. See the
documentation that came with the card.
PAPER NOT CUT
Paper light
flashing
Roll paper was not cut correctly.
Open the top cover and remove the uncut paper.
Reload paper if necessary.
PAPER NOT STRAIGHT
Paper light
flashing
PAPER OUT
Paper light on
The cutter may be blunt or incorrectly
installed.
Reinstall or replace the cutter blade if necessary.
Paper slipped and fed into the printer
at an angle.
Reload paper, making sure the edges are straight.
No paper is loaded.
Load paper.
Paper ran out.
Remove any printouts or paper remaining in the printer
and load more paper.
If the message appears during a print job, reset the
printer by pressing the Pause button for 3 seconds.
Then load paper and resend the job.
REAR COVER OPEN
—
The rear cover has been removed.
Replace the rear cover.
RELEASE LEVER REMOVE
PAPER JAM
Paper light
flashing
Paper has jammed in the printer.
Remove the jammed paper. See the Printer Basics
book for more information.
Printer cannot detect paper.
If you are using cut sheets, make sure the paper is flat.
Move the paper lever.
RELOAD PAPER
Paper light on
PAPER NOT CUT error was cleared.
Reload paper.
RELOAD PAPER INSERT
DEEPLY
Paper light on
Manually loaded sheet is not inserted
far enough.
Insert the sheet further into the printer.
REMOVE PAPER
Paper light on
Paper is too thick for head cleaning.
Pull the paper lever out to remove the paper. Head
cleaning automatically starts. After cleaning, reload
paper.
Printer could not feed the printed
page.
Remove the print.
REPLACE CNVRSION CRTG
—
The conversion cartridge needs to be
replaced.
Replace the conversion cartridge with a new one. Or,
complete the replacement of the black ink by pressing
Pause button.
the
SERVICE REQ.
All lights flashing
The print head is locked.
Pull out the green tab to unlock the print head.
An error has occurred.
Note the error number, then turn the printer off and
back on. If the message remains, contact Epson.
Ink cartridge chip error.
Remove and reinstall the ink cartridge. If the message
remains, replace the cartridge.
Paper lever was released during the
printing process or another operation.
Pull the lever all the way forward, to the secured
position. Start printing again from the beginning for
best results.
Top cover is open.
Close the top cover.
SET INK CRTG
—
SET PAPER LEVER
TOP COVER OPEN
Paper light on
—
8/05
Epson Stylus Pro 4800 - 5
Epson Stylus Pro 4800
Message/Light
Light
Explanation
Response
UNABLE TO PRINT
—
You tried to print while an error
condition was present.
Press the
Pause button to exit the SelecType menu
system. If the message appears again, clear the error
before you print.
WRONG INK CRTG
B Ink light on
You tried to install the wrong ink
cartridge.
If you are installing ink cartridges for the first time, you
must install the cartridges that came with your printer.
If you are replacing ink cartridges, check the package
and product code. You must use the ink cartridges
designed for your printer. Other cartridges will not
work.
WRONG PAPER SIZE
Paper light
flashing
Loaded paper does not match the
image size.
Make sure the size you selected in the printer driver
matches the loaded paper size. Load the correct size
paper if necessary.
See page 2 for information on selecting the correct
replacement cartridges. Before you start, make sure the printer
is turned on. Then follow these steps to replace an ink
cartridge:
Replacing an Ink Cartridge
The easiest way to check ink levels is from the control panel:
Tip:
You can store partially used ink cartridges for up to 6 months.
1. Note the color of the cartridge whose light is on or flashing.
This is the cartridge you need to replace.
Caution:
Leave the empty cartridge in the printer until you are ready to
replace it. To prevent ink reporting errors, never replace the ink
cartridges with the printer turned off.
1 2 3 4 5 6 7 8
Menu
2. Press the ink compartment cover to open it.
3sec.
1
Matte
Black/
Photo
Black
Empty
Full
8
Light
Light
Black
4 Yellow 6 Light Cyan
2 Cyan
3 Magenta
5 Light Black
7 Light
Magenta
3. Raise the ink levers to the unlocked position.
When the red B ink light is flashing (and INK LOW is
displayed on the LCD panel), the indicated cartridge is almost
out of ink. Make sure you have a replacement cartridge. When
the light stays on and INK OUT is displayed, the cartridge is
empty. You must replace the cartridge before you can
continue printing.
You can install any combination of 110 ml and 220 ml
cartridges. It’s a good idea to keep a set of empty 110 ml
cartridges on hand at all times in case you need to ship the
printer.
6 - Epson Stylus Pro 4800
8/05
Epson Stylus Pro 4800
4. Remove the empty ink cartridge from the printer. Make
sure you save your first set of empty 110 ml cartridges, so
you can use them for transporting the printer if necessary.
WARNING:
Do not shake the empty cartridge, or ink may leak out. If ink gets
on your hands, wash them thoroughly with soap and water. If
ink gets in your eyes, flush them immediately with water.
9. If you’re using 110 ml cartridges, close the ink
compartment cover. If you’re using 220 ml cartridges, you’ll
have to leave the cover open.
5. Make sure the replacement cartridge is the correct color,
and remove it from its package.
6. Gently shake the cartridge before installing it.
Caution:
Do not remove and re-insert cartridges more often than necessary.
Doing so can compromise the needle valve seal and allow air to enter
the ink tubes, causing nozzle loss.
Once the cartridge is installed, the printer returns to its
READY state.
7. Hold the cartridge with the arrow pointing toward the
printer. Then insert the cartridge into the slot. Don’t force
it in.
Checking Printer Status and Part Life
Using the SelecType menus, you can check the amount of ink
remaining, the total number of prints, and the status of your
cutter blade, maintenance tank, and other printer parts. You
can either print out a status check, or you can view the
printer’s status on the LCD panel.
Note:
If you can’t insert the cartridge smoothly, you may have the
wrong cartridge. Check the package and product code. If the
B ink light remains on after installing the cartridge, it may not be
inserted fully.
8. Lower the ink lever to its locked position.
8/05
Epson Stylus Pro 4800 - 7
Epson Stylus Pro 4800
❏ To check the amount of ink left, press until you see
INK LEFT, then press Menu
. The status of the first
cartridge (MK, matte black; PK, photo black) is
displayed, using the E*****F symbols described above.
Continue pressing to see the status of the remaining
cartridges. When done, press the button.
Printing Status Information
The status check sheet shows some of the current default
settings, the amount of ink remaining in each cartridge, the
page count, and the status of various printer parts.
Follow these steps to print the status check sheet:
❏ To check how much of the maintenance tank has been
used, press until you see MAINT TANK, then press
Menu
. The status of the tank is displayed, using the
E*****F symbols described above. When done, press
the button.
1. Make sure paper is loaded in the tray.
2. Press the Menu
3. Press the
Menu
button. You see PRINTER SETUP.
button so you see TEST PRINT, then press
. You see NOZZLE CHECK.
4. Press so you see STATUS CHECK, then press Menu
You see PRINT.
5. Press Menu
.
❏ To check the amount of ink used (in milliliters) and
paper used (in square meters), press until you see
USAGE COUNT, then press Menu
. Clear this
setting with the USE COUNT CLR option.
again to start printing.
Note:
You can replace the ink cartridges, cutter blade, and
maintenance tank yourself. Other printer parts need to be
replaced by an authorized Epson service technician.
You can change the units of measurement from meters
to inches and feet by using the maintenance mode on
the printer’s control panel. See the Printer Guide for
instructions.
The amount of ink left or the component life is indicated as
follows:
❏ To check job history, press until you see JOB
HISTORY, then press Menu
. For the last 10 print
jobs saved in the printer, you see the ink used (in
milliliters) and paper used (in square meters). The most
recent job is saved as No. 0. When done, press the
button. Clear this setting with the JOB HIST CLR
option.
E*****F = 100–81% ink or service life remaining
E**** F = 80–61%
E*** F = 60–41%
E**
F = 40–21%
E*
F = 20–11%
% = less than 10% ink or service life remaining
❏ To check the total number of prints, press until you
see TOTAL PRINTS, then press Menu
. When done,
press the button.
Viewing Status Information
To view printer status information instead of printing it,
follow these steps:
❏ To check the status of other printer parts, press until
you see SERVICE LIFE, then press Menu
. The
status of the cutter is displayed, using the E*****F
symbols described below. Continue pressing to see
the status of the carriage motor, paper feed motor, print
head, and cleaning unit.
Note:
Some status information is a projection based on the last print made.
1. Press the Menu
button. You see PRINTER SETUP.
2. Press the button until you see PRINTER STATUS, then
press Menu
. You see VERSION.
The status of the ink and printer parts is indicated with
these symbols:
3. Do one of the following:
❏ To check the firmware version, press Menu
When done, press the button.
E*****F = 100–81% ink or service life remaining
E**** F = 80–61%
E*** F = 60–41%
E**
F = 40–21%
E*
F = 20–11%
again.
❏ To check the number of pages that can be printed with
each ink cartridge, press until you see PRINTABLE
PG, then press Menu
. When done, press the
button.
% = less than 10% ink or service life remaining
4. Press the
For more information about the Printer Status menu, see your
electronic Reference Guide.
This option must be enabled by using the maintenance
mode on the printer’s control panel. See the Printer
Guide for instructions.
8 - Epson Stylus Pro 4800
Pause button to exit the menu.
8/05
Epson Stylus Pro 4800
5. Examine the nozzle check pattern to make sure it has no
gaps or lines.
Checking and Cleaning the Print Head
❏ If the printout looks okay, you’re done. Click Finish.
If your printed image shows a color shift or horizontal lines,
you should check the print head to see if any nozzles are
clogged.
❏ If you see any gaps, click Clean to clean the print head
and follow the on-screen instructions.
6. If the nozzles do not clear after a few cleaning cycles, run a
Power Cleaning Cycle, as described in the next section.
Note:
You can run a cleaning cycle by holding down the Menu button for
three seconds. You can also use the printer’s menus to run a power
cleaning cycle. See below for details.
Running a Power Cleaning Cycle
You can check the print head nozzles and select the Auto
Cleaning feature at the same time, using your printer utility
software. This enables the printer to print a nozzle check
pattern, read it, and automatically run a cleaning cycle if
necessary.
You can run a power cleaning cycle from the control panel if
the normal cleaning process is not sufficient to clear the
nozzles. However, the power cycle uses a large quantity of ink,
so it is recommended only as a last resort.
The cartridges need to be at least 50% full to use power
cleaning. You may need to replace a low cartridge to run the
cleaning cycle. After cleaning, you can reinsert the old
cartridge.
1. Make sure paper is loaded in the paper tray.
2. Do one of the following to access the printer utilities:
❏ Mac OS X: Open the Epson Printer Utility in your
Applications folder. Select Stylus Pro 4800, and
click OK.
Caution:
Don’t run a cleaning cycle while thick media is loaded in the printer.
❏ Windows XP: Click Start and select Control Panel.
Double-click Printers and Faxes. Right-click your
printer icon and select Printing Preferences. Click the
Utility tab.
1. Print a nozzle check to make sure the print head needs
cleaning, as described above.
❏ Windows 2000: Click Start, point to Settings, then
select Printers. Right-click your printer icon and select
Printing Preferences (Windows 2000). Click the
Utility tab.
3. Press the Menu
2. Make sure the printer is ready and the red B ink light on the
printer’s LCD panel is not on or flashing.
button.
4. Press the button until you see MAINTENANCE, then
press Menu
.
5. Press the button until you see PWR CLEANING, then
press Menu
. Press Menu
again to start the power
cleaning.
You see a screen like the following:
6. Follow the instructions on the LCD panel to raise or lower
the ink levers.
7. When cleaning is finished and the Pause light stops
flashing, print the nozzle check again to confirm that the
head is clean.
For effective cleaning, always run a nozzle check between
cycles.
Note:
You must use at least a 10
× eye loupe to check the pattern.
If the pattern is still missing segments after a few power
cleaning cycles, turn the printer off and leave it overnight,
then clean the print head again the following morning with
regular cleaning cycles. If you still see no improvement,
contact Epson for assistance.
3. Click the Nozzle Check icon.
4. Click Print to print the nozzle check pattern.
8/05
Epson Stylus Pro 4800 - 9
Epson Stylus Pro 4800
10. When the bi-directional black alignment is finished, press
the button until you see BI-D ALL. Then press the Menu
button again to start the alignment process. Again, this
process is completely automatic and takes about 7 minutes.
Aligning the Print Head
Aligning the print head is the most important thing you can
do to ensure the best print quality. If banding appears on your
prints, if they look grainy or blurry, or you see misregistration
or “ghosting,” you need to align the print head.
11. When done, press the
alignment mode.
Pause button to exit the head
Although you can align the print head using the printer utility
software, it’s best to align from the control panel. This will do
the most thorough job in the shortest time, and it’s all
automatic.
If you want to verify or fine-tune the automatic alignment
process, you can perform a manual head alignment. See your
electronic Reference Guide for instructions.
If you haven’t already done so, it’s a good idea to run a nozzle
check before aligning the print head (page 9). This ensures
that the print head alignment patterns print correctly.
Replacing the Paper Cutter Blade
If you notice that your paper isn’t being cut cleanly, the cutter
blade may need to be replaced. If you use the blade to cut
heavy stock, you will damage the blade and need to replace it.
See the Printer Guide for a list of media that do not work with
the cutter.
Follow these steps to align the print head using the control
panel:
1. Make sure the printer is turned on. Then load Epson
Enhanced Matte paper or the paper that came with the
printer.
Note:
You can purchase genuine Epson ink and paper from an authorized
Epson reseller. To find the nearest reseller, please call 800-GOEPSON (800-463-7766). To purchase online, visit
www.epsonstore.com (U.S. sales only). In Canada, please call (800)
463-7766 for reseller referral.
Tip:
To properly align the print head, you can use letter-size Epson
Enhanced Matte Paper or Premium Luster Photo Paper.
2. Press the Menu
button.
You can check the status of your cutter by printing the status
check sheet or viewing its status on the control panel. See page
8 for instructions.
3. Press the button so you see HEAD ALIGNMENT, then
press Menu
. You see PAPER THKNS.
4. Press the Menu
button again so that *STD appears on
the display. This is the correct thickness setting for most
Epson papers, including Enhanced Matte paper.
You can obtain a new cutter blade from Epson (part number
C12C815291).
5. Press the Menu
button to register the value, then press
the button to display PAPER THKNS again.
Make sure the printer is on, then follow these steps to replace
the blade:
6. Press the
1. Press the Menu
button to display ALIGNMENT.
2. Press the
7. Press the Menu
button to display AUTO, then press the
Menu
button again. You see UNI-D (uni-directional).
This is the type of alignment to start with.
8. Press the Menu
process.
3. Press Menu
button until you see CUTTER REPLACE.
to display EXEC.
Caution:
button again to start the alignment
Do not try to slide the carriage by hand, or you may
damage the printer.
It takes about 7 minutes to run the automatic unidirectional head alignment. The printer’s white beam sensor
reads the alignment pattern and adjusts the printer
automatically. Make sure you don’t open the top cover or
turn off the printer during this process.
4. Press Menu
again. The print head moves to the
replacement position. OPEN TOP COVER is displayed.
5. Open the top cover.
9. When the uni-directional alignment is finished, press the
button until you see BI-D 2-COLOR. Then press the Menu
button again to start the bi-directional black alignment
process, which is also completely automatic and takes about
7 minutes.
10 - Epson Stylus Pro 4800
button.
8/05
Epson Stylus Pro 4800
9. Push down on the side pin while turning the latch to the
left.
6. When REPLACE CUTTER is displayed on the LCD, hold
down the side pin as shown and turn the latch to the right.
10. Close the top cover when you see a message prompting you
to do so. The cutter moves to the home position.
Replacing the Maintenance Tank
The maintenance tank stores ink that gets flushed from the
system during manual and automatic print head cleaning.
When the tank is almost full, the message MNT TK NEAR
FULL appears on the LCD panel. When the tank is completely
full, the printer stops working and MNT TNK FULL appears
on the LCD.
7. Release the side pin and carefully remove the cutter blade.
You can check how much space remains in the maintenance
tank by viewing its indicator on the control panel, shown
below. You can also check its status by printing a nozzle check
sheet (see page 7).
WARNING:
The blade is sharp. Be careful when removing it.
Maintenance tank
indicator (showing
a new tank)
Replacement tanks are available from Epson (part number
C12C890191).
8. Insert the new cutter as shown.
Note:
You can purchase replacement items for your printer from Epson at
(800) 873-7766, or by visiting the Epson StoreSM at
www.epsonstore.com (U.S. sales only). In Canada, please call
(800) 463-7766 for dealer referral.
Follow these steps to replace the tank:
1. Make sure the printer is not printing or performing any
other operations (READY or PAPER OUT should appear on
the control panel).
8/05
Epson Stylus Pro 4800 - 11
Epson Stylus Pro 4800
2. If you are using 220 ml ink cartridges, remove the four
cartridges from the right ink compartment, then close the
compartment cover.
Note:
If an electrical power failure occurs during this operation, turn the
printer on again. You can continue your procedure at the breakpoint.
3. Place your hand under the right ink compartment and
gently pull out the maintenance tank.
The Photo Black cartridge is ideal for printing photographic
images on all media types. It is optimized for traditional
photographic and ink jet-coated papers, such as Epson
Premium Luster Photo Paper, Photo Semigloss Paper,
Premium Semimatte Photo Paper, etc.
Caution:
Be careful not to spill ink from the maintenance tank when
removing it. Hold it upright at all times and dispose of it carefully.
The Matte Black cartridge is optimized for printing
photographic images on matte or plain papers, such as Epson
Enhanced Matte Paper and Epson Velvet Fine Art Paper.
Generally, you should switch black ink cartridges only if you
plan to run a large number of print jobs in the new mode.
Since it takes about several minutes to switch and consumes
some ink, you shouldn’t switch cartridges more often than
necessary.
If MNT TNK FULL appears on the LCD, you need to replace
the maintenance tank. See page 11.
Draining the Old Ink
4. Place the used tank in the plastic bag included with the new
tank.
1. Make sure that READY appears on the LCD panel.
5. Insert the new tank.
2. Press the Menu
button.
3. Press the button until you see MAINTENANCE, and
then press the Menu
button.
4. Press the button until you see BK INK CHANGE, and
then press the Menu
button.
5. Press the Menu
button again.
6. When RAISE THE RIGHT INK LEVER appears on the
LCD, raise the ink lever on the right ink compartment.
7. When RAISE THE LEFT INK LEVER appears on the LCD,
raise the ink lever on the left ink compartment.
6. If you removed any ink cartridges, replace them after
inserting the new maintenance tank.
8. When REMOVE INK CRTG appears, remove all four ink
cartridges from the left ink compartment.
9. When INSTALL CNVRSION CRTG appears, insert the
three conversion cartridges in the slots on the left ink
compartment.
Changing the Black Ink Cartridge
You can change the black ink from Matte Black to Photo
Black or vice-versa. You will need to use the Black Ink
Conversion Kit (included with your printer) and a new black
ink cartridge (either Matte or Photo that you want to convert
to).
Note:
If REPLACE CNVRSION CRTG appears, press the Pause
button. Remove the old conversion cartridge(s) from the left ink
compartment, and then insert the new conversion cartridge(s).
Go to step 4 to start again.
Caution:
To avoid interruption, observe the following conditions: Do not turn
off the printer, open the top cover, remove the rear cover, move
the paper lever to the released position, remove the ink cartridges,
remove the maintenance tank, or unplug the power cord.
12 - Epson Stylus Pro 4800
10. When LOWER THE LEFT INK LEVER appears on the
LCD, lower the ink lever on the left ink compartment.
The printer starts draining ink and DRAINING XX%
appears on the LCD. Wait until draining is complete.
8/05
Epson Stylus Pro 4800
Installing the New Black Ink Cartridge
Updating Your Printer Firmware
1. When draining is complete, RAISE THE LEFT INK LEVER
appears on the LCD. Raise the ink lever on the left ink
compartment.
Before you begin using your printer, you should check for a
newer version of firmware on the Epson support site and
update your printer, if necessary.
2. When REMOVE CNVRSION CRTG appears, remove the
conversion cartridges from the slots on the left ink
compartment.
Downloading the Firmware
3. When INSERT INK CRTG appears, insert the cartridges in
their specified slots.
1. Navigate to http://www.support.epson.com in your
browser.
4. When LOWER BOTH INK LEVERS appears, lower the ink
levers on the right and left ink compartments.
2. Choose your printer.
3. Click Drivers and Downloads to find the newest
firmware.
5. When RAISE BOTH INK LEVERS appears, raise the ink
lever on the right and left ink compartments.
4. Choose the version for Macintosh or Windows and follow
the instructions on the screen, then continue in the
appropriate section below to upgrade the firmware.
The printer starts charging ink. After a while, ink lever
messages appear on the LCD.
Note:
Because ink charging after black ink conversion consumes a
large quantity of ink, you may need to replace the ink cartridges
soon.
Updating with Macintosh
1. Double-click the firmware file to extract it.
2. Open the Applications folder, open the Utilities folder
and then open the Printer Setup Utility.
6. When a message appears on the LCD, raise or lower the ink
levers accordingly until READY appears on the LCD.
3. Highlight Stylus Pro 4800 in the Printer List, then click
the Utility button.
When READY appears on the LCD, ink charging is
complete.
7. If you have installed 110 ml ink cartridges, close the ink
compartment covers. If you have installed 220 ml ink
cartridges, do not close the ink compartment covers.
Updating the Printer Driver Information
After the replacement operation, update the driver
information using the steps below.
❏ Mac OS X
Open the Epson Printer Utility in your Applications folder.
Select Stylus Pro 4800, and click OK. Click the EPSON
StatusMonitor button and make sure the Matte Black
cartridge option is shown. If not, click Update.
❏ Windows
Click the Main tab and make sure that the correct ink
cartridge is displayed. If not, set the information manually
by clicking the Utility tab and then the Printer and Option
Information button.
4. Click the EPSON LFP Remote Panel button.
Note:
If the button is grayed out, the LFP Remote Panel is not
installed. See the Printer Guide to install it.
8/05
Epson Stylus Pro 4800 - 13
Epson Stylus Pro 4800
You see the LFP Remote Panel. Make sure Stylus Pro
4800 is selected.
7. Click Browse and find the firmware that you just
downloaded and extracted. Select the file and click Choose.
Note:
For more information on using the LFP Remote Panel, click Help
to see the electronic guide.
8. If the firmware version of the file is newer, click Update to
start the firmware updating process. (If it is the same, you
don’t need to update.)
Caution:
Don’t turn off the printer while the firmware is updating.
9. When the update is complete, close the Firmware Updater
window, LFP Remote window, and the Printer Utility
window.
Updating with Windows
1. Double-click the firmware file to extract or unzip it.
2. Click Start > Settings > Printers and Faxes.
3. Right-click the EPSON Stylus Pro 4800 icon and click
Printing Preferences.
4. Click the Utility tab, then click the EPSON LFP Remote
Panel button.
5. Click the Firmware Updater button. You see the Firmware
Updater window.
Note:
If the button is grayed out, the LFP Remote Panel is not
installed. See the Printer Guide to install it.
6. Make sure your printer is on, its LCD is set to Ready, and
it is connected to your computer, then choose Stylus Pro
4800 in the Printer list.
14 - Epson Stylus Pro 4800
8/05
Epson Stylus Pro 4800
5. On the LFP Remote Panel screen, click the Firmware
Updater button.
7. Click Browse and find the firmware that you just
downloaded and unzipped. Select the file and click
Choose.
Note:
For more information on using the LFP Remote Panel, click Help
to see the electronic guide.
8. If the firmware version of the file is newer, click Update to
start the firmware updating process. (If it is the same, you
don’t need to update.)
Caution:
Don’t turn off the printer while the firmware is updating.
9. When the update is complete, close the Firmware Updater
window, LFP Remote window, and the Printer Driver
window.
Related Documentation
CPD-19586
Epson Stylus Pro 4800 Printer Guide
CPD-19587
Epson Stylus Pro 4800 Quick
Reference Guide
CPD-19585
Epson Stylus Pro 4800 CD-ROM with
electronic Reference Guide
CPD-19949R1
Important Information About Your Epson
Stylus Pro 4800
CPD-20166
Epson Stylus Pro 4800 Update
CPD-19588
EPSON Preferred Limited Warranty
You see the Firmware Updater window.
6. Make sure your printer is on, its LCD is set to Ready, and
it is connected to your computer, then choose Stylus Pro
4800 in the Printer list.
8/05
Epson Stylus Pro 4800 - 15
Epson Stylus Pro 4800
16 - Epson Stylus Pro 4800
8/05