1
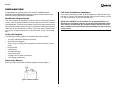
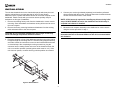
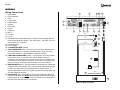
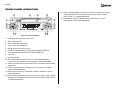
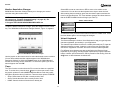
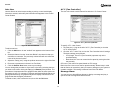
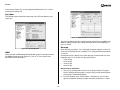
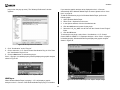
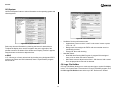
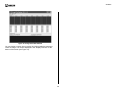
AVDINPC
Installation and Operation Manual
AVDINPC
APP LAUNCH
Power
FF
VOL
TAP
MUTE
VOL
TAP
NEXT
SEL
STOP
PLAY
DVD/CD/MP3/WMA PLAYER
PREV
REW
40G HD
Audiovox Electronics Corporation
150 Marcus Boulevard
Hauppauge, NY 11788
Technical Assistance: 1-800-645-4994
www.Audiovox.com
© 2005 Audiovox
v.050205
Printed in Korea
AVDINPC
INTRODUCTION
Features
•
•
•
•
•
•
•
•
•
•
•
•
•
•
40 GB Hard Drive
512 MB DDR RAM
2
AVDINPC
PREPARATION
Toll-Free Installation Assistance
Congratulations on your purchase of the Audiovox AVDINPC Mobile
Multimedia DVD/CD/MP3/WMA personal computer. Please read all of the
instructions before beginning the installation.
If you require assistance, contact Technical Support at 1-800-323-4815 from
8:30 a.m. to 7:00 p.m. EST Monday through Friday and from 9:00 a.m. to 5:00
p.m. EST on Saturday. (U.S.A. and Canada only.)
Installation Requirements
This unit is designed for installation in vehicles with an existing radio opening.
In many cases, a special installation kit will be required to mount the computer
to the dashboard. These kits are available at electronics supply stores and car
stereo specialty shops. Always check the kit application before purchasing to
make sure the kit works with your vehicle. If you need a kit but cannot locate
one, call our customer support line at 1-800-323-4815. (U.S.A. and Canada
only.)
NOTE: If the AVDINPC is to be installed in a car equipped with an onboard drive or navigation computer, do not disconnect the battery cable.
If the cable is disconnected, the computer memory may be lost. Under
these conditions, use extra caution during installation to avoid causing
a short circuit.
Tools and Supplies
The following tools and supplies are needed to install the computer.
• Torx type, flathead and Philips screwdrivers
• Wire cutters and strippers
• Tools to remove existing radio (screwdriver, socket wrench set or other
tools)
• Electrical tape
• Crimping tool
• Volt meter/test light
• Crimp connections
• 18 gauge wire for power connections
• 16-18 gauge speaker wire
Disconnect Battery
Before you begin, disconnect the battery negative terminal (Figure 1)
Figure 1: Battery Terminals
3
AVDINPC
INSTALLATION
The unit has threaded holes in the chassis side panels which may be used
with the original factory mounting brackets of some Toyota, Nissan,
Mitsubishi, Isuzu, Hyundai and Honda vehicles to mount the computer to the
dashboard. Please consult with your local car stereo specialty shop for
assistance on this type of installation.
1. Remove the existing factory radio from the dashboard or center console
mounting. Save all hardware and brackets as they will be used to mount
the new computer.
4. Connect your monitor (purchased separately) and install any software/
drivers supplied with the monitor. Follow the instructions included with the
monitor to mount the monitor in the vehicle.
2. Remove the factory mounting brackets and hardware from the existing
radio and attach them to the new computer.
5. Mount the new computer assembly to the dashboard or center console
using the reverse procedure in step 1.
CAUTION: Do not exceed M5 X 6 MM screw size. Longer screws may
touch and damage components inside the chassis.
CAUTION: For proper operation of the DVD player, the chassis must be
mounted within 20° of horizontal. Make sure the unit is mounted within
this limitation.
NOTE: A PS/2 mouse is required for installing any drivers during initial
setup. DO NOT MOUNT the unit to the dashboard until initial setup is
complete and software is installed.
3. Place the computer in front of the dashboard opening so the wiring can be
brought through the mounting sleeve. Follow the wiring diagram carefully
and make certain all connections are secure and insulated with wire nuts
or electrical tape. After completing the wiring connections, plug the
connector into the mating socket on the rear of the chassis and turn the
unit on to confirm operation (vehicle ignition switch must be “on”). If the
unit does not operate, re-check all wiring until the problem is corrected.
Figure 2: ISO Installation
4
AVDINPC
WIRING
Wiring Connections
1.
2.
3.
4.
5.
6.
7.
8.
9.
10.
11.
12.
13.
14.
15.
16.
17.
18.
19.
20.
4
PS/2 Mouse
PS/2 Keyboard
VGA
LAN (RJ-45)
USB 1/USB 2
S-Video
RCA Video
Printer
COM Port
MIC In
Line Out
Line In
AC Adapter (Purchased Separately) – Only use an AC adapter with the
following specifications: Output – 12V, 4.3A; Input – 100-240V~1.5A, 50/
60Hz; Center pin (+) positive
Car Power Input
Power Supply
ILLUMINATION WIRE (yellow)
ACC POWER WIRE (red) – Connect to a +12 volt circuit that is only live
when the ignition is on. The best connection point is at the car’s fuse
block at the “RADIO” or “ACCESSORY” identified terminals.
CONSTANT POWER WIRE (yellow) – Connect the 12V PLUS constant
power wire to a live 12 volt wire in the vehicle. Before making a
connection, check that the wire you intend to connect it to is always live,
even when the car’s ignition is turned off. If a live wire is not found, route
the wire to the car’s fuse block and connect it to a live circuit there.
GROUND WIRE (black) – Securely fasten the Ground wire to a grounded
metal part of the car’s chassis. If you cannot find an existing bolt or screw
to fasten it to, drill a hole in the metal and secure it with a screw. To
ensure a good ground, remove any paint or grease from areas where the
wire will contact the surface.
INLINE FUSE (red) – When running the red ACC Power wire directly to
the battery, the inline fuse MUST be connected between the unit and the
battery (within 18” of the battery). If the ACC Power wire is connected to
the fuse block, the inline fuse is not required.
11 12
8
13
1
14
2
3
5
6
9
7
10
Black
19
Red
17
Yellow
18
FUSE BOX
Red
20
+
Red
BATTERY
16
Yellow
15
Figure 3: Wiring Connections
5
AVDINPC
Replacing the Fuse
When replacing a fuse, be sure to use the correct type and amperage to avoid
damaging the computer. The AVDINPC uses one 5 amp ATO fuse.
Reconnecting the Battery
When wiring is complete, reconnect the battery negative terminal.
6
AVDINPC
FRONT PANEL OPERATION
6
8
9
15. PREV: Press this button to execute the “Previous” command in various
media applications. The Prev button also functions as the “Channel
Down” button in TV related applications.
14
AVDINPC
APP LAUNCH
Power
3
12
FF
VOL
5
4
16. PLAY/PAUSE: Press this button to execute the “Play” or “Pause”
commands in various media applications.
10
1
TAP
SEL
MUTE
VOL
NEXT
DVD/CD/MP3/WMA PLAYER
TAP
11
STOP
PLAY
PREV
REW
40G HD
7
13
16 15
2
Figure 4: Front Panel Operation
1. POWER: Press to power the unit on/off.
2. SEL: Press to “Enter”.
3. VOL +: Raise the volume level.
4. VOL -: Lower the volume level.
5. MUTE: Silence the system volume.
6. S.TAB: This button functions like the keyboard [Shift]+[TAB] key.
7. TAB: This button functions like the keyboard [TAB] key.
8. Disc Slot
9. Disc Eject Button
10. APP LAUNCHER: Press this button to run the iMON Application
Launcher, which can execute many assigned windows applications.
11. STOP: Press this button to execute the “Stop” command in various media
applications.
12. F.FWD: Press this button to execute the “Fast Forward” command in
various media applications.
13. REW: Press this button to execute the “Rewind” command in various
media applications.
14. NEXT: Press this button to execute the “Next” command in various media
applications. The Next button also functions as the “Channel Up” button in
TV related applications.
7
AVDINPC
REMOTE CONTROL OPERATION
Table 1: Remote Control Functions
The RSC (Remote Stick Controller) allows you to control the mouse pointer in
16 directions using the joystick control. The function of each remote control
button is described in the following table.
Icon
Figure 5: Remote Control
8
Name
Basic Functions
Power
Press this button to turn the PC
on. Press and hold more than 2
seconds to turn the PC off.
App. Exit
Press this button to generate the
[ALT] + [F4] keyboard shortcut,
which is used to closing the
active window.
Screen
Saver
Press this button to instantly
activate the screen saver.
Timer
Press this button to run the
Remote Manager timer setup
screen. This timer feature can
automatically turn off the PC or
activate an alarm assigned
through the timer setup.
Multi-Median
0-9
Numeric
Buttons
The numeric buttons (0 - 9)
function as shortcuts to the
Multi-Median application printed
below each button. These
buttons can be customized by
the user (see??? Page _____.)
In full screen TV view, press the
number buttons to input the
channel directly. In “Find View”,
press the number buttons to
enter alphabetic characters.
0
Press this button to show the
control panel (control bar and
shortcut bar). You can use the
up, down, left and right button to
select the control button on the
control bar and shortcut bar.
AVDINPC
Table 1: Remote Control Functions
Table 1: Remote Control Functions
Icon
Name
Basic Functions
Multi-Median
1
Press this button to change the
current media to My Music.
2
Press this button to change the
current media to My Movie.
3
Press this button to change the
current media to My Photo.
4
Press this button to change the
current media to My DVD.
5
Press this button to stop the
current media and return to the
Main View.
6
Press this button to change the
current media to My TV.
7
Press this button to search the
media file on the current
playlist.
8
Press this button to call the
setup view.
9
Press this button to call the
current playlist.
Desktop
Max/Res
ESC
Icon
Press this button to toggle
between “show desktop” and
“restore all”. This button has the
same function as the keyboard
shortcut [Windows]+[D].
Name
Windows
This button brings up the
Windows start menu and
functions like the keyboard
[Windows] key.
Menu
This button brings up the menu
and functions like the keyboard
[menu] key.
App.
Launcher
Press this button to run the
iMON Application Launcher,
which can execute many
assigned windows applications.
Multi
Median
Press this button to launch the
Multi-Median program provided
with the Remote Manager. Use
Multi-Median to enjoy a variety
of media files including DVD
movies, music, and photos, or to
access a multimedia device like
a TV card, digital camcoder, or
digital camera.
Task
Switcher
Press this button to switch
between current running
applications. This feature is
similar to the [ALT]+[TAB]
keyboard command.
Backspace
This button functions like the
keyboard [Backspace] key.
Press this button to toggle
between “maximize” and
“restore” for the active window.
This button functions like the
keyboard [ESC] key.
Press this button to return to the
previous view.
9
Basic Functions
Multi-Median
AVDINPC
Table 1: Remote Control Functions
Icon
Name
Space/
Select
Shift + Tab
Basic Functions
This button functions like the
keyboard [Space] key.
Table 1: Remote Control Functions
Multi-Median
Icon
Press this button to add or
remove the media file in the
current playlist in Media Folder/
File View. This will not delete
the media file, but will just
exclude the file from the playlist.
You an add the media file back
to the playlist at any time.
Name
Basic Functions
L. Click
This button functions like the left
mouse button.
R.Click
This button functions like the
right mouse button.
Drag &
Drop
This button performs the “Drag
and Drop” function of a mouse.
Push the button at the starting
position to begin “dragging”,
then move to the destination
position using the Joystick. Push
the button again to “drop”.
Joystick
Mouse mode: The joystick
functions like a mouse. Press in
on the joystick to “double-click”.
Keyboard mode: The joystick
functions like the four keyboard
arrow keys. Press in on the
joystick to “Enter”.
MUTE
Press this button to mute the PC
system volume.
VOL -
Press this button to reduce the
PC system volume.
Multi-Median
This button functions like the
keyboard [Shift]+[TAB] key.
Tab
This button functions like the
keyboard [TAB] key.
Mouse/
Keyboard
Press this button to toggle the
Remote RSC joystick operation
mode between Mouse and
Keyboard mode. The following
icons indicate the current mode.
The mouse icon
in the Remote
Indicator means
that you can
move the mouse
pointer using the
joystick. Press in on the joystick
to “double click”.
The keyboard
icon in the
Remote
Indicator means
that you can use
the joystick like
keyboard arrow keys. Press in
on the joystick to “Enter”.
10
These buttons are used to
move the focus in the MultiMedian. After moving the focus,
you can select the icon you
want.
Press in on the joystick button
to enter to the next view. After
moving the focus to the icon
and folder you want, push the
Enter button to move to the
next step.
AVDINPC
Table 1: Remote Control Functions
Icon
Name
Basic Functions
Table 1: Remote Control Functions
Multi-Median
Icon
Name
Basic Functions
Multi-Median
REW
Press this button to execute the
“Rewind” command in various
media applications.
Press this button to execute the
“Rewind” command.
Press this button to execute the
“Fast Forward” command in
various media applications.
Press this button to execute the
“Fast Forward” command.
VOL +
Press this button to increase the
PC system volume.
Play
Press this button to execute the
“Play” command in various
media applications.
Press this button to execute the
“Play” command. Use the Enter
button to play the media file in
the media preview.
F. FWD
Pause
Press this button to execute the
“Pause” command in various
media applications.
Press this button to execute the
“Pause” command.
Full Screen Press this button to execute the
“Full Screen” command in
various media applications.
Open
Press this button to execute the
“File/Folder Open” command in
various media applications.
Press this button to eject the
CD/DVD from the disc slot.
Prev
Press this button to execute the
“Previous” command in various
media applications. The Prev
button also functions as the
“Channel Down” button in TV
related applications.
Press this button to execute the
“Previous” command. The Prev
button also functions as the
“Channel Down” button in TV
View.
Next
Press this button to execute the
“Next” command in various
media applications. The Next
button also functions as the
“Channel Up” button in TV
related applications.
Press this button to execute the
“Next” command. The Next
button also functions as the
“Channel Up” button in TV View.
Stop
Press this button to execute the
“Stop” command in various
media applications.
Press this button to execute the
“Stop” command.
11
AVDINPC
USING THE MULTI-MEDIAN SOFTWARE
Multi-Median is designed to help you enjoy music, movie and photo media
files and allows you control your multimedia devices (DVD player, television,
digital camcoder or digital camera) using only the remote controller. Please
read this section of the manual in full before using your Multi-Median
software.
•
Setting: Customize Multi-Median through “Setting” menu. Please refer to
“Changing Program Settings” on page 14 for instructions.
• Exit: Exit Multi-Median and return to Windows.
To select one of the above options using the remote controller, use the arrow
keys to highlight the desired function, then press the Enter button.
Multi-Median User Interface
Playing Media Located on your Hard Disk Drive
You can launch the Multi-Median program by pressing the Multi-Median
button on the remote controller.
When you select the “Hard Disk Drive” icon, Multi-Median scans the hard
drive for media files and displays icons for each of the following types of
media:
• My Music: View MP3, WMA, OGG and WAV music files stored on your
hard disk drive. Please refer “Changing Program Settings” on page 14 to
learn more about scanning folders and file types.
• My Movies: View WMV, AVI, ASF, MPG, MPEG, M1V, MP2 and DAT
video files stored on your hard disk drive.
• My Photos: View BMP, GIF, JPG, TIFF and PNG image files stored on
your hard disk drive.
• Rescan: Rescan any folders designated as “scan” folders. After
downloading new media files or changing the scan folder preferences,
click this icon to update your media database. To reduce scanning time,
select the folder that contains the media files. Selecting a root folder, like
“My Computer”, will greatly increase scanning time.
Media Folder View
If you select “My Music”, “My Movies” or “My Photos”, the media folder view
will appear.
Figure 6: Multi-Median Main View
The icons on the menu bar located at the top of the window control the
devices and functions as follows:
• Hard Disk Drive: Access music, movies or photos saved on the hard
drive.
• CD/DVD: Access music, movies, or photos saved on a CD or DVD.
• TV: View and record television channels through the TV card. MultiMedian supports most analog TV cards.
• Digital Camcoder: Multi-Median allows you to access a DV Digital
Camcoder connected through the IEEE1394 port. You can control your
camcoder using the remote controller and copy video clips to the
computer.
12
AVDINPC
Table 2: Media Folder Icons
The selected folder is green. Press the
Enter button to view the files in this folder.
When media inside the folder is playing,
the folder is red. Inside the folder, the file
currently playing is outlined in red.
Media File View
Figure 7: Media Folder View
While in “Media Folder View”, press Enter to view the contents of that folder
in “Media File View”.
The icons in Table 2 indicate the status of the media folder.
Table 2: Media Folder Icons
The number in the top right corner of the
folder indicates the number of media files
in the folder. The check mark on the left
indicates whether or not the files in that
folder are added to the current play list.
All Files are in
Playlist
Some Files are in
Playlist
No Files are in
Playlist
Figure 8: Media File View
Select a media file to view information about that file in “Media Preview”.
13
AVDINPC
the remote control. You can also control playback of recorded video or record
the video as a movie file to your HDD using the Play, Pause, F.FWD, and
REW buttons on the remote control.
Media Preview
Media Preview shows the title, sequence number in the playlist, current
playing time, and the preview screen for the selected media file.
Internet Radio View
Internet Radio View shows the internet radio station according to its genre.
Multi-Median automatically updates the internet radio station list via internet.
The genre of internet radio stations are Rap/Hiphop/R&B, Rock/Metal, Jazz/
Blues, Classic, Dance, Pop, Oldies and World.
Using a Mouse with Multi-Median
Multi-Median can be controlled with mouse connected to the USB or serial
port of your PC. If you move the mouse pointer to the top or bottom of the
screen, the control panel (control bar or shortcut bar) appears. All the buttons
on the control panel can be controlled using the left mouse button.
Changing Program Settings
You can adjust all settings in Multi-Median using just the remote control. Click
the “Setup” icon (gear wheel) to access the “Setting” screen. Use the remote
control joystick to navigate the menus and press in on the joystick to select an
option. To exit a sub-menu, push the joystick to the left or click the Back
button using the mouse. Options for the Setting menu are described below.
Figure 9: Media Preview
Back
Full Screen View
For all menus, select the “Back” option to return to the previous menu, view,
or step.
Full Screen View expands the current video or image file to fit the entire
screen. To view a file in Full Screen View, press the Full Screen button on the
remote control. To view detailed information about the current playing media
file, return to Media Preview by pressing the Full Screen or Esc button or
press 0 on the remote control to open the control panel.
Common
Multi-Median provides a powerful media database that scans the media files
on your PC, allowing you to select media files without searching through
multiple folders. By default, Multi-Median is set to scan the “My Music”, “My
Video”, and “My Pictures” folders under “My Documents”. You you modify
which folders are scanned or choose to scan a TV card attached to your PC
through the “Scan Media” menu option.
TV View
Before watching a TV channel, you must select the TV card. Please refer to
“Setting Environment” on page 13 for instructions. TV View is also similar to
the Movie View. Once set up, you can select television channels from the TV
View using the Enter button on the remote control. With the TV playing in full
screen view, you can change the channel using the using the number buttons
on the remote control.
Music
Use the Music menu option to change various settings related to the My
Music view, including the background image. You can also change the repeat
option (Play All, Repeat All, Repeat Folder and Repeat Song) for your music
playlist, turn on/off the shuffle option, and set the folder view to group by
“Album”, “Artist”, or “Genre” based on the tag information of MP3 and OGG
files.
Digital Camcoder View
Digital Camcoder View supports all the digital camcoder devices that can be
connected to the IEEE1394 port using the DV format. Once connected, you
can view the image on your camcorder’s screen and control the camera using
14
AVDINPC
Movie
Use the Movie menu option to change the background image of the Movie
view or to modify the brightness, contrast, saturation and hue. You can also
change the aspect ratio, size, position, sync, font, color, bold, outline and
shadow properties of the subtitle, remove previous bookmark positions, and
change the repeat and shuffle settings.
Photo
Use the Photo menu option to change the background image of the Photo
view, change the duration of photo slide shows, set of the transition effect,
and modify the repeat and shuffle settings.
TV
Use the TV menu option to change the background image of the TV view,
choose the “Antenna” or “Cable” as the TV input source, and modify the auto
channel scanning, screen and aspect ratio settings. For the recording setting,
you can choose the Codec and the folder that your recording files would be
stored. Recording feature of Digital Camcoder will be updated on the next
update.
DVD
Figure 10: Video Codec Properties Window
Use the DVD menu option to change the background image of the DVD view,
or to change the brightness, contrast, saturation, hue or aspect ratio.
Digital Camcoder
Use the Camcorder menu option to change the background of the Digital
Camcoder view. For the recording setting, you can choose the Codec and the
folder that your recording files would be stored. Recording feature of Digital
Camcoder will be updated on the next update.
Video Codecs
In order to see the various video files which are encoded by different Codecs,
you need to install the appropriate Codec of the video file. You can install a
unified Codec package that installs many different Codecs at one time.
??? where do they get new codecs???
You can see the Codec information installed on your PC by opening the
“Video Codecs Properties” window through the Windows Device Manager. To
view the “Video Codecs Properties” window, use the Start menu to select
Control Panel > System > Device Manager > Sound, video and game
controllers > Video Codecs.
15
AVDINPC
USING THE IMON REMOTE MANAGER
Use the joystick to select the program you’d like to activate, then press in on
the joystick (the Enter button) to select it.
The Remote Manager group of programs allows you to control various
Windows system commands using your remote control. You can run the
screensaver directly, turn off the monitor, set timers, enter keyboard
characters and perform other useful commands using your remote control.
The iMON Application Launcher and Task Switcher allow you to use your
remote control to instantly launch Windows applications and quickly switch
between applications using the [ALT]+[TAB] keys.
Application Control
After activating a program with Application Launcher and Task Switcher, you
can use your registered remote control buttons to control the program. Please
note that the commands performed may be different depending on which
program is active. Use Task Switcher to activate a program without the mouse
or keyboard.
Application Launcher
To open the Application Launcher, press the App. Launcher button on the
remote control. The “iMON App. Launcher” window (Figure 11) appears.
All-time Control Mode
Use All-time Control mode to control a specific software program regardless
of the current active state of the application.
NOTE: You need to assign the All-time Control function to a button on
the remote (see “Program Command Setting” on page 18). The
executable program file is located here:
C:\Program Files\SOUNDGRAPH\iMON\iMON ATC.exe
To start All-time Control, press the assigned remote control key. The “iMON
All-time Control Window”, Figure 12, appears. The functions of the each
button are as follows.
Figure 11: iMON Application Launcher Window
Figure 12: iMON All-time Control Window
Task Switcher
•
Task Switcher functions like the [ALT]+[TAB] key combination to activate a
second window while using an active Windows program. With more than one
program open, press the Task Switcher button on the remote control to
display the program icons for any programs currently running in Windows.
•
•
16
ON: The application shown inside the remote button is being controlled by
All-time Control. In Figure 12, the Winamp icon appears inside the remote
button. Winamp will start automatically, if it was not running before.
OFF: Select “OFF to disable All-time Control mode.
SELECT: Choose “SELECT” to select the application you want to control.
AVDINPC
Monitor Resolution Changer
Select ABS to enter an exact time or REL to enter a time relative to the
current time. You can also use the keyboard arrow keys to enter the time.
After entering the timer settings, press the timer button again to activate the
timer for the specified time. The Timer Indicator changes to indicate the time
that the SLEEP/ALARM function will begin (see Table 3).
iMON Monitor Resolution Changer allows you to change your monitor
resolution using the remote control.
NOTE: You need to assign the “All-time Control” function to a button on
the remote (see “Program Command Setting” on page 18). The
executable program file is located here:
C:\Program Files\SOUNDGRAPH\iMON\iMON MRC.exe
Table 3: Timer Indicator
Timer function on
To start the Monitor Resolution Changer, press the assigned remote control
key. The “iMON Monitor Resolution Changer Window”, Figure 13, appears.
Timer function on and All-time Control mode enabled.
To cancel the timer, press the timer button and select the NONE mode. Press
the timer button again to exit and apply the changes.
Virtual Keyboard
The Remote Manager includes a Virtual Keyboard to help you type keyboard
characters (alphabet, punctuation) in your applications.
The character input method is similar to a mobile phone dial pad. To input the
alphabet character you want, locate the cursor on the text input field, then
execute the "Application Launcher" and select "Remote Virtual Keyboard".
Five different input character sets are pre-defined on the Remote Virtual
Keyboard for your typing, including English capital letters, English lowercase
letters, numbers, special characters, and key words for Web surfing. Click the
A1@ button to switch between character sets.
Figure 13: iMON Monitor Resolution Changer
Use the joystick on the remote control to select the desired screen resolution.
You can select which resolution options appear in the “iMON Monitor
Resolution Window” by clicking the Option button in the “iMON Manager”
window, then clicking “Screen resolution”. Un-check the options you do not
want to appear, then click OK.
Timer
The Timer function can shut down the PC or sound an alarm at a specified
time. To set the timer, press the timer button on the remote control. Push
the joystick up/down to select MODE/TIME/Hour/Minute. Push the joystick
left/right to adjust the value of each item. There are three options for MODE:
• Sleep: Shuts down the PC after a certain period of time.
• Alarm: Sounds the alarm after a certain period of time.
• NONE: Cancels the timer function that is already set.
Figure 14: Web Key Word Character Set
17
AVDINPC
2. From the “iMON Manager“ window, click the Setup button. The “Setup
iMON” window appears.
Use the remote control joystick to select characters. For buttons with multiple
characters, press in on the joystick to select the second or third options. Press
the arrow keys to move to the next or previous field. When finished, press the
OK button to return the input characters to the application.
Registering a New Remote Controller
To add an additional remote control, click the Add button in the “iMON
Manager” window. The “Add New RC” window appears. If you using the
Remote RSC that came with the unit, please use the remote control name of
“Remote RSC” only.
Program Command Setting
To control icons using the Application Launcher or Task Manager, or to specify
custom remote control functions for a specific program, the program must first
be registered.
Register an Application
Many applications are automatically registered during the installation process.
You can register additional programs using the following steps:
1. Click the “iMON Manager” icon located on the task bar tray at the bottom
of the screen to open the “iMON Manager” window (Figure 15).
Figure 16: Setup iMON Window
3. Press the Add Program button. If the application you want to add is
currently running, it will appear in the “Choose program” window, along
with any other applications currently running. This feature allows you to
register the application that you want without knowing the exact location
of it.
Figure 15: iMON Manager Window
4. To select an application from this window, click the name of the
application, then click the OK button.
If there are no applications running, the “Open” window will appear,
allowing you to browse and locate the executable file for the program you
want to register.
18
AVDINPC
Setting Customized Windows Commands
5. When the “Setup iMON” window appears, click Yes to register the
program in the launcher.
You can use the “Customized Windows CMD” tab to assign Windows system
commands that are not covered under the “Windows CMD” tab. Use the same
method explained in “Assign Functions to the Remote Control” on page 19.
Assign Functions to the Remote Control
You can customize many of the remote control buttons to perform different
functions in each registered program. The Remote Manager compares the
assigned functions to the command list for each registered application,
allowing you to assign a different set of functions for each program. To assign
a new function to the remote control, perform the following steps:
1. From the “iMON Manager“ window, click the Setup button to display the
“Setup iMON” window.
Building Macros
You can assign macros to a remote control button to help you complete
common tasks more efficiently. A macro can be used when you need more
than three key commands to complete a task. Please perform the following
steps to register a macro.
1. Click the “Macro” tab in the “Setup iMON” window.
2. Under the “Program CMD” tab, select the desired program from the dropdown list. A list of existing functions appears.
2. Click the Add button in the bottom left corner of the screen under
“Function”. The “Registration wizard for RC buttons” screen appears.
3. Click the Add button in the bottom left corner of the screen under
“Function”. The “Registration wizard for RC buttons” screen appears.
3. Type the name of the macro, then click Next >. The virtual keyboard and
mouse (appears on the screen.
4. Type the name of the function, then click Next >.
5. Input the keyboard shortcut by pressing the corresponding key on the
keyboard. For example, to enter [Ctrl]+[P], click inside the first field then
press the Ctrl key, then move to the second field and type P. You do not
have to enter a value in all fields. Click Next > when finished.
6. Press the remote control button that you want to assign the command to.
The bar will turn red when the signal is received. Press the button again
to confirm. Click Finish to complete the registration wizard.
Figure 17: Virtual Keyboard/Mouse
7. After completing the remote control registration, click Exit in the setup
window then confirm the remote control action in the selected application.
4. Use the mouse to select the virtual keyboard keys and virtual mouse
buttons in the proper sequence to complete the task. When finished, click
the Next > button.
Windows Command Setting
Under the “Windows CMD” tab in the “Setup iMON” window, you will see three
different sections (Keyboard command, Mouse command, and Power
Management cmd) of Windows commands that will help you to control the
Windows application with your remote control. You can assign various
Windows system commands to your remote controller for your convenience.
5. Press the remote control button that you want to assign the command to.
The bar will turn red when the signal is received. Press the button again
to confirm. Click Finish to complete the registration wizard.
6. After completing the remote control registration, click Exit in the setup
window then confirm the remote control action in the selected application.
NOTE: There are restrictions when assigning Windows commands to
the remote control. You cannot change the registration of the "Mouse/
Keyboard" toggle button or the Joystick functions, including the UP/
DOWN/LEFT/RIGHT arrow keys, the 16 directional mouse movements,
the [Enter] key, and the mouse [double click] function. Restricted
functions appear “grayed out”.
Setting Options
To change and set options for iMON Remote Manager, click the Option
button in the “iMON Manager” window. The “Option” window, Figure 18,
appears.
19
AVDINPC
Table 4: Remote Indicator Icons
Indicates the usage of the remote RSC joystick as a mouse
Indicates the usage of the remote RSC joystick as a keyboard
Figure 18: iMON Option Window
•
The following common options can be modified:
• Common
• All-time control mode - Select a registered function to run
automatically. This is the same as selecting a program using the
Application Launcher.
• IR signal indicator on desktop - Determine how the Remote Indicator
will display on the desktop. Table 4 shows the various remote
indicator icons.
•
•
•
•
Table 4: Remote Indicator Icons
•
Remote Indicator
Black: No infrared signal detected
Green: Registered infrared signal detected
Red: Non-registered infrared signal detected
Shows system volume level
Indicates the system is muted
20
Sound effect for detected IR signal - This option allows you to assign
a unique sound effect that will play when an IR signal is detected.
“Un-check” the box to turn the sound.
Mouse - Change the maximum speed and the rising time of the mouse
pointer movement of the remote control.
Keyboard - Change the repeat delay and repeat time of the keyboard.
This setting is helpful when you use the remote controller to control the
volume.
Timer - Change the sound and duration of the alarm.
Monitor Resolution - Select the resolutions that will displayed in the
“iMON Monitor Resolution Changer” window.
Virtual Keyboard - Assign custom characters to the Web character set of
the Remote Virtual Keyboard.
AVDINPC
L.I.S. 2 CONTROL CENTER
•
All functions of L.I.S can be managed easily from the Control Center. By
default, the L.I.S. Control Center will run automatically when the computer is
turned on. Because the program has so many features, please review the
instructions carefully.
CG Builder: User can create a unique symbol mark or logo with the CG
builder.
Table 5: Specifications
L.I.S. 2 Introduction
Controller
L.I.S. 2 USB 1.1/2.0 support
The L.I.S. Indicator displays PC hardware and software information in real
time through the VFD and LCD windows. It also provides POP3 e-Mail
checking, "Message Alarm", and A.F.C. (automatic fan control) functionality.
In addition, L.I.S. includes a proprietary "M-Play" (Multimedia Remote
Controller) program, used to display the multimedia information.
• M-Play
• Visualization: M-Play displays playing information and a graphic
analyzer while using Winamp or Windows Media Player.
• PC sound: M-Play displays a graphic analyzer to accompany the
sound.
• System Information
• L.I.S supports CPU Hyper-Threading and displays hardware and
usage information for the CPU/RAM/HDD.
• The L.I.S indicator displays software information related to OS,
Network, and Direct X and displays various data through MBM
(Motherboard Monitoring).
• Facility function
• POP3 mail checking: As new mail arrives, it is indicated on the
display panel.
• Message alarm: On the corresponding date, the indicator will display
a reminder for an appointment or obligation by displaying the
message or playing a sound file.
LCD
- Liquid Crystal Display
- Blue Negative type
- 5 x 8 Dot's
- HD44780 Compatible
- Character type
- 20 x 2 Size
VFD
- Vacuum Fluorescent Display
- 5 x 8 Dot's
- HD44780 Compatible
- Character type
- 20 x 2 Size
Cable
L.I.S 2: USB Cable (Internal 1ea,
External 1ea)
Input Voltage
DC 5V - DC 12V
Dimensions
149.30(W) × 42.50(H) × 8.00(D) mm
Precautions
Before using L.I.S. 2 please review the following precautions:
• Turn off the computer while installing the L.I.S. indicator. Also, do not
unplug the serial cable while L.I.S. is running. Doing so may damage the
system.
• The red, green, and blue jumpers on the controller manage the LCD
brightness. Please do not change any settings.
• When using the fan controller, do not exceed more than 10W (12V, 0.83A)
on each channel. Doing so may cause damage to the system. In addition,
setting the fans too low can cause serious damage to the system.
21
AVDINPC
Navigating the Control Center
•
•
To see the extracted menu, hover the mouse pointer over the control center
icon, located on the task bar, and right-click. The “Lost in Space” menu
(Figure 19) appears.
•
•
•
Winamp: Display the graphic analyzer through the Winamp plug-in.
WMPlayer: Display the graphic analyzer screen through the Windows
Media Player plug-in.
OS/System: Display system and O/S information.
E-mail: Check user-defined POP3 E-mail accounts.
Exit: Close the L.I.S. Control Center.
NOTE: After altering settings, you must click "Section Save" to save the
settings.
Module Setup
You can assign the LCD/ VFD module size, the USB/Com port, and change
the Starting and Ending Messages through the Module Setup window shown
in Figure 20.
Figure 19: L.I.S. Extracted Menu
•
•
•
•
•
•
•
•
•
•
•
About: View program version information.
Skins: Apply different skins (overall appearance) to your L.I.S. Control
Center window.
Preferences: Set up hardware devices and the start/ending message.
Access the CG Logo Builder program.
Auto Update: Perform an automatic program update via the internet.
Auto User: Organize items according to priority.
Fan Controller: Adjust the speed of your fan.
Message Alarm: Set the message alarm.
Time: Display the current time and date.
R.T.Clock: Watch the CPU's running clock.
CPU/ RAM: Display CPU information and resource usage.
MBM: Set the following expressions for MBM.
• User Set
• Temperatures
• Voltages
• Fans RPM
Figure 20: Module Setup Window
•
•
•
•
22
LCD/VFD Selection Size: Assign the LCD/ VFD module size.
Communication Info: After installing L.I.S. 2, COM ports are automatically
detected. However, POP accounts must be set up manually. In most
cases this will not be necessary.
User Message Setup: Customize starting/ ending messages.
Skin: View the path for the current skin.
AVDINPC
Auto User
A.F.C (Fan Controller)
Use this feature to order items according to priority, control each display
interval per second, and modify the information that appears in the Control
Center window.
The user can control each 4-Channel fan with the L.I.S Control Center.
Figure 22: A.F.C. (Fan Control) Window
To specify A.F.C. User Control:
1. Click the plus (+) sign to the left of A.F.C. (Fan Controller) to view the
A.F.C. Action option.
Figure 21: Auto User Window
To add a new item:
1. Click the Add button. A new “untitled” item appears at the bottom of the
list.
2. Click the “A.F.C. Action” link to view the “Fan Controller Action” settings.
The basic settings are as follows:
2. Select the feature from the “Auto User Builder” drop-down list that you
would like to customize. The previously untitled item will now reflect the
name of the chosen function.
•
CPU Usage: This A.F.C (Fan Controller) operates only at the
specified setting.
• Basic User Set: User can control the fan speed by moving the slide
bar manually.
CPU uses: This control fan speed based on CPU usage.
Basic User Set: User can set the fan speed manually. Please keep in mind
that the fans at an excessively low level cause to damage to your system or
unstable condition. This setting is different from Direct Fan Mode.
3. Adjust the “Delay (sec)” using the up/down arrows to the right of the field.
4. Enter text or parameters in the two Line Text fields.
5. Click the Section Save button to save your settings.
You can change the precedence of the items in the list by selecting the item
you want to move then clicking the Top (up) or Bottom (down) buttons. The
precedence is important when two programs that utilize the same resources
are playing at once. For example, if Winamp and Windows Media Player are
playing simultaneously, the graphic analyzer will display information for the
program that has the higher precedence.
To delete an item, click to select the item, then click the Del button.
Message Alarm
You can set up to three different alarms to display a message and play a
specific sound at an appointed date and time.
23
AVDINPC
Figure 24: Time Window
Figure 23: Message Alarm
Display Time & Date Selection: Choose from three possible display formats.
Display Text: Modify the text that appears before the Date/Time and change
the horizontal alignment.
To set a message alarm:
1. Select the date that you want the alarm to go off.
2. Select the hour and minute of the day.
R.T. Clock
3. Enter up to two lines of text to display when the alarm sounds. To select a
sound file, click the Search button and browse to locate the desired file.
The R.T. Clock displays the CPU's clock in real time down to the second
decimal.
4. Under “Setup”, select to play the alarm one time or every day.
5. Click the Section Save button to save your settings.
Time
Use the “Time” window (Figure 24) to control how the current date and time
that is displayed on the L.I.S. screen.
Figure 25: RT Clock Window
24
AVDINPC
In this screen (Figure 25), you can adjust the Refresh time from 1-10 and
customize the display text.
Cpu/Ram
The Cpu/Ram option shows the usage rate of the CPU and Memory (see
Figure 26).
Figure 27: MBM (Motherboard Monitor) Window
The user can specify the type of data he wants received from the MBM. If the
MBM is installed properly, the voltage and temperature will be displayed on
the L.I.S screen.
Winamp
Figure 26: Cpu/Ram Window
When Winamp is playing, L.I.S. 2 will display a graphic analyzer on the L.I.S
screens if the Winamp plug-in is installed. L.I.S. 2 supports Winamp versions
2.x and 5.x.
Visualization Plug-in display Time: Select the type of analyzer that you want
displayed on the L.I.S. screen from the options below.
• 1Line ST Bar
• 2Line ST Bar
• 3Line ST Bar
• 4Line ST Bar
MBM
When used with a MBM (Motherboard Monitor) program, this option shows
the MBM's shared data (see Figure 27). The A.F.C. can control the fan
automatically with this feature.
Manual Plug-in Installation
1. The LIS_Vis_Winamp204.dll is found in the plug-in folder (C:\Program
Files\L.I.SControlCenter\Plugins). Copy the plug-in to the following folder:
(C:\Program Files\Winamp\Plugins).
2. From the Winamp menu, select Options > Preferences. (You can also
right-click inside the Winamp program and select Visualization > Select
25
AVDINPC
If you want the graphic analyzer to be displayed on the L.I.S screen
automatically when Windows Media Player is sensed, please refer to “Auto
User” on page 23.
To add the visualization plug-in for Windows Media Player, perform the
following steps:
1. Open Windows Media Player
plug-in from the pop-up menu.) The “Winamp Preferences” window
appears.
2. Select Tools > Options from the menu.
3. In the Options window, click the Visualizations tab.
4. Click the Add button to browse for the plugin.
5. Select the “LIS_Vis_WMP X.xx.dll” file from the Control Center “Plugins”
folder.
6. Click the OK button.
To activate the new plugin, select View > Visualizations > L.I.S. Control
Center WMP Vis V#.## > L.I.S. Spectrum Analyzer - 2Line. If the L.I.S plug-in
is installed properly, Windows Media Player displays the graphic analyzer
shown in Figure 30.
Figure 28: Winamp Preferences Window
3. Click “Visualization” under “Plug-ins”.
4. Click to select the “L.I.S. Control Center Visualization Plug-in V2.04” from
the “Visualization Plug-ins” box.
5. Click the Start button to activate the plug-in.
If the L.I.S plug-in is installed properly, Winamp displays the graphic analyzer
shown in Figure 29.
Figure 29: Winamp L.I.S. Graphic Analyzer
WMPlayer
Figure 30: Windows Media Player L.I.S. Graphic Analyzer Plugin
When Windows Media Player is playing, L.I.S. 2 will display a graphic
analyzer on the L.I.S screen if the Windows Media Player plug-in is installed.
26
AVDINPC
OS/System
Use the OS/System feature to select information on the operating system and
related systems.
Figure 32: L.I.S. e-Mail Window
•
Figure 31: OS/System Window
Select any relevant information by checking the boxes for desired items.
To adjust the display time, use the navigation bar on the right side of the
window to scroll to the bottom of the window until “Display Time Set” appears.
Drag the button on the bar to adjust the time.
•
e-Mail
L.I.S. informs you of newly arrived mail by checking every designated POP3
mail account. When new mail is detected, there is a performance program
and sound file.
Set Mode: Set the performance mode.
• Applications: User must click “e-mail” on the control center or press
"Ctrl + Alt + Z".
• Background: User assigns the POP3 mail accounts that are to be
periodically checked.
• Always Off: No e-mail checking.
New Mail Check:
• New Mail after Running Mail Program: A program file is assigned
here, to be run when new mail is detected.
• Mail Check Interval: Adjust interval from 1-180 minutes. Add a sound
file to be played when new mail is detected.
CG Logo File Builder
CG Logo File Builder allows you to create a custom logo or symbol for display
in the L.I.S. Control Panel. To access the CG Logo File Builder program, click
the CG Logo File Builder button at the top of the “Preferences” window.
27
AVDINPC
Figure 33: CG Logo File Builder Window
You can design a custom logo or symbol by clicking inside the squares to
create an image. The result is displayed in the “Display View Box” at the
bottom of the screen (see Figure 33).
28
AVDINPC
PLAYNOW!
Setting PlayNow! to Automatically Load
During boot-up, hit the DEL key to enter the BIOS setup menu. Once in the
setup menu, select the etBIOS Configuration submenu. Set [Boot from
etBIOS] to [Enabled]. Now, PlayNow! will be launched every time the PC turns
on or reboots. To bypass PlayNow! under this configuration, hold down the
Scroll Lock key during boot-up to load the next available boot device instead.
Main Screen
After PlayNow! is launched, the main screen will appear on the screen (). On
the right side of the screen, there are five available options: CD/MP3, VCD,
DVD, TV Tuner and Power. The functionality of each option is explained on
the diagram below. Depending on the BIOS, the main screen may also
contain a Continue to boot option that allows PlayNow! to exit and boot-up to
the next boot device.
29
AVDINPC
TROUBLESHOOTING
30
AVDINPC
SPECIFICATIONS
Back Panel I/O:
• 1 PS2 mouse port
• 1 PS2 keyboard port
• 1 Parallel port
• 1 RJ-45 LAN port
• 1 Serial port
• 2 USB 2.0 ports
• 1 VGA port
• 1 RCA port (SPDIF or TV out)
• 1 S-Video port
• 3 Audio jacks: line-out, line-in and mic-in; can be switched to 6 channel output
BIOS: PlayNow!, 4Mbit flash memory
CEA Power Ratings
Power Output: 18 watts RMS X 4 channels into 4-ohms @ < 1% THD+N
Signal to Noise Ratio: 70dBA below reference. (Reference: 1 watt, 4-ohms)
Dynamic Power: 88 watts @ 4-ohms, all channels driven
Frequency Response: 20Hz to 20kHz (-3dB), Audio/Video input used as source reference
Reference Supply Voltage: 14.4VDC
DVD/CD Player
Compatible formats: DVD-R, DVD-RW, CD-R, CD-RW, CDDA, MP3, SVCD and VCD
Signal to Noise Ratio: >90dBA
Frequency Response: 20Hz to 20kHz, -3dB
Channel Separation: > 60dB @ 1kHz
D/A Converter: 1 bit
PlayNow!
Video: Supports DVD (MPEG-2), Supports VCD version 2.0 format (MPEG-1)
Audio: Supports A/52 audio decoding, Supports MPEG-2 audio and LPCM (Linear Pulse Code
Modulation) decoding.
Navigational Support: Play bar slider control allows instantaneous access to any scene.
• Fast forward speeds of 2X, 4X, 8X (16X and 32X for VCD).
• Fast backward speeds of 2X, 4X, 8X (16X and 32X for VCD).
DVD Support:
• Supports up to 32 different subtitles.
• Supports up to 8 different languages (audio tracks).
• Supports up to 9 viewing angles.
• Supports both seamless and non-seamless camera angles.
• Supports "Menu" and "Resume".
Video
Format: NTSC
Output: 1Vp-p (75-ohm)
Input: 1Vp-p (75-ohm)
Power Management
Power Input: 12V DC
Power Filter : Power sequencing and strict 12V regulation functions for automotive
systems(Automatic power controlled by Car Key On/Off)
General
Audio input impedance: 10k
Power Input: 12V DC
Power Filter : Power sequencing and strict 12V regulation functions for automotive
systems(Automatic power controlled by Car Key On/Off)
Fuse: 10 amp, ATO type
DIN chassis dimensions: 176mm (W) x 50mm (H) x 200mm (D)
* Specifications subject to change without notice.
PC
Processor: VIA C3 1GHz with Fan
Chipset: VIA CLE266 North Bridge, VT8235 South Bridge
System Memory: 1 DDR266 DIMM socket, 512MB
HDD: 2.5" Slim 40GB HDD, Fujitsu
DVD-ROM: One ATAPI interface for slot-in DVD-ROM (Brand : TEAC)
LCD/VFD Module:
• 20x2 Line Characteristic display and Graphic Bar Equalizer functions
• Serial Communication with COM2 on extension port
• Maximum distance : 15M
• Signal Reception Angle : 45° angle in all directions or narrower
Dedicated remote controller: 43 key buttons and 1 joystick (16 directional Mouse Control),
205x50x40(mm), 160g
VGA: Integrated VIA Unichrome AGP graphics with MPEG-2 Accelerator
Onboard IDE: 2 X UltraDMA 133/100/66 Connector
Onboard LAN: VIA VT6103 10/100 Base-T Ethernet PHY
Onboard Audio: VIA VT1616 6 channel AC'97 Codec
Onboard TV Out: VIA VT1622 TV out
Onboard I/O Connectors:
• 1 USB connector in front side (Right) for 2 additional USB 2.0 ports in rear
• Front-panel audio connector in front side (Left : Line Out)
• Serial port connector for second com port
31
AVDINPC
12-MONTH LIMITED WARRANTY
U.S.A: Audiovox Corporation, 150 Marcus Blvd., Hauppauge, NY 11788, 1800-645-4994
CANADA: Call 1-800-645-4994 for location of warranty station serving your
area.
AUDIOVOX CORPORATION (the Company) warrants to the original retail
purchaser of this product that should this product or any part thereof, under
normal use and conditions, be proven defective in material or workmanship
within 12 months from the date of original purchase, such defect(s) will be
repaired or replaced with new or reconditioned product (at the Company's
option) without charge for parts and repair labor. To obtain repair or
replacement within the terms of this Warranty, the product is to be delivered
with proof of warranty coverage (e.g. dated bill of sale), specification of
defect(s), transportation prepaid, to the warranty center at the address shown
below.
This Warranty does not extend to the elimination of car static or motor noise,
to correction of antenna problems, to costs incurred for installation, removal,
or reinstallation of the product, or damage to tapes, compact discs,
accessories or vehicle electrical systems. This Warranty does not apply to
any product or part thereof which, in the opinion of the Company, has suffered
or been damaged through alteration, improper installation, mishandling,
misuse, neglect, accident, or by removal or defacement of the factory serial
number/bar code label(s) or markings. THE EXTENT OF THE COMPANY'S
LIABILITY UNDER THIS WARRANTY IS LIMITED TO THE REPAIR OR
REPLACEMENT PROVIDED ABOVE AND, IN NO EVENT, SHALL THE
COMPANY'S LIABILITY EXCEED THE PURCHASE PRICE PAID BY
PURCHASER FOR THE PRODUCT.
This Warranty is in lieu of all other express warranties or liabilities. ANY
IMPLIED WARRANTIES, INCLUDING ANY IMPLIED WARRANTY OF
MERCHANTABILITY, SHALL BE LIMITED TO THE DURATION OF THIS
WRITTEN WARRANTY. ANY ACTION FOR BREACH OF ANY WARRANTY
HEREUNDER INCLUDING ANY IMPLIED WARRANTY OF
MERCHANTABILITY MUST BE BROUGHT WITHIN A PERIOD OF 30
MONTHS FROM DATE OF ORIGINAL PURCHASE. IN NO CASE SHALL
THE COMPANY BE LIABLE FOR ANY CONSEQUENTIAL OR INCIDENTAL
DAMAGES FOR BREACH OF THIS OR ANY OTHER WARRANTY,
EXPRESS OR IMPLIED, WHATSOEVER. No person or representative is
authorized to assume for the Company any liability other than expressed
herein in connection with the sale of this product.
Some states do not allow limitations on how long an implied warranty lasts or
the exclusion or limitation of incidental or consequential damage so the above
limitations or exclusions may not apply to you. This Warranty gives you
specific legal rights and you may also have other rights which vary from state
to state.
32