1
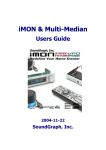
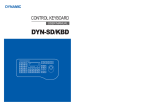
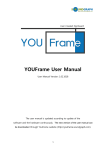
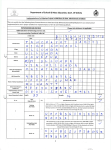
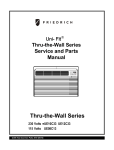
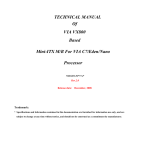
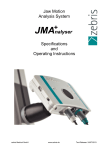
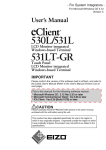
iMON & Multi-Median
Users Guide
SoundGraph, Inc.
Table of Contents
In your Package
4
1. iMON MM
4
2. iMON MM PLUS
4
3. iMON Inside
4
4. iMON Inside PLUS
4
S/W, H/W Installation and Remote Controller
5
1. Installation Process
5
1) S/W Installation
5
2) H/W (IR Receiver) Installation
5
3) Execute iMON Manager
7
2. Button Layout and its Feature of iMON Remote Controller
8
1) iMON MM Remote Controller
8
2) iMON RSC Remote Controller
12
Multi-Median Users Guide
18
1. Screen Layout of ‘Multi-Median’
18
1) Main View
18
2) Hard Disk Drive
19
3) Media Folder View
20
4) Media File View
20
5) Media Preview
21
6) Full Screen View
22
7) DVD View
22
8) TV View
22
9) Digital Camcoder View
22
2. Using Remote Controller on Multi-Median
23
3. Using Mouse on Multi-Median
25
4. Setting Environment
26
1) Back
26
2) Scan Media
26
3) Music
26
4) Movie
26
5) Photo
27
6) TV
27
-2-
7) DVD
27
8) Digital Camcoder
27
5. Installation of Video Codec
27
iMON Users Guide
29
1. Using Application Launcher
29
2. Using Task Switcher
29
3. Application Control
30
4. Using All Time Control Mode
30
5. Using Monitor Resolution Changer
31
6. Using Timer
31
7. Using Virtual Kyboard
32
8. Register New Remote Controller
33
9. Setting Program Command
33
10. Setting Windows Command
34
11. Setting Customized Windows Command
34
12. Setting Macro
35
13. Setting Option
35
Update of iMON & Multi-Median
37
SoundGraph, Inc.
38
-3-
In your Package
iMON product lineup is divided into four different models according to
the remote controller and IR receiver. Each product is composed as
like follows. Please check the components on the below in your box.
1. iMON MM
In the Box : 1 iMON MM Remote Controller, 1 iMON Station (External IR Receiver), 1 Installation
CD (iMON Manager, Multi-Median), 2 AAA Batteries, 1 Users Guide
2. iMON MM PLUS
In the Box : 1 iMON RSC Remote Controller, 1 iMON Station (External IR Receiver), 1
Installation CD (iMON Manager, Multi-Median), 2 AAA Batteries, 1 Users Guide
3. iMON Inside
In the Box : 1 iMON MM Remote Controller, 1 iMON Station inside (Interanl IR Receiver), 1
Installation CD (iMON Manager, Multi-Median), 2 AAA Batteries, 1 Users Guide
4. iMON Inside PLUS
-4-
In the Box : 1 iMON RSC Remote Controller, 1 iMON Station inside (Interanl IR Receiver), 1
Installation CD (iMON Manager, Multi-Median), 2 AAA Batteries, 1 Users Guide
S/W, H/W Installation
and Remote Controller
Please read this users guide before the installation of your iMON
Station (IR Receiver).
1. Installation Process
1) S/W Installation
Insert iMON&Multi-Median Installation CD to your CD ROM, and install the iMON Manager and
Multi-Median according to the auto running S/W installation process.
2) H/W (IR Receiver) Installation
① External iMON Station Installation
Connect your External iMON Station to your USB port, then assign the H/W driver according to
the ‘Found New H/W Wizard’. Assign the CD ROM drive for searching H/W driver.
② Internal iMON Station Installation
Internal iMON Station can be loaded to the 3.5” floppy drive bay. The additional feature of
internal type iMON Station is that you could power on your PC system using the power button
of the remote controller. After turn off your PC system, open your PC case and connect the
cable to its proper pin refer to the following picture.
-5-
Internal iMON Station is connected to mainboard with two cables, PC case with one cable,
Power Supply with one another cable. You should be careful to connect these four cables refer
to your mainboard manual. The connectors that each cable needs to be connected are as like
follows.
-6-
1. Stand-By Power Connection Cable
A1 : (2pin, iMON Inside ‘ST PWR1’
A2 : (2pin, Mainboard power extension cable)
connector)
2. Mainboard Power Switch Connection Cable
B1 : (2pin, iMON Inside ‘M/B PWR’
B2 : (2pin, Mainboard power switch
connector)
connector)
3. PC Case Power Switch Connection Cable
C1 : (2pin, iMON Inside ‘PWR S/W’
C2 : (2pin, PC Case power switch connector)
connector)
4. Mainboard USB Connection Cable
D1 : (5pin, iMON Inside USB connector)
D2 : (4pin, Mainboard USB internal connector)
The names of the additional USB port pins on the mainboard manual are different with the
manufacturer. Please refer to the following table to connect the USB cable.
Line Color
Additional USB Port Pin Name
RED
VCC, POWER, USBPOWER
WHITE
D-, DATA-, USBP#-, UP#-, P#-
GREEN
D+, DATA+, USBP#+, UP#+, P#+
BALCK
GND, GROUND
After all the connection finished, turn on your system. You may see the ‘Found New H/W
Wizard’ when Windows starts. Assign the CD ROM drive for searching H/W driver like the
external USB iMON station setup process.
3) Execute iMON Manager
After finish the S/W and H/W installation, please execute the iMON Manager using the desktop
iMON icon. Please refer to the iMON Users Guide in order to learn about the various settings
and usage of iMON Manager.
-7-
2. Button Layout and its Feature of iMON Remote
Controller
1) iMON MM Remote Controller
iMON MM (Multi-Median) remote controller is designed in order to use every functions of MultiMedian. The detail features of each button are as like follows.
Power : This button is used to turn on or turn off the PC. You need to push this
button more than 2 seconds in order to turn off the PC.
The Power ON feature is supported on the internal type iMON Station
model, iMON Inside, iMON Inside PLUS only.
App. Exit : This button generates the keyboard short cut, [ALT]+[F4], which is
used for closing the active window.
Num 0~9 : The numeric buttons from 0 to 9 are custom buttons that could be
assigned by users. These buttons act as a shortcut of the media view on the
Multi-Median application as printed like below the button.
-8-
Please refer to the Multi-Median Users Guide in order to learn about
the button usage on the Multi-Median.
Windows : This button brings the start menu and acts like the [Windows logo]
key of the keyboard.
Menu : This button brings the menu and acts like the [menu] key of the
keyboard.
App. Launcher : This button runs the Application Launcher which could execute
many assigned windows applications.
Task Switcher : This button is used for choosing the application among the
current running applications. This feature is similar to the [ALT]+[TAB] keyboard
command.
Multi-Median : This button runs the Multi-Median which is provided with the
iMON Manager. You could enjoy the various media files like DVD, Movie, Music,
Photo and use the multimedia device like TV card, Digital Camcoder, and Digital
Camera.
ESC/Back : This button is used as same like [ESC] key of the keyboard.
Select : This button is used as same like [Spacebar] key of the keyboard.
-9-
Up, Down, Left, Right : These buttons are used as same like four way arrow
keys of the keyboard.
Enter : This button is used as same like [Enter] key of the keyboard.
All Time Control Mode : This button used for the ‘All Time Control Mode’ of the
iMON Manager. Please refer to the iMON Users Guide for the details of the ‘All
Time Control Mode’.
Eject : This button is used to open and close the CD/DVD ROM.
VOL - : This button is used to reduce the PC system volume.
VOL + : This button is used to increase the PC system volume.
MUTE : This button is used to mute the PC system volume.
Play : This button is used to generate ‘Play’ command in the various media
applications.
Pause : This button is used to generate ‘Pause’ command in the various media
applications.
-10-
Prev : This button is used to generate ‘Previous’ command in the various media
applications and also worked as ‘Channel Up’ on the TV related applications.
Next : This button is used to generate ‘Next’ command in the various media
applications and also worked as ‘Channel Down’ on the TV related applications..
Rew : This button is used to generate ‘Rewind’ command in the various media
applications
F.Fwd : This button is used to generate ‘Fast Foward’ command in the various
media applications.
Stop : This button is used to generate ‘Stop’ command in the various media
applications.
Open : This button is used to generate ‘File/Folder Open’ command in the
various media applications.
Rec : This button is used to generate ‘Record’ command in the various media
applications.
Bookmark : This button is used to generate ‘Bookmark’ command in the various
media applications.
Thumbnail : This button is used to generate ‘Thumbnail’ command in the various
media applications.
-11-
Aspect Ratio : This button is used to generate ‘Change the Aspect Ratio’
command in the various media applications.
Menu : This button is used to generate ‘DVD Menu’ command in the DVD
applications.
Caption : This button is used to generate ‘Change the Caption/Subtitle’
command in the DVD applications.
Language : This button is used to generate ‘Change the Language/Audio’
command in the DVD applications.
Full Screen : This button is used to generate ‘Full Screen’ command in the
various media applications.
2) iMON RSC Remote Controller
iMON RSC (Remote Stick Controller) Remote Controller is designed to control the mouse pointer
in 16 directions using the Joystick of the remote controller. The detail features of each button
are as like follows.
-12-
Power : This button is used to turn on or turn off the PC. You need to push this
button more than 2 seconds in order to turn off the PC.
The Power ON feature is supported on the internal type iMON Station
model, iMON Inside, iMON Inside PLUS only.
App. Exit : This button generates the keyboard short cut, [ALT]+[F4], which is
used for closing the active window.
Screen Saver : This button runs the screen saver instantly.
Timer : This button runs the timer setup screen of the iMON manager. This
timer feature could turn off the PC or set the alarm assigned by timer setup.
Num 0~9 : The numeric buttons from 0 to 9 are custom buttons that could be
assigned by users. These buttons act as a shortcut of the media view on the
Multi-Median application as printed like below the button.
Please refer to the Multi-Median Users Guide in order to learn about
the button usage on the Multi-Median.
Desktop : This button toggles ‘show desktop/restore all’. This button has the
same function as the keyboard shortcut [Windows Logo] +[D].
-13-
Max/Res : This button toggles ‘maximize/restore’ the active window.
ESC : This button is used as same like [ESC] key of the keyboard.
Windows : This button brings the start menu and acts like the [Windows logo]
key of the keyboard.
Menu : This button brings the menu and acts like the [menu] key of the
keyboard.
App. Launcher : This button runs the Application Launcher which could execute
many assigned windows applications.
Multi-Median : This button runs the Multi-Median which is provided with the
iMON Manager. You could enjoy the various media files like DVD, Movie, Music,
Photo and use the multimedia device like TV card, Digital Camcoder, and Digital
Camera.
Task Switcher : This button is used for choosing the application among the
current running applications. This feature is similar to the [ALT]+[TAB] keyboard
command.
Backspace : This button is used as same like [Backspace] key of the keyboard.
Space (Select) : This button is used as same like [Space] key of the keyboard.
And this button is used for select the media folder and file in the Multi-Median
application.
-14-
Shift+Tab : This button is used as same like [Shift]+[TAB] key of the keyboard.
Tab : This button is used as same like [TAB] key of the keyboard.
Mouse/Keyboard : This button is used to toggle the ‘Joystick’ operation mode of
iMON RSC. This button could toggles the mode of the Joystick between Mouse
mode and Keyboard mode. The following two states show the each mode,
mouse and keyboard.
The mouse icon in the iMON Indicator on the screen means that you could use
Joystick as a mouse. You could move the mouse pointer using the Joystick lever
and you could get the [double click] action when you push the Joystick.
The keyboard icon in the iMON Indicator on the screen means that you could
use Joystick as four way arrow keys of the keyboard. You could get the [Enter]
key command when you push the Joystick.
L. Click : This button is used as same like [Left Click] button of the mouse.
R. Click : This button is used as same like [Right Click] button of the mouse.
Drag&Drop : This button has same function as the [Drag and Drop] function of
a mouse. Push this button at the position to start drag and move to the wanted
position using the Joystick, and then push again to drop, then you could get the
same result as like mouse [drag&drop].
Joystick : (mouse mode) This button controls a mouse cursor by moving Joystick
and [double-click] of mouse by pressing Joystick knob like a button.
(Keyboard mode) This button acts like same function as four way keyboard
arrow keys by moving stick and same function as [Enter] key by pressing
-15-
Joystick knob like a button.
MUTE : This button is used to mute the PC system volume.
VOL - : This button is used to reduce the PC system volume.
VOL + : This button is used to increase the PC system volume.
Play : This button is used to generate ‘Play’ command in the various media
applications.
Pause : This button is used to generate ‘Pause’ command in the various media
applications.
Open : This button is used to generate ‘File/Folder Open’ command in the
various media applications.
Prev : This button is used to generate ‘Previous’ command in the various media
applications and also worked as ‘Channel Up’ on the TV related applications.
Next : This button is used to generate ‘Next’ command in the various media
applications and also worked as ‘Channel Down’ on the TV related applications.
-16-
Stop : This button is used to generate ‘Stop’ command in the various media
applications.
Rew : This button is used to generate ‘Rewind’ command in the various media
applications
F.Fwd : This button is used to generate ‘Fast Foward’ command in the various
media applications.
Full Screen : This button is used to generate ‘Full Screen’ command in the
various media applications.
-17-
Multi-Median Users Guide
Multi-Median is designed to enjoy the media files like Music, Movie, Photo and use the
multimedia device like DVD, TV, Digital Camcoder and Digital Camera using only remote
controller. It is easier and more convenient to read this Users Guide before using the MultiMedian.
1. Screen Layout of Multi-Median
1) Main View
Run the Multi-Median using the ‘Multi-Median’ button of the iMON MM or iMON RSC remote
controller, you could see the main view of Multi-Median as like below picture. The icons on the
menu bar located on the upper side of the main view show the each devices and functions as
like below. Select the icon using the arrow key of the remote controller, and execute it using the
‘Enter’ button of the remote controller. The detail functions of icons are as like follows.
? Hard Disk Drive : You could enjoy the Music, Movie, Photo saved on the HDD using this icon.
? CD/DVD : You could enjoy the Music, Movie, Photo saved on the CD or watching the DVD
movie using this icon.
? TV : You could see and record the TV channels through the TV card in your PC. Multi-Median
could support the most of analog TV cards. Before watching the TV channel, you should select
the TV card in your PC.
The detail description about this TV feature, please refer to the
‘Setting Environment’. Time Shift and PVR feature would be upgraded on the next
update version.
-18-
? Digital Camcoder : Multi-Median supports the DV Digital Camcoder which is connected
through the IEEE1394 port of PC. You could control your camcoder using the iMON remote
controller and record the video clips of the camcoder. Recording feature would be
upgraded on the next update version.
? Setting : You could customize the Multi-Median through setting menu. Please refer to the
‘Setting Environment’ for detail description.
? Exit : You can go back to Windows.
2) Hard Disk Drive
If you select the ‘Hard Disk Drive’ icon, Multi-Median scans the media files, and shows the
media types that you could choose. The functions of each icon are as like follows.
? My Music : This icon leads to the Music files scanned on your hard disk drive. The supported
music files are MP3, WMA, OGG and WAV. Please refer to the ‘Setting Environment’ in order
to learn the details of scanning folders and file types.
? My Movie : This icon leads to the Movie, Video files scanned on your hard disk drive. The
supported movie files are WMV, AVI, ASF, MPG, MPEG, M1V, MP2 and DAT. Please refer to the
‘Setting Environment’ in order to learn the details of scanning folders and file types.
? My Photo : This icon leads to the Photo files scanned on your hard disk drive. The supported
photo files are BMP, GIF, JPG, TIFF and PNG. Please refer to the ‘Setting Environment’ in
order to learn the details of scanning folders and file types.
? Rescan : You can rescan the folder that you set as a scan folder. If you download the media
files from network or change the scan folder, you could update your media database using this
icon. Please select the scan folder that has the media files, if you choose a root folder (like my
computer) as a scan folder, it will take so much time to scan.
-19-
3) Media Folder View
If you choose the type of media like ‘My Music’, ‘My Movie’, ‘My Photo’, the media folder view
will be appeared. In the case of ‘My Movie’ and ‘My Photo’, you could see the folders that
contain the media files, you can group this folder view as folder. IN the case of ‘My Music’, you
can assign ‘Artist’, ‘Genre’ and ‘Album’ as a media group. The below icons show the status of the
media folder.
The number on the right up side of the folder image shows the number
of the media files that this folder contains. The check mark on the left
up side shows the status that all the media files in the folder are added
to the current playlist. The three different folder images show the each
status of the media files in the folder, these are ‘all media files are
added to the current playlist’, ‘some media files are added to the current
playlist’ and ‘media files are not added to the current playlist’.
? Current Select Folder
The left folder icon which has green outline means that this folder is
now selected. If you push the ‘Enter’ button of the remote controller,
you can move to the media file view.
? Current Playing Folder
The left folder icon which has red outline means that this folder is now
playing. If you open this folder, you could see the red outlined media file
which is now playing.
4) Media File View
-20-
If you enter to the ‘Media File View’from ‘Media Folder View’, you may see the following screen.
There is a difference in the ‘My Music View’ and the other views as like follows.
You can enter to the ‘Media Preview’ from ‘Media File View’ after selecting the media file that
you want.
5) Media Preview
Media Preview shows the information of the current playing media file. Media preview screen is
composed of ‘Title Bar’ displays the title of the current media, ‘State Bar’ displays the sequence
number in the playlist with current playing time, and the preview screen.
-21-
6) Full Screen View
Full Screen View shows the current playing media file on the full screen. If you want to see the
detail information about the current playing media file, you may go back to the media preview
or call the control panel using the ‘0, panel’ button on the remote controller.
7) DVD View
DVD View is similar to the Movie View. You can configure the DVD setting in the DVD menu
screen, then see the DVD movie on the full screen, just push the ‘Enter’ button on the remote
controller.
8) TV View
In order to see the TV using Multi-Median, firstly you need to select the TV card you have in the
setup menu. Please see details about the setup of TV card on the ‘Setting Environment’. TV
View is also similar to the Movie View. TV Channels are shown as like the media files in the
Media File View. You can watch the TV channel that you want using the ‘Enter’ button on the
remote controller. If you see the TV channel on the full screen, you can input the channel
number using the number buttons of the remote controller.
9) Digital Camcoder View
Digital Camcoder View supports all the digital camcoder devices which could be connected to
IEEE1394 port of the PC using the DV format. You can see the current screen of the digital
camcoder or you can control the digital camcoder using the remote controller on the playback
mode of the digital camcoder. You can enjoy the video that is recorded on your digital camcoder
or record the video as a movie file to your HDD using the ‘Play’, ‘Pause’, ‘Fast Forward’, ‘Rewind’
-22-
and ‘Rec’ button of the remote controller. The recording feature of Digital Camcoder
would be supported on the future update.
2. Using Remote Controller on the Multi-Median
Multi-Median could be controlled by iMON MM or iMON RSC remote controller. Especially, iMON
MM supports the special features of Multi-Median, so you can have more control power on
Multi-Median using iMON MM remote controller. Please refer to the remote controller button
usage on the below.
1) Up, Down, Left, Right buttons
These buttons are used for moving the focus on the Multi-Median. After moving the focus, then
you could select the icon that you want.
2) Enter button
‘Enter’ button is used to enter to the next view on the Multi-Median. After moving the focus to
the icon and folder that you want, push the ‘Enter’ button to enter to the next step.
3) Backspace button (‘ESC/Back button on the iMON MM remote controller)
‘Backspace’ button is used to go back to the previous view of the Multi-Median.
4) Select button
‘Select’ button is used to add or remove the media file to the current playlist in the Media
Folder/File View. Actually, this is not to delete the media file, but just exclude the file from the
playlist, so you can add the media file again to the playlist at any time you want.
5) Play button
‘Play’ button is used to ‘Play’ the media file. You can play the media file on the media preview if
you enter from the media file view using the ‘Enter’ button. You can use this button on the TV
view as a ‘Play’ command when you use the Time Shift feature. Time shift feature will be
updated in the next update.
6) Pause button
‘Pause’ button is used to make ‘pause’ the current playing media. You can use this button on TV
view as a ‘pause’ command when you use the Time Shift feature. Time shift feature will be
updated in the next update.
7) Prev. (CH-) button
“Prev.(CH-)’ button is used to make ‘previous’ command. This button is used to as ‘Channel
Down’ command at the TV view.
8) ‘Next (CH+) button
‘Next(CH+)’ button is used to make ‘next’. This button is used to as ‘Channel Up’ command at
-23-
the TV view.
9) Rew button
‘Rew’ button is used to make ‘rewind’ command.
10) F.FWD button
‘F.FWD’ button is used to make ‘fast forward’ command.
11) Stop button
‘Stop’ button is used to make ‘stop’ command.
12) Open button
‘Open’ button is used to make ‘open’ command for the CD/DVD Rom.
13) REC button
‘REC’ button is used to make ‘record’ command at TV and Digital Camcoder view. You can
choose the Codec for recording and other recording properties through the setting.
14) Bookmark button
‘’Bookmark’ button could set current position of the movie as a bookmark like DVD chapter. If
you push the ‘Bookmark’ button during the watching movie, the current position would be
recorded as a bookmark.
15) Thumbnail button
‘Thumbnail’ button captures the still image from the Movie and TV, then save the captured
image as thumbnail of the Movie and TV channel.
16) Aspect Ratio button
‘Aspect Ratio’ button changes the aspect ratio of the Movie and TV. In the case of Movie,
thereare four different aspect ratio options, normal, TV(4:3), HDTV(16:9), Screen1(1.85:1) and
Screen2(2.35:1). In the case of TV, you can choose the aspect ratio between TV and HDTV
aspect ratio.
17) Menu (DVD)
‘Menu’ button works on the DVD view and has a function that goes to the menu of the DVD title.
18) Caption (DVD)
‘Caption’ button works on the DVD view and has a function that changes the caption (subtitle).
19) Language (DVD)
‘Language’ button works on the DVD view and has a function that changes the language
(audio).
20) Full Screen (DVD)
‘Full Screen’ button works on the every media view and has a function to go to the full screen
mode directly.
21) Number 1 button (My Music)
‘Number 1’ button changes the current media to My Music.
-24-
22) Number 2 button (My Movie)
‘Number 2’ button changes the current media to My Movie.
23) Number 3 button (My Photo)
‘Number 3’ button changes the current media to My Photo.
24) Number 4 button (My DVD)
‘Number 4’ button changes the current media to My DVD.
25) Number 5 button (My Home)
‘Number 5’ button stops the current media and go back to the Main View.
26) Number 6 button (My TV)
‘Number 6’ button changes the current media to My TV.
27) Number 7 button (FIND)
‘Number 7’ button is used to search the media file on the current playlist.
28) Number 8 button (Setup)
‘Number 8’ button is used to call the setup view.
29) Number 9 button (Playlist)
‘Number 9’ button is used to call the current playlist.
30) Number 0 button (Panel)
‘Number 0’ button is used to show the control panel (control bar and shortcut bar). You can use
the up, down, left and right button in order to select the control button on the control bar and
shortcut bar.
31) Special feature of Number buttons
In the full screen view of TV, you can use the number button in order to input the channel
number directly. In the ‘Find View’, you can use the number button to enter alphabets.
3. Using Mouse on Multi-Median
Multi-Median could be controlled with mouse, but in order to excute the Multi-Median, you need
an iMON Station which is connected to USB port of your PC through internal or external
connection. If you move the mouse pointer to the upside or downside of the screen, you may
see the control panel (control bar or shortcut bar). All the buttons on the control panel could be
controlled with mouse left click action.
-25-
4. Setting Environment
Multi-Median is designed to change the settings using just remote controller. Please refer to the
followings in order to learn more about the various settings of Multi-Median.
1) Back
The ‘Back’ menu on the list is used to go back to the previous step of the current setting.
2) Scan Media
Multi-Median provides the powerful media database which scans the media files on your PC,
and this media database helps you to select the media file you want without searching through
the explorer one by one. When you execute the Multi-Median for the first time, the default scan
folder sets as ‘My Music’, ‘My Video’ and ‘My Pictures’ folders under ‘My Documents’ folder. You
can change this scan folder setting using the ‘Scan Media’ menu. If you have a TV card in your
PC, you can search your TV card device using this menu. Normally, TV card device is composed
of ‘TV Video Device’ and ‘TV Audio Device’. Please choose the device that you have.
3) Music
You can set many properties of the Music View. First, you can change the background image of
the Multi-Median easily. This changing background image feature is provided on the other
media view like ‘Movie View’, ‘Picture View’, ‘DVD View’ and ‘TV View’ too. Moreover, you can
change the repeat option (Play All, Repeat All, Repeat Folder and Repeat Song) of your music
playlist and turn on the shuffle option. In the case of Music, you can setup the folder view as
‘Album’, ‘Artist’, and ‘Genre’ according to the tag information of MP3 and OGG file.
4) Movie
You can set many properties of the Movie View. You could change the background image of the
Movie view like Music View. Additionally, you can change the ‘Brightness’, ‘Contrast’, ‘Saturation’
-26-
and ‘Hue’ setting. You can also change the ‘Aspect Ratio’, Size, Position, Sync, Font, Color, Bold,
Outline and Shadow properties of the subtitle. Finally, you can remove the bookmark position
that you made and change the repeat and shuffle settings.
5) Photo
You can set many properties of the Photo View. You could change the background image of the
Movie view like the other media view. And you can change the duration of the photo slide show,
setting of the transition effect and the repeat, shuffle settings.
6) TV
You can set many properties of the TV View. You could change the background image of the TV
view like the other media view. And you can choose the ‘Antenna’ and ‘Cable’ for TV input
source, auto channel scanning, screen and aspect ratio settings. For the recording setting, you
can choose the Codec and the folder that your recording files would be stored. Recording
feature of TV will be updated on the next update.
7) DVD
You can set many properties of the DVD View. You could change the background image of the
DVD view like the other media view. Also you can change the ‘Brightness’, ‘Contrast’, ‘Saturation’,
‘Hue’ setting and ‘Aspect Ratio’.
8) Digital Camcoder
You can set many properties of the Digital Camcoder View. You could change the background
image of the Digital Camcoder view like the other media view. For the recording setting, you
can choose the Codec and the folder that your recording files would be stored. Recording
feature of Digital Camcoder will be updated on the next update.
5. Installation of Video Codec
In order to see the various video files which are encoded by different Codecs, you need to
install the appropriate Codec of the video file. You can install the unified Codec package that
installs many different Codecs at one time.
In order to see the Codec information that is installed to your PC, you can see this information
on the property window of the ‘Device Manager -> Sound, video and game controllers -> Video
Codecs’.
-27-
-28-
iMON Users Guide
1. Using Application Launcher
Let’s start Application Launcher. While iMON Manger is running, press the remote controller
button that is assigned for ‘Run Application Launcher’ in Windows Command. The ‘Application
Launcher’ will start as shown in the below picture.
‘Application Launcher’ and ‘Task Switcher’, described in the next chapter, are useful function that
allows you to use your remote controller for basic Windows functions to launch the application
on the Windows and to switch the application by using [ALT]+[TAB] key.
2. Using Task Switcher
Next, let’s start ‘Task Switcher’. This function is similar to ‘[ALT]+[TAB]’ key combination that
you use to activate other window while using another active Windows program. In Windows
command setup, press the button registered in ‘Run Task Switcher’. This window shows the
program icons currently running in the Windows. Use arrow key to select the program to
-29-
activate and press Enter key.
3. Application Control
Now, once you have activated the program that you want using ‘Application Launcher’ and
‘Task Switcher’, you can use your registered remote controller button to control the program.
For example, if you want to control WinAmp, activate WinAmp and send the signal of the
remote
controller.
You
can
easily
use
the
functions
of
WinAmp
such
as
Play/Pause/Stop/Next/Previous/Volume Control. The point you should remind is that the
command that would be performed is different depending on what program is active. Use ‘Task
Switcher’ when you activate the program without mouse or keyboard.
4. Using All Time Control Mode
Basically, iMON Manager can control the S/W that is active. So if you want to control ‘Windows
Media Player’ while ‘WinAMP’ is active, you have to activate ‘Windows Media Player’ first using
‘iMON Task Switcher.
But you can use the “All-Time Control Mode” in order to control the
specific S/W regardless of the current active state of the application. Please refer to the
following in order to learn about the ‘All Time Control Mode’.
1) Assign ‘All Time Control Mode’ function to Remote Controller
In the case of iMON MM, there is a ‘All Time Control Mode’ button is located on the left side of
the down arrow key. But there is no ‘All Time Control Mode’ button on the iMON RSC. You need
to assign the ‘All Time Control Mode’ command to the iMON RSC remote controller.
2) Execute the ‘All Time Control’ Mode
If you push the button assigned to the ‘All Time Control Mode’, you may see the following
picture. The functions of the each screen button are as like follows.
-30-
? All Time Control Mode ON : Use the application shown in the iMON icon as a ‘All Time Control’
mode. You can use the Winamp as ‘All Time Control’ mode in the above picture. If the Winamp
automatically starts, if it does not running before.
? All Time Control Mode OFF : The ‘OFF’ button makes disable the ‘All-Time Control Mode’.
? All Time Control Mode SELECT : Choose the application that you want to control as a ‘All Time
Control Mode’
5. Using Monitor Resolution Changer
iMON could control various Windows system commands. You can run the screensaver directly
and turn off the monitor using your iMON remote controller. One of these useful system
commands, you can change your monitor resolution with remote controller. First, assign
‘Monitor Resolution Changer’ command to the button of your remote controller. If you run the
‘Monitor Resolution Changer’ command using remote controller, you may see the all monitor
resolution list of your monitor. Then, please select the monitor resolution that you want. You
could select the resolution set from the ‘Screen Resolution’ on the option menu of iMON
manager.
6. Using Timer
iMON Manager includes the Timer function that shuts down the PC at the defined time or
sounds alarm after a certain time. There are three modes: Sleep, Alarm, and None. Sleep mode
shuts down the PC after a certain period of time. Alarm mode sounds the alarm after a certain
period of time. And, NONE is use to cancel any timer function that is already set.
Time offers two modes: ABS. and REL. Use ABS to enter a certain time and use REL to enter
-31-
the relative time to the current time. You can also use arrow keys to set the time.
To register the timer, press the timer button on the remote controller and use up/down arrow
button to select MODE/TIME/Hour/Minute, or use Left/Right arrow button to adjust the value of
each item. Then, press the timer button again. The remote input signal indicator changes as
shown below in order to indicate the time that the ‘SLEEP/ALARM’ function will start.
Timer Function On
Timer Function On and All Time Control Mode enabled.
To cancel the timer, press the timer button and select the NONE mode. Then, press the timer
button again.
7. Using Virtual Keyboard
iMON Manager includes the Virtual Keyboard function in order to help you type the alphabet on
your application.
Basically, the character input method is similar in manner to use the mobile
phone dial pad. In order to input the alphabet character that you want, please locate the cursor
on the text input field and execute the “Application Launcher”. And select the “iMON Virtual
Keyboard” on the “Application Launcher”.
There are five different input character sets are pre-defined on the iMON Virtual Keyboard for
your typing. These are ①English Capital letters, ②English Small letters, ③Numbers, ④Special
letters and ⑤words for web surfing. You may input the character as shown on the Virtual
Keyboard using these buttons on the iMON remote controller.
-32-
You may input the characters like above picture, and then return the input characters to the
application using ‘Enter’ button on the highlighted text input window.
8. Register New Remote Controller
If you push the ‘ADD’ button on the iMON Manager, you may see the ‘Adding New Remote
Controller’ window. If you use the iMON remote controller like iMON MM or iMON RSC, please
use the remote controller name as ‘iMON MM’ and ‘iMON RSC’ only. You can use the remote
controller of home appliance like TV, VTR in order to control the PC. You can also register
several remote controllers to iMON Manager and use them.
9. Setting Program Command
You can control many applications which are registered to the ‘Program Command’ setting on
the iMON Manager. Many applications which are installed in your PC would be automatically
registered during the installation process. You can also register the other application that you
want. In order to register the application, you can follow the steps on the below on the Program
CMD of the iMON setup.
1) Register Application
Press ‘Add Program’ button to bring up a list for currently running applications as shown in the
figure below. This function allows you to select the application that you want to register from
the currently running applications. You can register the application that you want without
knowing the exact location of it. If the application is not running, please use the ‘Search by file
name’ in order to search the application.
2) Add Function
If you want to add the function, please click the ‘Add’ button on the Function. The ‘Registration
Wizard for RC buttons’ will be executed automatically.
3) Type the Function Name
Type the name of the function that you want to control using the remote controller.
4) Keyboard Shortcut Setup
Please input the keyboard shortcut that you want, if you want to input the command that has
the keyboard shortcut, ‘Ctrl+P’, type the ‘Ctrl’ key to the first field and type the
‘P’ key to the
second field.
5) Input the Remote Controller Button
Press the remote controller button that you want to assign to the command twice, two red bars
-33-
will be displayed to notice the IR signal assignment.
6) Confirmation
If you finished the remote controller registration, please close the setup window, and confirm
the remote control action on the selected application.
Since iMON Manager compares the button signal from the remote
controller with the currently active application command list to
execute the corresponding function of the application. So you can
share the same remote controller button among different applications.
That is, even though the playback shortcut keys are different on
WinAmp and Windows Media player, you can set the same ‘play’
button for the remote controller to play either of both programs.
10. Setting Windows Command
In the Windows CMD section of iMON setup window, there are three different sections
(Keyboard CMD, Mouse CMD and Power Management CMD) of Windows commands that will
help you to use Windows with remote controller. You can assign various Windows system
commands to remote controller, and use it.
You cannot use the remote controller buttons which are assigned for
Windows commands to the other applications. Therefore, it is
recommended to set up the required functions first depending on the
number of remote controller buttons that you want to use. Please be
sure to set buttons for 'Run application Launcher' and 'Run Task
Switcher' supported by iMON Manager since they are essentially
required for convenient use of iMON.
There is a restriction to set Windows commands in iMON RSC. You are
not able to change the registration of the “Mouse/Keyboard” toggle
button and the Joystick functions, which are UP/DOWN/LEFT/RIGHT
arrow keys, 16 directional mouse movements, [Enter] key, and mouse
[double click] function.
11. Setting Customized Windows Command
You can use the ‘Customized Windows Command’ to the Windows system commands that is not
-34-
prepared to the ‘Windows Command’ setting. The setting of ‘Customized Windows Command’ is
similar to that of ‘Windows Command’.
12. Setting Macro
There is a restriction that you cannot register the keyboard shortcut which is composed of more
than four keyboard keys combination. Normally, most of windows keyboard shortcut is
composed of less than three keys. But if you want to log in to the website, you need a ID and
password, in this case, you can use the Macro function of iMON usefully. You can also register
the command which is composed of mouse button and keyboard keys. The registration of
Macro is little different to the above commands setting of the remote controller. Please follow
the steps on the below in order to register the Macro.
1) Add Macro
Please select the Macro on the iMON setup window, then push the ‘Add’ button to register the
Macro.
2) Input the Macro Name
Please input the Macro name that you want in the ‘Registration Wizard for RC buttons’, then
click the ‘Next’ button.
3) Input the Macro
After input the name of Macro, then click the ‘Next’ button, you may see the setup window of
Macro. You may see also ‘virtual keyboard and mouse too. Please use your mouse and select
the virtual keyboard key and virtual mouse button that you want. After finishing the Macro
input, please click the ‘Next’ button to finish the Macro setup. The next process of Macro setup
is same like ‘Windows CMD’ setup.
13. Setting Option
You can change and set the options. The following is the details about the several option
parameters that iMON provide.
1) ‘All Time Control Mode’
You can choose the application that you want to use as an ‘All Time Control Mode’. This option
has a same function like push the ‘All Time Control Mode’ button on the remote controller.
2) iMON Indicator on the Desktop
You can assign the display way of iMON indicator on the desktop. The following is the various
-35-
states of iMON indicator that shows you the several informations.
Normal iMON Indicator
Registered IR Signal is detected
Not Registered IR Signal is detected
Shows the System Volume
Shows the System Volume Mute
Shows the usage of iMON RSC Joystick as a Mouse
Shows the usage of iMON RSC Joystick as a Keyboard
3) Adding Sound Effect
This option is the function that let you know the IR signal reception from the iMON Station. You
can set the sound or turn off the sound of IR signal reception.
4) Mouse
You can change the maximum speed and the rising time of mouse pointer movement on the
iMON RSC remote controller.
5) Keyboard
-36-
You can change the repeat delay and repeat time of the keyboard. This setting is useful when
you use the remote controller to control the volume.
6) Timer
You can change the sound of alarm and the duration of the alarm sound.
7) Monitor Resolution
You can select the resolution that will displayed on the ‘Monitor Resolution Changer’ window.
8) Virtual Keyboard
You can assign the word that you will use the URL set of iMON virtual keyboard.
Update of iMON & Multi-Median
iMON
and
Multi-Median
will
be
updated
continuously
through
the
iMON
website,
http://iMON.soundgraph.com/. If you have any difficulties to use iMON and Multi-Median or
have any question to us, please visit our website, and post a message.
-37-
SoundGraph, Inc.
Address
SoundGraph, 501 Hanyang Institute of Technology, Hanyang University, 17, Handang-Dong,
Sungdong-Gu, Seoul, Korea
Telephone
02-2298-2374~5
Fax
02-2282-6378
Web Site
http://iMON.soundgraph.com
http://www.soundgraph.com
For any inquiry, send us an e-mail to the following address.
iMON Development Team: [email protected]
1. It is strictly prohibited to copy or publish this user’s manual online without consent of
SoundGraph Co., Ltd.
2. The contents of this manual are subject to change without any prior notice for product
function addition and performance enhancement.
3. iMON is the registered trademark for USB IR reception device of SoundGraph Co., Ltd.
4. Other mentioned software band names are registered trademarks of each owner.
-38-