1
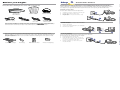
Step
Before you begin:
Verify that the following items came with your DSL kit:
®
treacam
dS
tions eam®
SpeedStr
Spee
Certifi
SpeedS
y andSafety and Certifications
Safet
tream
Safety and
Certifica
1
Step
Install Line Filters
Devices such as fax machines, caller ID boxes, or phones that share the same phone line as your DSL
account require a line filter, which prevents noise from disrupting the DSL signal on the phone line. Filters
can be in the form of a stand-alone line filter or a wall mount filter. A filter can also be plugged into a two-toone adapter if your SpeedStream PPPoE modem will share the same phone jack with another device.
®
tions
SpeedStream
®
2
Choose an Installation Method
The SpeedStream® PPPoE modem may be connected to either an existing USB port or an Ethernet port. If
you choose to attach the SpeedStream® modem via the Ethernet interface, it is only necessary to complete
the steps in Option A. Otherwise, proceed directly to Option B for USB installation.
Option B:
Software Installation
Before installing the software, make sure your PC is equipped with the following:
• Windows® 98, Windows® 98 Second Edition (SE), Windows® 2000 Professional,
Windows® Millennium Edition (Me), or Windows® XP
• 32 MB RAM
• Pentium-compatible 166 MHz processor or faster processor
• 12 MB available hard disk space
Option A: Ethernet Installation Method
Install Ethernet Adapter
Stand-alone Line Filter
You will need to install an Ethernet adapter if your computer does not already have one installed.
Refer to your Ethernet adapter manufacturer’s documentation for complete installation instructions.
For each device that shares the DSL phone line:
Note: the USB driver software for the PPPoE modem is not installable on Macintosh® computers.
xxxx
xxxx
SpeedStream
PPPoE Modem
Documentation
Software CD-ROM
1.
Unplug the device’s cord from the phone jack.
2.
Plug the filter into the phone jack.
3.
Plug the phone cord (or other device cord)
into the filter.
1
1.
2.
3.
4.
2
Connect the SpeedStream PPPoE Modem
3
Power supply
USB cable
RJ-11
DSL cable
RJ-45
Straight-through
Ethernet cable
If you are using the USB port to install the modem, you will need to provide your CD-ROM drive letter
during software installation. To find the drive letter, double-click the My Computer icon on your desktop.
Look for the CD icon and note the letter next to it. This letter is your CD-ROM drive letter.
1.
2.
3.
4.
4a.
5.
Wall Mount Filter
For a wall mount phone, install a wall mount filter:
1.
Remove the phone.
2.
Connect the wall mount filter to the wall plate.
3.
Reconnect the phone.
Connect the straight-through Ethernet cable to the Ethernet port on the modem.
Connect the other end of the straight-through Ethernet cable to the Ethernet port on your computer.
Plug the DSL cable into the DSL port on the modem.
Plug the other end of the DSL cable into the phone jack.
If using a two-to-one adapter, plug the cable into the open socket of your two-to-one adapter.
Plug the power adapter into the power outlet and modem.
4
Internet Connection
USB Installation Method
Insert the SpeedStream® Installation CD into your CD-ROM drive.
Click the Start button on the Windows® taskbar.
Select Run from the Start menu.
Type “e:\setup.exe” where “e” represents your CD-ROM drive.
Note: your CD-ROM drive letter may not be “e.”
5.
Click the OK button.
6.
The software installation program will start. Follow the on-screen directions to complete the software
installation. When prompted to attach the modem, please refer to the instructions below.
Connect the SpeedStream PPPoE Modem
1.
2.
3.
4.
4a.
5.
6.
Connect the USB Cable to the USB port at the rear of the modem.
Connect the other end to the USB port on your computer.
Plug the DSL cable into the DSL port on the modem.
Plug the other end of the cable into the phone jack.
If using a two-to-one adapter, plug the cable into the open socket of your two-to-one adapter.
Plug the power adapter into the power outlet and modem.
Power on the computer.
RJ-11 DSL cable
4a
1
2
3
3
4
DSL
Internet Connection
w/two-to-one adapter
Internet Connection
1
10BA
SE-T
USB
PWR-
RJ-11 DSL cable
Your service provider may include a wall-mount filter, two-to-one adapter(s), line filter(s), and an
Ethernet adapter in your DSL kit. If you received any of these items, follow the instructions provided in
this guide for basic installation. If you need further assistance installing these items, please contact
your service provider.
Two-to-One Adapter
Power Supply
If your SpeedStream PPPoE modem and another device will share
the same phone jack, install a two-to-one adapter:
1.
2.
5
2
Plug adapter into the phone jack.
Plug a line filter into one of the sockets of
the two-to-one adapter. The other socket will
Ethernet Connection
to computer RJ-45
Straight-through
Ethernet cable
1
2
Plug the telephone (or other device) cord
into the line filter.
PCI Ethernet adapter
Line filter(s)
Wall-mount line filter
Two-to-one adapter(s)
3
DSL
10BA
1
Optional:
Use Crossover (Xover) cable
when connecting to a hub or
switch without an “Uplink” port
SE-T
USB
PWR-
Power Supply
5
Hub
be used to connect the DSL cable.
3.
4a
Internet Connection
w/two-to-one adapter
2
3
You have completed the installation of your SpeedStream hardware; there is no modem software installation required when using the Ethernet connection method. Proceed to Step 3 to configure your modem and
connect to the internet.
®
USB Connection
to computer
You have completed the installation of your SpeedStream® DSL hardware. Proceed to Step 3 to configure
your modem and connect to the internet.
Step
3
4
Step
Connecting to the Internet
PC Configuration
Internet Access
In order to setup the SpeedStream® PPPoE modem your PC must first be configured to obtain
an IP address from the modem's built-in DHCP server. Follow the procedure below:
Next, make sure your PC will use the SpeedStream® PPPoE modem (and not Dial-Up Networking) when connecting to the Internet. Follow the below procedure:
Note: The following procedures cover configuration of a PC running Windows® 95, 98, 98SE or Me®.
Please refer to the User Guide on the CD-ROM for help configuring other operating systems.
1.
Select Start -> Settings -> Control Panel - and double click on the Internet Options icon.
2.
Select the Connections tab.
1.
Right-click the Network Neighborhood icon on the desktop.
3.
Select Setup.
2.
Select Properties from the menu.
4.
3.
Select the Configuration tab.
Select “I want to set up my Internet connection manually, or
I want to connect through a Local Area Network (LAN).”
5.
Click Next.
6.
Select “I connect through a Local Area Network (LAN).”
7.
Click Next.
8.
Ensure that all checkboxes on the “Local Area Network Internet Configuration” screen are unchecked.
9.
Follow the remaining prompts and when complete, click Finish.
Part #007-0720-002
Troubleshooting
LED
Off
Green
Blinking Green
Red
PWR
Power not applied
Normal system
operation
N/A
DSL
Power not applied–
DSL signal not detected
DSL Line is trained
and ready for data traffic
Steady Blinking -DSL
is training
Blinking - User traffic
flowing in either direction
Self test failure if
RED longer than 30
seconds
N/A
USB
Power not applied–
USB not connected
USB connected
USB user traffic flowing
in either direction
N/A
ENET
Power not applied–
Ethernet not connected
Ethernet connected
Ethernet user traffic
flowing in either direction
N/A
10. If prompted, reboot your PC before continuing to the next section, Modem Configuration.
Modem Configuration
Windows Me and XP Users: If you have Universal Plug and Play (UPnP) enabled, Windows may detect the
SpeedStream modem upon startup and provide a shorcut to the modem on the desktop or system task tray.
The icon will be labeled as "Residential Gateway", double-click the icon and skip to step 3.
4.
Identify the TCP/IP -> network card entry. If this entry is not present,
ensure both your network adapter and the TCP/IP protocol are installed properly.
5.
Highlight the TCP/IP -> network card entry.
1.
6.
Click the Properties button.
2.
In the Address box, enter the following: http://192.168.254.254
3.
When prompted for a username and password, type admin for the password only. (Username is not
required.)
4.
The modem will prompt to change the initial login password. Follow the instructions to change the password. Click Save.
5.
Select Login and enter the username and password provided by your service provider.
6.
Click the Save button.
7.
Visit http:\\www.efficient.com to register your new SpeedStream product.
8.
If additional configuration is desired, select Advanced Setup to configure DHCP, firewall settings, security
options and also to view status and statistical information.
7.
Ensure that Obtain an IP address automatically is selected.
8.
Select the DNS Configuration tab and ensure that Disable DNS is selected.
9.
Click the OK button to close the dialog. Then Click the OK button again to save changes
and exit Network Properties.
SpeedStream® PPPoE Modem
Start your web browser.
For more information about Efficient Networks or our products, please visit our website
Note: If your Service Provider requires you to use separate PPPoE client software, discontinue use of this
software. The SpeedStream Dual USB/Ethernet modem will negotiate the PPPoE logon to your service
provider's network.
www.efficient.com
Corporate Headquarters
4849 Alpha Road
Dallas, Texas 75244
1+972-852-1000
1+972-852-1001
Congratulations! You have completed the installation of your SpeedStream PPPoE modem.
PHONE
FAX
®
[email protected] EMAIL
10. Restart your PC, even if no changes were made.
11. Proceed to the Internet Access section of this quide to complete configuration.
©2002 Efficient Networks, Inc. All rights reserved. Efficient Networks, its logos, and SpeedStream
are registered and unregistered trademarks of Efficient Networks, Inc. All other brand names and
trademarks are held by their respective companies. Efficient Networks reserves the right to make
changes to product specifications at any time without notice.
Quick-Start Guide