1
Part # 007-6560-001
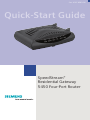
Quick-Start Guide
SpeedStream®
Residential Gateway
5450 Four-Port Router
Before you begin,
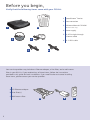
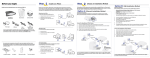
Verify that the following items came with your DSL kit:
• •
1 SpeedStream® Device
2 Documentation
3 Software Manual CD-ROM
2
1
(Router model only)
4 Power supply
5 RJ-45 Straight-through
Ethernet cable
4
3
6 RJ-11 DSL cable
6
5
Your service provider may include an Ethernet adapter, a line filter, and a wall-mount
filter in your DSL kit. If you received any of these items, follow the instructions
provided in this guide for basic installation. If you need further assistance installing
these items, please contact your service provider.
A PCI Ethernet adapter
B Line filter(s)
C Wall-mount filter
2
A
B
C
Step 1 >
Install Line Filters
Devices such as fax machines, caller
ID boxes, or phones that share
the same phone line as your DSL
account require a line filter, which
prevents noise from disrupting the
DSL signal on the phone line. Filters
can be in the form of a stand-alone
line filter or a wall-mount filter.
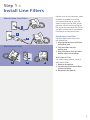
Stand-alone Line Filter
1
2
Stand-alone Line Filter
3
For each device that shares the
DSL phone line:
1. Unplug the device’s cord from
the phone jack.
2. Plug the filter into the
phone jack.
3. Plug the phone cord (or other
device cord) into the filter.
Wall-mount Filter
Wall-mount Filter
1
2
3
For a wall-mount phone, install a
wall-mount filter.
1. Remove the phone.
2. Connect the wall-mount filter
to the wall plate.
3. Reconnect the phone.
3
Step 2 >
Ethernet Installation
Install Ethernet Adapter
You will need to install an Ethernet
adapter if your computer does not
already have one installed. Refer to
your Ethernet adapter manufacturer’s
documentation for complete
installation instructions.
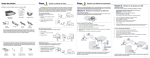
Connect the SpeedStream® Device
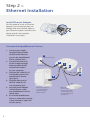
1. Connect the straightthrough Ethernet cable
(RJ-45) to the Ethernet
port on the SpeedStream®
device (yellow port).
2. Connect the other end
of the straight-through
Ethernet cable (RJ-45)
to the Ethernet port
on your computer.
3. Plug the DSL cable (RJ-11)
into the DSL port on the
SpeedStream® device
(gray port).
4. Plug the other end of
the DSL cable (RJ-11)
into the phone jack.
5. Plug the power adapter
into the power outlet
and SpeedStream® device
(black port).
6. Ensure the SpeedStream®
device is powered on (power
switch located on right side
of back panel).
4
4
Internet connection
3
R J-11 DSL cable
1
6
Power supply
5
2
Hub
Ethernet connection
to computer R J-45
Straight-through
Ethernet cable
Optional:
use crossover
(Xover) cable when
connecting to a hub
or switch without an
“uplink” port
Step 3 >
PC Configuration Procedures
Windows Configuration
In order to setup the SpeedStream® device,
your PC must first be configured to obtain
an IP address from a DHCP server. Follow the
procedure below:
Note: The following procedures cover configuration of a PC
running Windows® XP. Please refer to the User Guide on the
CD-ROM for help configuring other operating systems.
1. Click Start > Control Panel.
2. Double-click the Network
Connections icon.
3. Double-click your Network Card.
4. Click Properties.
5. Select Internet Protocol (TCP/IP).
6. Click Properties.
7. Select Obtain an IP address
automatically.
8. Select Obtain DNS server address
automatically.
9. Click OK and exit out of the Control Panel.
10. Configure Internet Access using the
procedure that follows.
Internet Access
Next, make sure your PC will use the
SpeedStream® device (and not Dial-Up
Networking) when connecting to the
Internet. Follow the procedure below:
1. Click Start > Control Panel.
2. Double-click the Internet Options icon.
3. Click the Connections tab.
5. Click Next.
6. Click Connect to the Internet.
7. Click Next.
8. Click Setup my connection manually.
9. Click Next.
10. Select Connect using a broadband
connection that is always on.
11. Click Next.
12. Click Finish.
13. Configure the Gateway using the
Gateway Configuration procedure
that follows.
Configure the Gateway
Windows Me and XP users: If you have
Universal Plug and Play (UPnP) enabled,
Windows may detect the SpeedStream®
device upon startup and provide a Shortcut
to the device on the desktop or system task
tray. The icon will be labeled as “Residential
Gateway.” Double-click the icon and skip
to step 3.
1. Start your Web browser. In the Address box,
enter the following: http://speedstream.
2. Press Enter. The SpeedStream® Simple Setup
Wizard will launch.
3. At the end of the Setup Wizard, you will be
given the option to either connect to
the Internet or further configure the optional
settings of the gateway.
4. If additional configuration is desired, select
the icon for the service or option
you wish to configure: the gateway’s firewall
and security settings, User Profiles and
content filtering, or home network options.
For non-standard configurations or troubleshooting procedures,
consult the User Guide on CD-ROM.
Congratulations! You have
completed the installation of
your SpeedStream® device.
4. Click Setup.
5
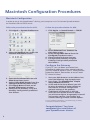
Macintosh Configuration Procedures
Macintosh Configuration
In order to setup the SpeedStream® device, your computer must first be configured to obtain
an IP address from a DHCP server.
Follow the procedure below for OSX:
Follow the procedure below for OS9:
1. Click Apple -> System Preferences.
1. Click Apple -> Control Panels -> TCP/IP.
2. Select the Network icon under the
Internet & Network section.
2. Select Ethernet from Connect via
drop-down menu.
3. Select Using DHCP Server from the
Configure drop-down menu.
4. Close window and save changes.
5. Configure the Gateway using the
Gateway Configuration procedure
that follows.
Configure the Gateway
If your PC has not been connected to a
broadband modem or other network device,
you will need to perform the PC configuration
procedure below. Remember to restart each
PC when finished.
3. Select Built-in Ethernet from the
Show drop-down menu.
4. Select Using DHCP Server from the
Configure IPv4 drop-down menu.
5. Click Apply Now and exit out of
System Preferences window.
6. Configure the Gateway using the
Gateway Configuration procedure
that follows.
1. Start your Web browser. In the Address box,
enter the following: http://speedstream.
2. Press Enter. The SpeedStream® Simple
Setup Wizard will launch.
3. At the end of the Setup Wizard, you will
be given the option to either connect to
the Internet or further configure the
optional settings of the gateway.
4. If additional configuration is desired,
select the icon for the service or option
you wish to configure: the gateway’s firewall
and security settings, User Profiles and
content filtering, or home network options.
For non-standard configurations or troubleshooting procedures,
consult the User Guide on CD-ROM.
Congratulations! You have
completed the installation of
your SpeedStream® device.
6
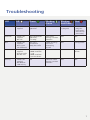
Troubleshooting
LED
Off
Green
Blinking
Green
Blinking
Red/Green
Red
Power
- Power not
applied
Normal system
operation
N/A
Flash write
in progress
- POST in
progress
- POST error
occurred (if
persistent)
Ethernet
- Power not
applied
- No link
Normal Ethernet
operation,
Link okay
User traffic
flowing in either
direction
N/A
N/A
DSL
- Power not
applied
- DSL signal
not detected
DSL line is
trained and
ready for traffic
Steady blinkingDSL line is
attempting
to train
N/A
Configurable
Internet
- Power not
applied
- Bridge mode
- No DSL link
- DSL link is up
+ WAN interface
is up
+ WAN interface
has IP Address
N/A
N/A
IP connection
failure
Activity
- Power not
applied
- No WAN or
LAN activity
N/A
LAN user traffic
flowing in either
direction
N/A
N/A
7
Siemens Subscriber Networks, Inc.
4849 Alpha Road
Dallas, TX 75244
(972) 852-1000
Fax (972) 852-1001
[email protected]
http://www.icn.siemens.com/subscriber
Copyright© 2004 SIEMENS SUBSCRIBER NETWORKS, INC. All rights reserved. Siemens and the Siemens
logo are trademarks of Siemens AG, Germany. All other trademarks are held by their respective companies.
Siemens reserves the right to make changes to product specifications at any time without notice.
8