1
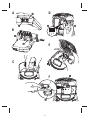
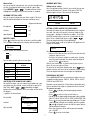
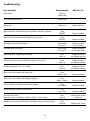
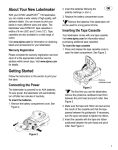
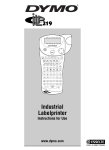
Electronic
Labelmaker
Instructions for Use
Etiqueteuse
Electronique
Guide D‘Utilisation
Electronische
Labelmaker
Gebruikershandleiding
Elektronisches
Beschriftungsgerät
Bedienungsanleitung
www.dymo.com
D
D
A
2
F
= 6 mm
E
= 9/12 mm
= 19/24 mm
B
CLICK !
C
This product is CE marked in accordance with the EMC directive and the low voltage directive and is designed
to conform with the following international standards:
Safety
– EN 60950, IEC 950, UL 1950
EMC emissions – EN 55022 Class B, CIS PR22 Class B,
FCC pt15 Sub pt B Class B
EMC immunity – EN50082-1, IEC801-2 & IEC801-3
Although unlikely, it is possible that abnormal behavior may result from electrostatic discharges. In such cases, should normal
operation not resume, follow the relevant procedure as detailed in the trouble-shooting section: No response to keys.
The user should avoid directly touching the thermal print head.
Esselte is an ISO 14000 registered company. Plastic components of this printer have been marked to enable final disposal in a
manner that is sensitive to the environment.
What the DYMO LabelMANAGER 400
can do for you
UK
Step Five - Print your label
On its own
You can use the LabelMANAGER 400 as a stand-alone
label printer to produce a wide range of high-quality
labels in different sizes and styles. You type using the
familiar layout of a traditional keyboard.
Press
to print your label. The LabelMANAGER 400 cuts
it automatically.
Congratulations ! You’ve just printed your first label !
Settings
With your PC
You can also link the LabelMANAGER 400 to your PC, and
use the specially-designed software to add text and pictures to create your labels. Store them on your PC, and
print them on the LabelMANAGER 400.
You will need to set or select a number of settings on your
LabelMANAGER 400. You can change them by pressing
SETTINGS. Scroll down the following list of options:
LANGUAGE
DATE
DATE FORMAT
TIME
TIME FORMAT
TAB LENGTH
UNITS
PRINT CONTRAST
The LabelMANAGER 400 can print on coloured and transparent plastic tapes, plastic tapes with a permanent adhesive and flexible nylon tapes. See the list of DYMO D1
cassettes available at the end of this guide.
How to use your DYMO
LabelMANAGER 400
Language
Push SETTINGS and scroll to the LANGUAGE option using
the P or H keys, then press
.
A list of 21 languages will appear. Select the language you
require using the P or H keys, then press
.
Getting started: your first label in 5 easy steps
Step One
EITHER: use a DYMO power supply (not included)
Connect the adapter plug into the socket (fig A1) and connect to the mains.
Note: When you use your LabelMANAGER 400 fot the first
time, the factory set language will be “OFF”.
Setting the language ensures you have fast access to the
extra accented characters or currency symbols you need in
your language. It will also specify the language in which
error messages appear on the display. Note that the starting
point for the list of languages depends on the keyboard model.
OR: insert the batteries
- Remove the battery cover (Fig B1)
- Insert six size AA alkaline batteries (Fig B2), observing
the polarity markings, and close the cover.
- Remove batteries if the LabelMANAGER is to be unused
for some time.
Step Two - insert the cassette
Date
Push SETTINGS and scroll to the DATE option using the P
or H keys, then press
.
A date will appear on the screen:
Press the buttons (fig C1) to open the cassette door
Switch the tape width setting to the correct width.(fig D1)
Insert cassette (fig D2) and gently press on the centre of the
cassette until it clicks into place (fig E1).
Check the cassette is correctly positioned before closing the
cassette door.
Step Three - switch on
19/04/03
Enter the current date with six keystrokes of the number keys.
Press the red button to switch on.
Date format
Push SETTINGS and scroll to the DATE FORMAT option
using the P or H keys.
Press
, and a number of different formats to display and
print the date will appear.
You can choose a range of different settings for the date.
The month can appear in text or as a number, and you can
choose European or US date formats.
Select the format you require using the P or H keys, then
to select.
Note: when using batteries, the LabelMANAGER switches off
automatically after 2 minutes if no keys are pressed. When
using an adapter, the LabelMANAGER will display the current
date and time after 2 minutes if no keys are pressed.
Step Four - type a label
Type a simple label first to try the machine. Learn more
about formatting in the following pages.
3
• The month’s name will appear in the language you have
selected.
• When a date is placed within a label, the label will automatically print the date in the format you have selected
in Display Date.
Print contrast
This function enables you to adjust the print quality under
extreme temperature conditions.
Push SETTINGS and scroll to the PRINT CONTRAST option
using the P or H keys, then press
.
A choice of contrast settings will appear on the display:
Setting the time
Push SETTINGS and scroll to the TIME option using the P
or H keys.
Press
, and time will appear on the screen:
11:35
Set the time using four strokes of the number keys, and
press
.
You can select by using the P or H keys. Press
firm your selection.
Select AM or PM using P or H (this option only appears if
12-hour display has been selected in the TIME FORMAT
option).
to con-
Typing labels
The DYMO LabelMANAGER 400 looks familiar: it has the
same layout as a computer keyboard to make typing
labels easy.
Time format
Push SETTINGS and scroll to the TIME FORMAT option
using the P or H keys.
Press
, and you can choose between 12-hour or 24-hour
format for the time:
12hour
24hour
Select one of the two by pressing Q or R , and confirm by
pressing
.
Typing normal characters: just like a computer keyboard
You can type in upper case by pressing
. The icon at
the bottom left of the display will show ABC.
Press
again to drop to lower case, and the icon will
disappear.
CAPS
CAPS
If you make a mistake, press
and the cursor will delete
the character on the left of the current cursor position, and
will move one place to the left.
Delete
Setting tab length
Scroll to the TAB LENGTH option in the SETTINGS menu
using the P or H keys, then press
.
The
The last-used setting appears (or the default setting of 050 mm).
You can change the settings in two ways:
• Use the P or H keys to move the settings up or down by
1mm;
or
• Key in the numbers in three positions.
For instance, for 25mm, key in 025.
Press
to confirm your selection.
To learn about using tabs, turn to page 7.
Example:
Type a twice, and the letter à appears. If you tap the key
again within one second, á will appear. Pause for a second, and the letter á will be selected, and the cursor will
move on to the next position.
For rapid entry of double letters like oo, you can use the R
key to advance the cursor, so you don’t have to wait.
Currency symbols
The currency key e also uses RACE to scroll through a
number of currency symbols: e - £ - $ - ¢ - ¥.
The order these symbols appear depends on the keyboard
version and language you have selected.
mm
appears on the display
Toggle between the two using Q or R , then press
select.
key inserts a blank space within your label.
Extra characters
The LabelMANAGER 400 also stores a large number of extra
characters (such as other letters or accented letters). It uses
technology similar to that of a mobile phone keyboard. If
you tap the same key repeatedly within a short time, you can
scroll through a sequence of characters based on that letter.
For example, pressing the E key repeatedly in the Frenchlanguage version will scroll through e - é - è - ê. If you wait
one second, the character will be selected, and the cursor
will move on to the next position.
You can indicate another letter than the E. We will complete
the list of accented characters for that letter in your language.
Units
The standard unit of measurement is millimetres. You can
change to inches if you wish.
Push SETTINGS and scroll to the UNITS option using the P
or H keys, then press
.
inch
SPACE
to
4
The display will show which line of a multi-line label you are
currently typing in. The example shows you are currently
typing in the second line. You can also use the P or H keys
to shift between different lines of your label.
Graphic symbols
The LabelMANAGER 400 also stores 163 graphic symbols.
To insert a symbol, press
. You can then scroll left and
right, up and down through the rows or columns of the
symbol chart, using the navigation key. On the right of the
display, you will see the coordinates of the symbol currently
selected (e.g. A2, F5). The display will also show you an
enlarged version of your symbol. Press
to insert your
selected symbol.
When you look at the text of your label on the display, a
generic icon representing all symbols will appear on the display in the place you inserted it. When you place your cursor
under the symbol (using the Q and R keys), the actual symbol will appear in a large format for about a second.
Symbol
Formatting labels
You can use a wide range of formatting options to change
the style in your printed label, such as font size, bold, italic,
boxed, vertical etc. The way you format your label is shown
by a combination of indicators above the text display.
Inserting date or time
With the
and TIME keys you can insert the date or time
into a label. You can choose the date or time you print the
label (dynamic format), or the date or time you create the
label.
• Press the
button once (or any odd number of
times), and a date icon will appear in the display. This
means that the label - even if saved - will always print
the date the label is printed. When you place your cursor
under the date icon (using the Q or R keys), it will be
displayed in a large format for about a second. You can
use this to check the date format you have selected.
• Press the TIME (
+
) button once (or any odd
number of times), and a time icon will appear in the
display. This means that the label - even if saved - will
always print the time the label is printed. When you
place your cursor under the time icon (using the Q or R
keys), it will be displayed in a large format for about a
second. You can use this to check the time format you
have selected.
• Press the
button twice (or any even number of
times), and the current date will be inserted into the label.
It will appear in full on the display, in the date display
format you have chosen. This date now forms part of
the text of your label, and will remain unchanged,
whenever you print this label.
You can also edit it like normal text.
• Press the TIME (
+
) button twice (or any
even number of times), and the current time will be
inserted into the label. It will appear in full on the
display, in the time display format you have chosen.
This time now forms part of the text of your label, and
will remain unchanged, whenever you print this label.
You can also edit it like normal text.
Display indicators
Date
Date
STYLE
There are 12 display indicators around the text display.
When one or more of these indicators is highlighted, it
shows the relevant formatting option is active:
Auto cut is enabled: the machine will automatically cut your label(s)
Fixed length is enabled
Date
Multiple copies are to be printed
Barcode mode has been selected
Date
Abc
BIG
The font size you have selected is highlighted
STYLE
The text will be printed in mirror font.
a certain type of style has been selected.
Displays whether capitals is selected
Date
Text over two or more lines
You can add a second line to your label by pressing
the display shows Abc ↵ 123, your label will print:
The text will be printed in a box
The text will be underlined
The label will be printed in big font
If you try a combination of formats which the machine cannot produce, an error message will appear. See error message list in Troubleshooting.
Selecting a font
The LabelMANAGER 400 can print 5 different fonts.
To select a font, press the
key. The machine will
display a scroll-down menu of five different fonts, and will
show you the way the font looks:
Font
. If
Abc
123
Select the font you require, and
5
to confirm.
Selecting the text size
Pressing the
key will display the size menu, with 2
options:
Font
HEIGHT
WIDTH
• Use the P or H keys to select height or width.
• Press
, then select one of the possible sizes. The
display will show you the size (1 to 5 for height, or 1 to 3
for width), and show an example of the font.
DYMO
Box 1
DYMO
Box 2
DYMO
Box 3
DYMO
Box 4
DYMO
Box 5
DYMO
Box 6
Pattern 1
Pattern 2
Pattern 3
• Use the P or H keys to select the height you require,
then
to select.
Pattern 4
Pattern 5
Note : Your choice of texts height depends on the tape width:
Tape width
6mm
9mm, 12mm
19mm, 24mm
Pattern 6
Text heights you can print
1
1, 2, 3
1, 2, 3, 4, 5
Pattern 7
Background text
Select the box you require, using the P or H keys. Press
to confirm. The
indicator will be highlighted.
Press
to exit from the box/pattern menu.
Selecting the text style
Pressing the
key will display the style menu. You have
12 options: an example of text in the style you have selected
will appear on the screen as you scroll down.
Style
Cancel
Selecting background text for a label
A label previously saved in one of the ten memory locations
(see saving a label p 8) can be used as background text on
another label. For example, a label already saved containing
the name DYMO can be printed in the background of a label
which has LabelMANAGER 400 as the foreground text.
LM400
Note that background text is always printed in BIG font,
regardless of the size selected for the original label. The
amount of background text printed is determined by the
length of the foreground label.
Select the style you require, using the P or H keys. Press
to confirm. The STYLE indicator will be highlighted in
the screen.
If you choose the option BACKGROUND TEXT, the display
will automatically show the saved labels locations:
BBBBBGGGGG
Contents lab
Underlining text
uline
Pressing the ULINE (
+
) key will underline the
text on your label. The Abc indicator will be highlighted in
the screen.
Box
Use the Q and R keys to select the label required and return
to the current label, which will feature as the foreground text.
Note: Background text is not possible with 6mm tape.
See more about using elements in the memory in the Label
memory section.
Boxes and backgrounds
The LabelMANAGER 400 can place your text in a box, or add
a background to make your label stand out.
Press the
+
key, and a scroll-down list of 14
options will appear. The options appear on the screen in the
style they will be printed:
Box
6
Mirrored text
You can also print mirrored text. You may for example want
to stick a transparent label on the inside of a glass door.
Press MIRROR (
+
). The cba indicator will be
highlighted, showing that the mirror function is enabled.
WORKING WITH TABS
Adding tabs to a label
You can add tabs within a label if you want to line up your
text over different lines. To enter a tab, press TAB. The
default length is 50mm. Tabs are only left-aligned.
Font
ALIGNING TEXT IN A LABEL
You can choose to align your text within a label. This function will add the blank part of the tape in different ways
text
Alignment indicator
left aligned:
your text
centred:
right-aligned:
your text
SETTING A FIXED LENGTH FOR YOUR LABELS
Normally the length of your label depends on the length of
your text. You may wish to print a series of labels of the
same length - perhaps to label files or folders. The FIXED
LENGTH function allows you to set a fixed length for the
label. To set a fixed length, press length (
+
).
The fixed length indicator will be highlighted.
The last fixed length used by the printer will appear on the
display, for example:
[=]
your text
=]
Cancel
MULTIPLE LINES
Press
to start the next line of text on a multi-line label.
This is a two ↵ line label on the display will be printed as:
This is a two
line label
040mm
and the display will indicate two lines:
You can change this setting in two ways.
• Either use the P or H keys to increase or decrease the
setting in steps of 1mm.
• Or key in the number using the number keys, starting
from the right-hand digit. Use Q to move one digit to
the left. Press
to confirm.
Note if your fixed length is shorter than the text of your
label, an error message will flash.
To return to the automatic length mode, press
again,
and the machine will return to the automatic length setting.
The fixed length indicator will no longer be highlighted.
You can print up to five lines on one label.
Tape width
24mm
19mm
12mm
9mm
6mm
Maximum number
of lines
5
5
3
3
1
Lenght
PRODUCING A BAR CODE
The LabelMANAGER 400 can generate bar codes in the six
standard barcode formats: EAN-13, EAN-8, UPC-A, UPC-E,
CODE-39 and CODE-128.
JUSTIFYING TEXT IN MULTI-LINE LABELS
For multi-line labels, you can choose three options for your
text alignment: left-justified, centre-justified, or right-justified. Press JUST (
+
)repeatedly to toggle
between these three options, which are shown on the left of
the display.
+ graphics of annunciators
Barcodes can be printed on 19 and 24mm wide labels only
and can be either full height or mixed with one line of text.
To create a bar code:
• Press
to display the barcode type previously
selected.
• Press
to return to the current label, or
• Use P or H to step through the barcode types available:
EAN-13, EAN-8, UPC-A, UPC-E, CODE-39 and CODE-128.
• Press
to select the barcode type displayed. The barcode indicator will light in the display and the symbols
and
will appear at each end of the space allocated for barcode characters.
• Enter the characters which will become the barcode,
e.g.: 1234567.
• Press
to return to the label.
Style
Bcode
Cancel
left justified
centred
right justified
text
[=
STAIRCASE
emergency lighting
BX-243
STAIRCASE
emergency lighting
BX-243
STAIRCASE
emergency lighting
BX-243
7
Note that the barcode indicator will appear in the display
whenever the cursor is positioned under barcode characters.
• To edit a barcode, press
; the barcode characters
only will be displayed and the barcode indicator will light
in the display.
• Press
to return to the label.
Clearing text or formatting
Use the NEW key to clear either the label settings or the
entire label.
Press NEW (
+
), The display will present you
with two options:
Bcode
Delete
TEXT
TEXT & FORMAT
On a single line label, a bar code can be mixed with text
which is small, medium or large size:
ABC
123456
ABC
123456
ABC
Select TEXT and press
to clear the text, but keep the settings. Select TEXT & FORMAT and press
to clear both
text and settings.
123456
Label memory
A two-line label always has small size text when it is mixed
with a barcode.
Text entered before
pressing
followed
by
, will result in
text above the barcode:
The LM400 has a powerful memory that stores text as well
as format.
• It stores the text of the last 15 labels you have printed
• You can store the text of up to 10 labels you use frequently
• You can store up to 10 formatting settings. Like this, you
can store the right dimensions for a folder label, a CD
cover, etc.. You can then apply these settings to any text.
ABC
123456
Bcode
Entering the text after
pressing at the end of a
barcode will produce text
below the barcode:
TEXT MEMORY
Last-printed labels
The LabelMANAGER 400 will automatically keep the last 15
labels you have printed in a buffer memory.
To access these labels, press
.
You will see a row of ten square boxes. To the right of this
are the first four of a series of fifteen diamond-shaped icons.
In the beginning, these diamonds will be empty. Once you
start printing labels, a full diamond represents a printed
label.
To select a label, use Q or R to move the cursor under a full
diamond. The text of the label will appear on the display
below.
Press
to select the label. You can then print or edit the
label as you wish. You can also delete a last-printed label.
Select it, then press
+ Delete
Storing a label text
You can store up to 10 labels in the LabelMANAGER memory.
• To save your current label, press SAVE (
+
) to
display 10 square boxes: these represent locations for
stored labels. If there are no labels saved, the cursor will
appear under the first box, which will be highlighted.
The display will show :
123456
Recall
ABC
Text can be underlined, e.g.:
LabelPOINT
ABC
123456
DEF
A box can be added around the complete label:
LabelPOINT
ABC
123456
DEF
Recall
PAGE BREAK
You can create ‘multiple formats’ in the same label. You do
this by dividing your label into ‘pages’ or blocks of text, each
with its own text size and style settings. Each of these
blocks is separated by a page break. The number of lines
which can be created in each page will depend on the label
width. You can store up to two page breaks in a label.
Press PG BREAK (
+
) to insert a page break.
When scrolling through the text, each page break is identified
by the symbol . When you scroll through a label with Q
or R, the display will show which ‘page’ of a label you are in.
In the example below, you are in the third of three sections:
[ ] [ ] [=]
GGGGGGGGGG
The boxes are full if they contain a label and the cursor will
be under the last changed label, e.g.:
BBBBBGGGGG
Contents lab
In this example, there are 5 saved labels, the cursor is under
the one which was last changed and the contents of that
label is displayed on the second line.
8
PRINT PREVIEW
• the text of the label will scroll over the display once
• Use Q or R to move the cursor under an empty location
• Press
to save your label and return to the label, or
to exit and return to the label.
STYLE PREVIEW
• the series of formatting options you have selected will
flash once on the screen.
Cancel
Recalling a saved label
• Press
to display the labels in the memory.
• You will now see 10 square boxes locations for labels
you have stored, and the first four of a series of 15
diamond-shaped symbols, representing the last 15
labels your LM400 has printed.
• Use Q or R to move the cursor under each full location,
until the label you require is displayed.
• Press
to select the label required, and then format,
edit or print. Alternatively, press
to exit and return
to the current label.
Recall
Printing multiple copies of a label
The LabelMANAGER 400 can print from 1 to 99 copies of a
label.
To print more than one copy of your label:
• press COPIES (
+
).
• The last number of copies requested on your machine
will appear in a message on the display, e.g.
# = 03
• Use P or H or on the navigation key to increase or
reduce the number of copies. If you need to print more
than nine copies, use the Q key to move the cursor one
step to the left to change the left-hand digit.
Press
to confirm.
• Press
.
Bcode
j
l
Cancel
Deleting a saved label
• To delete a saved label, use Q or R to move the cursor
under the location
• Press
+ Delete
FORMAT MEMORY
Printing incremental numbering
If you wish to print a series of labels, where the numbers
increase incrementally, the LabelMANAGER can help you in
two ways:
Saving and recalling personal preferences
You can save 10 formatting preferences using the PP SET
(
+
) key. This will store the format and label type
settings have selected (e.g. size, style, box, fixed length,
etc), but will not store the actual content of the label.
You can use this to store the settings for a particular use,
such as labelling a video box.
Setting personal preferences
Press PP SET (
+
) to store your current settings.
Name your Personal Preference and push
.
Recalling personal preferences
If you want to apply saved settings to the label you are
working on press
. Scroll through the list of personal
preferences you have saved using the Q and R arrows and
push
. You can then check these settings by selecting
STYLE PREVIEW (see below, previewing).
Changing personal preferences
If you have changed your formatting preferences, simply reset the personal preferences in the same storage location.
Checking personal preferences
Press PREVIEW (
+
), then select STYLE PREVIEW.
The series of formatting options you have selected will then
flash once on the screen.
Automatic incremental numbering
Type abc1, and press 123...n (
+
).
The LabelMANAGER will print abc1 and the screen will automatically jump to abc2. Press 123...n (
+
) to
jump to abc3 and so on.
CAPS
CAPS
Automatic printing of incremental series
The LabelMANAGER can also print out a series of incrementally-numbered labels.
• Type abc1
• Select the number of copies (press COPIES then
,
for example, 5. And push .)
• Press 123...n (
+
)
• The LabelMANAGER will now print a series of labels abc1, abc2, abc3, abc4, abc5.
• If Autocut is switched on, the labels will be cut separately.
If Autocut is switched off, the LabelMANAGER will print
chain marks between the labels as a guide to manual
cutting.
Note: While using fixed length setting, the LabelMANAGER
will stop printing when the label exceeds the fixed length.
CAPS
Printing labels
Printing a label
Press
and the label will be printed.
Previewing the text of your label(s)
Before printing, you can preview the text you have typed,
and/or the format(s) you have chosen. Press PREVIEW
(
+
)
Select one of the two options PRINT PREVIEW and STYLE
PREVIEW using the P and H keys and push .
9
Troubleshooting
Error description
Screen message
Tape jammed
Tape jam
Remove label
Auto cut, printing next label
Remove label
Battery low
What do I do?
Battery low
Replace batteries
Error
BIGFONT
Change formatting
Error
BIGFONT
Change formatting
Text bigger than defined fixed length
Fixed length
x mm Change formatting
or re-set length
Tab length>fixed label length
Fixed length
x mm Change formatting
or re-set tab length
Bigfont cannot be selected with 6 mm tape
Error
Tape size
Change font size or
use different size tape
Fontsize, barcode are not possible because tapesize is too small
Error
Tape size
Change font size or
use different size tape
Fontsize too high for 6, 9 or 12 mm tape
Error
Tape size
Change font size or
use different size tape
Error
Mirror + Style
Change formatting
Error
Mirror + Pattern
Change formatting
Error
Vert + Pattern
Change formatting
Error
Vert + Uline
Change formatting
Too many lines of text
More than 5 lines on 19/24mm, 3 lines on 9/12mm, 1 line on 6mm
Error
Line limit
Change layout of label
or tape size
Multiple lines cannot be selected with the selected function (vertical, barcodes)
Error
Line limit
Change layout of label
Bigfont cannot be selected with style, box (pattern is possible), underline
Bigfont cannot be combined with multiple lines, lower case
Mirror cannot be combined with other styles
Mirror cannot be combined with background/pattern
Vertical cannot be combined with background/pattern
Vertical cannot be combined with Underline
10
Cutting your label
European Adapter
Press CUT SET (
+
) to select between Auto Cut
ON or Auto Cut OFF using the Q and R keys, press
to
confirm.
When Auto Cut is ON the x icon will appear in the screen.
Each label will now be cut after printing.
When Auto Cut is OFF, you can cut the label or series of
labels by pressing the
key.
Cut
Cut
Printing from PC
• PC printing is automatically selected when you select
print on your PC.
• See Quick Start card to set up, and the on-disk manual for
Software applications.
• Two minutes after printing from your PC, the
LabelMANAGER 400 can be used as a stand-alone model.
To show the two minutes is up, the time and date will
appear on the display.
• If you have been working on the LabelMANAGER 400
itself, note that you will have to wait for 20 seconds
before you can use it in PC mode.
• An icon showing a PC will appear when printing from PC
mode is taking place. This may be useful if different
network users have access to the LabelMANAGER 400.
Cleaning
Check and clean the print head (F2) regularly using a cotton
bud and alcohol only to ensure optimum print quality, using
the cleaning tool supplied (see Fig F1).
DYMO D1 label cassettes
Width:
6mm 9mm 12mm 19mm 24mm
(3/4") (1/4") (3/8") (1/2")
(1")
Length:
7m
7m
7m
7m
7m
Black/Clear
43610 40910 45010 45800 53710
Blue/Clear
––––– ––––– 45011 ––––– –––––
Red/Clear
––––– ––––– 45012 ––––– –––––
Black/White
43613 40913 45013 45803 53713
Blue/White
––––– 40914 45014 45804 53714
Red/White
––––– 40915 45015 45805 53715
Black/Blue
––––– 40916 45016 45806 53716
Black/Red
––––– 40917 45017 45807 53717
Black/Yellow 43618 40918 45018 45808 53718
Black/Green
––––– 40919 45019 45809 53719
White/Clear
––––– ––––– 45020 45810 53720
White/Black
––––– ––––– 45021 45811 53721
Black/Silver
––––– ––––– 45022 45812 –––––
Black/Gold
––––– ––––– 45023 45813 –––––
Black/Fluo Green––––– ––––– 45024 ––––– –––––
Black/Fluo Red ––––– ––––– 45025 ––––– –––––
Flexible Nylon
––––– ––––– 16957 16958 –––––
Perm. Polyester ––––– ––––– 16959 16960 –––––
UK Adapter
40075
11
40076