1
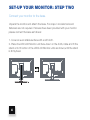
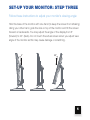
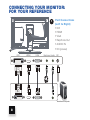
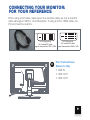
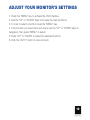
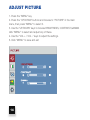
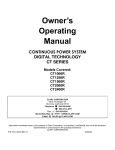
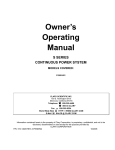
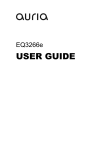
Clarity MONITOR
EQ248C
USER GUIDE
CONTENTS
Getting Started ........................................................................................... 2
Setting up your Monitor ........................................................................... 3-6
Connecting your Monitor to your computer ............................................. 7-9
Using your Monitor ................................................................................... 10
Operator Interface ............................................................................... 11-12
Adjusting your Monitor’s Settings......................................................... 13-18
Troubleshooting .................................................................................. 19-20
Specifications ..................................................................................... 21-22
Preset Display Modes ......................................................................... 23-24
Care and Safety .................................................................................. 25-26
Warranty Statement............................................................................. 27-29
1
GETTING STARTED
Your Monitor is designed to work seamlessly with Windows
devices that contain a HDMI, DVI, or VGA input.You also have a
USB 2 in 1 Hub. It features a 24” LED/LCD backlit screen with
2560 x 1440 resolution.(Only through DVI,other input just up to 1920 x 1080).
In this user guide you will learn how to:
• Set up your monitor
• Connect your monitor to a computer
• Adjust your monitor’s settings
Important
Carefully read your monitor’s set-up instructions and safety guidelines on
pages 24-26 before you set-up and use your display. To download the
specifications for your monitor please visit www.eqdcorp.com
2
SET-UP YOUR MONITOR: STEP ONE
Check to make sure your packaging includes each of the following:
1. Monitor / Monitor base
2. Signal Cable (VGA cables)
3. Power cord
4. AC/DC Adapter
3
SET-UP YOUR MONITOR: STEP TWO
Connect your monitor to the base.
Unpack the monitor and attach the base. For snap-in models tools and
fasteners are not required. If screws have been provided with your monitor
please connect the base as follows:
1. Cover an even stable surface with a soft cloth.
2. Place the LED/LCD Monitor unit face-down on the cloth,rotate and fit the
stand onto th botton of the LED/LCD Monitor units as shown,until the stand
is firmly fixed.
4
SET-UP YOUR MONITOR: STEP THREE
Follow these instructions to adjust your monitor’s viewing angle:
Hold the base of the monitor with one hand (to keep the screen from shaking)
Using your other hand, grab the side or top of the monitor and tilt the screen
forward or backwards. You may adjust the angle of the display from 5°
(forward) to 20° (back). Do not touch the actual screen when you adjust view
angle of the monitor as this may cause damage or scratching.
5°
20°
5
SET-UP YOUR MONITOR: STEP FOUR
Connect your monitor to a power source.
1. Connect the output cable from the AC Power Adapter (“The Brick”) to the
DC Power In connector (flat side of connector towards the cabinet rear) on the
monitor.
2. Plug in the IEC Power Cord to the input side of The Brick and your
100/120V or 220/240V AC grounded power outlet using the provided power
cord. NOTE: using the device with voltages other than those listed above may
cause permanent damage to the monitor. It is strongly recommend that you
use a power strip with a surge suppressor.
NOTE: It is suggested that you leave the AC Power Adapter (The Brick) plugged
into 120 VAC source all of the time (do not use the switch on the power strip to turn
the monitor On/Off). Please use the Power Button on the monitor to turn On/Off.
When the monitor is off, the Brick goes into “stand-by” mode (burns 1 or 2 watts)
and the Green LED remains lit.
6
CONNECT YOUR MONITOR TO YOUR
COMPUTER OR DEVICE
Plug in the Cable connecting your desktop, laptop or other device
to your monitor.
Notes:
• If you want to use for WQHD (2560 x 1440), only through DVI Port,VGA &
HDMI just can support 1920 x 1080.
• If you are using the DVI or VGA video cable, be certain to tighten down the
grounding screws on the connector (on both ends of the video cable).
Turn on the source device then turn on the monitor (push power button on
the cabinet). For the best performance, use 1920 x 1080 (Full HD/WUXGA)
graphics’ mode (If supported by your graphics card).
Auria recommend using WQHD (2560 x 1440) just for photo viewing, video
and game application,for office. Internet surfing application please
use 1920 x 1080.
7
CONNECTING YOUR MONITOR:
FOR YOUR REFERENCE
1
Port Connections
(Left to Right)
• DVI
• HDMI
• VGA
• Earphone Out
• AUDIO IN
• DC (power)
3
DVI
HDMI
VGA
Earphone Audio
DC
Mainframe computer
8
CONNECTING YOUR MONITOR:
FOR YOUR REFERENCE
When using a DVI cable, make sure it is a dual link cable, as only a dual link
cable will support 2560 x 1440 Resolution. If using a DVI to HDMI cable, the
DVI end must be dual link.
DVI-D(Dual Link)
DVI-D(Single Link)
24+1 needle DVI cable
18+1 needle DVI cable
support the resolution 1920 x 1080 support the resolution 2560 x 1440
2
Port Connections
(Down to Up)
• USB IN
• USB OUT1
• USB OUT1
3
9
USING YOUR MONITOR
Turn on your monitor by using the ON/OFF power key (located on
the front, bottom edge). The power ON indicator LED should be lit.
In the following section you will learn how to adjust your monitor’s
settings.
3
3
10
Keys (Left to Right)
• AUTO:
Multi-purpose auto adjustment and menu exit key
• MENU
Show main menu
• VOL +
Increase the sound level by adjusting to the right
• VOL Decrease the sound by adjusting to the left
• UP
Navigate or select higher options
• DOWN
Navigate or select lower options
• Power
ON/OFF
OPERATOR INTERFACE
AUTO Key:
This key is an exit key (exit OSD menu) when OSD menu is active.
MENU Key(Menu/Select):
Activate OSD menu or confirm function adjustment.
VOL-Volume control key:
1.Press this key to decrease volume.
2.Press this key to adjust the options to move left.
VOL+Volume control key:
1.Press this key to increase volume.
2.Press this key to adjust the options to move right.
UP KEY/ECO Adjustment Key:
When OSD menu is active, press this key to adjust the options
move up.
11
OPERATOR INTERFACE
DOWN Key/DCR Adjustment Key:
When the OSD menu is active, press this key to adjust the options
move down.
POWER:
Green -Turn on
Red -on standby
12
ADJUST YOUR MONITOR’S SETTINGS
1. Press the “MENU” key to activate the OSD interface.
2. Use the “UP” or “DOWN” Keys to browse the main functions.
3. In order to select a function press the “MENU” key.
4. If the function you need has a sub-menu use the “UP” or “DOWN” keys to
navigate it, then press “MENU” to select.
5. Press “UP” or “DOWN” to adjust the selected function.
6. Click the “AUTO” button to save and exit.
13
ADJUST PICTURE
1. Press the “MENU” key
2. Press the “UP/DOWN” buttons and browse to “PICTURE” in the main
menu, then press “MENU” to select it.
3. Use the “UP/DOWN” keys to browse BRIGHTNESS, CONTRAST,GAMMA
click “MENU” to select and adjust any of these.
4. Use the “VOL + / VOL -” keys to adjust the settings.
5. Click “MENU” to save and exit
14
ADJUST COLOR
1. Press the “MENU” key
2. Press the “UP/DOWN” buttons and browse to “COLOR” in the main menu,
then press “MENU” to select it.
3. Use the “UP/DOWN” keys to browse PRESET,RED,GREEN,BLUE click
“MENU” to select and adjust any of these.
4. Use the “VOL + / VOL -” keys to adjust the settings.
5. Click “MENU” to save and exit
15
ADJUST TRACKING
1. Press the “MENU” key
2. Press the “UP/DOWN” buttons and browse to “TRACKING” in the main
menu, then press “MENU” to select it.
3. Use the “UP/DOWN” keys to browse HORIZONTAL,VERTICAL,CLOCK,
PHASE,SHARPNESS click “MENU” to select and adjust any of these.
4. Use the “VOL + / VOL -” keys to adjust the settings.
5. Click “MENU” to save and exit
16
ADJUST VOLUME
1. Press the “MENU” key
2. Press the “UP/DOWN” buttons and browse to “VOLUME” in the main menu,
then press “MENU” to select it.
3. Use the “UP/DOWN” keys to browse VOLUME, MUTE click “MENU” to
select and adjust any of these.
4. Use the “VOL + / VOL -” keys to adjust the settings.
5. Click “MENU” to save and exit
VOLUME
VOLUME
MUTE
OFF
17
ADJUST SETUP
1. Press the “MENU” key
2. Press the “UP/DOWN” buttons and browse to “SETUP” in the main menu,
then press “MENU” to select it.
3. Use the “UP/DOWN” keys to browse LANGUAGE,OSD HORIZONTAL,
OSD VERTICAL,OSD TIMER, WHITE BALANCE, DCR,4:3 OR WIDE, INPUT
SELECT,FACTORY RESET click “MENU” to select and adjust any of these.
4. Use the “VOL + / VOL -” keys to adjust the settings.
5. Click “MENU” to save and exit
SETUP
TIMER
1920x1080
18
60Hz
1920x1080
60Hz
TROUBLESHOOTING
Power pilot lamp is dim
Check to make sure the power is turned ON
Check to make sure the power cord is securely connected to both the monitor
and the socket.
Picture looks faint
Adjust brightness or contrast ratio
Screen display distorted or picture becomes wavy
Possibly caused by electronic jamming due to nearby electrical equipment
Power pilot lamp is bright, but there is no image on the screen
• Confirm the computer power is ON
• Confirm the computer graphics card is inserted
• Confirm the computer signal cable is properly connected
• Check each pin on the monitor signal cable to make sure none are bent
• Press “Caps Lock” key on your keyboard to confirm the computer is in
operation and not sleep mode.
Color loss (Red, Green, Blue)
Check each pin on the monitor signal cable to make sure none are bent.
19
TROUBLESHOOTING
Picture is not in the middle or incorrect size
Adjust CLOCK and FOCUS or hot keys (AUTO)
The images have color shading (white looks not pure white)
Adjust RGB color or choose new color temperature
Weak brightness and contrast
Monitor brightness may be reduced due to over use. The monitor may need
service. Please send monitor to authorized service organization for repair.
Picture displays horizontal or vertical interference
Close Win95/98/2000 / ME/XP, adjust CLOCK and FOCUS or press hot keys
(AUTO key )
The Clock controls the quantity of scanned pixel at each line. If the frequency
is not correct, vertical stripes may appear on screen, and appear incorrect
screen width. FOCUS adjust phase of Point frequency signal, a wrong phase
adjustment will cause picture appear horizontal interference. Use “dot-pattern”
or Win95/98/2000/ME/XP shutdown pattern to adjust CLOCK and FOCUS.
20
SPECIFICATIONS
Panel
Display Equipment
Dimensions
Dot Pitch (mm)
Panel Resolution
Clarity Resolution
Panel (LED/LCD backlight)
24”
0.233 x 0.233
1920 x 1080
2560 x 1440 (Just through DVI)
Input Signal
VGA
DVI
HDMI
D-Sub 15 pin Connector
DVI-D Connector
HDMI Connector
Frequency
HFR (Horizontal Frequency)
VFR (Vertical Frequency)
Pixel Clock Frequency
PNP (Plug and Play)
30KHz 88.7KHz
60Hz
241.5MHz
VESA DDC2B
Power Consumption
Operation
Standby
< 36W
≤ 1W
21
SPECIFICATIONS
Power Equipment
12V 3A
AC Adapter: 100-240V,50-60Hz
Ambient Temperature Humidity
Operating temperature:0~50°C
Storage temperature:-20~60°C
Operation relative humidity: 10~85%
Dimensions (mm)
640(L) x 150(W) x 470(H) mm
Weight (Net)
4.2Kg
22
PRESET DISPLAY MODES
Resolution
HFR(KHz)
VFR(Hz)
DOS Mode
720 x 400
31.469
70
VGA
640 x 480
640 x 480
640 x 480
31.469
37.861
37.500
60
72
75
SVGA
800 x 600
800 x 600
800 x 600
37.879
47.20
46.875
60
72
75
XGA
1024 x 768
1024 x 768
1024 x 768
48.363
56.476
60.023
60
70
75
SXGA
1280 x 1024
1280 x 1024
63.981
79.976
60
75
WXGA+
1440 x 900
55.674
60
WSXGA+
1680 x 1050
59.80
60
23
PRESET DISPLAY MODES
Resolution
HFR(KHz)
VFR(Hz)
Full HD
1920 x 1080
67.50
60
WQHD
2560 x 1440
88.70
30
* WQHD (2560x1440) 30Hz only for DVI Port
CARE & SAFETY
Attention:
Any unauthorized modifications or changes may cause the monitor to not work
properly. The manufacturer is not responsible for radio or image interference
caused by unapproved modifications. Users should solve interference issues
by themselves.
Warning:
To prevent fire hazards or explosions, do not expose the monitor to rain or
humid environments. Please do not open the monitor’s back cover or you
may be exposed to high voltage current. Contact professional personnel for
maintenance.
24
CARE & SAFETY
Usage
It is normal for your monitor to “blink” the first time you use it. If this occurs
simply turn your monitor off, then on again. The effective screen pixels of your
monitor should read 99.99% or more, pixel or brightness loss should be less
than 0.01%. During normal usage your monitor should not have pixel residue.
However, when the same static picture is showed a long time before changing
the image, the previous image may remain, which is called “the shadow”. The
best way to avoid this “shadow” is when you are not operating your PC or
computer system, run monochrome or dynamic images as a screen saver, or
turn off monitor power 2 hours at every 12 hours. When the screen is black,
blinking, etc., Please contact the dealer or authorized service center to replace
related parts. Do not attempt to fix the monitor yourself.
Environments
Keep your monitor away from water sources, such as the bathroom,
dishwasher, kitchen, washing machine, swimming pools or humid basements.
Also avoid placing your monitor near direct heat such as heaters, hot air pipes
or under direct sunshine. Also avoid unstable surfaces or places with excess
dust or vibration. If your monitor is fixed on the wall or shelf, installation should
be confirmed by a professional installer. The long, narrow holes in the upper
and bottom part of the monitor back cover are for ventilation. These holes
must be kept clear at all times to prevent overheating.
25
CARE & SAFETY
Cleaning & transport
Keep the original box and other packing material in the event that you need to
ship your monitor. To clean your monitor use a soft, dry cloth and only cleaners
intended for use with a screen or display. Cleaners with alcohol or acetone
will damage your screen. Any marks on the monitor should be cleaned gently
so as to prevent damage. For your safety, please un-plug power cord before
cleaning.
Power
For safety purposes, your monitor may only be used with a power supply
voltage range of 100 ~ 240V AC (current at least 3 A) .If you can’t confirm the
supply voltage, you can consult your reseller or the local power company. This
monitor is equipped with a three-wire grounding plug, one end grounded. For
safety, the plug should be inserted only into grounded power outlets. If you
can’t insert the plug into a three-phase socket, please find an electrician to
install one or use an adapter to ground the equipment safely. When the display
is not used for a long period of time unplug it to cut off the power supply. Such
action can prevent electrical shock, fire or abnormal power voltage due to
events like thunderstorms. Do not open your monitor’s shell or place foreign
material inside the shell as this may cause fire or electrical shock.
26
Warranty Statement
For AURIA LED/LCD Monitor - EQ248C
Including those Sold within North America
AURIA warrants this product to be free from defects in material and workmanship
for a period of twelve months after the original date of consumer purchase.
During this period, Auria will, at its option, either repair the defective product
with new or rebuilt parts, or replace it with a new or rebuilt product at no charge
except as *stated below. The parts or products that are replaced become the
property of Auria. In the USA to obtain service under this limited warranty,
call Auria for the name of the Authorized Service Center (ASC). Deliver the
product freight pre-paid, along with the dated proof of purchase, to the Auria
ASC.
Pack it in its original shipping container (or equivalent)
Put the RMA number on the address label
● Put the RMA number on the shipping carton
● Insure it (or assume the risk of loss/damage during shipment)
● Pay all shipping charges
●
●
Auria is not responsible for damage to inbound product that was not properly
packaged.
Auria will pay for the return shipment charges with in the USA and is responsible
for any costs across any international borders. In the USA or Canada, please
contact your local dealer or call Auria customer service at (877)375-1065.
If the unit is found not to be defective, the unit will be shipped back at the
owner’s expense.
27
This limited warranty does not cover any losses or damages that occur as a
result of:
● Shipping or improper installation or maintenance
● Misuse
● Neglect
● Adjustment by non-authorized sources
● Any cause other than ordinary usage
● Repair, modification, installation of options or parts by anyone other
than an Auria ASC
● Improper environment
● Excessive or inadequate heating or air conditioning or electrical
power failures, surges, or irregularities
This one year warranty does not cover any of the products firmware or hardware
that you or any third party have modified or altered; you bear the sole responsibility
and liability for any such modification or alteration.
ALL EXPRESSED AND IMPLIED WARRANTIES FOR THIS PRODUCT (INCLUDING
THE WARRANTIES OF MERCHANTABILITY AND FITNESS FOR A PARTICULAR
PURPOSE) ARE LIMITED IN DURATION TO A PERIOD OF ONE (1) YEARS FOR
PARTS AND LABOR FROM THE ORIGINAL DATE OF CONSUMER PURCHASE.
NO WARRANTIES(EITHER EXPRESSED OR IMPLIED) APPLY AFTER THIS PERIOD.
IN THE UNITED STATES OF AMERICA, SOME STATES DONOT ALLOW
LIMITATIONS ON HOW LONG AN IMPLIED WARRANTY LASTS, SO THE ABOVE
LIMITATIONS MAY NOT APPLY TO YOU.
28
AURIA OBLIGATIONS AND YOUR REMEDIES HEREUNDER ARE SOLELY AND
EXCLUSIVELY AS
STATES HERE. AURIA LIABILITY, WHETHER BASED ON CONTRACT, TORT,
WARRANTY, STRICT LIABILITY, OR OTHER THEORY, SHALL NOT EXCEED
THE PRICE OF THE INDIVIDUAL UNIT WHOSE DEFECT OR DAMAGE IS THE
BASIS OF THE CLAIM. IN NO EVENT SHALL AURIA BE LIABLE FOR ANY LOSS
OF PROFITS, LOSS OF USE OR FACILITIES OR EQUIPMENT OR OTHER
INDIRECT, INCIDENTAL, OR CONSEQUENTIAL DAMAGE. IN THE UNITED STATES
OF AMERICA, SOME STATES DO NOT ALLOW THE EXCLUSION OR LIMITATION
OF INCIDENTAL OR CONSEQUNTIAL DAMAGES, SO THE ABOVE LIMITATION
MAY NOT APPLY TO YOU. ALTHOUGH THIS LIMITED WARRANTY GIVES YOU
SPECIFIC LEGAL RIGHTS. YOU MAY HAVE OTHER RIGHTS WHICH MAY VARY
FROM STATE TO STATE.
29
EQD is located at:
3309 E. Miraloma Avenue
Suite 107
Anaheim, CA 92806
For Customer Service please call 877-375-1065
or visit www.eqdcorp.com