1
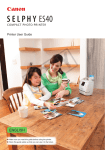
Printer User Guide
C
Y
P
O
ENGLISH
CDP-E063-010
© CANON INC. 2008
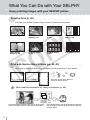
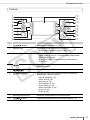
What You Can Do with Your SELPHY
Enjoy printing images with your SELPHY printer.
Creative Print (p. 40)
Complete your favorite images using a variety of Creative Print functions.
Add Frames (p. 42)
Add Clip Art
Stamps (p. 43)
Create a Calendar
(p. 45)
Print a Picture
Diary (p. 47)
Add a Speech
Bubble (p. 48)
Print with Effects
(p. 50)
Create ID Photos
(p. 51)
Print a Movie (p. 53)
C
Y
P
O
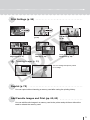
Print with Gold or Silver Effects (pp. 42, 43)
Use a gold or silver print supporting cartridge for printing with gold or silver effects.
Print with gold or silver effects on
frames or clip art stamps.
More creative decoration by using a computer (p. 88).
Print desired frames and text with gold or silver effects
using the supplied software, Ulead Photo Express LE.
2
Add (update) frames and clip art stamps to the printer
from a computer with the supplied software, SELPHY
Contents Utility.
Print Settings (p. 54)
Print the Date (p. 55)
Print after Selecting a
Page Layout (p. 57)
C
Print the Image Number
(p. 55)
Add Borders to an Image
(p. 55)
Print after Correcting
Red-Eye (p. 55)
Print after Adjusting the
Brightness (p. 58)
Y
P
O
Trimming Images (p. 33)
You can enlarge and print a portion
of an image.
Reprint (p. 70)
You can reprint without inserting a memory card after saving the printing history.
Add Favorite Images and Print (pp. 60, 62)
You can add favorite images in a memory card to the printer and print them without the
need to reinsert the memory card.
3
Table of Contents
What You Can Do with Your SELPHY ..........................................2
Table of Contents .............................................................................4
About This Guide .............................................................................6
Conventions Used in this Guide...........................................................6
Getting Started ..................................................................................7
Y
P
O
Check the Package Contents...............................................................8
Accessories (Sold Separately) .............................................................9
Components Guide ............................................................................10
Preparing/Replacing/Storing the Easy Photo Pack ................................21
Placing/Connecting the Printer...........................................................27
Printing Precautions ...........................................................................28
Printing from Memory Cards .....................................................29
C
Compatible Memory Cards ................................................................30
Insert a Memory Card ........................................................................31
Print Selected Images (Basic Print) ...................................................32
Print All Images ..................................................................................37
Print an Image Using Camera Specified Settings (DPOF Print) ........38
Selecting an Image during Auto Play for Printing (Auto Play)............39
Creative Print .....................................................................................40
Print Settings......................................................................................54
Printing Favorite Images .............................................................59
Add Favorite Images to the Printer ....................................................60
Print Added Images............................................................................62
Protect................................................................................................63
Erase..................................................................................................66
4
Table of Contents
Reprinting .........................................................................................69
Reprint................................................................................................70
Printing from a Camera ...............................................................72
Print Images When Connected with a Camera ..................................73
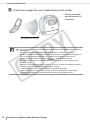
Printing from a Mobile Phone (Wireless Printing).............75
Y
P
O
Infrared (IrDA) Wireless Printing ........................................................76
Printing via Bluetooth .........................................................................77
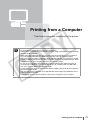
Printing from a Computer ...........................................................79
System Requirements........................................................................80
Install the Printer Driver and Software ...............................................82
Introduction to the Supplied Programs...............................................88
Appendix ...........................................................................................98
C
Make Printer Settings.........................................................................99
Cleaning, Storing and Carrying the Printer.......................................103
Safety Precautions ...........................................................................105
Handling Precautions .......................................................................107
Specifications ...................................................................................109
Troubleshooting ........................................................................... 111
You Think There is a Problem .......................................................... 112
Error Messages................................................................................ 116
Index .................................................................................................122
5
About This Guide
Before using your printer for the first time, please read through the Safety Precautions
(p. 105) and the Handling Precautions (p. 107).
Conventions Used in this Guide
Y
P
O
This mark denotes issues that
may affect the printer's operation.
C
This mark denotes additional
topics that complement the basic
operating procedures. The
number refers to the
corresponding step.
z Use the "Easy Photo Pack" which is an ink and paper integrated cartridge in the SELPHY ES
series. This is referred to as "Easy Photo Pack" or "cartridge" in this guide.
z This printer can be used with various types of media, such as, SD* memory cards or
MultiMediaCards (p. 30).
These types of media are referred to as "memory cards" in this guide.
* SD is an acronym for Secure Digital.
z General "camera" descriptions in this guide refer to digital cameras or digital camcorders
compatible with the SELPHY ES3. The explanations in this guide use Canon digital cameras.
z In this guide, the screen shots from the LCD monitor show a "P" for the Postcard-size ink and
paper integrated cartridge.
z Illustrations and screen examples shown in this guide may differ slightly from the actual printer.
6
Getting Started
C
Y
P
O
Getting Started
7
Check the Package Contents
The package contains the following accessories. If there is anything missing, please contact the
store where you purchased this product.
Main Printer Unit
5 Print Trial Cartridge
(Postcard size)
Cleaner Unit
(Inserted prior to shipment)
Y
P
O
• SELPHY Beginner's Guide
• Warranty Card
• "Canon Customer Support"
Leaflet
Compact Photo Printer
Solution Disk
C
8
Getting Started
Power Cord
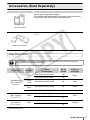
Accessories (Sold Separately)
Ink and paper integrated cartridge.
The cartridge differs depending on the paper size and ink type.
Please refer to the Easy Photo Pack table below.
Easy Photo Pack
You can print wirelessly from a Bluetooth-enabled mobile phone
(p. 77).
Bluetooth Unit BU-30
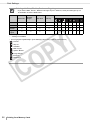
Easy Photo Packs
C
Y
P
O
Thin lines/texts may be unclear or defaced when printing with the gold or silver print supporting
cartridge (Easy Photo Pack E-P20G/E-P20S).
Paper Size
Ink Type
No. of
Sheets
Color of
Cartridge
Easy Photo Pack E-P100
100
Easy Photo Pack E-P50
50
Color/
Gold
Easy Photo Pack E-P20G
20
Gold
Color/
Silver
Easy Photo Pack E-P20S
20
Silver
Easy Photo Pack E-P25BW
25
Gray
Easy Photo Pack E-L100
100
Easy Photo Pack E-L50
50
Easy Photo Pack E-C25
25
Easy Photo Pack E-C25L*
25
Color
Postcard size
(100 x 148mm)
(4 x 6 in.)
Name
(Product No.)
BW
L size
(89 x 119mm)
(3.5 x 4.7 in.)
Color
Card size
(54 x 86mm)
(2.1 x 3.4 in.)
Color
Green
Blue
Orange
* Card-size label sheet.
Getting Started
9
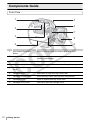
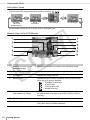
Components Guide
Front View
1
5
6
2
7
3
4
10
Y
P
O
8
9
1
Print Output Receptacle
Button
2
Card Slot Cover
3
Print Output Receptacle
4
Paper-Handling Slot
5
Print Output Receptacle
Cover
6
Cartridge Lever
7
Cartridge Compartment
Insert the Easy Photo Pack into this compartment.
8
Cartridge Cover
Open to replace the Easy Photo Pack.
9
Cartridge Cover Lever
Slide up to open the cartridge cover.
C
Getting Started
Press to manually open the output receptacle cover.
Open to insert a memory card or card adapter with a
memory card inserted.
Paper is deposited here after printing.
Paper projects from this slot while printing is in progress.
Opens automatically when printing starts.
Slide down to eject the Easy Photo Pack.
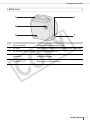
Components Guide
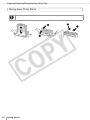
Back View
1
4
2
3
Y
P
O
5
1
Carrying Handle
2
Air Vents
3
AC IN (Power Input) Terminal
Connects to the power cord.
4
USB Terminal for PC
Connection
For USB connection to your PC using a commercially
available USB cable.
5
USB Terminal for Camera
Connection
Used for carrying the printer (p. 104).
Dissipates heat inside the printer and prevents overheating.
C
Connects to a camera using the interface cable, or
Bluetooth unit (sold separately).
Getting Started
11
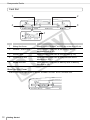
Components Guide
Card Slot
1
4
2
5
3
1
Sliding Slot Cover
2
SD/MMC+/miniSD Slot
3
microSD Slot
4
CF/microdrive Slot
5
MS/MS Duo Slot
C
About the Slot Cover
Y
P
O
Slide to use the SD/MMC+/miniSD slot or the microSD slot.
Insert a memory card such as SD memory card or
MultiMediaCard (p. 30).
Insert a memory card such as microSD card (p. 30).
Insert a memory card such as CompactFlash card or
Microdrive (p. 30).
Insert a memory card such as Memory Stick or Memory
Stick Duo (p. 30).
Slide the slot cover right or left to use the "SD/MMC+/miniSD" slot or "microSD" slot.
12
Getting Started
Components Guide
Controls
1
2
3
4
5
6
7
8
9
1
Button
2
Saving Lamp
3
Power Lamp
4
5
6
7
8
Y
P
O
10
11
12
13
14
15
16
17
Displays the mode menu (p. 18).
Indicates the status of the built-in memory.
Blinks orange: Adding images in the printer.
C
Button
Button
Button
Infrared Data Receiver
Button
Indicates the printer status.
Lights green: Power on / communicating infrared data
Blinks green: Printing
Blinks green (fast): Communicating with Bluetooth /
Direct Print
Turns the printer's power on when pressed until the power
lamp lights green.
Displays the Creative Print menu (p. 40).
Displays the main menu (displayed menu items differ
depending on the print mode).
Print All Images (p. 37)
DPOF Print (p. 38)
Auto Play (p. 39)
Print Settings (p. 54)
Printer Setup (p. 99)
Add to Favorites (p. 60)
Protect (p. 63)
Erase (p. 66)
Receives infrared data from a mobile phone.
Displays the properties of the selected image (p. 16).
Getting Started
13
Components Guide
9
10
Button
LCD Monitor
11
Displays the editing menu.
Trimming (p. 33)
Page Layout (p. 35)
Select by date (p. 36)
Displays images, setting screens, and error messages.
(Enlarge, Reduce)
Displays an enlarged or reduced view of the image (p. 15).
Button
12
Button
13
Button
Confirms settings.
14
Easy-Scroll Wheel
15
,
,
,
(Up, Down,
Left, Right) Buttons
16
Button
17
Starts printing.
Button
Used instead of
,
functions) (p. 20).
,
,
(excluding some
Y
P
O
Used for selecting images, shifting items, changing setting
value, moving trimming frames, etc.
Returns to the previous screen.
Cancels printing.
Specifies the number of prints for a selected image.
The LCD monitor may be covered with a thin plastic film for protection against scratches during
shipment. If so, remove the film before using the printer.
C
14
Getting Started
Components Guide
LCD Monitor
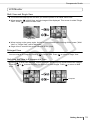
Multi View and Single View
z The screen that displays the first time you turn the printer on is called "Multi View".
z When pressing
in Multi View, a single image will be displayed. This screen is called "Single
View". Press
to return to Multi View.
Y
P
O
Single View
Multi View
z When turning on the power again, the last screen selected before turning off the power ("Multi
View" or "Single View") will be displayed.
z Single View is used for the screen samples in this guide.
Enlarged View
You can enlarge an image by pressing
in Single View. Press
to return to Single View.
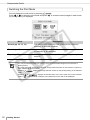
Switching the View to 9 Images at a Time
Pressing
Press the
View.
C
in Multi View displays a set of 9 images, and a jump bar appears below the images.
or
buttons to display the previous or next images. Press
to return to Multi
Multi View
Jump Bar
9 Image View
Getting Started
15
Components Guide
Information Views
You can switch the image information views by pressing
Operation
commands
(Default setting)
Image
information
Print settings
.
No information
No information displays only in Single View or Enlarged View.
Sample View of the LCD Monitor
Y
P
O
Image information
16
C
1
Number of Copies for the
Displayed Image
2
Time and Date
3
File Number
Displays the image number.
4
Memory Card
Displays the slot in which a memory card is inserted (only
when the print mode is Normal).
: SD/MMC+/miniSD slot
: microSD slot
: CF/microdrive slot
: MS/MS Duo slot
5
Number of Displayed Image/
Total Number of Images
Displays the number of the currently displayed image, and
the total number of images on a memory card (or built-in
memory).
6
Total Number of Copies
Displays the total number of images to print.
7
Recording Pixels
Displays the recording pixels or time counter for movies
(only when the print mode is Normal).
Getting Started
Displays the number of copies for the displayed image.
Displays the date and time the image was shot.
Components Guide
8
Paper Type
Displays the paper type.
P
: Postcard size
L
: L size
C
: Card size
C Label : Card size full-sized label sheet
G
: Postcard size (supporting gold printing)
S
: Postcard size (supporting silver printing)
BW
: Postcard size (black and white)
9
Paper Status
Displays the remaining amount of paper in the cartridge.
: 1/2 full or more (the trial cartridge is different
from the commercially available Easy Photo
Pack and
does not display).
: About 1/4 full or more.
: About 1/8 full or more.
: The cartridge is empty.
No Display : The status is unknown.
10
Protect
11
Operation Guides
Y
P
O
Displays when the image is protected (Favorite print mode
only).
C
Displays operation guides. Follow the instructions to
proceed.
Getting Started
17
Components Guide
Switching the Print Mode
You can display the mode menu by pressing
Press
or
to select the print mode and press
(or printing history) is displayed.
Mode
.
. A screen to select images in each mode
Y
P
O
Description
Normal (pp. 32, 75, 79)
Print images from a memory card, mobile phone (cellphone
(Infrared)) or personal computer.
Favorite (p. 62)
Select images saved in the built-in memory of the printer in [Add
to Favorites] (p. 60) and print.
Reprint (p. 70)
Select images you wish to reprint from the printing history list
and print.
C
• You can print without inserting a memory card if you have added images to the favorites or
printing history.
• The mode menu can be displayed anytime, except when the printer is connected to a camera or
when a Bluetooth unit is inserted.
• Pressing
displays the image selection screen (or the printing history) in the selected
mode.
• Pressing
or
displays the Creative Print menu or the main menu in the selected
mode. If
is pressed while in Reprint, the Creative Print menu will not be displayed.
18
Getting Started
Components Guide
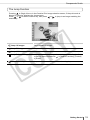
The Jump Function
Pressing
in Single View or in the Creative Print image selection screen, if the print mode is
Normal or Favorite, displays the Jump screen.
Press
or
to select a search key, then press
or
to jump to an image matching the
search key.
Y
P
O
Jump 10 Images
Jumps ahead 10 images.
Jump 50 Images
Jumps ahead 50 images.
Jump 100 Images
Jumps ahead 100 images.
Jump Selected Images
Jumps to the images that you have set a number of copies for,
or that you have marked with
in [Add to Favorites], [Protect]
or [Erase].
C
Jump Selected date
Jumps to the newest image of each shooting day.
Getting Started
19
Components Guide
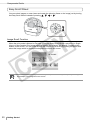
Easy-Scroll Wheel
You can select images or menu items and rotate the trimming frame or the image just by turning
the Easy-Scroll Wheel instead of pressing
,
,
or
.
Image Scroll Function
Y
P
O
When the print mode is Normal or Favorite, giving the Easy-Scroll Wheel a quick turn in Single
View or in the Creative Print image selection screen, for example, will display 5 images at the
bottom of the screen. You can scroll through the images one at a time by turning the wheel and
select the image which is displayed enlarged at the upper left corner.
C
If there are less than 5 images on a memory card (or built-in memory of the printer), the Image
Scroll display will not appear on the screen.
20
Getting Started
Preparing/Replacing/Storing the Easy Photo Pack
Replace the Easy Photo Pack with the size of the paper you wish to print.
Preparing the Easy Photo Pack
An ink and paper integrated cartridge is used in this printer (p. 9). Prepare a cartridge (Easy Photo
Pack) with the size of paper you wish to print.
• When opening a cartridge, check the contents. If something seems to be damaged, contact the
dealer for assistance.
• Some cartridges are not supported depending on the printing type. Check the table below.
Print Type
Y
P
O
Creative Print
Basic Print
Print All
Images
Ink Type
Color
{
{
BW
{
{
Gold/Silver
–
–
{ : Available
– : Not available
DPOF Print
Auto Play
{
{
{
{
{
{
{
{
{
{
{
{
–
–
–
–
–
{*
{
{
–
–
{
{
–
–
–
–
–
–
* Cannot be used with Sepia, B/W, Positive Film, Lighter Skin, Darker Skin.
: Frames
: Clip Art
: Calendar
C
: Multi Layout
: Speech Bubble
: Image Effects
: ID Photo
: Movie Print
Getting Started
21
Preparing/Replacing/Storing the Easy Photo Pack
Inserting the Easy Photo Pack into the Printer
• Do not touch the ink sheet of the cartridge, or pull out the ink sheet or papers.
There may not be enough ink left for the allotted sheets, or paper jams or poor printing may result.
• Do not handle the cartridge with wet or sweaty hands.
• Please use only cartridges specified for use with the SELPHY ES series (Cartridges for the CP
series cannot be used).
• Do not apply excessive force to the cartridge.
The paper may come out from under the clips. In this case, push the paper back under the clips.
Ink sheet
1
2
3
22
Y
P
O
Clip
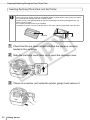
Check that the ink sheet is tight and that the paper is correctly
loaded in the cartridge.
Slide the cartridge cover lever up to open the cartridge cover.
C
If there is a cleaner unit inside the printer, grasp it and remove it.
Getting Started
Preparing/Replacing/Storing the Easy Photo Pack
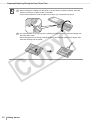
4
Make sure that the cartridge is oriented as shown by the direction
indicator on the inside of the printer, and insert the cartridge until it
clicks into place.
Direction
indicator
5
Y
P
O
Protective paper
Press the area marked PUSH to close the cartridge cover.
C
Getting Started
23
Preparing/Replacing/Storing the Easy Photo Pack
1
• When inserting the cartridge into the printer, if the ink sheet is so slack it catches, insert the
cleaner unit and turn it slowly to take up the slack.
• It will not be possible to use all the paper for printing if you overwind the ink sheet.
4
• The colored paper on the top side of the cartridge is protective paper. Load the cartridge with
this paper still in place.
• Some cartridges have an orange colored stopper on the backside. Remove the stopper then
insert the cartridge into the printer.
C
24
Getting Started
Y
P
O
Preparing/Replacing/Storing the Easy Photo Pack
Replacing the Easy Photo Pack
Replace the Easy Photo Pack when paper has run out, or if another sheet size is required.
• Do not remove the Easy Photo Pack while paper is being fed into or ejected from the printer, or
while printing is in progress.
• When replacing the Easy Photo Pack, remove all paper from the print output receptacle.
• Do not reuse empty Easy Photo Packs. Attempting to reuse an empty Easy Photo Pack may result
in malfunction or damage to the printer.
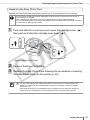
1
Push and slide the cover lever up to open the cartridge cover (
then push and slide the cartridge lever down ( ).
C
),
Y
P
O
• Eject the Easy Photo Pack.
2
3
Remove the Easy Photo Pack.
Replace the Easy Photo Pack following the procedures in inserting
the Easy Photo Pack into the printer (p. 22).
3
• You can check the type of the Easy Photo Pack and the amount of remaining paper (ink)
loaded in the printer, by the icons displayed in the print confirmation, printing or standby
screens (p. 17).
• After power is turned on, or immediately after the cartridge cover is opened or closed, the
status icon is not displayed. This icon is displayed when one sheet has been printed.
Getting Started
25
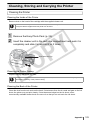
Preparing/Replacing/Storing the Easy Photo Pack
Storing Easy Photo Packs
When storing the Easy Photo Pack, return it to its original package.
C
26
Getting Started
Y
P
O
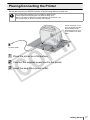
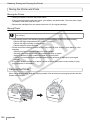
Placing/Connecting the Printer
Set up and connect your SELPHY printer in the following manner for safe use.
• Do not place the equipment on an unstable or tilted surface.
There is risk that the equipment may fall and cause injury.
• Be sure to select a safe place to avoid tripping over the power cord.
• Do not block the air vents on the back of the printer.
Leave more than 15 cm
(6 in.) of clearance at the
front and back of the
equipment and 10 cm (4
in.) of clearance on both
sides.
Y
P
O
15 cm
(6 in.)
To power outlet
1
2
3
15 cm
(6 in.)
10 cm
(4 in.)
Place the printer on a flat surface.
C
Connect the supplied power cord to the printer.
Insert the plug into a power outlet.
Getting Started
27
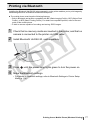
Printing Precautions
These cautions apply to Printing from Memory Cards, Printing Favorite Images, Reprinting,
Printing from a Camera, Wireless Printing, and Printing from a Computer.
z Do not eject the Easy Photo Pack or open the cartridge cover right after turning the power on or
while printing. It may result in equipment damage.
z During the printing operation, paper is temporarily output from the printer. Do not touch the
paper until printing ends. This could impede printing, or may result in equipment damage.
z Do not allow 50 or more sheets to accumulate in the print output receptacle while printing.
z Do not close the print output receptacle cover when printing. If closed accidentally, press the
print output receptacle button to open the cover.
z If the printer overheats, it will temporarily stop operating. The printer will resume normal printing
as soon as it cools down (This will occur if the room is unusually warm or you are printing
continuously).
z Do not print on printed paper.
C
28
Getting Started
Y
P
O
Printing from Memory
Cards
Y
P
O
Print images from a memory card that is inserted
into the printer.
• Make sure that a camera or computer is not connected to the printer.
• This printer supports image data conforming to the Design rule for Camera File system
(Exif compliant) and DPOF (Ver.1.00) standard.
• Images that have been edited on a computer might not be displayed or printed
successfully.
• An image that has been taken by a mobile phone, depending on the size of the image
when the image was taken, might not be displayed or printed successfully.
• Movies cannot be played back on this printer.
C
Printing from Memory Cards
29
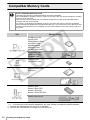
Compatible Memory Cards
About Compatible Memory Cards
• Operation with all memory cards listed below cannot be guaranteed.
• Do not add labels or stickers to memory cards. The memory card may get stuck inside the card slot
and may not be removed.
• Use a memory card formatted with your camera. Images from a memory card formatted with a
computer may not be recognized.
• For memory cards requiring an adapter, be sure to first insert the memory card into the adapter
before inserting the adapter into the appropriate card slot. If you insert the memory card into a card
slot without first inserting it into an adapter, you may not be able to remove the memory card from
the printer.
Slot
Memory Cards
Y
P
O
SD Memory Card
miniSD Card
SDHC Memory Card
miniSDHC Card
MultiMediaCard
MMCplus Card
HC MMCplus Card
MMCmobile Card
MMCmicro Card
RS-MMC Card*1
C
microSD Card
microSDHC Card
CompactFlash Card
Microdrive
xD-Picture Card*2
Memory Stick
Memory Stick PRO
Memory Stick Duo
Memory Stick PRO Duo
Memory Stick micro
: You need to use the specific adapter for the card. Please purchase the specific adapter.
*1
*2
30
Reduced-Size MultiMediaCard is referred to as "RS-MMC."
Purchase the CompactFlash Card Adapter for xD-Picture Card.
Printing from Memory Cards
Insert a Memory Card
Insert a single memory card into the printer.
Please refer to the user guide included with your memory card for handling instructions.
1
Press
until the power lamp lights
green to turn the power on.
• The startup screen
appears on the LCD
monitor.
2
• An image is displayed
on the LCD monitor.
C
• Slide the card slot cover to
switch from SD/MMC+/miniSD
slot to microSD slot.
• Insert a memory card all the
way in (for microSD cards,
microSDHC cards, push the
card in until you hear a click).
• When you remove a memory
card from a card slot, grasp the
portion of the card protruding
from the card slot, and pull it out
(for microSD cards, microSDHC
cards, push the memory card in
until you hear a click, and after it
silently pops out, grasp it and
pull it out).
• There is a lead-in guide to be
tailored to the size of the
memory card in the "SD/MMC+/
miniSD" slot. Insert a small
memory card, such as a miniSD
Card, along the lead-in guide.
• If the confirmation screen for
whether or not to use DPOF for
printing is displayed on the LCD
monitor, select [OK] or [Cancel]
then follow the instructions
below.
[OK] : Step 3 on Page 38
[Cancel] : Page 32
Y
P
O
Insert a single memory card into the
appropriate card slot of the printer.
Label side
2
Printing from Memory Cards
31
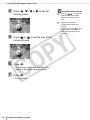
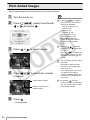
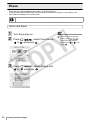
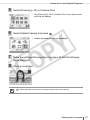
Print Selected Images (Basic Print)
You can select images, specify the number of copies for each, and then print them all out.
1
2
3
Turn the printer on, and insert the
memory card into the appropriate
memory card slot (p. 31).
Press
or
Press
or
of copies.
C
.
• Printing starts.
32
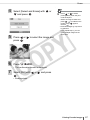
3
• You can specify up to 99 copies
per image.
• Set borders, dates and other
functions in [Print Settings] in
advance (p. 54).
• If you repeat steps 2 and 3, you
can specify the number of
copies for multiple images and
then print all of the images at
the same time.
4
• By pressing
when the
number of copies for all images
is 0, you can print only one copy
of the image selected.
Y
P
O
to specify the number
Number of copies of the
selected image
Press
• Press
to switch the
displayed image information
(p. 16).
• Press
to display the
editing menu, and you can print
the image after editing (pp. 33,
35, 36).
to select images.
Total number of copies
4
2
Printing from Memory Cards
Print Selected Images (Basic Print)
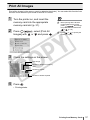
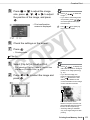
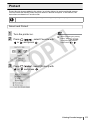
Enlarging and Printing a Portion of an Image (Trimming)
You can trim a part of the desired image and print.
1
Press
32.
Y
P
O
as in step 2 on page
1
• You cannot trim an image
smaller than 640 x 480, larger
than 5616 x 3744 or narrower
than aspect ratio 16:9.
• Maximum of 50 images can be
trimmed in Basic Print.
3
• In [Clip Art] (p. 43), [Calendar]
(p. 45), [Multi Layout] (p. 47),
[Speech Bubble] (p. 48) or [ID
Photo] (p. 51) in Creative Print,
you can trim an image from step
3 and the following steps.
• The edit menu is displayed.
2
Press
or
to select [Trimming]
and press
.
• Trimming setting screen
is displayed.
3
C
Press
to rotate the trimming
frame and set the aspect.
Printing from Memory Cards
33
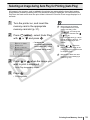
Print Selected Images (Basic Print)
4
5
6
Press
,
,
trimming area.
or
to set the
C
.
• The setting is completed and the screen
returns to the image selection screen.
7
Press
.
• Printing starts.
34
Printing from Memory Cards
• Press
to cancel the
trimming setting, and select
[Reset trimming] in the edit
menu.
7
• The trimming setting is
canceled after printing has
finished.
• In Basic Print, press
to print
images set for trimming and
other selected images at the
same time.
Y
P
O
Press
or
to set the size of the
trimming frame.
Press
6
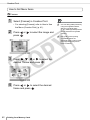
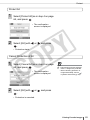
Print Selected Images (Basic Print)
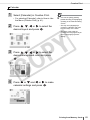
Put Images in a Single Sheet (Page Layout)
Set the number of images to print in a single sheet temporarily, then print.
1
Press
32.
as in step 2 on page
3
• The edit menu is displayed.
2
3
Press
or
to select [Page Layout]
and press
.
Y
P
O
Press
or
to select the desired
layout and press
.
C
• The layout is set and
the screen returns to
the image selection
screen.
4
Press
• The layout you can change is
the same as [Page Layout]
(p. 57) in [Print Settings].
• This setting is not reflected in
[Page Layout] in [Print Settings].
• Use
or
for specifying
the number of copies
appropriate to the layout. The
position of the image cannot be
specified.
• If you change the layout after
making the trimming setting, the
confirmation screen to change
the trimming setting appears.
Select [OK], and the trimming
setting changes automatically to
the most suitable setting.
• If you select [Index] after
making the trimming setting, the
confirmation screen to remove
selected images and the set
number of prints appears. If you
choose [OK], the settings will
cancel, and the layout will be
set to [Index].
4
• The page layout setting is
canceled after printing has
finished.
.
• Printing starts.
Printing from Memory Cards
35
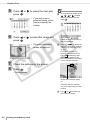
Print Selected Images (Basic Print)
Select Images by Shooting Date
Narrow images down by shooting date and print after selecting images.
1
Press
32.
as in step 2 on page
3
• If there are multiple images for
the selected shooting date,
press
or
to check the
images.
4
• Use
or
for specifying
the number of copies.
• If you wish to cancel the setting
of [Select by date], press
to select [View all]
in the edit menu.
• The edit menu is displayed.
2
Press
or
to select [Select by
date] and press
.
Y
P
O
5
3
Press
press
or
to select the date and
C
.
• The image confirmation
screen of the date you
selected is displayed.
4
5
Press
or
Press
.
to select images.
• Printing starts.
36
Printing from Memory Cards
• The selection by date is
canceled after printing has
finished.
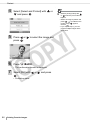
Print All Images
Print all the images in the memory card (or added to the printer). You can select this function from
the main menu when the print mode is Normal or Favorite.
1
2
3
Turn the printer on, and insert the
memory card into the appropriate
memory card slot (p. 31).
Press
Images] with
, select [Print All
or
and press
.
2
• When printing all the favorite
images added to the printer,
press
and change
the print mode to Favorite with
or
(p. 18).
3
• Press
or
to specify the
number of copies.
Y
P
O
Check the settings on the screen.
C
Print image
Number of images on memory
card
Number of copies
Number of sheets required
4
Press
.
• Printing starts.
Printing from Memory Cards
37
Print an Image Using Camera Specified Settings (DPOF Print)
You can make prints according to the DPOF (Digital Print Order Format) setting specified on the
camera.
For details on the DPOF settings, refer to the user guide provided with your camera.
1
2
3
Turn the printer on, and insert the
memory card into the appropriate
memory card slot (p. 31).
2
Press
with
• [DPOF Print] is only displayed
when the print mode is Normal
and a memory card containing
images with DPOF settings set
with a camera is inserted.
3
• The date and file number reflect
the DPOF settings. These
settings cannot be changed with
the printer.
• Settings of the printer are
reflected in the following when
[Print Type] is set to [Standard]
with a Canon camera. Set [Print
Settings] (p. 54) in advance.
[Borders]
[Page Layout]*1
[Correct Red-Eye]
[Image Optimize]
[Adjust Image]*2
*1 Even if you select [Index] in
[Page Layout] on the printer,
the print will come out as [1up].
*2 Even if you set the [Print
Type] to [Index] on the
camera, the settings made
on the printer will be
reflected.
or
, select [DPOF Print]
and press
.
Y
P
O
Check the settings on the screen.
C
[Date] and [File No.] set with
the camera
The [Print Type] set with the
camera
: Standard
: Index
Number of sheets required
4
Press
.
• Printing starts.
38
Printing from Memory Cards
Selecting an Image during Auto Play for Printing (Auto Play)
All images in the memory card (or added to the printer) are automatically played back and an
image can be printed by pausing Auto Play while that image is displayed. You can select Auto
Play from the main menu when the print mode is Normal or Favorite. Each image displays for 3
seconds.
1
2
Turn the printer on, and insert the
memory card in the appropriate
memory card slot (p. 31).
Press
with
or
, select [Auto Play]
and press
.
\
C
• When printing the favorite
images added to the printer
during Auto Play, press
and change the
print mode to Favorite with
or
(p. 18).
• If you set [Transition] (p. 100) in
[Printer Setup] in advance, you
can play back images with
effects.
Y
P
O
• Images are
automatically played
back after they have
finished being read.
3
2
3
• Press
or
while Auto
Play is paused to return to the
previous image or move forward
to the next image.
4
• Set borders, dates and other
functions in [Print Settings] in
advance (p. 54).
Press
or
when the image you
wish to print is displayed.
• Auto Play temporarily stops.
4
Press
.
• Printing starts.
Printing from Memory Cards
39
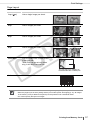
Creative Print
Creative Print allows for easy printing of images in a few simple steps, following the instructions
on the screen. With this function, Frames, Clip Art, Calendar, Multi Layout, Speech Bubble, Image
Effects, ID Photo and Movie Print options are available.
Frames
Images with added frames are
printed.
Clip Art
Images with added clip art stamps are
printed.
Calendar
A one-month calendar and images
are printed after selecting one of the
available layouts.
Multi Layout
Images are printed as a picture diary.
You can enjoy writing your messages
with a marker pen.
C
40
Y
P
O
Speech Bubble
Images are printed out overlaid with a
speech bubble. You can enjoy writing
your messages in the speech bubble
with a marker pen.
Image Effects
Images with added effects are
printed.
ID Photo
The desired size of the final image is
set, and a portion of the image is
printed as ID photos.
Movie Print
Movie frames are printed at regular
intervals on a single sheet.
Printing from Memory Cards
Creative Print
How to Use the Menu (Creative Print)
1
2
Turn the printer on, and insert the
memory card into the appropriate
memory card slot (p. 31).
Press
.
• The Creative Print
menu is displayed.
3
4
2
Y
P
O
3
• Only [Image Effects], [ID Photo]
and [Movie Print] are displayed
when the black and white
cartridge (Easy Photo Pack EP25BW) is inserted into the
printer (p. 21).
• Only [Frames] and [Clip Art] are
displayed when the gold or
silver print supporting cartridge
(Easy Photo Pack E-P20G/EP20S) is inserted into the printer
(p. 21).
4
• Multiple functions cannot be
applied to an image at the same
time.
• Each function is available only
for a single image for each
printing. You can select several
images up to frame number with
[Multi Layout].
• If you change the cartridge
while making settings, the
settings, such as trimming or
position, are automatically
adjusted to fit the new cartridge.
• If the new cartridge does not
support the set function or
setting, the screen will return to
the Creative Print menu.
• Print confirmation screen (the
finished image) is displayed
after finishing each setting.
Press
to start printing.
Press
,
,
or
to select the
desired function and press
.
C
• When printing the favorite
images added to the printer with
the Creative Print function,
press
and change
the print mode to Favorite with
or
(p. 18).
• Creative Print is not available
when the print mode is Reprint.
Make settings and then print.
• For detailed settings for each item, refer to
pp. 42 - 53.
Printing from Memory Cards
41
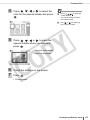
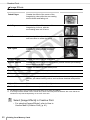
Creative Print
How to Set Menu Items
Frames
1
Select [Frames] in Creative Print.
• For selecting [Frames], refer to How to Use
the Menu (Creative Print) (p. 41).
2
3
4
42
Press
press
or
.
3
to select the image and
Y
P
O
Press
,
,
or
to select the
desired Theme and press
.
C
Press
or
to select the desired
frame and press
.
Printing from Memory Cards
• You can add (update) frames by
using the supplied software,
SELPHY Contents Utility
(p. 93). Added (updated) frames
can be selected from [Added
Frames].
4
• Only gold or silver printing
compatible frames are
displayed when a gold or silver
print supporting Easy Photo
Pack is inserted.
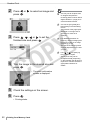
Creative Print
5
Press
or
to adjust the image
size, press
,
,
or
to adjust
the position of the image, and press
.
• Print confirmation
screen is displayed.
6
7
Press
.
Clip Art
6
• Use
or
for specifying
the number of copies.
Y
P
O
C
Select [Clip Art] in Creative Print.
• For selecting [Clip Art], refer to How to Use
the Menu (Creative Print) (p. 41).
2
• Press
to rotate the
image.
• If you wish to reset image size
and position, press
and select [Reset settings] in
the edit menu.
Check the settings on the screen.
• Printing starts.
1
5
Press
press
or
.
to select the image and
2
• Press
to display the
edit menu and print an enlarged
portion of an image (trimming)
(p. 33).
• If you trim the image, the
trimming frame has an arrow
icon (
) attached to it that
allows you to determine the
correct orientation for the image
once it has been trimmed.
The arrow shows which
direction the print will come out
(with Postcard size Easy Photo
Packs, the arrow points up).
• Trimming setting is available
only for a single image for each
printing.
Printing from Memory Cards
43
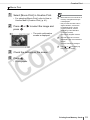
Creative Print
3
4
5
Press
,
,
or
to select the
desired clip art stamp and press
.
or
to select an item and
.
• If you wish to add clip art stamps, select [Yes]
and repeat steps 3 to 5.
6
7
C
Check the settings on the screen.
Press
.
• Printing starts.
44
Printing from Memory Cards
• You can add (update) clip art
stamps by using the supplied
software, SELPHY Contents
Utility (p. 93).
• Only gold or silver printing
compatible clip art stamps are
displayed when a gold or silver
print supporting Easy Photo
Pack is inserted.
4
• A single image can contain up
to 30 clip art stamps.
• Press
to rotate the
clip art stamp.
• You cannot enlarge or reduce
clip art stamps.
Y
P
O
Press
,
,
or
to place the
clip art stamps where you wish and
press
.
Press
press
3
6
• Use
or
for specifying
the number of copies.
Creative Print
Calendar
1
Select [Calendar] in Creative Print.
• For selecting [Calendar], refer to How to Use
the Menu (Creative Print) (p. 41).
2
3
4
Press
,
,
or
to select the
desired layout and press
.
4
• You can set [Year], [Month],
[Week start day], and [Highlight]
(holiday) in the calendar setting
screen.
• The day set in [Highlight] is
printed in a different color from
the other days of the week.
• The days of the week are
printed in the language that you
set in [Language] in [Printer
Setup].
Y
P
O
Press
,
,
or
to select the
desired background color and press
.
C
Press
or
and
or
calendar settings and press
to make
.
Printing from Memory Cards
45
Creative Print
5
Press
press
or
to select the item and
.
5
• If you wish to set a
personal holiday, select
[Yes] and specify the
holiday.
6
Press
press
or
.
Y
P
O
to select the image and
• The print confirmation
screen is displayed.
7
8
C
• To set a personal holiday, press
,
,
or
to select
the day you wish to set and
press
.
After pressing
,
holiday is set and the screen in
step 5 is displayed.
6
• Press
to display the
edit menu and print an enlarged
portion of an image (trimming)
(p. 33).
• If you trim the image, the
trimming frame has an arrow
icon (
) attached to it that
allows you to determine the
correct orientation for the image
once it has been trimmed.
Check the settings on the screen.
Press
.
• Printing starts.
Shows which direction will be
up
• Trimming setting is available
only for a single image for each
printing.
7
46
Printing from Memory Cards
• Use
or
for specifying
the number of copies.
Creative Print
Multi Layout
1
Select [Multi Layout] in Creative Print.
• For selecting [Multi Layout], refer to How to
Use the Menu (Creative Print) (p. 41).
2
3
4
Press
,
,
or
to select the
desired layout and press
.
Press
press
or
.
• A preview of the layout is
displayed on the right edge of
the screen.
• Select an image you wish to
arrange and press
, then the
frame number and
are
added on the image. Press
to remove
.
• You can specify the same
image to multiple frames.
• You cannot make a blank frame.
• Press
to display the
edit menu and print an enlarged
portion of an image (trimming)
(p. 33).
• If you trim the image, the
trimming frame has an arrow
icon (
) attached to it that
allows you to determine the
correct orientation for the image
once it has been trimmed.
Y
P
O
Press
,
,
or
to select the
desired background color and press
.
C
4
to select the image and
Shows which direction will be
up
• The number of images you can
make trimming setting per
single print operation is the
same number as the images
arranged.
• When pressing
after
assigning an image to
all frames, the print
confirmation screen is
displayed.
Printing from Memory Cards
47
Creative Print
5
6
Check the settings on the screen.
5
Press
.
• Use
or
for specifying
the number of copies.
• Printing starts.
Speech Bubble
1
Select [Speech Bubble] in Creative
Print.
Y
P
O
• For selecting [Speech Bubble], refer to How
to Use the Menu (Creative Print) (p. 41).
2
3
48
Press
press
or
.
to select an image and
C
Press
,
,
or
to select the
desired speech bubble and press
.
Printing from Memory Cards
2
• Press
to display the
edit menu and print an enlarged
portion of an image (trimming)
(p. 33).
• If you trim the image, the
trimming frame has an arrow
icon (
) attached to it that
allows you to determine the
correct orientation for the image
once it has been trimmed.
The arrow shows which
direction the print will come out
(with Postcard size Easy Photo
Packs, the arrow points up).
• Trimming setting is available
only for a single image for each
printing.
Creative Print
4
5
Press
,
,
or
to select the
color for the speech bubble and press
.
5
• Press
to rotate the
speech bubble.
• You cannot enlarge or reduce
the speech bubble.
6
• Use
or
for specifying
the number of copies.
Y
P
O
Press
,
,
or
to place the
speech bubble where you wish and
press
.
• The print confirmation
screen is displayed.
6
7
C
Check the settings on the screen.
Press
.
• Printing starts.
Printing from Memory Cards
49
Creative Print
Image Effects
Faded Edges
Creates the effect of the center of the
image being clear while the surrounding
area is fainter and fading out.
Soft Edges
Creates the effect of the center of the
image being in focus, with the
surrounding area out of focus.
Soft Focus
Creates the effect of a soft focus lens or
soft focus filter to soften the image.
Star Lights
Creates the effect of bright spots in an
image being enlarged with a sparkle
effect.
Modern Bright
Creates the effect of a soft white haze.
Pinhole Camera
Nostalgic
Sepia
B/W
C
Y
P
O
Creates the effect of a picture taken with a pinhole camera (surrounding
area is darker and high contrast).
Creates the effect of a color-faded photo.
*1
Images are printed out in sepia tone.
*1
Images are printed out in black and white.
Positive Film
*1
This setting makes red, green or blue colors more intense. It produces
intense, yet natural-looking colors, such as those obtained with positive
film.
Lighter Skin*1 *2
Skin tones are reproduced in a lighter tone.
Darker Skin*1 *2
Skin tones are reproduced in a darker tone.
*1
*2
Not displayed when using the black and white Easy Photo Pack (E-P25BW).
If an image contains similar color to human skin, these colors may also be affected. Skin color effects are
sometimes not produced depending on the color of the skin.
1
Select [Image Effects] in Creative Print.
• For selecting [Image Effects], refer to How to
Use the Menu (Creative Print) (p. 41).
50
Printing from Memory Cards
Creative Print
2
Press
or
to select the desired
effect and press
.
• The example of the
effect is displayed.
3
Press
press
or
.
3
• It may take longer to display the
finished image.
4
• Use
or
for specifying
the number of copies.
• The displayed image may be
slightly different from the printed
photo.
Y
P
O
to select the image and
• The print confirmation
screen is displayed.
4
5
C
Check the settings on the screen.
Press
.
• Printing starts.
ID Photo
1
Select [ID Photo] in Creative Print.
• For selecting [ID Photo], refer to How to Use
the Menu (Creative Print) (p. 41).
Printing from Memory Cards
51
Creative Print
2
3
4
Press
press
or
.
to select an image and
Trim the image to the desired size and
press
.
• The print confirmation
screen is displayed.
5
6
Check the settings on the screen.
Press
.
• Printing starts.
52
Printing from Memory Cards
• You can print an ID photo from
an image that equals the
recording pixels of Canon brand
digital cameras' L (Large) such
as the PowerShot series.
3
• You can set [Long Side] and
[Short Side] in the size setting
screen.
• The preview of the page layout
displayed on the right side of
the screen is used as an
example.
Y
P
O
Press
,
,
or
to set the
finished size and press
.
C
2
4
• For detailed information on
trimming, refer to Enlarging and
Printing a Portion of an Image
(Trimming) (p. 33).
• The size of the trimming frame
changes depending on the size
you set.
5
• Use
or
for specifying
the number of copies.
• The ID photo may not be
accepted officially, depending
on the institution the ID photo is
required for. Please contact the
appropriate institution for
details.
Creative Print
Movie Print
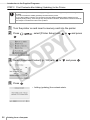
1
Select [Movie Print] in Creative Print.
• For selecting [Movie Print], refer to How to
Use the Menu (Creative Print) (p. 41).
2
Press
press
or
.
1
to select the image and
• The print confirmation
screen is displayed.
3
4
• When there is no movie file on a
memory card, [Movie Print] is
not displayed.
• Only movies shot with Canon
digital cameras, such as the
PowerShot series, can be
printed (However, movies
supporting H.264 standard
cannot be printed).
• You cannot playback movies.
Y
P
O
2
• The first frame of a movie is
displayed in the movie selection
screen.
• A movie cannot be enlarged.
3
• Use
or
for specifying
the number of copies.
Check the settings on the screen.
Press
.
C
• Printing starts.
Printing from Memory Cards
53
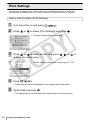
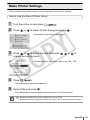
Print Settings
You can set print-related items, such as date on/off, bordered/borderless, or print layout.
Print Settings is available in the main menu when the print mode is Normal or Favorite.
How to Use the Menu (Print Settings)
1
2
Turn the printer on and press
Press
or
.
to select [Print Settings] and press
.
• The print setting menu is displayed.
3
Y
P
O
Press
or
to select an item and press
change the setting value.
C
,
or
to
• For the setting of each item, refer to pp. 55 - 58.
4
Press
.
• Confirmation screen is displayed if you change the setting value.
5
Select [OK] and press
.
• The setting value is saved and the screen returns to the main menu.
54
Printing from Memory Cards
Print Settings
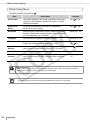
Print Setting Menu
The default setting is marked as
Item
.
Description
*
Settings
Prints the shooting date on the image.
On, Off (
)
Prints the file number on the image.
On, Off (
)
Prints borders on the image.
Bordered, Borderless (
Sets the number of images to print on a single
sheet of paper or makes an index print.
Refer to p. 57
Correct Red-Eye*
Corrects Red-eye (occurring in images when
taking photos with a flash in a dark area).
On, Off (
Image Optimize*
Corrects the image quality automatically for
optimum image quality.
On (
Adjust Image
Corrects image brightness, contrast,
sharpness, or saturation as desired.
Refer to p. 58
Date Format
Sets the date format used when printing out
with the date.
yy/mm/dd,
mm/dd/yy,
dd/mm/yy
Date
*
File No.
Borders
*
Page Layout
*
)
)
Y
P
O
), Off
* The setting is not reflected when printing with a camera connected. If you set the camera to [Default] when
printing from the camera connected with
(PictBridge), the setting is reflected (only when [Page Layout] is set
to [Index], the setting will not be reflected and the print will come out as [1-up] (single image)).
C
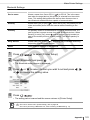
Correct Red-Eye
• Depending on the image, red-eye may not be automatically detected or optimally corrected.
In the following examples red-eye may not be corrected.
- Faces that appear extremely small, large, dark or bright in relation to the overall image.
- Faces turned to the side or at a diagonal, or faces with a portion hidden.
• Images that do not contain red-eye could have portions of the image other than the eyes
mistakenly corrected. Set [Correct Red-Eye] to [On] only when printing images with red-eye.
Image Optimize
• Optimizes the color of the whole image automatically, particularly the color of the face when the
image contains a person, although it may not be corrected as you wish.
Printing from Memory Cards
55
Print Settings
Printing with Date, File No., Borders or Page Layout
• If you set the Date, File No., Borders and Page Layout in advance, some print settings may not
be available. Check the table below.
Creative Print
Basic Print
Print All
Images
DPOF Print
Auto Play
Date
{
{
–
{
–
–
–
–
–
{
–
–
File No.
{
{
–
{
–
–
–
–
–
{
–
–
{
*
{
–
–
–
–
{
–
–
–
{
*
–
–
–
–
–
–
–
–
–
Borders
Page
Layout
{
{
{
{
{ : Setting available
– : Setting not available
Y
P
O
* [Print Type] set to [Standard] in [Print Settings] (when using a Canon digital camera)
: Frames
: Clip Art
: Calendar
: Multi Layout
: Speech Bubble
: Image Effects
: ID Photo
: Movie Print
56
C
Printing from Memory Cards
Print Settings
Page Layout
1-up (
)
Prints a single image per sheet.
2-up
Prints 2 images per sheet.
4-up
Prints 4 images per sheet.
8-up
Prints 8 images per sheet.
Fixed Size
Prints the image with a white border
on the right side.
[Fixed Size] can be set only when
using L size and Postcard size.
Index
C
Y
P
O
You can write your message on
the blank side with a marker pen.
Prints a thumbnail index.
• You can set bordered/borderless when the setting is 1-up, 2-up, 4-up or 8-up.
• When the page layout is set to [Index] and the print mode is [Print All Images] (p. 37), all images
in the memory card (or added to the printer) can be printed out as a thumbnail index.
• You cannot specify the layout of images.
Printing from Memory Cards
57
Print Settings
Adjust Image
Off (
)
Brightness
Prints the image without
adjusting the image.
Corrects the image
brightness.
: Makes the image darker.
: Makes the image lighter.
Contrast
Sharpness
Corrects the difference
between light and dark
(gradation) areas of the
image.
: Reduces the difference between light
and dark so that medium color stands
out.
: Increases the difference between light
and dark.
Y
P
O
Corrects the outline of the
image.
: Softens the image outline.
: Sharpens the image outline.
Saturation*
Corrects the color vibrancy of
the image.
C
: Makes the image flat.
: Makes the image more colorful.
* Not available when using a black and white cartridge (Easy Photo Pack E-P25BW).
58
Printing from Memory Cards
Printing Favorite Images
Y
P
O
Print images added to the built-in memory of the
printer.
Precautions for adding images to the printer
Once you add (download) an image to the printer, you cannot restore it to a computer
or memory card. Before erasing data in a memory card, save the data to a computer
or CD, in addition to adding it to the printer.
C
Printing Favorite Images
59
Add Favorite Images to the Printer
Add images in a memory card to the built-in memory of the printer.
• You cannot write images added to the printer to computer or memory cards. Before erasing data in
a memory card, save the data to a computer or CD, in addition to adding it to the printer.
• Do not turn the printer off while adding images to the printer. Images or information of added images
might be erased.
Selecting Images to Add
1
2
3
60
Turn the printer on, and insert a
memory card into the appropriate
memory card slot (p. 31).
Press
Favorites] with
.
Select [Select and Add] with
and press
.
Printing Favorite Images
• You cannot add images as
favorites even when connecting
a camera or computer to the
printer directly.
• Effects may differ when printing
images added to the printer, or
when printing images from a
memory card, with correction
settings such as Image
Optimize set.
Y
P
O
, select [Add to
or
and press
C
2
or
Add Favorite Images to the Printer
4
Press
press
or
to select images and
.
4
Total number of
added images
5
Press
.
Y
P
O
6
• Images already added cannot
be added again.
• Unprintable images or movies
cannot be added.
2
• Images already added cannot
be added again.
• The confirmation screen is displayed.
6
Select [OK] with
.
or
• Adding images starts.
C
Add All Images
1
• You can add up to 999 images.
Depending on the file size of the
image, you may not be able to
add 999 images.
• Select an image and press
,
is added on the image.
Press
again to remove
.
• If you repeat step 4, you can
add multiple images at the
same time.
• You can add up to 999 images
at the same time.
and press
Select [Add All] as in step 3 on page
60, and press
.
• The confirmation
screen is displayed.
2
Select [OK] with
.
or
and press
• Adding images starts.
Printing Favorite Images
61
Print Added Images
Select images added to the built-in memory of the printer and print.
1
2
3
4
Turn the printer on.
2
Press
or
Press
, select Favorite with
and press
.
or
Y
P
O
Number of copies of the
selected image
Press
.
• Printing starts.
62
Printing Favorite Images
• Press
to change
the screen of image information
(p. 16).
• Press
to display the
editing menu, and you can print
the image after editing (pp. 33,
35, 36).
4
• You can specify up to 99 copies
per image.
• Set borders, dates and other
functions in [Print Settings] in
advance (p. 54).
• If you repeat steps 3 and 4, you
can specify the number of
copies for multiple images, and
then print all the images at the
same time.
5
• By pressing
when the
number of copies for all images
is 0, you can print only one copy
of the image selected.
to specify the number
Total number of copies
5
3
to select images.
C
Press
or
of copies.
• Press
to display
the main menu. The following
settings are available.
- Print All Images (p. 37)
- Protect (p. 63)
- Erase (p. 66)
- Auto Play (p. 39)
- Print Settings (p. 54)
- Printer Setup (p. 99)
• Press
to display the
Creative Print menu and the
Creative Print is available
(p. 40).
Protect
Protect favorite images added to the printer (or printing history) to avoid accidental erasure.
You can select this function when the print mode is Favorite or Reprint. In this section, the
instructions are based on Favorite mode.
Do not turn the printer off while protecting. Added images or printing history might be erased.
Select and Protect
1
2
3
Turn the printer on.
Y
P
O
2
Press
or
Press
or
, select Favorite with
and press
.
C
• When protecting the printing
history, press
,
change the print mode to
Reprint with
or
.
, select [Protect] with
and press
.
Printing Favorite Images
63
Protect
4
5
6
Select [Select and Protect] with
and press
.
Press
press
Press
or
.
or
C
• The confirmation screen is displayed.
7
Select [OK] with
.
• Protection starts.
64
Printing Favorite Images
• Select a printing history with
or
when the print mode is
Reprint.
• Select an image to protect and
press
,
is added on the
image. Press
again to
remove
.
• If you repeat step 5, you can
protect multiple images at the
same time.
Y
P
O
to select the image and
.
5
or
and press
Protect
Protect All
1
Select [Protect All] as in step 4 on page
64, and press
.
• The confirmation
screen is displayed.
2
Select [OK] with
.
Y
P
O
or
• Protection starts.
Cancel Protection of All
1
C
and press
Select [Cancel All] as in step 4 on page
64, and press
.
• The confirmation
screen is displayed.
2
Select [OK] with
.
or
1
• [Cancel All] cannot be selected
when no images are protected.
• When canceling protection of
images individually, remove
in [Select and Protect] (p. 63).
and press
• Protection is canceled.
Printing Favorite Images
65
Erase
Erase favorite images added to the printer (or printing history).
You can select this function when the print mode is Favorite or Reprint. In this section, the
instructions are based on Favorite mode.
Do not turn the printer off while erasing. Added images or printing history might be erased.
Select and Erase
1
2
3
66
Turn the printer on.
Y
P
O
2
Press
or
Press
or
, select Favorite with
and press
.
C
, select [Erase] with
and press
.
Printing Favorite Images
• When erasing the printing
history, press
,
change the print mode to
Reprint with
or
, and
press
.
Erase
4
5
6
Select [Select and Erase] with
and press
.
Press
press
Press
or
.
or
5
• Press
or
to select
printing history when the print
mode is Reprint.
• Select an image to erase and
press
,
is added on the
image. Press
again to
remove
.
• Protected images (p. 63) cannot
be selected.
• If you repeat step 5, you can
erase multiple images at the
same time.
Y
P
O
to select the image and
C
.
• The confirmation screen is displayed.
7
Select [OK] with
.
or
and press
• Erasing starts.
Printing Favorite Images
67
Erase
Erase All
1
Select [Erase All] as in step 4 on page
67, and press
.
• The confirmation
screen is displayed.
2
Select [OK] with
.
• Erasing starts.
C
68
Printing Favorite Images
Y
P
O
or
and press
Reprinting
Y
P
O
Reprint images from the printing history.
C
Reprinting
69
Reprint
Select the printing history you wish to reprint from the printing history list and print. Printing history
can be saved when [Save for Reprint] in [Printer Setup] is set to [On] (Default is [On]).
You can save up to 99 items in the printing history. When more than 99 items in the printing history
are saved, previous items will be replaced with new ones, starting from the oldest.
1
2
Turn the printer on.
2
Press
or
, select Reprint with
and press
.
Y
P
O
3
3
Select a printing history with
and press
.
C
or
• The confirmation
screen is displayed.
70
Reprinting
• Press
to display
the main menu. The following
settings are available.
- Protect (p. 63)
- Erase (p. 66)
- Printer Setup (p. 99)
• You can check images by
pressing
or
if a single
printing history contains multiple
images.
• You cannot print the printing
history when a different type of
Easy Photo Pack from the
printing history you wish to print
is inserted.
• Printing history is not saved
when printing with [Movie Print]
in Creative Print, or [Page
Layout] in [Print Settings] is set
to [Index].
• By pressing
, you can print
only one copy of the selected
printing history.
Reprint
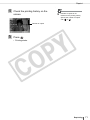
4
Check the printing history on the
screen.
4
• Number of copies is not
retained in the printing history.
Specify the number of copies
with
or
.
Number of copies
5
Press
.
• Printing starts.
C
Y
P
O
Reprinting
71
Printing from a Camera
Y
P
O
Print from a camera supporting
(PictBridge) or
(Canon Direct Print) by connecting it to the
printer.
PictBridge is an industry standard that allows any
digital camera or video camera, regardless of the
manufacturer or model, to print images taken with
the camera directly to a printer without using a
computer.
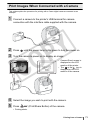
C
• Make sure that no memory cards are inserted in the printer, or that no computer is
connected to the printer before connecting a camera.
• Printing from a camera is not available if a gold or silver print supporting cartridge (Easy
Photo Pack E-P20G/E-P20S) is inserted into the printer.
• Make sure that the camera is PictBridge or Direct Print compliant.
• Use the interface cable (USB cable) supplied with the camera to connect to the printer.
• Ensure the camera's communication settings are configured correctly.
• Set the print setup with the camera.
• For camera handling details, refer to the Camera User Guide.
72
Printing from a Camera
Print Images When Connected with a Camera
This guide explains the procedure for printing with a Canon digital camera connected as an
example.
1
2
3
Connect a camera to the printer's USB terminal for camera
connection with the interface cable supplied with the camera.
Press
Turn the camera's power on to display an image.
C
4
5
Y
P
O
until the power lamp lights green to turn the power on.
• Camera Direct screen is
displayed on the LCD
monitor of the printer.
• The
or the
icon is
displayed on the LCD
monitor of the camera.
Select the image you wish to print with the camera.
Press
(Print/Share Button) of the camera.
• Printing starts.
Printing from a Camera
73
Print Images When Connected with a Camera
3
• The power button lights steadily green once the printer is ready to print.
• If an error occurs while connecting or printing, check the message displayed on the LCD
monitor of the printer or camera.
• If the
icon is displayed on the LCD monitor of the camera, the black and white cartridge
(Easy Photo Pack E-P25BW) cannot be used.
5
• If the camera does not feature the
button, perform the printing procedure with the
camera.
• The camera returns to the playback screen once printing is successfully completed.
• Printing cannot be canceled with
on the printer while printing with a camera
connected. Operate the camera to cancel printing.
• If printing does not start, check the camera's LCD monitor for any messages.
• The setting of date, the number of copies, or layout is available with Canon cameras (This
may not apply to some models, however). For more details, see the Camera User Guide
supplied with the camera.
C
74
Printing from a Camera
Y
P
O
Printing from a Mobile
Phone (Wireless Printing)
Y
P
O
Transmit and print out images shot with a
camera-equipped mobile phone supporting
infrared data communication or Bluetooth.
• Do not insert a memory card or connect a camera or computer to the printer when
wireless printing.
• Infrared wireless printing from a mobile phone is not available if the gold or silver print
supporting cartridge (Easy Photo Pack E-P20G/E-P20S) is inserted.
• Infrared wireless printing is not available if the print mode is Favorite or Reprint.
Change the print mode to Normal.
• You cannot print via wireless connection between the printer and a computer.
• Only image data files up to approx. 3 MB can be sent (maximum data size varies
depending on the mobile phone).
• Data transmission time increases when data size is large. Accordingly, it may take some
time before printing starts.
• Movies, E-mails, phone directories, or image data, for example, downloaded from a URL
attached to an E-mail cannot be printed.
• The printer may not be able to print images saved onto the memory card of certain
mobile phones.
• The position and orientation (horizontal or vertical) of images for printing is set
automatically by the printer. Since images are enlarged or reduced to fit the paper size,
the edges of the image may be cropped with certain combinations of image and paper
sizes.
• See the user guide of your mobile phone for information on how to use its wireless
functions.
C
Printing from a Mobile Phone (Wireless Printing)
75
Infrared (IrDA) Wireless Printing
Print images transmitted from a mobile phone supporting infrared data communication (IrDA).
SELPHY printer supports IrSimple (higher speed infrared data communication).
z The mobile phone must have the following features.
• Infrared data communication (infrared data communication port supporting IrDA)
• A built-in camera capable of recording and saving JPEG images.
1
2
3
Check that no memory cards are inserted in the printer, no
Bluetooth unit is attached, and the camera is not connected via
USB cable.
Press
Y
P
O
until the power lamp lights green to turn the power on.
Transmit an image from your mobile phone to the printer.
• Printing starts after data
transmission is completed and
the power lamp blinks green.
Within 20 cm (7.9 in.) (Do not
place objects within this
range.)
C
Effective range
Approx. 10 degrees (right
to left)
Approx. 20 degrees (top to
bottom)
3
76
• Printing is done according to the setting value specified in [Print Settings]. Setting of each item
must be done in advance (p. 54).
• If an error occurs, a message will display on the printer's or mobile phone's screen.
• Printing cannot be canceled by pressing
during infrared printing.
• If the transfer is not working well, reposition the mobile phone closer and directly in front of the
infrared data receiver and reinitiate the transfer.
• Note that the distance over which infrared signals can be transmitted and received varies
according to the mobile phone model. For details on connection, refer to your mobile phone's
user guide.
Printing from a Mobile Phone (Wireless Printing)
Printing via Bluetooth
Installing the Bluetooth Unit BU-30 (sold separately) on the printer enables you to print images by
transmitting data from a Bluetooth-enabled mobile phone.
z The mobile phone must have the following features.
• Built-in Bluetooth and profiles compatible with BIP (Basic Imaging Profile), OPP (Object Push
Profile), or BPP (Basic Printing Profile). For details on compatible profiles, refer to the user
guide of the mobile phone.
• A built-in camera capable of recording and saving JPEG images.
1
2
3
4
Check that no memory cards are inserted in the printer, and that no
camera is connected to the printer via USB cable.
Y
P
O
Install Bluetooth Unit BU-30, sold separately.
Press
C
until the power lamp lights green to turn the power on.
Make the Bluetooth settings.
• For details on Bluetooth settings, refer to Bluetooth Settings in Printer Setup
Menu (p. 101).
Printing from a Mobile Phone (Wireless Printing)
77
Printing via Bluetooth
5
Transmit an image from your mobile phone to the printer.
• Printing starts after
data transmission is
completed.
Y
P
O
Up to approx. 10 m (33 ft.)
5
• The power lamp blinks green fast during data transmission. When printing starts, the blinking
slows down.
• If an error occurs, a message will display on the printer's or mobile phone's screen.
• Bluetooth Unit blinks blue during transmission. If data transfer is interrupted, the blinking will
stop. Check the message appearing on the mobile phone display if an error occurs.
• Printing cannot be canceled by pressing
during Bluetooth printing.
• For details on how to send or make Bluetooth connection, refer to the user guide of your
Bluetooth device.
• Maximum communication distance is approx.10 m (33 ft.). However, the following conditions
sometimes cause this distance or printing speed to change:
- Obstacles or radio wave conditions between communication devices
- Sites where magnetic fields, static electricity or radio wave interference is generated
- Reception sensitivity and antenna performance of the communication devices
C
78
Printing from a Mobile Phone (Wireless Printing)
Printing from a Computer
Y
P
O
Print from a computer connected to the printer.
• Make sure that no memory cards are inserted in the printer, or that no camera is
connected to the printer before connecting a computer.
• Printing from a computer is not available if the print mode is Favorite or Reprint. Change
the print mode to Normal.
• When using the USB cable, be sure to connect the printer directly to your computer. If
you connect the USB cable to a USB hub, the printer may not function properly.
• The printer may not function properly if other USB devices (with the exception of a USB
mouse or USB keyboard) are used at the same time as the printer. Disconnect any other
USB devices from your computer and then reconnect the printer.
• Do not put your computer into the standby mode (or sleep mode) while the printer is
connected to a USB port. If you accidentally do so, do not disconnect the USB cable
from your computer while it is in standby mode.
• Do not connect the computer to the printer before installing the printer driver. Follow the
instructions of this guide.
• You must login to the computer as an administrator before beginning installation of the
printer driver and software.
• For details on how to use the computer, refer to the user guide of your computer.
C
Printing from a Computer
79
System Requirements
Install the software on a computer meeting the following minimum requirements.
Windows
OS
Windows Vista (including Service Pack 1)
Windows XP Service Pack 2
Configuration
The above OS should be pre-installed on computers with builtin USB ports.
CPU
Windows Vista: Pentium 1.3 GHz or higher processor
Windows XP: Pentium 500 MHz or higher processor
RAM
Windows Vista: 512 MB or more
Windows XP: 256 MB or more
Interface
USB
Free Hard Disk Space
Canon Utility
ZoomBrowser EX: 200 MB or more
SELPHY Contents Utility: 40 MB or more
Ulead Photo Express LE: 300 MB or more
Canon SELPHY Printer Driver: 5 MB or more
(the amount of free space required for installation)
Display
1,024 x 768 pixels or more
High Color (16 bit) or better
C
80
Printing from a Computer
Y
P
O
System Requirements
Macintosh
OS
Mac OS X (v10.4 - v10.5)
Configuration
The above OS should be pre-installed on computers with builtin USB ports.
CPU
PowerPC G4/G5 or Intel processor
RAM
Mac OS 10.5: 512 MB or more
Mac OS 10.4: 256 MB or more
Interface
USB
Free Hard Disk Space
Canon Utility
ImageBrowser: 300 MB or more
SELPHY Contents Utility: 40 MB or more
Canon SELPHY Printer Driver: 4 MB or more
(the amount of free space required for installation)
Display
1,024 x 768 pixels or more
32,000 colors or better
•
•
•
•
•
Y
P
O
A CD-ROM drive is required to install the software.
Even when system requirements are met, not all computer functions can be guaranteed.
Ulead Photo Express LE supported on Windows only.
Macintosh software cannot be used on disks formatted in the UFS (Unix File System) format.
Macintosh software can only be used on disks formatted in the Mac OS Extended (journaled)
format.
C
Printing from a Computer
81
Install the Printer Driver and Software
The Compact Photo Printer Solution Disk contains software that your computer requires for
printing. Install the printer driver and the software (p. 88) according to the following steps.
Before you install the printer driver, do not connect the printer to a computer.
The instructions in this section are intended for Windows XP and Mac OS X (v10.4). If you are using
another version of OS, actual screen contents and procedures may differ slightly from those
indicated here.
Windows
Installing the Printer Driver
1
Y
P
O
Place the supplied Compact Photo
Printer Solution Disk in the computer.
• The installer panel is displayed.
2
3
Select the printer you are using.
C
Click [Yes] if you consent to all the
conditions of the software license
agreement.
• The installer starts and the screen indicating
to connect the printer is displayed.
82
Printing from a Computer
1
• Close any programs that are
running.
Install the Printer Driver and Software
4
Connect the printer to the computer
following the instructions on the screen
and turn the printer on.
4
Y
P
O
• A dialog box appears informing you that the
installation is complete.
5
Click [Finish].
• When connecting the printer to
the computer, a commercially
available USB cable is required.
The USB cable should be 2.5
meters or less.
• After connecting the printer to
the computer, the PC
connection screen appears on
the LCD monitor.
• Press
when the following
screen appears.
• Installation of the printer driver is completed.
• Next, install the software on your computer.
C
• Restart your computer when a
dialog box appears instructing
you to do so.
5
• If you wish to uninstall the
printer driver, do as follows on
your computer. Click the [Start]
button and select [All Programs]
- [Canon SELPHY XXXX] [Uninstaller].
Printing from a Computer
83
Install the Printer Driver and Software
Installing the Software
6
Set the supplied Compact Photo
Printer Solution Disk in the computer.
6
• If the CD-ROM is already set
and the installer panel does not
appear, remove and reinsert the
CD-ROM.
7
• Click [Custom Installation] to
select programs for individual
installation.
9
• If you wish to uninstall the
software, do as follows on your
computer. Click the [Start]
button and select [All Programs]
- [Canon Utilities] - [Zoom
Browser EX] - [Zoom Browser
EX Uninstall].
• You can use the same
procedure to uninstall other
software. To uninstall Ulead
Photo Express LE, click the
[Start] button and select [Control
Panel] - [Add or Remove
Programs].
• The installer panel is displayed.
7
Click the Application Software [Easy
Installation] button.
• The screen for
confirming the
installation appears.
8
9
Click [Install].
C
Y
P
O
• Follow the onscreen
instructions to
proceed until a
dialog box informing
you that the
installation is
completed appears.
Click [Finish].
• Software installation is complete. Remove the
CD-ROM.
84
Printing from a Computer
Install the Printer Driver and Software
Macintosh
Installing the Printer Driver
1
2
3
Place the supplied Compact Photo
Printer Solution Disk in the computer
and double-click the
icon in the
CD-ROM window.
1
• Close any programs that are
running.
Select the printer you are using.
C
Y
P
O
Click [Agree] if you consent to all the
conditions of the software license
agreement.
• Installer starts.
Printing from a Computer
85
Install the Printer Driver and Software
4
Click
and select [Easy Install], then
click [Install].
• Installation starts.
Follow the
onscreen
instructions until a
dialog box
informing you to
restart appears.
5
6
• When connecting the printer to
the computer, a commercially
available USB cable is required.
The USB cable should be 2.5
meters or less.
• After connecting the printer to
the computer, the PC
connection screen appears on
the LCD monitor.
Y
P
O
Following the instructions on the
screen, then restart your computer.
Connect the printer to the computer
and turn the printer on.
C
• The printer will be registered to the computer.
86
6
Printing from a Computer
• Press
when the following
screen appears.
• If you wish to uninstall the
printer driver, double-click the
icon in Solution Disk, select
the installer panel, and follow
the onscreen instructions. Next,
delete the printer from the
Printer list.
Install the Printer Driver and Software
Installing Software
7
Place the supplied Compact Photo
Printer Solution Disk in the computer
and double-click the
icon in the
CD-ROM window.
• The installer panel is displayed.
8
9
10
Click [Install].
9
• Click [Custom Installation] to
select programs for individual
installation.
10
• If you wish to uninstall the
software, drag the application's
folder (the folder in which it was
installed) into the Trash, and
empty the Trash.
Y
P
O
Select [Easy Installation] and click
[Next].
C
• Follow the
onscreen
instructions to
proceed until a
dialog box
informing you that
the installation is
complete appears.
Click [OK].
• Software installation is complete. Remove the
CD-ROM.
Printing from a Computer
87
Introduction to the Supplied Programs
• For printing operations, refer to the [Help] menu of the software or a message appearing on the
display.
• You can download the ZoomBrowser EX guide or ImageBrowser guide from the following
website (available in English only).
http://web.canon.jp/imaging/information-e.html
Windows
ZoomBrowser EX
Use this multi-function software
not only for printing, but also for
managing, viewing, editing, and
exporting images.
Ulead Photo Express
LE
Use this software's functions to
add frames or text to your images,
and to easily print them in various
ways.
If you use a gold or silver print
supporting cartridge (Easy Photo
Pack E-P20G/E-P20S), you can
also print with gold or silver
frames, clip art stamps or added
text.
C
SELPHY Contents
Utility
88
Printing from a Computer
Y
P
O
Use this software to add (update)
[Frames] and [Clip Art] in Creative
Print (contents) to the printer. Save
the contents to a memory card
first, and then add (update) to the
printer.
Introduction to the Supplied Programs
Macintosh
ImageBrowser
Use this multi-function software
not only for printing, but also for
managing, viewing, editing, and
exporting images.
SELPHY Contents
Utility
Use this software to add (update)
[Frames] and [Clip Art] in Creative
Print (contents) to the printer. Save
the contents to a memory card
first, and then add (update) to the
printer.
C
Y
P
O
Printing from a Computer
89
Introduction to the Supplied Programs
Ulead Photo Express LE
This section gives a basic overview of inserting frames and text, and then printing.
If you have questions about Ulead Photo Express LE, please access the URL below:
http://www.ulead.com/events/canon/selphy/
1
Double-click
on the desktop.
• Ulead Photo Express LE starts.
2
Select
3
Select the paper from the list on the left.
and click
[SELPHY Print].
Y
P
O
• The frame list will appear on the right.
4
90
C
Select the desired frame and click
Printing from a Computer
[Replace].
Introduction to the Supplied Programs
5
6
7
From the list on the left, choose an image that you want to add a
frame to and click
, determine the image position, then click
[Customize].
Click
Y
P
O
[Text] to select [Add/Edit].
C
Type the desired text to print, click
size of the text, then click
[Print].
, adjust the position or
Click the text box to activate it and
change the size and position of the text.
Printing from a Computer
91
Introduction to the Supplied Programs
8
9
92
Determine [Printer name], [Cartridge], [Paper size], [Layout], and
[Copies], then click
.
Printing completes.
C
Y
P
O
3
• Frames can be assigned only when [Postcard size] or [L size] paper is selected.
8
• The image will not print correctly if you change the paper size setting.
Printing from a Computer
Introduction to the Supplied Programs
SELPHY Contents Utility
In this section, how to add (update) [Frames] and [Clip Art] for Creative Print (contents) using
SELPHY Contents Utility is described.
Add (update) the contents as described in the 2 steps below.
• STEP 1 Write the contents from the computer to the memory card.
• STEP 2 Add (update) the contents to the printer and print.
STEP 1 Write Contents in a Computer to a Memory Card
1
Click to select in the following order: [Start] menu, [All Programs],
[Canon Utilities], [SELPHY Contents Utility] and [SELPHY
Contents Utility].
Y
P
O
• SELPHY Contents Utility starts.
2
Click [Next].
3
Click [Frames installed from CD].
C
• The installed frame list is displayed on the right side of
the screen.
Printing from a Computer
93
Introduction to the Supplied Programs
4
Select frames you wish to add (update) to the printer and click
.
• The selected frames are displayed in [Frames to be
added] at the bottom of the screen.
5
Click [Next].
Y
P
O
• The screen to add (update) clip art stamps is displayed.
If you wish to add (update) clip art stamps, repeat steps
3 and 4 and click [Next].
6
7
Follow the onscreen instructions and insert a memory card into the
memory card slot (or the memory card reader).
C
Click [Write to Memory Card].
• Writing to the memory card starts.
94
Printing from a Computer
Introduction to the Supplied Programs
2
• After writing contents to a memory card, [Frames installed from CD] is displayed on the left
side of the screen when starting SELPHY Contents Utility next. The frames currently added
(updated) to the printer can be confirmed if you select [Frames installed from CD].
4
• You can add (update) up to 20 frames or Clip Art Stamps to the printer. Previously added
(updated) contents will be overwritten each time. If you wish to keep previously added
contents on the printer, place a
mark.
• Contents with an
icon support print with gold or silver. Use Easy Photo Pack E-P20G/EP20S.
• Press the
icon to enlarge contents. You can check parts to be printed in gold or silver of
the contents supporting gold or silver printing.
6
• You cannot add (update) contents if you connect the computer to the printer directly.
• Purchase a commercially available memory card reader if a card slot is not featured in your
computer.
C
Y
P
O
Printing from a Computer
95
Introduction to the Supplied Programs
STEP 2 Print Contents after Adding (Updating) to the Printer
• Do not turn the printer off while adding (updating) contents. Added (updated) contents might be
erased.
• You cannot erase the added (updated) contents with the printer.
• If you add (update) contents, the contents previously added (updated) will be erased from the
Reprint printing history, even though they are protected. However, the default 47 frames and 28 clip
art stamps in Creative Print will not be updated.
1
2
Turn the printer on and insert a memory card into the printer.
Press
.
, select [Printer Setup] with
Select [Download Content] (p. 100) with
4
Press
or
and press
.
• Adding (updating) the contents starts.
96
Printing from a Computer
and press
Y
P
O
3
C
or
.
Introduction to the Supplied Programs
5
Select [Frames] (p. 42) in Creative Print.
• See [Clip Art] (p. 43) in Creative Print if you wish to print
with clip art stamps.
6
Select [Added Frames] and press
.
Y
P
O
• Added (updated) frames are displayed.
7
8
Make the settings following step 4 on page 42 and the following
steps, then print.
C
Printing completes.
6
• Added (updated) clip art stamps are displayed after default clip art stamps.
Printing from a Computer
97
Appendix
C
98
Appendix
Y
P
O
Make Printer Settings
You can make various printer settings, such as language or power saving settings.
How to Use the Menu (Printer Setup)
1
2
Turn the printer on and press
Press
or
.
to select [Printer Setup] and press
.
• The printer setup menu is displayed.
3
Y
P
O
Press
or
to select the item and press
change the setting value.
C
,
or
to
• For the setting of each item, refer to pp. 100 - 102.
4
Press
.
• The confirmation screen is displayed.
5
Select [OK] and press
.
• The setting value is saved and the screen returns to the main menu.
3
• [Bluetooth] is displayed only when a Bluetooth unit is connected.
• [Download Content] is displayed only when the memory card containing contents is inserted.
Appendix
99
Make Printer Settings
Printer Setup Menu
The default setting is marked as
Item
.
Description
Settings
Auto Rotate
If an image displays in the wrong orientation (caused by
camera or other settings) on the LCD monitor, it will be
rotated automatically.
On (
), Off
Auto Power
Down
The printer automatically turns off if no operation is
performed for five minutes.
On (
), Off
Bluetooth
Sets the model name and/or security details when using
Bluetooth. [Bluetooth] is displayed only when a Bluetooth
unit (sold separately) is connected.
Refer to p. 101
Language
Sets the display language of the LCD monitor.
Refer to p. 102
Transition
Sets the transition effects when you switch the image in
Single View in Basic Print or Auto Play (p. 39).
Fade, Wipe,
Off (
)
Save for
Reprint
Sets to add the printing history to the printer. Saved printing
history can be printed from the Reprint (p. 70) mode.
On (
Reset All
Reset the printer's settings to their defaults.
–
Download
Content
Add (update) the frames or clip art stamps copied to the
memory card using SELPHY Contents Utility (supplied
software).
Refer to pp. 93
- 97
C
Save for Reprint
Y
P
O
), Off
Saves printing history after printing if [Save for Reprint] is set to [On]. The saving lamp blinks
orange while saving. Do not turn the printer off while saving.
Reset All
The printing history and the favorite images added to the printer are not erased.
100
Appendix
Make Printer Settings
Bluetooth Settings
Device name
Selects a name from Canon ES3-1 (
) to ES3-9. This is the name
used when the target device (this printer) is selected from the mobile
phone. This setting distinguishes this device when there are two or
more Bluetooth-enabled devices capable of communication.
Security
Selects either [On] or [Off] (
). When set to [On], the passkey for the
printer and mobile phone must be entered when connecting to the
printer.
Passkey
The passkey refers to an identification number to be determined. It is
used to prevent incorrect access from other Bluetooth devices. When
[Security] is set to [On], press
and set the key (4-digit number) to
enter on the mobile phone to enable printing. The default passkey is
"0000".
Deny Access
Selects either [On] or [Off] (
). Selecting [On] will disable searching
and printing from Bluetooth devices.
Reset
Reset Bluetooth settings to their defaults.
1
2
Press
Y
P
O
to select [Printer Setup].
C
Select [Bluetooth] and press
.
• The Bluetooth setting screen is displayed.
3
4
Press
or
to select the item you wish to set and press
or
to change the setting value.
Press
,
.
• The setting value is saved and the screen returns to [Printer Setup].
1
• For how to use the menu (Printer Setup), refer to page 99.
• For how to print using a Bluetooth unit, refer to Printing via Bluetooth (p. 77).
Appendix
101
Make Printer Settings
Language
1
2
Press
to select [Printer Setup].
Select [Language] and press
.
• The language selection screen is displayed.
3
Press
press
,
.
,
or
to select the language you wish to set and
Y
P
O
• The selected language is set and the screen returns to
[Printer Setup].
1
• For how to use the menu (Printer Setup), refer to page 99.
• When no memory card is inserted, or when no camera or computer is connected to the printer,
press and hold down
and then press
to shortcut to the language set up
screen. Select the language and press
.The language is set and the screen returns to the
standby screen.
C
102
Appendix
Cleaning, Storing and Carrying the Printer
Cleaning the Printer
Cleaning the Inside of the Printer
Remove dust on the head of the cartridge with the supplied cleaner unit.
• Do not touch white parts of the cleaner as its performance may be affected.
• Only the cleaner supplied with this printer can be used.
1
2
Remove the Easy Photo Pack (p. 25).
Y
P
O
Insert the cleaner unit in the cartridge compartment and push it in
completely and slide it in and out 2 or 3 times.
Arrow side facing up
C
Cleaning the Printer Casing
Wipe the casing with a soft dry cloth.
Never use volatile solvents such as benzine, paint thinner, or diluted neutral solvent. They may cause
deformation or peeling of the printer's casing.
Cleaning the Back of the Printer
Clean the dust from the air vents on the back. If dust enters from the air vents and gets on the ink
sheet, the printer may not print cleanly. If dust becomes lodged on the ink sheet, use a
commercially available blower brush to remove it so that you do not touch the ink sheet.
Appendix
103
Cleaning, Storing and Carrying the Printer
Storing the Printer and Prints
Storing the Printer
• Unplug the power cord from the power outlet.
• If dirt or foreign objects enter the printer, print quality may deteriorate. Close the print output
receptacle cover and card slot cover.
• Remove the cartridge from the printer and store it in its original package.
Storing Prints
Color may change over time depending on the conditions of storage. Canon assumes no liability for
color changes.
Y
P
O
• Avoid storing prints in the following places to prevent image quality from deteriorating.
- Places with high temperatures (40°C/104°F or higher).
- Places with high humidity or dusty areas.
- Places subject to direct sunlight.
• Please avoid the following actions as they may result in color change, color fading or color
bleeding.
- Sticking any type of adhesive tape on a print surface.
- Allowing print surfaces to come into contact with vinyl or plastic.
- Applying alcohol or other volatile solvents to a print surface.
- Leaving print surfaces tightly pressed against other surfaces or objects for prolonged
periods.
• If you wish to mount prints in an album, select an album with photo covers made of nylon,
polypropylene or cellophane.
C
Carrying the Printer
When carrying the printer, hold the carrying handle. We recommend carrying the printer with the
cleaner unit inserted.
104
Appendix
Safety Precautions
Use this equipment correctly according to the following precautions to avoid the risk of injury, fire,
electrical shock, malfunction or other hazards. Please also be sure to read Handling Precautions.
Equipment refers to the printer.
The safety precautions noted on the following pages are intended to instruct you in the safe and
correct operation of the printer to prevent injuries or damage to yourself or other persons.
WARNING
Store the equipment in a place where it cannot be reached by children.
Do not disassemble or modify the equipment.
Y
P
O
If the equipment is dropped or the casing becomes damaged, do not continue operation.
Stop operating the equipment immediately if it emits smoke or noxious fumes. Immediately
contact the retail outlet or a Canon Customer Support center.
Do not allow water or other liquids to enter the interior of the equipment.
If the equipment is subjected to water droplets or damp salty air, gently wipe it with a soft,
absorbent cloth.
Do not insert or drop metallic objects or flammable substances into the equipment interior.
If this occurs, immediately turn off the printer power and remove the power cord from the power
outlet.
C
Do not touch metal parts of the device or the power plug during thunderstorms.
Immediately stop using the equipment and distance yourself from it.
Do not use flammable solvents such as alcohol, benzine, or paint thinner to clean the
equipment.
Do not rest heavy objects on the power cord or plug, pull on it with excessive force or
damage it.
Do not use power cords other than the supplied power cord.
Remove the power cord on a regular periodic basis and wipe away the dust and dirt that
collects on the plug, the exterior of the power outlet and the surrounding area.
Leaving the equipment plugged in during prolonged periods of non-use poses risk of electric
shock or fire.
Do not handle the power cord if your hands are wet.
Do not play the supplied CD-ROM(s) in any CD player that does not support data CD-ROMs.
Playing the CD-ROM(s) in an audio CD player (music player) could damage the
speakers. It is also possible to suffer hearing loss while listening with headphones to the
loud sounds of a CD-ROM played on a music CD player.
Appendix
105
Safety Precautions
CAUTIONS
Do not stick any part of your hand into the printer interior.
Do not use or store the equipment in the following types of places.
• Humid or dusty areas
• Places subject to strong vibrations
• Places near flames or subject to direct sunlight
• Places that may heat up such as an automobile trunk or dashboard
Do not allow metallic pins to touch or allow dirt to collect on the power plug.
Do not excessively pull or bend the power cord.
Y
P
O
Do not use the power cord for any other equipment except this printer, use it beyond its
rated capacity or voltage, or leave the plug partially inserted into a power outlet.
Do not open the cartridge cover during printing.
• If you do so, printing will stop.
• Paper moves back and forth in the printer during printing. Placing your hand in the way of the
moving paper may result in injury.
C
106
Appendix
Handling Precautions
For the handling of memory cards, cameras, mobile phones, or computers, refer to the supplied
user guide of each product.
Warning Against Copyright Infringement
Please respect all copyrights. Use of images produced by SELPHY ES3 for purposes other than
personal entertainment may be prohibited by law.
Warranty Limitations
This printer's warranty is only effective in the country of sale. If a problem arises while the printer
is in use abroad, please convey it back to the country of sale before proceeding with a warranty
claim to a Canon Customer Support center.
Printer
Y
P
O
Do not turn the printer on and off repeatedly when you do not intend to print.
The printer initialization process consumes ink and the equivalent of several pages could be
wasted.
Be careful not to spray the equipment with insecticides or volatile substances. In addition,
do not store the equipment in contact with rubber or vinyl products for long periods of
time.
These materials may cause deformation of the printer's casing.
C
If the printer overheats, it will temporarily stop operating. This does not mean that the
printer has malfunctioned.
The printer will resume normal printing as soon as it cools down.
Temporary stoppages are most likely to occur in the following cases:
- When printing continuously.
- If a room is unusually warm.
- If the air vents on the back of the printer are blocked or if ventilation is inadequate.
Appendix
107
Handling Precautions
If the print output receptacle cover comes off, tilt the cover to the LCD monitor side (
)
align the tip of the spring on the left side of the cover with the groove on the printer (
),
and then slide the hole on the right side of the cover over the peg on the printer (
).
If the print output receptacle cover is not attached during printing, paper that is finished printing
may become jammed inside the printer.
Y
P
O
Do not insert foreign objects into the print output receptacle.
z To prevent malfunctions and damage caused by electromagnetic fields
Never position the equipment close to motors or other devices that generate strong
electromagnetic fields. Moreover, do not use near televisions or AM radio.
C
z To prevent condensation
You can avoid condensation by placing the equipment in an airtight, sealable plastic bag and
allow for adjustment to temperature changes gradually before removing from the bag.
In the event that condensation does form within the equipment, keep it at room temperature
until the water droplets evaporate naturally before use.
108
Appendix
Specifications
All data is measured according to standard Canon testing procedures. We reserve the right to
change specifications without notice.
SELPHY ES3
Printing Method
Dye-sublimation thermal transfer (with overcoating)
Print Resolution
300 x 600 dpi
(300 x 300 dpi : When a PC is connected, 2-up and higher layout
or Creative Print is selected)
Gradation
128 shades per color (300 x 600 dpi)
256 shades per color (300 x 300 dpi)
Ink
Easy Photo Pack (dedicated ink and paper integrated cartridge)
Color (Y, M, C and overcoating)
Gold (Y, M, C, overcoating and gold, Postcard size only)
Silver (Y, M, C, overcoating and silver, Postcard size only)
B/W (black and white and overcoating, Postcard size only)
Paper
Dedicated paper (Postcard size, L size, Card size (including
Card-size label sheet ))
Y
P
O
Print size (for color prints) Borderless
C
Bordered
Postcard size
100.0 x 147.6 mm
(3.9 x 5.8 in.)
91.0 x 121.2 mm
(3.6 x 4.8 in.)
L size
89.0 x 119.0 mm
(3.5 x 4.7 in.)
78.2 x 104.9 mm
(3.1 x 4.1 in.)
54.0 x 86.0 mm
(2.1 x 3.4 in.)
49.5 x 66.0 mm
(1.9 x 2.6 in.)
Printing from Memory Cards
Connected to Cameras
Postcard size
Approx. 55 sec.
Approx. 55 sec.
L size
Approx. 47 sec.
Approx. 47 sec.
Card size
Approx. 33 sec.
Approx. 33 sec.
Card size
Printing Speed
Feeding system
Automatic paper feed from the cartridge
Ejection system
Automatic paper ejection to the print output receptacle on top of
the printer
LCD monitor
TFT color LCD 3.5-inch type
Appendix
109
Specifications
Interface
USB
Connecting to PictBridge compliant devices/a Canon Direct Print
compliant camera: USB compliant Type A connector
Connecting to a PC: USB compliant Type B connector
Wireless
Infrared data communication IrDA (IrSimple also supported)/
Bluetooth*1
Memory Cards
SD Memory Card, miniSD Card, SDHC Memory Card,
miniSDHC Card, MultiMediaCard, MMCplus Card, HC MMCplus
Card, MMCmobile Card*2, MMCmicro Card*2, RS-MMC Card*2,
microSD Card, microSDHC Card, CF (CompactFlash) Card,
Microdrive, xD-Picture Card*2, Memory Stick, Memory Stick
PRO, Memory Stick Duo, Memory Stick PRO Duo, Memory Stick
micro*2
Y
P
O
Operating Temperatures
5 - 40 °C (41 - 104 °F)
Operating Humidity
20 - 80%
Power Source
Compact Power Adapter CA-ES200 (Built-in)
Rated Input : AC 100 - 240 V (50/60 Hz)
1 A (100 V) - 0.5 A (240 V)
Power Consumption
70 W or less (4 W or less on standby)
Dimensions
225.0 x 226.3 x 138.0 mm (8.86 x 8.91 x 5.43 in.)
C
Weight (printer only)
Approx. 2090g (73.7 oz.)
*1 Bluetooth Unit BU-30 (sold separately) is required.
*2 Specialized adapter is required.
When connecting to and using a household power outlet, use only "Compact Power Adapter
CA-ES200 (Built-in)" (rated input: 100-240 V AC 50/60 Hz, rated output: 24V DC, 16V DC,
12V DC, 5V DC). Using anything else can cause fire, overheating, or electrical shock.
110
Appendix
Troubleshooting
Y
P
O
This section has solutions for when the printer
does not function as expected or an error symbol
is displayed.
C
Troubleshooting
111
You Think There is a Problem
If the solutions below do not remedy your problem, contact the retail outlet or a Canon Customer
Support center.
Printer and Power Source
Power Will Not Turn on
• Has the plug come out of the power outlet? (p. 27)
• Is the connector of the power cord securely connected to the printer's AC IN
terminal? (p. 27)
• Did you press
long enough? (p. 31)
Printing Problems
Cannot Print
Y
P
O
• Is the printer power turned on? (p. 31)
• Is the printer connected to more than one device?
Do not simultaneously connect to a camera, memory card or computer.
• Is the cartridge loaded correctly? (p. 22)
• Is the ink sheet slack? (p. 22)
C
• Has the printer overheated?
The printer will temporarily stop when it exceeds a certain temperature. This is not a
malfunction. Wait until the temperature drops and the printer resumes. If the printer is
connected to a computer when this happens, a message will appear on the computer
display. Do not cancel the print. Wait until printing resumes.
Printing from Memory Cards
• Is the memory card inserted all the way into the slot with the label facing front?
(pp. 30, 31)
• Does the image data conform to the Design rule for Camera File system? (p. 29)
• Some memory cards require a specific adapter. Have you inserted the memory
card directly into the card slot without first inserting the card into the adapter?
(p. 30)
Printing from Cameras
• Is the printer connected to the camera correctly? (p. 73)
112
Troubleshooting
You Think There is a Problem
Cannot Print (continued from previous page)
• Does the camera battery have sufficient charge?
Replace the battery with a fully charged (or new) battery, or use the compact power
adapter for the camera.
Printing from Computers
• Did you install the printer driver according to the correct procedures? (pp. 82, 85)
• Is the printer connected directly to a port on the computer with the USB cable?
The printer may not operate correctly if it is connected to a USB hub.
Problems Exclusive to Windows
• Is the printer set to offline?
Right-click the printer icon and cancel the offline setting.
Problems Exclusive to Macintosh
• Is the printer registered on the Printer List?
Check if your printer is registered on the Printer List in the Printer Setup Utility.
Y
P
O
Image Does Not Appear When Memory Card Is Inserted
• Is the memory card inserted all the way into the correct slot with the label facing
front? (pp. 30, 31)
• Does the image data conform to the Design rule for Camera File system? (p. 29)
• Some memory cards require a specific adapter. Have you inserted the memory
card directly into the card slot without first inserting the card into the adapter?
(p. 30)
C
Cannot Print the Date
Printing from Memory Cards
• Is the date imprint option set? (p. 55)
If you are using DPOF printing, the date imprint settings are configured on the device
used for the DPOF settings.
Printing from Mobile Phones
• When using infrared data communication or Bluetooth, the date will not be printed.
Printing from Cameras
• Is the date imprint option set to [Off] on the camera?
Set the date imprint option to [On] on the camera. If it is set to [Default], the date imprint
settings of the printer will be used.
Troubleshooting
113
You Think There is a Problem
Cannot Make Clean Prints
• Is the ink sheet or paper dirty?
• Is dirt lodged within the printer? (p. 103)
• Has condensation formed within the printer?
Leave it to dry at room temperature for a while.
• Is the printer placed near a device with a strong electromagnetic or magnetic field?
Electromagnetic waves from video game devices or strong magnetism from speakers
may distort images. Set it at least 1 meter (3 ft.) apart.
Colors on the Computer Display and the Print Are Different
• Color generation methods are different for computer displays and printers.
Moreover, the variance may be attributable to the environment in which the display
is viewed (color and strength of the light), or to the display's color adjustment
settings.
Y
P
O
After using the computer to cancel a print in progress, an image that had
already been printed was printed again when printing resumed.
• Are you using a Macintosh computer?
When you restart printing on a Macintosh computer after canceling, an already printed
image may print again when printing resumes.
C
114
Troubleshooting
You Think There is a Problem
Paper Problems
Frequent Paper Jams
• Has too much paper been left in the print output receptacle?
Do not leave 50 or more sheets in the print output receptacle.
Cannot Print the Specified Number of Prints
• Is the printer's power being turned on and off repeatedly without printing?
The printer initialization consumes ink. There may not be enough ink left for the allotted
sheets in the set.
• Is the ink sheet being pulled?
Do not forcefully pull out the ink sheet.
Print is not Ejected
Y
P
O
• Has paper jammed inside the printer?
Remove the jammed paper.
• Is the print output receptacle cover open?
If the print output receptacle cover does not open automatically and paper gets jammed,
press the print output receptacle button on the left side of the print output receptacle to
open the print output receptacle cover and remove the jammed paper.
C
Troubleshooting
115
Error Messages
If any error occurs during printing, a message is displayed on the LCD monitor of the printer. If a
problem occurs while the printer is connected to the camera, the camera's LCD monitor may
display an error message.
No paper/ink
• Check that the cartridge is correctly inserted.
• Change the cartridge to a new one.
• If paper is not feeding correctly, remove the cartridge, and manually remove any
paper remaining in the printer.
Paper jam!
Y
P
O
• Press
to eject the paper. If the paper is not ejected, turn the power off
and turn it on again. If the printer fails to eject the paper, contact a Canon
Customer Support center for assistance.
Ink Error
• Remove the cartridge from the printer, take up the slack in the ink sheet, and then
reload the cartridge. If the cartridge is stuck in the printer, contact a Canon
Customer Support center for assistance.
C
Cannot print! / Could not print XX images
• The following images cannot be printed.
- An image with a data size that is too big. Images larger than 8000 x 8000 pixels cannot
be printed
- An image that is corrupted
- An image other than JPEG
• When you wish to print an image with the printer connected to the camera, check if
the size of the image matches the recording pixels of the image in the camera. If
the size is not appropriate, resize the image and convert it as necessary to a JPEG
image that the camera can display.
• Limit the size of image files to less than 8000 x 8000 pixels.
• This printer supports image data conforming to the Design rule for Camera File
system.
116
Troubleshooting
Error Messages
No Image.
• Check whether there are images recorded on the memory card. Also check if there
are images added to Favorites, saved for Reprint or in the Print History.
• Check whether readable image data is recorded on the memory card.
• The image file name (folder name) sometimes cannot be recognized if it contains
double-byte characters (Japanese, Chinese or Korean). Change double-byte
characters to single-byte alphanumeric characters.
• Use a personal computer to print data that has been edited or processed on a
personal computer.
Hardware Error
• Check if there are other problems than cartridge problems.
Y
P
O
• Turn the printer and camera power off, then turn on again. If the error message
does not clear, contact a Canon Customer Support center for assistance.
Cartridge cover is open
• Close the cartridge cover. If the error message does not clear, turn the power off
and on again.
This camera cannot print B/W
Insert memory card to print
C
• Black and white printing is not possible when a camera is connected (except when
(PictBridge) is displayed on the LCD monitor of the camera). Insert a memory
card to print.
Creative Cartridge Inserted
Change the cartridge
• Printing from a camera or a mobile phone using the gold or silver print supporting
cartridge (Easy Photo Pack E-P20G/E-P20S) is not possible. Change the cartridge
to a cartridge other than the gold or silver print supporting cartridge.
Cartridge has been changed
• The cartridge was changed for a cartridge of a different size after the print menu
was displayed. Insert a cartridge of the same size or change the print settings.
Cartridge has been changed
Trim Settings Adjusted
• If the cartridge is changed after the trimming settings have been made, the printer
automatically sets the trimming frame again to fit the paper size.
Troubleshooting
117
Error Messages
Cartridge not compatible
• Use a cartridge that is compatible with this printer.
Communication error!
• Turn the printer, camera and computer power off, then turn on again.
• Check the Print Images When Connected with a Camera section (p. 73). If the error
message continues to display, contact a Canon Customer Support center for
assistance.
Disconnected
Y
P
O
• Make sure that the printer and the sender are within an appropriate distance.
• Check the sender's power supply.
• If you are connecting via Bluetooth, the connection may interrupt depending on
the signal condition. Try to establish the connection again.
Cartridge incorrectly inserted or not loaded
• Insert the cartridge.
• Remove the cartridge and insert it again all the way, then close the cartridge cover.
C
Image too large.
• Images larger than 8,000 x 8,000 pixels, or 32 MB or larger files cannot be played
back. Select another image.
• When printing from a mobile phone (wirelessly), the maximum image file size that
can be transmitted is approx. 3 MB (maximum file size varies depending on the
mobile phone).
Incompatible JPEG
• You attempted to play back or print an incompatible JPEG image. Select another
image.
Memory card error
• Memory card has experienced an anomaly. Use another memory card.
• A memory card adapter without an inserted memory card has been inserted. Be
sure to insert a memory card into the adapter before inserting it into the printer. If
an empty adapter had been inserted, remove the adapter and turn the printer's
power off and on again.
• Some memory cards require a specific adapter. You have inserted the memory
card directly into the card slot without first inserting the card into the adapter
(p. 30).
118
Troubleshooting
Error Messages
Unidentified Image
• You attempted to play back or print an image with corrupted data, an image
recorded in a foreign camera or data type, or an image that has been edited on a
computer. Select another image.
Cannot magnify!
• You attempted to magnify an image with corrupted data, an image recorded with
another camera or data type, or an image that has been edited on a computer, or a
movie. Select another image.
Too many marks.
Y
P
O
• Too many images have been marked with print settings. Mark 998 or less images.
Cannot trim
• You attempted to trim an image smaller than 640 x 480 pixels, larger than 5616 x
3744 or an image with a width-to-height ratio narrower than 16:9. Select another
image to trim.
Image not compatible
C
• You attempted to put a speech bubble in an image smaller than 320 x 240 pixels,
larger than 5616 x 3744 or an image with a width-to-height-ratio narrower than 16:9.
Select another image size that allows speech bubbles to be set.
Device Not Supported
• This displays when you attempt to connect an unsupported USB device, e.g. USB
memory. Disconnect the USB device. If the message returns, turn the printer off
and back on.
Device Not Supported (HUB)
• You attempted to connect an unsupported USB connector, e.g. a USB hub.
Disconnect the USB hub.
Data Error
• You attempted to add (update) or register incompatible or corrupted contents to
the printer.
• If you are connecting via Bluetooth, try to establish the connection again. If the
message keeps reappearing several times, Bluetooth incompatibility or corrupted
data may be the problem. Select a different image.
Troubleshooting
119
Error Messages
Out of operating temperature
• Operation of the printer is out of operating temperature. Use the printer between 5
- 40°C (41 - 104°F).
Incompatible image
• Images smaller than 640 x 480 pixels, or images with a width-to-height ratio
narrower than 2:1, cannot be printed in Creative Print. Select an image of a size
that can be printed in Creative Print.
• You can only print ID photos that are shot with the same number of recording
pixels as "Large" of a Canon PowerShot series or IXUS series camera.
Y
P
O
Could not add some images
• You cannot add the following types of images.
- An image with a data size that is too big. Images larger than 8000 x 8000 pixels cannot
be added
- An image that is corrupted
- An image other than JPEG
• You can stop adding an image when you press
while an image is being added.
Some image(s) already added
C
• You cannot add an image that already exists on the printer.
You can not add more images
• You can add up to 999 images. However, depending on the data size, you may not
be able to add 999 images.
Images can not be added
• You cannot add the following types of images.
- An image with a data size that is too big. Images larger than 8000 x 8000 pixels cannot
be added
- An image that is corrupted
- An image other than JPEG
Protected!
• Protected images cannot be erased (p. 63). Remove the protection, then erase the
image.
120
Troubleshooting
Error Messages
No print history
• If you set [Save for Reprint] (p. 100) to [Off], no print history will be saved. If you
set it to [On], each time you print the print will be saved and the print history will
display.
C
Y
P
O
Troubleshooting
121
Index
Numerics
D
1-up.........................................................................57
2-up.........................................................................57
4-up.........................................................................57
8-up.........................................................................57
9 Image View ..........................................................15
Darker Skin .............................................................50
Date ........................................................................55
Date Format ............................................................55
Deny Access .........................................................101
Device name .........................................................101
Direct Print ..............................................................72
DISP. Button .....................................................13, 16
Download Content ................................................100
DPOF Print .............................................................38
A
AC IN (Power Input) Terminal.................................11
Accessories...............................................................9
Add to Favorite........................................................62
Adjust Image .....................................................55, 58
Air Vents .................................................................11
Auto Play.................................................................39
Auto Power Down .................................................100
Auto Rotate ...........................................................100
B
Y
P
O
B/W .........................................................................50
BACK Button...........................................................14
Basic Print ...............................................................32
Bluetooth
BU-30 ..................................................................9
Print...................................................................77
Settings ...........................................................100
Borders ...................................................................55
Brightness ...............................................................58
C
C
Calendar ...........................................................40, 45
Card Slot ...........................................................12, 31
Card Slot Cover ......................................................10
Carrying Handle ..............................................11, 104
Cartridge .............................................................9, 21
Cartridge Compartment ..........................................10
Cartridge Cover.................................................10, 22
Cartridge Cover Lever.......................................10, 22
Cartridge Lever .................................................10, 25
CF/microdrive Slot ..................................................12
Cleaner Unit ......................................................8, 103
Cleaning................................................................103
Clip Art ..............................................................40, 43
Compact Photo Printer Solution Disk..................8, 82
Contrast ..................................................................58
Controls...................................................................13
COPIES Button .......................................................14
Correct Red-Eye .....................................................55
CREATIVE Button...................................................13
Creative Print ..........................................................40
122
E
Easy Photo Pack ................................................9, 21
Easy-Scroll Wheel.............................................14, 20
EDIT Button ............................................................14
Enlarge/Reduce Button...........................................14
Enlarged View.........................................................15
Erase ......................................................................66
Error Messages ....................................................116
F
Fade......................................................................100
Faded Edges ..........................................................50
Favorite .............................................................18, 60
File No. ...................................................................55
Fixed Size ...............................................................57
Frames..............................................................40, 42
H
Handling Precautions............................................107
I
ID Photo ............................................................40, 51
Image Effects ....................................................40, 50
Image Optimize.......................................................55
ImageBrowser.........................................................89
Index .......................................................................57
Infrared data communication ..................................76
Infrared Data Receiver......................................13, 76
Installation...............................................................82
IrDA.........................................................................76
IrSimple...................................................................76
J
Jump Function ........................................................19
L
Language......................................................100, 102
LCD Monitor......................................................14, 15
Lighter Skin .............................................................50
Index
M
S
Memory Cards ........................................................30
MENU Button ..........................................................13
microSD Slot ...........................................................12
MODE Button....................................................13, 18
Modern Bright .........................................................50
Movie Print ........................................................40, 53
MS/MS Duo Slot .....................................................12
Multi Layout.......................................................40, 47
Multi View................................................................15
Safety Precautions................................................105
Saturation ...............................................................58
Save for Reprint ....................................................100
Saving Lamp ...........................................................13
SD/MMC+/miniSD Slot ............................................12
Security .................................................................101
Select by date .........................................................36
SELPHY Contents Utility.............................88, 89, 93
Sepia.......................................................................50
SET Button .............................................................14
Sharpness...............................................................58
Single View .............................................................15
Sliding Slot Cover ...................................................12
Soft Edges ..............................................................50
Soft Focus...............................................................50
Software......................................................84, 87, 88
Specifications........................................................109
Speech Bubble .................................................40, 48
Star Lights...............................................................50
System Requirements.............................................80
N
Y
P
O
Normal ....................................................................18
Nostalgic .................................................................50
O
ON Button .........................................................13, 31
P
Page Layout (Basic Print) .......................................35
Page Layout (Print Settings) .............................55, 57
Paper-Handling Slot................................................10
Passkey ................................................................101
PictBridge................................................................72
Pinhole Camera ......................................................50
Positive Film............................................................50
Power Cord .........................................................8, 27
Power Lamp............................................................13
Print All Images.......................................................37
PRINT Button..........................................................14
Print Mode...............................................................18
Print Output Receptacle..........................................10
Print Output Receptacle Button ..............................10
Print Output Receptacle Cover ...............................10
Print Settings...........................................................54
Printer Driver.....................................................82, 85
Printer Setup ...........................................................99
Protect.....................................................................63
C
R
Reprint ..............................................................18, 70
Reset.....................................................................101
Reset All................................................................100
T
Transition ..............................................................100
Trial Cartridge ...........................................................8
Trimming .................................................................33
Troubleshooting ....................................................111
U
Ulead Photo Express LE...................................88, 90
Up/Down/Left/Right Button .....................................14
USB Terminal for Camera Connection .............11, 73
USB Terminal for PC Connection ...........................11
W
Wipe......................................................................100
Y
You Think There is a Problem ..............................112
Z
ZoomBrowser EX....................................................88
123
C
Y
P
O