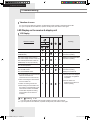
1
Safety Precautions Keep this installation manual together with the user’s manual in a handy place so that you can find it whenever you need to see it after reading this manual thoroughly. Make sure you read this ‘Safety Precautions’ carefully before installing the product. Safety Precautions states information that is important to your safety matters. Please follow the instructions carefully. WARNING Hazards or unsafe practices that may result in severe personal injury or death. CAUTION Hazards or unsafe practices that may result in minor personal injury or property damage. You must install the product by qualified installer. If you install the product on your own or by unqualified person, Samsung is not responsible for any damages which may occur due to incorrect installation. Make sure to read the following safety precautions carefully before installation. Make sure to observe the cautions specified in this manual. Conduct a test run of the unit after installation and then explain all system functions to the owner. The indications and meanings are as shown below. Follow IEC (International Electrotechnical Commission) standards for the power input and ISO (International Standards Organization) standards for input current. WARNING Hazards or unsafe practices that may result in severe personal injury or death. Installation must be carried out by a qualified installer. Do not attempt to repair, move, modify or reinstall the unit on your own since such act may cause fire, electric shock or water leakage. Install the unit in a place where it is strong enough to hold the product weight. When installed in place where it is not strong enough to withhold the product weight, the unit could fall and cause injury. The unit should be installed in accordance with the National Electrical regulations. Check if the voltage and the frequency of the main power supply are those required for the unit to be installed and check the connection. Avoid the use of an extension cord and do not share the power outlet with other appliances. Incomplete connection, defective insulation or exceeding the permissible current may cause electric shock or fire. Use the specified wires to connect the indoor and outdoor units securely and attach the wires firmly to the terminal block connecting sections so that the pressure is not applied to the sections. Inappropriate connection and fixing could cause fire. Attach the electrical cover to the indoor and outdoor unit securely without any gaps. If there are any gaps, there is potential risk of fire or electric shock due to dust or water. Make sure to use the part provided or specified parts for the installation work. The use of defective parts could cause an injury or leakage of water due to a fire, an electric shock, the unit falling, etc. Make sure that the refrigerant gas does not leak after completing the installation. If the refrigerant gas of the indoor unit leaks and comes into contact with the fan heater, space heater or stove, harmful gas will be generated. Ensure that the national safety code requirements have been followed for the main supply circuit. Ensure that a proper ground wire is in place. Do not connect the ground to a gas pipe, water pipe, lightning rod or telephone grounding. Defective grounding could cause electric shock. Do not install the unit in a place with direct sunlight, dangerous substances or where it is exposed to inflammable gas leakage to prevent explosion, fire or personal injury. Perform the installation securely referring to the installation manual. Incomplete installation could cause personal injury due to fire, electric shock and water leakage or from the unit falling. Before connecting the power plug and power receptacle check for dust, loose or blocked. Make sure that plug is fully inserted. Dusted power plug, blocked or loosened power receptacle may cause fire or electric shock. Exchange the power receptacle if it is loose. Check first the following situations before starting the operation during the installation. - The pipe must be properly connected and make sure there is no leakage. - Service valves must be open. If compressor is operated with the service valve closed, excessive pressure may damage parts of the compressor. If leakage occurs on any of the connection, air inflow may also cause excessive pressure that could lead to explosion. E-2 FJM_IM_DB98-31792_E_6.10.10.indd 2 2010-6-10 9:53:13 Hazards or unsafe practices that may result in severe personal injury or death. Stop the compressor before disconnecting the refrigerant pipe for pump-down operation. If you disconnect the refrigerant pipe while compressor is operating with service valve open, air inflow will cause excessive pressure in the refrigerant cycle that could lead to explosion and personal injury. Do not assemble the power cord on your own, use two cables together to extend the cable length or tangle the cable. Bad connection, isolation and over voltage may cause fire or electric shock. CAUTION Make sure to turn off the main power when setting up the indoor unit electrical circuit or power cords. There is a risk of electric shock. Make sure that proper circuit breaker and safety switches are installed. Install a ground leakage breaker depending on the installation place(where it is humid). If not, it may cause electric shock. ENGLISH WARNING Do not install the unit by yourself (owners). Incorrect installation of the unit could cause injury due to fire, electric shock and water leakage or from the unit falling. Consult a dealer or a qualified installer. Use the unit on a single outlet circuit. Do not share the power outlet with other appliances. Obtain the consent by a qualified installer before connecting the unit to the power supply system. Hazards or unsafe practices that may result in minor personal injury or property damage. Perform the drainage/piping work securely according to the installation manual. If not, water could drop from the unit and household goods could get wet and damaged. Fasten a flare nut with a torque wrench as specified in this installation manual. When fastened too tight, a flare nut may break after a long period of time and cause refrigerant leakage. Wear thick gloves during the installation process. If not, personal injury may occur due to the air conditioner parts. Be careful not to touch the outdoor unit inlet or aluminium pins. You may get personal injury. The air conditioner should be used only for the applications for which it has been designed: the indoor unit is not suitable to be installed in areas used for laundry. When installing the indoor unit, use a stable stool and watch your steps carefully. To prevent injury when accidentally touching the indoor unit fan, install the indoor unit at least 2.5m above the floor level. Our units must be installed in compliance with the spaces indicated in the installation manual to ensure either accessibility from both sides or ability to perform routine maintenance and repairs. The units’ components must be accessible and that can be disassembled in conditions of complete safety either for people or things. For this reason, where it is not observed as indicated into the Installation Manual, the cost necessary to reach and repair the unit (in safety, as required by current regulations in force) with slings, trucks, scaffolding or any other means of elevation won’t be considered in-warranty and charged to end user. Do not install the outdoor unit in a place where animals could live. If an animal get contact with the electric parts, damage or fire may occur. In addition ask the customer to maintain a clean installation place around it. After completing the installation run the trial operation. If no error occurs, explain to the customer how to use and clean the air conditioner according to the user’s manual. In addition give the installation manual and the user’s manual to the customer. All of the manufacturing and packaging material used for your new appliance are compatible with the environment and can be recycled. Dispose of the packaging material in accordance with the local requirements. This product is an air conditioning system and contains a coolant that must be recovered and disposed of in an appropriate way by qualified personnel. At the end of the life cycle, take it to a proper recycling or disposal center or return it to the dealer so that it can be disposed correctly. Check the unit for damage that may have taken place during transportation and do not install or use damaged equipment. E-3 FJM_IM_DB98-31792_E_6.10.10.indd 3 2010-6-10 9:53:14 Contents Preparation for installation . . . . . . . . . . . . . . . . . . . . . . . . . . . . . . . . . . . . . . . . . . . . . . . . . . . . . . . . . . . . Deciding on where to install the Air Conditioner . . . . . . . . . . . . . . . . . . . . . . . . . . . . . . . . . . . . . Air Conditioner and Accessories . . . . . . . . . . . . . . . . . . . . . . . . . . . . . . . . . . . . . . . . . . . . . . . . . . . . . . Deciding on where to install the indoor unit . . . . . . . . . . . . . . . . . . . . . . . . . . . . . . . . . . . . . . . . . . Indoor unit installation . . . . . . . . . . . . . . . . . . . . . . . . . . . . . . . . . . . . . . . . . . . . . . . . . . . . . . . . . . . . . . . . Purging the unit . . . . . . . . . . . . . . . . . . . . . . . . . . . . . . . . . . . . . . . . . . . . . . . . . . . . . . . . . . . . . . . . . . . . . . Connecting the refrigerant pipe . . . . . . . . . . . . . . . . . . . . . . . . . . . . . . . . . . . . . . . . . . . . . . . . . . . . . . Cutting/Flaring the pipes . . . . . . . . . . . . . . . . . . . . . . . . . . . . . . . . . . . . . . . . . . . . . . . . . . . . . . . . . . . . . Performing leak test & insulation . . . . . . . . . . . . . . . . . . . . . . . . . . . . . . . . . . . . . . . . . . . . . . . . . . . . . Drain hose installation . . . . . . . . . . . . . . . . . . . . . . . . . . . . . . . . . . . . . . . . . . . . . . . . . . . . . . . . . . . . . . . . Connecting the connection cord . . . . . . . . . . . . . . . . . . . . . . . . . . . . . . . . . . . . . . . . . . . . . . . . . . . . . Increasing Fan Speed . . . . . . . . . . . . . . . . . . . . . . . . . . . . . . . . . . . . . . . . . . . . . . . . . . . . . . . . . . . . . . . . . Assigning Address to Indoor Unit . . . . . . . . . . . . . . . . . . . . . . . . . . . . . . . . . . . . . . . . . . . . . . . . . . . . . Additional Functions . . . . . . . . . . . . . . . . . . . . . . . . . . . . . . . . . . . . . . . . . . . . . . . . . . . . . . . . . . . . . . . . . . Filter Replacement . . . . . . . . . . . . . . . . . . . . . . . . . . . . . . . . . . . . . . . . . . . . . . . . . . . . . . . . . . . . . . . . . . . . Drain pump Installation (Optional) . . . . . . . . . . . . . . . . . . . . . . . . . . . . . . . . . . . . . . . . . . . . . . . . . . . . Placing the Indoor Unit in Position . . . . . . . . . . . . . . . . . . . . . . . . . . . . . . . . . . . . . . . . . . . . . . . . . . . . Troubleshooting . . . . . . . . . . . . . . . . . . . . . . . . . . . . . . . . . . . . . . . . . . . . . . . . . . . . . . . . . . . . . . . . . . . . . . 5 6 10 11 14 15 15 16 17 18 20 22 23 24 25 27 29 30 E-4 FJM_IM_DB98-31792_E_6.10.10.indd 4 2010-6-10 9:53:14 COMPLETING THE INSTALLATION ENGLISH Preparation for installation When deciding on the location of the air conditioner with the owner, the following restrictions must be taken into account. General Do NOT install the air conditioner in a location where it will come into contact with the following elements: Combustible gases Saline air Machine oil Sulphide gas Special environmental conditions If you must install the unit in such conditions, first consult your dealer. Avoid installing the air conditioner: In areas where it is exposed to direct sunlight. Close to heat sources. In damp areas or locations where it could come into contact with water (for example rooms used for laundry) In areas where curtains and furniture could affect the supply and discharge of air. Without leaving the required minimum space around the unit (as shown in the drawing). In scarcely ventilated areas. On surfaces that are unable to support the weight of the unit without deforming, breaking or causing vibrations during the use of the air conditioner. In a position that does not enable the condensate drainage pipe to be correctly installed (at the end of the installation. It is always essential to check the efficiency of the drainage system.) CAUTION You have just purchased a Free Joint Multi air conditioner and it has been installed byyour installa- tion specialist. This device must be installed according to the national electrical rules. Max input power & current is measured according to IEC standard and input power ¤t is measured according to ISO standard. E-5 FJM_IM_DB98-31792_E_6.10.10.indd 5 2010-6-10 9:53:14 COMPLETING THE INSTALLATION Deciding on where to install the Air Conditioner Indoor unit There must be no obstacles near the air inlet and outlet. Install the indoor unit on a ceiling that can support its weight. Maintain sufficient clearance around the indoor unit. Make sure that the water dripping from the drain hose runs away correctly and safely. The indoor unit must be installed in this way, that they are out of public access. (Not touchable by the users) After connecting a chamber, insulate the connection part between the indoor unit and the chamber with t10 or thicker insulation. Otherwise, there can be air leak or dew from the connection part. Space requirements for installation & service Unit Depth(D)+50mm Construction Standard for Inspection Hole. 1) In case, the ceiling is textile, Inspection hole dose not need. 2) In case, the ceiling is plaster board, Inspection hole depends on Inside height of the ceiling. a. Height is more than 1m : Only “B” [Inspection for PBA] is applied. b. Height is less than 1m : Both “A” & ”B” are applied. c. “A” & ”B” are inspection holes. Unit Width(W) “A”=W+100mm “B”=500mm 20mm or more 20mm or more You must have 20mm or more space between the ceiling and the bottom of indoor unit. Otherwise, the noise from the vibration of indoor unit may bother the user.When the ceiling is under construction, the hole for check-up must be made to take service, clean and repair the unit. It is possible to install the unit at an height of between 2.2~2.5m from the ground, if the unit has a duct with a well defined lenght (300mm or more), to avoid fan motor blower contact. E-6 FJM_IM_DB98-31792_E_6.10.10.indd 6 2010-6-10 9:53:15 ENGLISH COMPLETING THE INSTALLATION MH050FXEA2 Piping outside diameter Indoor unit Outdoor unit Power supply Ø, V, Hz 026/035 MH050FXEA2 1,220-240, 50 Unit 026/035 Outside diameter Liquid Gas 1/4" 3/8" MH050FXEA2 outdoor unit cannot be connected to the following indoor unit combination. -MH052FMEA/MH052FUEA/MH052FEEA CAUTION: 3 m as minimum pipe length: It will reduce noise and vibration. This value must be increased at 7.5 meters in case it is connected just one indoor unit. (h) (H) 600 mm minimum 300 mm minimum 300 mm minimum B A 600 mm minimum Main power switch Piping length and the height Dimension Composition 1 Room max length 20m A,B 2 Room total max length 30 m A+B Max height between indoor unit & outdoor unit 15m (H) Max height between indoor units 7.5 m (h) System can work with one indoor unit connected, but it is recommended that the TOTAL number of indoor unit suggested by manufacturer are connected to obtain the maximum performance. Make at least one round: It will reduce noise and vibration The appearance of the unit may be different from the diagram depending on the model. E-7 FJM_IM_DB98-31792_E_6.10.10.indd 7 2010-6-10 9:53:17 COMPLETING THE INSTALLATION Deciding on where to install the Air Conditioner (Continue) MH060FXEA3B Piping outside diameter Indoor unit Outdoor unit Power supply Ø, V, Hz Unit 026/035/052 MH060FXEA3B 1,220-240, 50 026/035 Outside diameter Liquid Gas 052 3/8" 1/4" 1/2" CAUTION: 3 m as minimum pipe length: It will reduce noise and vibration. This value must be increased at 7.5 meters in case it is connected just one indoor unit. 600 mm minimum 300 mm minimum (h) (H) A B C 300 mm minimum 600 mm minimum Main power switch Piping length and the height Dimension Composition 1 Room max length 20m A,B,C 3 Room total max length 45 m A+B+C Max height between indoor unit & outdoor unit 15m (H) Max height between indoor units 7.5 m (h) System can work with one indoor unit connected, but it is recommended that the TOTAL number of indoor unit suggested by manufacturer are connected to obtain the maximum performance. Make at least one round: It will reduce noise and vibration The appearance of the unit may be different from the diagram depending on the model. E-8 FJM_IM_DB98-31792_E_6.10.10.indd 8 2010-6-10 9:53:24 ENGLISH COMPLETING THE INSTALLATION MH070FXEA4B / MH080FXEA4B Piping outside diameter Indoor unit Outdoor unit Power supply Ø, V, Hz Unit 026/035/052 MH070FXEA4B MH080FXEA4B 1,220-240, 50 026/035 1/4" 3/8" 052 1/4" 1/2" Outside diameter Liquid Gas CAUTION: 3 m as minimum pipe length: It will reduce noise and vibration. This value must be increased at 7.5 meters in case it is connected just one indoor unit. (h) (H) 600 mm minimum B 300 mm A minimum 300 mm minimum C D 600 mm minimum Main power switch Piping length and the height Dimension Composition 1 Room max length 25m A,B,C,D 4 Room total max length 70 m A+B+C+D Max height between indoor unit & outdoor unit 15m (H) Max height between indoor units 7.5 m (h) System can work with one indoor unit connected, but it is recommended that the TOTAL number of indoor unit suggested by manufacturer are connected to obtain the maximum performance. Make at least one round: It will reduce noise and vibration The appearance of the unit may be different from the diagram depending on the model. E-9 FJM_IM_DB98-31792_E_6.10.10.indd 9 2010-6-10 9:53:29 COMPLETING THE INSTALLATION Air Conditioner and Accessories Accessories in the Indoor Unit Case The following accessories are supplied with the indoor unit. Pattern Sheet Drain pipe holder Insulation A Insulation D Insulation B Insulation C Insulation cover band E Flexible hose Putty User’s manual Cable-Tie Installation manual Wired remote controller box Wired remote control accessories Wired remote control Cable-tie Cable clamp M4x16 tapped screw Indoor unit power drawing cable Communication cable of the wired remote control Wire joint User’s manual Installation manual E-10 FJM_IM_DB98-31792_E_6.10.10.indd 10 2010-6-10 9:53:34 COMPLETING THE INSTALLATION ENGLISH Deciding on where to install the indoor unit Drawing of the indoor unit MH026FEEA/MH035FEEA/NJ026LHXEA/NJ035LHXEA 3 256=768 71 100 10 11.9 Unit : mm 28 28 600 477(Suspension position) 938.4 (Suspension position) 8 100=800 860 (Air outlet duct flange) 22-ø3.2 hole (Air around) 650 900 900 500 No. 1 2 3 4 5 6 7 8 Name Liquid pipe connection Gas pipe connection Hose connection Hose connection Power supply/Communicaion connection Power supply connection Air discharge grille flange Air inlet grille flange 100 151.6 199 145.5 30.5 OD32 115.5 18 1000 Discharge side 182 246 333 Suction side Description ø6.35 ø9.52 M8~M10 E-11 FJM_IM_DB98-31792_E_6.10.10.indd 11 2010-6-10 9:53:36 COMPLETING THE INSTALLATION Deciding on where to install the indoor unit (Continue) MH052FEEA Unit : mm 71 100 10 12.9 3 322=966 28 477 600 (Suspension position) 28 1138 (Suspension position) 10*100=1000 1060 (Air outlet duct flange) 26-ø3.2 hole (Air around) ��� 1100 ���� ��� 100 OD32 30.5 115.5 144.5 199 151.6 18 ���� Discharge side No. 1 2 3 4 5 6 7 8 Name Liquid pipe connection Gas pipe connection Drain pipe connection Drain pipe connection Power supply connection Air discharge flange Air filter Hook 182 246 333 Suction side Description ø6.35 ø12.7 M8~M10 E-12 FJM_IM_DB98-31792_E_6.10.10.indd 12 2010-6-10 9:53:37 ENGLISH COMPLETING THE INSTALLATION MH052FUEA Unit : mm 530 480 1000 135x5=675 900 7 844 (Air outlet duct flange) 8 936 (Suspension position) (Suspension position) 900 397 6 12 185 90 260 500 77 117 2 1 Discharge side Suction side 5 No. 1 2 3 4 5 6 7 8 4 3 76 132 139 Name Liquid pipe connection Gas pipe connection Drain pipe connection Drain pipe connection Power supply connection Air discharge flange Air filter Hook Description ø6.35 ø12.7 OD32 ID26(without drain pump) Using drain pump (Optional) M8~M10 E-13 FJM_IM_DB98-31792_E_6.10.10.indd 13 2010-6-10 9:53:38 COMPLETING THE INSTALLATION Indoor unit installation It is recommended to install the refnet joint before installing the indoor unit. 1 Place the pattern sheet on the ceiling at the spot where you want to install the indoor unit. Note Concrete Insert Since the diagram is made of paper, it may shrink or stretch slightly due to temperature or humidity. For this reason, before drilling the holes maintain the correct dimensions between the markings. 2 Insert bolt anchors. Use existing ceiling supports or construct a suitable support as shown in figure. 3 Install the suspension bolts depending on the ceiling type. Hole in anchor hole in plug Suspension bolt(M8)-field supply CAUTION Ensure that the ceiling is strong enough to support the weight of the indoor unit. Before hanging the unit, test the strength of each attached suspension bolt. Ceiling support If the length of suspension bolt is more than 1.5m, it is required to prevent vibration. If this is not possible, create an opening on the false ceiling in order to be able to use it to perform the required operations on the indoor unit. Si no es posible, cree una operación en el techo falso para poder usarlo y efectuar las operaciones requeridas en la unidad interna. 4 Screw eight nuts to the suspension bolts making space for hanging the indoor unit. CAUTION You must install all the suspension rods. 5 Hang the indoor unit to the suspension bolts between two nuts. Note When the drain hose is installed to the right. 3mm Drain hose port Piping must be laid and connected inside the ceiling when suspending the unit. If the ceiling is already constructed, lay the piping into position for connection to the unit before placing the unit inside the ceiling. 6 Screw the nuts to suspend the unit. 7 Adjust level of the unit by using measurement plate for all 4 sides. Note For proper drainage of condensate, give a 3mm slant to the left or right side of the unit which will be connected with the drain hose, as shown in the figure. Make a tilt when you wish to install the drain pump, too. E-14 FJM_IM_DB98-31792_E_6.10.10.indd 14 2010-6-10 9:53:39 COMPLETING THE INSTALLATION ENGLISH Purging the unit From factory the unit is supplied and set with a pre-charge of nitrogen gas (insert gas). Therefore, all insert gas must be purged before connecting the assembly piping. Unscrew the pinch pipe at the end of each refrigerant pipe. Result: All inert gas escapes from the indoor unit. Note To prevent dirt or foreign objects from getting into the pipes during installation, do NOT remove the pinch pipe completely until you are ready to connect the piping. CAUTION Connect the indoor and outdoor units using pipes with flared connections(not supplied). For the lines, use insulated, unwelded, degreased and deoxidized copper pipe,(Cu DHP type to ISO 1337), suitable for operating pressures of at least 4200kPa and for a burst pressure of at least 20700kPa. Copper pipe for hydro-sanitary applications is completely unsuitable. The designs and shape are subject to change according to the model. For sizing and limits (height difference, line length, max. bends, refrigerant charge, etc.) see the outdoor unit installation manual. All refrigerant connection must be accessible, in order to permit either unit maintenance or removing it completely. Connecting the refrigerant pipe There are two refrigerant pipes of different diameters: A smaller one for the liquid refrigerant A larger one for the gas refrigerant The inside of copper tube must be clean & has no dust. The connection procedure for the refrigerant pipes varies according to the exit position of the pipes from the indoor unit, as seen when facing the indoor in the “A” side. Liquid refrigerant port Gas refrigerant port Drain hose connection port 1 A Drain hose connection port Liquid refrigerant port Gas refrigerant port Remove the pinch pipe on the pipes and connect the assembly pipes to each pipe, tightening the nuts, first manually and then with a torque wrench, a spanner applying the following torque. Outer Diameter 6.35 mm (1/4”) 9.52 mm (3/8”) 12.70 mm (1/2”) Note Thickness 0.8mm 0.8mm 0.8mm Torque (N•m) 18 42 55 If the pipes must be shortened refer to page 16. 2 Must use insulator which is thick enough to cover the refrigerant tube to protect the condensate water on the outside of pipe falling onto the floor and the efficiency of the unit will be better. 3 Cut off any excess foam insulation. 4 Be sure that there must be no crack or wave on the bended area. 5 It would be necessary to double the insulation thickness(10mm or more) to prevent condensation even on the insulator when if the installed area is warm and humid. The designs and shape are subject to change according to the model. E-15 FJM_IM_DB98-31792_E_7.14.10.indd 15 2010-7-14 11:28:08 COMPLETING THE INSTALLATION Cutting/Flaring the pipes 1 Make sure that you have the required tools available. (pipe cutter, reamer, flaring tool and pipe holder). 2 If you wish to shorten the pipes, cut it with a pipe cutter, taking care to ensure that the cut edge remains at a 90° angle with the side of the pipe. Refer to the illustrations below for examples of edges cut correctly and incorrectly. Oblique Burr 3 To prevent any gas from leaking out, remove all burrs at the cut edge of the pipe, using a reamer. 4 Slide a flare nut on to the pipe and modify the flare. Outer diameter (D) 6.35 mm (1/4”) 9.52 mm (3/8”) 12.70 mm (1/2”) 5 6 Thickness 0.8mm 0.8mm 0.8mm Depth (A) 1.3mm 1.8mm 2.0mm Check that the flaring is correct, referring to the illustrations below for examples of incorrect flaring. Inclined Valve Rough Damaged Surface Cracked Uneven Thickness Align the pipes and tighten the flare nuts first manually and then with a torque wrench, applying the following torque. Flare nut Valve cap Pressure port cap Valve needle Pressure port N•m Wrench(mm) N•m Wrench(mm) N•m Wrench(mm) N•m Wrench(mm) N•m Wrench(mm) 1/4" 3/8" 1/2" 5/8" 3/4" 17 22 26 29 36 18 42 55 65 100 23 23 29 29 38 20 20 40 40 40 18 18 18 18 18 16~18 16~18 16~18 16~18 16~18 Allen(hex.) 5 9 Allen(hex.) 5 9 Allen(hex.) 5 13 Allen(hex.) 5 13 Allen(hex.) 5 13 - 0.34 0.34 0.34 0.34 0.34 CAUTION In case of welding the pipe, you must weld with nitrogen gas blowing. E-16 FJM_IM_DB98-31792_E_6.10.10.indd 16 2010-6-10 9:53:42 COMPLETING THE INSTALLATION ENGLISH Performing leak test & insulation Leak test LEAK TEST WITH NITROGEN (before opening valves) In order to detect basic refrigerant leaks, before recreating the vacuum and recirculating the R-410A, it’s responsable of installer to pressurize the whole system with nitrogen (using a cylinder with pressure reducer) at a pressure above 30 bar (gauge). LEAK TEST WITH R-410A (after opening valves) Before opening valves, discharge all the nitrogen into the system and create vacuum. After opening valves check leaks using a leak detector for refrigerant R-410A. A B CAUTION Discharge all the nitrogen to create a vacuum and charge the system. Insulation Once you have checked that there are no leaks in the system, you can insulate the piping and hose. 1 To avoid condensation problems, place T13.0 or thicker Acrylonitrile Butadien Rubber separately around each refrigerant pipe. Note No gap Always make the seam of pipes face upwards. 2 Wind insulating tape around the pipes and drain hose avoiding to compress the insulation too much. 3 Finish wrapping insulating tape around the rest of the pipes leading to the outdoor unit. 4 The pipes and electrical cables connecting the indoor unit with the outdoor unit must be fixed to the wall with suitable ducts. NBR(T13.0 or thicker) Insulation cover pipe Indoor unit Be sure to overlap the insulation CAUTION All refrigerant connection must be accessible, in order to permit either unit maintenance or removing it completely. CAUTION Must fit tightly against body without any gap. E-17 FJM_IM_DB98-31792_E_6.10.10.indd 17 2010-6-10 9:53:43 COMPLETING THE INSTALLATION Drain hose installation Care must be taken when installing the drain hose for the indoor unit to ensure that any condensate water is correctly drained outside. The drain hose can be installed to the right of the base pan. 1 Unscrew the 4 tapped screws to remove the cover of the drain hose connection port. 2 Insert the flexible hose to the drain hose port. Drain hose connection port Note MHFEEA/NJLHXEA Cable-tie 3 Clamp Fix the flexible hose to the indoor unit with the supplied cable clamp securely. (Use the screwdriver to fix the flexible hose securely.) Install the drain hose so that its length can be as short as possible. Internal diameter of the drain hose should be the same or slightly bigger than the external diameter of the drain hose port. Inner diameter of the drain hose Insulator Flexible hose 32mm(Inner diameter) MH052FUEA Indoor unit Note Give a slightly slant to the drain hose for proper drainage of condensate. Fix the flexible hose to the PVC with the supplied cable tie securely. Cable-tie Insulation drain hose Insulation cover drain 4 Wrap the drain hose with the insulation drain as shown in figure and secure it. CAUTION Must fit tightly against body without any gap. No gap E-18 FJM_IM_DB98-31792_E_7.14.10.indd 18 2010-7-14 11:36:07 ENGLISH COMPLETING THE INSTALLATION MHFEEA/NJLHXEA Testing the drainage Prepare a little water about 5 liter. 1 2 Open the cover of water supply intake by turning and pulling the cover. (MHFEEA/NJLHXEA) Water supply intake Pour water into the the indoor unit as shown in figure. Note If you do not pour water inside the water supply intake, wateray spill from the indoor unit. 3 Confirm that the water flows out through the drain hose. 4 Reassemble the cover of water supply intake.(MHFEEA/NJLHXEA) MHFUEA CAUTION When installing the drain pump Do not give the hose upward gradient after the connection port. This will cause water to flow backwards when the unit is stopped, resulting in water leaks. When installing a flexible hose, the difference of pivot of a drain hose port and a drain hose must be within 20mm. If the difference of each pivot is more than 20mm, or a flexible hose is bent steeply, a flexible hose may leak. Upward gradient 20mm or more Ceiling Do not apply force to the piping on the unit side when connecting the drain hose. The hose should not be allowed to hang loose from its connection to the unit. Fasten the hose to a wall, frame or other support as close to the unit as possible. 1/100 or more 550mm or less When not installing the drain pump Flexible hose Ceiling Support pieces Ceiling E-19 FJM_IM_DB98-31792_E_7.14.10.indd 19 2010-7-14 13:36:38 COMPLETING THE INSTALLATION Connecting the Connection Cord The indoor unit is powered from the outdoor unit via the connection cord. 1 Remove the screw on the electrical component box and remove the cover plate. 2 Route the connection cord through the side of the indoor unit and connect the cable to terminals; refer to the figure below. 3 Route the other end of the cable to the outdoor unit through the ceiling & the hole on the wall. 4 Reassemble the electrical component box cover, carefully tightening the screw. Between Indoor and Outdoor Connection Cord Specifications Power Supply (Single Phase) Power Supply Max/Min(V) Connection Wire 220-240V~ /50Hz ±10% 1.0mm2 or more (H07RN-F, 3 wires) Earth Cable Communication Cable Home server Ø 1.6mm (2 wires) 0.75~ 1.25mm2 (H07RN-F, 2 wires) 0.75~ 1.25mm2 (2 wires) CAUTION Keep the power cable and the connection cord in a steel pipe to protect them against liquids, outside impacts and so on. E-20 FJM_IM_DB98-31792_E_6.10.10.indd 20 2010-6-10 9:53:47 ENGLISH COMPLETING THE INSTALLATION Wiring and Communication Cable Connection Connect the power cable, which is connected with the outdoor unit and supplied by another source, making sure that the power cable terminal should not be changed. The F3 and F4 communication cable may be cross-connected, however, it is recommended that they are connected to the corresponding F3 and F4 terminal. Indoor Unit Receiver & Display Unit (Optional) MAIN PCB CN51 BLK CN31 RED CN33 BLU Float Switch Drain Pump (Optional) CN74 YEL COM2 (F3, F4) 1(L) 2(N) Vc Vc Vw Vw F1 F2 V1 V2 F3 F4 V2 V1 Wired Remote Controlle 1(L) 2(N) Indoor Power Terminal Between Indoor and Outdoor Communication Terminal Outdoor Unit E-21 FJM_IM_DB98-31792_E_6.10.10.indd 21 2010-6-10 9:54:12 COMPLETING THE INSTALLATION Increasing Fan Speed If external static pressure is too great(due to long extension of ducts, for example), the air flow volume may drop too low at each air outlet. This problem can be solved by increasing the fan speed using the following procedure. K1 K2 K3 K4 1 Remove the screw on the electrical component box and remove the cover plate. 2 Adjust the DIP switch(SW05) on the main PCB to the “OFF” position. SW05 3 Switch No. Switch Position Function K3 ON OFF Normal speed High speed Re-install the cover plate and join the removed screw. External Static Pressure External Static Pressure (mmAq) 1.0 2.0 3.0 4.0 MH026FEEA/NJ026LHXEA 015201-1400FB 015201-14020C 015201-140360 015201-1403A2 MH035FEEA/NJ035LHXEA 015201-16025D 015201-16026E 015201-1603C4 015203-160108 MH052FEEA 011223-194108 011223-194119 011223-1941AC 011223-19431D External Static Pressure (mmAq) MH052FUEA 0.0 2.0 4.0 6.0 012221-194247 012221-194360 012221-1943A2 012223-194105 Mark ‘*’ is the basic model of this product. Refer to the table above depending on the installation environment. E-22 FJM_IM_DB98-31792_E_7.14.10.indd 22 2010-7-14 13:40:42 COMPLETING THE INSTALLATION ENGLISH Assigning Address to Indoor Unit 1 Before installing the indoor unit,assign an address to the indoor unit according to the air conditioning system plan. 2 The address of the indoor unit is assigned by adjusting MAIN(SW02) switch. K1 K2 K3 K4 K5 K6 K7 K8 K9 K10K11 K12 3 The MAIN address is for communication between the indoor unit and the outdoor unit. Therefore, you must set it to operate the air conditioner properly. 4 It is required to set the RMC address if you install the wired remote controller and/or the centralized controller. 5 If you install optional accessories such as the wired remote controller, centralized controller, etc. see an appropriate installation manual. 6 If an optional accessory is not installed, you do not have to set the RMC address. However, adjust K1 and K2 switches of the SW05 DIP switch to "ON" position in this case. 7 Set the MAIN address by adjusting the rotary switch(SW02) from 0 to 9. Each indoor unit connected to the same outdoor unit must have different address. E-23 FJM_IM_DB98-31792_E_6.10.10.indd 23 2010-6-10 9:54:16 COMPLETING THE INSTALLATION Additional Functions No. SW05 SW05 Function ON OFF K1 External room sensor Not use Use K2 Centralized controller Not use Use K3 Compensate RPM Standard Up K4 Drain Pump Not use Use K1 OFF Heating mode : Setting temperature compensation value = 0°C Thermo OFF Fan OFF No. SW06 SW06 Function ON OFF K5 Indoor Temperature Compensation for Heating Mode +2°C +5°C K6 Filter Time 1,000 hours 2,000 hours K7 Hot Water Coil Not Use Use K8 - - - Function ON OFF - - - No. K9 SW07 SW07 K10 - - - K11 External control Not Use Use K12 External Control Output Thermal ON Operation ON E-24 FJM_IM_DB98-31792_E_6.10.10.indd 24 2010-6-10 9:54:16 COMPLETING THE INSTALLATION Filter Replacement (Optional) ENGLISH There are 2 kinds of air inlet as follows; they should be installed according to the following instruction. Accessories Filter Cap filter Bracket filter 2 1 2 Appearance When air enters back side When air enters bottom side Installation Diagram When air enters back side TEX Diffuser Suction Grille When air enters bottom side TEX Suction Grille Diffuser E-25 FJM_IM_DB98-31792_E_6.10.10.indd 25 2010-6-10 9:54:17 COMPLETING THE INSTALLATION Filter Replacement (Optional) - continued Installation Method The shape and installation method are subject to change according to the models. 1 When air enters back side Fix the indoor unit support to the top of the air inlet with screws. When air enters bottom side Fix the cover to the back of the product with screws. 2 Put pads on the support. 3 Put the indoor unit on the support. 4 Insert another pad between the indoor unit and the support. E-26 FJM_IM_DB98-31792_E_6.10.10.indd 26 2010-6-10 9:54:18 COMPLETING THE INSTALLATION ENGLISH Drain pump Installation (Optional) Accessories . 1 Drain pump & Float switch Flexible hose pump Flexible hose Drain cap 1 1 1 1 Clamp Insulation Cable-tie Screw 1 1 4 3 Separate the bracket of the indoor unit and fix it with the drain pump. Note 2 Connect the drain pump and the flexible hose pump. Note 3 Fix it with 3 screws. Insert the flexible hose pump into a hole of the indoor unit. Connect the flexible hose to the connection of the drain pump with a clamp. Change a clamp under the drain pump. Insulation cover pipe Connect the flexible hose to the flexible hose pump. Note Check a rubber ring is installed to the drain pump. Stop the drain hole of the drain cushion with a drain cap. Insulate the flexible hose. Indoor Unit Must fit tightly against body without any gap. E-27 FJM_IM_DB98-31792_E_6.10.10.indd 27 2010-6-10 9:54:20 COMPLETING THE INSTALLATION Drain pump Installation (Optional) - continued Power supply unit (Black) 4 Connect the float switch of the drain pump(Yellow) and power supply unit(Black) to the PCB of the indoor unit. Note Use a cable tie for managing the drain pump. Drain pump (Yellow) 5 K1 K2 K3 K4 SW05 Adjust K4 DIP switch(SW05) to the "OFF" position. Switch No. Switch Position Using Drain Pump K4 ON OFF X O Note 6 Wrap the drain tube outlet on the right and left side of the indoor unit with an insulating materials. Check water leakage of the drain hose port and the drain pipe after completing installation. CAUTION The drain pump must be installed by an installation specialist. Before installing the optional kits, ensure that you have turned off the main power. You should use the original drain pump made in Samsung. If you assemble the drain pump, you are responsible for every claim caused from the drain pump you assembled. After completing the drain pump, fix the connection port of the drain hose with insulation. E-28 FJM_IM_DB98-31792_E_6.10.10.indd 28 2010-6-10 9:54:21 COMPLETING THE INSTALLATION ENGLISH Placing the Indoor Unit in Position Once you have checked that there are no leaks in the system, you can insulate the piping, hose and cables and place the indoor unit on the installation plate. 1 To avoid condensation problems, place heat-resistant polyethylene foam separately around each refrigerant pipe in the lower part of the indoor unit. 2 Wind insulating tape around the pipes, assembly cable and drain hose. 3 Place the resulting bundle carefully in the lower part of the indoor unit, making sure that it does not jut out from the rear of the indoor unit. 4 Hook the indoor unit on to the installation plate and move the unit to the right and left until you are sure that it is securely in place. 5 Finish wrapping vinyl tape around the rest of the piping leading to the outdoor unit. 6 Installation plate Using clamps (optionally supplied), attach the piping to the wall wherever possible. E-29 FJM_IM_DB98-31792_E_6.10.10.indd 29 2010-6-10 9:54:22 COMPLETING THE INSTALLATION Troubleshooting Detection of errors If an error occurs during the operation, an LED flickers and the operation is stopped except the LED. If you re-operate the air conditioner, it operates normally at first, then detect an error again. LED Display on the receiver & display unit LED Display Indicators Concealed Type Abnormal conditions Green Operating Red Standard Type Power reset X Error of temperature sensor in indoor unit (OPEN/SHORT) X Error of heat exchanger sensor in indoor unit Error of heat exchanger OUT sensor in indoor unit Error of outlet temperature sensor in indoor unit (OPEN/SHORT): For heat pump models only X X X Error of mixed operation X Error of outdoor temperature sensor Error of COND sensor Error of DISCHARGE sensor X X X X X X X X X X X 1. No communication for 2 minutes between indoor unit and outdoor unit (communication error for more than 2 minutes) 4. When sending the communication error from outdoor unit the mismatching of the communication numbers and installed numbers after completion of tracking. (communication error for more than 2 minutes) On Flickering Displayed on appropriate indoor unit which is operating Displayed on appropriate indoor unit which is operating Displayed on outdoor unit 1. Error of indoor unit: Displayed on the indoor unit regardless of operation 2. Indoor unit receiving the communication error from outdoor unit 3. Outdoor unit tracking 3 minute error Displayed on appropriate indoor unit which is operating X X X 2. Error of outdoor unit: Displayed on the indoor unit which is operating X Off If you turn off the air conditioner when the LED is flickering, the LED is also turned off. If you re-operate the air conditioner, it operates normally at first, then detect an error again. E-30 FJM_IM_DB98-31792_E_6.10.10.indd 30 2010-6-10 9:54:22 ENGLISH COMPLETING THE INSTALLATION LED Display Indicators Concealed Type Abnormal conditions Green Operating Red Standard Type Self-diagnostic error (including the indoor unit not detected) Displayed on appropriate indoor unit which is operating Displayed on outdoor unit 1. Error of electronic expansion valve close 2. Error of electronic expansion valve open X X 3. Breakaway of EVA OUT sensor 4. Breakaway of EVA IN sensor 5. Breakaway of COND MID sensor Displayed on appropriate indoor unit which is operating Displayed on outdoor unit 6. 2nd detection of refrigerant completely leak 7. 2nd detection of high temperature COND 8. 2nd detection of high temperature DISCHARGE 9. COMP DOWN due to 2nd detection of low pressure switch X X Error of float switch X X Error of setting option switches for optional accessories X X 10. Error of reverse phase 11. Compressor down due to 6th detection of freezing 12. Self-diagnosis of condensation sensor (G8, G9) 13. Compressor down due to condensation ratio control X EEPROM error X X X EEPROM option error On Flickering X Off If you turn off the air conditioner when the LED is flickering, the LED is also turned off. If you re-operate the air conditioner, it operates normally at first, then detect an error again. E-31 FJM_IM_DB98-31792_E_6.10.10.indd 31 2010-6-10 9:54:23 "EEE Yönetmeliğine Uygundur" "This EEE is compliant with RoHS" FJM_IM_DB98-31792_E_6.10.10.indd 32 2010-6-10 9:54:23 ENGLISH PORTUGUÊS ITALIANO FRANÇAIS MHFEEA Series MHFUEA Series NJLHXEA Series ESPAÑOL INSTALLATION MANUAL EΛΛHNIKA (Cooling and Heating) DEUTSCH Free Joint Multi Air Conditioner E S F I P D G DB98-31792A(2) FJM_IM_DB98-31792_E_6.10.10.indd 33 2010-6-10 9:54:24