1
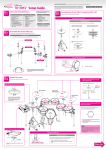
Copyright © 2011 ROLAND CORPORATION HD-3 V-Drums Lite 01 All rights reserved. No part of this publication may be reproduced in any form without the written permission of ROLAND CORPORATION. Roland, V-Drums, V-Drums, Lite are either registered trademarks or trademarks of Roland Corporation in the United States and/or other countries. Setup Guide Check the Included Items Before using this unit, carefully read the sections entitled: “USING THE UNIT SAFELY” and “IMPORTANT NOTES.” These sections provide important information concerning the proper operation of the unit. Additionally, in order to feel assured that you have gained a good grasp of every feature provided by your new unit, Owner’s manual and Setup Guide should be read in its entirety. The manual should be saved and kept on hand as a convenient reference. * 5 1 0 0 0 2 3 4 9 4 - 0 2 * As soon as you open the package, check to see that all items are included. If anything is missing, please contact your dealer. HD-3 parts HD-3 Sound Module Stand Cymbal Pad x 3 AC Adaptor Power Cord Foot Pipes Thumb Screw for Sound Module x 2 Drum Key Screw for Foot Pipe x 4 Manual Set Setup Guide Owner’s Manual Cable Tie Audio Cable 02 Attach the Foot Pipes * When assembling the stand, take care that it does not fall over. * When attaching the foot pipes, take care not to pinch your finger between the movable parts or between the foot pipes and the floor. 03 Open the Arms * Be careful not to pinch yourself. 1. Open the arm pipes in the order shown in the 2. Using a drum key, loosen the screws of the cymbal illustration (1, 2, 3, 4). 3. Adjust the rod height. arm holders. Adjust this so that it does not interfere with other pads, taking care that the rod does not come out. Rear of the HD-3 1. Lay the stand on the floor, and attach one of the foot pipes. * As the cymbal rod sticks through the pipe on the bottom side, be careful to not injure yourself Rod * Do not insert your fingers or hands underneath the pedals or in the spring. 4. Tighten the bolt to fasten securely. * Be careful that the left and right foot pipes are located correctly. 1 Align the flat portion. 2 3 Align with the screw holes. Tighten 4 Insert the screws from the underside of the stand, and fasten them evenly and securely. Loosen 2. Flip the stand over, and attach the other foot pipe. 04 3. Use the clamp to fasten the pedal cable. Attach the Pads 1. Attach the cymbal pad. * For details on setup for left-handed use, refer to p.21 of the Owner's Manual. Cymbal Knob Cymbal Felt Unscrew the cymbal knob, mount the cymbal pad, and attach the cymbal knob as shown in the illustration. 4. Set the stand upright. Attach in the orientation shown in the illustration. * Make sure the foot pipes are securely fastened to the stand. If not you risk to damage the stand or have stability problems. Tighten to obtain an appropriate amount of sway. If this knob is too loose, you may experience double triggering. 05 Attach the Sound Module 2. Fasten it using the supplied 1. Place the HD-3 sound thumbscrews (two places). module on the holder. holder * Vibration can cause the screws to be loosened. Should this occur, make sure to retighten them. 3. Connect the D-sub cable 08 Adjusting Pads and Seat Height 1. Seat Height to the sound module, and hand-tighten the screws (two locations). 2. Adjust the height of the pad. Adjust the height of the seat so that when your feet are on the pedals, your legs are parallel to the floor, as shown in the diagram. Adjust the height and position of each pad so you can play comfortably. Once you've got everything adjusted the way you want it, firmly tighten all the screws and knobs. Set Tom 2 at the same height as Tom 1. Tom 1 Tom 2 Be careful that the cable does not protrude. Tighten the knob firmly. 06 Adjust the height of the snare and its position relative to other things, so it is suitable for the height of your waist when you are seated, and the position of the stool. Connect the Cables If you loosen the knob, you'll be able to move it forwards or backwards. 1. Connect the cables to the pads and pedals. The labels affixed to the cables indicate the pad to which they should be connected. Make connections as shown in the illustration. If you use a drum key to loosen the screw of a tom, you'll be able to move it to the left or right. 2. Use the clamp to fasten the cymbal cable. CR RD T1 knob HH T2 T3 SNR * Connect T3 after you've finished the step "08 Adjusting Pads and Seat Height." HHC Fasten the cable with the clamp Allow some slack KIK 09 Connect the AC Adaptor and Amp * To prevent malfunction and/or damage to speakers or other devices, always turn down the volume, and turn off the power on all devices before making any connections. Place the AC adaptor so the side with the indicator (see illustration) faces upwards and the side with textual information faces downwards. The indicator will light when you plug the AC adaptor into an AC outlet. Audio Cable 07 Correct any Instability If the stand wobbles because the floor is not perfectly flat, use the adjusters (three locations) to adjust the height. In particular, when using the HD-3 on carpet, adjust these so that they are in firm contact with the floor. *Be careful not to pinch your fingers or hands when making these adjustments. 1. For either the left pedal or right pedal, turn the adjuster clockwise (as seen from above) for the pedal that's not in firm contact with the floor. 2. If the stand's vertical support is still floating even after you've adjusted the left and right height, turn the rear adjuster. AC Adaptor Headphones AC Outlet Use the cable ties to bundle the AC adaptor cable together with the trigger cables. Monitor Amplifier etc. This completes assembly and connections. ■■ When you’ve finished making connections, turn on the power as described in the HD-3 Owner’s Manual, and verify that you can hear sound. When using the HD-3, you must firmly tighten the knobs and screws. In particular, before performing, you should check to be sure that all knobs and screws are firmly tightened. If they are not tight, not only will you be unable to perform correctly, but your equipment or pads may fall down. Other side ■■ Snare Pad Handling Component Names Adjusting the Tension NOTE From behind, use the drum key to evenly tighten the tuning bolts a little at a time in the order shown in the illustration. Head * Be sure to adjust the head tension before use. * Striking the head when the head tension is loose may damage the sensor and head. Head sensor * Do not apply excessive force to the sensor and cushion located under the head. Doing so can interfere with accurate detection, and may damage it. Rim rubber * Due to the nature of the materials used in the sensor, changes in room temperature may affect the sensitivity of the sensor. * The head and the rim rubber are expendable items that eventually will wear out and need to be replaced. Replace the head when the following occurs: Slack portions remain in the head even when the head tension is properly adjusted. Rim shots may not be performed correctly when the rim rubber is worn out. If this occurs, replace the rim rubber. Consult Roland Service for more on replacing the rim rubber. Tuning bolts 4 Knob Suitable position for rim shots 2 6 5 1 Player 3 ■■ Detaching or Attaching Pads or the Pedal Unit Read this if you need to detach only a pad, such as when servicing is required. Detaching a Tom Pad * A detached pad must not be attached to another product or used with another product. Be careful so as not to lose any of the parts you've removed. 1. Unplug the tom and cymbal cables. 4. Use a drum key to loosen the bolt securing the pad to the pipe. Mounting a Tom Pad This is basically a reverse operation of the detaching process. But when refitting the pads to the pipes, be careful to align the grooves in the pipe with the triangular protrusions of the pad. The pads can be fitted to three pitch(angle) positions. 2. Use a drum key to remove bolt securing the cymbal rod from the pipe. Tom 1, Tom 2 Detaching the Snare Pad Tom 3 cymbal rod 1. Loosen the screw using the drum key. 5. Remove the tom pad from the pipe. 3. Remove the plastic end-cap from the pipe. When removing a tom pad from the pipe, be very careful when disconnecting and pulling the cable through the pad mount bracket. * Do not insert your finger into the pipe while the cap is removed. end-cap Detaching the Pedal Unit 2. Pull out the entire snare pad assembly, including arm pipe, from To detach the pedal unit, reverse the procedure described in "02 Attach the Foot Pipes" (other side). the stand. end-cap arm pipe * Do not remove the arm pipe from the snare pad. Using the Unit Safely About WARNING and CAUTION Notices Used for instructions intended to alert the user to the risk of death or severe injury should the unit be used improperly. Used for instructions intended to alert the user to the risk of injury or material damage should the unit be used improperly. * Material damage refers to damage or other adverse effects caused with respect to the home and all its furnishings, as well to domestic animals or pets. Important Notes CAUTION About the Symbols The symbol alerts the user to important instructions or warnings.The specific meaning of the symbol is determined by the design contained within the triangle. In the case of the symbol at left, it is used for general cautions, warnings, or alerts to danger. The unit and the AC adaptor should be located so their location or position does not interfere with their proper ventilation. The symbol alerts the user to items that must never be carried out (are forbidden). The specific thing that must not be done is indicated by the design contained within the circle. In the case of the symbol at left, it means that the unit must never be disassembled. Always grasp only the plug on the AC adaptor cord when plugging into, or unplugging from, an outlet or this unit. The symbol alerts the user to things that must be carried out. The specific thing that must be done is indicated by the design contained within the circle. In the case of the symbol at left, it means that the power-cord plug must be unplugged from the outlet. ALWAYS OBSERVE THE FOLLOWING WARNING Do not open (or modify in any way) the unit or its AC adaptor. Do not attempt to repair the unit, or replace parts within it (except when this manual provides specific instructions directing you to do so). Refer all servicing to your retailer, the nearest Roland Service Center, or an authorized Roland distributor, as listed on the “Information” page. Never install the unit in any of the following locations. • Subject to temperature extremes (e.g., direct sunlight in an enclosed vehicle, near a heating duct, on top of heat-generating equipment); or are • Damp (e.g., baths, washrooms, on wet floors); or are • Exposed to steam or smoke; or are • Subject to salt exposure; or are • Humid; or are • Exposed to rain; or are • Dusty or sandy; or are • Subject to high levels of vibration and shakiness. Make sure you always have the unit placed so it is level and sure to remain stable. Never place it on stands that could wobble, or on inclined surfaces. Be sure to use only the AC adaptor supplied with the unit. Also, make sure the line voltage at the installation matches the input voltage specified on the AC adaptor’s body. Other AC adaptors may use a different polarity, or be designed for a different voltage, so their use could result in damage, malfunction, or electric shock. Use only the attached power-supply cord. Also, the supplied power cord must not be used with any other device. Do not excessively twist or bend the power cord, nor place heavy objects on it. Doing so can damage the cord, producing severed elements and short circuits. Damaged cords are fire and shock hazards! This unit, in combination with an amplifier and headphones or speakers, may be capable of producing sound levels that could cause permanent hearing loss. Do not operate for a long period of time at a high volume level, or at a level that is uncomfortable. If you experience any hearing loss or ringing in the ears, you should immediately stop using the unit, and consult an audiologist. WARNING Do not place containers containing liquid on this product. Never allow foreign objects (e.g., flammable objects, coins, wires) or liquids (e.g., water or juice) to enter this product. Doing so may cause short circuits, faulty operation, or other malfunctions. Immediately turn the power off, remove the AC adaptor from the outlet, and request servicing by your retailer, the nearest Roland Service Center, or an authorized Roland distributor, as listed on the “Information” page when: • The AC adaptor, the powersupply cord, or the plug has been damaged; or • If smoke or unusual odor occurs • Objects have fallen into, or liquid has been spilled onto the unit; or • The unit has been exposed to rain (or otherwise has become wet); or • The unit does not appear to operate normally or exhibits a marked change in performance. In households with small children, an adult should provide supervision until the child is capable of following all the rules essential for the safe operation of the unit. Protect the unit from strong impact. (Do not drop it!) Do not force the unit’s powersupply cord to share an outlet with an unreasonable number of other devices. Be especially careful when using extension cords—the total power used by all devices you have connected to the extension cord’s outlet must never exceed the power rating (watts/ amperes) for the extension cord. Excessive loads can cause the insulation on the cord to heat up and eventually melt through. Before using the unit in a foreign country, consult with your retailer, the nearest Roland Service Center, or an authorized Roland distributor, as listed on the “Information” page. At regular intervals, you should unplug the AC adaptor and clean it by using a dry cloth to wipe all dust and other accumulations away from its prongs. Also, disconnect the power plug from the power outlet whenever the unit is to remain unused for an extended period of time. Any accumulation of dust between the power plug and the power outlet can result in poor insulation and lead to fire. Try to prevent cords and cables from becoming entangled. Also, all cords and cables should be placed so they are out of the reach of children. Never climb on top of, nor place heavy objects on the unit. Never handle the AC adaptor or its plugs with wet hands when plugging into, or unplugging from, an outlet or this unit. Before moving the unit, disconnect the AC adaptor and all cords coming from external devices. Before cleaning the unit, turn off the power and unplug the AC adaptor from the outlet. Whenever you suspect the possibility of lightning in your area, disconnect the AC adaptor from the outlet. Be careful so you don’t get your fingers pinched when you handle any moving parts such as the following. Adult supervision is recommended whenever small children use the unit. • Pedal (Owner’s Manual p. 8) To prevent accidental ingestion of the parts listed below, always keep them out of the reach of small children. • Included Parts thumb screws screws for foot pipe cable tie • Removable Parts screws washers hex nuts knobs cymbal knobs cymbal felts rubber bushings Snare tuning bolts cable hooks Adjusters Power Supply • Do not connect this unit to same electrical outlet that is being used by an electrical appliance that is controlled by an inverter (such as a refrigerator, washing machine, microwave oven, or air conditioner), or that contains a motor. Depending on the way in which the electrical appliance is used, power supply noise may cause this unit to malfunction or may produce audible noise. If it is not practical to use a separate electrical outlet, connect a power supply noise filter between this unit and the electrical outlet. • The AC adaptor will begin to generate heat after long hours of consecutive use. This is normal, and is not a cause for concern. • Before connecting this unit to other devices, turn off the power to all units. This will help prevent malfunctions and/or damage to speakers or other devices. • With the factory settings, the HD-3’s power will automatically be switched off 30 minutes after you stop playing or operating the unit. If you don’t want the power to turn off automatically, change the “AUTO OFF” setting to “OFF” as described on p. 15 of the Owner’s Manual. (Note) The settings you were editing will be lost when the power is turned off. If you want to keep your settings, you must save your settings before turning the power off. Placement • Using the unit near power amplifiers (or other equipment containing large power transformers) may induce hum. To alleviate the problem, change the orientation of this unit; or move it farther away from the source of interference. • This device may interfere with radio and television reception. Do not use this device in the vicinity of such receivers. • Noise may be produced if wireless communications devices, such as cell phones, are operated in the vicinity of this unit. Such noise could occur when receiving or initiating a call, or while conversing. Should you experience such problems, you should relocate such wireless devices so they are at a greater distance from this unit, or switch them off. • Do not expose the unit to direct sunlight, place it near devices that radiate heat, leave it inside an enclosed vehicle, or otherwise subject it to temperature extremes. Excessive heat can deform or discolor the unit. • When moved from one location to another where the temperature and/or humidity is very different, water droplets (condensation) may form inside the unit. Damage or malfunction may result if you attempt to use the unit in this condition. Therefore, before using the unit, you must allow it to stand for several hours, until the condensation has completely evaporated. • Depending on the material and temperature of the surface on which you place the unit, its rubber feet may discolor or mar the surface. You can place a piece of felt or cloth under the rubber feet to prevent this from happening. If you do so, please make sure that the unit will not slip or move accidentally. • Do not put anything that contains water (e.g., flower vases) on this unit. Also, avoid the use of insecticides, perfumes, alcohol, nail polish, spray cans, etc., near the unit. Swiftly wipe away any liquid that spills on the unit using a dry, soft cloth. • If you will be using the HD-3 in the same location for an extended period, we recommend that you use an optional drum mat (TDM-1) to prevent the adjuster from discoloration to the surface • When setting up or storing the HD-3, be careful so the fingers used to grasp the stand don’t get pinched. Also, take care that the stand does not become unbalanced and fall over or fall against you. • When moving the HD-3, check the following points first, then be sure to keep the system in the horizontal position while lifting and carrying it. Take care not to pinch your hand, or drop the system on your feet. • Check that the knobs and screws that fasten the pads, arm pipes, and foot pipes have not become loose. If any are loose, tighten them securely. • Disconnect the AC adaptor. • Disconnect external devices. Maintenance • For everyday cleaning wipe the unit with a soft, dry cloth or one that has been slightly dampened with water. To remove stubborn dirt, use a cloth impregnated with a mild, non-abrasive detergent. Afterwards, be sure to wipe the unit thoroughly with a soft, dry cloth. • Never use benzine, thinners, alcohol or solvents of any kind, to avoid the possibility of discoloration and/or deformation. • The rubber portion of the striking surface is treated with a preservative to maintain its performance. With the passage of time, this preservative may appear on the surface as a white stain, or reveal how the pads were struck during product testing. This does not affect the performance or functionality of the product, and you may continue using it with confidence. Repairs and Data • Please be aware that all data contained in the unit’s memory may be lost when the unit is sent for repairs. Important data should always be written down on paper (when possible). During repairs, due care is taken to avoid the loss of data. However, in certain cases (such as when circuitry related to memory itself is out of order), we regret that it may not be possible to restore the data, and Roland assumes no liability concerning such loss of data. Additional Precautions • Use a reasonable amount of care when using the unit’s buttons, sliders, or other controls; and when using its jacks and connectors. Rough handling can lead to malfunctions. • Never strike or apply strong pressure to the display. • When connecting / disconnecting all cables, grasp the connector itself—never pull on the cable. This way you will avoid causing shorts, or damage to the cable’s internal elements. • To avoid disturbing your neighbors, try to keep the unit’s volume at reasonable levels. You may prefer to use headphones, so you do not need to be concerned about those around you. • This instrument is designed to minimize the extraneous sounds produced when it’s played. However, since sound vibrations can be transmitted through floors and walls to a greater degree than expected, take care not to allow these sounds to become a nuisance to neighbors, especially when using headphones. • When you need to transport the unit, package it in the box (including padding) that it came in, if possible. Otherwise, you will need to use equivalent packaging materials. • Some connection cables contain resistors. Do not use cables that incorporate resistors for connecting to this unit. The use of such cables can cause the sound level to be extremely low, or impossible to hear. For information on cable specifications, contact the manufacturer of the cable. • Due to the structure of this product, it is possible for pets or other small animals to enter the openings of the pedals. If this should occur, immediately turn off the power, disconnect the AC adaptor from the outlet, and consult your dealer or a Roland service center • When you operate the pedals, please be careful not to get your fingers pinched between the movable part and the panel. In households with small children, an adult should provide supervision until the child is capable of following all the rules essential for the safe operation of the unit. • Synthetic rubber is used in the pads and cymbals. If you are bothered by the smell of rubber, please ventilate the room. Do not place this product near heating equipment. • The copyright of content in this product (the sound waveform data, style data, accompaniment patterns, phrase data, audio loops and image data) is reserved by Roland Corporation and/or Atelier Vision Corporation. • Purchasers of this product are permitted to utilize said content for the creating, performing, recording and distributing original musical works. • Purchasers of this product are NOT permitted to extract said content in original or modified form, for the purpose of distributing recorded medium of said content or making them available on a computer network. • MMP (Moore Microprocessor Portfolio) refers to a patent portfolio concerned with microprocessor architecture, which was developed by Technology Properties Limited (TPL). Roland has licensed this technology from the TPL Group. • Company names and product names appearing in this document are registered trademarks or trademarks of their respective owners.