1
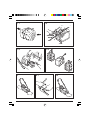
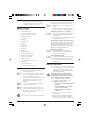
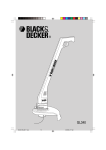
GFC1234
GFC1238
GFC2438
13
A
B1
14
B2
B3
C1
C2
C4
C3
D
E1
E2
15
E3
16
E5
E4
F1
F2
G
H
English
1
Cordless Rotary Lawnmower
User manual
Congratulations!
•
On your purchase of your Black & Decker cordless
lawnmower.
This user manual provides important operating and
maintenance instructions for all of the mowers in the
Black & Decker 4x4 cordless range.
•
Know your mower
Read this manual carefully. Observe all the
recommended safety instructions before,
during and after using your machine, and
maintain your machine in good working order.
Familiarise yourself with the controls on your
machine before attempting to operate it, but
above all, be sure you know how to stop
your machine in an emergency.
Retain this manual and all other literature
supplied with your machine for future
reference.
Safety instructions
Training
• Never allow children or persons who are
unfamiliar with this type of machine to
use it, nor anyone who has not read
this leaflet.
Do not allow children, animals
or other persons near your
machine when in use - always
keep them at least 6m (20ft)
away from the cutting area.
• Remember that the operator/user is
responsible for accidents or hazards
occurring to other people or their property.
Preparation
• To protect your feet, always wear stout
shoes or boots - freshly cut grass is
damp and slippery.
• Use a face mask if dusty.
• Do not operate in gaseous explosive
atmospheres.
• Do not mow barefoot or in open sandals.
• Wear long trousers to protect your legs any debris left on the lawn or cutting path
may be picked up and ejected by the
blades.
• Always be sure your machine is in a safe
operating condition.
2
•
Before using your machine, remove
safety key and visually check that the
blade, blade nut and cutter assembly are
not worn or damaged. A damaged blade
or worn blade nut is a major hazard and
must be replaced. Also check that the
blade nut is securely fastened.
Always check that your lawn or cutting
path is clear of all sticks, stones, wire
and other debris. Contact with such
debris may be dangerous or may
damage your mower and could be
thrown by the blade.
Check grassbox frequently for wear
or damage.
Operation
• When tilting the handle downwards (or to
the side) to start your mower, do not tilt it
more than is absolutely necessary.
Always ensure that both hands are in the
operating position and feet are well away
from the blades before returning your
mower to the ground, and commence
cutting using both hands to guide it.
• Avoid accidental starting. Ensure switch
is off when inserting safety key.
Your mower will continue to run
for a short time after releasing
the switch lever. Always allow
your mower to stop on its own.
• Release switch lever to turn mower off
and remove the safety key:
• Whenever you leave your machine
unattended.
• Before checking, cleaning or
working on the mower.
• Before clearing a blockage.
• If the mower starts to vibrate
abnormally (check immediately).
• After striking a foreign object.
Inspect the mower for damage and
make repairs as necessary.
• Never run the unit whilst on its’ side or
attempt to stop the blade - always allow
it to stop on its own.
• Do not put hands or feet near or under
rotating parts.
• Keep clear of discharge openings at all
times.
•
•
•
•
•
•
•
•
•
•
•
•
•
•
•
Avoid using the machine during rain and
avoid wet grass if possible.
Mow only in daylight or good artificial
light.
Do not pull your machine towards you or
walk backwards when mowing.
Do not cross gravel paths or roads whilst
the blade is rotating.
Always be sure of your footing,
particularly on slopes.
Always mow across the face of slopes,
never up and down. Exercise extreme
caution when changing direction on slopes.
Do not cut excessively steep slopes and
always wear non-slip footwear.
Check the grassbag frequently for wear
or damage, and replace if necessary.
Walk, never run. Do not force the mower.
Never pick up or carry your mower while
the motor is running.
Ensure the blades have stopped rotating
when tilting for transporting the mower to
and from the area to be mowed.
When transporting your unit, always
remove the safety key, adjust the cut
height setting to a mid position and take
extreme care when lifting.
Never operate the mower with defective
guards or shields.
In order to prevent accidental starting or
unauthorised use of your lawnmower, a
removable safety key has been supplied
with your mower. The mower will be
completely disabled when this safety key
has been removed from the mower.
Always remove the key before doing any
cleaning or maintenance and especially
before changing the blade.
If for any reason you come in contact
with battery electrolyte flush with water
immediately, seek medical advice if it
comes in contact with eyes.
Maintenance and storage
Store your machine in a dry place when
not in use, remove the safety key and
place out of the reach of children.
• Do not use solvents or cleaning fluids to
clean your machine - use a blunt scraper
to remove grass and dirt. Always remove
the safety key before cleaning.
• Do not charge or store the unit outdoors.
• Do not operate your machine if any parts
are defective; discard all defective parts
and fit new parts before use.
• Replace worn or damaged parts for safety.
•
ENGLISH
•
•
Keep all nuts, bolts and screws tight to
be sure your mower is in a safe working
condition.
Use only Black & Decker recommended
replacement parts and accessories.
Black & Decker’s policy is one of continuous
improvement to our products and, as such, we
reserve the right to change product specifications
without prior notice.
Features (Fig. A)
A
Your purchase of the Black & Decker lawnmower
gives you a product combining quality with
modern design and the following features, to
provide safe, efficient and easy mowing.
• Cordless - there is no need for extension
cables while mowing.
• Gasless - there is no need for petrol and
oil to buy, mix, store or transport.
• Clean - there are no emissions, the
mower is environmentally friendly.
• Rechargeable batteries - provides reliable
power.
• Easy to start - starts first time every time.
• Specially designed switch box and
safety key to prevent accidental starting
of the mower.
• Ergonomically designed upswept handle
for comfortable use and greater
manoeuverabilty.
• A blade brake for added safety. Stops
the blade from rotating within 3 seconds,
once the switchbox lever is released.
• Large handle wing nuts for easy
assembly and storage.
• Fourteen height of cut positions which
provides the flexibility to deal with most
grass conditions.
• Your mower has 360º rotating wheels for
maximum manoeuverability, which allows
cutting right up to the edge of the lawn
as well as around obstructions.
• The rear wheels are lockable to enable
accurate straight-line cutting.
• Easy grassbox removal.
• Tough, durable plastic deck which will
not rust and contributes to low noise and
low vibration.
3
•
Powerful and efficient permanent
magnet motor which gives effective
cutting and bagging in all reasonable
conditions and a low noise level.
Carton contents
The carton contains:
1 Lawnmower body
1 Handle assembly (3 parts)
1 Grassbox assembly (2 parts)
1 Spanner/scraper
1 Screwdriver
1 Battery
1 Battery cover
1 Charger
1 Safety key
1 Spare fuse
2 Wing nuts
2 Washers
2 Shaped washers
2 Bolts for upper handle
2 Bolts for lower handle
5 Screws for grassbox
1 Wiper (UK only)
2 Screws for wiper (UK only)
2 Cable clips
1 Instruction manual
• Carefully unpack all parts.
Assembling the handle
• Place the mower with its wheels on a
B1
•
•
B2 •
B3 •
•
firm and level surface.
Insert the handle bars into the openings
as shown in fig. B1, so that the curve
makes them widen at the top.
Secure each of the bars with a bolt and
shaped washer as shown. Securely
tighten the bolt using the spanner
supplied.
Place the U-shaped upper handle bar
onto the bars as shown.
Secure the upper handle bar using the
bolts, washers and wing nuts as shown.
Secure the cables to the handle using
the cable clips supplied.
Do not use any tools to tighten the wing nuts.
4
Grassbox assembly (Fig. C)
C1
C2
The grassbox comes supplied in two halves.
In order to assemble proceed as follows:
• Align the two halves of the grassbox as
shown.
• Fit the two halves together with the 5
screws, using the screwdriver supplied.
Fitting the grassbox to your mower:
• The spring loaded rear flap is lifted and
the top of the grassbox is placed over
the mounting.
• The rear flap can now be released to lock
the grassbox into position.
Removing the grassbox from your mower:
The full grassbox may be removed by raising
the grassflap, freeing the grassbox from its
mounting and resting it on the lawn. The
grassflap can be gently lowered, leaving both
hands free to lift the full grassbox.
C3
C4
Battery Cover Fitting
• Assemble battery cover provided
inserting hinge no.1 into mower body
then push home hinge no. 2.
Fitting the Battery strap
• Locate the battery and its carrying strap.
• Fit the battery carrying strap as shown.
• The strap should be kept on the battery
at all times.
Battery information
• The battery in your cordless lawnmower
is a sealed lead acid system. The battery
employs an absorbed electrolyte and,
can therefore, be stored in any position
without fear of leakage.
The battery has been charged at the
factory, but you will need to recharge it
for a minimum of 30 hours before every
use to make sure it is fully charged.
• For optimal performance the battery
should be recharged after each use.
• For winter storage ensure:
• The mower is fully charged before
storing.
• The temperature of the storage
location is below 25˚C.
• Storage duration is less than
6 months.
• Always store your mower in a dry and
cool location.
• Keep the mower and battery away from
water, heat sources (such as radiators,
heaters, stoves etc.), flames or chemicals.
ENGLISH
Charging instructions
• Always charge your mower indoors in a
well ventilated area, where it is dry and
protected from the weather.
• Charge mower in a location where the
temperature is more than 5˚C (41˚F) and
below 40˚C (104˚F).
Warning! Do not attempt to charge
non-rechargeable batteries.
To charge
• The battery on your mower can be
charged on the mower or can be
removed and charged away from the
mower if a mains socket is not at hand.
To charge the battery ON the mower
• Remove the safety key and store in a
safe place away from children.
• Open the battery cover by sliding the
catch and opening upwards.
• Disconnect the battery lead (red and
black) by pulling it from the socket at the
side of the battery recess.
• The red and black socket of the charger
is then connected to the red and black
socket of the battery.
Note: The charger socket will fit one way only.
• Connect the charger to the mains
socket and switch on.
• The red indicator on the charger will
turn on. This indicates that the battery
is being charged.
Double light charger
• When the battery becomes charged,
normal time 24 to 30 hours, the red light
will go out and the green light will turn on.
• It is safe to leave your battery on charge
until ready to use.
When charging is finished
• Disconnect the charger from the battery
and connect the battery to the socket on
the mower.
• Your mower is now ready for use.
To charge the battery OFF the mower
• Remove the safety key and open
battery cover as described above and
disconnect the battery.
• Lift out battery out of the mower using
the carry handle.
• Charge as described above.
• After charging, replace in mower and
connect to the mower socket.
Battery disposal
Pb
-
+
When the mower’s battery requires replacing
discharge the energy from the battery by
running the mower until the motor stops.
Remove the battery from the mower .
Warning: The battery may still have some
residual charge even after the motor stops.
It is therefore necessary to protect against
accidental short circuit of the battery
terminals with uninsulated tools or materials
of a conductive nature, such as, but not
limited to steel wool or aluminium foil.
Batteries must be disposed of in a
responsible manner.
This symbol indicates the lead acid battery
contained within this unit must be disposed
of properly and not discarded in everyday
household waste which may be disposed of
in an incinerator or landfill site.
Lead acid batteries can be harmful to the
environment and can explode when exposed
to fire. Do not incinerate.
The battery should be taken to a
Black & Decker service centre, your local
dealer or your local recycling station. If
necessary, contact your local authority for
disposal information.
If the cutting performance begins to deteriorate,
please refer to the “Fault finding” guide.
Warning! It is essential that the red lead is
fitted to the red terminal and the black lead is
fitted to the black terminal when installing a
new battery.
How to use your mower (Fig. E)
Important! Always observe all the
relevant warnings when using your
machine.
Warning! Never attempt to operate your
machine with one hand. You must guide
your machine with both hands.
Safety key
• In order to prevent accidental start-up or
unauthorised use of your cordless
mower, a removable safety key has been
incorporated into the design of your
mower. The mower will be completely
disabled when this safety key has been
removed from the mower.
• Always use the grassbox provided.
5
Warning! Always remove the safety key
from mower when leaving it unattended,
even for a short period of time.
• Your safety key will be found in the
parts pack (plus one spare fuse).
E1
E2
E3
E4
E5
Starting
• Insert the safety key into position and
push fully home.
• Tilt the handle downwards to slightly raise
the front of your mower and to reduce
the risk of lawn damage whilst starting,
depress the safety lock-off button on the
switchbox and whilst still depressed pull
the switch lever towards you. Your
mower will start and you can now allow
the lock-off button to be released and
lower your mower to its proper cutting
position, and commence cutting using
both hands to guide it.
• To turn the mower off, just release the
lever. The spring-loaded “snap-action”
lever will relocate itself back into its original
position inside the switch housing.
Note: Your mower has 360º rotating wheels
for maximum manoeuverability. The rear
wheels can be locked into position for
straight, accurate, cutting as follows:
• Push the mower forwards until all the
wheels rotate towards the rear of the
mower.
• Pull the locking lever on the left-hand side
of the mower until the ratchet engages.
• To unlock the wheels push the release
button forwards.
• Should the lever fully engage on the
ratchet, but the rear wheels not lock into
place, then release the lever, unscrew the
cable adjustment by one turn and reengage the lever and ratchet. Repeat
until the wheels fully lock into position.
Your mower will continue to operate whilst
you are pulling the switch lever. To stop your
mower release the switch lever.
When you have finished using your mower
we recommend that you clean all debris from
it before putting it away. Refer to the
‘Care and maintenance’ section.
Note: To obtain the best results cut your
lawn or grassed area regularly and do not
cut when the grass is wet.
If, when mowing, loose grass is seen to be
scattered from beneath the mower, the grassbag is probably full and should be emptied.
Manoeuverability (Fig. D)
Your mower has fully rotating wheels and
as such is capable of manoeuvering around
trees posts and other objects. It also allows
accurate mowing of contoured features in
your garden like flower beds.
For maximum manoeuverability release the
rear wheel locking mechanism by pushing
the release button forwards.
Height of cut adjustment (Fig. F)
F1
F2
Maintenance of blades
The steel blade is designed to give a fine
finish in long or tough grass.
If, however, because of damage or wear
the cutting performance deteriorates, then
the mower may require a new blade, or at
least the existing blade to be sharpened.
We recommend that the steel blade is
sharpened or a new blade fitted at the
beginning of the season.
Replacement blades are available from
Black & Decker dealers and service centres.
Warning! When fitting a new blade use
only the Black & Decker replacement part
specified for your machine - do not attempt
to fit any other blade.
Fitting new blade (Fig. G)
Observe all the relevant warnings before
changing the blade.
Warning! Remove safety key before
changing the blade.
G
6
Warning! Remove the safety key before making
any adjustment and give the blade time to stop
rotating: the cutting blades are sharp.
• Flip the lever outwards and hold it firmly.
• Using the lever, rotate the knob to set
the desired height of cut.
• Flip the lever back to lock the knob.
• To produce a stripe on your lawn, first slide
the striping flap in position and fix with the
2 screws provided, then adjust the height
of cut to a low position (UK only).
Note: For longer or uneven growth lawns
(particularly the first cut of the season) first
use a higher height setting and then finish
with a second cut to the desired length.
•
Turn your mower over on its side so
that the underside of the cutter cover is
exposed.
ENGLISH
•
Using a cloth placed over the blade or
heavy duty gloves to protect your
hands, grip the blade and, using a
spanner, loosen and remove the nut
from the motor spindle. Turn the nut in
an anti-clockwise direction to loosen it.
• The blade can now be replaced and
the washer and nut reassembled.
Note: Some mowers are fitted with a clutch
washer, between the blade nut and the blade,
which must be reassembled at all times.
Overload protection (Fig. H)
• Your machine is fitted with overload
H
protection. If you work too quickly in
long grass, or in heavy conditions, you
may overload the motor. If this occurs,
the safety key fuse will blow, causing the
machine to stop.
• This is not a fault of the machine but a
safety device to protect your machine.
• When this occurs, remove the safety key
and inspect the fuse link. If link is broken,
the fuse has blown and needs to be
replaced with a new fuse. One of which is
supplied as a spare in your parts pack.
Alternatively, you can purchase a new key
from any Black & Decker service centre.
To obtain the best results:
• Cut the grass regularly.
• Do not cut wet grass.
• When the grass is longer than 10cm
(4 inches), it is advisable to go over the
lawn on a high cut setting and then finish
using a lower setting.
Care and maintenance
The advice given in this section covers the general care
and maintenance of the main body of your mower.
Advice relating to the blades is given in “Maintenance of
blades”. Advice relating to the maintenance and
storage of the battery is given in “Battery information”.
• Always keep your machine clean and free from
grass cuttings, especially the underside of the
cutter deck and the air vents.
• At the end of each cutting session we
recommend that the build up of grass on the
underside of the cutter cover is removed using a
blunt scraper, the spanner included with this
mower may be used for this purpose.
• Clean all plastic components with a damp cloth.
• Caution! Do not use solvents or cleaning fluids
as these may damage the plastic components of
your mower.
Hints for optimum use
• When cutting long grass, set the
•
•
•
•
•
•
mower to the highest height of cut.
Fully charge the battery before first use.
Charge the battery immediately after use.
Before storing, fully charge the battery.
Do not store the mower or battery at
extreme temperatures.
If the battery is stored for a long period
of time, regularly charge it.
Note that after prolonged storage the
battery will only attain full capacity after
several discharge/charge cycles.
Fault finding
If your mower does not operate correctly, use the
following table to locate the problem.
Problem
Solution
Mower does not run
(a) Check to make sure safety key
when switch lever
has been inserted correctly.
is activated
(b) Remove the safety key, turn
mower over and check that the
blade is free to turn.
(c) Has battery been fully charged?
(d) Check that the fuse has
not blown.
Mower stops when mowing (a) Remove safety key. Turn
mower over and check that blade
is free to turn.
(b) Raise cutting height of wheels
and start mower.
(c) Has battery been fully charged?
(d) Inspect safety key fuse link, if
broken the safety key has blown
and requires replacement.
Mower runs but cutting
(a) Has battery been fully charged?
performance is poor
(b) Battery may need replacing.
Refer to ‘Battery disposal’ section.
Mower is too hard to push (a) Raise cutting height to
reduce drag on grass. Check
each wheel for ease of rotation.
Mower is abnormally noisy (a) Remove safety key. Turn unit
and vibrates
on its side and check blade for
damage. If damaged replace with
Black & Decker replacement blade.
(b) If there is no visible damage
to the blade or underside of the
mower return to your local service
centre or authorised dealer.
7
Warning! Always remove safety key before
carrying out any inspection.
Protecting the environment
Tools
Black & Decker provides a facility for
recycling Black & Decker products and
rechargeable batteries once they have
reached the end of their working life.
This service is provided free of charge.
To take advantage of this service please
return your product to any authorised repair
agent who will collect them on our behalf.
Batteries
Black & Decker batteries can be recharged
many times. At the end of their useful life,
discard batteries with due care for our
environment:
Pb
• Run the battery down completely, then remove
it from the tool.
• Batteries are recyclable. Take them to any
authorised repair agent or a local recycling station.
You can check the location of your nearest
authorised repair agent by contacting your local
Black & Decker office at the address indicated in
this manual. Alternatively, a list of authorised
Black & Decker repair agents and full details of our
after-sales service and contacts are available on the
Internet at: www.2helpU.com.
Guarantee
Black & Decker is confident of the quality of its
products and offers an outstanding guarantee.
This guarantee statement is in addition to and in no
way prejudices your statutory rights. The guarantee
is valid within the territories of the Member States
of the European Union and the European Free
Trade Area.
If a Black & Decker product becomes defective due
to faulty materials, workmanship or lack of
conformity, within 24 months from the date of
purchase, Black & Decker guarantees to replace
defective parts, repair products subjected to fair
wear and tear or replace such products to ensure
minimum inconvenience to the customer unless:
• The product has been used for trade,
professional or hire purposes;
• The product has been subjected to misuse or
neglect;
• The product has sustained damage through
foreign objects, substances or accidents;
• Repairs have been attempted by other persons
than authorised repair agents or Black & Decker
service staff.
8
To claim on the guarantee, you will need to submit
proof of purchase to the seller or an authorised
repair agent. You can check the location of your
nearest authorised repair agent by contacting your
local Black & Decker office at the address indicated
in this manual. Alternatively, a list of authorised
Black & Decker repair agents and full details of our
after-sales service and contacts are available on the
Internet at: www.2helpU.com.
Other outdoor tools
Black & Decker has a full range of outdoor power
tools that make life in the garden easy. If you would
like further information on the following products,
please contact our Service and Information Centre
(see the address page towards the end of this
manual) or your local Black & Decker retailer.
String trimmers
Chainsaws
Cordless shear
Hedgetrimmers
Lawnmowers
Lawnrakers
Leafbusters
Shredders
Not all products are available in all countries.
EC Declaration of Conformity
GFC1234/GFC1238/GFC2438
Black & Decker declares that these tools
conform to:
98/37/EC, 89/336/EEC, 73/23/EEC,
EN 55014, EN 60335, EN 61000,
2000/14/EC, Lawn mower, L ≤ 50 cm,
Annex VIII, No. 0086
B.S.I., HP2 4SQ, United Kingdom
Level of sound pressure, measured according to
2000/14/EC:
LpA (sound pressure)
dB(A) 79
LWA (acoustic power)
dB(A) 93
LWA (guaranteed)
dB(A) 96
Hand/arm weighted vibration value according to
EN 50144: < 2.5 m/s2
Brian Cooke
Director of Engineering
Spennymoor, County Durham DL16 6JG,
United Kingdom
1-12-2001
r
ie
uth
Ga
9
Australia
DEWALT Industrial Power Tool Company
7 Clarice Road
Box Hill, Victoria 3128
Tel. 03 9895 9200
Fax 03 9899 7465
New Zealand
Black & Decker
81 Hugo Johnson Drive
Penrose, Auckland, New Zealand
Tel. 09 579 7600
Fax 09 579 8200
South Africa
Black & Decker South Africa (Pty) Ltd
Physical address:
39 Commerce Crescent
Eastgate, ext. 12, Sandton, Kramerville 2148
Postal address:
Postnet Suite 107, Private Bag X65
Halfway House 1685
Tel. (011) 653-1400
Fax (011) 653-1499
United Kingdom
Black & Decker
210 Bath Road
Slough, Berkshire SL1 3YD
Tel. 01753 511234
Fax 01753 551155
Helpline 01753 574277
10 577625-05
○
○
○
○
○
○
○
○
○
○
○
○
○
○
○
○
○
○
○
○
○
○
○
○
○
○
○
○
○
○
○
○
○
○
○
○
○
○
Yes
No
Was this tool your first purchase?
Yes
No
Was this tool a gift?
Postal code: .............................................................................................
Town: .......................................................................................................
Address: ...................................................................................................
Name: ......................................................................................................
○
Dealer address
○
○
○
○
○
○
○
○
○
○
○
○
○
○
○
○
○
○
○
○
○
○
○
○
○
○
○
○
○
○
○
○
Data protection act:
Tick the box if you prefer not to receive further information.
Dealer address: ........................................................................................
.................................................................................................................
.................................................................................................................
Yes
No
Was this tool bought as a replacement?
○
Date of purchase
○
✁
11
○
○
○
○
○
○
○
○
○
○
○
○
○
○
○
○
○
○
○
○
○
○
○
○
○
○
○
○
○
○
○
○
○
○
○
○
○
○
○
○
○
○
○
○
○
○
○
○
○
○
○
○
GUARANTEE CARD
○
○
○
○
○
○
○
○
○
○
○
○
○
○
○
○
○
○
○
○
○
○
○
○
○
○
○
✁
Please complete this section immediately after the purchase of your tool and send it to Black & Decker in your
country. If you live in Australia or New Zealand, please register by using the alternative guarantee card
supplied.
12 577625-05
○
○
○
○
○
○