1
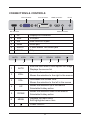
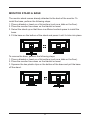
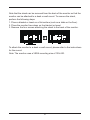
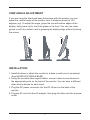
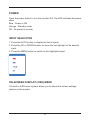
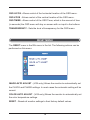
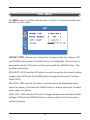
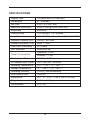
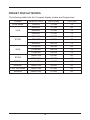
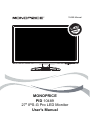
10489 Manual
MONOPRICE
PID 10489
27" IPS-G Pro LED Monitor
User's Manual
CONTENTS
SAFETY GUIDELINES -----------------------------------------------------------------
2
FEATURES --------------------------------------------------------------------------------
3
PACKAGE CONTENTS ----------------------------------------------------------------
3
CONNECTIONS & CONTROLS -----------------------------------------------------
4
MONITOR STAND & BASE------------------------------------------------------------
5
VIEW ANGLE ADJUSTMENT --------------------------------------------------------
7
INSTALLATION ---------------------------------------------------------------------------
7
POWER-------------------------------------------------------------------------------------
8
INPUT SELECTION ---------------------------------------------------------------------
8
ON-SCREEN DISPLAY (OSD) MENU ---------------------------------------------
8
BASIC MENU OPERATION -----------------------------------------------------------
9
TROUBLESHOOTING ----------------------------------------------------------------- 16
SPECIFICATIONS ----------------------------------------------------------------------- 18
PRESET DISPLAY MODES ----------------------------------------------------------- 19
1
SAFETY GUIDELINES
To avoid personal injury or damage to your equipment, please adhere to the
following safety guidelines:
1. Do not place the monitor on an unstable surface where it could fall and
cause personal injury or damage to the monitor or other equipment.
2. Do not expose the monitor to water or moisture of any kind. Do not place
objects filled with moisture such that they could tip over and spill onto the
monitor.
3. If the monitor is exposed to moisture, immediately unplug the power source
and allow it to completely dry out before reapplying power.
4. Do not block the ventilation holes on the monitor. Do not place the monitor
in an enclosed space where it cannot get adequate ventilation or cooling.
5. Do not place the monitor near a heat source, such as a fireplace, radiator,
heater vent, etc.
6. The power supply for this monitor uses a NEMA 5-15 grounded plug.
Ensure that your power source is properly grounded. Do not use a "cheater"
plug to bypass the ground pin.
7. The monitor can be powered by a wide voltage range, from 100 to 240 V
AC at 50 or 60 Hz, with an AC current at least 3.75A. Ensure that your power
source supplies voltage within this operating range. If your power source is
not within this operating range, please consult your local power company.
8. If the monitor will be unused for a long period of time, turn it off and unplug
it from the power source. This will help prevent damage in the event of a
lightning strike or excessive power surge.
9. Do not attempt to open the case or service the monitor yourself.
10. Clean only with a soft, dry cloth. Do not use solvents or chemical cleaners
on the screen or casing.
11. Do not leave a single image on the display for an extended length of time.
Doing so could cause burn-in of the image, that is visible on the screen mask.
It is recommended to use a variable desktop background and to use a screen
saver to prevent burn-in. Alternatively, ensure that the monitor is powered off
for at least 2 hours out of every 12.
2
FEATURES
27" IPS monitor with LED backlighting
16:9 aspect ratio
2560 x 1440 @ 60Hz maximum resolution
Includes DisplayPort, VGA, HDMI, and Dual Link DVI-D input options
Angle adjustable stand +20 ~ -5 degrees
Built-in stereo speakers with 2 watt/channel amplifier
PACKAGE CONTENTS
1x 27" IPS LED monitor
1x Stand base
1x AC power adapter
1x AC power cord
1x 3.5mm audio cable
1x Dual Link DVI-D cable
1x User's manual
3
CONNECTIONS & CONTROLS
VGA connector
DVI connector
HDMI connector
DP connector
DC IN
Audio connector
1
DP
DisplayPort connector
2
VGA
VGA port
3
DVI
Dual Link DVI-D port
4
HDMI
HDMI port
5
AUDIO
3.5mm stereo TRS audio jack
6
DC IN
DC power connector
AUTO
VOL+
VOL-
UP
DOWN
MENU
1
2
3
4
5
6
7
1
AUTO
Exits the main menu/ Auto adjusts the image
Displays the source list
2
VOL+
Increases the volume level
Moves the selection to the right in the menus
3
VOL-
Decreases the volume level
Moves the selection to the left in the menus
4
UP
5
DOWN
Moves the selection down in the menus
Selectable Hotkey action
6
MENU
Displays the main menu
Edit highlighted menu item
7
Moves the selection up in the menus
Selectable Hotkey action
Power ON/OFF
4
MONITOR STAND & BASE
The monitor stand comes already attached to the back of the monitor. To
install the base, perform the following steps:
1. Place a blanket or towel on a flat surface (such as a table or the floor).
2. Place the monitor face down on the blanket or towel.
3. Swivel the stand up so that there is sufficient vertical space to install the
base.
4. Fit the base on the bottom of the stand and press it until it clicks into place.
To remove the base, perform the following steps:
1. Place a blanket or towel on a flat surface (such as a table or the floor).
2. Place the monitor face down on the blanket or towel.
3. Squeeze the two plastic clips on the bottom of the base and pull the base
off the stand.
5
Note that the stand can be removed from the back of the monitor so that the
monitor can be attached to a desk or wall mount. To remove the stand,
perform the following steps:
1. Place a blanket or towel on a flat surface (such as a table or the floor).
2. Place the monitor face down on the blanket or towel.
3. Remove the four screws attaching the stand to the back of the monitor.
100mm
100mm
To attach the monitor to a desk or wall mount, please refer to the instructions
for the mount.
Note: The monitor uses a VESA mounting size of 100x100.
6
VIEW ANGLE ADJUSTMENT
If you are using the stand and base that comes with the monitor, you can
adjust the vertical angle of the monitor from -5 degrees (down) to +20
degrees (up). To adjust the angle, grasp the top and bottom edges of the
display, taking care not to touch the glass on the front. You can use clean
gloves or soft, dry cloths to aid in grasping the display edge without touching
the screen.
5°
20°
INSTALLATION
1. Install the base or attach the monitor to a desk or wall mount, as desired.
(See MONITOR STAND & BASE)
2. Using the included video signal cables, connect video source devices to
the appropriate ports on the back of the monitor. You can have a different
video source device for each input.
3. Plug the DC power connector into the DC IN port on the back of the
monitor.
4. Plug the AC cord into the AC adapter, then plug the other end into a power
outlet.
7
POWER
Press the power button to turn the monitor ON. The LED indicates the power
state:
Blue - Power is ON
Orange - Standby mode
Off - No power to monitor
INPUT SELECTION
1. Press the AUTO button to display the list of inputs.
2. Press the UP or DOWN buttons to move the red highlight to the desired
input.
3. Press the MENU button to switch to the highlighted input.
ON-SCREEN DISPLAY (OSD) MENU
The built-in OSD menu system allows you to adjust the various settings
options on the monitor.
8
BASIC MENU OPERATION
MENU - The MENU button performs three basic functions, depending on the
context. If you press the MENU button with the OSD off, the OSD menu will
be displayed. If you press the MENU button again, without pressing any
other buttons, the OSD menu will close. Finally, if you press the MENU with
the OSD menu displayed AFTER moving the highlight with the UP and
DOWN buttons, the highlighted entry will be opened for editing.
UP - When the OSD menu is displayed, the pressing the UP button moves
the selection highlight up. If you press the UP button when the OSD menu is
off, it will activate the selected Hotkey function.
DOWN - When the OSD menu is displayed, the pressing the DOWN button
moves the selection highlight down. If you press the DOWN button when the
OSD menu is off, it will activate the selected Hotkey function.
VOL+ - When the OSD menu is displayed and an item has been opened for
editing, the VOL+ button increases the selected value. If the OSD menu is
off, pressing the VOL+ button increases the speaker volume.
VOL- - When the OSD menu is displayed and an item has been opened for
editing, the VOL- button decreases the selected value. If the OSD menu is
off, pressing the VOL- button decreases the speaker volume.
AUTO - If the OSD menu is displayed, pressing the AUTO button closes the
menu. If the OSD menu is off, pressing the AUTO button activates the INPUT
SELECTION menu.
9
BRIGHTNESS MENU
The BRIGHTNESS menu is the one at the top of the list. The following items
can be edited on this menu:
BRIGHTNESS - Controls the monitor's overall brightness level.
CONTRAST - Controls the monitor's contrast level.
ECO - Allows direct selection of the preset display modes. The four presets
are: Standard, Text, Movie, and Game.
DCR - Allows direct control over the use of Dynamic Contrast Ratio (DCR).
You can set it ON or OFF.
10
IMAGE MENU
The IMAGE menu is the second menu in the list. The following items can
be edited on this menu:
H.POSITION - Allows adjustment of the horizontal position of the image on
the screen.
V.POSITION - Allows adjustment of the vertical position of the image on the
screen.
CLOCK - (VGA only) Allows adjustment of the monitor's CLOCK frequency.
On a grey test screen, an incorrect CLOCK setting will manifest itself as large
vertical lines and the display may have an incorrect width. The CLOCK should
be corrected before attempting to correct the PHASE. This control only affects
the analog VGA display.
PHASE - (VGA only) Allows adjustment of the monitor's PHASE setting. On
a grey test screen, an incorrect PHASE setting will manifest itself as a series
of horizontal lines. The CLOCK should be corrected before attempting to
correct the PHASE. This control only affects the analog VGA display.
ASPECT - Allows you to set the aspect ratio. The two options are WIDE and 4:3.
11
COLOR TEMP MENU
The COLOR TEMP menu is the third menu in the list. The following items
can be edited on this menu:
COLOR TEMP - Allows selection of one of three preset color temperature
settings, plus the user setting. The four options are: Warm, Normal, Cool,
and User.
RED - Adjusts the amount of red in the display. This option is only available
when the Color Temp option is set to User.
GREEN - Adjusts the amount of green in the display. This option is only
available when the Color Temp option is set to User.
BLUE - Adjusts the amount of blue in the display. This option is only available
when the Color Temp option is set to User.
12
OSD SETTING MENU
The OSD SETTING menu is the fourth in the list. The following items can be
edited on this menu:
LANGUAGE - Allows selection of the language to use in the OSD menus.
Available options are: English, Francais, Deutsch, Italiano, Espanol, and
Nederlands.
13
OSD H.POS - Allows control of the horizontal location of the OSD menu.
OSD V.POS - Allows control of the vertical location of the OSD menu.
OSD TIMER - Allows control of the OSD Timer, which is the amount of time
(in seconds) the OSD menu will stay on screen with no input to the buttons.
TRANSPARENCY - Sets the level of transparency for the OSD menu.
RESET MENU
The RESET menu is the fifth menu in the list. The following actions can be
performed on this menu:
IMAGE AUTO ADJUST - (VGA only) Allows the monitor to automatically set
the CLOCK and PHASE settings. In most cases the automatic setting will be
correct.
COLOR AUTO ADJUST - (VGA only) Allows the monitor to automatically set
the color temperature settings.
RESET - Resets all monitor settings to their factory default values.
14
MISC MENU
The MISC menu is the fifth and last menu in the list. The following items can
be edited on this menu:
HOTKEY TYPE - Allows you to select the functions of the two Hotkeys (UP
and DOWN buttons when the OSD menu is not displayed). The first item is
associated with the UP button and the second with the DOWN button. The
available options are:
ECO+DCR - ECO sets the UP button to cycle through the four preset display
modes, while DCR sets the DOWN button to toggle the Dynamic Contrast
Ratio (DCR).
BRI+CON - BRI sets the UP button to directly select the Brightness menu
option for editing. CON sets the DOWN button to directly select the Contrast
menu option for editing.
ASP+CON - ASP sets the UP button to toggle between the two Aspect Ratio
settings. CON sets the DOWN button to directly select the Contrast menu
option for editing.
15
SIGNAL SOURCE - Allows direct selection of the four input options: VGA,
DVI, HDMI, and DisplayPort.
AUDIO SELECT - Allows you to toggle between DIGITAL audio coming in
over the HDMI or DisplayPort inputs and ANALOG audio coming in through
the 3.5mm AUDIO INPUT jack.
VOLUME - Allows direct setting of the volume level.
TROUBLESHOOTING
Following are some common problems and possible solutions. If you cannot
solve a problem yourself, please contact Monoprice Technical Support for
assistance.
Q: The power LED is off.
A: Verify that the power adapter is plugged into the monitor. Verify that the
power cord is plugged into both the AC adapter and the power outlet. Verify
that the power outlet is live by plugging something else in, such as a lamp.
Q: The picture is weak or washed out.
A: Adjust the Brightness and/or Contrast.
Q: Image flashes or distorts.
A: Verify that there are no nearby sources of Radio Frequency or
Electromagnetic interference.
Q: The power LED is illuminated, but the display is blank.
A: Press a key on the keyboard to ensure the computer is not asleep. Verify
that the proper input is selected. Verify that the display cable is securely
attached to both the display and the video source. Replace the cable with the
same type to verify it is not faulty.
16
Q: Loss of a single color (red, green, or blue).
A: Replace the video cable. Connect to a different source to verify no
problems with the video card or source device.
Q: The VGA image is not centered or is the incorrect size.
A: Adjust the CLOCK and PHASE values on the IMAGE menu.
Q: The colors are not correct.
A: Adjust the color temperature or individual mix of Red, Green, and Blue
picture elements.
Q: There is horizontal and/or vertical interference on the display.
A: Adjust the CLOCK and PHASE settings or activate the
AUTO IMAGE ADJUST function.
17
SPECIFICATIONS
Display Type
IPS panel with LED backlight
Dimensions
27" (685mm)
Dot Pitch
0.2331 x 0.2331 mm
Maximum Resolution
2560 x 1440 @ 60Hz (WQXGA)
Brightness
440cd/m2
Viewing Angle
178o left/right, 178o up/down
Input Options
VGA, DVI-D Dual Link, DisplayPort v1.2, HDMI
Horizontal Frequency (HFR)
30KHz ~ 88.7KHz
Vertical Frequency (VFR)
60Hz ~ 75Hz
Pixel Clock Frequency
241.5MHz
PNP Standard
VESA DDC2BTM
Power Consumption
Operation: < 90W
Standby: < 1.5W
Monitor Input Power
DC 24 V 3.75A
AC Adapter Input Power
100 ~ 240 VAC, 50-60Hz
Operating Temperature
+32 ~ +122°F(0~+50℃)
Storage Temperature
-4 ~ +140°F(-20~+60℃)
Operating Humidity
10-85%, non-condensing
VESA Mount Size
100x100
Dimensions
29.1" x 7" x 20.1" (740 x 180 x 510 mm)
Weight
18.3 lbs. (8.3 Kg)
Certifications
FCC, CE
18
PRESET DISPLAY MODES
The following table lists the 15 preset display modes and frequencies.
STAND
RESOLUTION
HFR (KHz)
VFR (Hz)
DOS Mode
720x400
31.469
70
640x480
31.469
60
640x480
37.861
72
640x480
37.500
75
800x600
37.879
60
800x600
47.200
72
800x600
46.875
75
1024x768
48.363
60
1024x768
56.476
70
1024x768
56.476
75
1280x1024
63.981
60
1280x1024
79.976
75
VGA
SVGA
XGA
SXGA
WXGA+
1440x900
55.674
60
WSXGA
1680x1050
59.800
60
FULL HD/HDMI
1920x1080
67.500
60
WQXGA
2560x1440
67.500
60
19