1
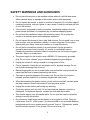
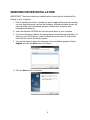
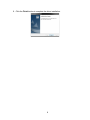
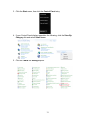
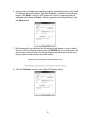
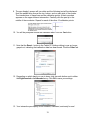
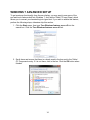
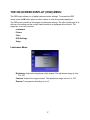
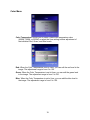
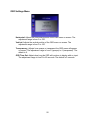
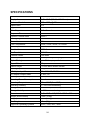
TABLE OF CONTENTS
SAFETY WARNINGS AND GUIDELINES ...................................................................... 3
PACKAGE CONTENTS .................................................................................................. 4
FEATURES ..................................................................................................................... 4
PEN CHARGING ............................................................................................................ 5
Checking Charge Status .............................................................................................. 5
Charging the Pen ......................................................................................................... 5
WINDOWS DRIVER INSTALLATION ............................................................................. 6
HARDWARE INSTALLATION ......................................................................................... 9
WINDOWS 7 BASIC SETUP ........................................................................................ 10
WINDOWS 7 ADVANCED SETUP ............................................................................... 14
CONTROLS .................................................................................................................. 16
THE ON-SCREEN DISPLAY (OSD) MENU .................................................................. 17
Luminance Menu ....................................................................................................... 17
Picture Menu ............................................................................................................. 18
Color Menu ................................................................................................................ 19
OSD Settings Menu ................................................................................................... 20
Setup Menu ............................................................................................................... 21
REPLACING THE PEN TIP .......................................................................................... 22
TECHNICAL SUPPORT................................................................................................ 22
TROUBLESHOOTING .................................................................................................. 23
SPECIFICATIONS ........................................................................................................ 24
2
SAFETY WARNINGS AND GUIDELINES
•
Do not place the monitor on an unstable surface where it could fall and cause
either personal injury or damage to the monitor and/or other equipment.
•
Do not expose the monitor to water or moisture of any kind. Do not place objects
containing moisture, such as a glass or vase, where it could tip over and spill into
or onto the monitor.
•
If the monitor is exposed to water or moisture, immediately unplug it from its
power source and allow it to completely dry out before reapplying power.
•
Do not block the ventilation holes in the monitor's casing. Do not place the
monitor in a confined space with inadequate ventilation.
•
Do not expose this device to fire or other heat sources. Do not install it on or near
heat sources, such as ventilators, radiators, or near a fireplace. Do not place
objects with open flame, such as lit candles, on or near this device.
•
Do not place or install this monitor in an area where it can be exposed to
excessive amounts of dust, humidity, oil, smoke, or combustible vapors.
Periodically check the ventilation holes to ensure they do not become clogged
with dust, debris, or nearby items.
•
The power supply for this monitor uses a NEMA 5-15 three prong, grounded
plug. Do not use a "cheater" plug or otherwise bypass the grounding pin.
•
Unplug the monitor if it will go unused for a long period of time.
•
Prior to operation, check the unit and power cord for physical damage. Do not
use if physical damage has occurred.
•
Before plugging the unit into a power outlet, ensure that the outlet provides the
same type and level of power required by the device.
•
Take care to prevent damage to the power cord. Do not allow it to become
crimped, pinched, walked on, or become tangled with other cords.
•
When disconnecting the power cord do not pull on the cord itself. Instead, grasp
the plug connector head to disconnect it from the power socket.
•
Unplug the monitor before performing any cleaning.
•
Clean only using a soft, dry cloth. Do not use chemical cleaners, solvents, or
detergents. For stubborn deposits, moisten the cloth with warm water.
•
This monitor has no user serviceable parts. Do not open the case or otherwise
attempt to modify this monitor.
•
Do not leave a single image on the display for a long period of time. Doing so
could cause "burn-in" of the image. It is recommended to use a variable desktop
background and to use a screen saver to prevent "burn-in". Alternatively, ensure
that the monitor is power off for at least 2 hours out of every 12.
3
PACKAGE CONTENTS
After receiving the product, please inventory the contents to ensure you have all the
proper parts, as listed below. If anything is missing or damaged, please contact
Monoprice Customer Service for a replacement.
1x 22" IPS interactive pen display
1x Angle adjustment bracket
4x Bracket mounting screws
1x DVI cable
1x USB cable
1x AC power adapter
1x AC power cord
1x Pen stylus
1x Pen charger
1x Pen tip removal tool
3x Spare pen tips
1x CD-ROM containing drivers
1x User's manual
FEATURES
•
22-inch class LED backlit IPS capacitive panel with extended viewing angles
(170° horizontal, 160° vertical)
•
Capacitive panel with pen stylus input
•
1920 x 1080p native resolution
•
Windows 8.1 compatible
•
Three fixed color temperature settings (6500K, 7500K, 9300K)
•
Screen protector preinstalled at the factory
•
Rechargeable pen stylus
•
VESA mount compatible (75 x 75)
•
Angle adjustable stand, from 10-85° from horizontal
4
PEN CHARGING
This display includes a rechargeable pen stylus for pen input. The pen stylus must be
charged before use. Carefully remove the pen stylus and the pen charger from the
plastic packaging.
Checking Charge Status
1. Tap the tip on a desk or other surface to turn the pen on.
2. Observe the charge LED inside the button. If it is Blue, the pen has a usable
charge. If it is red or does not illuminate at all, the pen needs charging.
Charging the Pen
1. Locate the direction arrow indicators on the pen charger. The arrows indicate the
direction to insert the pen.
2. Insert the pen into the opening at the end of the pen charger in the indicated
insertion direction. Align the pen's pocket clip with the key slot and insert until the
pocket clip fits into the key. The yellow band on the pen will be at the edge of the
pen charger.
3. Remove the cap from the USB plug and plug the pen charger into an available
USB power source, such as a computer port, wall charger, etc.
4. When it is plugged into a valid USB power source, the indicator in the pen
charger will glow red.
5. While it is being charged, the charge indicator in the pen will glow red. When
charging is complete, the pen's charge indicator will turn off.
5
WINDOWS DRIVER INSTALLATION
IMPORTANT: The drivers should be installed before connecting the Interactive Pen
Display to your computer!
1. Prior to installing the driver, uninstall any pen or tablet software and drivers that
you may have previously used on this computer. Multiple pen/tablet drivers will
cause a conflict and unexpected operation. Reboot your computer after
uninstalling the driver(s).
2. Insert the included CD-ROM disc into the optical drive on your computer.
3. If you have Autostart enabled, the setup program should start automatically. If it
does not, open File Explorer, locate the Setup.exe file on the CD, and double
click the file to launch the setup program.
4. You are first asked to select the language for the installation program. Select
English and click the Next button to continue.
5. Click the Next button to continue.
6
6. If you want to install to a directory other than the default, click the Change button
and locate the desired installation directory. Otherwise, click the Next button to
continue.
7. Click the Install button to begin the driver installation.
8. The progress bar usually moves slowly at first, then speeds up towards the end
of the installation.
7
9. Click the Finish button to complete the driver installation.
8
HARDWARE INSTALLATION
This installation process assumes you will be using the included angle adjustment
bracket. If you will be mounting the monitor to a wall or desk bracket, follow the
instructions that came with your bracket, replacing steps 3-4 below. This monitor
features a 75x75 VESA mounting pattern.
1. Place a towel or blanket on a flat surface, such as a table or the floor.
2. Place the monitor face down on the towel or blanket with the top of the monitor
closest to you.
3. Pull the silver lever at the top of the angle adjustment bracket to unlock the
bracket's position locking mechanism. Open the bracket so you have access to
the screw holes.
4. Place the bracket over the screw holes on the back of the monitor. Insert the four
screws and tighten them using a #2 Philips screwdriver (not included). Note that
you will likely need to readjust how much the bracket is opened to access all the
screws.
5. While the monitor is still on its face, plug one end of the included DVI cable into
the DVI port on the monitor. Alternatively, plug a High Speed HDMI cable (not
included) into the HDMI port or plug a VGA cable (not included) into the VGA
port.
6. Plug one end of the included USB cable into the USB port on the monitor.
7. Plug the DC connector on the AC adapter into the DC12V port on the monitor.
8. Position the monitor on your desk where desired. Pull the silver lever at the top of
the angle adjustment bracket and adjust to a comfortable viewing angle. Release
the lever to lock the angle into place.
9. Ensure your computer is powered off before connecting the monitor. Power it
down if necessary.
10. Plug the loose end of the DVI cable into the DVI port on your computer.
Alternatively, plug the loose end of the HDMI cable into the HDMI port or plug the
loose end of the VGA cable into the VGA port on your computer.
11. Plug the loose end of the USB into an available USB port on your computer.
12. Plug the included AC power cord into the AC adapter, then plug the other end
into a nearby AC power outlet.
13. Turn on your computer and let it boot into the operating system.
14. If you are using Windows 8, you can begin using the monitor right away. If you
are using Windows 7, you will need to perform at least the Basic Setup, if not
also the Advanced Setup, as documented in the following sections.
9
WINDOWS 7 BASIC SETUP
1. If this is part of a multi-monitor setup, right-click on the desktop to access the
menu. Select the Screen Resolution entry. If not, skip ahead to step 3.
2. Using the following dialog, drag the monitors to the relative positions you desire.
Note that if you want to use the Windows Tablet Input Panel, which allows you to
use the pen stylus instead of typing, you must make the Interactive Pen Display
the Main Display. If this is the case, click the check box to the left of Make this
my main display. Click the OK button when you have it the way you want.
10
3. Click the Start menu, then click the Control Panel entry.
4. If your Control Panel display resembles the following, click the View By:
Category link and select Small Icons
5. Click the Tablet PC Settings option.
11
6. If the monitor is installed and operating properly, the details section of the Tablet
PC Settings dialog will indicate "Pen Input Available", as shown in the following
image. If the Reset... button is NOT grayed out, click it to clear any previous
calibration data. Once the Reset... button is grayed out (as shown below), click
the Setup button.
7. Both screens will turn white and the following text will appear on one of them. If
the text is NOT on the pen display, press the ENTER key to move the text to the
other screen. Once the text is on the pen display, tap the screen with the tip of
the pen stylus to clear the text and white screen.
8. Click the Calibrate... button in the Tablet PC Settings dialog.
12
9. The pen display's screen will turn white and the following text will be displayed.
Note the parallel blue lines at the top, bottom, and on each side of the screen.
The intersections of these lines are the calibration points. A black crosshair
appears on the upper leftmost intersection. Carefully click the pen tip in the
middle of the crosshairs. Repeat for each of the other 15 calibration points.
10. You will be prompted to save the calibration data. Click the Yes button.
11. Note that the Reset... button in the Tablet PC Settings dialog is now no longer
grayed out, indicating that calibration data has been saved. Click the Other tab.
12. Depending on which hand you use to draw, click the radio button next to either
the Right-handed or Left-handed entry. Click OK to save your settings.
13. Your interactive pen display is now installed, calibrated, and ready for use!
13
WINDOWS 7 ADVANCED SETUP
To get maximum functionality from the pen display, you may want to use some of the
pen and touch features built into Windows 7, such as the Tablet PC Input Panel, which
allows you to convert your handwriting into typed text. If you wish to enable this feature,
perform the following steps, otherwise skip this section.
1. Click the Start menu, then type Turn Windows features on or off into the
search box. Click the Turn Windows features on or off link.
2. Scroll down and ensure that there is a check mark in the box next to the Tablet
PC Components entry. If it is not there, click in the box. Click the OK button when
finished.
14
3. Wait for the changes to complete.
4. You may be prompted to restart your computer. If so, close all open programs,
then click the Restart Now button.
5. Once your computer has restarted, click the Start menu, then click the Control
Panel entry.
6. Click the Pen and Touch option.
15
7. Use this dialog to control the behavior of various pen features, such as how
quickly you have to double-tap to register a double-click action and how long you
have to hold the pen on the display to register a right-click action. Click the OK
button when you are finished.
CONTROLS
The monitor's controls are on the lower right corner of the display bezel. The five
buttons have the following functions:
A: When using the VGA input, pressing the A button automatically adjusts the
display to the optimal settings. When in any menu, pressing the A button selects
the currently highlighted entry for editing or sets the currently highlighted value.
-: Pressing the - button displays the Input Selection menu. When in any menu,
pressing the - button scrolls the highlight down or decreases the currently
selected value.
+: Pressing the + button displays the Brightness control. When in any menu
(including the Brightness control), pressing the + button moves the highlight up
one position or increases the currently selected value.
M: Pressing the M button displays the OSD menu. When in any menu, pressing the
M button backs up to the previous menu or closes the menu, if already at the first
page.
: Pressing the
button turns the monitor on and off.
16
THE ON-SCREEN DISPLAY (OSD) MENU
The OSD menu allows you to adjust various monitor settings. To access the OSD
menu, press the M button when no other menus or controls are being displayed.
The OSD menu consists of five pages of preference settings. The title of each page is at
the top of the dialog and the current video resolution is displayed at the bottom. The
pages are, from top to bottom:
Luminance
Picture
Color
OSD Settings
Setup
Luminance Menu
Brightness: Adjusts the brightness of the display. The adjustment range is from
0 to 100.
Contrast: Adjusts the image contrast. The adjustment range is from 0 to 100.
Gamma: Turns gamma decoding on or off.
17
Picture Menu
Note that the Picture Menu is only available when using a VGA input.
Clock: Allows adjustment of the monitor's Clock frequency. On a grey test
screen, an incorrect Clock setting will manifest itself as large vertical lines and
the display may have an incorrect width. The Clock should be corrected
before attempting to correct the Phase.
Phase: Allows adjustment of the monitor's Phase setting. On a grey test screen,
an incorrect Phase setting will manifest itself as a series of horizontal lines.
The Clock should be corrected before attempting to correct the Phase.
H.Position: Allows adjustment of the horizontal position of the image on the
screen.
V.Position: Allows adjustment of the vertical position of the image on the screen.
18
Color Menu
Color Temperature: Allows you to select a fixed color temperature value
(6500K, 7500K, or 9300K) or select the User setting to allow adjustment of
the individual Red, Green, and Blue levels.
Red: When the Color Temperature is set to User, you can edit the red level in the
image. The adjustment range is from 0 to 100.
Green: When the Color Temperature is set to User, you can edit the green level
in the image. The adjustment range is from 0 to 100.
Blue: When the Color Temperature is set to User, you can edit the blue level in
the image. The adjustment range is from 0 to 100.
19
OSD Settings Menu
Horizontal: Adjusts the horizontal position of the OSD menu on screen. The
adjustment range is from 0 to 100.
Vertical: Adjusts the vertical position of the OSD menu on screen. The
adjustment range is from 0 to 100.
Transparency: Adjusts how opaque or transparent the OSD menu will appear
on screen. The adjustment range is from 0 (opaque) to 4 (transparent). The
default is 0.
OSD Time Out: Adjusts how long the OSD will continue to display with no input.
The adjustment range is from 5 to 60 seconds. The default is 5 seconds.
20
Setup Menu
Language: Allows selection of the language to use in the OSD menu. The
available options are English, Spanish, French, German, Italian, Portuguese,
Korean, and Chinese. The default is English.
Input: Allows selection of which video input to use, VGA, DVI, or HDMI.
Reset: Resets the monitor to its default settings.
Display Size: Allows you to set the Aspect Ratio. The available options are Full
Screen and 4:3. The default is Full Screen.
21
REPLACING THE PEN TIP
This monitor includes three replacement pen tips and a pen tip removal tool. To replace
the pen tip, perform the following steps:
1. Position the pen tip removal tool over the pen tip, with the tip positioned in the
notch on one side of the opening.
2. Squeeze the pen tip removal tool to firmly grasp the pen tip.
3. While still squeezing, carefully pull the tip out of the pen body.
4. Insert the replacement tip into the pen body.
5. Put pressure on the tip to seat it in place.
TECHNICAL SUPPORT
Monoprice is pleased to provide free, live, online technical support to assist you with
any questions you may have about installation, setup, troubleshooting, or product
recommendations. If you ever need assistance with your new product, please come
online to talk to one of our friendly and knowledgeable Tech Support Associates.
Technical support is available through the online chat button on our website
(www.monoprice.com) during regular business hours, 7 days a week. You can also
get assistance through email by sending a message to [email protected]
22
TROUBLESHOOTING
Problem: There is no picture on the screen and none of the LEDs are illuminated.
Solutions:
1. Verify that the AC adapter is properly plugged into the monitor and an AC power
source.
2. Verify that the AC power source is live by plugging a different device into it.
Problem: The power LED is illuminated, but there is no picture on the screen.
Solutions:
1. Verify that you have the correct video input selected.
2. Verify that the video cable is securely connected to both the monitor and the
video source.
3. Try using a different video cable.
4. Try using a different video source.
Problem: The video is lower quality than 1920x1080p.
Solutions:
1. Check the native resolution of your primary display.
2. Check the resolution settings in Control Panel to ensure that it is set to
1920x1080.
Problem: The pen is not charging.
Solutions:
1. Ensure that the pen is properly seated in the pen charger. The pen clip should
align with and insert into the key slot on the charger, resulting in the yellow band
around the pen being at the edge of the charger.
2. Ensure that the pen charger is plugged into an active, powered USB port (when
plugged into a live source, the LED inside the charger will glow red).
23
SPECIFICATIONS
Panel Size
Display Area
Maximum Resolution
Aspect Ratio
Brightness
Color Support
Response Time
Dynamic Contrast Ratio
Viewing Angles
Transmittance
Color Temperature
Video Inputs
Pen Interface
Pen Resolution
Pressure Levels
Accuracy
Stylus Tilt Angle
Report Rate
Sensor Height
Tracking Speed
AC Adapter Input Power
AC Adapter Output Power
Standby Power Consumption
Operating Power Consumption
Operating Temperature
Operating Humidity
Storage Temperature
Storage Humidity
Dimensions
Weight (without stand)
Weight (with stand)
Pen Weight
Supported Operating Systems
21.5 inches
18.8" x 10.6" (476.64 x 268.11 mm)
1920 x 1080p @ 60Hz
16:9
250 cd/m²
16.7 million colors
5ms
50000:1
170° Horizontal, 160° Vertical
85%
6500K, 7500K, 9300K, or Custom
DVI, HDMI, VGA
USB 2.0
2048 LPI
1024 levels
0.5mm (Center), 2mm (Edge)
up to 45° from perpendicular
200 rps
5-15 mm above screen surface
133 pps
100 ~ 240 VAC, 50/60 Hz
12 VDC, 3A
less than 1 watt
36 watts
+32 ~ +104°F (0 ~ +40°C)
10 ~ 90% non-condensing
-4 ~ +140°F (-20 ~ +60°C)
5 ~ 95% non-condensing
20.4" x 12.7" x 1.5" (517.8 x 323.8 x 38.3 mm)
8.4 lbs. (3.8kg)
9.5 lbs. (4.3kg)
0.7 oz. (20g)
WinXP, Vista, Win7, Win8
24